
How to change your user account name
The user account name on a Windows device shows the name of the signed-in Microsoft account or work/school account.
To change which user is signed in, select the Start button on the taskbar. Then select the account name icon or picture to see a list of users you can switch to. Select another user to switch.
To edit the account name shown, select the account type:
Need more help?
Want more options?
Explore subscription benefits, browse training courses, learn how to secure your device, and more.
-
Home
-
Partition Magic
- 4 Ways to Quickly Change User Account Name on Windows 10
By Irene |
Last Updated
Your user account name appears in the Sign-in screen on your Windows PC. And sometimes you may want to change it. If you don’t know how to change user name Windows 10, this post from MiniTool is all you need.
There are many reasons that you may need to change user name on Windows 10. For example, you use a wrong name when creating the user account, and now you want to correct it with your real name.
Well, how to change user name Windows 10? Here are 4 ways with detailed steps and screenshots. Let’s have a look one by one.
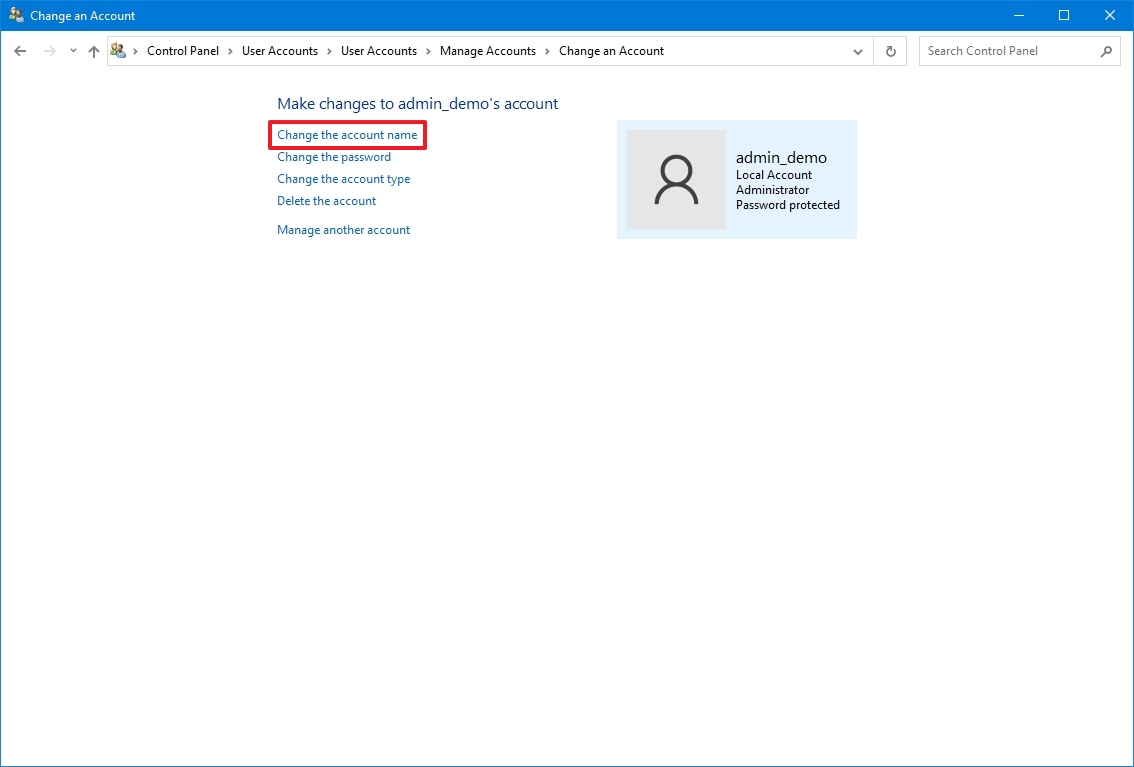
Way 1. Change User Name Windows 10 via Control Panel
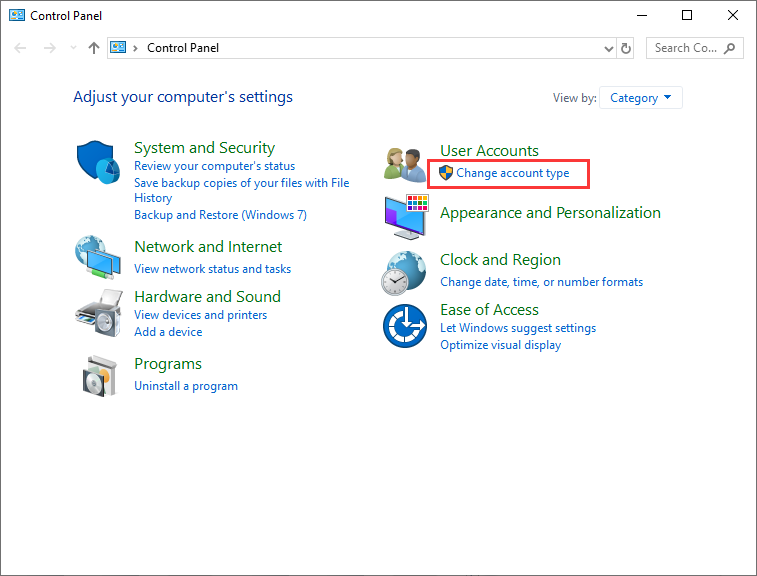
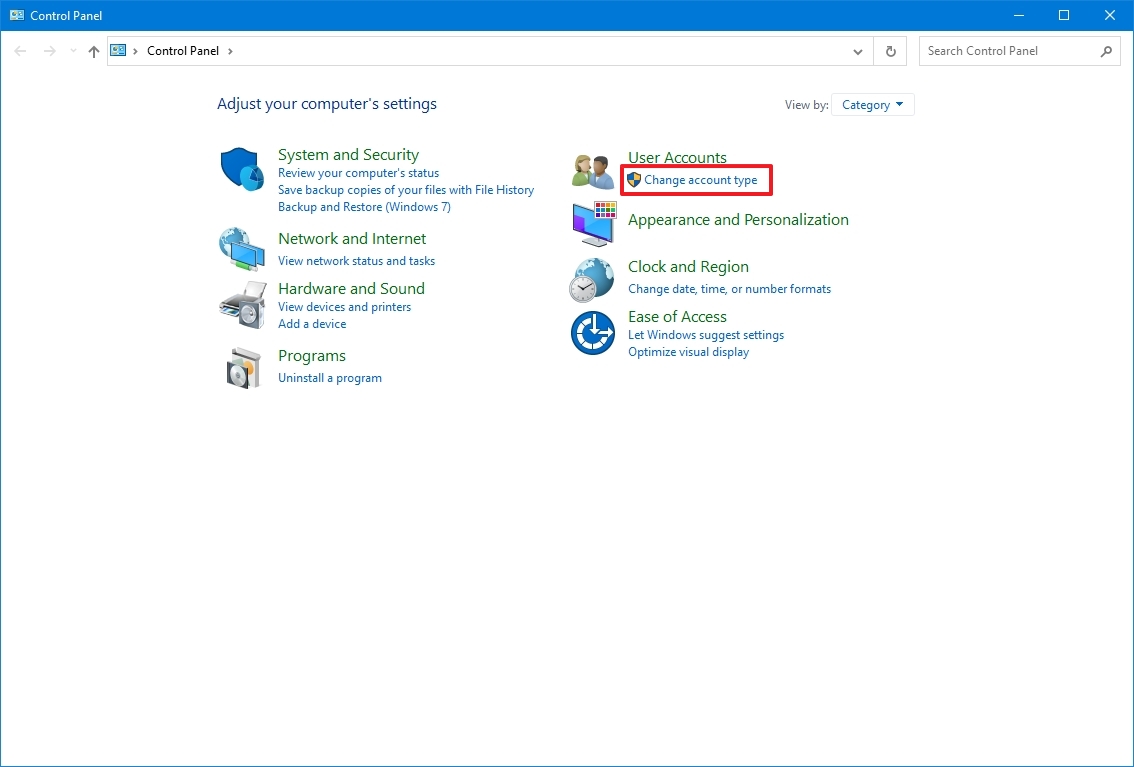
Step 1. Type control panel in the Windows 10 Cortana search box and then click the best match to open it. Alternatively, you can press Win + R keys to bring up the Run box. Type control and hit Enter to open the Control panel.
Step 2. Under the User Accounts, choose Change account type directly when the Control Panel is in Category view.
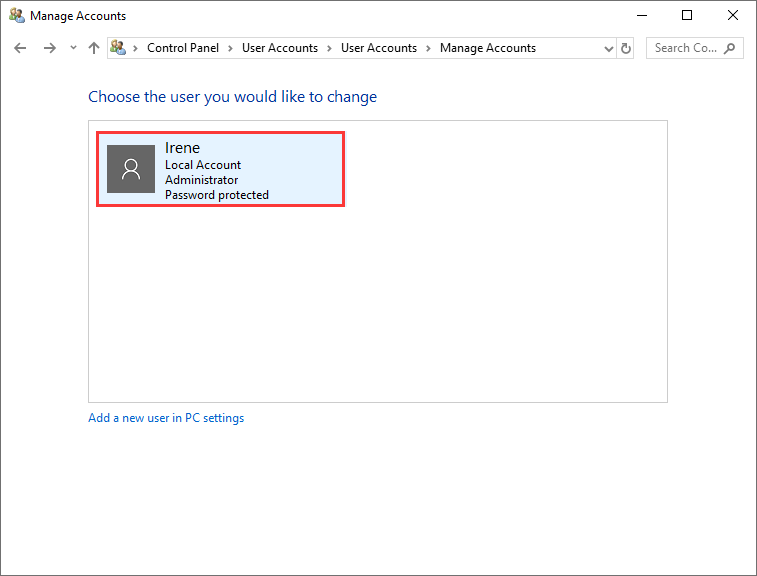
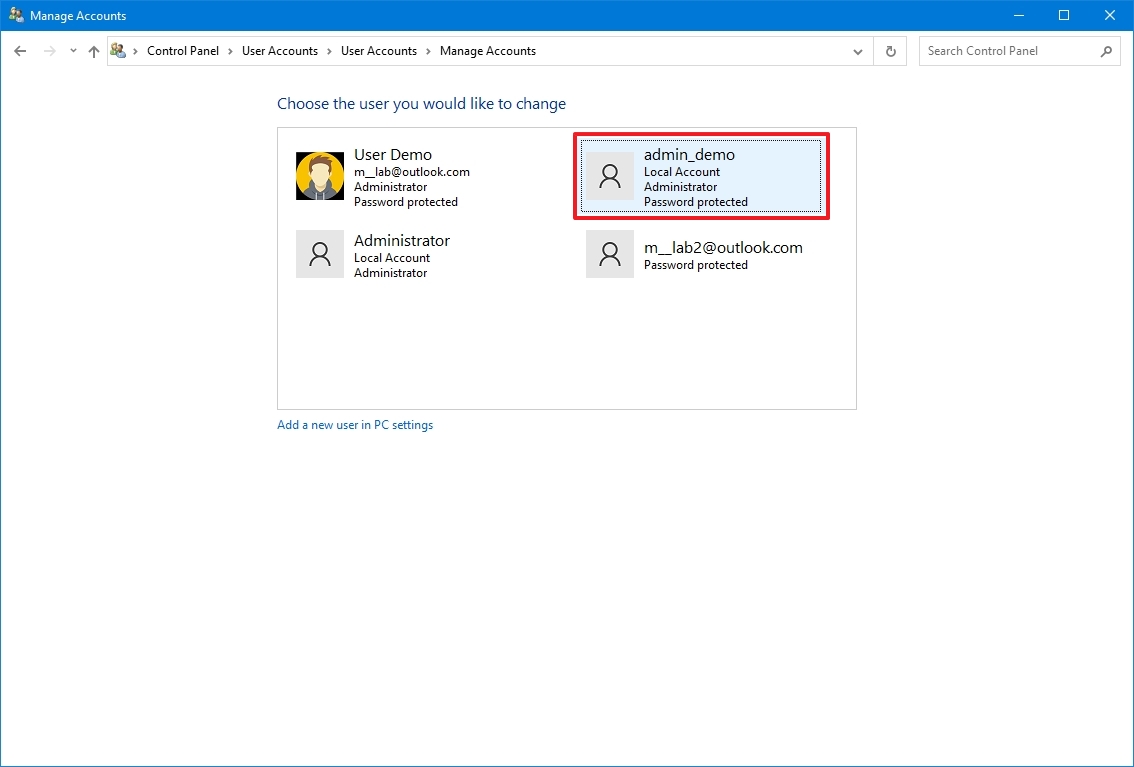
Step 3. Click on the account that you would like to change the user name.
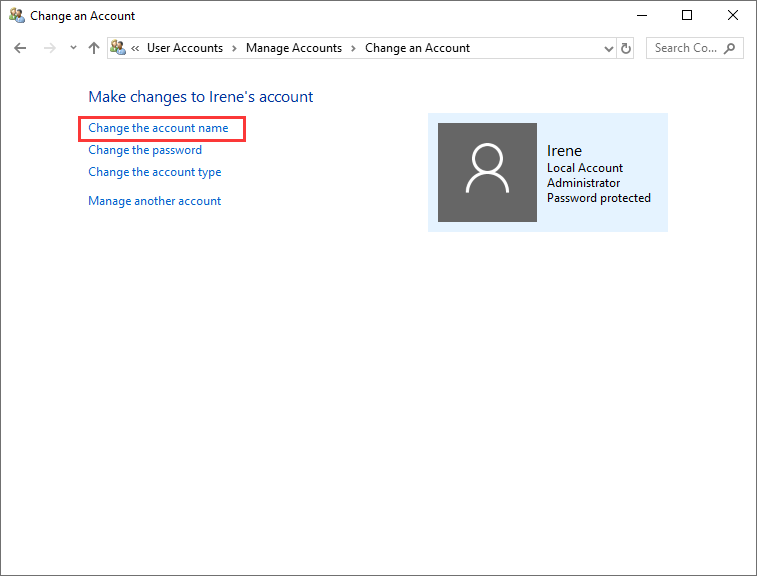
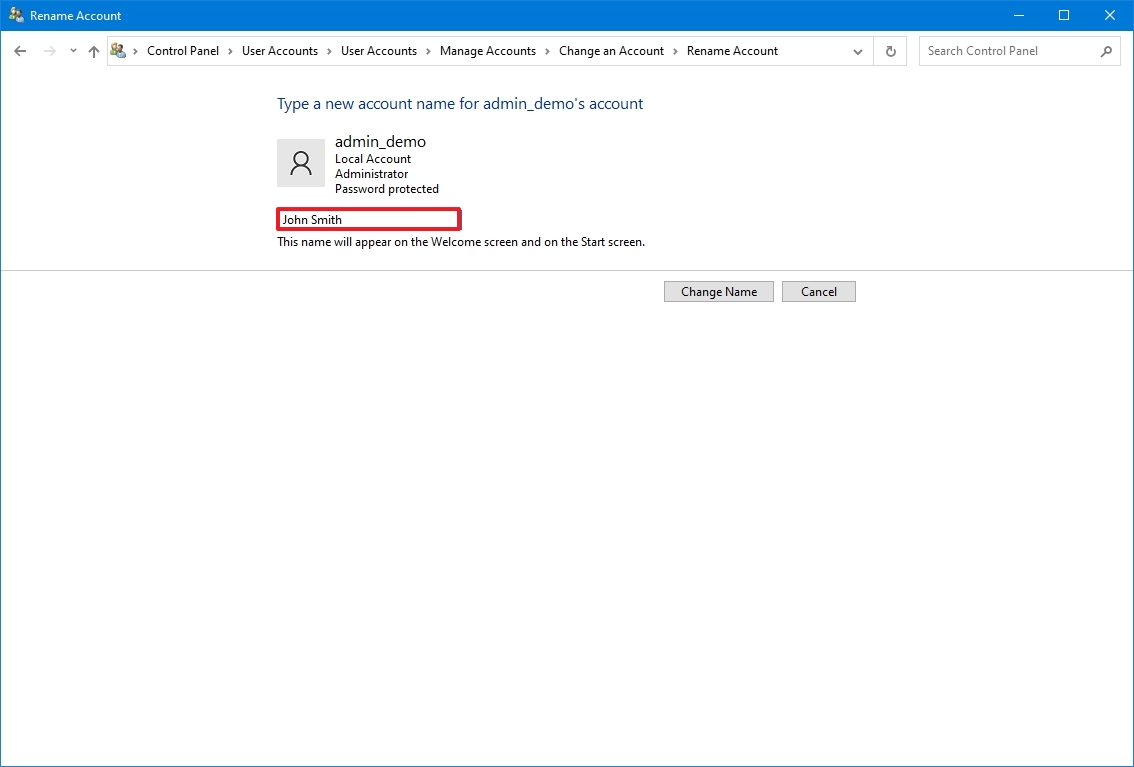
Step 4. Then select Change the account name from the left panel.
Step 5. Type the new name into the target box, and then click Change Name to make instant change. Then this name will appear on the Welcome screen and on the Start screen.
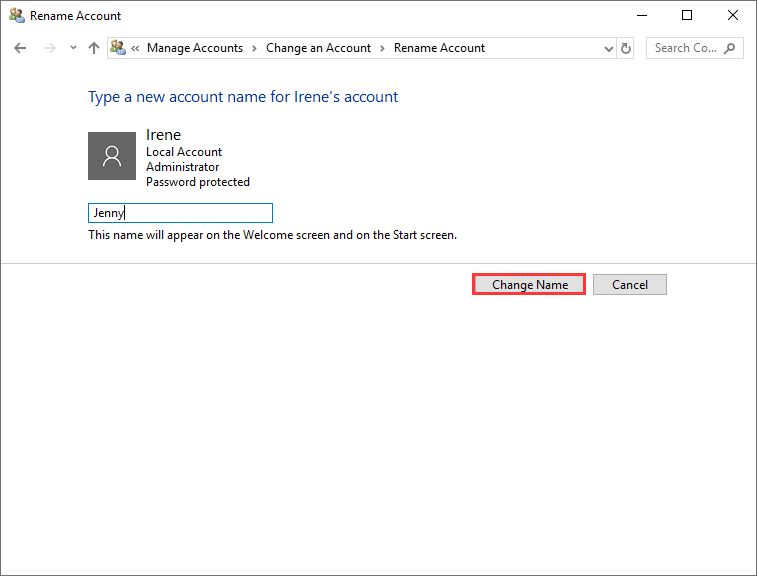
So next time when you log in your account, you’ll then see your account with the new name.
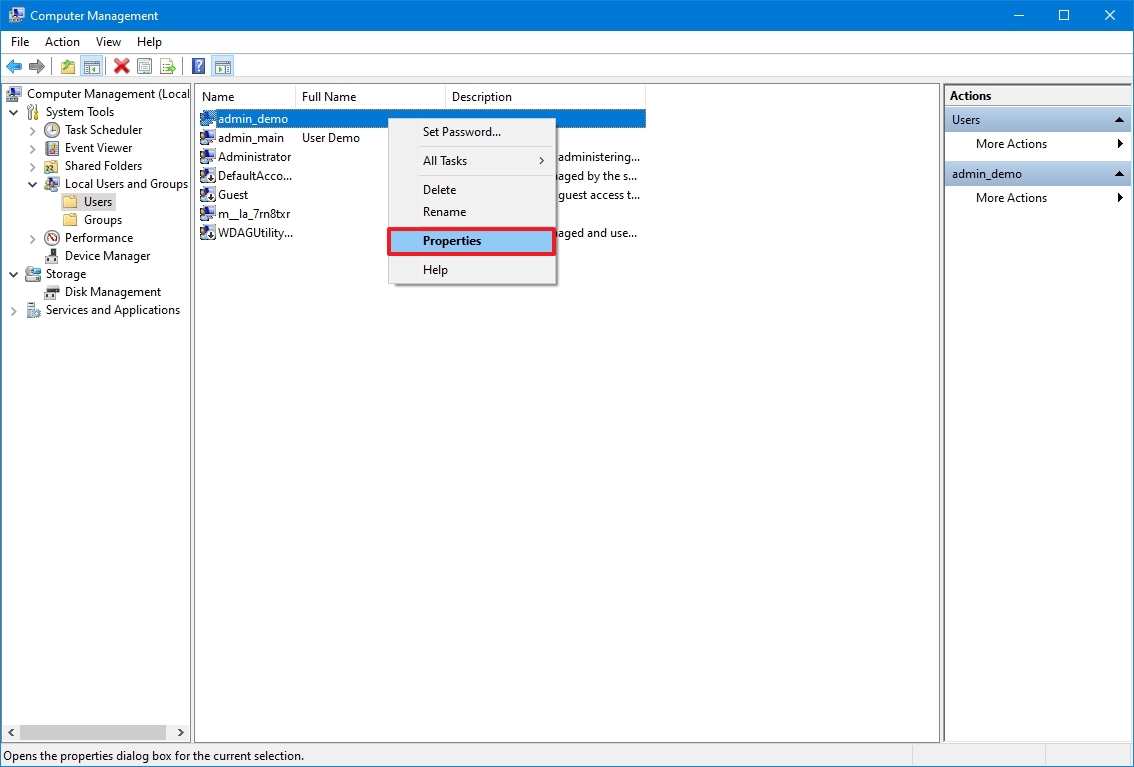
Way 2. Change User Name Windows 10 via Local Users and Groups
Step 1. Press Win + R keys on the keyboard to open the Run dialog box (you can also right click Windows 10 Start menu and choose Run from the menu get the Run box), and then input lusrmgr.msc and hit Enter to open Local Users and Groups.
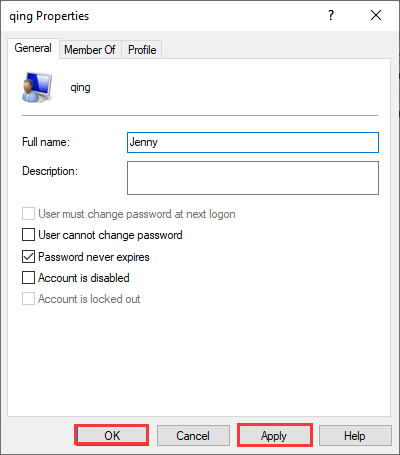
Step 2. Click on the Users folder from the left panel, and then double-click the user account you would like to rename.
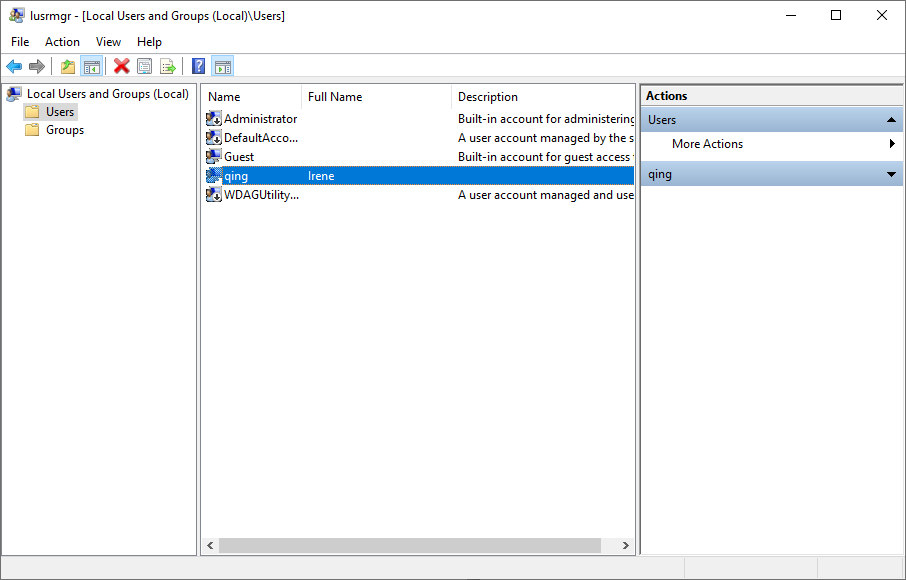
Step 3. On the pop-up window, type a new name in the full name box. Then click Apply and OK to save the change.
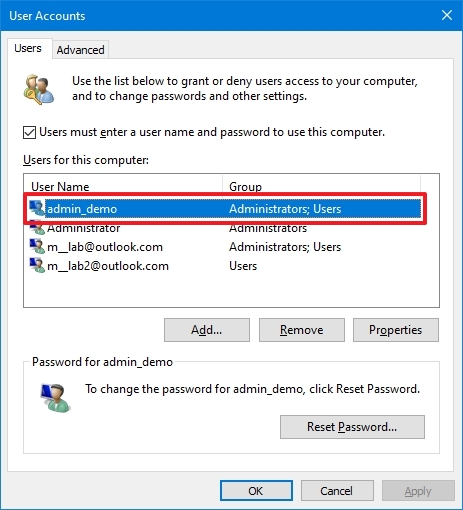
Way 3. Change Users Name Windows 10 via Netplwiz
You can use the user account settings netplwiz to change user account name in a simple way. Here are detailed steps.
Step 1. Input netplwiz in the Windows 10 Cortana search box and click the best match to open the tool.
Step 2. Choose the account that you want to change. Then click the Properties button.

Step 3. In Full Name field, input your new user name. Then click Apply and OK to save it.
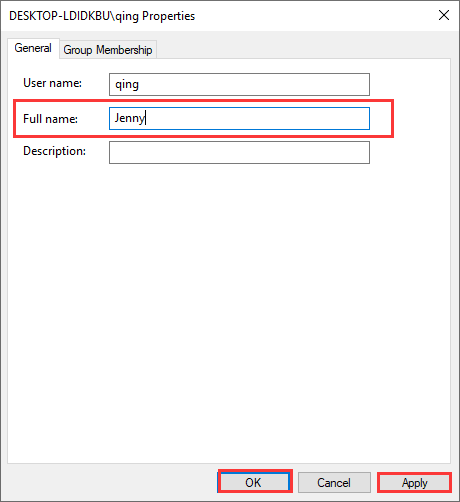
Then the newly updated name you specified in the Full Name field will be shown in the Windows 10 Sign-in and sign-out screen.
Way 4. Change User Name Windows 10 via Setting
If you log in your Windows 10 computer with a Microsoft account, you can change user account name Windows 10 via Settings. Follow the steps below to change user name windows 10 now.
Step 1. Right click Windows start menu and choose Settings from the pop-up window. Alternatively, you can press Win + X keys on the keyboard and then select Settings from the quick-access menu.
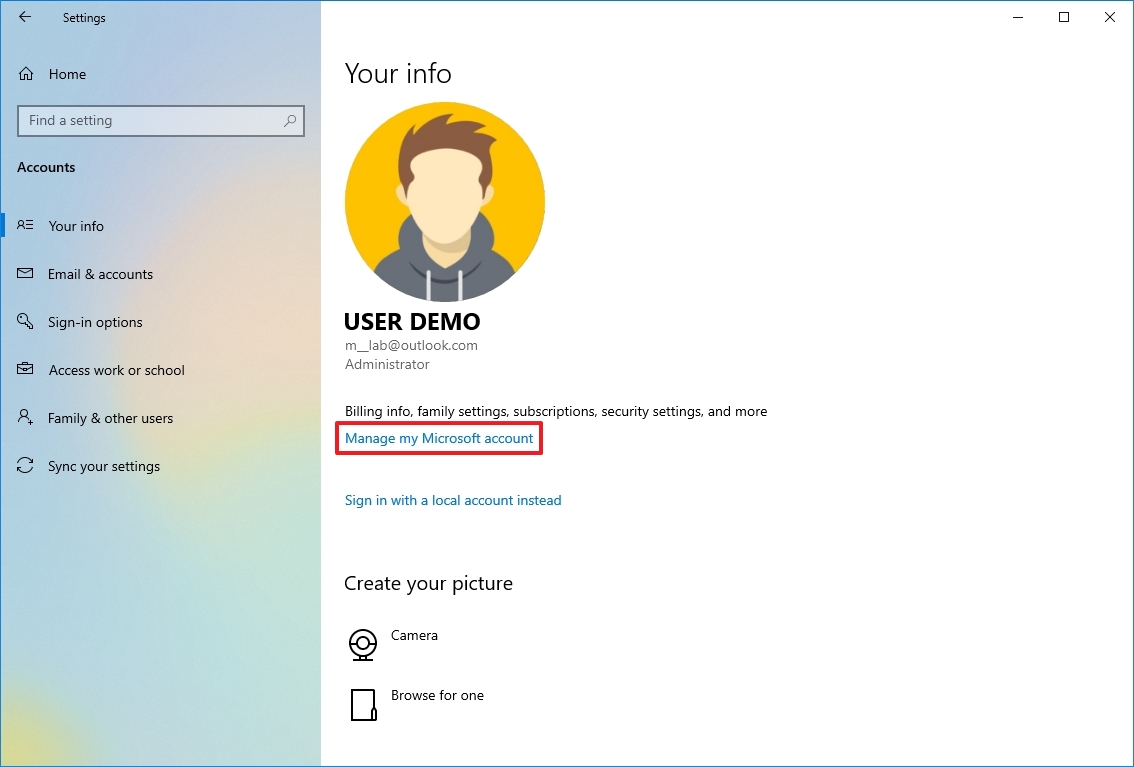
Step 2. Click Accounts from the Windows Settings window.

Step 3. Click Manage my Microsoft account.
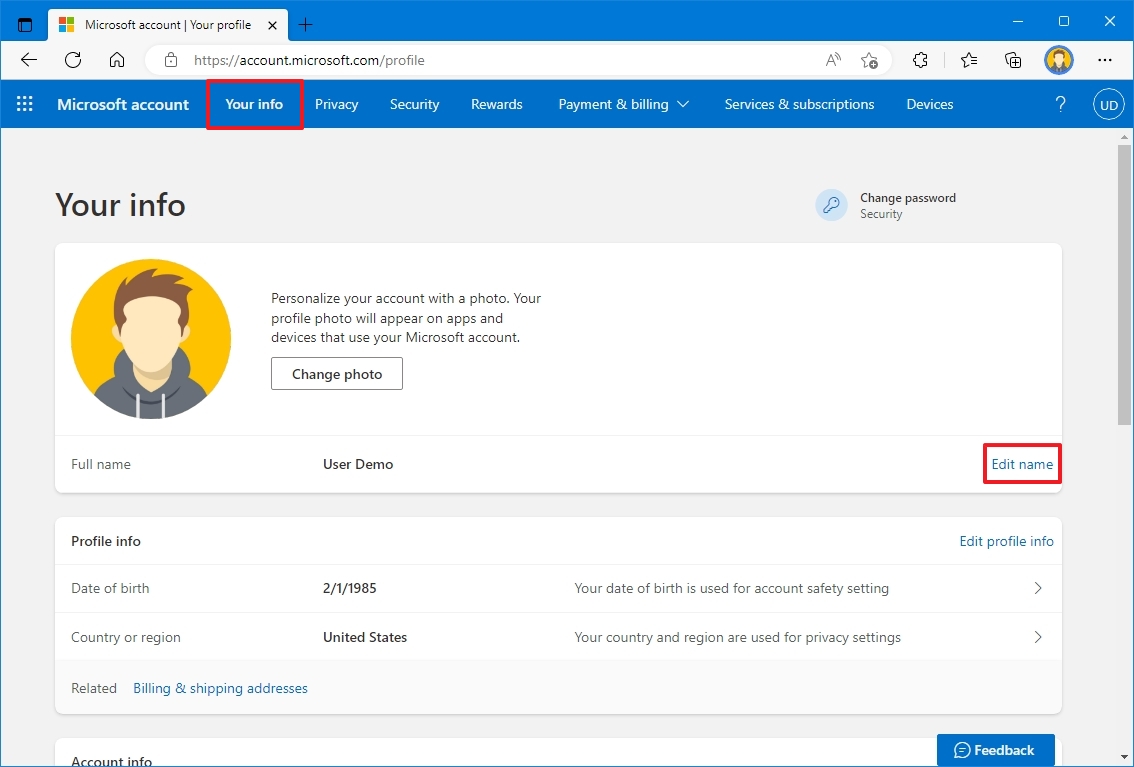
Step 4. Click the drop-down menu of More options under your Microsoft account. Then click Edit Profile.
Step 5. Find and click Edit name.
Step 6. Enter the new name into the box and save it.
After finishing the above steps, the account name of your Microsoft account will be changed.
Have you learned how to change user name Windows 10? If this post helps you, you might as well share it with your friends who need to change user name Windows 10. If you have any question about the methods shown in this post, you can leave a comment in the comment zone below.
About The Author
Position: Columnist
Irene joined MiniTool in 2018 and has since become a professional in the areas of disk management and Windows tricks. Irene’s expertise allows her to assist clients with managing their hard drives, optimizing their Windows operating system, and troubleshooting any technical issues that arise.
Если текущее имя пользователя Windows, отображаемое при входе или в меню Пуск вам не по душе, его сравнительно легко можно изменить как для локальной учетной записи, так и для локальной учетной записи Майкрософт. Если вы также хотите поменять имя папки пользователя — здесь сложнее, но и эту тему мы также затронем.
В этой пошаговой инструкции подробно о том, как переименовать пользователя Windows 11 или Windows 10 с локальной учетной записью или учетной записью Майкрософт, а также кратко об изменении имени папки пользователя.
Как переименовать локального пользователя
Если требуется переименование локальной учетной записи пользователя, сделать это можно одним из следующих способов.
Управление учетными записями пользователей
Первый вариант — использование утилиты управления учетными записями пользователей, порядок действий будет следующим:
- Нажмите правой кнопкой мыши по кнопке «Пуск», выберите пункт «Выполнить» (или нажмите клавиши Win+R на клавиатуре), введите
netplwiz
или
control userpasswords2
и нажмите Enter.
- В открывшемся окне выберите нужного пользователя и нажмите кнопку «Свойства».

- Задайте новое имя пользователя и нажмите «Ок», затем — «Ок» в окне управления учетными записями.
- Выйдите из системы и снова зайдите — имя вашего пользователя будет изменено.


Учитывайте, что несмотря на то, что имя пользователя изменится, название его папки останется прежним.
Локальные пользователи и группы
Второй способ подойдет только для Pro (Профессиональная) и Enterprise (Корпоративная) версий Windows 11/10. Необходимые шаги:
- Нажмите клавиши Win+R на клавиатуре, введите
lusrmgr.msc
и нажмите Enter.
- В окне «Локальные пользователи и группы» перейдите в раздел «Пользователи», нажмите правой кнопкой мыши по имени пользователя, которое нужно изменить и выберите пункт «Переименовать».

- Укажите новое имя пользователя, закройте окно, выйдите из системы и снова зайдите.

Командная строка
Ещё одна возможность — изменение имени пользователя в командной строке Windows:
- Запустите командную строку от имени администратора.
- Введите команду
wmic useraccount where name='старое_имя' rename новое_имя
и нажмите Enter.

- Закройте командную строку, выйдите из системы и вновь зайдите, уже под новым именем.

Изменение имени пользователя для учетной записи Майкрософт
Если вы используете учетную запись Майкрософт, изменение имени выполняется на соответствующем сайте:
- Зайдите на страницу вашей учетной записи Майкрософт https://account.microsoft.com/ с вашими учетными данными.
- Нажмите по вашему имени или перейдите на вкладку «Сведения».

- Нажмите «Изменить имя» и укажите новые имя и фамилию (необязательно).


После применения сделанных настроек они, через некоторое время (не сразу и, возможно, после перезагрузки) будут синхронизированы с вашим устройством, и вы увидите, что имя пользователя в Windows также изменилось.
Изменение имени папки пользователя
Изменить имя папки пользователя, если оно вам не нравится, в принципе, возможно, но часто приводит к неожиданным результатам: от неработоспособности некоторых программ, для которых были прописаны абсолютные пути, до невозможности зайти в Windows из-за ошибок профиля пользователя.
Простой и безопасный способ
Если вам нужен простой и безопасный способ, рекомендую использовать следующий подход:
- Создайте новую локальную учетную запись с нужным именем (рекомендую использовать латиницу), для нее будет создана папка с тем же именем, сделайте нового пользователя администратором. Подробно о том, как это сделать в статьях: Как создать пользователя Windows 11, Как создать пользователя Windows 10.
- Зайдите под вновь созданным пользователем, и, если нужно, прикрепите учетную запись Майкрософт (это можно сделать в Параметрах).
- Убедившись, что всё работает как нужно и перенеся все данные из старого профиля (например, хранящиеся в папках Документы, Изображения, Рабочий стол), удалите старого пользователя и работайте с новой учетной записью и новым именем папки.
Рискованный метод
Способ переименования папки текущего пользователя без создания нового выглядит иначе (и, ещё раз предупреждаю, небезопасный):
- Выйдите из текущей учетной записи и зайдите в систему с другой учетной записью Администратора (не с той, для которой мы изменяем имя папки), можно включить скрытую учетную запись Администратор.
- При желании измените имя пользователя, для которого меняется имя папки одним из способов, описанным ранее.
- Перейдите в папку C:\Пользователи (C:\Users\) и переименуйте папку нужного пользователя тем же способом, которым вы переименовываете другие папки.
- Запустите редактор реестра и перейдите в раздел
HKEY_LOCAL_MACHINE\SOFTWARE\Microsoft\Windows NT\CurrentVersion\ProfileList
- В подразделах этого раздела найдите такой, где для параметра с именем ProfileImagePath задан путь к изменяемой папке, дважды нажмите по этому параметру и измените путь на нужный.

- Закройте редактор реестра, перезагрузите компьютер и попробуйте вновь зайти в учетную запись, для которой менялся путь к папке.

Несмотря на то, что этот метод описан на официальном сайте Майкрософт , он остается крайне ненадежным и, если на почти чистой системе обычно работает, на ОС с множеством установленных программ зачастую вызывает неожиданные проблемы.
Иногда бывает достаточным изменить старые пути на новые в реестре, выполнив поиск по старому имени папки, а иногда даже это не позволяет избежать проблем: от необходимости повторно настраивать OneDrive и проблем с WinGet до, уже упоминавшихся проблем с профилем пользователя. О случаях неудачных попыток вы можете прочесть, например, в комментариях к статье Как изменить имя папки пользователя в Windows 10.
(Image credit: Future)
On Windows 10, you can change the account name for many reasons, including because you may need to update your personal information if you recently changed your name. The computer has a local account, and you prefer showing the actual name instead of the nickname. Or you want to update the name to make it a little more private.
Regardless of the reason, Windows 10 includes different ways to change the name on the Sign-in screen and across the desktop, but it is not a straightforward process. Depending on the account type, the instructions will be entirely different.
This guide will walk you through the steps to change the account name on the Sign-in screen for a local or Microsoft account on Windows 10.
How to change account name with Settings on Windows 10
Windows 10 displays the account name from your cloud account when the computer is configured with a Microsoft account. As a result, you must change the settings online if you want to change the account name.
To change the name of the account on Windows 10, use these steps:
- Open Settings.
- Click on Accounts.
- Click on Your info.
- Click the «Manage my Microsoft account» option.
- Quick tip: You can always access your account settings online on this Microsoft page.
- Sign in with your credentials (if applicable).
- Click the Your Info tab.
- Under the current name of the account, click the Edit name option.
- Change the new account name as necessary.
- Quick tip: To make your information more private, you can use the first six letters of your name and the first two letters of your last name (often known as «six-by-two» by administrators).

- Confirm the challenge to verify that a robot is not making the changes in the account.
- Click the Save button.
- Restart the computer.
Once you complete the steps, the Sign-in screen will reflect the new name change but allow some time for the device to sync the latest information.
While changing the account name is a straightforward process, renaming the account online also changes the first and last name of any services connected to your account, including Xbox Live, Outlook, OneDrive, Microsoft 365, and others.
All the latest news, reviews, and guides for Windows and Xbox diehards.
How to change account name using Control Panel on Windows 10
When using a local account on Windows 10, you have several ways to modify the account’s name through Control Panel.
Change account name with User Accounts
To change the account name using the User Accounts settings on Windows 10, use these steps:
- Open Control Panel.
- Under the «User Accounts» section, click the «Change account type» option.
- Select the local account to change its name.
- Click the «Change the account name» option.
- Confirm the new account name for the Sign-in screen.
- Click the Change Name button.
After completing the steps, sign out of the current session, and the Sign-in screen should display the new name.
Change account name with netplwiz
You can also use the legacy account management tool (netplwiz) to complete the same task on your computer.
To update the account name with netplwiz, use these steps:
- Open Start.
- Search for netplwiz and click the top result to open the legacy account management tool.
- Click the Users tab.
- Select the account to change its name.
- Click the Properties button.
- (Optional) Update the «User name» field to change the account nickname.
- Confirm the new name in the «Full Name» field — for example, «John Smith.»
- Quick tip: If you want to display a nickname instead of your real name, leave the «Full Name» field empty.

- Click the Apply button.
- Click the OK button.
- Click the OK button again.
Once you complete the steps, sign out, and the Sign-in screen will show the name in the «Full Name» field.
With the legacy tool, you can also edit the accounts linked to a Microsoft account. However, the cloud settings will overwrite the information again, thus making this option only available for local profiles.
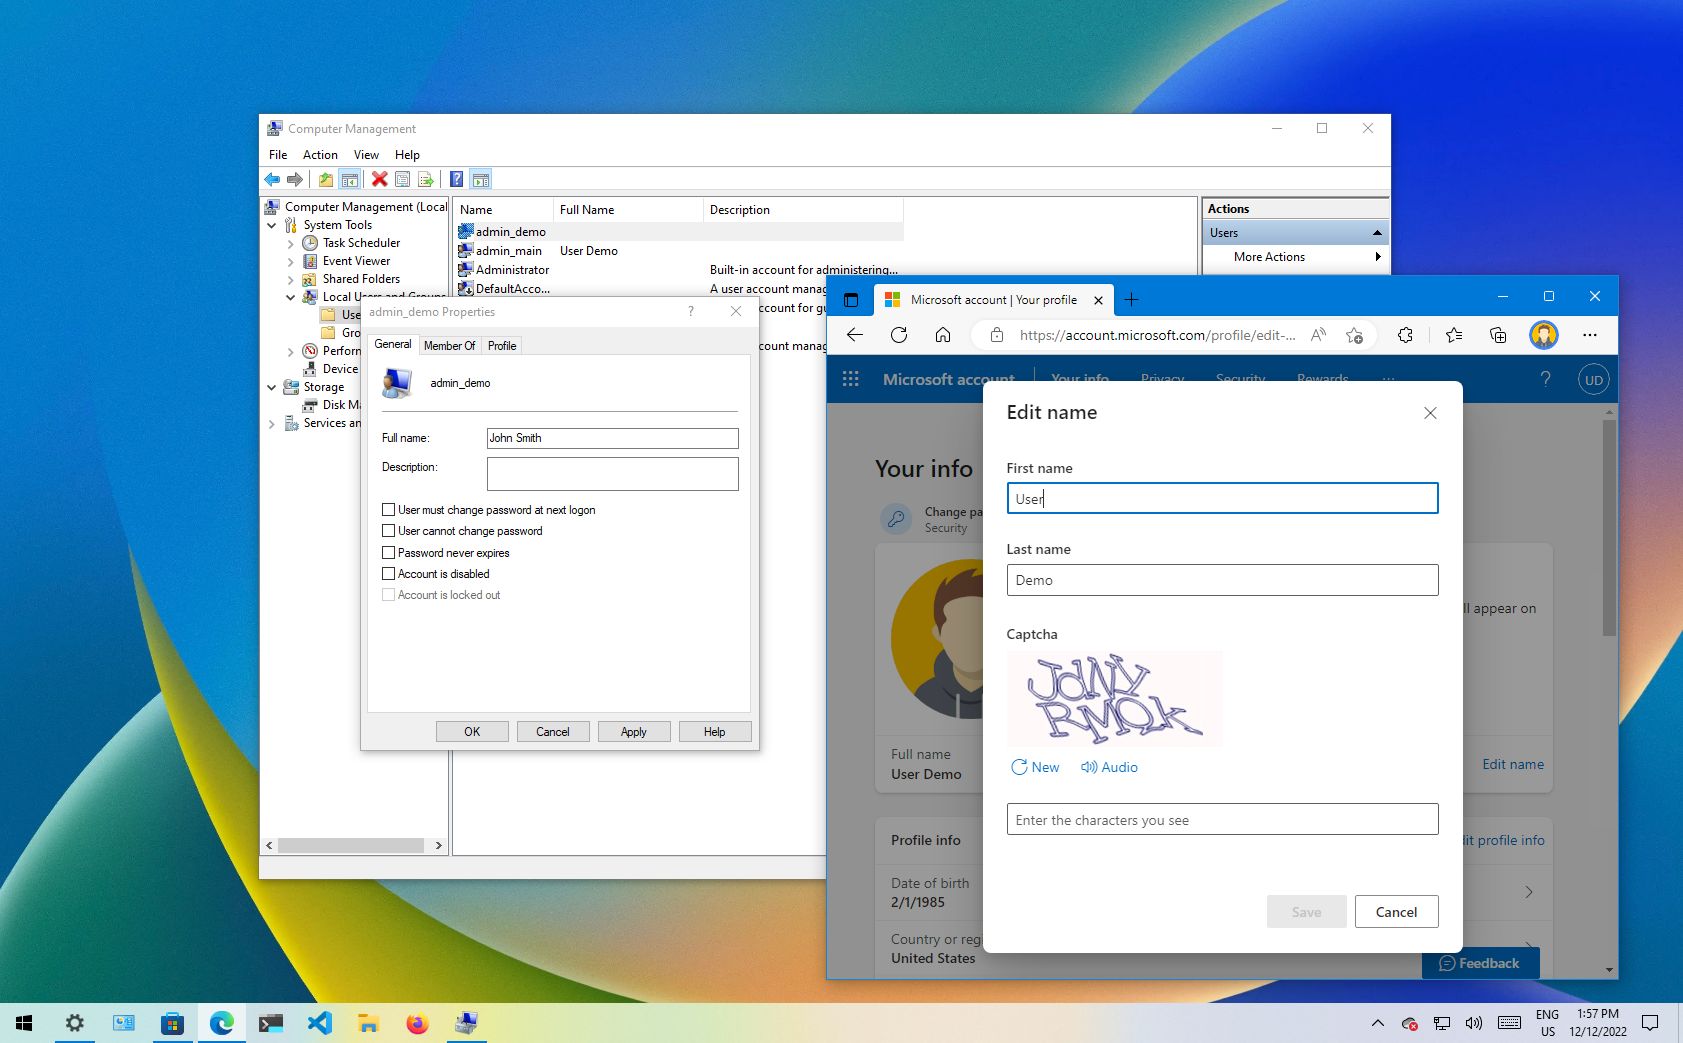
Change account name with Computer Management
To use a different name on your Windows 10 account, use these steps:
- Open Start.
- Search for Computer Management and click the top result to open the app.
- Double-click to expand the System Tools branch.
- Double-click the Local Users and Groups branch.
- Click on Users.
- Right-click the account to edit and select the Properties option.
- Quick tip: You can use the Rename option to change the profile nickname from the context menu.
- Click the General tab.
- In the «Full name» field, confirm a new name for the account.
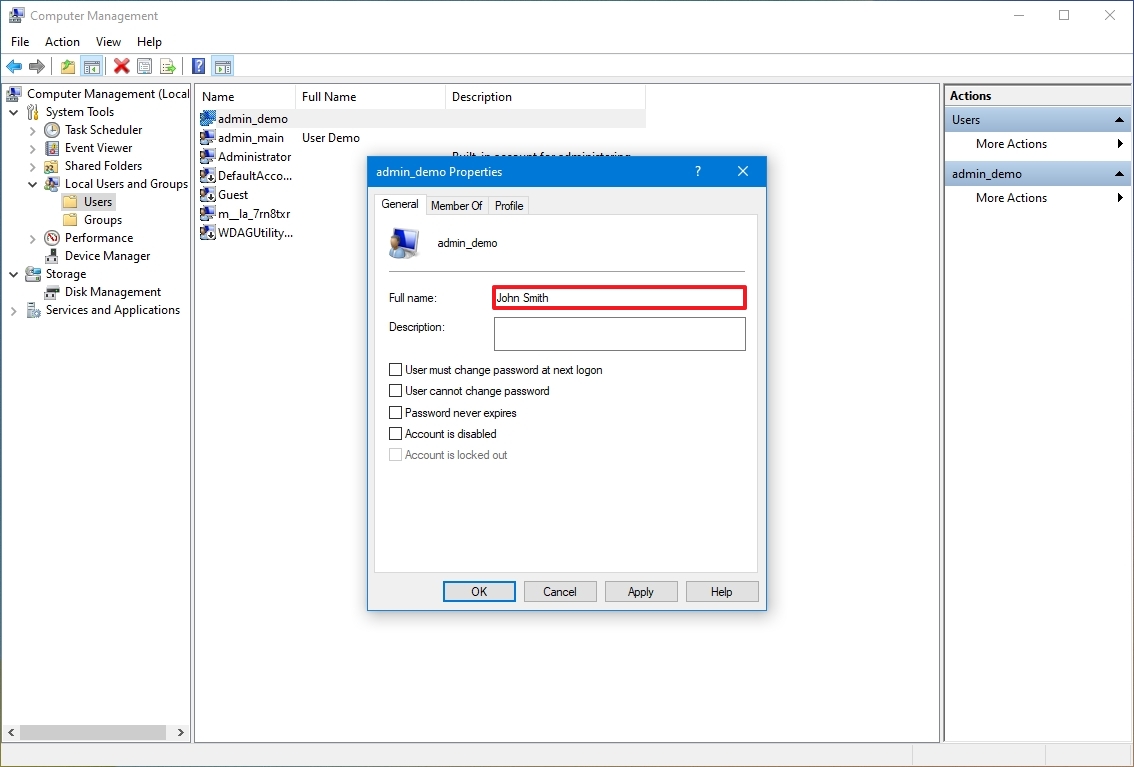
- Click the Apply button.
- Click the OK button.
After you complete the steps, the sign-in screen will show the local account’s new name when you sign into the account.
On Windows 10, you have several methods to change the account name, but none of the available options will change the name of the profile folder in the «Users» folder. You might find some workarounds online, but it is not recommended to use those instructions, as you may create other issues.
If you want to rename the account everywhere on Windows 10, you should create a new account with the name you wish to use and then transfer all your settings and files to the newly created account.
More resources
For more helpful articles, coverage, and answers to common questions about Windows 10 and Windows 11, visit the following resources:
- Windows 11 on Windows Central — All you need to know
- Windows 10 on Windows Central — All you need to know

Cutting-edge operating system
A refreshed design in Windows 11 enables you to do what you want effortlessly and safely, with biometric logins for encrypted authentication and advanced antivirus defenses.
Mauro Huculak has been a Windows How-To Expert contributor for WindowsCentral.com for nearly a decade and has over 15 years of experience writing comprehensive guides. He also has an IT background and has achieved different professional certifications from Microsoft, Cisco, VMware, and CompTIA. He has been recognized as a Microsoft MVP for many years.