
Applies ToWindows 11 Windows 10
When you initially setup your Windows device, you might have opted to use a local account instead of a Microsoft account.
The main difference between a local account and a Microsoft account is that a local account is specific to one device, while a Microsoft account can be used across multiple devices and Microsoft services.
-
A local account is created on the device and doesn’t require Internet connectivity to sign in. It’s independent of other services, and it’s not connected to the cloud. Your settings, files, and applications are limited to that single device
-
A Microsoft account, on the other hand, is associated to an email address and password that you use with Outlook.com, Hotmail, Office, OneDrive, Skype, Xbox, and Windows. When you sign in to your PC with a Microsoft account, you’re connected to a Microsoft cloud service, and your settings and files can sync across various devices. You can also use it to access other Microsoft services
Tip: Discover the benefits of a Microsoft account and how it enhances your experience by visiting the What is a Microsoft account article.
Change from a local account to a Microsoft account
You can use the Settings app to switch your local account to a Microsoft account.
-
In the Settings app on your Windows device, select Accounts > Your info, or use the following shortcut:
Your info
-
Select Sign in with a Microsoft account instead. You’ll see this link only if you’re using a local account
-
Follow the prompts to switch to your Microsoft account
-
Select Next, then select Sign out and finish. Sign back in with your new local account
Change from a Microsoft account to a local account
You can use the Settings app to switch your Microsoft account to a local account.
Important: Microsoft recommends using a Microsoft account, not a local account, when signing in to Windows. Using a Microsoft account in Windows allows for seamless integration of Microsoft services, enhanced security, and sync across devices, unlike a local account.
-
In the Settings app on your Windows device, select Accounts > Your info, or use the following shortcut:
Your info
-
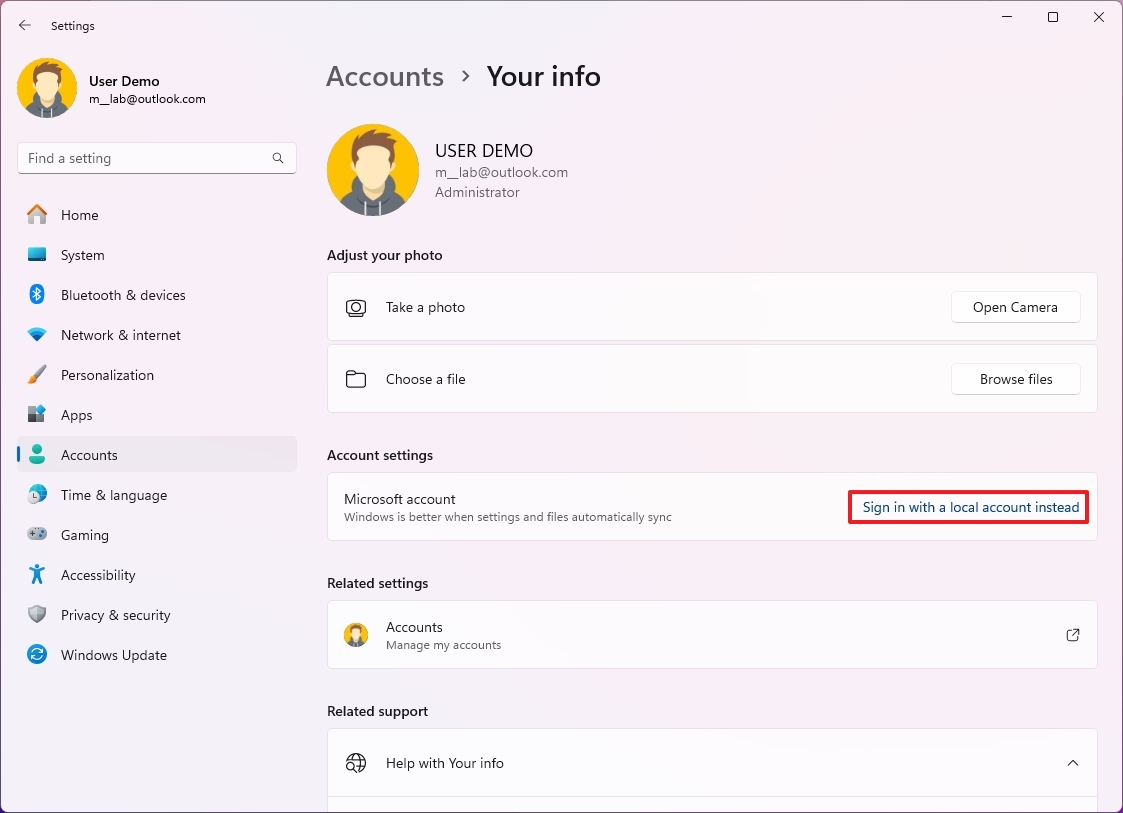
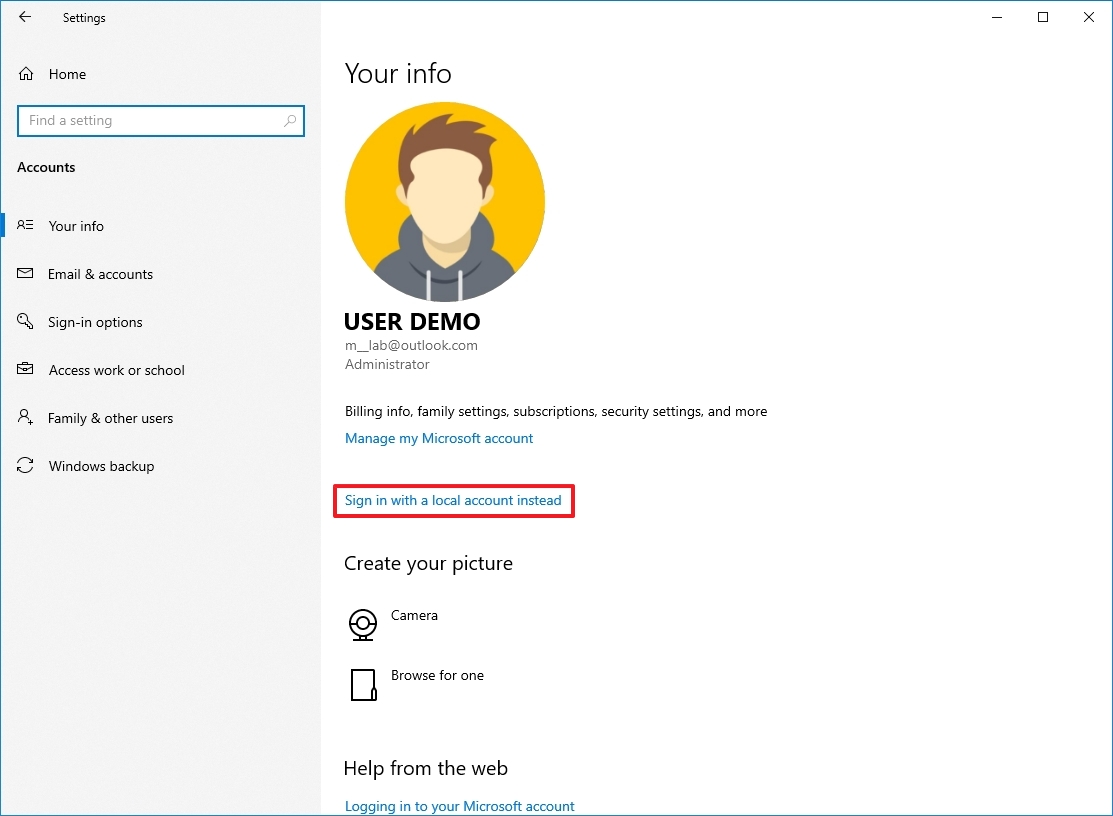
Select Sign in with a local account instead. You’ll see this link only if you’re using a Microsoft account
-
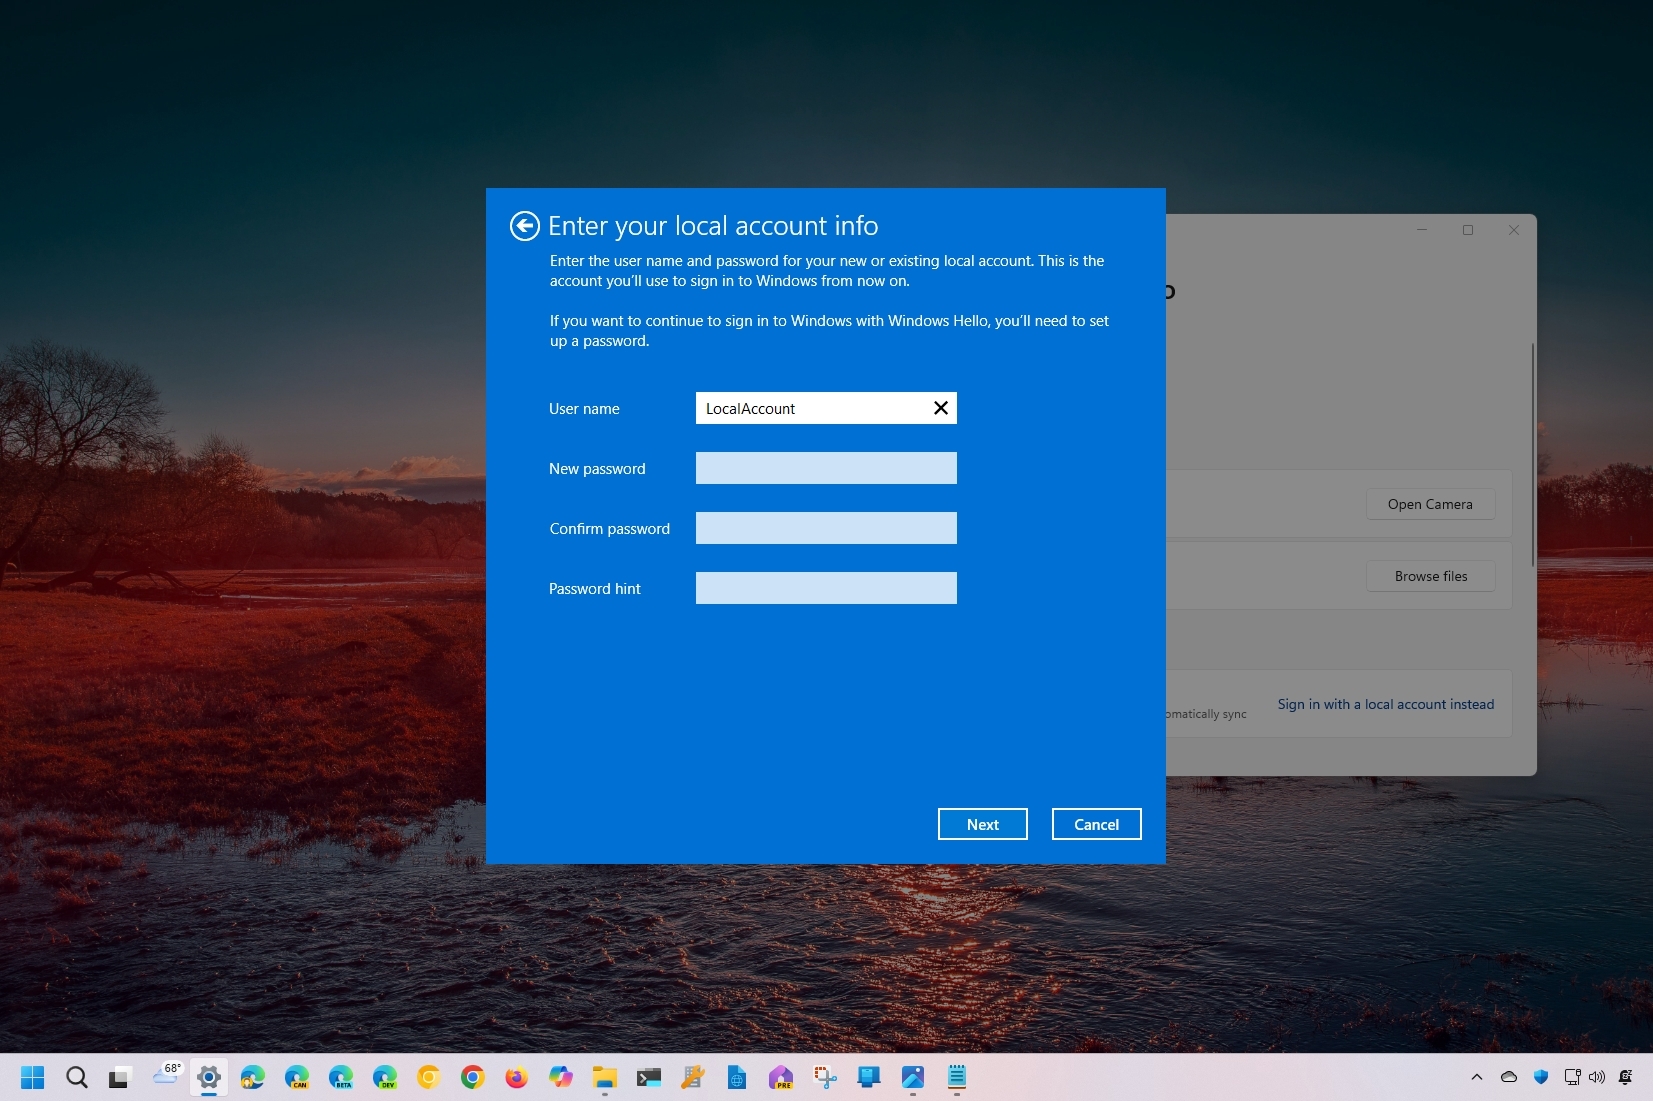
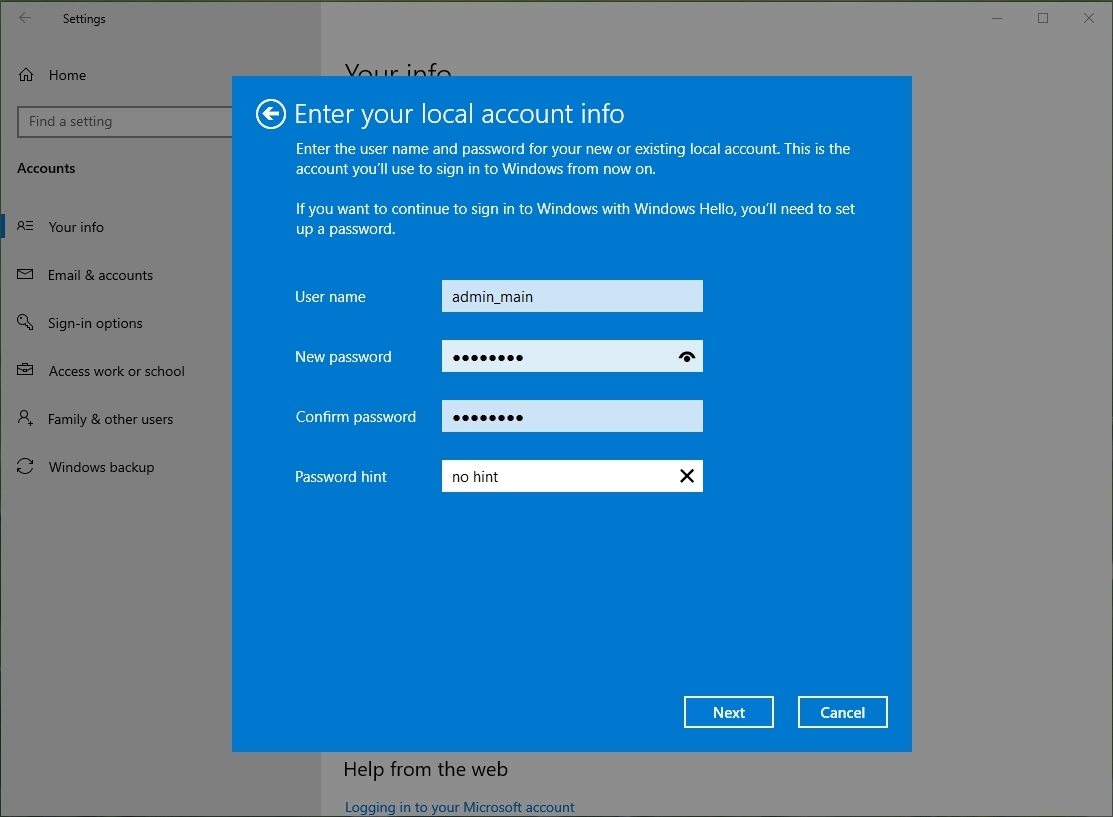
Type the username, password, and password hint. The username must be different than any others on the device
-
Select Next, then select Sign out and finish. Sign back in with your new local account
Warning: when using a local account, it’s a good idea to create a password reset disk. If you don’t do this and then forget your password, you won’t be able to recover it.
Need more help?
Want more options?
Explore subscription benefits, browse training courses, learn how to secure your device, and more.
(Image credit: Mauro Huculak)
Although Windows 11 (and 10) forces you to use a Microsoft account to set up your computer during the initial setup, you can switch to a local account quite easily. You just need to know where to find the settings.
This approach is based on the company’s desire to encourage you to use its online accounts to access the different benefits, such as the ability to sync settings and files across devices and recover their accounts. Microsoft also uses this strategy to lure users into signing up for its services, such as OneDrive and the Microsoft 365 apps.
You can always set up your computer with a local account using this other guide I wrote. However, if you’re already using a Microsoft account, you can switch to a local account regardless of the version of the operating system.
In this how-to guide, I will explain the steps to switch to a local account from a Microsoft account using the Settings app.
How to switch to a local account on Windows 11
To switch from a Microsoft to a local account on Windows 11, use these steps:
- Open Settings.
- Click on Accounts.
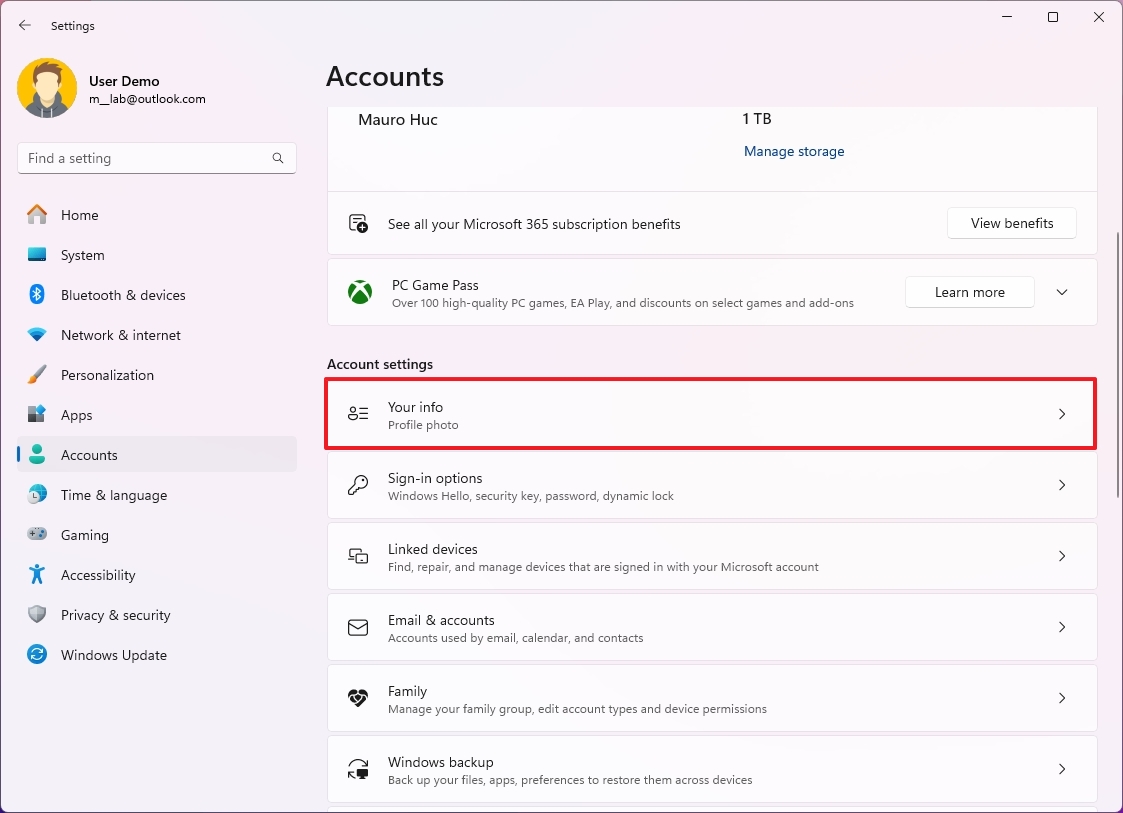
- Click the Your info page on the right side.
- Click the «Sign in with a local account instead» option in the «Microsoft account» setting.
- Click the Next button.
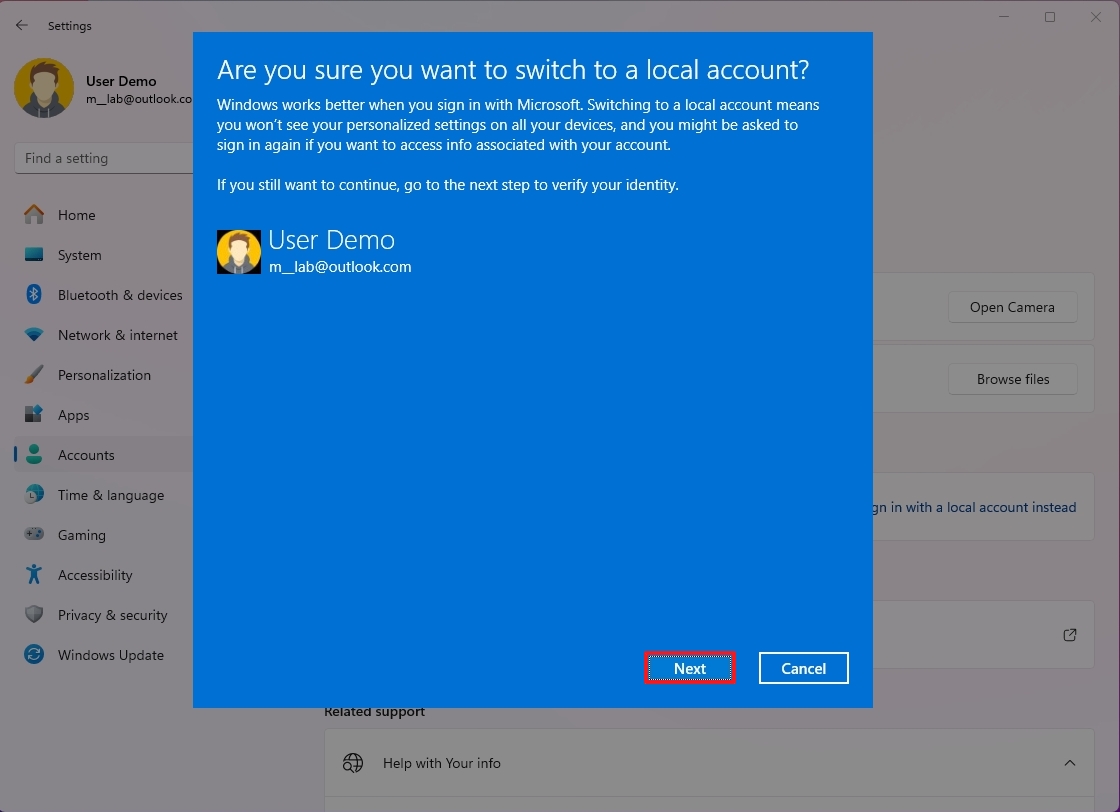
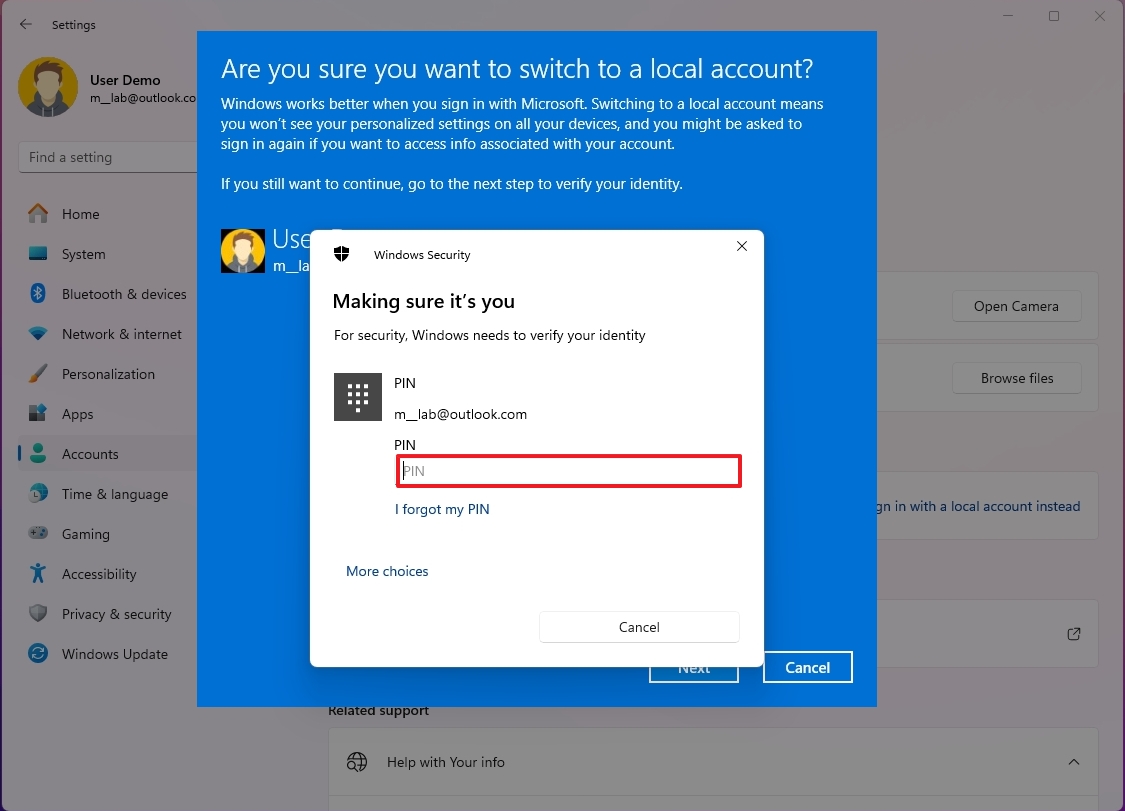
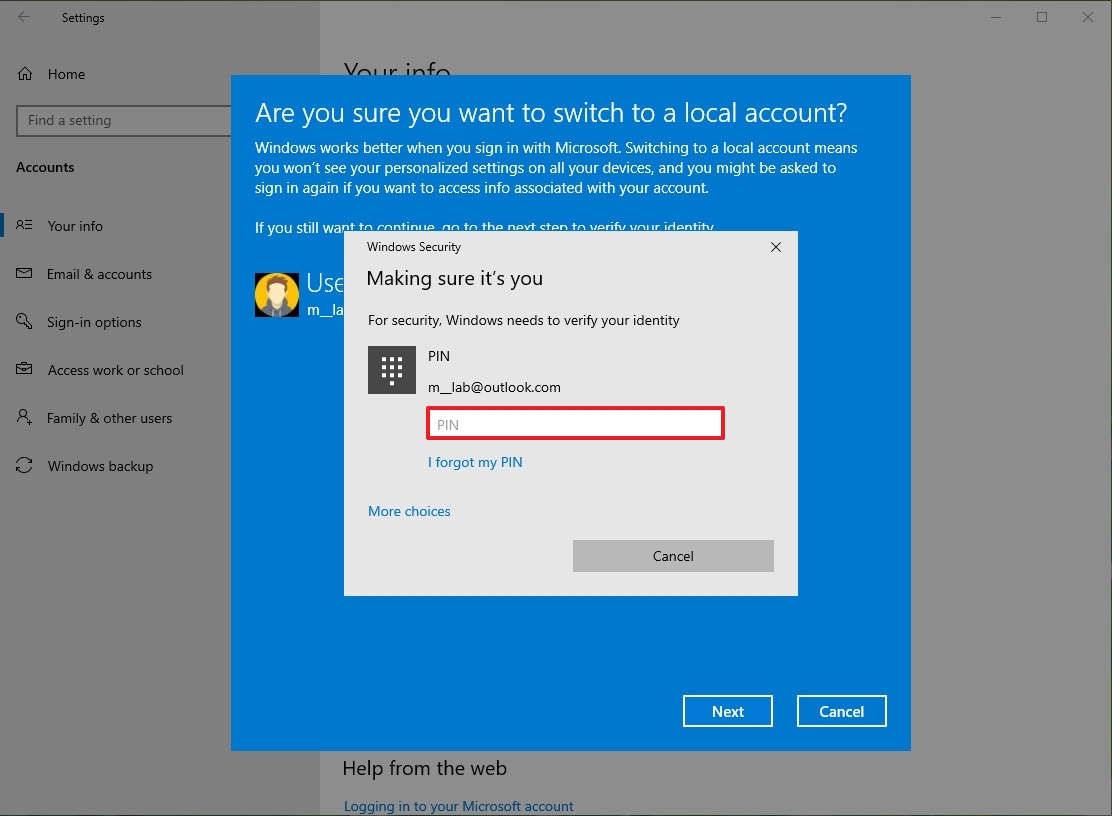
- Confirm your account credentials.
- Confirm a username for the local account.
- Create a password for the account.
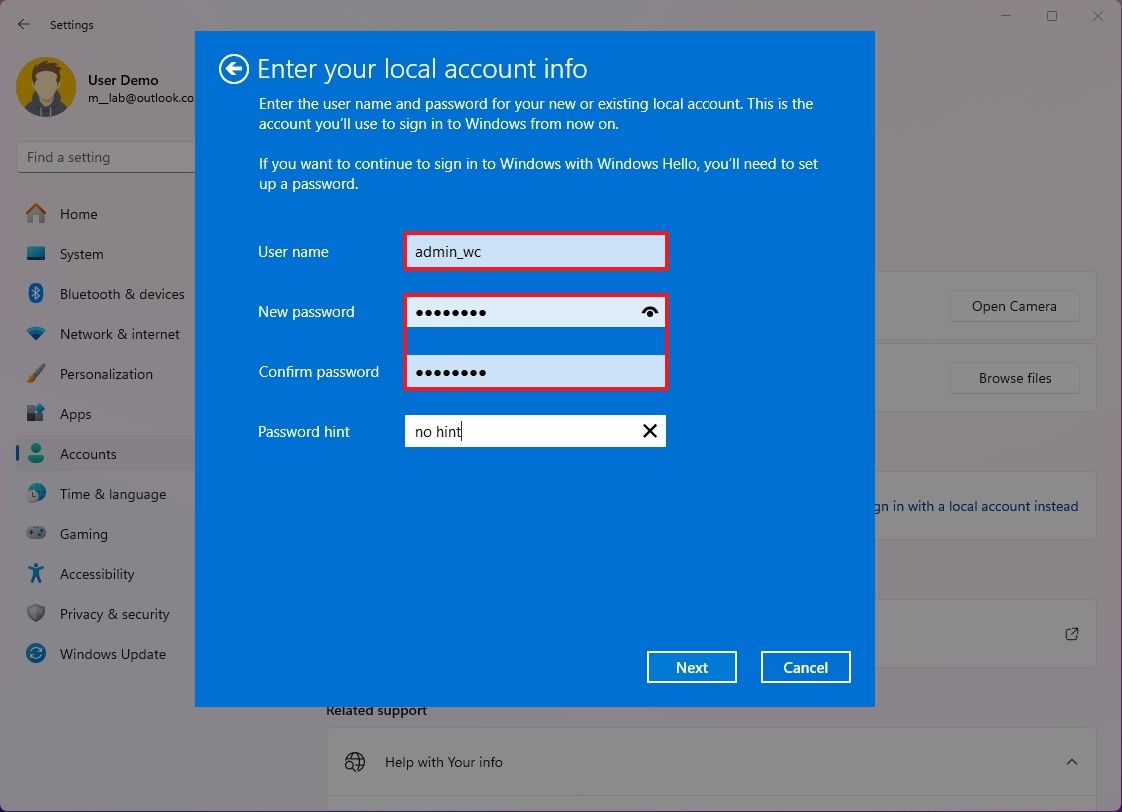
- (Optional) Set up a password hint that can make you remember the password.
- Click the Next button.
- Click the «Sign out and finish» button.
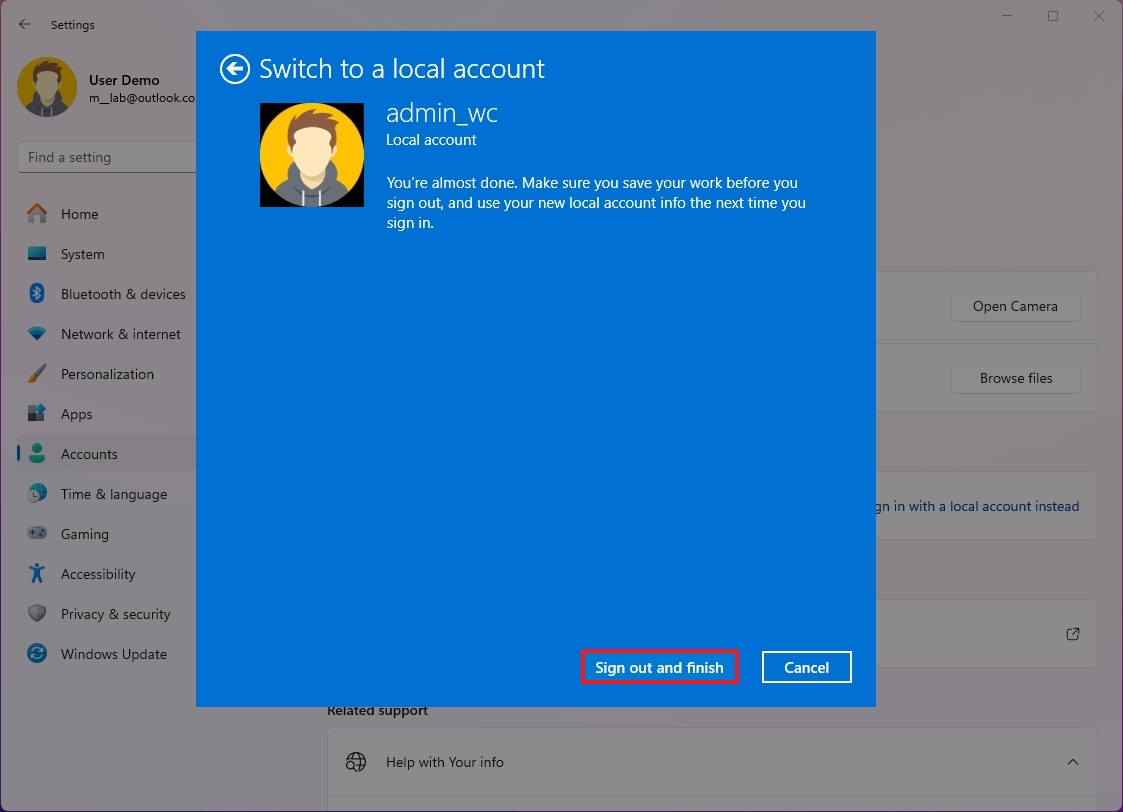
After completing the steps, you can sign in to the same account without a connection to Microsoft services.
How to switch to a local account on Windows 10
To switch to a local account from a Microsoft account on Windows 10, use these steps:
All the latest news, reviews, and guides for Windows and Xbox diehards.
- Open Settings.
- Click on Accounts.
- Click on Your info.
- Click the «Sign in with a local account instead» option.
- Click the Next button.
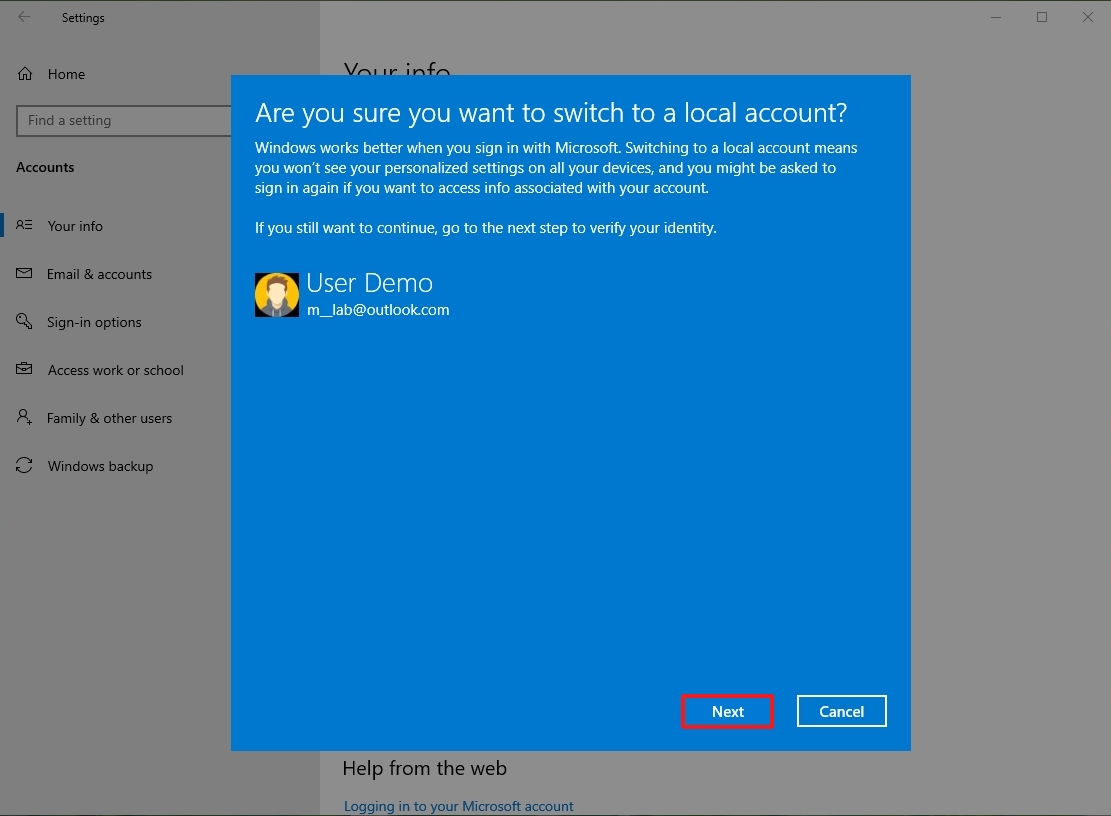
- Confirm your account credentials.
- Confirm the new username for the local account.
- Create a password for the account.
- (Optional) Set up a password hint that can make you remember the password.
- Click the Next button.
- Click the «Sign out and finish» button.
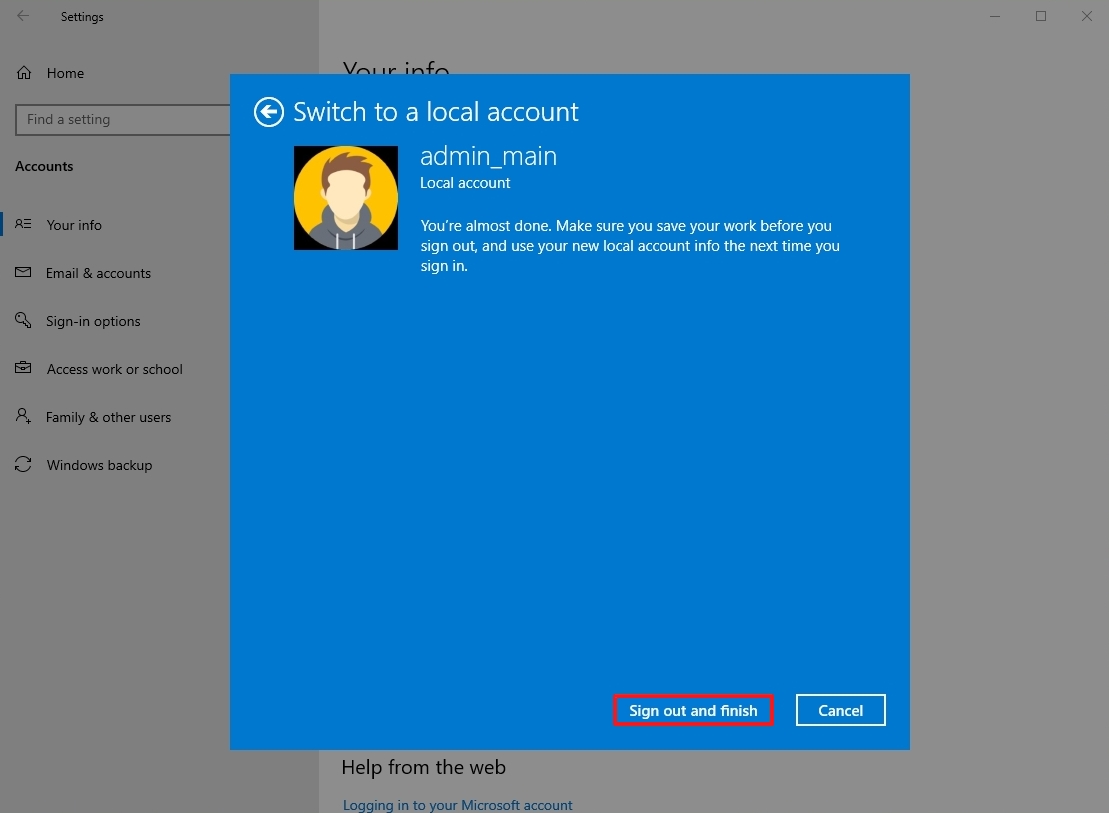
Once you complete these steps, your Windows 10 account will be disconnected from your Microsoft account, and it will switch to the traditional local account style. Using this method, your Microsoft account credentials will continue to be available on the device to sign you into various services as required automatically.
More resources
For more helpful articles, coverage, and answers to common questions about Windows 10 and Windows 11, visit the following resources:
- Windows 11 on Windows Central — All you need to know
- Windows 10 on Windows Central — All you need to know
Mauro Huculak has been a Windows How-To Expert contributor for WindowsCentral.com for nearly a decade and has over 15 years of experience writing comprehensive guides. He also has an IT background and has achieved different professional certifications from Microsoft, Cisco, VMware, and CompTIA. He has been recognized as a Microsoft MVP for many years.
Readers help support Windows Report. We may get a commission if you buy through our links.
Read our disclosure page to find out how can you help Windows Report sustain the editorial team. Read more
Windows allows you to create and manage multiple user accounts on your computer. If you are looking for ways to change the main account on Windows 10, this guide will walk you through the process.
We will cover the steps and prerequisites to change the primary account, ensuring a smooth transition and uninterrupted access to your PC’s resources and settings.
How to change the primary Microsoft account on Windows 10?
Before proceeding with changing the main account on Windows 10, it is important to consider the following prerequisites:
- Ensure your computer is connected to the internet.
- Back up your important data.
- Make sure you have access to the current primary account.
- Verify the UAC is enabled and set to an appropriate level to allow administrative actions during the process.
If you have gone through the checks, use different methods to change the account.
1. Create a new user account
- Press Windows + I to open the Settings app.
- Go to Accounts.

- Click Family & other users.
- Now under Other users, click Add someone else to this PC.

- Follow the onscreen instructions to create a new user account.
- Once the account is created, select it and choose Change account type.

- Now set it as Administrator and click OK.

- Log out from the current primary account and log in to the new one.


2. Switching user accounts
- Press Windows + L to lock your computer or log out of your current account.
- On the login screen, choose the user account you want to use as the primary account and enter the password.
- Press Windows + I to open the Settings app.
- Go to Accounts.

- Click Your info.
- Now click Sign in with a local account instead.

- Select the account and then enter the PIN and click Next.

- Now on Enter your local account info page, enter the User name, and New password, and click Next.

- Log out and log in using the new account, and it will be your main account.


3. Changing from a Microsoft account to a local account
- Press the Windows key, locate the user profile icon, right-click, and choose Change account settings.

- On the Your info section, click Sign in with a local account instead.

- Now click Sign in with a local account instead.
- Select the account and then enter the PIN and click Next.

- Now on Enter your local account info page, enter the User name, and New password, and click Next.

- Log out and log in using the new account, and it will be your primary account.

- Microsoft releases Windows 10 (KB5058379/ KB5058392 / KB5058383/ KB5058387) May 2025 Patch Tuesday
- Microsoft extends Microsoft 365 apps support on Windows 10 to 2028
- Microsoft pushes Windows 11, but this project wants you to switch to Linux instead
- Microsoft addresses Windows 10 broken jump lists and says it’s now fixed
- Microsoft updates Copilot app with guided tour for new users
4. Use the Control Panel
- Press the Windows key, type control panel, and click Open.

- Select View by as Category, and click User Accounts.

- Select User Accounts again.

- Click Manage another account.

- Choose the user account you want to change.

- Click Change the account type.

- Select Administrator and click the Change Account Type button.

- Now log out and log in using the new account, and it can be the main account.


5. Use the Command Prompt
- Press the Windows key, type command prompt, and click Run as administrator.

- Copy & paste the following command to create a new username after replacing <new username> with the username that you want & <password> with the password you wish to use and hit Enter:
net user <new username> <password> /add - Once the account is created, type the following command and press Enter:
net localgroup administrators <new username> /add
- Now log out and log in using the new account, and it can be the primary account.


So, these are the methods you can use to change your main account on Windows 10.
We also recommend reading our guide on what to do if you can’t log into Windows 10 with the Microsoft account.
If you have questions or suggestions, feel free to mention them in the comments section below,
Srishti Sisodia
Windows Software Expert
Srishti Sisodia is an electronics engineer and writer with a passion for technology. She has extensive experience exploring the latest technological advancements and sharing her insights through informative blogs.
Her diverse interests bring a unique perspective to her work, and she approaches everything with commitment, enthusiasm, and a willingness to learn. That’s why she’s part of Windows Report’s Reviewers team, always willing to share the real-life experience with any software or hardware product. She’s also specialized in Azure, cloud computing, and AI.
Windows 10 и 11 позволяют создать несколько типов учетных записей. Первая из них — учетная запись Microsoft — предлагается операционной системой по умолчанию. Она требует электронную почту или номер телефона, а вся информация о таких учетках хранится на серверах Microsoft. В наших реалиях — это сомнительное удовольствие, ведь компания в любой момент может отключить такую учетку, и вы потеряете доступ к своему ПК, как при входе по паролю, так и с помощью сканера отпечатков. Поэтому сейчас многие пользователи предпочитают создавать локальные учетные записи, по сути, требующие от вас только имя и пароль.
Такие учетки совсем не в новинку тем, кто застал времена Windows 98 и XP. Они не дадут вам доступа к привычным многим Microsoft Store или облачному хранилищу OneDrive, но помогут сохранить конфиденциальность и некую независимость от политики американского гиганта. И хотя еще в 2020 году Microsoft начала бороться с подобными учетными записями, полностью они не исчезли, а создать их достаточно легко. Ну а мы предлагаем вам подробное руководство о том, как это сделать.
Содержание
- Как создать локальную учетную запись
- Как изменить локальную учетную запись в Windows
- Как удалить локальную учетную запись
- Выводы
Как создать локальную учетную запись
Управление всеми учетными записями в свежих версиях Windows оптимизировано и сосредоточено в разделе «Учетные записи». Ну а для того, чтобы открыть его, достаточно кликнуть по меню «Пуск» правой кнопкой мыши и выбрать «Параметры». В открывшемся экране найдите пункт «Учетные записи» и войдите в него.
Найдите там пункт меню «Семья и другие пользователи».
Здесь можно создать учетные записи как простых пользователей, так и членов семьи. При этом последние помимо всего прочего позволяют организовать родительский контроль, что может быть актуально для учеток детей или пожилых родственников. Нас же интересует раздел «Другие пользователи», где есть возможность создать самую обычную учетку. Для этого нажмите «Добавить пользователя для этого компьютера».
В открывшемся окне операционная система попросит ввести электронную почту или номер телефона человека, учетку для которого вы создаете. Нам же нужна локальная учетная запись, поэтому просто проигнорируйте эту просьбу и нажмите «У меня нет данных для входа этого человека».

Но Windows — это достаточно упорная платформа, поэтому она предпримет еще одну попытку вытянуть из вас нужную информацию. Не поддавайтесь на эту уловку и нажмите «Добавить пользователя без учетной записи Microsoft».

В следующем окне останется ввести имя пользователя и пароль для входа в локальную учетную запись Windows, а также добавить три секретных вопроса, ответив на которые вы сможете восстановить доступ к учетке, если забудете ее данные.

После этого локальная учетная запись будет создана и отобразится в соответствующем меню.
Как создать локальную учетную запись с помощью командной строки
Те же, кто не хочет скакать по пунктам меню и привык работать с командной строкой, могут воспользоваться еще одним простым способом создания локальной учетки. Просто откройте командную строку или Windows PowerShell от имени администратора и введите команду net user имя_пользователя пароль /add. Вместо «имя_пользователя» и пароль подставьте нужные вам данные учетки.
С помощью командной же строки можно присвоить права администратора созданному пользователю. Для этого существует команда net localgroup Администраторы имя_пользователя /add.
Не забудьте убедиться, что соответствующее окно в списке пользователей обновлено. Только тогда вы увидите там новую учетную запись.
Как изменить локальную учетную запись в Windows
По умолчанию, учетная запись создается с правами простого пользователя. Если же вам интересно, как поменять локальную учетную запись и присвоить ей права администратора, то это можно сделать уже после ее создания. Но, конечно, для этого ваша текущая учетка также должна иметь соответствующие права.
- Кликните правой кнопкой мыши по меню «Пуск», после чего откройте «Параметры», перейдите в раздел «Учетные записи» -> «Семья и другие пользователи».
- Найдем в списке нужную учетку, жмем по ней левой кнопкой мыши и выбираем «Изменить тип учетной записи».
- В открывшемся окне нажмите на выпадающее меню под пунктом «Тип учетной записи» и выберите «Администратор».

- Нажмите «ОК».
Если вы все сделали правильно, нужная учетная запись получит права администратора, а информация об этом будет показана в разделе «Семья и другие пользователи».
Как удалить локальную учетную запись
Если созданная ранее учетная запись больше не нужна, ее лучше всего удалить. Таким образом, вы, как минимум, обезопасите свой компьютер от навязчивого внимания посторонних и освободите немного, а может и совсем немало места на системном накопителе ПК под управлением Win.
- Кликните правой кнопкой мыши по меню «Пуск», войдите в «Параметры», перейдите в раздел «Учетные записи» -> «Семья и другие пользователи».
- Найдите в списке учетную запись, которая вам больше не нужна, нажмите на ней левой кнопкой мыши и воспользуйтесь кнопкой «Удалить».
- Система спросит вас, точно ли вы хотите удалить локальную учетную запись и предупредит, что вместе с ней будут утеряны все данные на рабочем столе, в папках «Загрузка», «Документы», «Фотографии» и другие файлы учетки. Если эта информация вам не нужна, или вы уже позаботились о ее сохранении, нажмите «Удалить учетную запись и данные».

О том что все прошло по плану, будет говорить отсутствие записи об учетке в списке «Семья и другие пользователи».
Выводы
Как вы видите, перейти на локальную учетную запись в Windows совсем несложно, а, учитывая не самую дружелюбную политику американского гиганта, ее создание выглядит вполне оправданным. Но дело даже не в этом. Единая учетная запись Microsoft позволяет эффективно отслеживать все ваши действия, тогда как с локальной учеткой у вас сохраняется пусть призрачный, но все-таки шанс на анонимность в сети.
В самой Microsoft утверждают, что онлайн-учетка заметно повышает вашу безопасность, но это может быть верно только в том случае, если ее данные не были скомпрометированы. А в случае утечки все ее преимущества исчезают, и злоумышленники не только могут получить доступ к вашему desktop, но и удаленно заблокировать и его и все остальные компьютеры, привязанные к учетной записи.
Если же вы создадите локальную учетную запись, то вы вполне сможете использовать ее в качестве резервного (для устранения неполадок) или основного входа в систему. Кстати, в последнем случае онлайн-учетку лучше всего удалить.
Читайте также
- Как запустить Windows с флешки: пошаговая инструкция
- Как переустановить Виндовс 10: четыре способа на любой вкус