
В Windows 10 файлы изображений по умолчанию открываются в новом приложении «Фотографии», которое может быть несколько непривычным, а на мой взгляд оно и хуже предыдущей стандартной программы для этих целей «Средство просмотра фотографий Windows».
При этом, в настройках приложений по умолчанию в Windows 10 старый вариант просмотра фотографий отсутствует, равно как и найти отдельный exe файл для него не представляется возможным. Тем не менее, возможность сделать так, чтобы фото и картинки открывались в старом варианте «Просмотр фотографий Windows» (как в Windows 7 и 8.1) можно, и ниже — о том, как это сделать. См. также: Лучшие бесплатные программы для просмотра фото и управления изображениями.
- Как включить Средство просмотра фотографий в Windows 10
- Как сделать старый просмотр фотографий используемым по умолчанию
- Видео инструкция
Как включить средство просмотра фотографий Windows в Windows 10

Средство просмотра фотографий Windows реализовано в библиотеке photoviewer.dll (который никуда не делся), а не в отдельном исполняемом exe файле. И, для того, чтобы его можно было назначать используемым по умолчанию, потребуется добавить некоторые ключи в реестр (которые были в ОС раньше, но нет в Windows 10).
Для этого вам потребуется запустить блокнот, после чего скопировать в него код, представленный ниже, который будет использоваться для добавления соответствующих записей в реестр.
Windows Registry Editor Version 5.00
[HKEY_CLASSES_ROOT\Applications\photoviewer.dll]

[HKEY_CLASSES_ROOT\Applications\photoviewer.dll\shell]

[HKEY_CLASSES_ROOT\Applications\photoviewer.dll\shell\open]
"MuiVerb"="@photoviewer.dll,-3043"

[HKEY_CLASSES_ROOT\Applications\photoviewer.dll\shell\open\command]
@=hex(2):25,00,53,00,79,00,73,00,74,00,65,00,6d,00,52,00,6f,00,6f,00,74,00,25,\
00,5c,00,53,00,79,00,73,00,74,00,65,00,6d,00,33,00,32,00,5c,00,72,00,75,00,\
6e,00,64,00,6c,00,6c,00,33,00,32,00,2e,00,65,00,78,00,65,00,20,00,22,00,25,\
00,50,00,72,00,6f,00,67,00,72,00,61,00,6d,00,46,00,69,00,6c,00,65,00,73,00,\
25,00,5c,00,57,00,69,00,6e,00,64,00,6f,00,77,00,73,00,20,00,50,00,68,00,6f,\
00,74,00,6f,00,20,00,56,00,69,00,65,00,77,00,65,00,72,00,5c,00,50,00,68,00,\
6f,00,74,00,6f,00,56,00,69,00,65,00,77,00,65,00,72,00,2e,00,64,00,6c,00,6c,\
00,22,00,2c,00,20,00,49,00,6d,00,61,00,67,00,65,00,56,00,69,00,65,00,77,00,\
5f,00,46,00,75,00,6c,00,6c,00,73,00,63,00,72,00,65,00,65,00,6e,00,20,00,25,\
00,31,00,00,00

[HKEY_CLASSES_ROOT\Applications\photoviewer.dll\shell\open\DropTarget]
"Clsid"="{FFE2A43C-56B9-4bf5-9A79-CC6D4285608A}"

[HKEY_CLASSES_ROOT\Applications\photoviewer.dll\shell\print]

[HKEY_CLASSES_ROOT\Applications\photoviewer.dll\shell\print\command]
@=hex(2):25,00,53,00,79,00,73,00,74,00,65,00,6d,00,52,00,6f,00,6f,00,74,00,25,\
00,5c,00,53,00,79,00,73,00,74,00,65,00,6d,00,33,00,32,00,5c,00,72,00,75,00,\
6e,00,64,00,6c,00,6c,00,33,00,32,00,2e,00,65,00,78,00,65,00,20,00,22,00,25,\
00,50,00,72,00,6f,00,67,00,72,00,61,00,6d,00,46,00,69,00,6c,00,65,00,73,00,\
25,00,5c,00,57,00,69,00,6e,00,64,00,6f,00,77,00,73,00,20,00,50,00,68,00,6f,\
00,74,00,6f,00,20,00,56,00,69,00,65,00,77,00,65,00,72,00,5c,00,50,00,68,00,\
6f,00,74,00,6f,00,56,00,69,00,65,00,77,00,65,00,72,00,2e,00,64,00,6c,00,6c,\
00,22,00,2c,00,20,00,49,00,6d,00,61,00,67,00,65,00,56,00,69,00,65,00,77,00,\
5f,00,46,00,75,00,6c,00,6c,00,73,00,63,00,72,00,65,00,65,00,6e,00,20,00,25,\
00,31,00,00,00

[HKEY_CLASSES_ROOT\Applications\photoviewer.dll\shell\print\DropTarget]
"Clsid"="{60fd46de-f830-4894-a628-6fa81bc0190d}"

[HKEY_LOCAL_MACHINE\SOFTWARE\Microsoft\Windows Photo Viewer\Capabilities\FileAssociations]
".bmp"="PhotoViewer.FileAssoc.Tiff"
".dib"="PhotoViewer.FileAssoc.Tiff"
".gif"="PhotoViewer.FileAssoc.Tiff"
".jfif"="PhotoViewer.FileAssoc.Tiff"
".jpe"="PhotoViewer.FileAssoc.Tiff"
".jpeg"="PhotoViewer.FileAssoc.Tiff"
".jpg"="PhotoViewer.FileAssoc.Tiff"
".jxr"="PhotoViewer.FileAssoc.Tiff"
".png"="PhotoViewer.FileAssoc.Tiff"
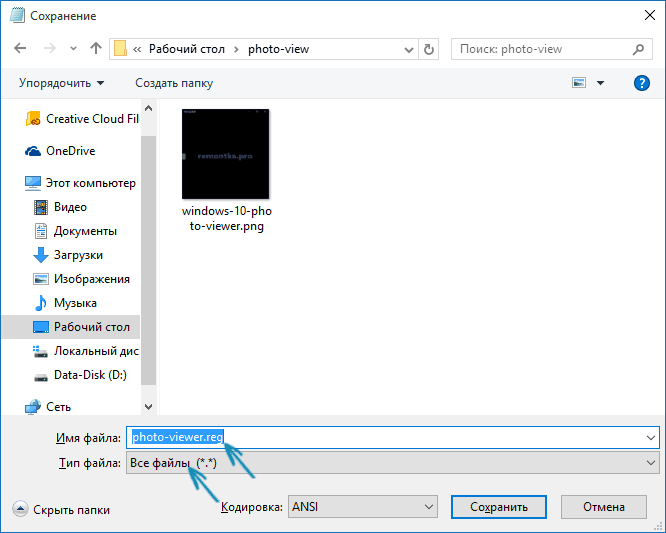
Затем в блокноте выберите файл — сохранить как, а в окне сохранения в поле «Тип файла» выберите «Все файлы» и сохраните ваш файл с любым именем и расширением «.reg». Подробнее на тему, если что-то не срабатывает — Как создать файл .REG в Windows 10, 8.1 и Windows 7.
После сохранения, кликните по данному файлу правой кнопкой мыши и выберите в контекстном меню пункт «Слияние» (в большинстве случаев работает и простой двойной клик по файлу).
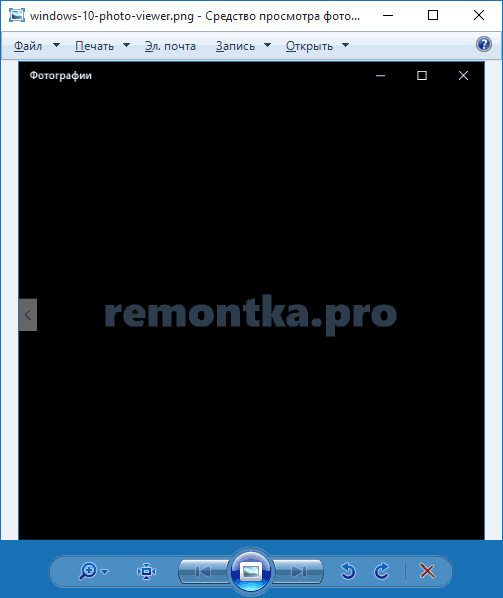
Подтвердите согласие с добавлением сведений в реестр на запрос об этом. Готово, сразу после сообщения о том, что данные были успешно добавлены в реестр, приложение «Просмотр фотографий Windows» будет доступно для использования.
Как установить средство просмотра фотографий в качестве приложения по умолчанию для фото и других файлов изображений
Для того, чтобы после проделанных действий установить стандартный просмотр фотографий в качестве используемого по умолчанию для определенного типа файла:
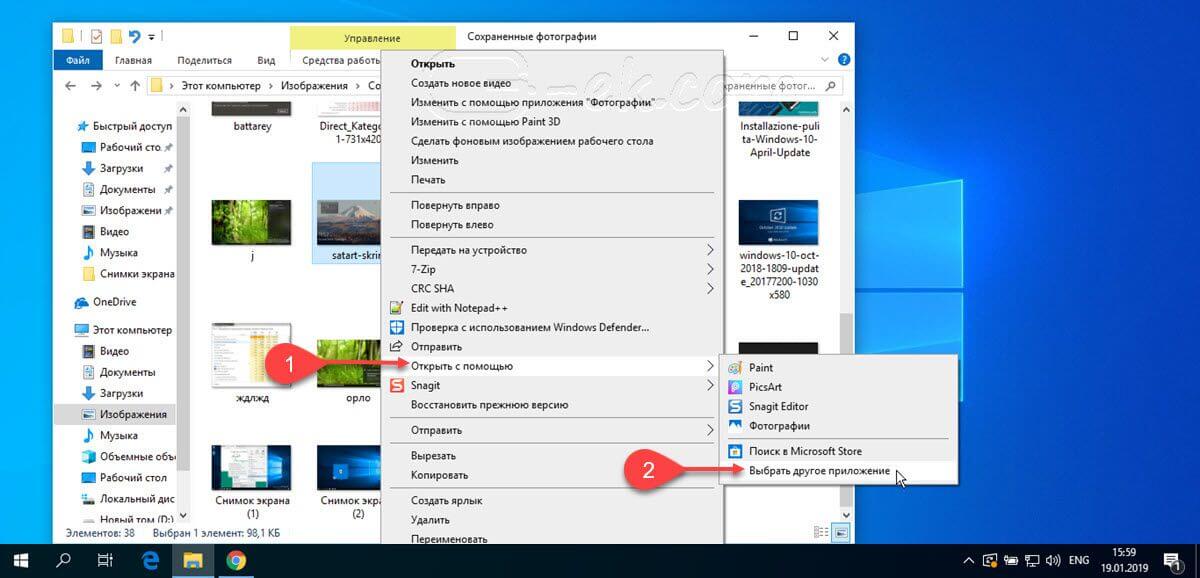
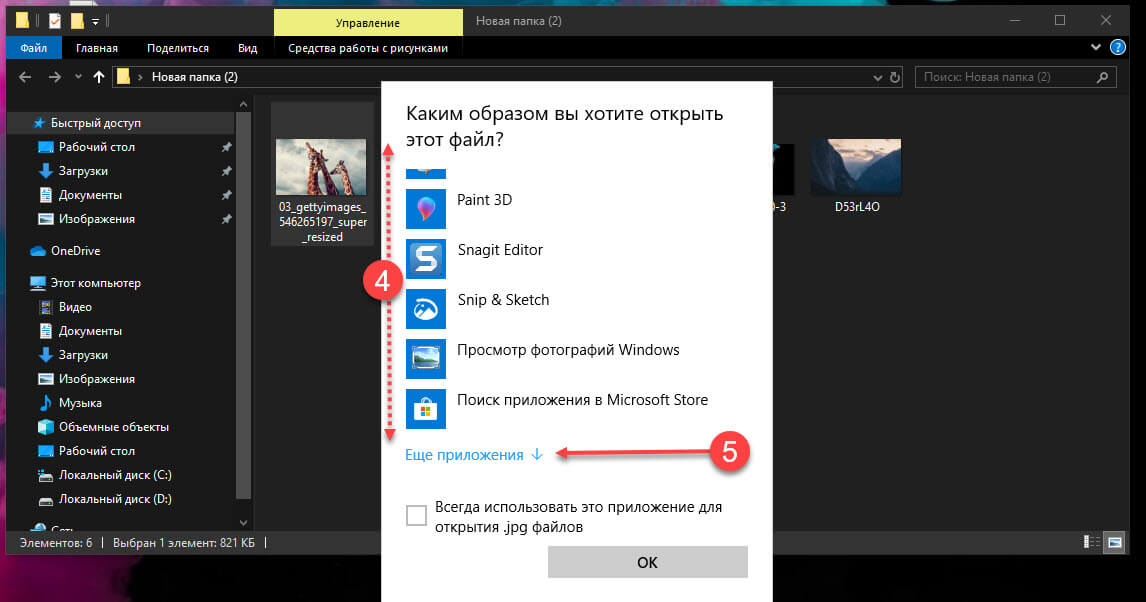
- Кликните правой кнопкой мыши по изображению этого типа и выберите «Открыть с помощью» — «Выбрать другое приложение»
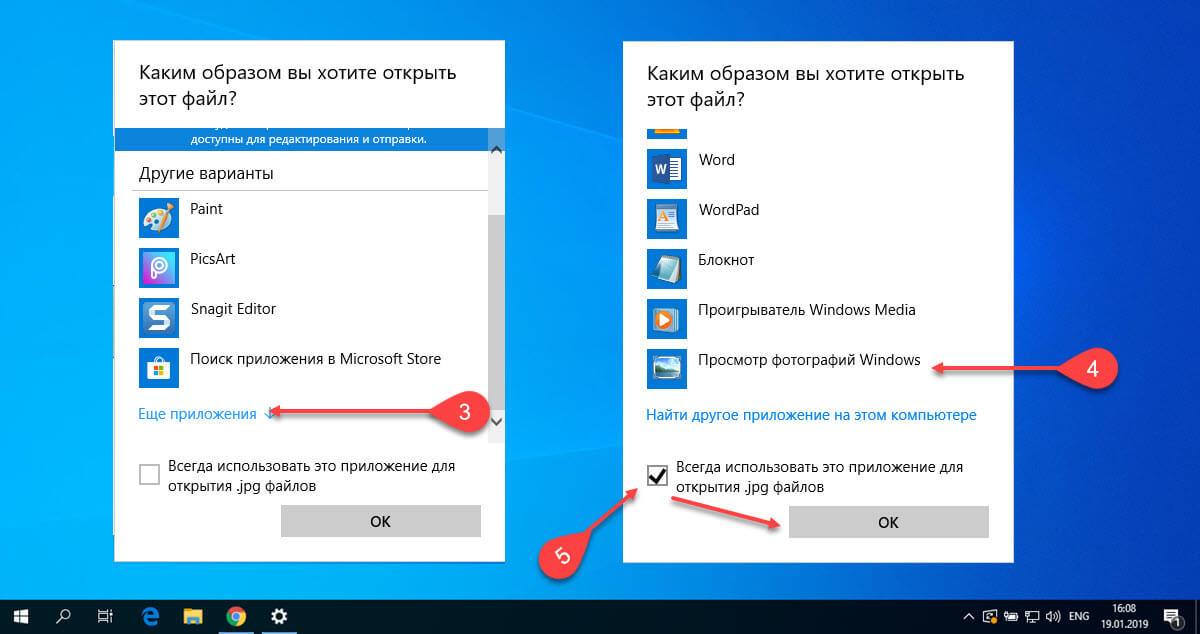
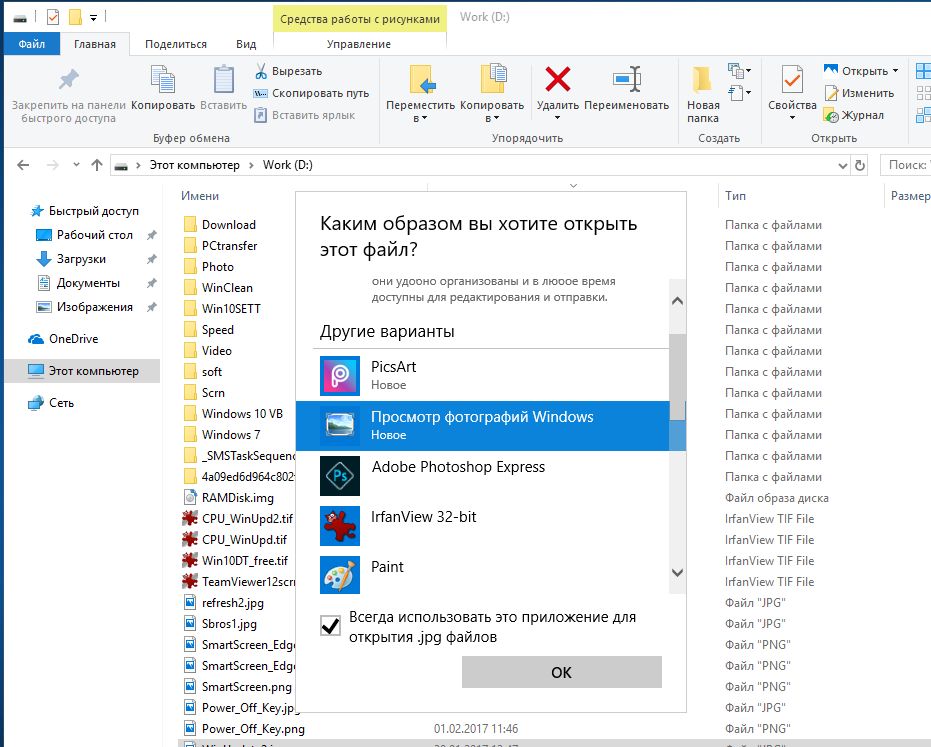
- В окне выбора приложения, нажмите «Еще приложения», после чего выберите «Просмотр фотографий Windows» и отметьте пункт «Всегда использовать это приложение для открытия файлов». Нажмите Ок.

К сожалению, этот метод предполагает, что для каждого типа файлов изображений процедуру потребуется повторить, однако есть способ назначить средство просмотра фотографий для открытия всех поддерживаемых типов фото и картинок:
- Зайдите в Параметры — Приложения — Приложения по умолчанию.
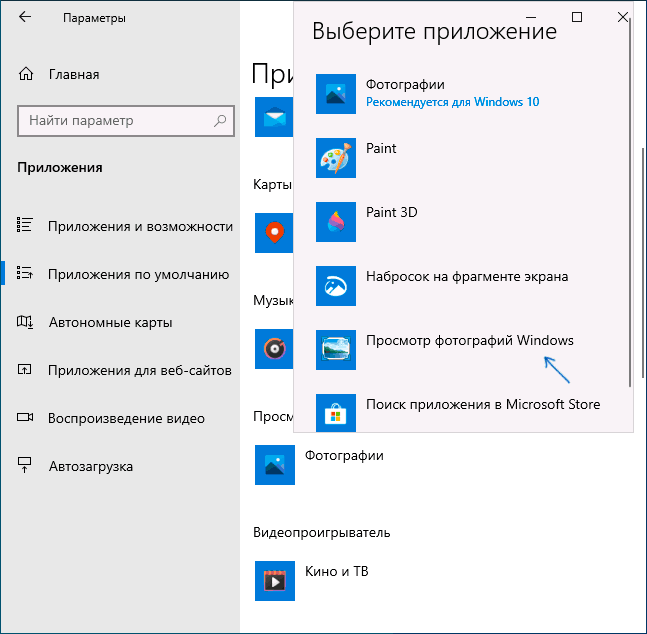
- В пункте «Просмотр фотографий» выберите старое средство просмотра фотографий.

- Дополнительно, в этом же разделе настроек, внизу вы можете открыть «Задать значения по умолчанию по приложению», выбрать Средство просмотра фотографий Windows, нажать кнопку «Управление» и задать, какие типы файлов должны открываться в этой программе.
Видео инструкция
Примечание: если сделать всё описываемое вручную для вас сложно, можно использовать стороннюю бесплатную утилиту Winaero Tweaker, чтобы включить старый просмотр фотографий в Windows 10.
Читайте также: 16 Способов освободить место на диске в Windows 10.
Microsoft в новых версиях Windows 10 скрыла от пользователей старое доброе «Средство Просмотра фотографий Windows», На смену которому пришло современное приложение, под названием «Фотографии» (Photos), нельзя сказать, что новое приложение не удобное, просто не совсем привычное.
Несмотря на то что новое приложение «Фотографии» имеет более богатый функционал в отличии от старого классического, но многие пользователи хотят вернуть «Средство Просмотра фотографий Windows», на самом деле это несложно.
Как вернуть Классическое Средство Просмотра фотографий в Windows 10?

Предлагаем нашим читателям Три способа, с помощью которых, вы сможете установить классический просмотрщик для использования в качестве программы по умолчанию, для просмотра ваших любимых изображений и фотографий.
- Первый способ — позволит вам иметь под рукой готовый Reg файл, вы всегда сможете восстановить средство просмотра фотографий на нескольких компьютерах.
- Второй способ — более быстрый, просто выполните команду в Windows Powershell.
- Третий способ — с помощью приложения и библиотеки shimgvw.dll
Microsoft, не удалила Просмотрщик из Windows 10, установить в настройках Средство Просмотра фотографий Windows по умолчанию нельзя, так как оно отсутствует в списке Приложения по умолчанию. А в Классической панели управления ассоциировать с ним можно только файлы с расширением TIFF. Давайте исправим это ограничение в Windows 10 и включим всеми любимый старый, добрый «Просмотр фотографий».
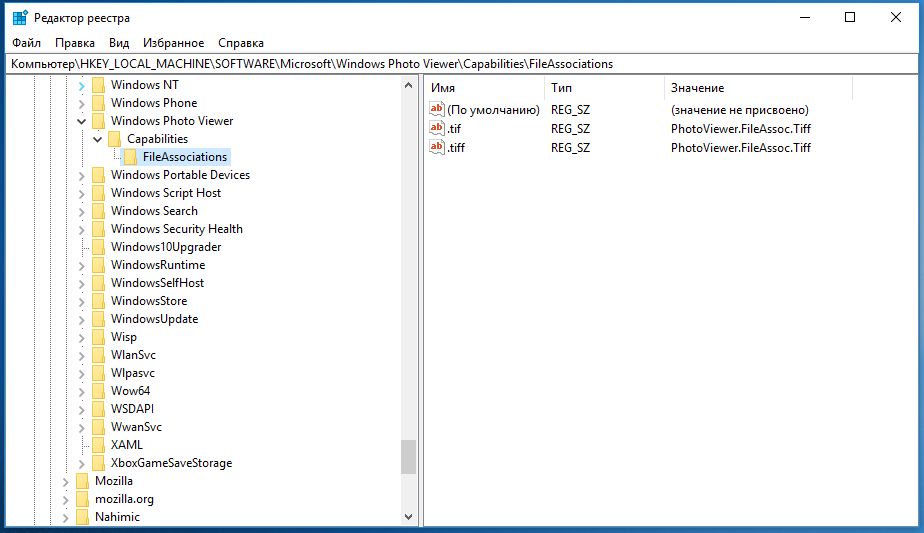
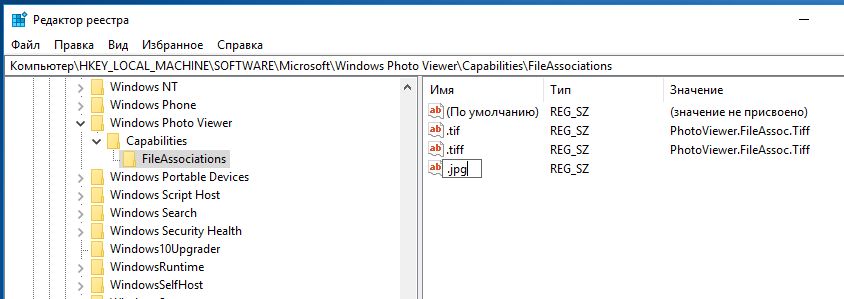
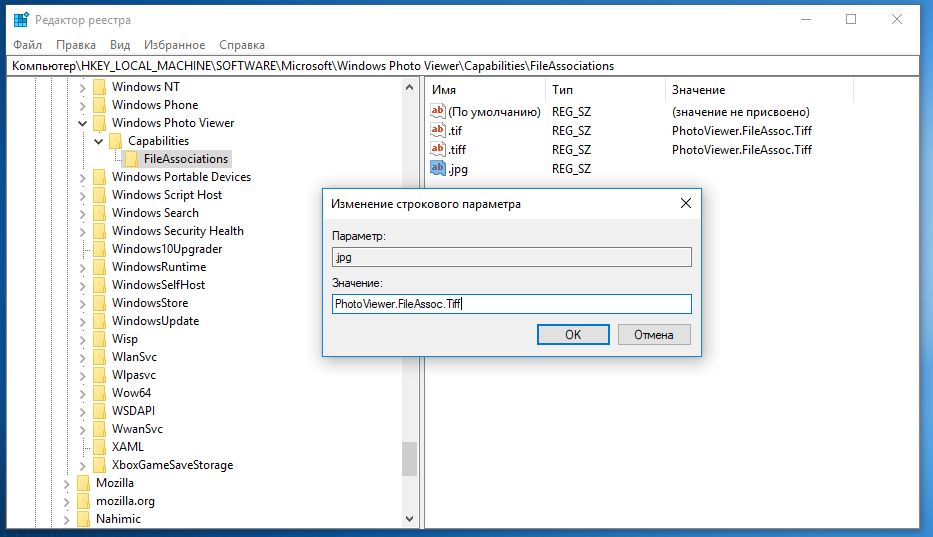
Просмотр фотографий Windows может быть активирован путем редактирования реестра. Необходимо добавить набор значений для ассоциации графических файлов в Раздел реестра —
[HKEY_LOCAL_MACHINE\SOFTWARE\Microsoft\Windows Photo Viewer\Capabilities\FileAssociations].Это можно сделать в ручную или с помощью команды Powershell.
Включить Windows Photo Viewer с помощью готового Reg файла.
Чтобы сэкономить Ваше время, ниже, я добавил уже готовый файл реестра, теперь вам нет необходимость вносить сложные правки в реестре вручную, все что нужно — загрузить архив, распаковать и запустить файл: Windows 10 Photo Viewer.reg.
Шаг 1: Загрузите архив Windows 10 Photo Viewer.zip и распакуйте его.
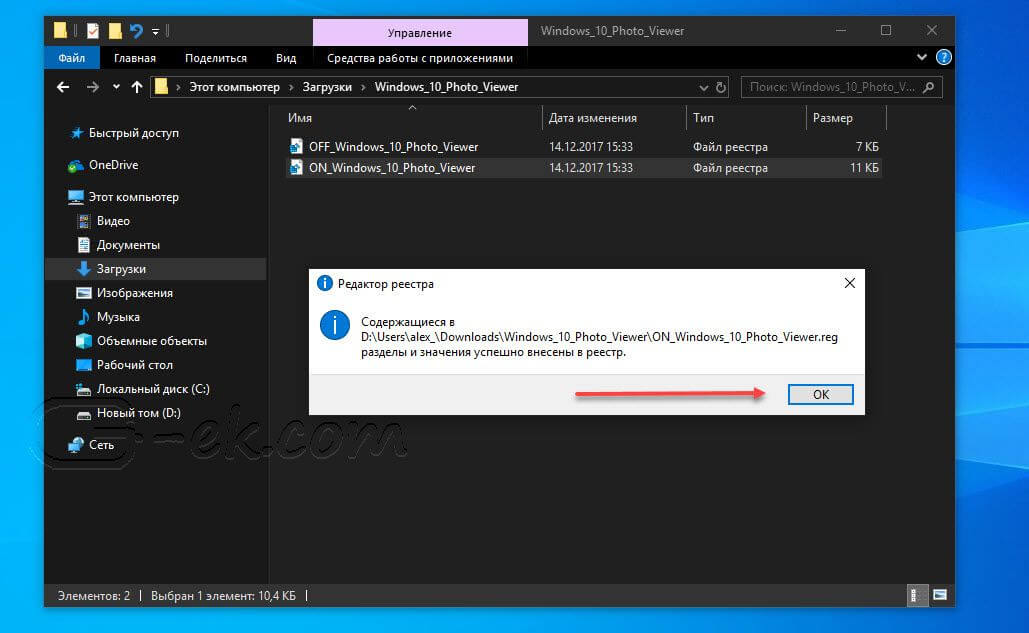
Шаг 2: В полученной папке, найдите и запустите файл — «ON_Windows_10_Photo_Viewer»
Шаг 3: Подтвердите запрос контроля учетных записей и добавление сведений.
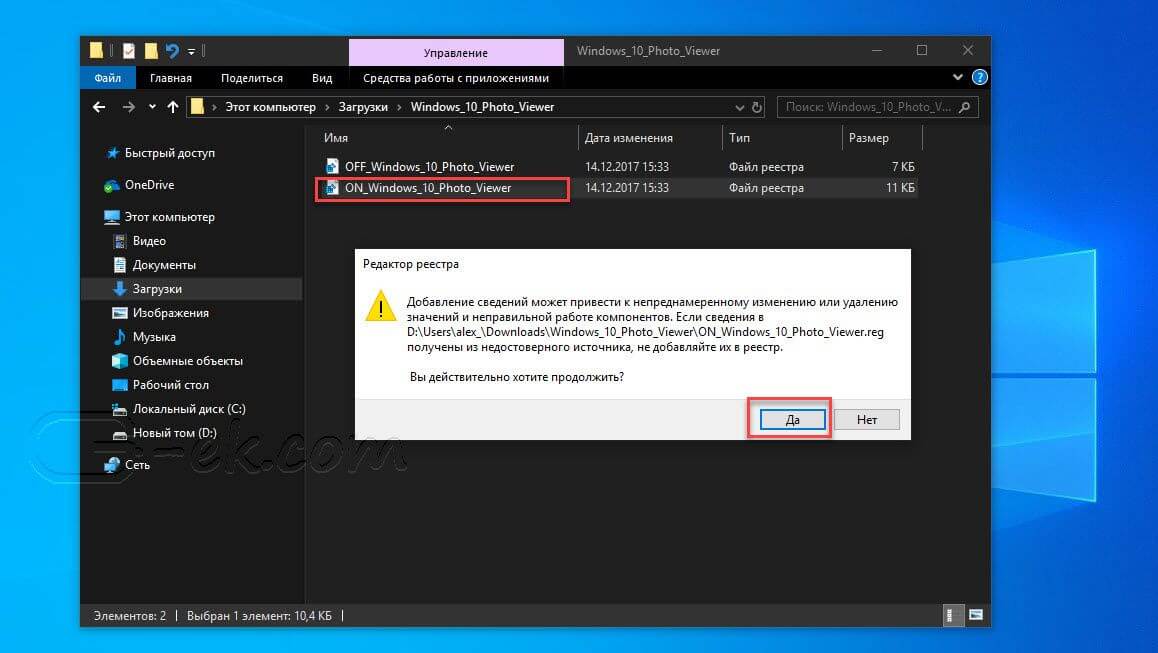
После запуска, все необходимые разделы и значения будут автоматически внесены в реестр, о чем вы будете оповещены, (см. скриншот ниже).
Шаг 4: Теперь откройте Параметры Windows, нажав сочетания клавиш Win + I или нажмите на значок шестеренки в меню «Пуск».
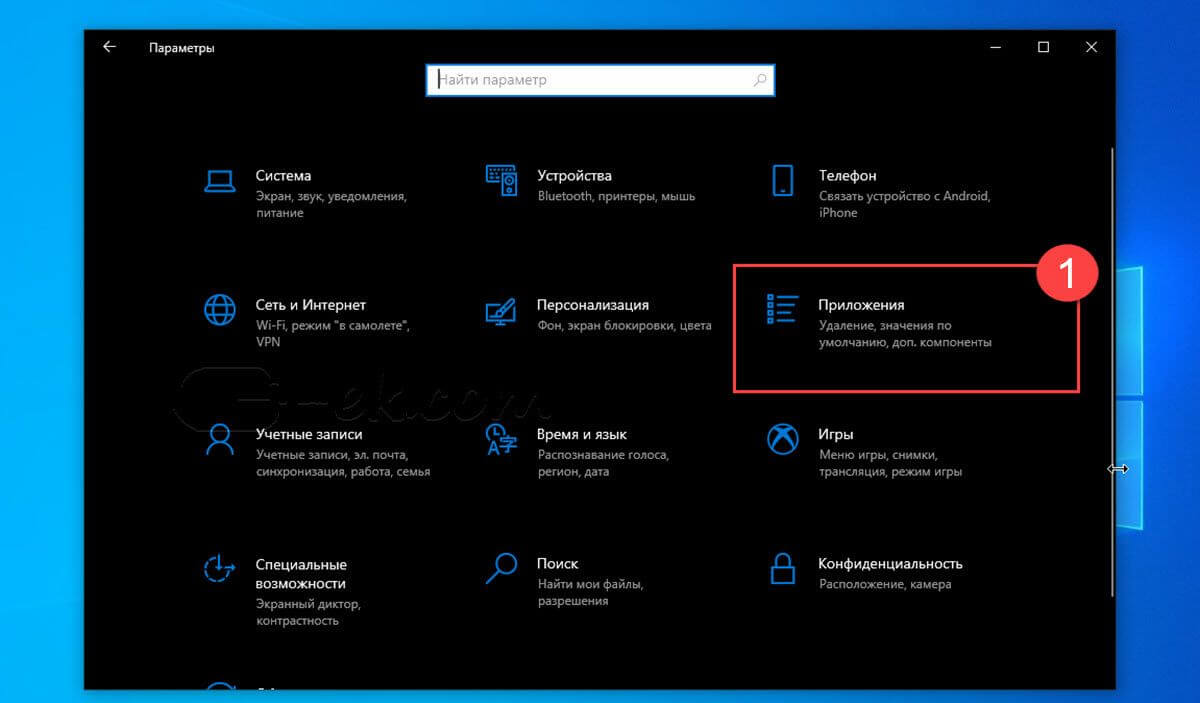
Шаг 5: Перейдите в группу настроек «Приложения» → «Приложения по умолчанию».
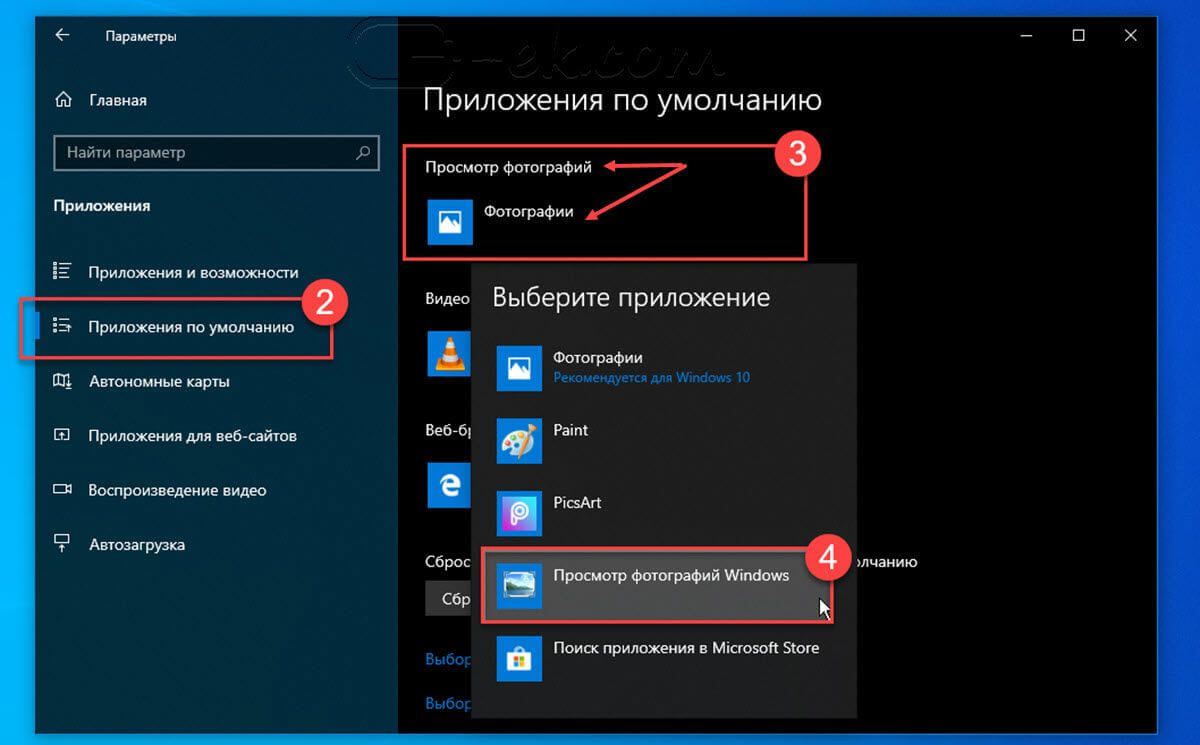
На открывшийся странице «Приложения по умолчанию», найдите раздел «Просмотр фотографий», нажмите на значок приложения которое используется по умолчанию и выберите в выпадающем меню «Просмотр фотографий Windows». См. скрин ниже:
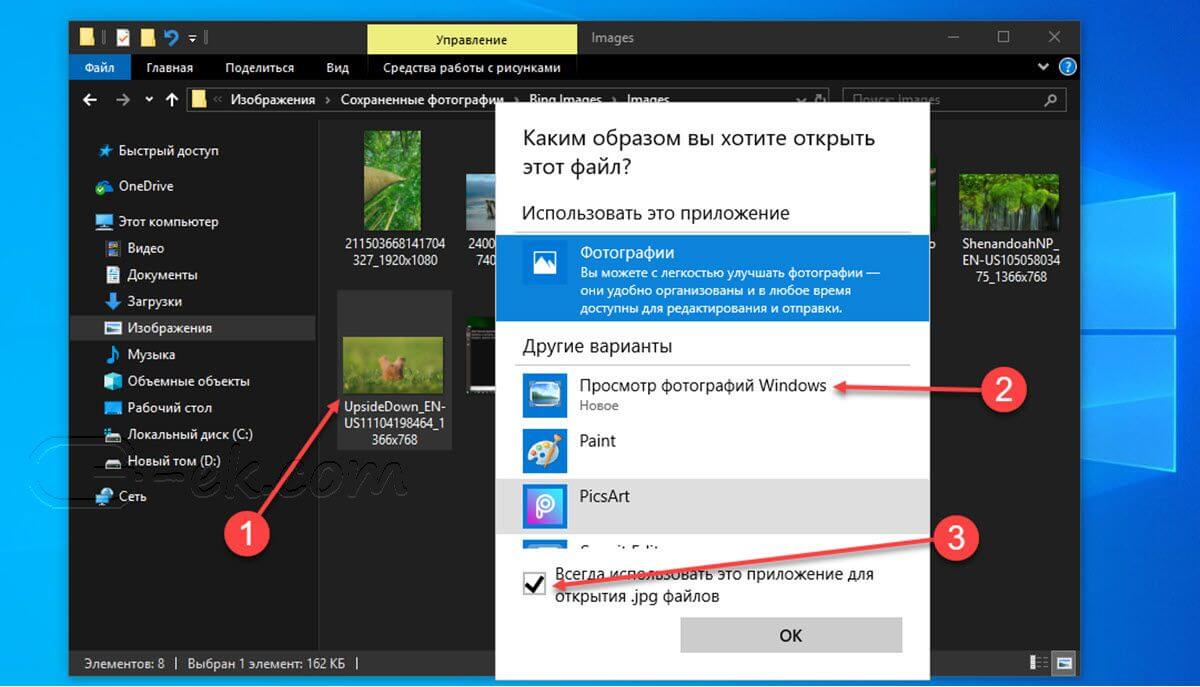
Или, вы можете кликнуть правой кнопкой мыши на любом изображении и выбрать в контекстном меню «Открыть с помощью»
В появившимся окне «Каким образом вы хотите открыть этот файл», выберите «Просмотр фотографий Windows».
Примечание: Если вы захотите вернуть настройки по умолчанию файл отката присутствует в архиве.
Все!
Способ 2 — Включить классическое средство просмотра фотографий с помощью Powershell.
Данный способ отличается от первого, только настройкой Приложения по умолчанию, выполняется для каждого типа изображения.
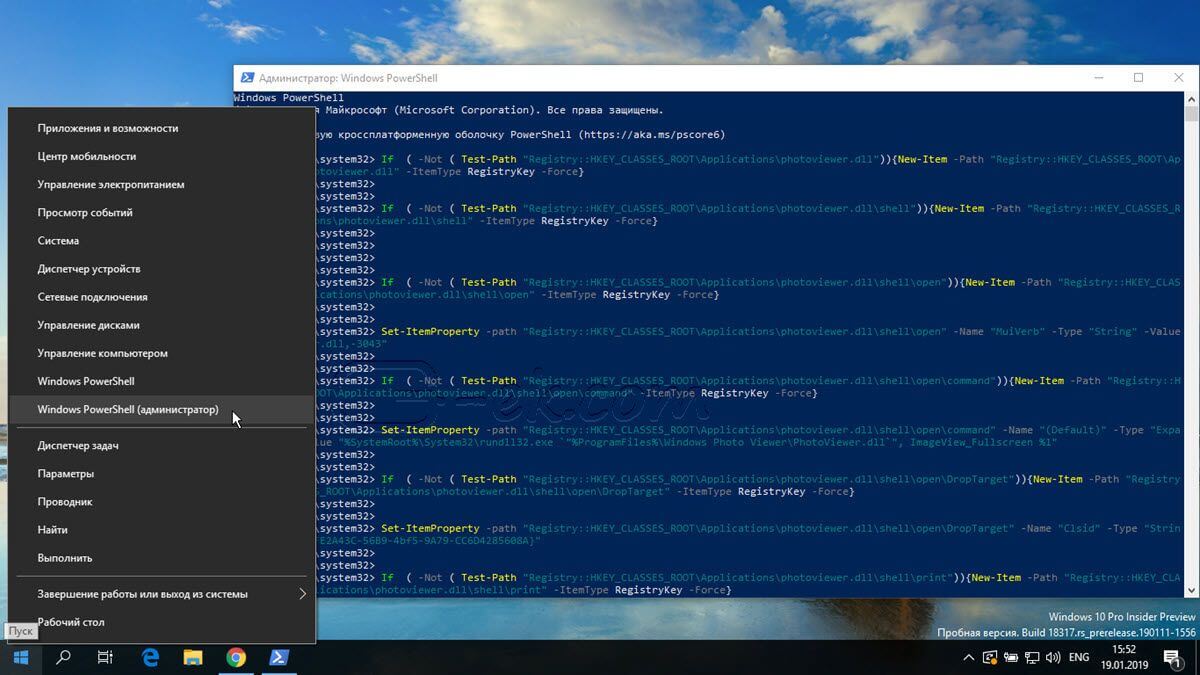
Шаг 1: Кликните правой кнопкой мыши на меню «Пуск».
Шаг 2: В появившемся контекстном меню выберите Windows Powershell (администратор) — Это важно!
Шаг 3: Скопируйте и вставьте следующие команды:
Примечание: Скопируйте и вставьте все команды за один раз включая символ # и нажмите клавишу Enter.
If  ( -Not ( Test-Path "Registry::HKEY_CLASSES_ROOT\Applications\photoviewer.dll")){New-Item -Path "Registry::HKEY_CLASSES_ROOT\Applications\photoviewer.dll" -ItemType RegistryKey -Force}
If  ( -Not ( Test-Path "Registry::HKEY_CLASSES_ROOT\Applications\photoviewer.dll\shell")){New-Item -Path "Registry::HKEY_CLASSES_ROOT\Applications\photoviewer.dll\shell" -ItemType RegistryKey -Force}
If  ( -Not ( Test-Path "Registry::HKEY_CLASSES_ROOT\Applications\photoviewer.dll\shell\open")){New-Item -Path "Registry::HKEY_CLASSES_ROOT\Applications\photoviewer.dll\shell\open" -ItemType RegistryKey -Force}
Set-ItemProperty -path "Registry::HKEY_CLASSES_ROOT\Applications\photoviewer.dll\shell\open" -Name "MuiVerb" -Type "String" -Value "@photoviewer.dll,-3043"
If  ( -Not ( Test-Path "Registry::HKEY_CLASSES_ROOT\Applications\photoviewer.dll\shell\open\command")){New-Item -Path "Registry::HKEY_CLASSES_ROOT\Applications\photoviewer.dll\shell\open\command" -ItemType RegistryKey -Force}
Set-ItemProperty -path "Registry::HKEY_CLASSES_ROOT\Applications\photoviewer.dll\shell\open\command" -Name "(Default)" -Type "ExpandString" -Value "%SystemRoot%\System32\rundll32.exe `"%ProgramFiles%\Windows Photo Viewer\PhotoViewer.dll`", ImageView_Fullscreen %1"
If  ( -Not ( Test-Path "Registry::HKEY_CLASSES_ROOT\Applications\photoviewer.dll\shell\open\DropTarget")){New-Item -Path "Registry::HKEY_CLASSES_ROOT\Applications\photoviewer.dll\shell\open\DropTarget" -ItemType RegistryKey -Force}
Set-ItemProperty -path "Registry::HKEY_CLASSES_ROOT\Applications\photoviewer.dll\shell\open\DropTarget" -Name "Clsid" -Type "String" -Value "{FFE2A43C-56B9-4bf5-9A79-CC6D4285608A}"
If  ( -Not ( Test-Path "Registry::HKEY_CLASSES_ROOT\Applications\photoviewer.dll\shell\print")){New-Item -Path "Registry::HKEY_CLASSES_ROOT\Applications\photoviewer.dll\shell\print" -ItemType RegistryKey -Force}
If  ( -Not ( Test-Path "Registry::HKEY_CLASSES_ROOT\Applications\photoviewer.dll\shell\print\command")){New-Item -Path "Registry::HKEY_CLASSES_ROOT\Applications\photoviewer.dll\shell\print\command" -ItemType RegistryKey -Force}
Set-ItemProperty -path "Registry::HKEY_CLASSES_ROOT\Applications\photoviewer.dll\shell\print\command" -Name "(Default)" -Type "ExpandString" -Value "%SystemRoot%\System32\rundll32.exe `"%ProgramFiles%\Windows Photo Viewer\PhotoViewer.dll`", ImageView_Fullscreen %1"
If  ( -Not ( Test-Path "Registry::HKEY_CLASSES_ROOT\Applications\photoviewer.dll\shell\print\DropTarget")){New-Item -Path "Registry::HKEY_CLASSES_ROOT\Applications\photoviewer.dll\shell\print\DropTarget" -ItemType RegistryKey -Force}
Set-ItemProperty -path "Registry::HKEY_CLASSES_ROOT\Applications\photoviewer.dll\shell\print\DropTarget" -Name "Clsid" -Type "String" -Value "{60fd46de-f830-4894-a628-6fa81bc0190d}"
#
Шаг 4: После выполнения команды закройте окно Powershell и откройте папку с изображениями.
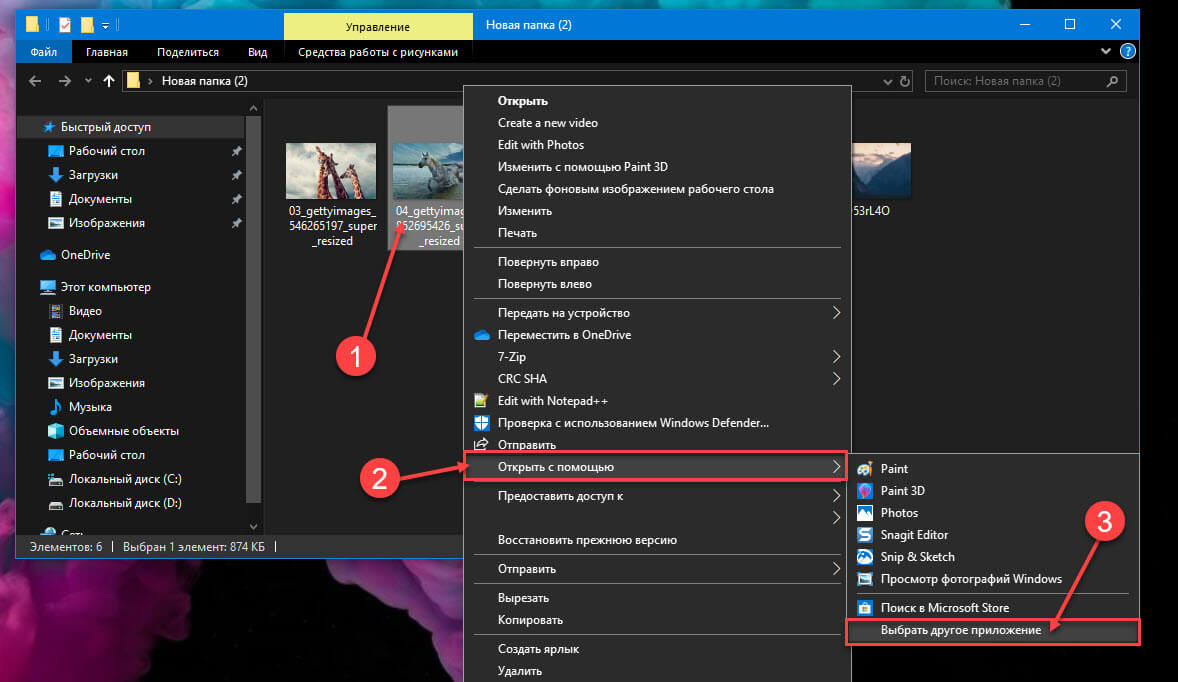
Шаг 5: Нажмите правой кнопкой мыши на любой картинке и выберите в контекстном меню «Открыть с помощью» → «Выбрать другое приложение».
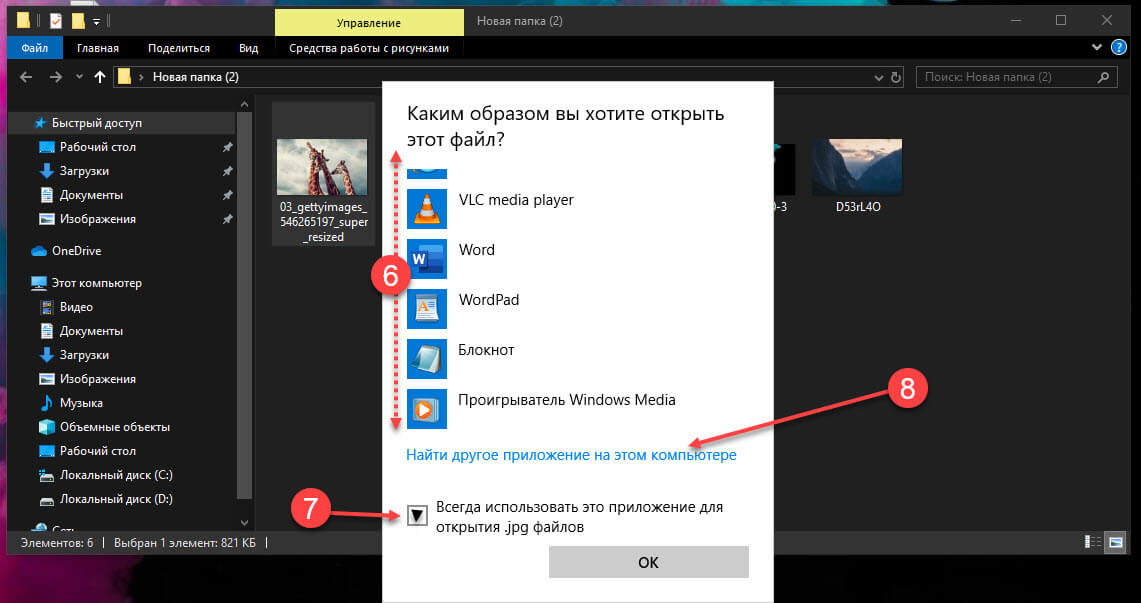
Шаг 6: В открывшимся окне Найдите и нажмите «Просмотр фотографий Windows», Для того чтобы фото и картинки открывались всегда с помощью «Средства Просмотра фотографий Windows» не забудьте поставить галочку как на скриншоте ниже:
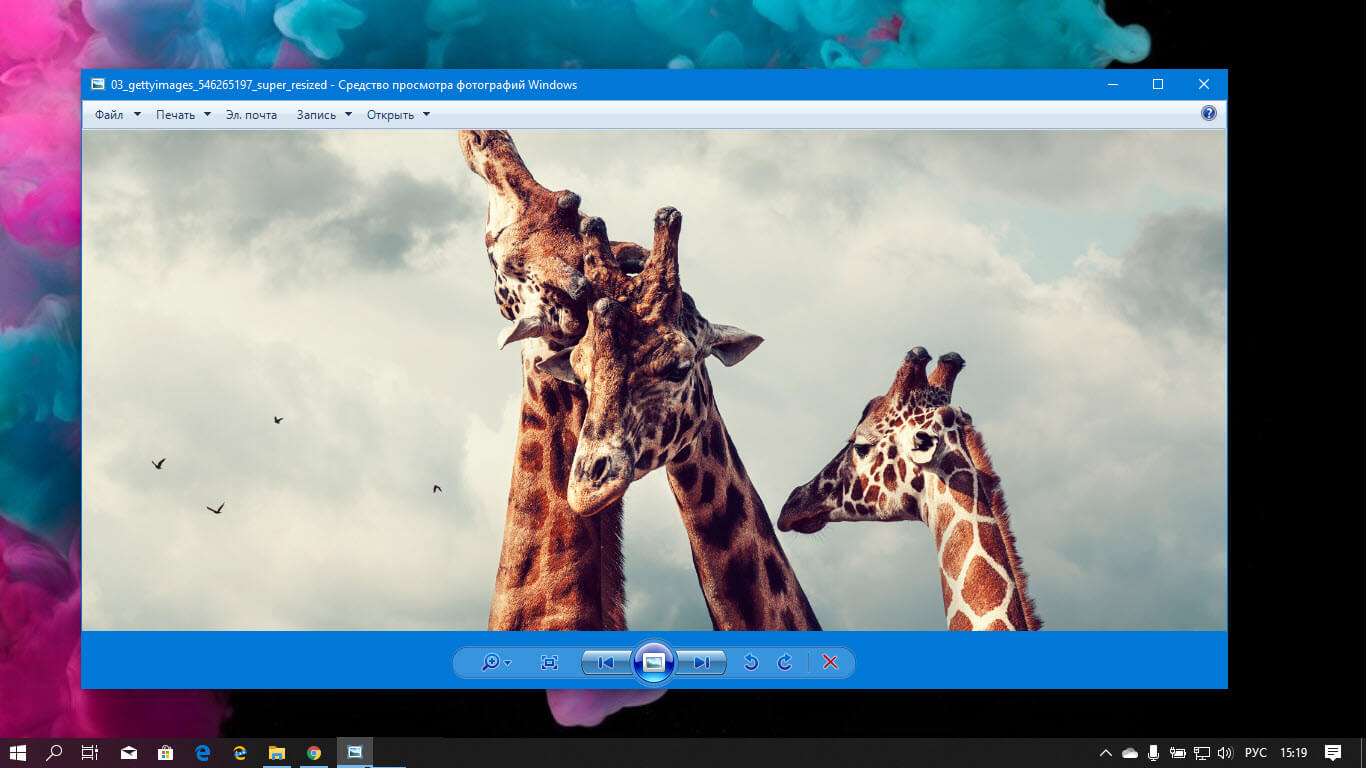
Все! вы справились, перейдите в папку с изображениями или фотографиями и дважды кликните на любой картинке, изображение откроется в «Средстве Просмотра фотографий Windows»!
Способ 3 — Как вернуть стандартный просмотрщик изображений с помощью приложения.
Поскольку способы выше работают при условии что в системе есть файл библиотеки динамической компоновки shimgvw.dll. Еще один способ вернуть средство просмотра фотографий, с помощью отдельного приложения которое уже включает в себя нужную библиотеку если ваша по какой либо причине, повреждена.
Оригинальный просмотрщик картинок в Windows — это не совсем обычное приложение. Расположено оно в библиотеке shimgvw, следовательно и запустить его напрямую нельзя — нужен как минимум rundll32.
Чтобы сделать загрузчик не нужно ничего кроме небольшого числа функций WinAPI, получилось мини-приложение не требующее установки, которое включает в себя две библиотеки shimgvw.dll из Windows 7 и XP SP3, с размером всего 502 килобайта. На выходе получаем независимый просмотрщик картинок, который можно записать на флешку и всегда иметь под рукой.
Шаг 1: Загрузите мини приложение: Средство просмотра изображений для Windows 10.
Шаг 2: Распакуйте полученный архив Sredstvo_prosmotra_fotografij.zip в любое место, я скопирую содержимое архива в корневую директорию диска С:\.
Шаг 3: Теперь, откройте папку с изображениями, кликните на одном из них правой кнопкой мыши и выберите «Открыть с помощью» → «Выбрать другое приложение».
Шаг 3: В окне запроса «Каким образом вы хотите открыть этот файл» прокрутите список в самый низ и нажмите ссылку «Еще приложения».
Шаг 4: В следующем окне, установите флажок для «Всегда использовать это приложение для открытия файла jpg» и нажмите ссылку «Найти другое приложение на этом компьютере».
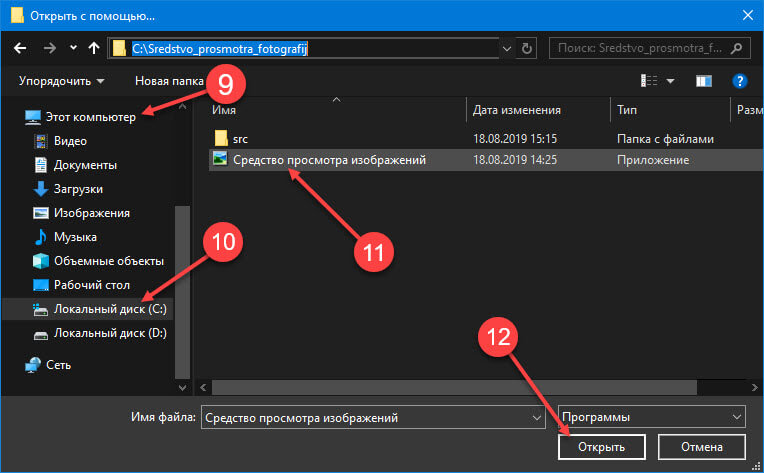
Шаг 5: Теперь перейдите в папку где вы распаковали загруженный архив (я поместил содержимое архива в корень диска С:\Sredstvo_prosmotra_fotografij), выберите файл «Средство просмотра изображений» и нажмите кнопку «Открыть».
Все! Просмотрщик работает!
Повторите эту процедуру для таких типов файлов: .jpg, .jpeg, .png, .tiff, .bmp, .gif, .tif Или, Вы можете настроить ассоциации файлов в приложении «Параметры» перейдите «Приложения» → «Приложения по умолчанию» → «Выбор стандартных приложений для всех типов».
Для того чтобы вернуть просмотр фотографий как в XP, в нем работают анимированные гифки, вам придётся выполнить часть данного руководства, описанную выше. После выполнения, просто переименуйте в папке «Sredstvo_prosmotra_fotografij» библиотеку shimgvw.dll в Win7-shimgvw.dll, а xp-shimgvw.dll в shimgvw.dll.
Все!
Вам может быть интересно: Как вернуть классическое Средство Просмотра фотографий в Windows 11
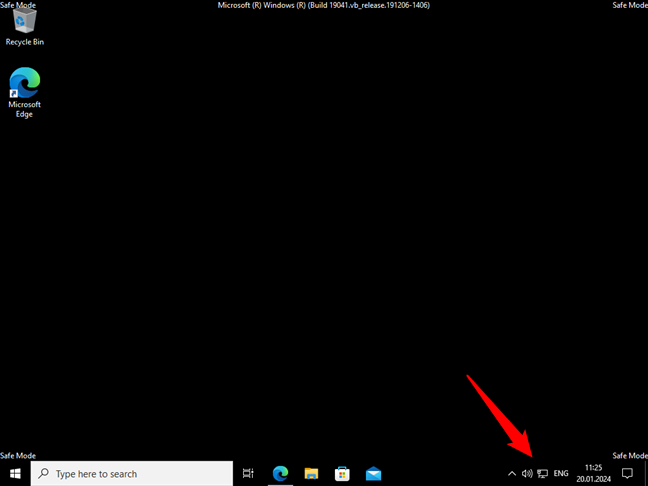
If your Windows is acting up or not booting at all, you may want to try Safe Mode to fix it. Safe Mode is a special way of starting Windows that only loads the essential stuff, so you can troubleshoot and repair the issues. But sometimes, you need more than just the basics, like internet access. That’s where Safe Mode with Networking comes in handy. It’s a variation of Safe Mode that also lets you connect to the web and other networks. In this guide, I’ll show you how to start Windows 10 in Safe Mode with Networking using various methods, including from the command line and the graphical user interface of this operating system:
NOTE: This guide covers the ways in which you can boot Windows 10 into Safe Mode with Networking. If you’d like to know more about Safe Mode, what it is, and why it’s useful, you should read this article first: What is Safe Mode? Also, if you’re interested in starting your computer into standard Safe Mode without networking or internet access, read this tutorial instead: How to boot Windows 10 in Safe Mode.
What is Safe Mode with Networking in Windows 10? What’s the difference between Safe Mode and Safe Mode with Networking?
The default Safe Mode starts Windows using only a few core services and drivers to avoid as many issues as possible. Unfortunately, the downside is that the minimal Safe Mode doesn’t let you connect to the network or the internet, so you’re kind of isolated.
That’s where the Safe Mode with Networking environment comes in handy. If you need to use the internet while in Safe Mode to make it easier to troubleshoot your Windows 10 computer, you should try Safe Mode with Networking. This option lets you start Windows with only the essential services and drivers, but it also includes the networking components. However, keep in mind that this only works with wired Ethernet connections. Safe Mode with Networking doesn’t work with Wi-Fi. That’s because wireless cards need more complex drivers that are not loaded by Windows 10 when running in Safe Mode.
Safe Mode with Networking
Safe Mode with Networking can be tremendously helpful when you need to download repair tools from the internet or when your computer is infected with malware and you must download and run antivirus tools that are up to date. Now let’s see how to boot into Safe Mode with Networking in Windows 10. I’ll first cover the ways to start Safe Mode with Networking when you can’t log in to Windows 10 and then the ones to use when you can sign in with your user account.
How to boot in Safe Mode with Networking when you can’t log in to Windows 10
Having trouble starting or logging in to Windows 10? You can still boot your computer into Safe Mode with Networking in order to fix the problem(s). Here’s how:
1. How to restart Windows 10 in Safe Mode with Networking using the Shift + Restart keyboard shortcut
One of the easiest methods to boot Windows 10 into Safe Mode with Networking is to restart it while keeping the Shift key pressed. Furthermore, you can do that from the sign-in or lock screen without having to actually sign in with a user account on your Windows 10 computer:
Boot your Windows 10 PC as you would normally do. When you get to the sign-in screen, press and hold the Shift key while clicking the Power button, and then Restart.
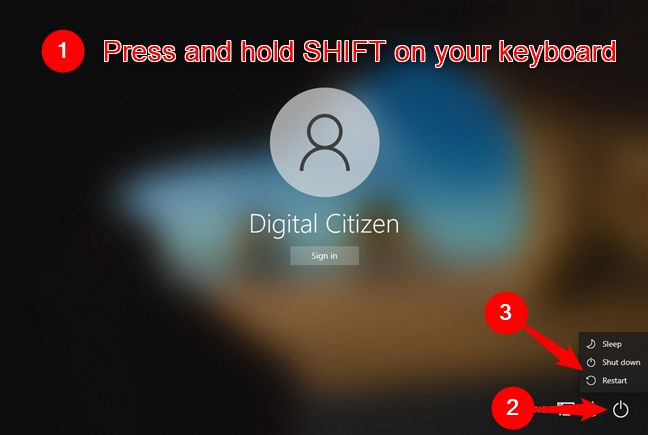
How to start Windows 10 in Safe Mode with Networking from the Sign In screen
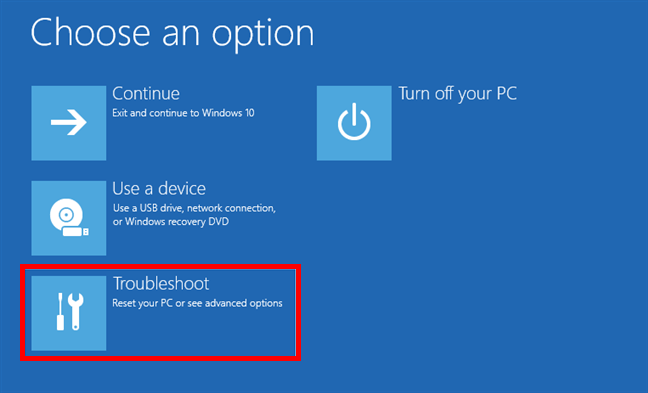
After a short while, you should see a blue screen with four options: “Continue (Exit and continue to Windows 10),” “Use a device (Use a USB drive, network connection, or Windows recovery DVD),” “Troubleshoot (Reset your PC or see advanced options),” and “Turn off your PC.” Click or tap the third one: Troubleshoot.
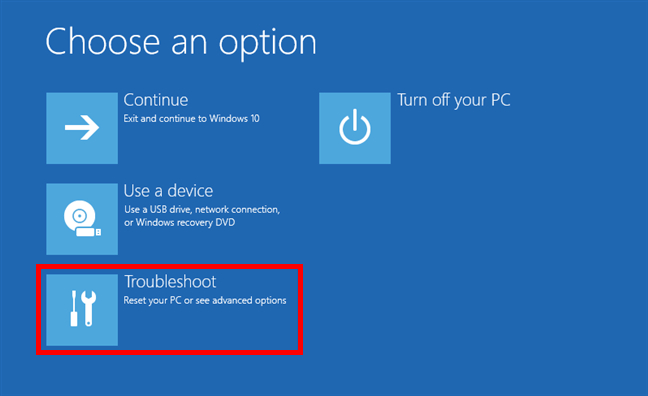
Click Troubleshoot (Reset your PC or see advanced options)
On the Troubleshoot screen, choose Advanced options.

Select Advanced options
On the Advanced options screen, click or tap on “Startup Settings (Change Windows startup behavior).”
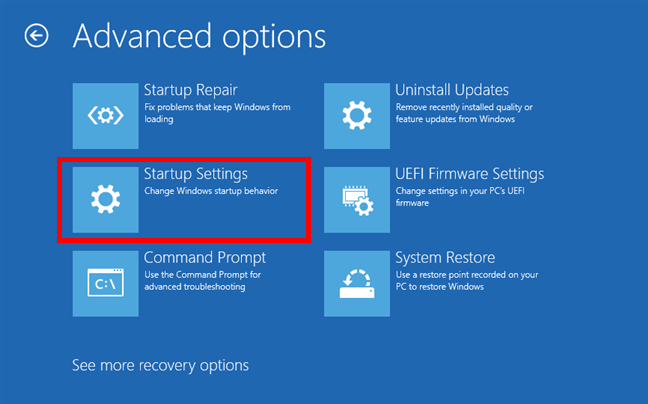
Enter Startup settings in Windows 10’s recovery environment
Next, on the Startup Settings screen, click or tap on the Restart button.
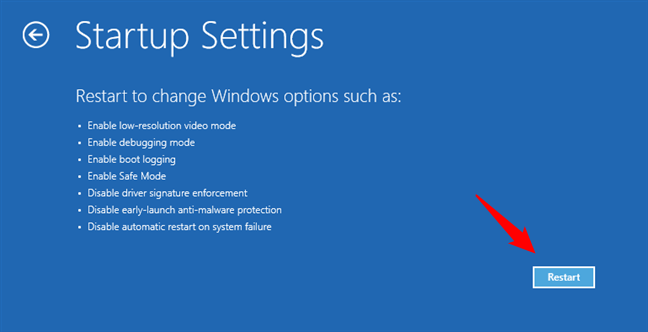
Choose to restart Windows 10
After a short while, Windows 10 restarts and gives you some options for how it will boot up. To make it go into Safe Mode with Networking, choose option number five: “5) Enable Safe Mode with Networking”. To select it, either press the number 5 key or the F5 function key on your keyboard.
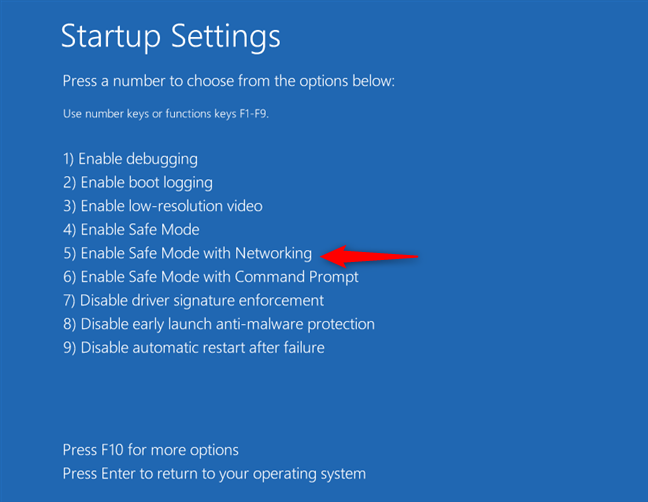
Press 5 or F5 to restart Windows 10 in Safe Mode with Networking
Your Windows 10 computer will now restart and boot into Safe Mode with Networking.
2. How to open boot into Safe Mode with Networking when Windows 10 shows a black screen
If Windows 10 fails to boot normally three times consecutively, it automatically enters Automatic Repair mode the next time you try to start it. You can access the Safe Mode with Networking from there. Trigger the Automatic Repair mode manually by interrupting the normal boot process three times over: use the reset or the power button on your Windows 10 computer to stop it during boot.
If you use the power button, you might have to keep it pressed for at least 4 seconds to force the power off. When your Windows 10 computer enters the Automatic Repair mode, the first thing you see is a screen letting you know that the operating system is “Preparing Automatic Repair.”
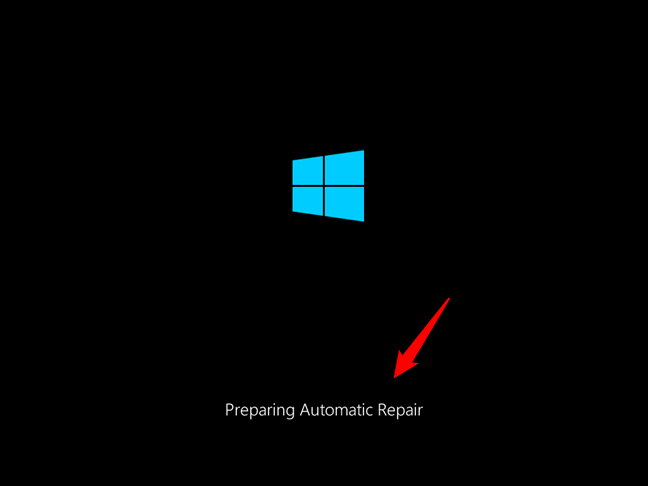
How to boot into Safe Mode from a black screen
After a short while, the Automatic Repair tries to diagnose the problems that keep your Windows 10 PC from booting successfully.
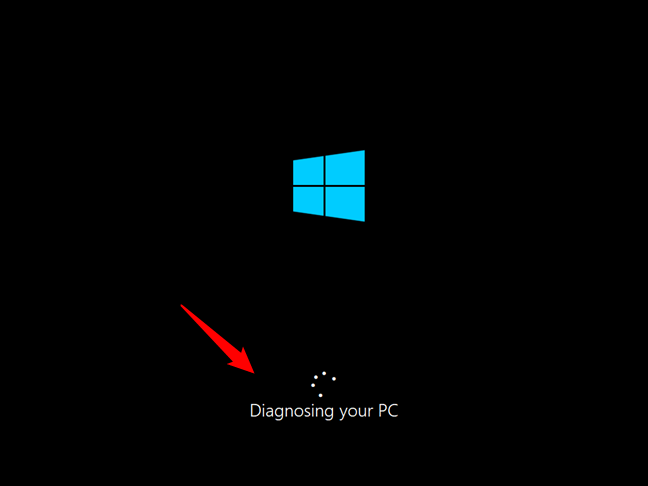
Windows 10 is diagnosing your PC
When the Automatic Repair screen is loaded, click or tap on the Advanced options button.
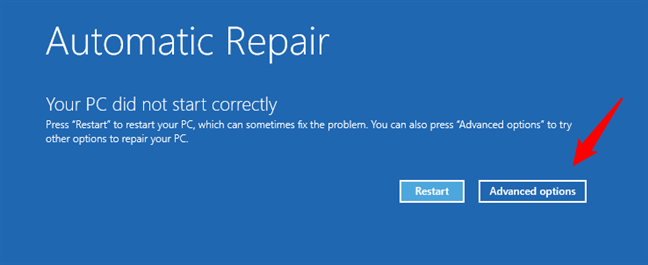
Advanced options on the Automatic repair screen
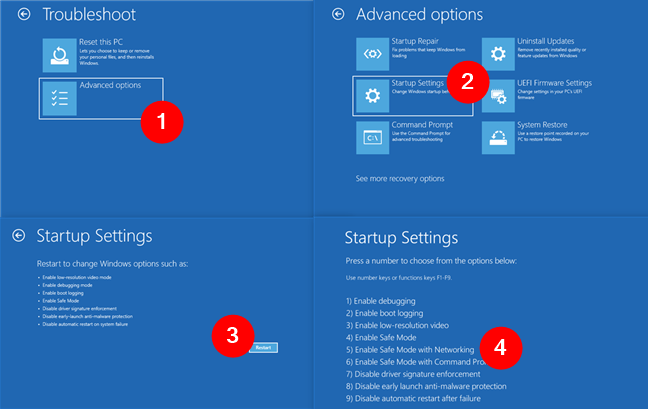
Then, the “Choose an option” screen loads. Click or tap on Troubleshoot and take the same steps shown in this guide’s first method. In short, follow this path: Troubleshoot > Advanced options > Startup Settings > Restart > Enable Safe Mode with Networking (press the 5 or the F5 key).

Go to Troubleshoot > Advanced options > Startup Settings > Restart > Enable Safe Mode with Networking
3. How to restart in Safe Mode with Networking from the command line, with a Windows 10 installation disc or USB stick
If your PC doesn’t boot Windows 10, but you have access to another computer, you can use the working computer to create a Windows 10 installation DVD or USB memory stick. Download Windows 10 and create your own installation media. Then, insert the DVD or the USB memory stick into your non-working Windows 10 computer and boot from it. Wait for the Windows 10 setup wizard to load, and choose the language and keyboard layout you prefer. Then, click or tap Next.
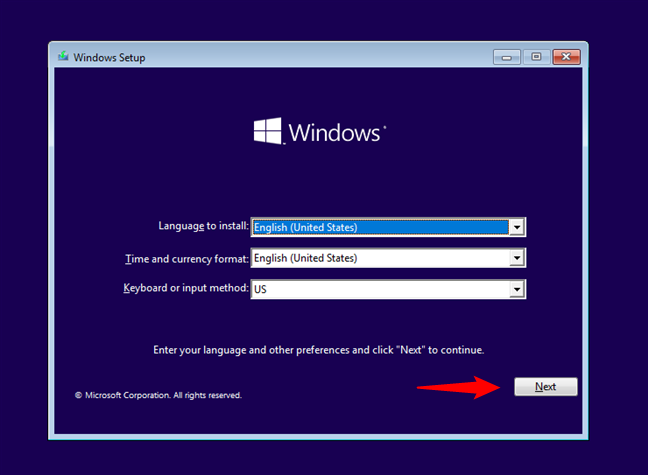
The Windows 10 Setup first screen
On the next screen, don’t click/tap on Install now. Instead, look at the bottom left part of the wizard and click/tap on “Repair your computer.”
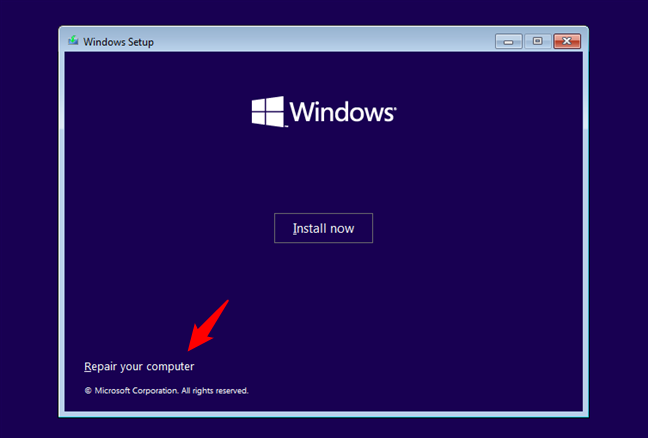
Click on Repair your computer
The screen called “Choose an option” loads. On it, click or tap Troubleshoot.
Select Troubleshoot
The Troubleshoot screen loads. On it, click or tap Advanced options.

Select Advanced options
A screen called Advanced options is loaded: click or tap “Command Prompt (Use the Command Prompt for advanced troubleshooting).”
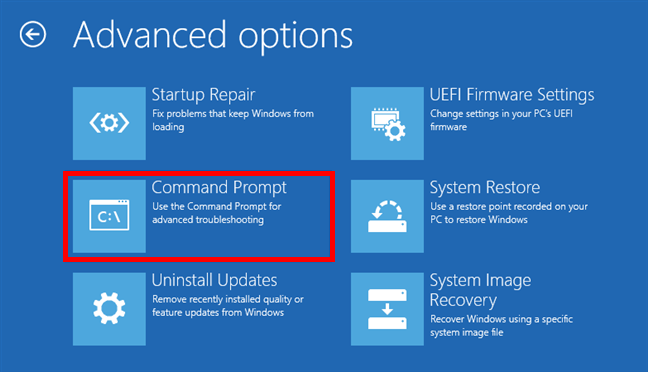
Open Command Prompt
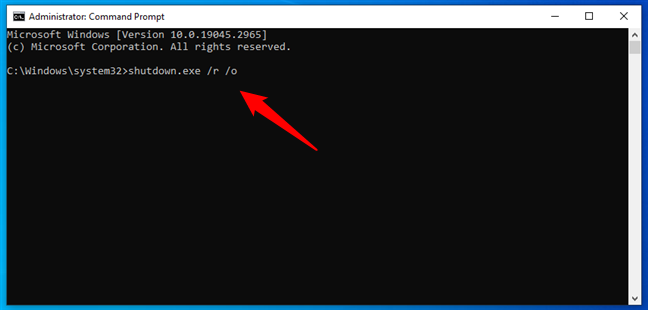
To restart Windows 10 in Safe Mode with Networking from Command Prompt, run this command:
bcdedit /set {default} safeboot network
After you press Enter on your keyboard, the Command Prompt should state: “The operation completed successfully.”
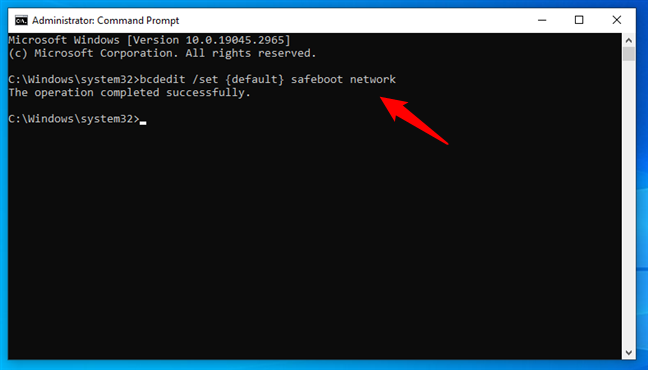
How to restart Windows 10 in Safe Mode with Networking from command line
Close the Command Prompt and then click or tap on “Continue (Exit and continue to Windows 10)”.
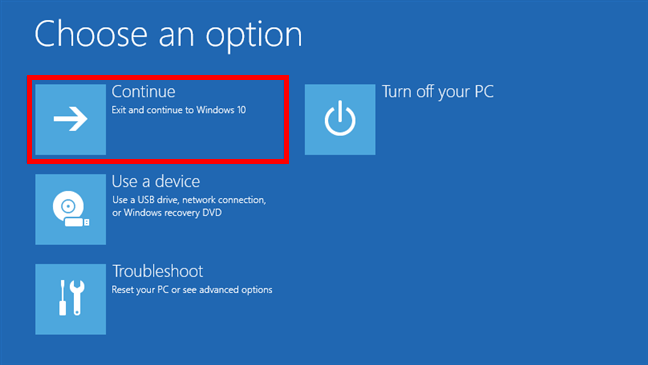
Choose Continue to start Windows 10 in Safe Mode with Networking
After your PC restarts, Windows 10 will boot into Safe Mode with Networking.
IMPORTANT: To get back to normal boot after you’ve finished repairs, follow the same steps, but run this command instead:
bcdedit /deletevalue {default} safeboot
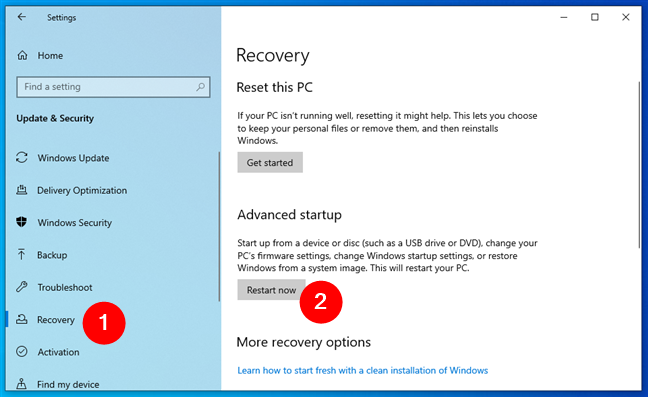
4. How to start Windows 10’s Safe Mode with Networking from a recovery drive
If you already have a recovery disk or you create one on another Windows 10 computer, you can use it to boot your broken Windows 10 PC into Safe Mode with Networking.
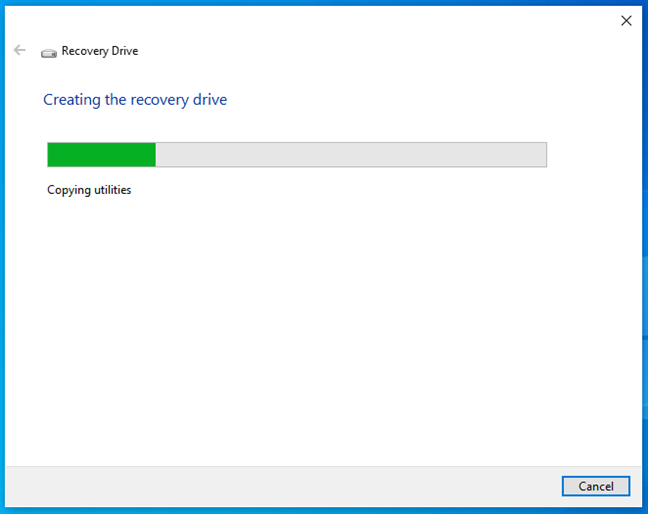
Creating a recovery drive in Windows 10
Plug the recovery drive into your Windows 10 PC and use it to boot. The first screen you see asks you what keyboard layout you prefer to use. Click or tap on the one you want.
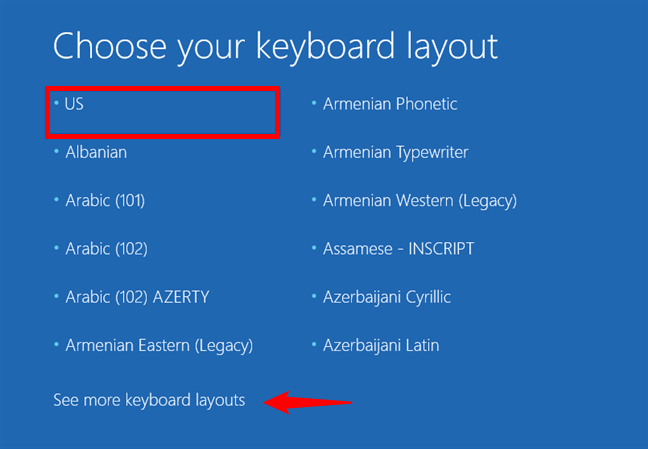
Choose your keyboard layout
Then, on the “Choose an option” screen, click or tap on “Troubleshoot (Reset your PC or see advanced options.” The next steps are the ones shown in the first method from this guide. Essentially, you should follow this path: Troubleshoot > Advanced options > Startup Settings > Restart > Enable Safe Mode with Networking (press the 5 or the F5 key).
Go to Troubleshoot > Advanced options > Startup Settings > Restart > Enable Safe Mode with Networking
How to boot in Safe Mode with Networking when you can log in to Windows 10
If you want to boot your Windows 10 PC in Safe Mode with Networking, and you can still log in normally, here’s are your options:
5. How to start Windows 10 in Safe Mode with Networking using Shift + Restart
If you’re signed in to Windows 10, open the Start Menu. Press and keep the Shift key down, click the Power button, and select Restart.
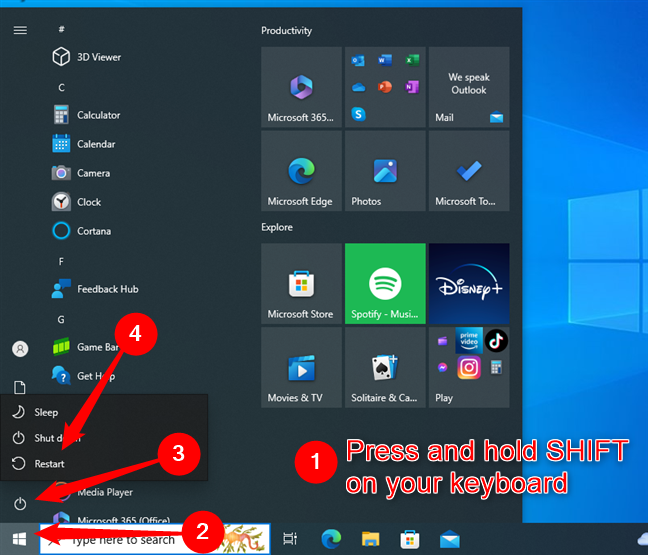
Press Shift and select Restart to get to Windows 10’s Safe Mode with Networking
After a short while, you should see a blue screen with four options: “Continue (Exit and continue to Windows 10),” “Use a device (Use a USB drive, network connection, or Windows recovery DVD),”, “Troubleshoot (Reset your PC or see advanced options),” and “Turn off your PC.” Click or tap on the third one — Troubleshoot — and then take the same steps shown in the first method of this guide. In short, go to Troubleshoot > Advanced options > Startup Settings > Restart > Enable Safe Mode with Networking (press the 5 or the F5 key).


")