
To change the Security Identifier (SID) on Windows 10 using PowerShell, you can utilize the `New-Sid` cmdlet to generate a new SID and apply it accordingly, though care should be taken as this can affect system security and stability.
# Example of changing SID (Note: Use with caution)
Import-Module ActiveDirectory
$NewSID = New-Guid
Set-ADUser -Identity "username" -Replace @{objectSID=$NewSID}
Understanding SID
What is a Security Identifier (SID)?
A Security Identifier (SID) is a unique value utilized by Windows operating systems to identify users, groups, and other entities within the system security. Each account or group has a distinct SID, which Windows uses to enforce permissions and access controls. Whenever a user logs onto a system, their SID is used in the backend to verify and authenticate permissions for files, folders, and resources.
Why Changing SID is Necessary
Changing the SID becomes crucial in certain scenarios, particularly when you deal with system migrations or when cloning machines. If multiple systems have the same SID, this can result in serious security issues, such as access violations where one system might incorrectly grant permissions to users on another. Duplicate SIDs can lead to conflicts in user authentication and data access, making it essential to change the SID when duplicating or migrating Windows systems, especially in environments that use virtualization technology.
Mastering Wget in Windows PowerShell for Easy Downloads
Prerequisites
PowerShell Requirements
Before you embark on the journey to change SID in Windows 10 using PowerShell, ensure that you are running a compatible version of PowerShell. Windows 10 typically comes with PowerShell 5.1 or later, which is suitable for this task. Additionally, administrative rights are a must; you need full permissions to execute the commands related to SID modifications.
Backup Your System
Creating a backup of your system is a critical step prior to any significant adjustments. Backing up your data ensures that you can restore it in the event something goes wrong during the SID change process. You can utilize built-in tools like Windows Backup or third-party applications to create a complete system image. Always remember: It’s better to be safe than sorry!
Unlocking PWD in Windows PowerShell: A Quick Guide
Changing SID Using PowerShell
Overview of the Process
Changing SID involves a series of steps that include preparation and executing specific commands in PowerShell. The primary tool for this operation is Sysprep, which helps generalize the system information and assign a new SID upon reinstallation.
Creating a New SID
Using the Sysprep Tool
Sysprep is a Microsoft tool designed for Windows systems to prepare a system for disk imaging or hardware changes. It works well for changing the SID when you need to deploy a cloned installation.
To initiate the process, you will use the following command in an elevated Command Prompt (running as an administrator):
sysprep /oobe /generalize /shutdown
Here’s a brief explanation of each parameter:
- /oobe: Starts the system in the Out-Of-Box Experience, allowing users to set up their Windows installation.
- /generalize: Removes all system-specific data, including the SID, enabling the system to receive a new SID when it boots up next.
- /shutdown: Powers down the system after Sysprep completes its work.
Running PowerShell to Change SID
After running the Sysprep command, the next step involves executing PowerShell commands to facilitate further actions and verification.
New-Sysprep
This command informs the system to prepare for the next boot process where it will generate a new SID.
Change User in PowerShell: A Simple Guide
Example Scenario
Step-by-step Guide to Changing SID
Scenario: Cloning a Windows Installation
Imagine you have cloned a Windows installation; the following steps detail the approach to changing the SID effectively.
Step 1: Prepare the Cloned System
Before changing the SID, ensure the cloned system has all necessary drivers and updates. This is crucial for the proper function once the SID change occurs.
Step 2: Boot into the Cloned System
When you first boot into the cloned system, it might recognize the existing SID. Some applications may prompt errors or access issues if the same SID is detected.
Step 3: Open PowerShell as Administrator
To execute SID-related commands, you need PowerShell open with administrative privileges:
Start-Process powershell -Verb runAs
Step 4: Execute Sysprep Using PowerShell
Back in PowerShell, rerun the Sysprep command as previously mentioned:
sysprep /oobe /generalize /shutdown
After executing this command, the system will perform the necessary actions and then shut down. The next time you boot, it will undergo the Out-Of-Box Experience and create a new SID.
Understanding Microsoft.PowerShell.Commands.Internal.Format.FormatStartData
Post-SID Change Confirmation
Verifying the Change
To confirm the successful SID change, you can use the following PowerShell command:
Get-WmiObject Win32_SecurityIdentifier
This command retrieves the SID for the current system. You should see a new SID reflected in the output.
Troubleshooting
Common Issues
During the SID change process, various issues might arise. Here are a few common problems along with possible solutions:
- Sysprep Fails to Run: Ensure that there are no pending Windows Updates and that the system isn’t in the middle of an upgrade.
- Duplicate SID Error: If you encounter this upon booting after SID change, double-check the cloning process and ensure that the local account settings are reset correctly.
Mastering Microsoft.PowerShell.Commands.WriteErrorException
Conclusion
In summary, changing the SID in Windows 10 using PowerShell is a fundamental process, especially in system migrations or during cloning efforts. Adhering to best practices, such as ensuring administrative rights and backing up your data beforehand, paves the way for a successful and secure SID change.
By understanding how to manipulate SIDs effectively, you can maintain a secure and robust Windows environment, avoiding potential pitfalls associated with duplicate SIDs. PowerShell is a powerful ally in this process, enabling swift and efficient management of system identifiers.
Invoke-PowerShell: Mastering Command Execution Effortlessly
Additional Resources
For further information, consider visiting the official Microsoft documentation on SID and Sysprep. Engaging with PowerShell community forums can also provide valuable insights, allowing you to stay updated and learn more about best practices in managing Windows systems effectively. Additionally, exploring related PowerShell articles on our website will enhance your skills and knowledge even further.
Время на прочтение6 мин
Количество просмотров104K
Привет, Хабр! Упомянутая в заголовке тема всё ещё порождает множественные дискуссии и недопонимание между системными администраторами. В своей статье я постараюсь ответить на следующие вопросы:
- Что такое SID и каких он бывает типов?
- Когда наличие двух и более машин с одинаковыми Machine SID будет порождать проблемы? Или, другими словами, когда всё-таки (не)нужно менять Machine SID?
- Что такое Sysprep и нужен ли Sysprep для клонирования/развёртывания?
Эти вопросы будут рассмотрены в первую очередь в контексте задачи развёртывания/клонирования множества рабочих станций/серверов из одного мастер-образа в пределах одной компании.

В основу рассуждений была взята популярная статья Марка Руссиновича (доступна также на русском языке), которую довольно часто неправильно интерпретируют (судя по комментариям и «статьям-ответам»), что приводит к неприятным последствиям. Добро пожаловать под кат.
TL;DR
- Менять SID машины само по себе бессмысленно и даже вредно для современных ОСей (пример последствий смены SID на Windows 10 ниже).
- Для подготовки машины к клонированию/развёртыванию образа стоит использовать sysprep.
- SID машины будет иметь значение, только если одну из склонированных машин промоутить до домен контроллера. Так делать не стоит.
- Не стоит клонировать/развёртывать образ машины, которая УЖЕ добавлена в домен; добавление в домен нужно делать после клонирования/развертывания.
Что такое SID, его типы и чем отличается Machine SID от Domain SID?
Ликбез
“SID (Security Identifier), или Идентификатор безопасности – Это структура данных переменной длины, которая идентифицирует учетную запись пользователя, группы, домена или компьютера (в Windows на базе технологии NT (NT4, 2000, XP, 2003,Vista,7,8)). SID ставится в соответствие с каждой учетной записью в момент её создания. Система оперирует с SID’ами учетных записей, а не их именами. В контроле доступа пользователей к защищаемым объектам (файлам, ключам реестра и т.п.) участвуют также только SID’ы.”
В первую очередь, важно различать SID компьютера (Machine SID) и SID домена (Domain SID), которые являются независимыми и используются в разных операциях.
Machine SID и Domain SID состоят из базового SID’а (base SID) и относительного SID’а (Relative SID = RID), который «приклеивается» в конец к базовому. Базовый SID можно рассматривать как сущность, в рамках которой можно определить группы и аккаунты. Машина (компьютер) является сущностью, в рамках которой определяются локальные группы и аккаунты. Каждой машине присваивается machine SID, и SID’ы всех локальных групп и аккаунтов включают в себя этот Machine SID с добавлением RID в конце. Для примера:
| Machine SID для машины с именем DEMOSYSTEM | S-1-5-21-3419697060-3810377854-678604692 |
| DEMOSYSTEM\Administrator | S-1-5-21-3419697060-3810377854-678604692-500 |
| DEMOSYSTEM\Guest | S-1-5-21-3419697060-3810377854-678604692-501 |
| DEMOSYSTEM\CustomAccount1 | S-1-5-21-3419697060-3810377854-678604692-1000 |
| DEMOSYSTEM\CustomAccount2 | S-1-5-21-3419697060-3810377854-678604692-1001 |
Именно SID’ы (а не имена) хранятся в токенах доступа (access tokens) и дескрипторах безопасности (security descriptors), и именно SID’ы используются при проверке возможности доступа к объектам системы Windows (в том числе, например, к файлам).
На машине вне домена используются локальные SID’ы, описанные выше. Соответственно, при соединении с машиной удалённо используется локальная аутентификация, поэтому даже имея 2 или более машин с одинаковым machine SID в одной сети вне домена, проблем с логином и работой внутри системы не будет, т.к. SID’ы в операциях удалённой аутентификации попросту не используются. Единственный случай, в котором возможны проблемы, это полное совпадение имени пользователя и пароля на двух машинах – тогда, например, RDP между ними может глючить.
Когда машина добавляется в домен, в игру вступает новый SID, который генерируется на этапе добавления. Machine SID никуда не девается, так же как и локальные группы, и пользователи. Этот новый SID используется для представления аккаунта машины в рамках домена. Для примера:
| Domain SID для домена BIGDOMAIN | S-1-5-21-124525095-708259637-1543119021 |
| BIGDOMAIN\DEMOSYSTEM$ (аккаунт машины (computer account)) | S-1-5-21-124525095-708259637-1543119021-937822 |
| BIGDOMAIN\JOHNSMITH (аккаунт пользователя (user account)) | S-1-5-21-124525095-708259637-1543119021-20937 |
Таким образом, машина DEMOSYSTEM теперь имеет два независимых SID’а:
• Machine SID, определяющая машину как сущность, в рамках которой заданы группы и аккаунты (первая строчка в первой таблице).
• SID аккаунта машины (computer account SID) в рамках домена BIGDOMAIN (вторая строчка во второй таблице).
Увидеть точное значение machine SID можно с помощью утилиты PsGetSid, запустив её без параметров. Второй SID, относящийся к домену, можно увидеть, запустив PsGetSid со следующими параметрами: psgetsid %COMPUTERNAME%$. Соответственно, для примера из таблиц это будет “psgetsid DEMOSYSTEM$«.
Основная суть в том, что SID’ы должны быть уникальны в пределах окружения (authority), к которому они применимы. Другими словами, если машине DEMOSYSTEM присвоен machine SID S-1-5-21-3419697060-3810377854-678604692-1000, то неважно, что у другой машины в той же сети будет идентичный machine SID, т.к. этот SID используется только локально (в пределах машины DEMOSYSTEM). Но в пределах домена BIGDOMAIN computer SID у обоих машин должен быть уникальным для корректной работы в этом домене.
Смена SID при клонировании или развёртывании
В применении к продукту Acronis Snap Deploy 5 (основное предназначение — массовое развёртывание систем из мастер-образа), в котором функциональность смены SID-а присутствовала с самой первой версии, это означает, что мы, как и многие пользователи, ошибочно пошли на поводу у устоявшегося мнения, что менять SID нужно.
Однако исходя из вышесказанного, ничего страшного в развёртывании (или клонировании) машины без изменения Machine SID вовсе нет, в случае если это развёртывание происходит до добавления машины в домен. В противном случае — возникнут проблемы.
Из этого правила есть одно исключение: нельзя клонировать машину, если в дальнейшем роль этого клона планируется повышать (promote) до уровня домена контроллера. В этом случае Machine SID домен контроллера будет совпадать с computer SID в созданном домене, что вызовет проблемы при попытке добавления оригинальной машины (из которой производилось клонирование) в этот домен. Это, очевидно, относится только к серверному семейству Windows.
Проблемы, связанные со сменой SID
Пересмотреть точку зрения на функциональность смены SID нас подтолкнул выпуск новой версии Windows. При первом тестовом развёртывании образа Windows 10 со сменой SID на получившейся машине обнаружилось, что кнопка Start перестала нажиматься (и это оказалось только вершиной «айсберга»). Если же развёртывать тот же образ без смены SID, то такой проблемы не возникает.
Основная причина в том, что эта опция вносит изменения практически во всю файловую систему развёртываемой машины. Изменения вносятся в реестр Windows, в разрешения NTFS (NTFS permissions) для каждого файла, в SID’ы локальных пользователей (так как SID пользователя включает в себя в том числе и machine SID; подробнее тут) и т.д.
В случае с Windows 10 большая часть ключей реестра не могла быть модифицирована («Error code = C0000005. Access violation» и другие ошибки) и, как следствие, наша функция смены SID’а отрабатывала не до конца, что и приводило к
трагической гибели
практически нерабочей копии Windows 10.
Было принято решение убрать эту опцию в случае, если в мастер-образе мы находим Windows 10 (или Windows Server 2016). Решение было принято на основе теоретических выкладок описанных выше плюс, естественно, было подтверждено практикой при тестировании недавно вышедшего обновления Acronis Snap Deploy 5 во множестве комбинаций: с и без переименования машин после развёртывания, с добавлением в домен и рабочую группу, развёртывание из мастер-образов снятых от разных состояний мастер-машины (она была добавлена в домен или рабочую группу в разных тестах) и т.д.
Использование Sysprep
Начиная с Windows NT клонирование (развертывание) ОСи с использованием только NewSID никогда не рекомендовалось самим Microsoft. Вместо этого рекомендуется использовать родную утилиту Sysprep (см. KB314828), которая, помимо смены SID’а, также вносит большое число других изменений, и с каждой новой версией Windows их становится только больше. Вот небольшой (неполный) список основных вносимых изменений:
- Удаляется имя машины
- Машина выводится из домена: это нужно для последующего успешного добавления в домен с новым именем
- Удаляются plug-and-play драйвера, что уменьшает риск возникновения проблем с совместимостью на новом «железе»
- Опционально удаляются Windows Event Logs (параметр ‘reseal’)
- Удаляются точки восстановления
- Удаляется профиль локального администратора и этот аккаунт отключается
- Обеспечивается загрузка целевой машины в режим аудита, позволяющий устанавливать дополнительные приложения и драйверы
- Обеспечивается запуск mini-setup при первом запуске для смены имени машины и другой дополнительной конфигурации
- Сбрасывается период активации Windows (сброс возможен до 3 раз)
Таким образом, клонирование/развертывание без использования Sysprep может повлиять (читай «скорее всего, сломает») на функциональность Windows Update, Network Load Balancing, MSDTC, Vista и выше Key Manager Activation (KMS), который завязан на CMID (не путать с Machine SID), также изменяемый Sysprep’ом, и т.д.
Итого
Повторяя TL;DR из начала статьи, основной вывод можно сделать такой: для подготовки образа машины к клонированию/развёртыванию следует использовать sysprep в подавляющем большинстве случаев.

Линки
— Как изменить SID в Windows 7 и Windows Server 2008 R2 с помощью sysprep
— How to View Full Details of All User Accounts in Windows 10
— Миф о дублировании SID компьютера
— Sysprep, Machine SIDs and Other Myths
— The Machine SID Duplication Myth (and Why Sysprep Matters)
— Yes you do need to worry about SIDs when you clone virtual machines – reasserting the ‘myth’
— Why Sysprep is a necessary Windows deployment tool
Спасибо за внимание!

In Windows 10, the Security Identifier (SID) acts as a unique identifier for user accounts and devices, playing a vital role in security by managing access to resources. Changing the SID is essential when addressing security issues or cloning complications, as duplicate SIDs can result in unauthorized access and privilege escalation. While traditional methods such as Sysprep are frequently employed, there are other options available. This guide delves into how to change SID Windows 10 without Sysprep, offering a practical method for effectively managing security.
Understanding SID in Windows 10
What is SID?
A Security Identifier (SID) serves as a unique code assigned to each user account and device within a Windows environment. This identifier plays a crucial role in maintaining security by controlling access to resources. Each SID consists of a string of characters that Windows uses to identify users and devices. The SID ensures that only authorized users can access specific files, folders, and system settings. Without a unique SID, the system cannot differentiate between different users or devices, leading to potential security risks.
Also learn: [solved] How to Recreate Recovery Partition in Windows 10/11
Why Change SID?
Changing the SID becomes necessary when addressing security vulnerabilities. Attackers often exploit SID injection techniques to escalate privileges and bypass security controls. A compromised SID can allow unauthorized access to sensitive information, leading to data breaches. By changing the SID, you enhance the security posture of your Windows 10 system. This proactive measure prevents attackers from exploiting known vulnerabilities associated with duplicate SIDs.
Cloning a Windows 10 machine without altering the SID can lead to significant problems. Multiple devices with the same SID create conflicts within network environments. These conflicts result in issues with user permissions and access control. When two devices share an identical SID, the system cannot distinguish between them, causing operational disruptions. Changing the SID resolves these conflicts, ensuring smooth operation and proper resource allocation. This step is vital for maintaining a secure and efficient network infrastructure.
Preparing for SID Change
Backup Important Data
Before changing the SID, prioritize data protection. Use third-party software like Wittytool DiskClone. This free tool provides automatic backups for Windows OS, applications, and hard drives. Regular backups prevent data loss and facilitate recovery if issues arise. With this tool, you can also do a network clone easily. Now download this tool and follow the steps below:
Step 1. Turn to Backup tab, click Create backup.
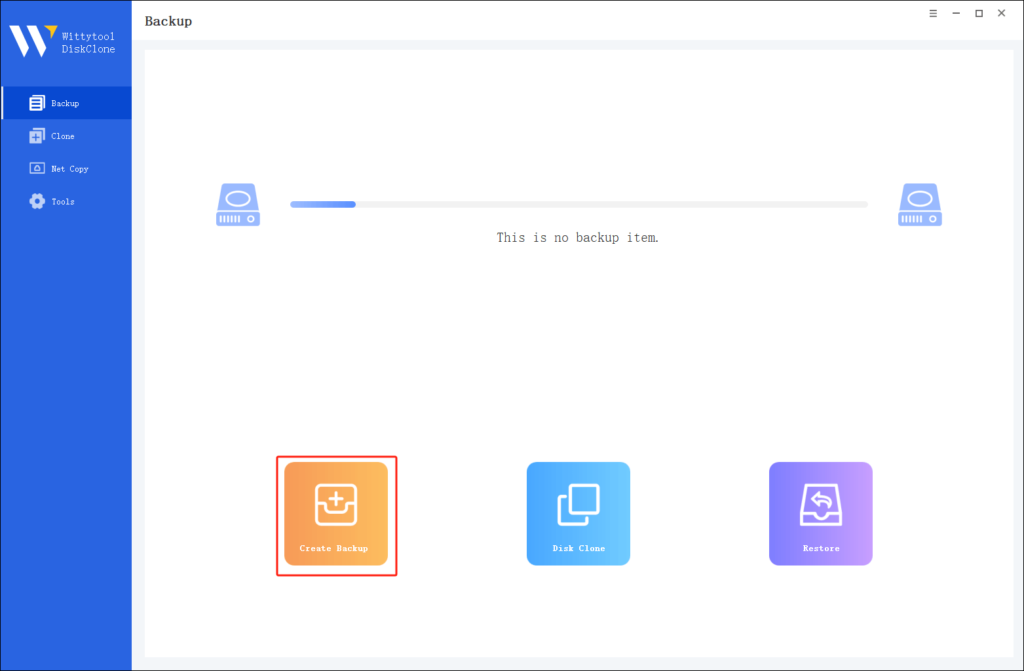
Step 2. Choose the data which you want to backup, then click Start Backup.
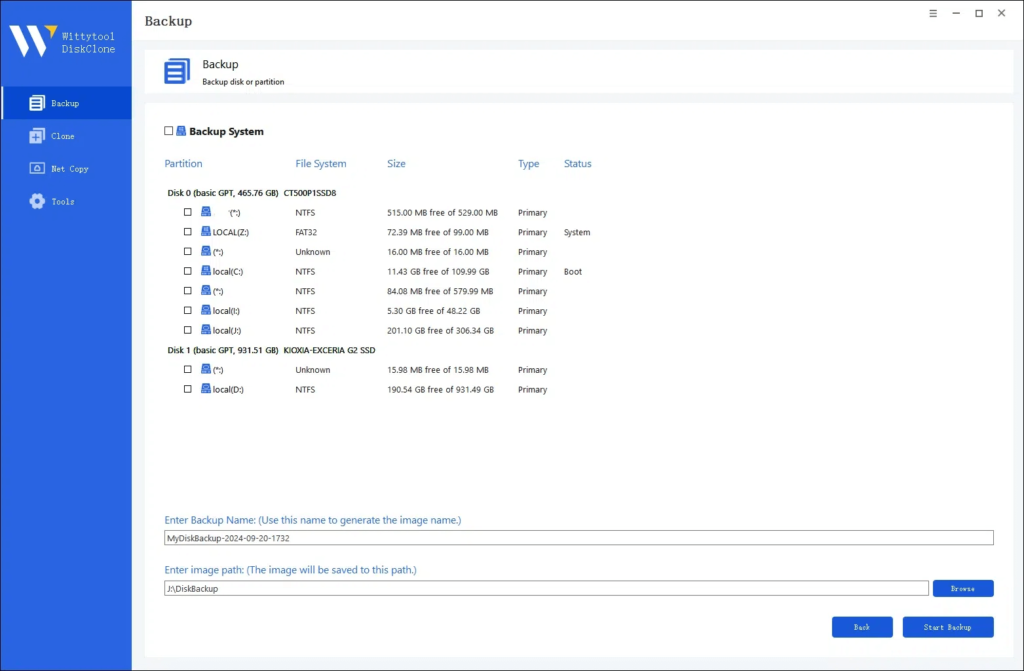
Step 3. The software will perform an automatic and fast backup, and once the process is complete, you can easily locate the backup file.
Ensure System Compatibility
Verify system compatibility before proceeding with the SID change. Confirm that the hardware and software meet the requirements for the chosen method. Check for updates to ensure that the system runs the latest version of Windows 10. Compatibility checks prevent potential conflicts and ensure a smooth transition. Evaluate third-party tools for compatibility with the current system configuration. A thorough assessment minimizes risks and enhances the success of the SID change process.
Also learn: Windows 10 System Restore Taking a Long Time: Solutions and Tips
Methods to Change SID Windows 10 Without Sysprep
Changing the SID in Windows 10 without using Sysprep requires careful consideration and precise execution. Explore two primary methods: using third-party tools and manual processes.
(Recommended) Using Third-Party Tools to Change SID Windows 10
Third-party utilities provide a simplified solution for modifying Windows SIDs in Windows 10 environments. These specialized tools streamline the process through automation while minimizing potential configuration errors. While SIDCHG was historically a common choice for its straightforward SID modification interface, this legacy tool has become outdated.
For modern implementations, we recommend utilizing WittyTool DiskClone‘s “Change Windows SID” feature, which offers enhanced reliability and maintains user-friendly operation. It remains popular among system administrators for the operational efficiency and reduced technical complexity.
Now Continue using the WittyTool Disk Clone software and follow the step-by-step instructions to change the Windows SID.
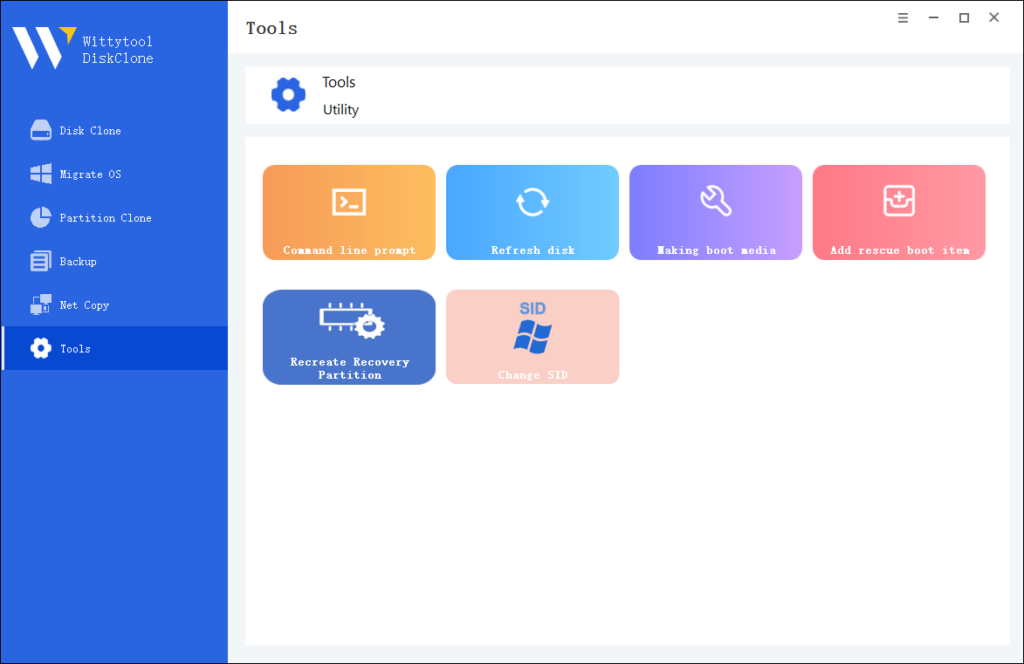
Step 1. Access the SID Change Feature
① Launch Wittytool DiskClone and navigate to the left-side menu.
② Click Tools → Select Change SID.
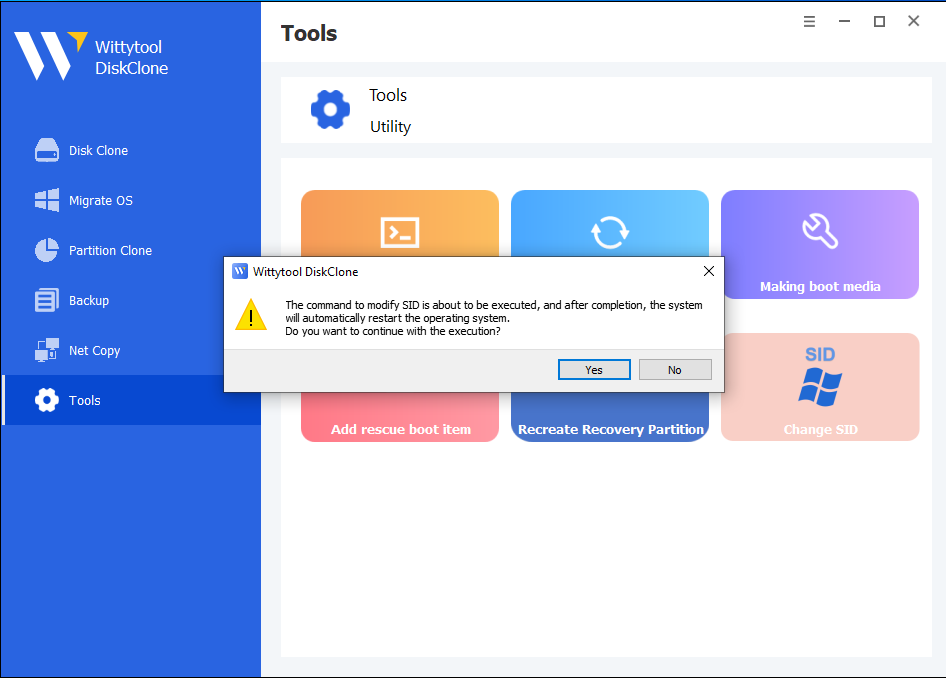
Step 2. Confirm and Execute
① A confirmation dialog will appear: “Do you want to continue with the execution?”
② Click YES to initiate the SID change process.
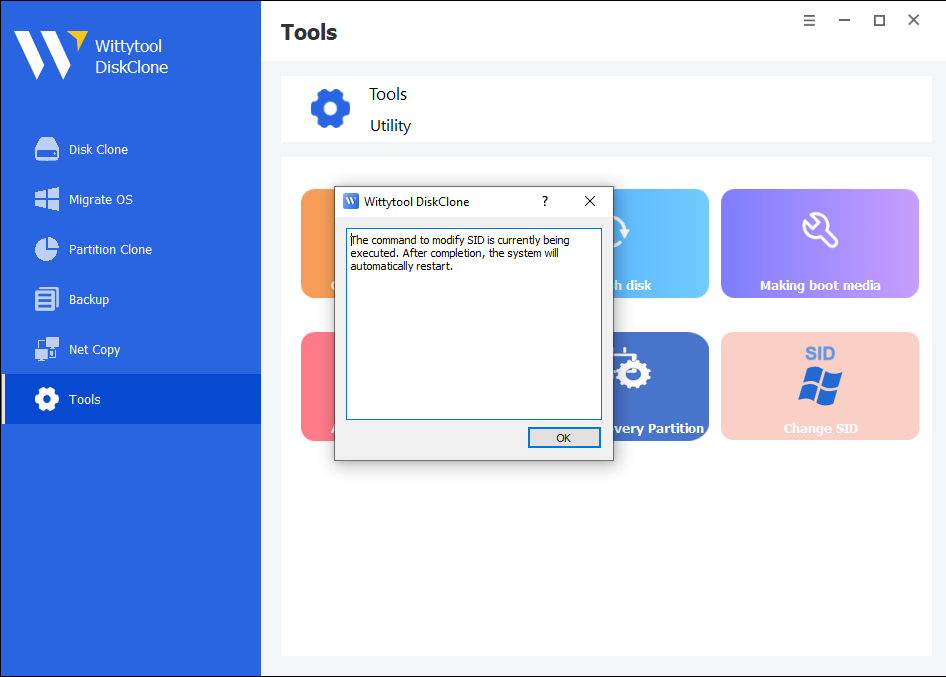
Step 3: Reboot and Validate
If successful:
①A prompt will display: “The command to modify SID is currenty being executed, After completion, the system will automatically restart.”
②Click OK → The system will reboot automatically, and the new SID will take effect.
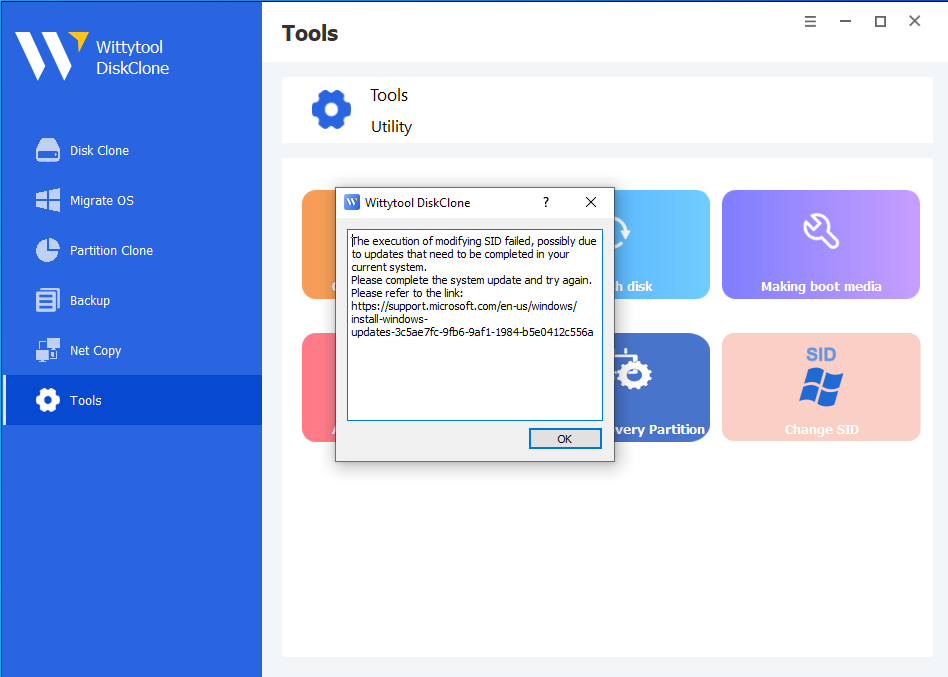
If failed:
①An error message will appear.
②Install pending Windows updates via Settings → Windows Update, then retry.
Key Notes:
⚠️ Run the software as Administrator if permission errors occur.
⚠️ Temporarily disable third-party antivirus to avoid conflicts.
Note: Microsoft does not officially support third-party tools for SID changes. Ensure a thorough understanding of potential risks before proceeding.
Manual SID Change Process
For those with technical expertise, a manual process offers more control over the SID change.
Registry Editing
- Open Registry Editor: Press
Win + R, typeregedit, and press Enter. This opens the Registry Editor. - Navigate to SAM Database: Locate the Security Account Manager (SAM) database. Exercise caution when editing registry entries.
- Modify SID Entries: Carefully alter the SID values. Ensure accuracy to prevent system instability.
- Save and Exit: Save changes and exit the Registry Editor. Restart the computer to apply changes.
Command Line Instructions
- Open Command Prompt: Access the Command Prompt with administrative privileges.
- Use WMIC Commands: Execute
wmic useraccount get name,sidto list current SIDs. Identify the SID to change. - Apply Changes: Use specific commands to modify the SID. Double-check syntax to avoid errors.
- Restart System: Reboot the system to finalize changes. Verify the new SID through system checks.
Both methods require attention to detail and a clear understanding of potential risks. Changing the SID Windows 10 without Sysprep can enhance security and resolve cloning issues, but always proceed with caution.
Verifying SID Change
Checking New SID
You need to confirm the success of the SID change. Open the Command Prompt with administrative privileges. Type wmic useraccount get name,sid and press Enter. This command will display the current SIDs for all user accounts. Compare the new SID with the previous one. Ensure that the SID has changed correctly. Verification guarantees that the change sid windows 10 process completed successfully.
Troubleshooting Common Issues
Issues may arise after changing the SID. You might encounter login problems or access denials. Restart the system to resolve minor glitches. Check for any software conflicts by reviewing recent installations. Use the Event Viewer to identify specific errors. Access the Event Viewer by typing eventvwr in the Run dialog. Look for warnings or errors related to user accounts. If problems persist, consider restoring from a backup. Regular backups ensure data safety during the change sid windows 10 process.
Conclusion
Explore the methods to change the SID in Windows 10 without Sysprep. Each method offers unique benefits and challenges. Effective SID management is crucial for maintaining security and preventing unauthorized access. Follow best practices to ensure a secure computing environment. Regularly review and update security protocols to align with modern standards. Always give top priority to data security and system compatibility. Implementing these strategies will enhance your network’s security and efficiency.
If you cloned a VM, you will have to sometimes generate a new SID. This usually occurs with VMware ESXi, Workstation, Fusion, Proxmox, and other virtual machine servers and software. If 2 systems have the same SID this will show errors trying to join domains or host services.
The System Preparation tool (Sysprep) is a utility used for deployment purposes but can be used to generate a new system SID with little to no loss of Windows data or settings.
In this tutorial, we will step-by-step learn How to Change SID in Windows 11/10 | Windows Server 2022/2019/2016/2012 with the System Preparation tool
Applies to:
- Windows Server 2022/2019/2016/2012
- Windows 11/10/8/7
Step by step Change SID on your system
First of all, backup your data in the folders Desktop, Document, Download…to another drive or your USB, because when you change SID with the System Preparation tool it deletes data on that.
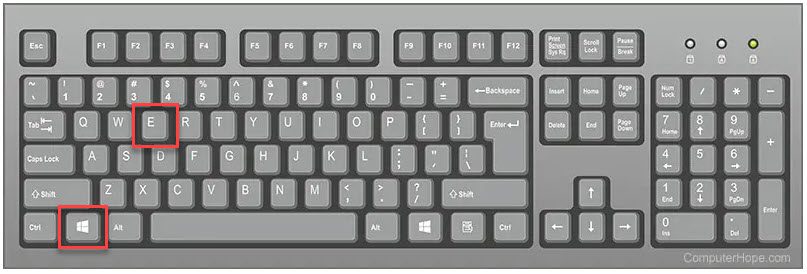
On the keyboard, pressing at the same time two keys Windows + E to open File Explorer
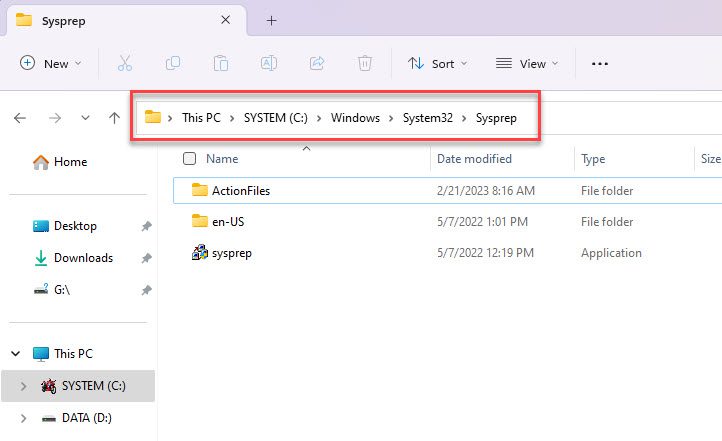
File Explorer is opened, go to the directory C:\Windows\System32\Sysprep to open the location of the System Preparation tool
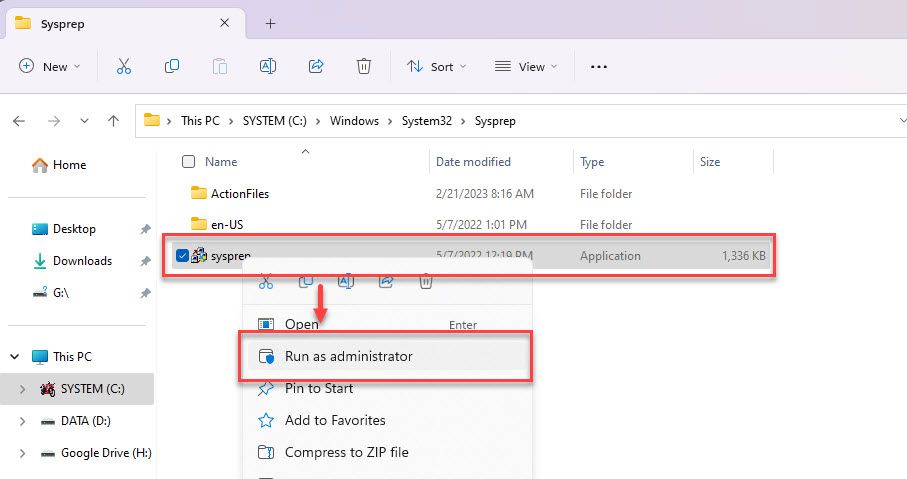
Right-click to sysprep.exe application and choose Run as Administrator
In the window System Preparation Tool choose like as below:
- System Cleanup Action:
- Check to Generalize box
- Shutdown options: Reboot
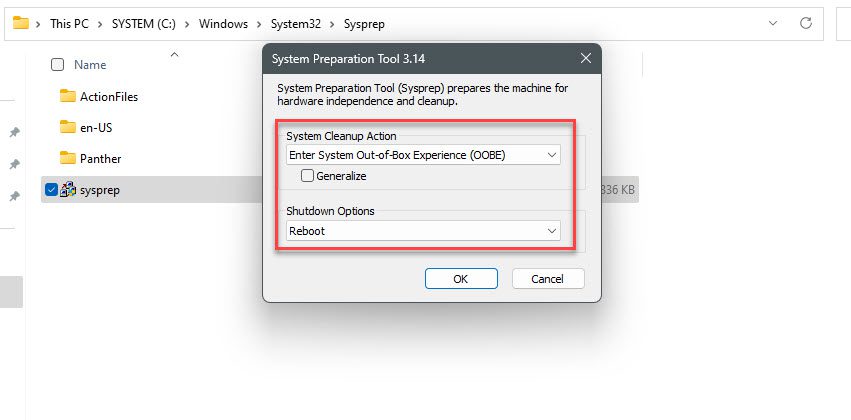
and click OK button to genera new SID:
After the system reboot, login to your system and follow the steps to change your profile.
Thank you for reading !!!
Video
Case #
You need to change the security identifier SID in Windows operating systems. This KB article provides guidance on how to change the security identifier SID in Windows operating systems. There are many entities in the Windows operating system which have an associated SID, some of which are the following:
- Local users and groups
- Domain users and groups
- Computer objects
- Active Directory domains and forests
More specifically, changing the SID of a Windows computer may be required if you have used a misconfigured Windows OS image, which, if used to deploy new machines, may lead to a duplicate SID issue. The duplicate SID issue usually manifests with the following error when trying to join a machine to an Active Directory domain.
The following error occurred attempting to join the domain [domain name]. The domain join cannot be completed because the SID of the domain you attempted to join was identical to the SID of this machine. This is a symptom of an improperly cloned operating system install. You should run sysprep on this machine in order to generate a new machine SID.

Every security account, such as a user, group, or computer, has a unique SID. Access permissions are granted or denied to SIDs for resources, such as files, folders, printers, Microsoft Exchange mailboxes, Microsoft SQL Server databases, objects that are stored in Active Directory, and any data that is protected by the Windows Server security model. A SID contains header information and a set of relative identifiers that identify the domain and the security account. In a domain, each domain controller can create accounts and issue a unique SID to every account. It must be noted that there are both machine SIDs and domain SIDs (https://learn.microsoft.com/en-us/archive/blogs/aaron_margosis/machine-sids-and-domain-s).
This article provides guidance on how to change the security identifier SID in Windows operating systems, to resolve the duplicate SID issue.
Solution #
Before moving forward with any action, it is highly recommended to read a relevant article on Windows Security Identifiers (SID) to get a better grasp of how they work.
https://learn.microsoft.com/en-us/windows-server/identity/ad-ds/manage/understand-security-identifiers
AD Domain SID #
Run the following command to get the current AD domain SID. There is no supported way to change the AD domain SID.
Import-Module ActiveDirectory

#Get the SID of all domains in an AD forest
(Get-ADForest).Domains| %{Get-ADDomain -Server $_} | Select-Object name, domainsid

#Get the SID of a specific AD domain
Get-AdDomain | Select-Object name, domainsid
User or group SID #
Run the following command to get the current local user SID.
Get-LocalUser -Name "[username]" | Select-Object sidRun the following command to get the current domain user SID.
Import-Module ActiveDirectory
Get-AdUser -Identity [username-SaMAccount] | Select Name, SID, UserPrincipalName
Run the following command to get the current local group SID.
Get-LocalGroup "[groupname]" | select SIDRun the following command to get the current domain group SID.
Import-Module ActiveDirectory
Get-ADGroup -Identity "[groupname]" | Select-Object Name, SID
Computer SID #
To get the SID of a workgroup computer, you need to download and run the PsGetSID command line tool, which is part of the SysInternals suite.
To get the SID of a domain-joined machine, run the following Powershell cmdlet.
Get-ADComputer -Filter * | Select-Object Name, SID
Get-ADComputer "[computername]" | Select-Object Name, SID
To change the computer SID of a Windows computer you can try the following methods.
- As the error message itself suggests, the most direct method of changing the machine SID is by running sysprep on it. Sysprep is a Windows utility which generalizes an OS image. Generalizing an image removes computer-specific information such as installed drivers and the computer security identifier (SID). You can either use Sysprep by itself or Sysprep with an unattend answer file to generalize your image and make it ready for deployment. Details about running sysprep can be found at https://learn.microsoft.com/en-us/windows-hardware/manufacture/desktop/sysprep—generalize—a-windows-installation?view=windows-11. To run sysprep manually, run the following tasks:
- Open an elevated command prompt and run the following command:
C:\Windows\System32\Sysprep\sysprep.exeIn the pop-up form, select system cleanup action «Enter System OOBE», check the «Generalize» checkbox and select «reboot» or «shutdown» as the shutdown option and click OK.

- Since running sysprep is a quite intrusive action, which will most likely affect already installed applications and drivers, it is not recommended in machines already in production. An alternative for systems already in an Active Directory production environment is to first check for and cleanup any duplicate SID by running the ntdsutil utility. Details about ntdsutil can be found at: https://learn.microsoft.com/en-us/troubleshoot/windows-server/identity/ntdsutil-find-clean-duplicate-security-identifiers. Carry out the following steps to detect and cleanup duplicate SID from the SAM database.
- In an elevated command prompt, run ntdsutil.
- At the Ntdsutil command prompt, type security account management, and then press Enter.
- To connect to the server that stores your Security Account Maintenance (SAM) database, type
connect to serverDNSNameOfServerat the SAM command prompt, and then press Enter. - At the SAM command prompt, type check duplicate sid (or cleanup duplicate sid for cleaning up duplicate SID), and then press Enter.
- Microsoft used to provide the NewSID utility as part of the SysInternals suite but it was later determined that this tool would not provide a sufficient solution, hence it is no longer available for download. Microsoft does not support images that are prepared using NewSID, they only support images that are prepared using SysPrep. Microsoft has not tested NewSID for all deployment cloning options. You can still use the PsGetSID as part of the SysInternals suite, to identity SID property and map it to object names, for both workgroup and AD accounts.
- One viable option for changing a Windows computer SID in production environments is the SIDCHG command line tool, which comes in both 32-bit and 64-bit versions. This is a paid tool, which is licensed based on your usage scenario. SIDCHG (SIDCHG64 on 64-bit Windows) 3.0i is a command-line utility to modify local computer SID and computer name, for Windows 2022/11/2019/2016/10/8.1/2012 R2/8/2012/7/2008 R2. It replaces current computer SID with new random SID. In addition, it changes the WSUS ID for Windows Updates, the MachineGuid, the Machine ID, the Device Identifier for modern Windows apps, the MSDTC CID, the Dhcpv6 DUID, the SQL Server Master database, the encryption state to preserve encrypted files, Windows Action Center settings, Certificates and other encrypted stored information. Preservation of credentials stored in Windows Vault is possible with prior preparation of Vault backup. Optionally OneDrive can be reset. A reboot is needed after the SID change.
Run the following procedure to have the computer SID changed with the SIDCHG command line tool.
- Firstly, activate the SIDCHG software.
- Then run the command with any required parameters as per your scenario. Consult the software vendor’s documentation for each command parameter usage. In the example below the only parameter provided is the /R parameter for automatic system reboot after the SID change. Click Yes to continue.
- Click OK to continue and wait until the system is explicitly restarted or shutdown.
- After system reboot, login to the computer again to verify that the computer SID has been changed, by running the PsGetSID tool from SysInternals.
Bear in mind that before you change the machine SID you need to carry out the following actions:
- Take a full backup of the machine whose SID will be changed, whether that be a bear metal backup or operating system disk backup of a physical machine or a full backup of a virtual machine or container. A VM snapshot may also be handy but a full backup is always recommended. If you compare a snapshot with a backup, for example a Windows System State backup, the snapshots are dependent of the virtual machine, while the System State backup is not, it is independent.
- Audit the machine(s) in question to understand if operating system or application related functionality and features are dependent on the machine SID to operate. This can include application and SQL connection strings and application license files which may have dependencies on the machine SID. If this is the case, create a plan to make necessary changes to accommodate the change.
- Ensure that any real-time antivirus and antimalware software is turned off / disabled before you run the SID change application.
- Ensure that no users will be able to power off, shutdown or logon to the system whose SID is being changed, during the SID change procedure.
This article provided guidance on how to change the security identifier SID in Windows operating systems.
Sources #
- https://learn.microsoft.com/en-us/archive/blogs/deploymentguys/sysprep-machine-sids-and-other-myths
- https://learn.microsoft.com/en-us/archive/blogs/markrussinovich/the-machine-sid-duplication-myth-and-why-sysprep-matters
- https://learn.microsoft.com/en-us/archive/blogs/aaron_margosis/machine-sids-and-domain-sids
- https://learn.microsoft.com/en-us/windows-server/identity/ad-ds/manage/understand-security-identifiers