
Applies ToWindows 10 Windows 11
Чтобы использовать камеру с приложениями в Windows, необходимо включить разрешения в параметрах конфиденциальности для камеры. Чтобы включить разрешения для приложений на использование камеры, выполните следующие действия:
-
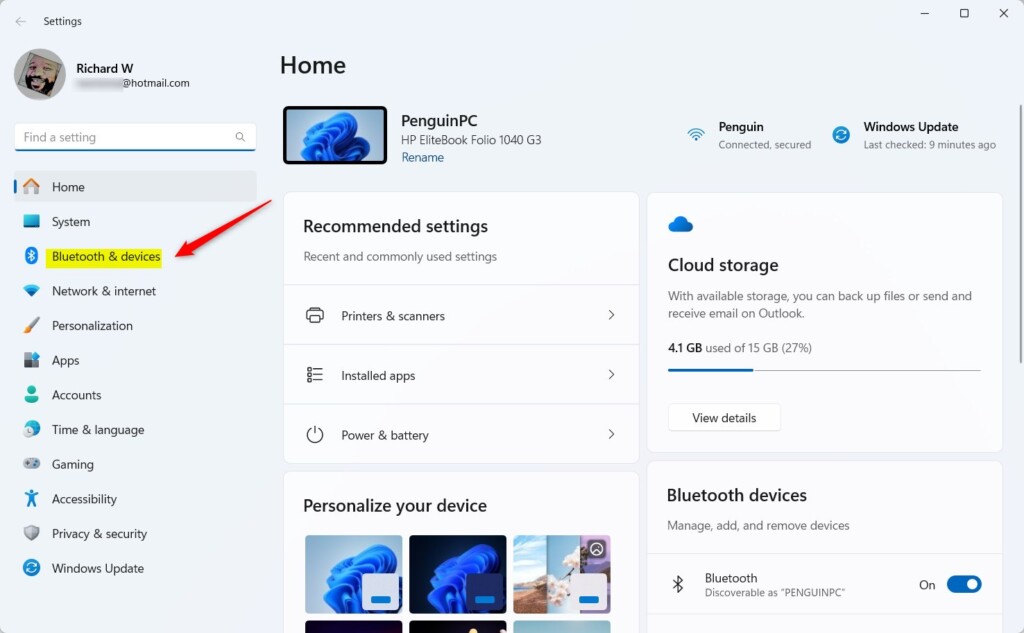
Нажмите кнопку Пуск и выберите Параметры > Конфиденциальность & безопасность > камера .
Или
Выберите следующий ярлык «& безопасность > камера «:
Открыть & безопасность > камеры
-
В окне Конфиденциальность & безопасность > камера :
-
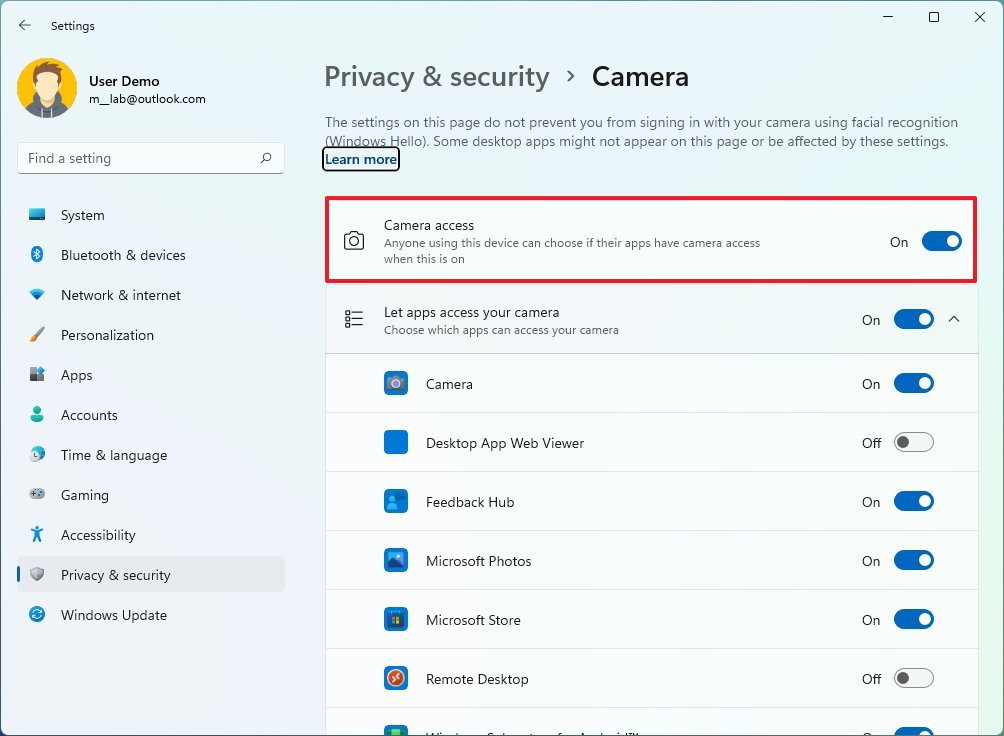
Убедитесь, что доступ к камеревключен. Этот параметр позволяет отдельным пользователям на устройстве выбирать, должны ли приложения иметь доступ к камере.
Примечание: Если параметр «Доступ к камере » не удается изменить, администратору устройства необходимо изменить его.
-
Убедитесь, что параметр Разрешить приложениям доступ к камеревключен. Этот параметр позволяет приложениям из Microsoft Store получать доступ к камере. При этом не указывается, какие именно приложения имеют доступ.
-
После того как приложения получают доступ к камере, доступ может быть предоставлен для каждого отдельного приложения. Прокрутите список приложений, чтобы найти нужное приложение, а затем включите параметр На камеру доступа для приложения. Чтобы отключить доступ к отдельному приложению, установите для приложения значение Выкл.
-
Если приложение отсутствует в списке, оно может не быть приложением Microsoft Store. Вместо этого это может быть классическое приложение.
Чтобы включить камеру для всех классических приложений, после списка приложений Microsoft Store включите параметр Разрешитьклассическим приложениям доступ к камере. Некоторые классические приложения, имеющие доступ к камере, перечислены в этом параметре.
Классические приложения обычно — это приложения, которые не были установлены через Microsoft Store. Они могут включать приложения, установленные из Интернета, USB-накопитель или приложения, установленные ИТ-администратором. Интернет-браузеры, такие как Microsoft Edge, и приложения для видеоконференций, такие как Microsoft Teams, являются классическими приложениями, для которых этот параметр включен.
Важно: Параметры конфиденциальности камеры для классических приложений нельзя изменить на уровне отдельных классических приложений.
-
Исключения в параметрах конфиденциальности камеры
Если Windows Hello используется для входа на устройство с Windows, устройство Windows входит в систему, даже если параметр Доступ к камере отключен. Если Windows Hello отключен, устройство с Windows не будет обращаться к камере.
Некоторые приложения делают фотографии и снимают видео с помощью приложения «Камера». Приложение не отображается в списке. Параметры доступа к камере для приложения «Камера» определяют, имеет ли приложение доступ к камере. Приложение «Камера» не записывает и не отправляет изображения в приложение, которое его открыло, если вы явно не нажмете кнопку захвата в приложении «Камера».
Классические приложения могут не отображаться в списке приложений, доступных на странице Параметры камеры. Они могут по-прежнему иметь доступ к камере или микрофону, даже если эти параметры отключены. Дополнительные сведения см. в разделе Классические приложения Windows и конфиденциальность.
Нужна дополнительная помощь?
Нужны дополнительные параметры?
Изучите преимущества подписки, просмотрите учебные курсы, узнайте, как защитить свое устройство и т. д.
When you need to use your webcam, you want to look your best. But that won’t happen if the brightness is off or if there is something else that is not adjusted right. But that can easily be fixed by going into the webcam’s settings and making a few changes here and there. Even if you’re having problems with the webcam, the following steps will help since they will take you to where to need to go to get the issue fixed.
Contents
- 1 How to Change the Brightness, Contrast, and Video Rotation
- 1.1 Disabling the Webcam and Troubleshooting
- 1.2 How to Deny Apps Access to Your Camera
- 1.3 Conclusion
How to Change the Brightness, Contrast, and Video Rotation
To change the brightness, contrast, and video rotation, you’ll need to go into your computer’s Settings by clicking on the Windows Start menu and choosing Settings.

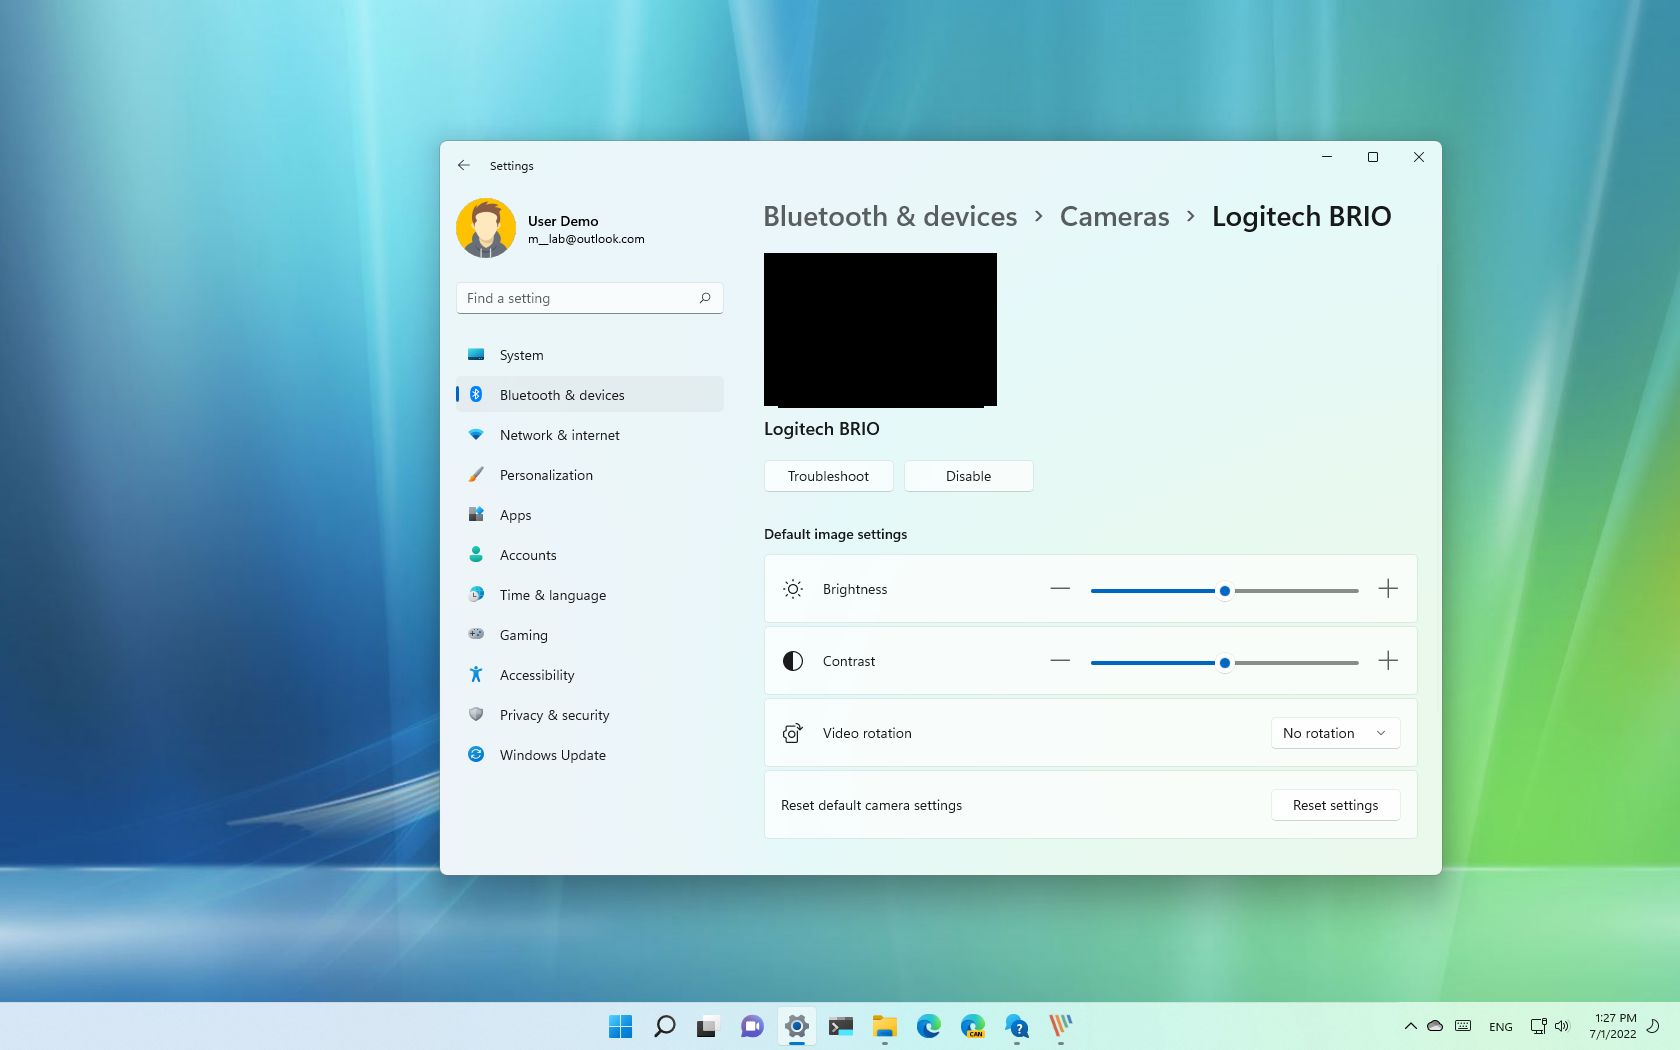
When it opens, click on Bluetooth and devices and click on the Camera option that will be to your right. Under Connected Cameras, click on the camera that’s installed on your computer.

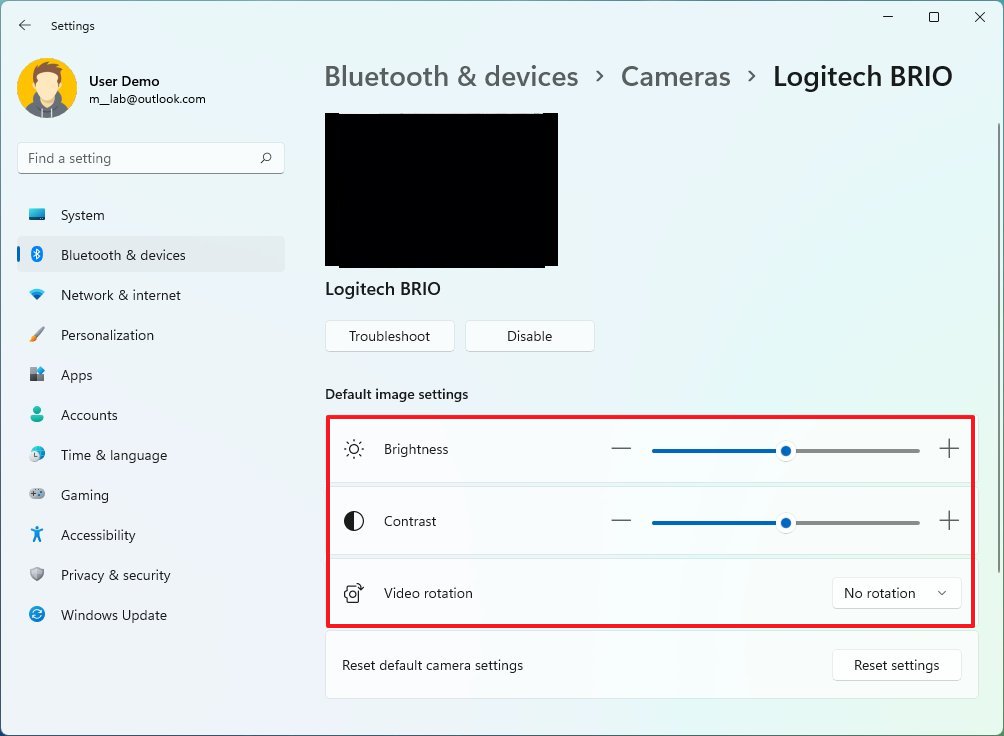
On the next page, in the Default Image Settings section, you’ll find the slider or the plus/minus options to adjust these settings. Any changes you make will be applied automatically.

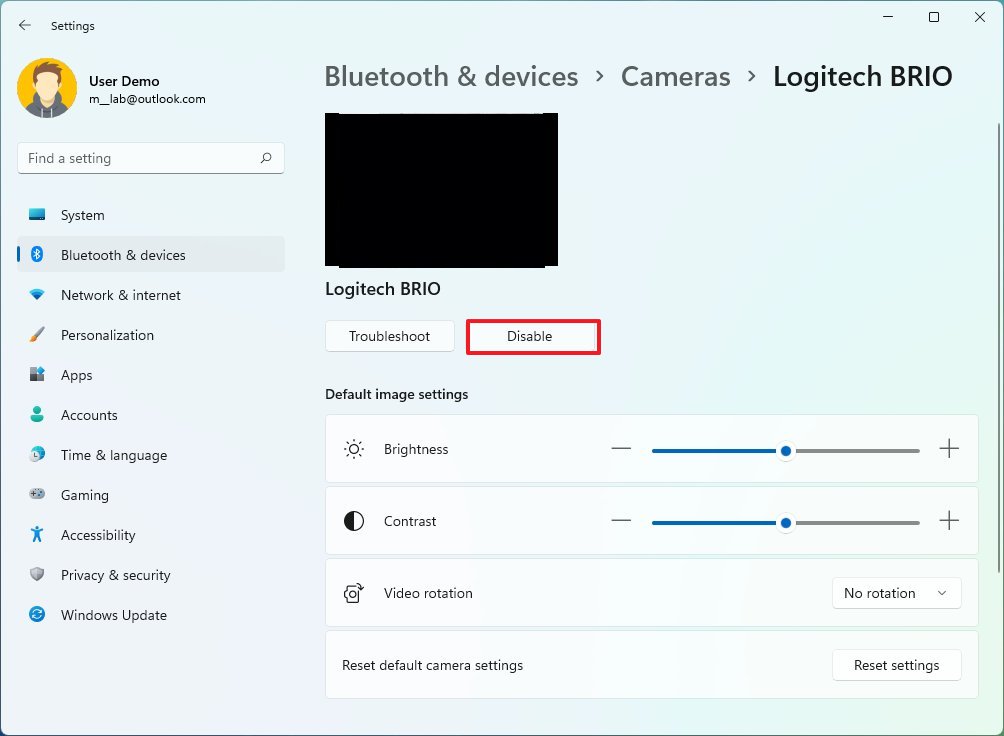
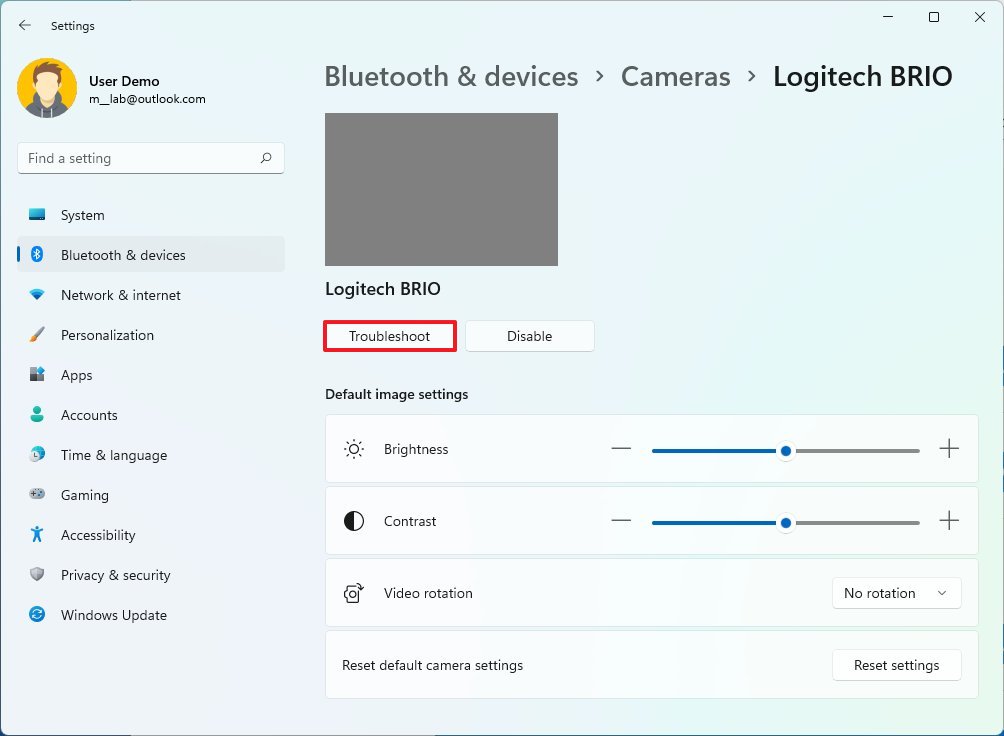
Disabling the Webcam and Troubleshooting
Below the video of your webcam, you’ll see the options to Disable the webcam and troubleshoot it. If you decide to disable it, you won’t be able to continue using it, but it will still show that it’s installed on your computer. If you ever change your mind and want to turn it back on, follow these steps and click on the Enable button.
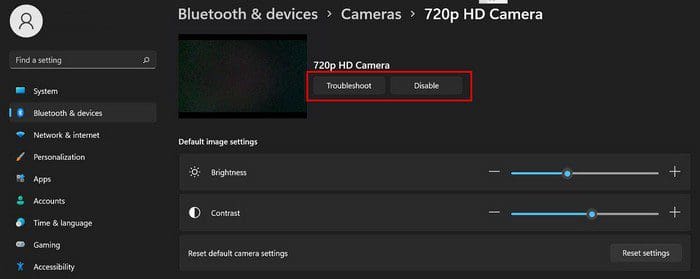
You’ll be taken to a separate page when you click on the Troubleshoot option. Here you’ll need to answer some questions to help you find a solution to the issue your camera is experiencing. You have different kinds of options all in one place. For example, you can adjust the brightness, disable the camera and find help with your camera issues.
How to Deny Apps Access to Your Camera
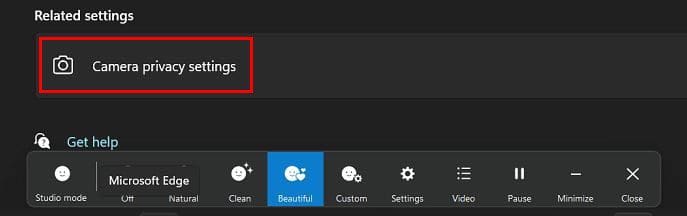
Are you curious to see what app has access to your webcam? After following these steps, you’ll see a list of all the apps that are accessing your webcam. If you want to deny access to any of them, all you need to do is toggle the button off. That’s all there is to it. Click on Camera Privacy Settings.
On the next page, you should see the list of the apps that have access to your webcam.
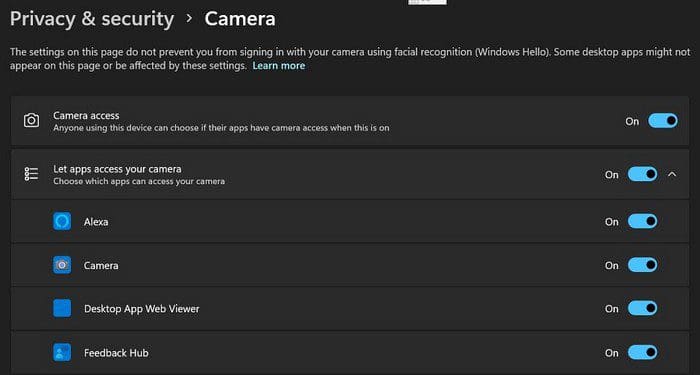
If you want to block access to all the apps, simply toggle off the Let apps access your camera option. You also can deny access to specific apps by toggling off the option for that app only to the right of the app.
As long as you adjust the webcam settings at the bottom, you should also see the studio mode options.
You can apply options such as:
- Natural
- Clean
- Beautiful
- Custom
- Video
- Pause
- Minimize
- Close
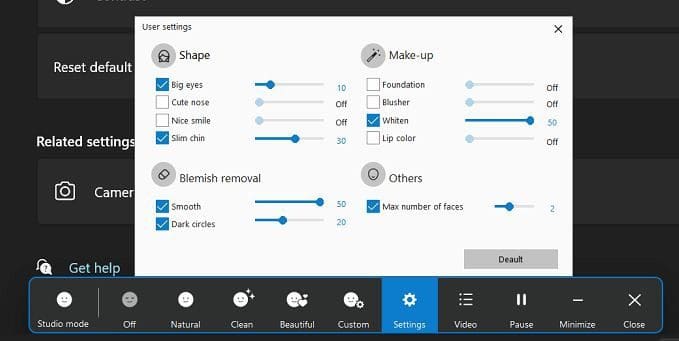
If you go into Settings, you can adjust the slider for things such as:
- Big eyes
- Cute Nose
- Nice Smile
- Slim chin
- Foundation
- Blusher
- Whiten
- Lip Color
- Smooth for blemish removal
- Dark circles for blemish removal
Conclusion
You can do various things when it comes to customizing your webcam. You can deny access to the apps you want and even disable them if that’s what you want. If the webcam is giving you problems, there’s a troubleshooting button you can try to fix the issue. You’ll also see an option to adjust the contrast and brightness, so your video looks great. What changes will you be making? Share your thoughts in the comments below, and don’t forget to share the article with others on social media.
The article explains how to set the preferred camera resolution for media type in Windows.
Windows 11 offers a user-friendly interface for camera settings, including features like background blur, filters, and various modes to enhance video quality.
The privacy settings allow users to control which apps can access the camera, providing a secure experience. If you have administrator access, you can also enable or disable cameras.
With Windows 11 build 27758, Microsoft added a new advanced camera options section on the Cameras page in Settings. From there, you can adjust Multi-app and basic camera settings.
Another feature available on Windows 11 PC is configuring the camera resolution for media type. You can let Windows handle it to set a resolution for the camera.
Choose the Media type resolution for the preferred camera
As mentioned, users can configure advanced camera settings, including choosing the media type resolution for the preferred camera on Windows 11.
Here’s how to do it.
First, open the Windows Settings app.
You can do that by clicking on the Start menu and selecting Settings. Or press the keyboard shortcut (Windows key + I) to launch the Settings app.
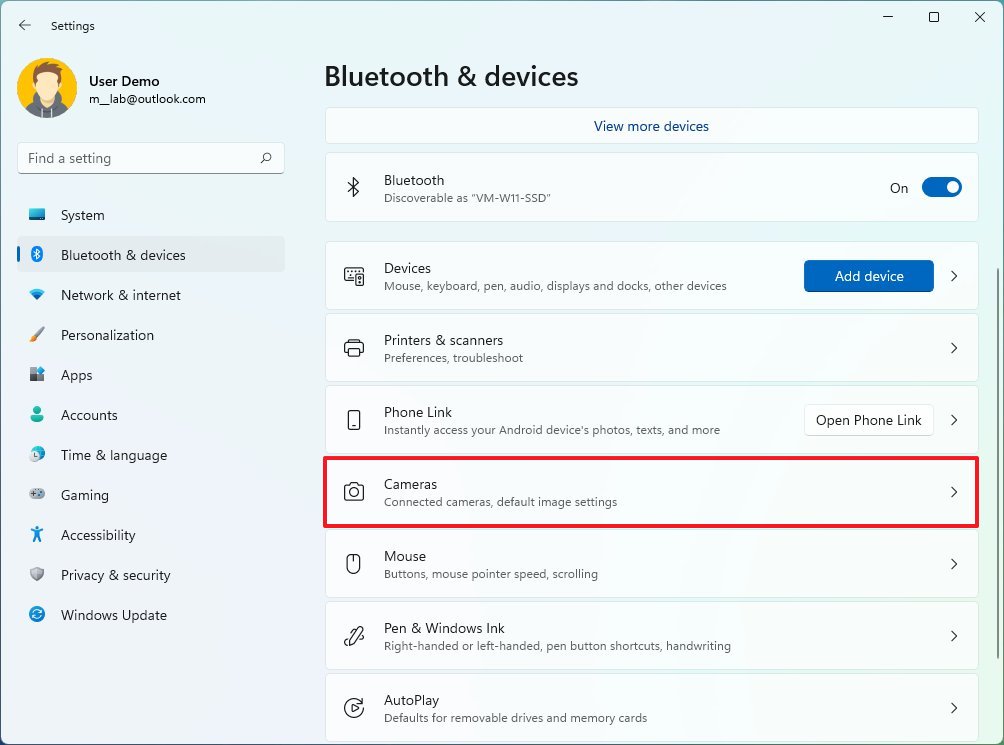
When the Setting app opens, click the Bluetooth & devices button on the left.
On the right, click the Cameras tile to open its settings.
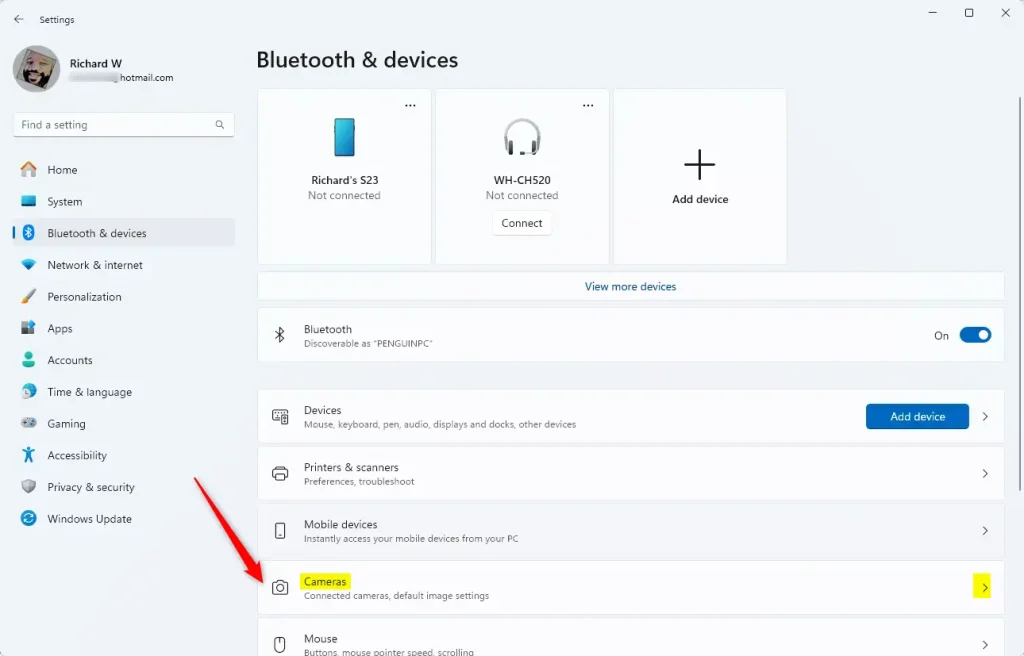
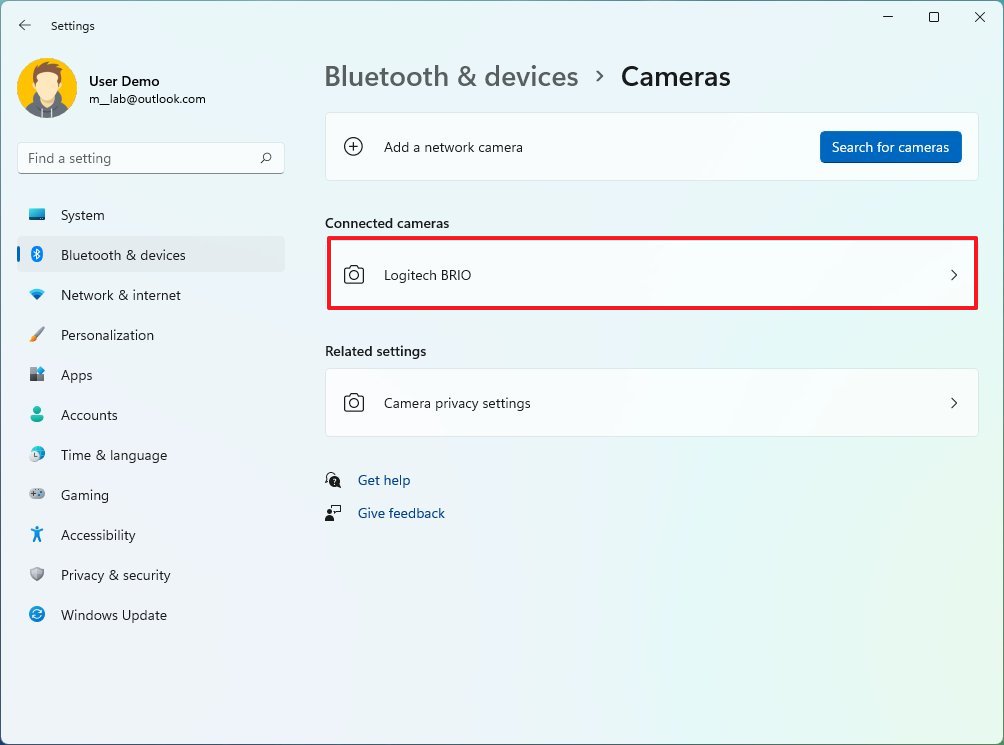
Select a connected camera under the “Connected cameras” section on the page. Select the “Advanced camera options” tile on the camera settings page and click the Edit button.
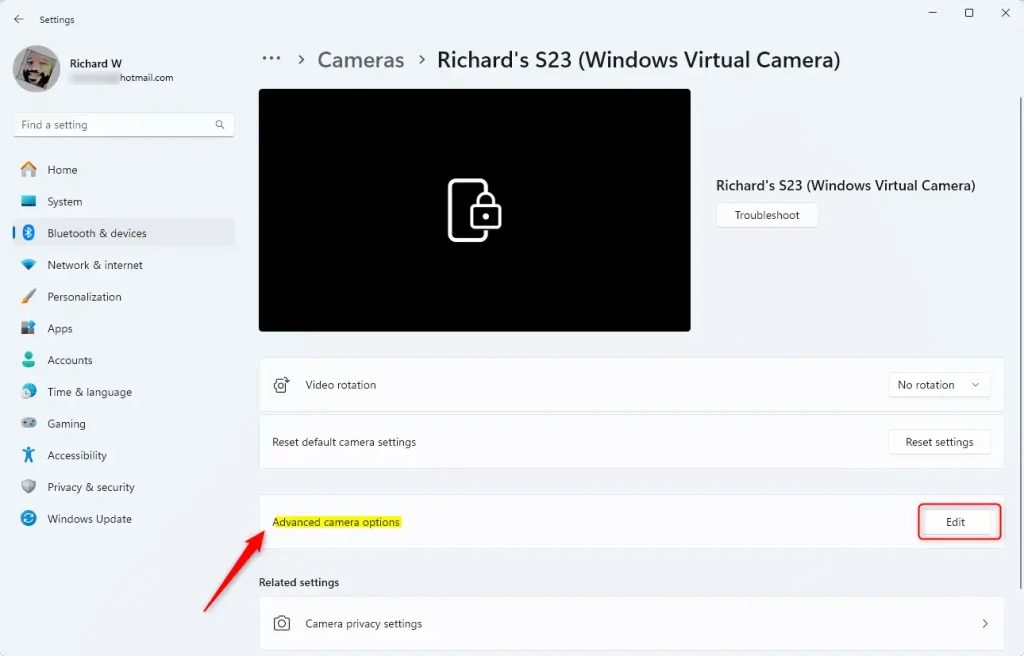
You must turn on the Allow multiple apps to use camera at the same time or basic setting to change the camera Media type.
After that, select an available preferred camera resolution using the drop-down menu for Media type.
Let Windows choose is the default preferred camera resolution Media type
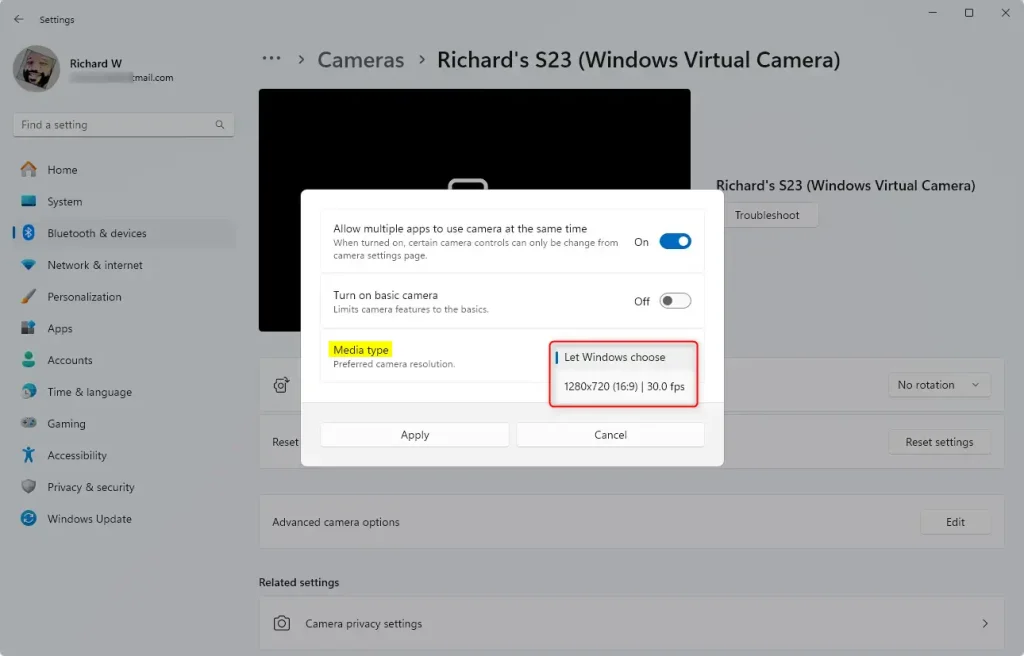
Click Apply to save your changes and exit.
That should do it!
Conclusion:
In summary, configuring the preferred camera resolution for media type in Windows 11 enhances your video quality and overall camera experience. Here are the key takeaways:
- User-Friendly Interface: Windows 11 provides an intuitive settings interface for camera adjustments.
- Privacy Control: Users can manage which apps access the camera for added security.
- Advanced Options: The new Advanced camera options allow for detailed customization.
- Step-by-Step Process: Changing media type resolution is straightforward with the provided instructions.
- Continuous Improvement: Regular updates from Microsoft, like build 27758, include useful new features.
Following the steps outlined, you can easily optimize your camera settings for media use, ensuring a better and more secure experience.
Unlike smartphone cameras, PC cameras are primarily used for video calling. Smartphone users use phone cameras to capture photos, videos, video calling, and document scanning. PC users rarely capture pictures and videos.

If your Windows 10/11 computer has an in-built camera or you have attached an external webcam to it, you might want to change its default settings such as the brightness and contrast to improve the picture/video quality.
As you might have observed by now, the built-in Camera app lacks most of the settings that you find in a dedicated camera app camera manufacturer. It offers basic settings only.
That said, there are options to change the default brightness and contrast settings.
IMPORTANT: If you are using a dedicated camera, we recommend using the camera software offered by the camera manufacturer. For instance, Logitech offers its own software named Logitech Capture, which provides tens of settings to change the default camera settings.
Method 1 of 2
Step 1: On a Windows 10 PC, go to Windows 10 Settings > Devices > Cameras page. If you are on a Windows 11 PC, jump to Windows 11 Settings > Bluetooth & devices > Camera page.
If the Cameras page is missing, it is either because you are running a build older than 21354 or the camera driver is not installed.
Step 2: The Cameras page displays all connected cameras to your PC, including the built-in webcam. The built-in webcam will be detected as an integrated camera.
On Windows 10 PC, to change the camera settings, click on the camera’s entry and then click the Configure button. If you are on a Windows 11 powered machine, click on Integrated camera to see available settings.


Step 3: As you can see in the picture below, you can change the default brightness and contrast settings by moving their respective sliders. On Windows 11 PC, if you cannot see camera settings, please click on Basic Settings.


Method 2 of 2
Change photo/video quality via Camera app
The built-in Camera app in Windows 10/11 offers a few options to change the default settings. For instance, you can change the picture resolution (photo quality), video quality, and brightness via the app.
Step 1: Open the Camera app.
Step 2: If you would like to change the photo or video quality, click on the gear/settings icon located top left of the app. The photos and videos section offer options to change the picture and video quality.

NOTE: If you would like to change the brightness from within the Camera app, you need to enable the Pro mode (available under Camera Settings). Once you enable the Pro mode, an option to change the brightness will be shown within the app.

If you make video calls on your computer through Zoom, Skype, WhatsApp, or any other video service, and the brightness and contrast aren’t the best, you can adjust these and other settings through the Camera settings on Windows 11.
However, the available settings will depend on the capabilities of the device. For example, in addition to the brightness, contrast, and rotation, some cameras may include the option to use High Dynamic Range (HDR) or the Eye contact feature that allows the system to project your face as if you were looking directly into the camera.
Furthermore, through the «Privacy & security» settings, you can allow or deny access to the camera.
This guide will walk you through the steps to manage the camera settings on Windows 11.
How to configure webcam settings on Windows 11
To manage the webcam settings on your computer, use these steps:
- Open Settings.
- Click on Bluetooth & devices.
- Click the Cameras page on the right side.
- Under the «Connected cameras» section, click on the webcam installed on the computer.
- Use the Brightness setting to adjust the camera brightness.
- Use the Contrast setting to adjust the device contrast.
- (Optional) Use the Video rotation setting to rotate the camera right 90, left 90, or 180 degrees.
Once you complete the steps, the settings will apply to the camera automatically.
If you want to revert the changes to the defaults, you can use the same steps, but on step 5, click the Reset settings button.
All the latest news, reviews, and guides for Windows and Xbox diehards.
How to disable webcam on Windows 11
To disable a camera on Windows 11, use these steps:
- Open Settings.
- Click on Bluetooth & devices.
- Click the Cameras page on the right side.
- Click the Disable button.
After you complete the steps, the webcam will be disabled, but it’ll continue to be installed on the computer.
If you want to re-enable the device, you can use the same instructions, but on step 3, click the Enable button next to the webcam.
How to fix common webcam problems on Windows 11
If the camera isn’t working, Windows 11 includes a troubleshooter specifically designed to detect and resolve more problems automatically.
To fix camera problems on Windows 11, use the steps:
- Open Settings.
- Click on Bluetooth & devices.
- Click the Cameras page on the right side.
- Click the Troubleshoot button.
- Continue with the on-screen wizard to fix the camera.

Once you complete the steps, the troubleshooter will prompt you to answer some questions to run diagnostics and apply fixes-based answers.
How to control webcam privacy settings on Windows 11
To allow or deny users and apps access to the webcam, use these steps:
- Open Settings.
- Click on Privacy & security.
- Click the Camera page on the right side.
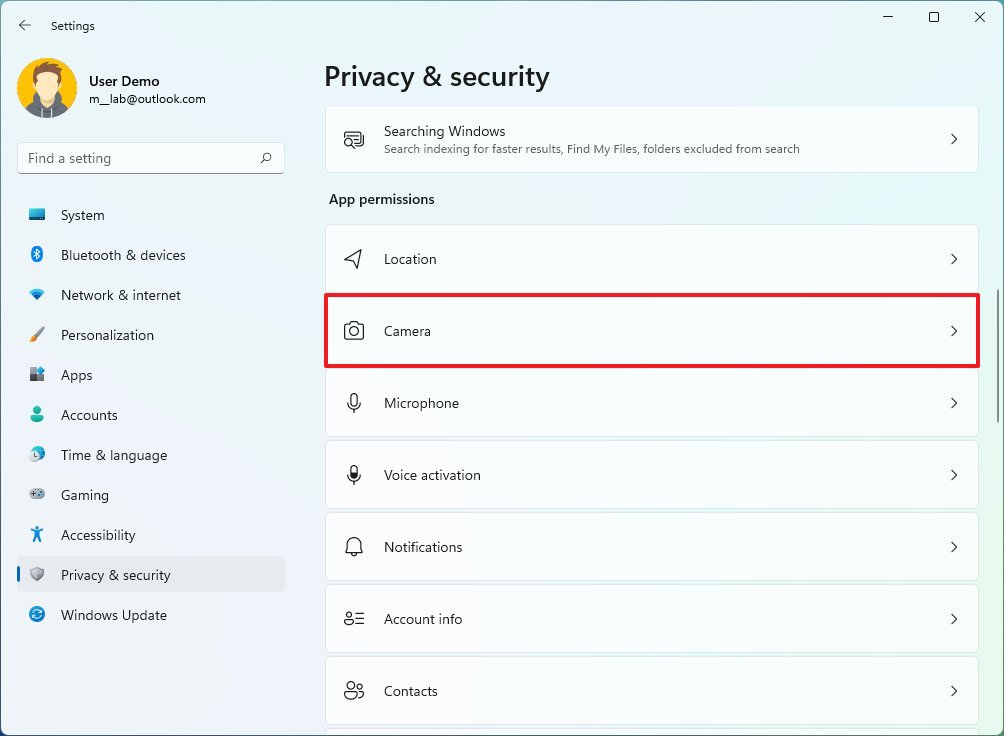
- Turn on or off the Camera access toggle switch to allow or deny users access to the webcam.
- Turn on or off the «Let apps access your camera» toggle switch to allow or deny users access to the webcam.
- (Optional) Turn off the toggle switch for the apps for which you want to have restricted access to the camera.
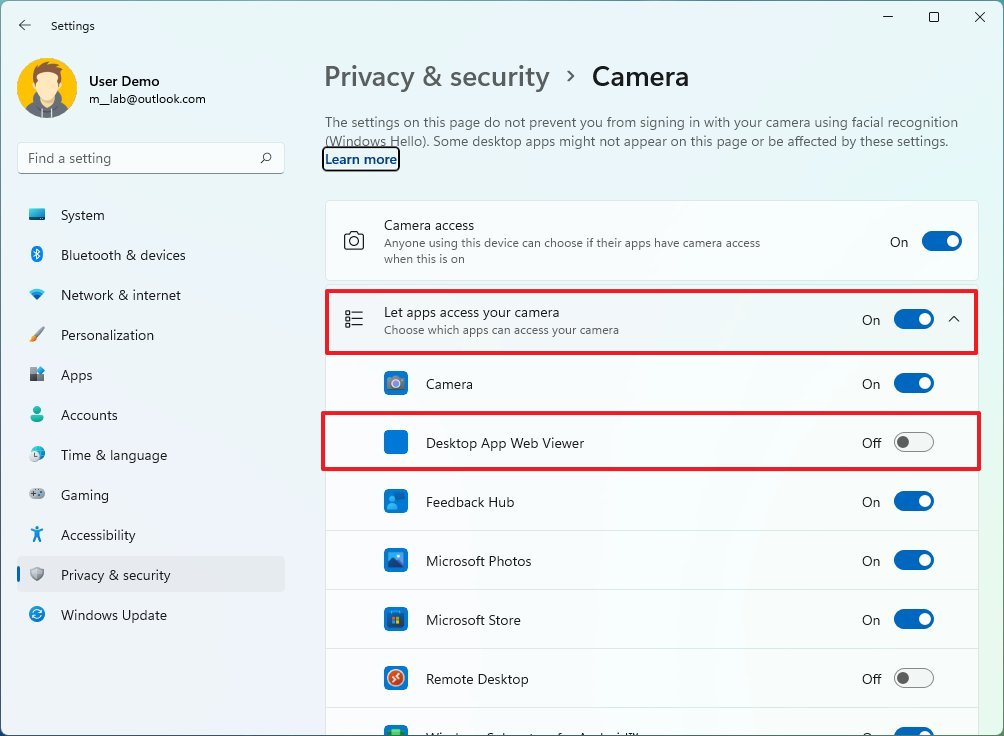
Once you complete the steps, the camera will be available for users and apps according to your configuration.
More resources
For more helpful articles, coverage, and answers to common questions about Windows 10 and Windows 11, visit the following resources:
- Windows 11 on Windows Central — All you need to know
- Windows 10 on Windows Central — All you need to know
Mauro Huculak has been a Windows How-To Expert contributor for WindowsCentral.com for nearly a decade and has over 15 years of experience writing comprehensive guides. He also has an IT background and has achieved different professional certifications from Microsoft, Cisco, VMware, and CompTIA. He has been recognized as a Microsoft MVP for many years.