
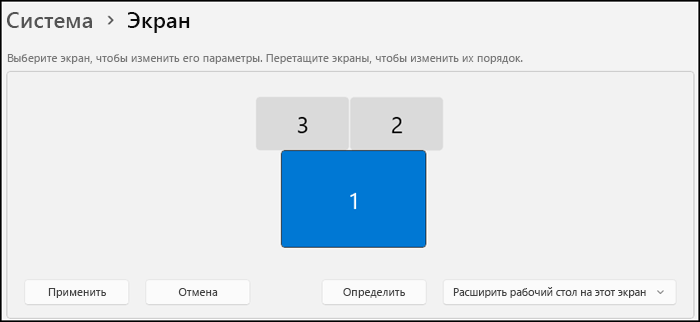
Если у вас есть внешние дисплеи, подключенные к компьютеру, до начала работы не забудьте выбрать, какие дисплеи нужно изменить.
-
Выберите Пуск > Параметры > Системный > Дисплей и просмотрите раздел, в котором отображаются ваши дисплеи.
-
Выберите дисплей, который необходимо изменить. После этого следуйте приведенным ниже инструкциям.

«Изменение размера текста, приложений и прочих элементов»
-
Оставайтесь на экране или откройте параметры дисплея.Откройте параметры дисплея
-
Прокрутите до раздела Масштаб и макет.
-
Выберите Масштаб, а затем выберите параметр. Как правило, лучше всего выбрать один из помеченных как (Рекомендуется).
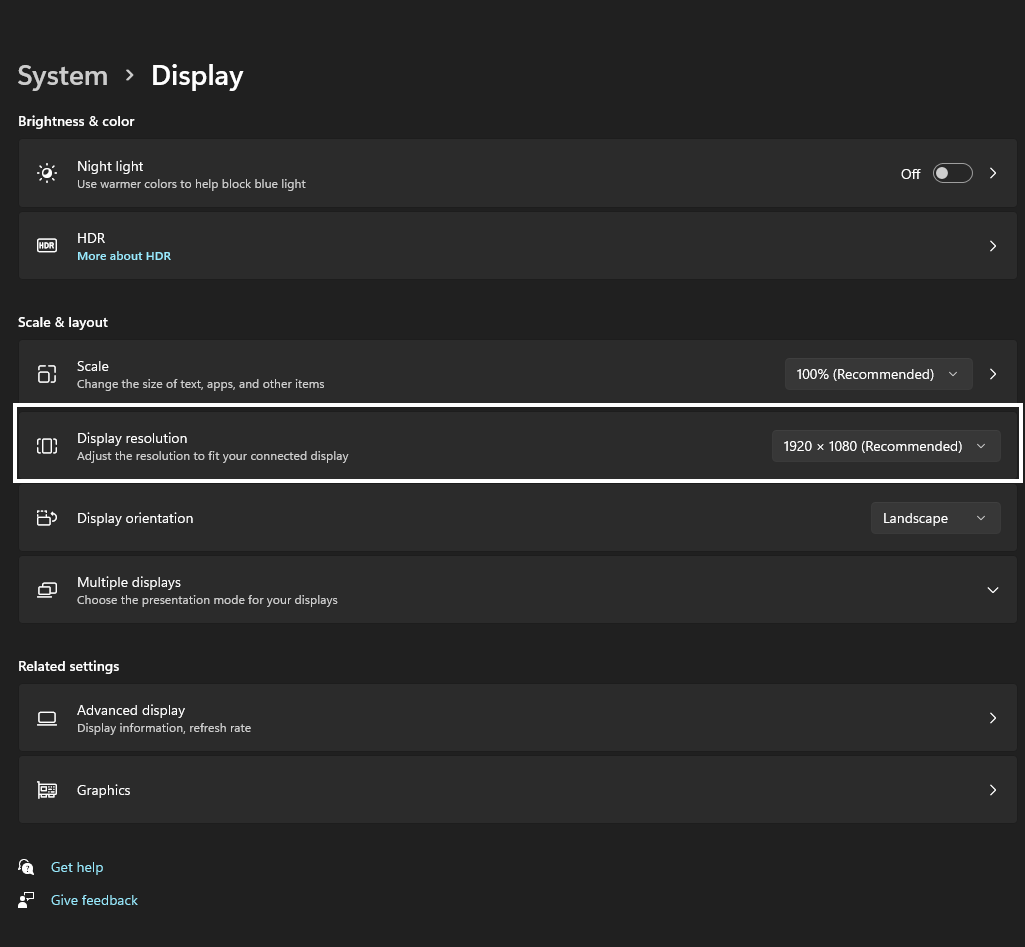
Изменение разрешения дисплея
-
Оставайтесь на экране или откройте параметры дисплея.Откройте параметры дисплея
-
В строке Разрешение экрана выберите список и параметр. Как правило, лучше всего использовать тот, который помечен (рекомендуется). Мониторы могут поддерживать разрешение ниже основного, но в этом случае текст будет менее четким, а изображение может занимать не весь экран, быть растянутым или располагаться по центру черного экрана.
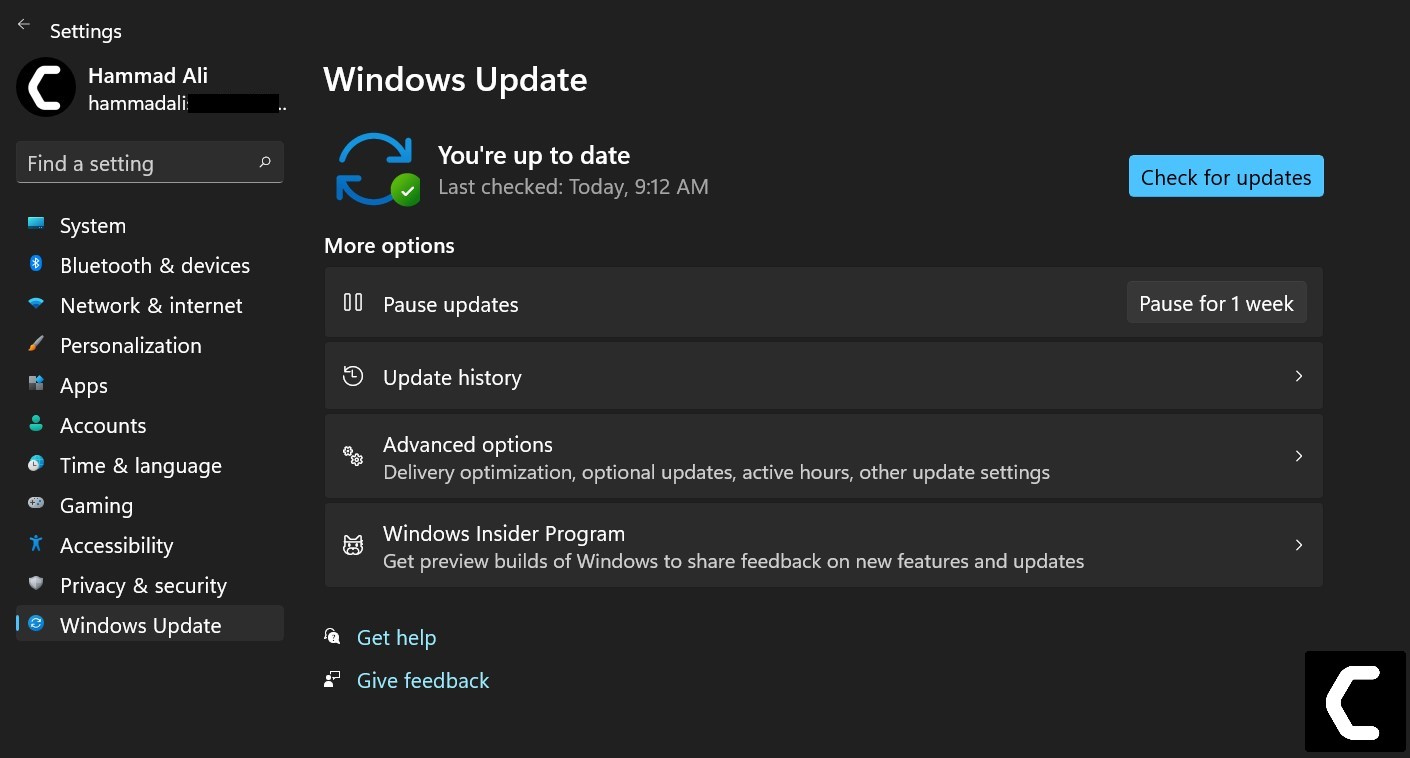
Примечание: Если в разрешении экрана есть непредвиденные изменения, возможно, потребуется обновить графический драйвер. Чтобы просмотреть и установить доступные обновления, выберите Пуск > Параметры > Центр обновления Windows > Проверить наличие обновлений.
Изменение ориентации дисплея
Нажмите кнопку Пуск и введите параметры. Выберите Параметры > Системный > Дисплей и выберите ориентацию экрана в раскрывающемся списке рядом с пунктом Ориентация экрана.
Windows порекомендует ориентацию для вашего экрана. Если вы измените ориентацию монитора, вам также потребуется физически повернуть экран. Например, вам нужно будет повернуть свой внешний монитор, чтобы использовать его в книжной ориентации вместо альбомной.
Изменение ориентации экрана
Если вам требуется поменять разрешение экрана монитора — выставить правильное, если установлено отличающееся от фактического разрешения матрицы или, возможно, установить нестандартное разрешение, сделать это сравнительно просто.
В этой инструкции подробно о способах изменить разрешение экрана в Windows 11, нюансах, которые следует при этом учитывать и дополнительная информация, которая может оказаться полезной.
Изменение разрешения экрана в Параметрах
Первый, стандартный способ изменения разрешения экрана Windows 11 — использование приложения «Параметры». Достаточно выполнить следующие шаги:
- Нажмите правой кнопкой мыши по пустому месту рабочего стола и выберите пункт «Параметры экрана», либо перейдите в Параметры — Система — Дисплей.
- В разделе «Масштаб и макет» выберите желаемое разрешение экрана. В идеале — то, рядом с которым указано «рекомендуется», о чем подробнее в разделе инструкции с дополнительной информацией.

- Если у вас подключено несколько мониторов, разрешение может меняться отдельно для каждого из них: сначала выбираем нужный монитор вверху параметров дисплея, а затем устанавливаем разрешение для него.

- После смены разрешения появится окно: в нем можно сохранить, либо отменить сделанные изменения, в зависимости от того, устраивает ли вас изображение.


В случае, если после смены разрешения изображение на экране пропало или монитор сообщает «Вне диапазона» или «Out of range», просто подождите — через короткое время будет выставлено предыдущее разрешение экрана.
Настройка разрешения в расширенных параметрах дисплея
В Windows 11 доступна ещё одна возможность смены разрешения экрана в Параметрах:
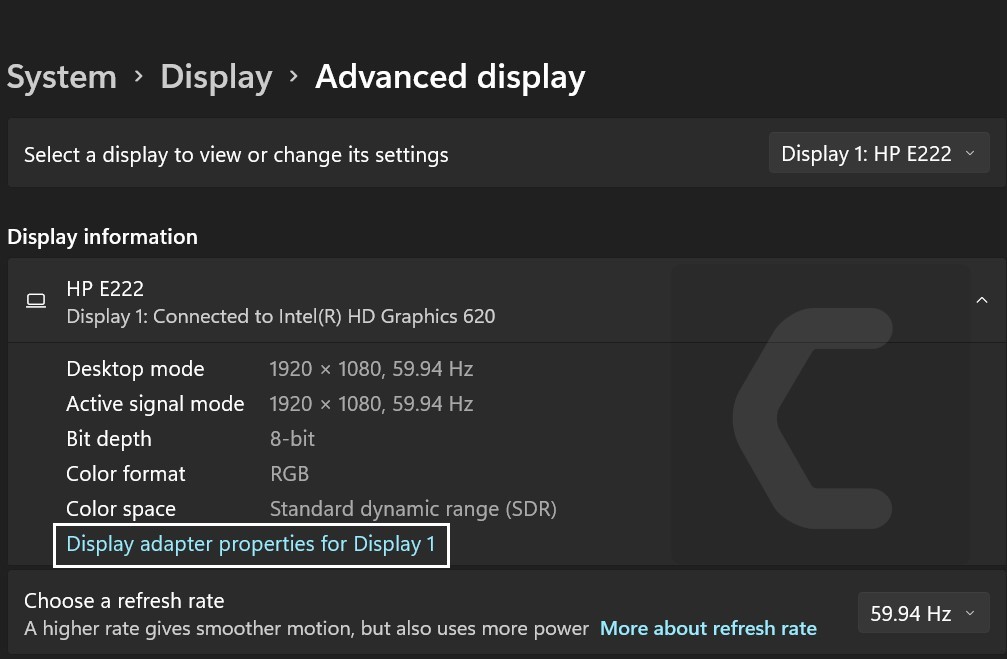
- На той же странице параметров дисплея, которая была рассмотрена выше, нажмите «Расширенные параметры дисплея».
- В следующем окне выберите монитор при необходимости, а затем в пункте «Сведения о дисплее» нажмите «Свойства видеоадаптера для дисплея».

- В следующем окне нажмите кнопку «Список всех режимов».

- Выберите нужное разрешение, а также разрядность цвета и частоту обновления и нажмите «Ок». Затем — снова кнопку «Ок» в окне свойств адаптера.
- Разрешение будет изменено, а также появится окно с предложением сохранить его или отменить изменения.


Панель управления NVIDIA
Если ваш монитор подключен к дискретной видеокарте NVIDIA GeForce, вы можете изменить разрешение экрана в Панели управления NVIDIA:
- Нажмите правой кнопкой мыши по рабочему столу, выберите пункт «Показать дополнительные параметры», а затем — «Панель управления NVIDIA».
- Перейдите в раздел «Дисплей» — «Изменение разрешения» и выберите желаемое разрешение и частоту обновления экрана. Лучше всего, если будет выбрано собственное разрешение монитора. Примените настройки.

- Панель управления NVIDIA позволяет настроить и протестировать собственные разрешения экрана, сделать это можно нажав кнопку «Настройка» под списком разрешений, а затем создав пользовательское разрешение экрана.


Если в панели управления NVIDIA нет вкладки «Дисплей», вероятно монитор (такое может быть и на ноутбуке) физически подключен не к дискретной, а к интегрированной видеокарте и для процессоров Intel вам должен подойти следующий вариант.
Центр управления графикой Intel
Если у вас установлена интегрированная видеокарта Intel, выполнить настройки разрешения можно в центре управления графикой Intel, который, обычно, устанавливается вместе с драйверами видеокарты:
- В поиске на панели задач начните набирать «Intel» и, если нужный результат найдется, откройте панель управления графикой Intel.
- Перейдите к разделу «Дисплей».
- Выберите нужное разрешение экрана на вкладке «Общие» и примените настройки.

- При наличии нескольких мониторов, настройка может выполняться по отдельности для каждого: достаточно выбрать нужный монитор в верхней части окна параметров.

Центр управления графикой Intel, также как и панель управления NVIDIA позволяет настроить пользовательские разрешения: для этого нажмите кнопку «Плюс» справа от списка разрешений, прочтите предупреждение и настройте собственные параметры разрешения.
Custom Resolution Utility (CRU)
Сторонняя программа Custom Resolution Utility позволяет настроить собственные разрешения экрана, поддержка которых не гарантирована монитором.
Общая схема действий — добавление своего разрешения в раздел Detailed Resolutions (требует дополнительных параметров) или в Standard Resolutions, применение настроек и перезагрузка — после этого созданное разрешение появится в списке доступных для выбора в параметрах Windows и в программах от производителя видеокарты.

В рамках этой инструкции детально рассматривать CRU не будем, но вы можете ознакомиться с ней подробнее в статье про увеличение частоты обновления экрана.
При смене разрешения вы можете столкнуться с теми или иными проблемами, наиболее распространенные из которых:
- Нельзя выбрать или не меняется разрешение экрана. На эту тему на сайте есть отдельная инструкция: Что делать, если не меняется разрешение экрана (написана для Windows 10, но подойдет и для Windows 11).
- Слишком мелкое изображение при рекомендуемом разрешении экрана и размытое, если выставить разрешение ниже рекомендуемого. Это обычная ситуация: если установлено разрешение экрана, не совпадающее с фактическим разрешением матрицы монитора, появятся искажения и размытость. Решение: выставить «родное» разрешение и использовать параметры масштабирования в параметрах дисплея. Учитывайте, что после применения параметров масштабирования, до первой перезагрузки они могут работать не совсем правильно.
- Не отображается реальное разрешение монитора в списке доступных. Такое может происходить при использовании переходников/адаптеров для подключения монитора (попробуйте найти способ обойтись без них), по причине отсутствия установленных драйверов видеокарты и, в редких случаях — необходимости установки специфичных драйверов монитора с сайта производителя (для большинства мониторов подходит стандартный драйвер).
- Для предыдущей ситуации также могут помочь следующие шаги: в диспетчере устройств нажмите правой кнопкой мыши по вашему монитору, и используйте шаги Обновить драйвер — Найти драйвер из списка доступных драйверов на компьютере. Посмотрите, есть ли в списке другие (отличающиеся от установленного) совместимые драйверы монитора, при их наличии — выберите и установите такой драйвер вместо используемого в настоящий момент.

- При наличии двух и более мониторов в режиме «Дублировать эти экраны», вы не можете установить разное разрешение для них, только одинаковое. При несовпадении физических разрешений двух экранов, это может приводить к проблемам с изображением. Возможное решение: использовать режим «Расширить эти экраны» или включить вывод изображения только на один из экранов.

Если смена разрешения экрана вам требуется часто, полезной может оказаться статья: Как изменять разрешение экрана с помощью горячих клавиш.
- To change resolutions on Windows 11, right-click the desktop, select “Display settings,” and choose the resolution. Or open Settings > Display and change screen resolution with the “Display resolution” setting. Typically, you want to use the “Recommended” resolution.
Although Windows 11 does a good job applying the most optimal screen resolution to make elements and text as clear as they can be on your laptop or desktop computer, you may sometimes need to change this setting manually.
For instance, if you have a monitor that supports 1366 x 768 pixels, or the device has a 1080p (1920 x 1080-pixel) or 4K (3840 x 2160-pixel) resolution, and for some odd reason, Windows 11 isn’t displaying the correct settings, you are setting up a secondary display of a different size, or you want to match the resolution of the primary monitor.
Whatever the reason, Windows 11 includes an easy way to adjust the resolution for all monitors from the Settings app. In addition, you can use third-party apps to change the resolutions from Command Prompt.
In this guide, you will learn the easy steps to change the resolution of the display on Windows 11.
- Change screen resolution on Windows 11 from Settings
- Change screen resolution on Windows 11 from Command Prompt
Change screen resolution on Windows 11 from Settings
To change the screen resolution on Windows 11, use these steps:
-
Open Settings on Windows 11.
-
Click on System.
-
Click the Display page on the right side.
Quick tip: You can also right-click the desktop and select the “Display settings” to access the option to change the resolution.
-
Select the display from the top (if you are in a multi-monitor setup).
-
Under the “Scale & layout” section, change the screen resolution on Windows 11 with the “Display resolution” setting.

-
Click the Keep changes button.

Once you complete the steps, the display will apply the new resolution, and depending on the setting, elements on the screen will be bigger and easier to see.
Alternatively, the easiest way to access the resolution settings is to right-click the desktop and select the “Display settings” option.
If you try to make the items bigger and smaller, you shouldn’t change the resolution. Instead, you should change the “Scale” setting.
Change screen resolution on Windows 11 from Command Prompt
To change screen resolution with commands on Windows 11, use these steps:
-
Download QRes from website.
-
Right-click the QRes.zip file and select the Extract All button.
-
Click the Extract button.
-
Type CMD and press Enter in the address bar to open Command Prompt in the “QRes” folder location.
-
Type the following command to change the screen resolution on Windows 11 and press Enter:
QRes.exe /x:1680 /y:1050

In the command, change the path for the “QRes.exe” file and enter a supported width (x) and height (y) pixel resolution. For example, 1366 x 768, 1440 x 900, 1680 x 1050, 1920 x 1080, 2560 x 1440, etc.

After you complete the steps, the Windows 11 desktop will change to the specified resolution.
Why You Can Trust Pureinfotech
The author combines expert insights with user-centric guidance, rigorously researching and testing to ensure you receive trustworthy, easy-to-follow tech guides. Review the publishing process.
Want to know How to Change Resolution on Windows 11?
Or
Are you unable to optimize the resolution on your Windows 11?
Don’t worry about it!
The CPU Guide brings you the best working solution & tutorials To Change Resolution on Windows 11.
Windows 11 Features
Windows 11 is the most anticipated Windows ever,
Windows 11 come with new modern features that make this Windows super interesting. Windows 11 contains lots of productivity features that will enhance the user experience and enable office workers to do work on multiple tasks on one screen at the same time, that’s super cool though! Windows 11 is full of applications this time,
READ ALSO: This PC Can’t Run Windows 11?
In Windows 11 you will get a fully new Microsoft store experience, in the new Windows Microsoft store you will have access to the android apps, which will enable users to use android apps on their PCs and this will improve productivity by using android tools on your PC.
Windows 11 is not that different from Windows 10, The setting of Windows 11 is pretty similar to Windows 10 settings, so if you are familiar with the Windows 10 settings it pretty easy to rectify any error you have in Windows 11 due there a similarity.
However, the UI of Windows 11 is far better than Windows10, Windows 11 enable the user to gather all of his work on one platform plus provides entertainment with your mobile apps. A start-up sound is also a unique thing after Windows 7.
Windows 11 is available in various languages which allows user to have their local language on their PC. Some languages are fully optimized with “Display language“, “Text to Speak“, Speach recognition“, “Handwriting” features.
Solution 1: Change Resolution on Windows 11 Via Display Settings
To Change Resolution on Windows 11, we have to go into settings to change them and set them according to your Monitor requirement to provide you best experience on Windows 11.
Here is how you can Change Resolution on Windows 11 Via Display Settings:
- Turn on your PC
- Right-click on the main desktop screen
- The small menu will appear
- Select Display Settings
- The settings window will open
- Now you are in System > Display
- Under the Scale & layout section
- Select Display resolution

- There is a drop-down menu click on it
- Now select the resolution which is appropriate for your monitor
- Your monitor resolution is now changed successfully.
If your monitor supports more resolution and there are only lower options are available then you have to update the graphic and monitor drivers on Windows 11.
Here are multiple ways to update graphic and Monitor display drivers to enhance your monitor resolution.
Way 1: Update Graphics Card Driver on Windows 11 with Windows Update
Here is how you can do it:
- Click on the Windows icon

- Click on the settings icon
- A new window will pop up
- Select Windows Update from the left menu

- The new window will pop up
- Now select Advanced options
- Click on Optional updates

- A new window will open
- Click on the drop-down button of driver updates
- Now select your desired drivers and up by checking in the box
- Now press the Download & Install button

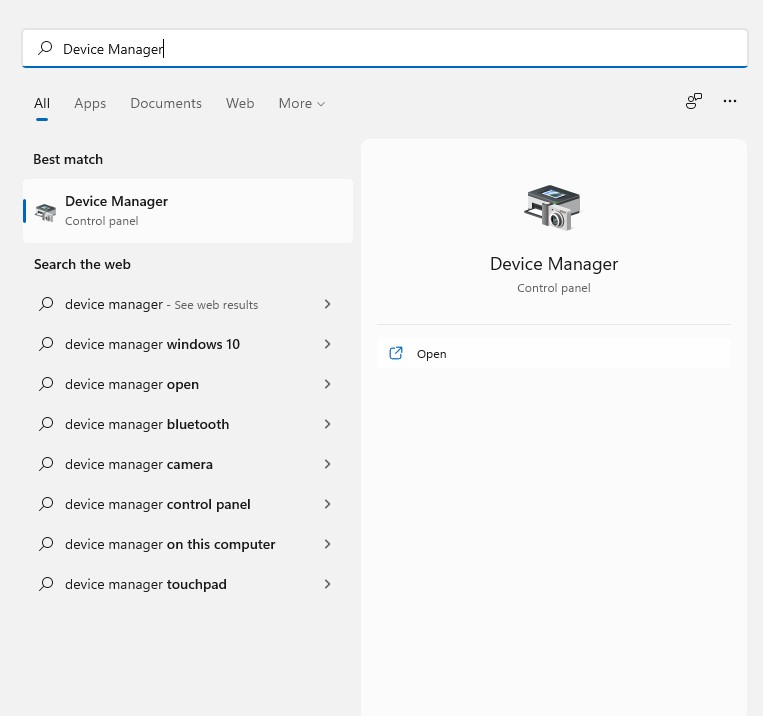
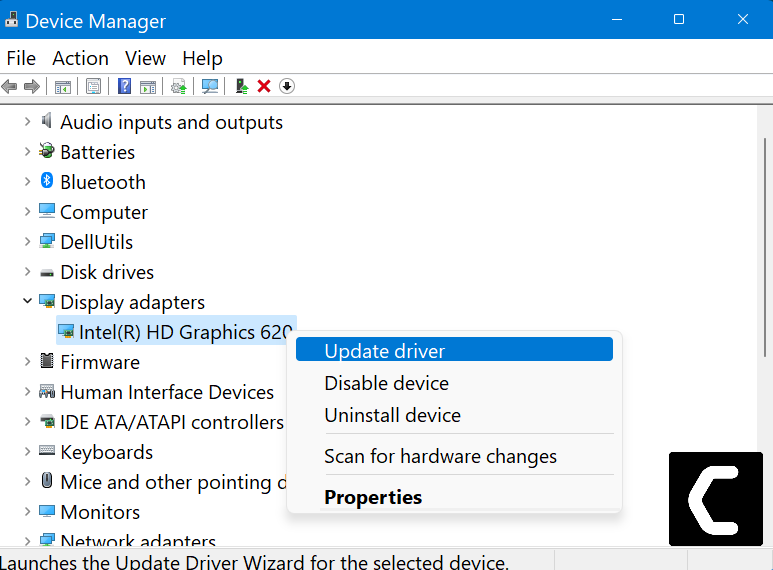
Way 2: Update Graphics Card Driver on Windows 11 through Device Manager
Here is how you can do it:
- Click on the Search icon
- Type Device Manager

- Click to open Device Manager
- Then select the Display adapter
- A further menu will open
- Find your video driver
- Click right on the graphic card name
- Click on the Updated driver

Solution 3: Check for Driver’s Updates of GPU/Video Card OF different company
One of the main and highlighted issues is the GPU drivers are outdated when our video card has outdated drivers it’s unable for GPU to go align with the update/modern gaming experience so we recommend updating the video card drivers. Giving you direct links to Main GPU making companies
- AMD
- Nvidia
- Intel
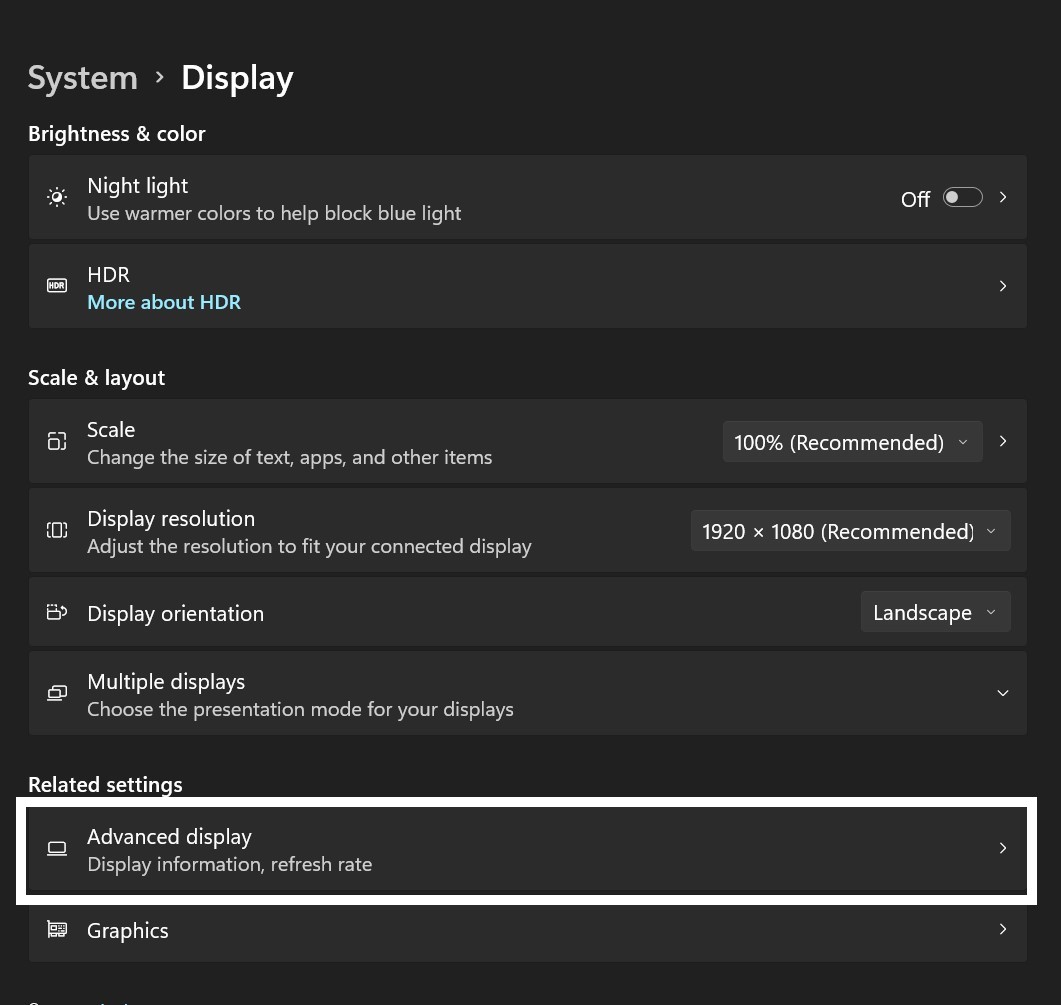
Solution 2: Change Resolution on Windows 11 Via Advanced Display Settings
If the above settings are no help to then there is another way to Change Screen Resolution on Windows 11.
Here is how you can do it:
- Press Windows + I
- A Settings window will open
- From the left menu select System
- Now go to the right side menu
- Select the “Display” option
- Now scroll down
- Under Related settings select “Advance display“

- The Advance display settings window will open
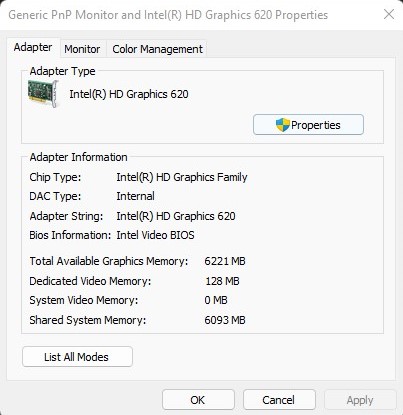
- Under the Display information
- Select “Display adapter properties For Display“

- A new pop up window will open
- Select “List All Modes“

- List All-Mode window will open
- Now select the appropriate resolution according to your monitor
- Click Ok and exit from settings
- Your monitor resolution is changed successfully.
If your PC has an intel graphic card then there is another way to Change Resolution on Windows 11.
Solution 3: Change Resolution on Windows 11 Via Intel Graphic Command Center
The Intel Graphic Command Center is the one-stop solution for the intel graphic card user. This software allows the user to control all of the graphic settings in one place. Similarly, the Intel Graphic Command Center allows the user to change the monitor resolution without going into complicated settings.
Here is how you can Change Resolution on Windows 11 Via Intel Graphic Command Center:
- Press Windows + S to open Windows search
- Type Intel Graphic Command Center

- Now choose the appropriate option
- The Intel Graphic Command Center Will open
- From the left menu select “Display“

- On the right multiple options are given
- Select the “General” tab
- Now select the drop-down menu in front of the “Resolution” option
- Select the appropriate resolution for your PC
- A pop-up message will come to select “Keep” to save the new resolution.
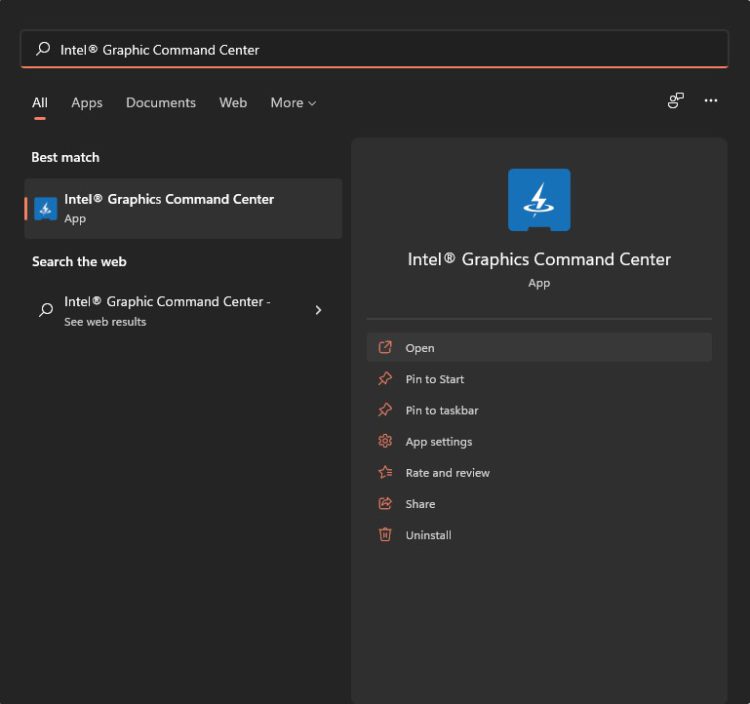

Now your Resolution on Windows 11 is changed successfully.
Solution 4: Change Resolution on Windows 11 Via AMD Catalyst Control Center & AMD Radeon™ Software
AMD also comes with two software that allows users to experience a more enhanced controlling experience and do things in the quickest ways. AMD Catalyst Control Center is an older version of AMD software that is still functional and used by many users.
Meanwhile, the AMD Radeon Software is designed according to the need of the new modern era. This AMD Radeon Software is more enhanced and optimized as compared to AMD Catalyst Control Center.
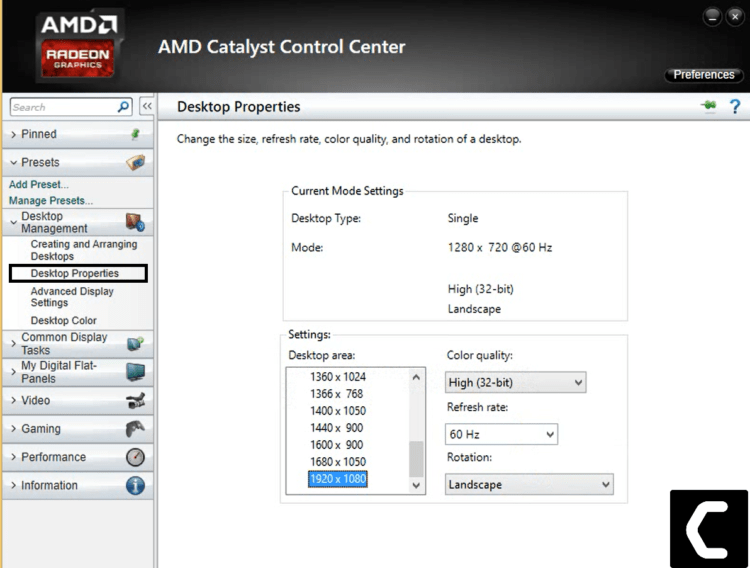
AMD Catalyst Control Center
Here is how you can Change Resolution on Windows 11 via AMD Catalyst Control Center:
- Press Windows + S
- Search For AMD Catalyst Control Center
- Select the Appropriate option
- From the left menu select “Desktop Management“
- Select “Desktop Properties“
- Under the heading of the Settings
- Go to “Desktop Area“

- Select the appropriate resolution for your monitor
- Then click on Apply
- A pop message will come to select “Yes“
- Now your Resolution on Windows 11 changed successfully on AMD Catalyst Control Center
AMD Radeon™ Software
Here is how you can Change Resolution on Windows 11 via AMD Catalyst Control Center:
- Press Windows + S
- Search For AMD Catalyst Control Center
- Select the Appropriate option
- AMD Radeon Software is opened
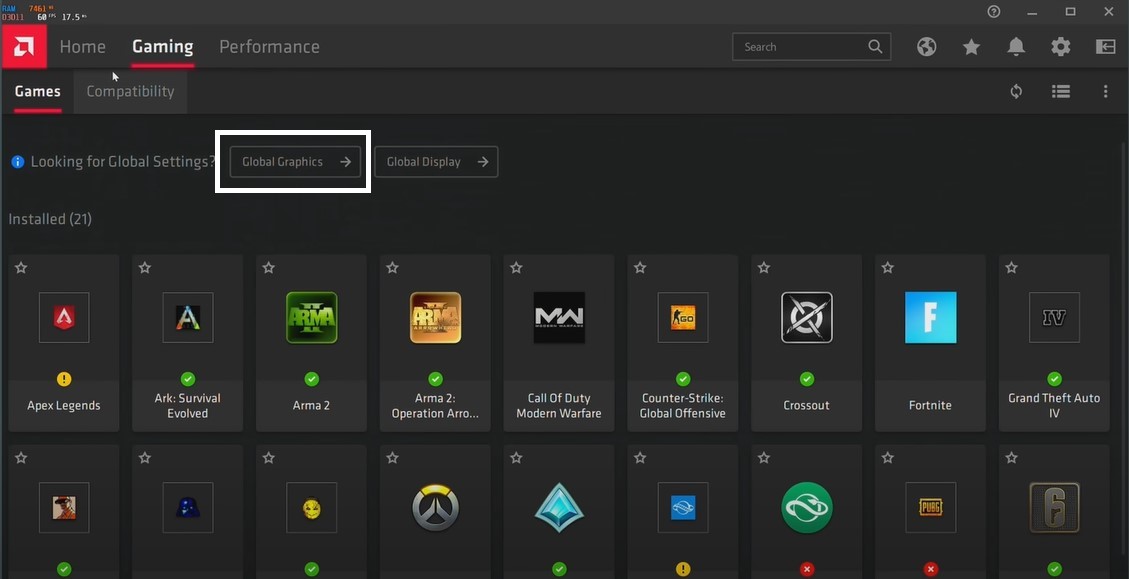
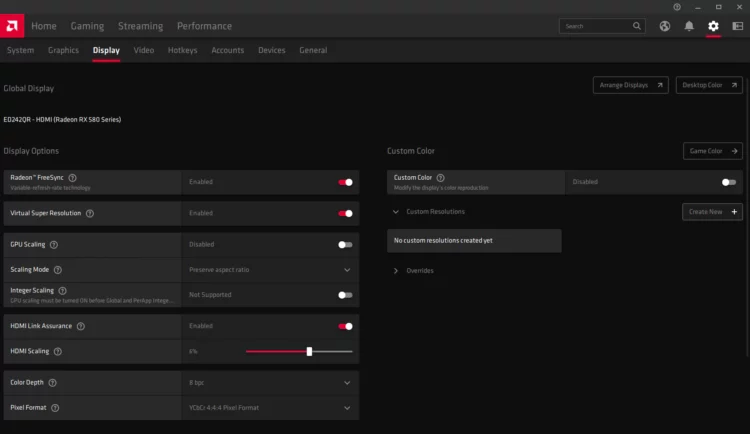
- Select Gaming Tab
- Find the “Global Graphics” button

- A new window will open
- Under Global Display
- Find Custom Resolutions

- Here you can create a resolution according to your need
- To create custom resolution press on “Create New” Button
- A window will open now put values according to your monitor required
- When your custom resolution is ready
- Click on it to Apply
Now your Resolution on Windows 11 AMD via Catalyst Control Center is changed successfully.
Hopefully, all of the above solutions help you Change Resolution on Windows 11 easily.
Share your experience in the comment section down below.
Video Guide: How To Change Resolution on Windows
FAQs
How do I change resolution from Windows 11 to 1366×768 to 1920×1080?
Here is how you can change resolution from Windows 11 1366×768 to 1920×1080:
1. Right-click on the main desktop screen
2. The small menu will appear
3. Select Display Settings
4. The settings window will open
5. Now you are in System > Display
6. Under the Scale & layout section
7. Select Display resolution
8. There is a drop-down menu click on it
9. Now select the resolution which is appropriate for your monitor
10. Your monitor resolution is now changed successfully.
Why is my computer resolution messed up?
Your computer resolution messed up might be due to the corrupted graphic drivers which makes your user experience worst. To prevent that you have updated the graphic drivers or reinstall them if needed.
Why can’t I change the display resolution?
When you can’t change the display resolution this problem happened when your PC missed out on the graphic card update. So its recommended to upgrade your outdated graphic card drivers to change display resolution on Windows 11.
Meet Hammad, a dynamic writer with a passion for gaming and a talent for analysis. With extensive years of experience in the gaming industry, Hammad has a unique perspective on the latest gaming trends and technologies. In addition to writing about gaming, Hammad also guides our team with marketing news and his investment analysis.
Key Takeaways
- Outdated or corrupt graphics drivers can prevent you from changing display resolution on Windows 11.
- Running system maintenance tools and SFC scans can help resolve underlying system problems that affect display resolution.
Basic Fixes:
- Restart the computer: Rebooting is effective because minor bugs may trigger the problem, and a reboot often kills the problematic services or processes.
- Reinstall monitor drivers: Outdated monitor drivers may trigger the problem, and reinstalling them may fix it.
- Change resolution via graphics control panel: As a workaround, you should try changing display resolution via the NVIDIA Control Panel or Intel Graphics Command Center.
Fix 1: Update or Reinstall the Graphics Driver
On Windows computers, the graphics driver aids communication between the graphics card and the operating system. When it is outdated, you may notice certain flaws with graphical components, which may be why you cannot change the display resolution. Follow the steps below to update the driver.
Step 1: Right-click the Start menu and click Device Manager.

Step 2: Expand the Display adapters category, right-click your driver, and click Update driver.

Step 3: Click Search automatically for updates.

Alternatively, you may reinstall the driver if it is corrupted.
Step 1: Right-click the Start menu and click Device Manager.
Step 2: Expand the Display adapters category, right-click your driver, and click Uninstall device.

Step 3: Confirm your choice.
Step 4: Restart the computer, reopen the Device Manager, and click the icon for Scan for hardware changes. Once done, the system should automatically prompt you to install the required drivers.

Fix 2: Adjust the Display Scale
If you have selected a mismatch scale for your Windows 11 display resolution, you may encounter a few problems. In this case, your only option will be to set the scale to the recommended settings from Display Settings before changing the resolution.
Step 1: Click the magnifying lens on your Taskbar, type display settings, and click the Display Settings application.

Step 2: In the Scale & layout section, click the Scale dropdown menu and select any option that has Recommended.

Step 3: Try changing the display resolution again.
Fix 3: Change Display Refresh Rate
When you change the refresh rate, you may fix compatibility issues that trigger the problem or bypass conflicts. Follow these steps.
Step 1: Press Windows + I to open Settings.
Step 2: Select System on the left pane and click Display on the right.

Step 3: Click on Advanced Display.
Step 4: Select a new refresh rate from the Choose a refresh rate dropdown.

Fix 4: Run the System Maintenance Troubleshooter
The system maintenance troubleshooter can scan your computer for various problems and fix or recommend solutions. When an underlying system issue impacts the display drivers or settings, this troubleshooter resolves it.
Step 1: Press Windows + R to open the Run dialog, type cmd, and hit Ctrl + Shift + Enter to open an elevated Command Prompt.
Step 2: Type the command below and hit Enter to launch the System Maintenance troubleshooter.
msdt.exe -id MaintenanceDiagnostic

Step 3: Click Next and follow the wizard to complete the process.

Fix 5: Run the SFC Scan
On Windows 11, the System File Checker (SFC) utility scans for damaged or corrupted system files. This tool is powerful enough to fix damage or repair the files when needed. If system file corruption makes changing the display resolution on Windows 11 impossible, an SFC scan will fix it.
Step 1: Press Windows + R to open the Run dialog, type cmd, and hit Ctrl + Shift + Enter to open an elevated Command Prompt.
Step 2: Type the command below and hit Enter to start the SFC scan.
sfc /scannow
Step 3: Follow any instructions on the Command Prompt and restart your computer when the scan is complete.
Was this helpful?
Thanks for your feedback!
The article above may contain affiliate links which help support Guiding Tech. The content remains unbiased and authentic and will never affect our editorial integrity.