
The boot menu shows up every time you turn on a PC where two or more Windows operating systems are installed. For instance, if you have installed Windows 10 and Windows 7 in a dual boot setup, you will get the boot menu where you can either select the non-default operating system or let the boot menu automatically boot into the default operating system.
By default settings, the most recently installed or most recently upgraded operating system is the default operating system in the boot menu.
")
However, at times, after installing or upgrading an operating system, you might want to change the boot order to set or change the default operating system.
In Windows 10, if you need to change the default boot order, you can do so without the help of third-party tools.
The following are the four ways out there to change the boot order in Windows 10.
Method 1 of 4
Change the boot order in Windows 10 via System Configuration
Step 1: Type msconfig in the Start/taskbar search field and then press the Enter key to open the System Configuration dialog.
Step 2: Switch to the Boot tab. Select the operating system that you want to set as the default and then click Set as default button. Click the Apply button.
")
Here, you can also change the default 30-second waiting period to the time of your choice.
Method 2 of 4
Change the boot order in Windows 10 via advanced options
Step 1: Close all running programs. Restart your PC.
Step 2: When you see the boot menu (Choose an operating system) screen, click the Change defaults or choose others.
")
Step 3: Next, you will get the Options screen. Here, click Choose a default operating system tile.
")
Step 4: On the Choose a default operating system screen, you can see the default operating system. The entry at the top of the list is usually the default operating system.
")
To change the default operating system, simply click on the tile that you want to set as the default operating system in the boot menu. For instance, I am clicking on Windows 10 entry to make it the default operating system.
That’s all! You will not see any confirmation message.
Instead, you will be taken back to the Options screen, where you can click Change the timer tile if you wish to change the default 30 seconds of the boot menu to 5, 10, or 15 seconds.
")
To exit, click the Back icon. You will now get the Choose an operating system screen. Here, the default operating system will appear at the top of the list. Click on an entry to boot into it.
Method 3 of 4
Step 1: Open the Settings app. Navigate to Update & security > Recovery.
Step 2: Click the Restart now button in the Advanced startup section.
")
Step 3: Your PC will restart, and you will get the Choose an option screen after the restart. Click Use another operating system tile.
")
Step 4: On the Choose an operating system screen, click Change defaults.
")
Step 5: Next, you will see the Options screen. Here, click Choose a default operating system tile.
")
Step 6: Finally, click on the OS entry that you want to set as default to make it the default.
")
You will now see the Options screen. Click the Back icon to go back to Choose an operating system screen. Here, you can see the default operating system. The default one appears at the top of the list.
Click on an entry to boot into it.
Method 4 of 4
Change the boot order in Windows 10 using EasyBCD
EasyBCD is one of the must-have tools for dual-boot PC users. With EasyBCD, you can easily change not just the default boot order but also add a new operating system to the boot menu.
Here is how to use the EasyBCD to change the boot order in Windows 10.
Step 1: Download EasyBCD and install the same. The free version is for personal and non-commercial use only.
Step 2: Run, EasyBCD. Click the Edit Boot Menu button on the left pane.
Step 3: In the Modify Menu Entries section, select an entry and then click the Up or Down icons to move it up or down.

To change the default operating system, simply click the checkbox next to it.
Here you can also change the countdown time from the default 30 seconds to something else, or you can make the boot menu wait until the user selects an entry.
Finally, click the Save settings button.
The boot order can be changed in the BIOS settings. To change the boot order in Windows 10, you’ll need to access the BIOS settings. The process for doing so varies depending on your computer’s manufacturer, but you’ll typically need to press a key (such as F2, F12, Esc, or Del) during bootup to access the BIOS settings.
Once you’re in the BIOS settings, look for a tab or menu called «Boot Order» or «Boot Priority.» From here, you should be able to change the boot order. Be sure to save your changes before exiting the BIOS.
How do I change BIOS boot order?
How do I change the boot order in Windows 10 without BIOS?
There are a few ways to change the boot order in Windows 10 without BIOS. One way is to use the System Configuration tool. To do this, press the Windows key + R, type msconfig, and press Enter. In the System Configuration window, go to the Boot tab, and select the order you want the devices to be booted in. Another way is to use the BCDEdit tool. To do this, press the Windows key + R, type cmd, and press Enter. In the Command Prompt window, type bcdedit /set {bootmgr} path \EFI\Microsoft\Boot\bootmgfw.efi, and press Enter.
How do I change my boot order permanently?
There are a few ways to change the boot order on a computer. The most common way is to enter the BIOS setup utility and change the boot order from there. Many computers will display a message at bootup that tells you what key to press to enter the BIOS setup utility. Once in the BIOS setup utility, look for a menu option that allows you to change the boot order. Save your changes and exit the BIOS setup utility. Your computer should now boot from the selected device.
Another way to change the boot order is to use the boot options menu. This menu is usually accessed by pressing a key during bootup, such as F12. Once in the boot options menu, use the arrow keys to select the desired boot device. Save your changes and exit the boot options menu. Your computer should now boot from the selected device.
How do I change my boot order BIOS or UEFI?
There are a few different ways to change the boot order of your computer, depending on whether it uses BIOS or UEFI.
If your computer uses BIOS, you can typically change the boot order by pressing a key during bootup (often F12 or F10) and then using the arrow keys to select the desired boot device. Once you’ve selected the boot device, press Enter to save your changes and reboot.
If your computer uses UEFI, the process is a bit different. You’ll need to access the UEFI settings menu, which is usually done by pressing a key during bootup (often F2 or Esc). Once you’re in the UEFI settings menu, look for a menu option labeled «Boot Order» or something similar. Use the arrow keys to select the desired boot device, and then press Enter to save your changes and reboot.
What is the best boot order in BIOS?
There is no one-size-fits-all answer to this question, as the best boot order for BIOS will vary depending on the specific hardware and software configuration of your computer. However, in general, it is typically best to boot from the hard drive first, followed by any optical drives (CD/DVD), and then any removable drives (USB, etc.).
Which boot option should be first?
There is no one-size-fits-all answer to this question, as the best boot option for a given system will depend on a number of factors, including the type of operating system being used, the hardware configuration of the system, and the specific needs of the user. However, some general tips that may be helpful include:
-For systems running Windows, it is generally recommended to install the operating system on the first bootable drive. This will typically be the C: drive.
-For systems running Linux, it is generally recommended to install the operating system on the first bootable drive. This will typically be the /dev/sda drive.
-For systems with multiple bootable drives, it is generally recommended to install the operating system on the drive with the highest capacity. This will ensure that there is plenty of space for the operating system and any associated data.
How do I choose which device to boot from?
There are a few factors to consider when choosing which device to boot from. The most important factor is compatibility. Make sure that the device you choose is compatible with your computer’s operating system. Another factor to consider is speed. Choose the device that will boot your computer the fastest. Another factor to consider is storage space. Choose the device with the most storage space if you need to store a lot of data.
How do I fix an incorrect boot order?
If you are using a PC, you can fix an incorrect boot order by following these steps:
1. Restart your computer and press the key that allows you to enter the BIOS settings. This key is usually F2, F10, or Del.
2. Use the arrow keys to navigate to the Boot tab.
3. Use the arrow keys to select the incorrect boot device and press the minus (-) key to move it down the list.
4. Use the arrow keys to select the correct boot device and press the plus (+) key to move it up the list.
5. Press the key to save your changes and exit the BIOS. Your computer should now boot from the correct device.
Which is better UEFI or BIOS?
There is no definitive answer to this question as it depends on individual preferences and needs. Some people prefer UEFI because it offers more features and is more user-friendly, while others prefer BIOS because it is more stable and compatible with a wider range of hardware. Ultimately, it is up to the individual to decide which is better for them.
Does UEFI boot faster than BIOS?
There is no definitive answer to this question as it depends on a number of factors, including the specific UEFI implementation and the hardware it is running on. However, in general, UEFI boot times are faster than BIOS boot times.
What happens if I change BIOS to UEFI?
If you change your BIOS from BIOS to UEFI, your computer will no longer be able to boot into BIOS. This means that you will not be able to change your BIOS settings or use BIOS-based utilities. In order to change your BIOS from BIOS to UEFI, you will need to reinstall your operating system.
Which is better BIOS or UEFI?
There is no definitive answer to this question as it depends on personal preferences and needs. Some people prefer BIOS because it is more compatible with a wider range of hardware and software. Others prefer UEFI because it offers more advanced features and is more user-friendly. Ultimately, it is up to the individual to decide which is better for them.
Which boot is better UEFI or legacy?
There is no definitive answer to this question as it depends on a number of factors, including the specific hardware and software involved. In general, however, UEFI is the newer standard and offers several advantages over legacy boot, including faster boot times, support for larger hard drives, and more security features. If you are unsure which boot mode to use, consult your computer’s documentation or the manufacturer for guidance.
Which boot is faster legacy or UEFI?
There is no definitive answer to this question as it depends on a number of factors, including the specific hardware and software configurations involved. In general, however, UEFI boot is faster than legacy boot. This is because UEFI uses a more efficient boot process that bypasses certain time-consuming tasks, such as initializing the BIOS.
На каждом компьютере есть BIOS. Пользователь, который переустанавливал операционную систему или «разгонял» компьютер, сталкивался с необходимостью настройки этого компонента ПК. Поэтому нужно знать, как зайти в BIOS на Windows 10.
Зачем он нужен?
BIOS – это аббревиатура, которая в переводе с английского означает «базовая система ввода/вывода». С его помощью компоненты компьютера взаимодействуют друг с другом и с ОС. Он первым стартует на ПК и тестирует составляющие устройства, и только после этого запускается Windows. Также в нем есть много изменяемых параметров, с помощью которых компьютер «разгоняется» или настраивается на максимальную производительность.
Разновидности
Как и любой другой компонент компьютера, базовая система ввода/вывода со временем совершенствуется, поэтому сейчас используются ее различные виды.
AMI
Разработанный компанией American Megatrends Incorporated этот тип отличается наличием синего или серого экрана на синем фоне. В зависимости от версии расположение пунктов меню в нем отличается.
AWARD
AWARD разработан компанией Phoenix. Отличие от AMI заключается в ином расположении пунктов меню. Но в общем эти два вида похожи между собой.

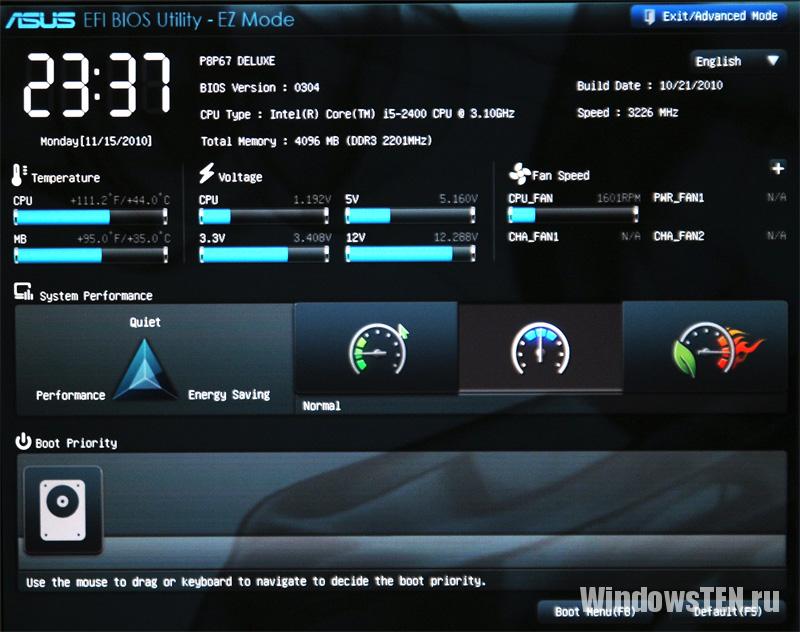
UEFI
UEFI предустанавливается на современные компьютеры. В отличие от двух предыдущих, эта система имеет графический понятный интерфейс и отличается большим количеством дополнительных функций, которые недоступны в предыдущих сборках BIOS.
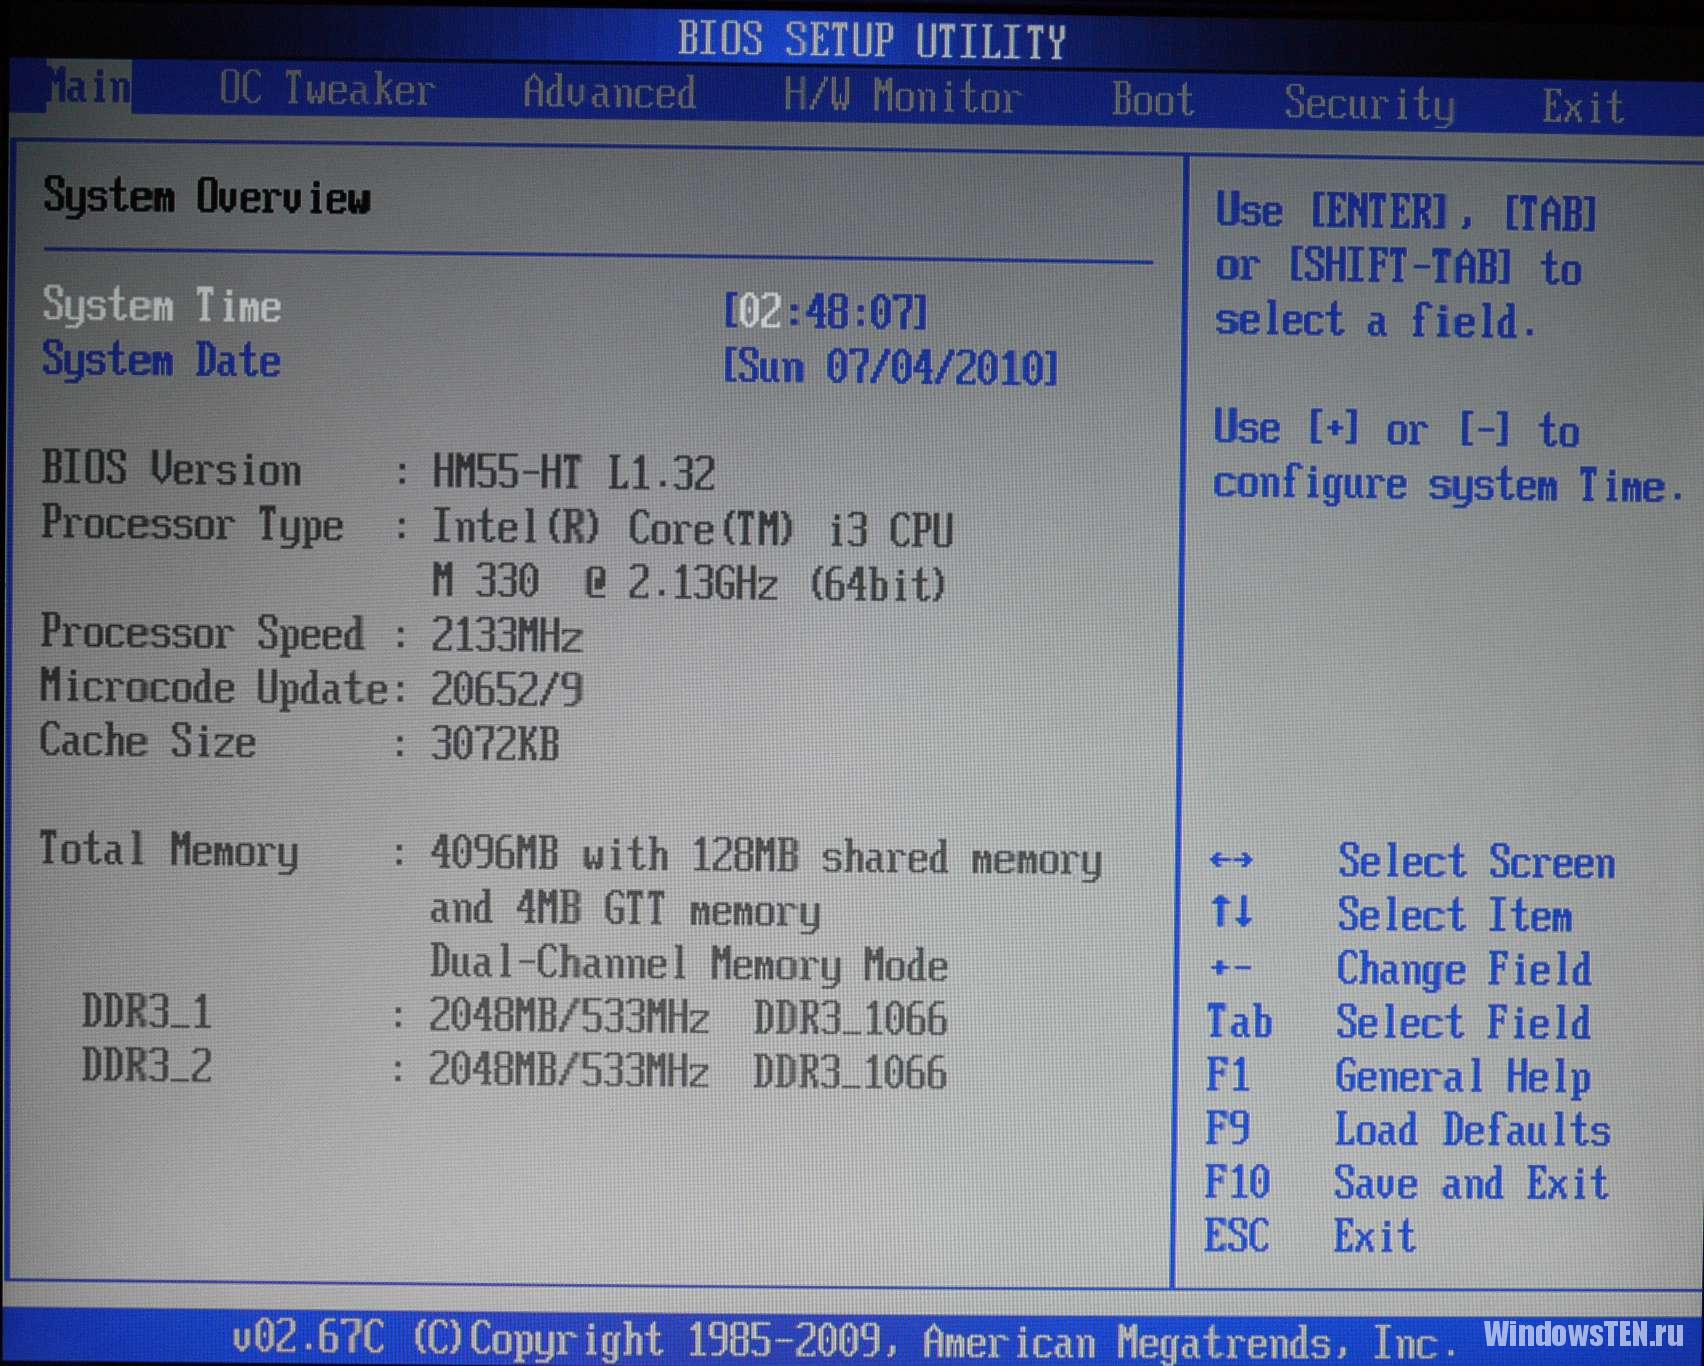
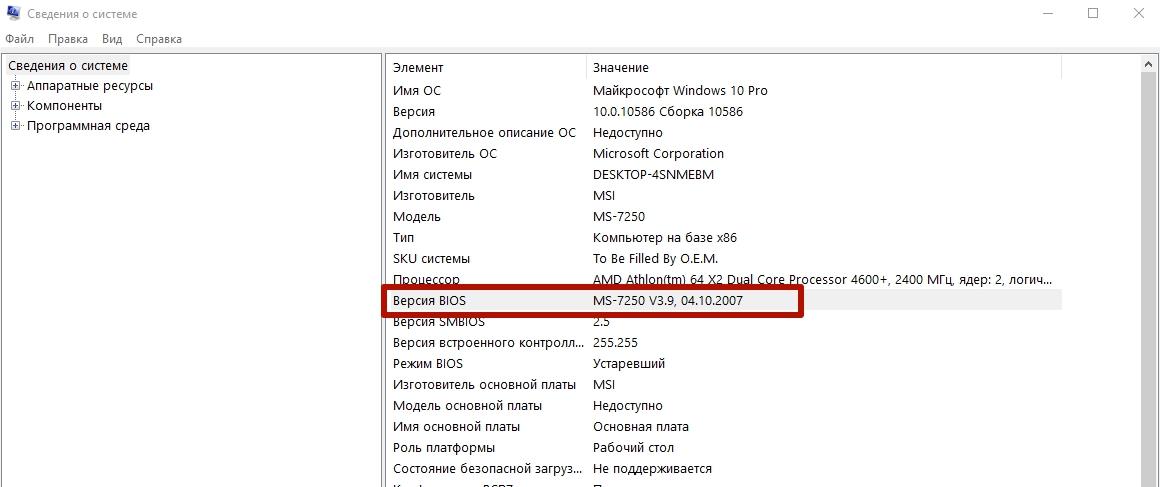
Как узнать версию на ПК?
Откройте окно «Выполнить» (нажатием клавиш Win+R) и введите в нем команду: msinfo32. В разделе «Сведения о системе» указана версия установленного на компьютер BIOS.
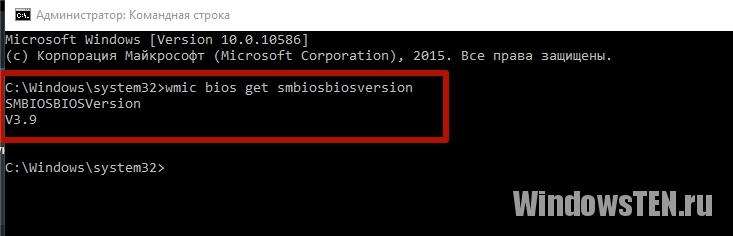
Используйте для просмотра командную строку.
ПКМ → меню Пуск → Командная строка (Администратор) → введите команду: wmic bios get smbiosbiosversion → на экране появится версия установленного BIOS.
Как зайти
Вход в BIOS выполняется во время перезагрузки, включения компьютера или из-под Windows.
При перезагрузке
Во время перезагрузки устройства, после того как компьютер выключится, нужно несколько раз нажать клавишу входа в BIOS. В основном это Del, F2 или Esc, но каждый производитель сам выбирает, какими клавишами он запускается, и указывает это на стартовой заставке компьютера. Но из-за того, что современные устройства имеют маленький промежуток между запуском и загрузкой ОС, эту информацию не всегда можно прочитать. Поэтому увеличьте этот временной интервал.
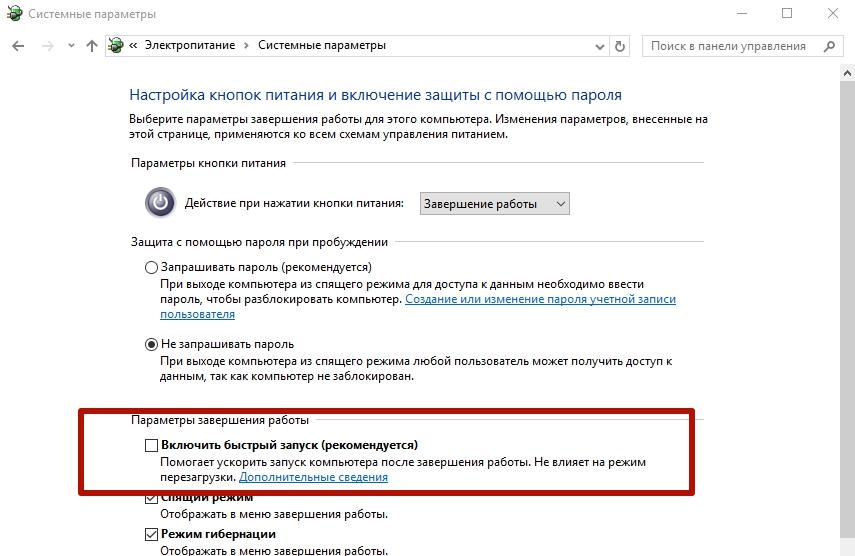
Панель управления → электропитание (включите маленькие значки) → Действие кнопки питания → Изменение параметров, которые сейчас недоступны → снимите галочку с пункта «Включить быстрый запуск».
Из Windows
Для входа из-под Windows используйте приложение Параметры.
- Приложение Параметры → Обновление и безопасность → Восстановление → нажмите Перезагрузить сейчас.
- Диагностика → Дополнительные параметры → Параметры встроенного ПО UEFI.
Важно! Этот способ работает исключительно с устройствами, на которых установлен UEFI-интерфейс.
Видео
Посмотрите на видео, как выполняется вход в BIOS из-под ОС и при перезагрузке компьютера.
Как изменить приоритет загрузки
Изменение приоритета загрузки понадобится, в первую очередь, при переустановке Windows (вам будет интересно прочитать статью Как обновиться до Windows 10?) или же восстановлении ОС. Сделать это можно двумя способами.
При использовании Boot Menu настройки BIOS не изменяются. Во время загрузки ПК вызовите это меню (в основном это клавиша F8) и установите загрузку с того носителя, который вам нужен (прочитайте, как установить Windows 10 с флешки в статье Создание установочной флешки Windows 10 различными способами). Это изменение одноразовое, поэтому последующие загрузки выполняются со стандартного носителя.
В настройках BIOS
Найдите в меню пункт Boot (для AMI) или Advanced BIOS Features (AWARD и Phoenix) → перейдите в Boot Device Priority (только для AMI) и на пункте First Boot Device укажите то устройство, с которого выполнится загрузка → перед выходом сохраните изменения.
При использовании интерфейса UEFI изменить устройство загрузки можно, следуя графическим подсказкам.
Вывод
В BIOS настраивается взаимодействие между компонентами компьютера. В нем можно изменить приоритет загрузки с различных устройств, но сложности возникают из-за того, что современные производители используют разные базовые системы ввода/вывода.
Part 1: How to Change Boot Order in Legacy BIOS on Windows 10 Computer
Methods below only work for Windows 10 computer upgraded from Windows 7/8/8.1 with legacy BIOS. Many computers nowadays coming with Windows 10 preinstalled will use UEFI motherboard firmware. To check whether your PC are using UEFI or BIOS, a quick way is to open Run > type MSInfo32 to see system information.
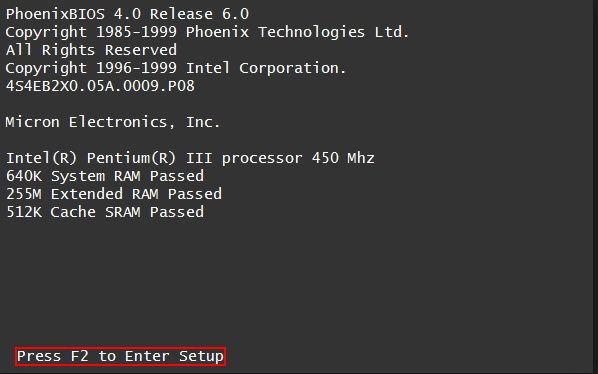
1. Restart Windows 10 Computer and Press the Key to Enter Setup
Turn on your computer or restart it if it’s already on. Press F2 on the keyboard as soon as you see the entering setup message. Do it quickly because there are only few seconds for you to enter BIOS. The key varies by manufacturer and mostly it will be F2, F10, F12 or Del. If you didn’t catch the key sequence instructed successfully to access BIOS settings, just restart it and try again.
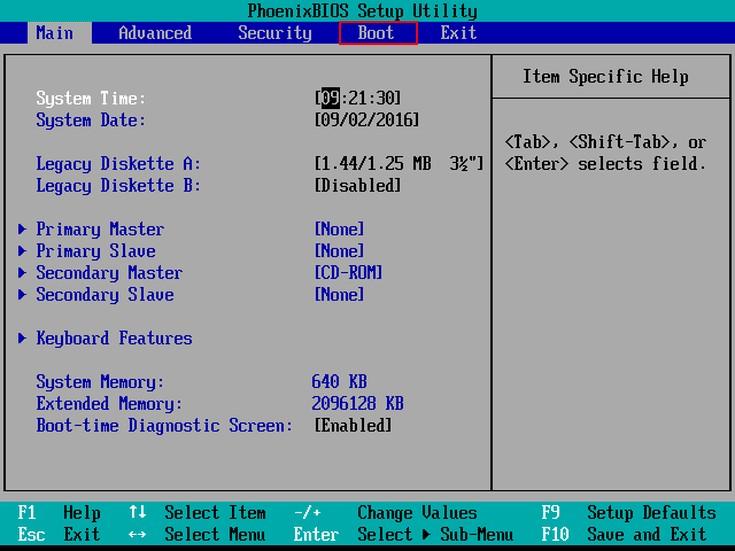
2. Enter BIOS Setup Utility
Give it a moment to continue booting till the setup utility is brought up. You might expect slight differences of the layout on different computers, but the operations are basically similar. Use the information given on the bottom (usually the right arrow key) to navigate to Boot tab, or maybe Boot Option, Boot Order, Advanced Options, Advanced BIOS Features on specific computers.
3. Change BIOS Boot Order Windows 10
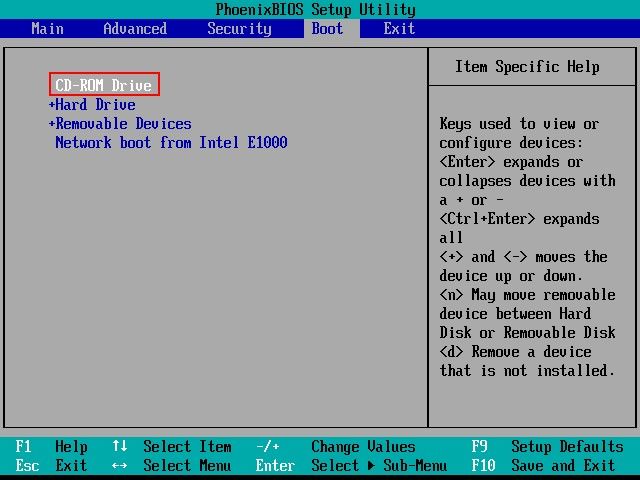
When switching to Boot Device Priority, you will find the hard drive is on the top place of the sub-menu, which means BIOS will firstly try to boot Windows 10 computer from hard disk. If no hard devices are bootable, it will move to next boot device or the third one in a similar way. This is what we called the boot order. By adjusting the listed sequences in BIOS options, you can easily boot from CD in windows 10, or maybe a USB flash drive.
To change the boot sequence in BIOS, just select the available device you have and use the arrow keys to stick it to the top. Here we take CD-ROM as an example. You can decide whatever boot option changes freely.
4. Save Boot Order Changes and Exit BIOS
Once your CD/DVD/USB flash drive is set to be the primary boot device, save the changes you made and exit. Simply press F10 or move to Exit Menu and locate Exit Saving Change to call out the confirmation message and your Windows 10 computer will restart automatically to check the bootable CD-ROM. Insert your device to fix or upgrade your PC.
Part 2: How to Change UEFI Boot Order in Windows 10 Computer
Basically, only the initial a few steps are different from legacy BIOS to UEFI because there is no use to press any key to enter setup utility with UEFI. Here I will only show you how to access UEFI BIOS in Windows 10.
Head for Settings > General > Advanced Startup and select Restart now under, then the page will be loaded to advanced recovery options screen, there click Troubleshoot and hit UEFI Firmware Settings. Or you can just hold the Shift button and click Restart to enter the advanced options interface.
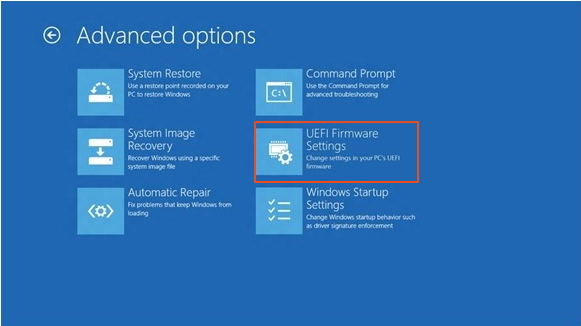
If you don’t see this option, that means your computer doesn’t have an UEFI BIOS. Now you can enter the UEFI setup utility to change Win 10 boot order, similar to legacy method.
Extra Tip: Windows 10 Computer Won’t Boot with Blue/Black Screen of Death?
Situations may occur that your computer fails to boot up normally and only gets a blue dead or black dead when you try to alter boot priority or upgrade the operating system. More severely, Windows 10 crashed and can’t access your data. Then you will need Windows Boot Genius to get out of the predicament. All boot related issues can be settled with the help of this professional bootup doctor.
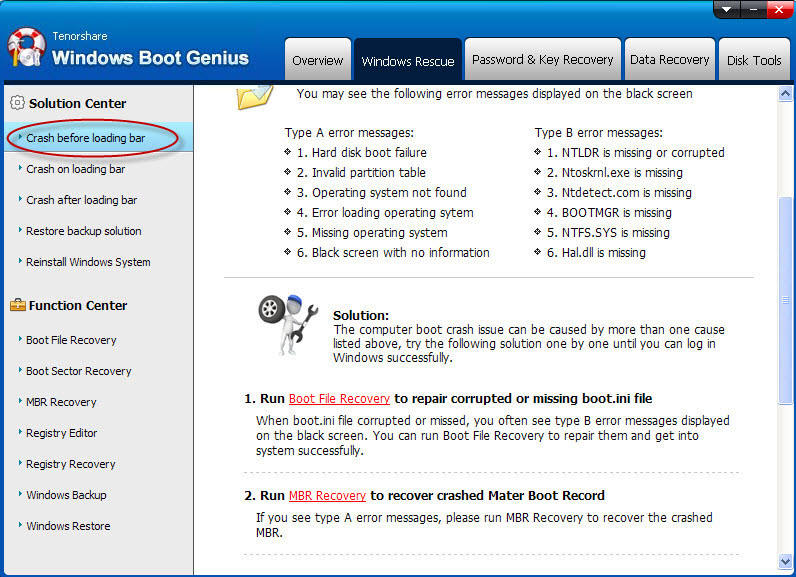
Solution Center and Function Center are listed vertically on Windows Rescue menu so that you can decide how to fix the issue quickly depending on when your computer was having problem with. And then try the method we provided to restore your Windows 10 computer back to normal.