
На компьютере Windows с несколькими сетевыми адаптерами (Ethernet, Wi-Fi, VPN) для корректной маршрутизации трафика иногда нужно вручную настраивать приоритеты сетевых подключений. Например, при наличии одновременного подключений к сети через Wi-Fi и Ethernet, вы можете изменить приоритеты сетевых адаптеров так, чтобы по-умолчанию трафик всегда отправлялся через проводное подключение.
Windows автоматически назначает приоритеты сетевым адаптерам в зависимости от скорости подключения. Чем выше скорость подключения, тем более высокий приоритет такого сетевого адаптера (меньше значение метрики). Обычно Windows использует следующий порядок приоритетов для различных типов сетевых интерфейсов:
- Ethernet
- Wi‑Fi
- Мобильные подключения
Если компьютер подключен к 100 Мб Ethernet порту и высокоскоростному Wi-Fi роутеру, может оказаться, что беспроводное подключение будет иметь более высокий приоритет.
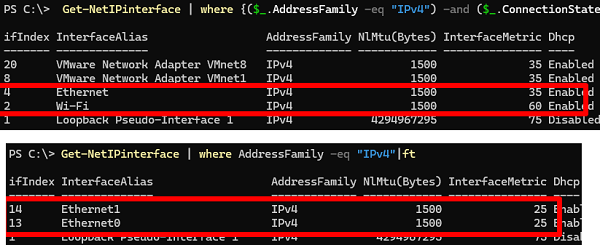
Вывести информацию о доступных IPv4 сетевых адаптерах в Windows:
Get-NetIPinterface | where AddressFamily -eq "IPv4"
Приоритет сетевого интерфейс определяется значением InterfaceMetric. Чем меньше значение InterfaceMetric, тем выше приоритет сетевого подключения.
Ниже представлены результаты команды с двух разных компьютеров. На первом скриншоте видно, что у Ethernet подключения выше приоритет чем у беспроводного Wi-Fi адаптера. На втором скриншоте два Ethernet интерфейса с одинаковыми приоритетами.
Значение InterfaceMetric это метрика, которая задает приоритет IP маршрута через этот сетевой адаптер в таблице маршрутизации Windows:
route print

В этой таблице маршрутизации видно, что по умолчанию сетевой трафик будет отправлен через интерфейс с меньшей метрикой.
С помощью PowerShell можно проверить, какой сетевой адаптер будет использоваться для доступа в Интернет согласно текущей таблицы маршрутизации:
Get-NetRoute -DestinationPrefix 0.0.0.0/0

В данном случае есть два маршрута с одинаковыми метриками. Это означает, что вы не может гарантировать какой адаптер будет использоваться для доступа в Интернет.
Можно изменить метрики сетевых интересов и назначать приоритеты вручную с помощью PowerShell командлета Set-NetIPInterface. Чтобы уменьшить приоритет одного из интерфейсов, нужно указать его название (
InterfaceAlias
) или индекс интерфейса (
ifIndex
) и новое значение метрики:
Set-NetIPInterface -ifIndex 14 -InterfaceMetric 26
или
Set-NetIPInterface -InterfaceAlias Ethernet1 -InterfaceMetric 26
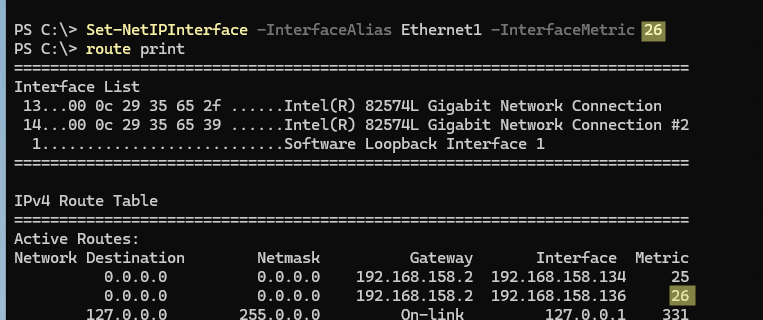
Проверьте, что значение в таблице маршрутизации изменилась метрика для этого адаптера.
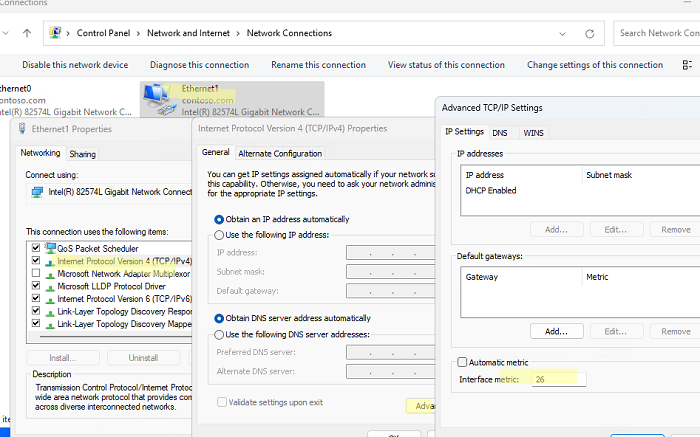
Также вы можете изменить приоритет (метрику) сетевого интерфейса в свойствах сетевого адаптера в панели управления Network Connections (
ncpa.cpl
).
Откройте свойства IPv4 протокола адаптера -> кнопка Advanced -> измените значение в поле Interface metric и примените изменения.
По умолчанию здесь включена опция Automatic metric, которая указывает, что приоритет сетевого адаптера устанавливается автоматически в соответствии со скоростью подключения среды.
В версиях до Windows 10 и Windows Server 2016 можно было изменить приоритет сетевых адаптеров в настройках привязки адаптеров (Adapters and Bindings). В более новых версиях эту опцию убрали.
Most modern PCs and laptops come with at least 2 network adapters: Ethernet and Wi-Fi. Ever wondered what would happen if you used them both simultaneously? The adapter that supports faster speeds will be given preference. Although most people use the Wi-Fi network adapter as they are always on the go, how will Windows know which one is faster and give preference to it?
Windows 11, Windows 10, and Windows 7 come with the Automatic Metrics feature, which is responsible for assigning a metric number to each network adapter based on different parameters. Regardless of the number of adapters a device has, a metric will be automatically assigned to it, even if the adapter is virtual.
Depending on your internet needs, you may sometimes need to override the automatic preferences assigned by Windows to the network adapter. Moreover, you can also manage the priorities of the networks you connect to using Wi-Fi. This article tells you how to change your adapter and network preferences on a Windows machine.
Table of Contents
We’ll show you how to change the network priority in Windows 10, Windows 11, Windows 8/8.1 and Windows 7, but first let’s learn a bit about what it is and how Windows assigns these metrics.
What is Network Priority
Network priority refers to the use of a specific network over others, while more than one is available. Network priority defines a backup network to use if the one with the highest preference is unavailable.
By default, Windows assigns priority to a network connected through Wi-Fi, as well as the network adapters on the machine. The reason for prioritizing the adapters is the same as for network priority; where one adapter is used more (when available) than the others.
Windows assigns metrics to every network adapter, which in turn defines its priority.
How does Windows Assign Network Interface Metric Priority
As we mentioned earlier, a feature known as Automatic Metric assigns metrics to each network adapter on the device. These can be both physical and virtual adapters.
By definition, a metric is an integer value assigned to an IP route for a specific network interface. Windows identifies the feasibility of a network, also known as cost, by considering the following parameters:
- Speed of the link
- Number of hops to a specific destination
- Delay time
Taking these factors into account, Windows assigns a metric to each network adapter. The lower the metric number, the higher its priority.
Prioritizing network adapters is useful, especially in scenarios where you find multiple adapters connected to the same network. Will Windows send network traffic through an Ethernet cable, or via Wi-Fi? An adapter with more speed capability will be preferred over other adapters.
Below is a table that indicates the metrics assigned by Automatic Metric in Windows 11 to the network adapters:
| Link Speed | Metric |
|---|---|
| Less than 500 Kb | 75 |
| Greater than or equal to 500 Kb and less than 4 Mb | 65 |
| Greater than or equal to 4 Mb and less than 20 Mb | 55 |
| Greater than or equal to 20 Mb and less than 80 Mb | 45 |
| Greater than or equal to 80 Mb and less than 200 Mb | 35 |
| Greater than or equal to 200 Mb and less than 2 Gb | 25 |
| Greater than or equal to 2 Gb and less than 10 Gb | 20 |
| Greater than or equal to 10 Gb and less than 40 Gb | 15 |
| Greater than or equal to 40 Gb and less than 100 Gb | 10 |
| Greater than or equal to 100 Gb | 5 |
To learn more about Automatic Metric in Windows, read this Microsoft document.
You can manually change the assigned metrics according to the order of network card. This can be useful in scenarios where you prefer Wi-Fi over Ethernet cable.
How to Change Network Interface Metric in Windows 11 and Windows 10
You can manually set the network adapter priority metric. This can be done for any network adapter. Follow the guide below to change your network adapter priority.
Change Network Adapter Priority Through Control Panel
If you would rather change the metric using the Graphical User Interface (GUI) in Windows 10 or 11, follow the steps below:
Learn how to change your network adapter name.
-
Open Network Connections.
Open Network Connections Type in ncpa.cpl in the Run Command box to open the Network Connection applet.
-
Right-click on the network adapter and then click Properties.
 2")
Open adapter properties -
Click Internet Protocol version 4 (TCP/IPv4) and then click Properties.
Open IPv4 properties -
Click Advanced.
Open advanced IPv4 settings -
Uncheck the Automatic Metric box and then enter the metric in the text field.
Assign metric value You can enter a metric value depending on the priority you want to give to this network adapter. For example, if you want to give top preference to the selected network adapter, assign the metric value “5.”
-
Close all windows.
-
Repeat steps 2 through 7 to change the metrics of other adapters as well.
 2")
 3")
 4")
 5")
This will change the network connection priority for multiple network adapters. If these seem like a lot of steps, you can also change the metric values using the Command Line Interface (CLI).
Change Network Adapter Priority Through PowerShell
Follow the steps below to change network adapter metrics using Windows PowerShell:
-
Launch an elevated PowerShell instance.
-
Run the following command:
Get-NetIPInterfaceThis cmdlet will display information about all network adapters, both physical and virtual.
 6")
Display all network adapter information -
Note down the interface index (ifIndex) of the network adapter.
-
Run the following “Set-NetIPInterface” command to change the interface metric of the adapter.
Replace [IFIndex] with the interface index and [IFMetric] with the metric value that you want to assign to the network adapter.
Set-NetIPInterface -InterfaceIndex [IFIndex] -InterfaceMetric [IFMetric] 7")
Assign priority metric to network interface from PowerShell -
Confirm the new metric has been applied by rerunning the command in Step 2 above.
 6")
 7")
You have now learned the steps to change the network priorities of network interfaces on your device.
By default, the LAN adapter has a higher priority than the wireless network adapter. However, you can disable your Wi-Fi adapter to ensure that all your traffic is routed through the LAN adapter. Otherwise, any established connection before connecting a LAN wire would still send data packets through the Wi-Fi adapter.
You can disable your wireless adapter through the Quick Access menu in the taskbar (Windows 11/10) or from the Network and Connections applet.
Let us now move on to show you how you can also manage the priorities of the wireless networks your Windows device connects to.
How to Change Wi-Fi Network Connection Priority in Windows 11/10
Has it ever happened to you that your computer keeps connecting to the Wi-Fi connection whose wireless router is further than the one which is placed right beside you? It is likely because your Windows is configured to connect to it automatically, disregarding the wireless router which has stronger wireless signals.
Similar to network adapters, you can also change the priority of the wireless networks that your device(s) connect to. This way, you will not have to keep “forgetting” a wireless SSID that your computer connects to automatically, and then reconnect to it when you change your location.
Manually changing your Wi-Fi connection priority is also useful when you want your device to prefer a wireless connection over all others when available, but also automatically connect to the other one(s) in case the one with the highest priority is not available.
There are several ways you can manage the priorities of your Wi-Fi connections.
Enable Automatic Connection when in Range
One way to prioritize a Wi-Fi network is to configure your computer to connect to a wireless SSID automatically when it is available. Of course, this will only happen when your device is in the range of the router’s wireless signal transmission.
This method allows you to prioritize a network over others. However, when this capability is enabled for more than one Wi-Fi network, all those networks then have the same priority. Therefore, we suggest that you only enable the “Connect automatically when in range” capability for one SSID at a time.
Here is how you can prioritize networks using this technique in Windows OS:
-
Navigate to the following:
Settings app >> Network & internet >> Wi-Fi >> Manage known networks
-
Click on the wireless network that you want to prioritize.
 8")
Select the network -
Check the “Connect automatically when in range” box.
Connect automatically to network -
Return to the previous “Manage known networks” page.
-
Click on all other wireless networks and uncheck the “Connect automatically when in range” box.
 8")
 9")
After performing the steps above, your computer will now automatically connect to the wireless network you have configured to connect it with, even while other networks are saved on your device.
If you want to assign a different priority to more than one wireless network, we suggest you opt for any one of the methods given below.
Change Wi-Fi Connection Priority from Command Prompt
This method is also applicable to Windows 7.
Unfortunately, unlike the network adapters, the priority for the Wi-Fi networks cannot be assigned using the Graphical User Interface (GUI). Nonetheless, you can still prioritize all known networks. This will allow you to manage which network your device’s Wi-Fi connects to even when all of them are available at the same time.
Follow the guide below to learn how to do so:
-
Launch an elevated Command Prompt.
-
Run the following command:
netsh wlan show profilesThis will show all the names of the known network profiles on your device.
 10")
Show network profiles in Command Prompt Note down the name of the profile that you want to change the priority of
-
Now run this command:
netsh wlan show interfacesThis will show you the information on the wireless interfaces on your PC.
Show details of wireless device interfaces -
Use the following cmdlet to assign a new priority to the wireless network:
Replace [ProfileName] with the name of the network, [AdapterName] with the name of your wireless adapter, and [PriorityValue] with a priority number (1 being of highest priority).
netsh wlan set profileorder name="[ProfileName]" interface="[AdapterName]" priority=[PriorityValue]
Change wireless network priority using Command Prompt -
Repeat Step 4 to assign different priorities for different network profiles on the same network adapter.
 10")
 11")
 12")
Using the command in Step 4 above, you can keep the [AdapterName] constant while changing the [PriorityValue] for the different [ProfileNames] and assign different priorities to all of the known networks on your computer.
Change Wi-Fi Connection Priority Using Third-Party Software
Wlan10 Utility
The name of the tool implies that it was designed for Windows 10. However, after testing it out thoroughly, we discovered that the tool also functions just as smoothly on Windows 11 as well.
Using this small, portable utility, you can prioritize the known wireless networks on your computer through the GUI. Not only that, but you can also control the auto-connect feature as well as auto-switch (switches to the network automatically when prioritized). Here is how:
-
Open, download, and install Wlan10.
-
Drag and drop the networks according to the priority that you want to implement (top to bottom).
 13")
Wlan 10 network Manager You will now see the app with the known networks already populated. Simply rearrange them to configure their priority over one another.
-
Close the tool when you are finished with the re-ordered networks.
The settings will be saved automatically.
 13")
Wifinian
Wifinian is an application installed on your OS which is available to download through Microsoft Store. Once installed, you can access and manage your known networks directly from the menu on the Taskbar.
-
Open the Wifinian Microsoft Store page and click Get.
 14")
Download Wifinian -
Click Open Microsoft Store.
Open Microsoft Store -
Click Install to get the app.
 16")
Install Wifinian The app will now be installed on your device.
-
Click on the Wifinian icon from the Quick Access menu.
 17")
Click Wifinian icon from Quick Access -
Click Organize and then click on the network that you want to move within the list. Then click on either Up or Down to move the network in the list.
 18")
Rearrange network priority using Wifinian The signal strength of each network will now be visible. Set the priority of each network, where the one with the highest priority will be at the top.
-
When done, click Organize again to implement the changes.
 14")
 15")
 16")
 18")
At any time, you can click on the Engage button to execute automatic connections depending upon the signal strength, placement of the profile in the list, and its automatic switch setting. The Rush button performs a rescan of available wireless networks at short intervals, delivering optimized network connectivity.
Final Thoughts
After you have successfully changed the metric of a network adapter, we suggest that you go through all the metrics of all network adapters to ensure that the same value is not assigned to another adapter (accidentally).
Moreover, when network adapter prioritization is combined with Wi-Fi network prioritization, you can increase your internet speed drastically by ensuring that the strongest internet connection is readily available to your computer.
У многих пользователей дома или на работе присутствует более одной точки доступа Wi-Fi — обычно, работающих на разных частотах, для которых в Windows сохранены учётные данные. При этом автоматически подключение может устанавливаться не для той сети, к которой вы хотели бы подключаться по умолчанию. Это поведение можно изменить.
В этой инструкции подробно о том, как изменить приоритет Wi-Fi сетей в Windows 11 и Windows 10 таким образом, чтобы при доступности нескольких беспроводных сетей автоматическое подключение выполнялось к выбранной вами.
Настройка приоритета беспроводных сетей в командной строке
Изменение приоритета Wi-Fi сетей в Windows 11/10 возможно с помощью команды netsh в командной строке, других способов не предусмотрено. Порядок действий будет следующим:
- Запустите командную строку от имени администратора, либо Терминал Windows от имени администратора (сделать это можно в меню по правому клику на кнопке «Пуск»).
- Введите команду
netsh wlan show profiles
и нажмите Enter. Команда отобразит список сохранённых Wi-Fi сетей на компьютере.

- Для установки приоритета сетей используйте команду
netsh wlan set profileorder name="ИМЯ_СЕТИ" interface="Беспроводная сеть" priority=ПРИОРИТЕТ
где приоритет задаётся числом, а 1 означает первую по порядку подключения сеть. Например, на скриншоте ниже команда устанавливает мою сеть, работающую на частоте 5 ГГц в качестве предпочтительной:
- Аналогичным образом можно установить приоритеты для других сохранённых сетей.


Обратите внимание, что значение для параметра «interface» в команде на первом шаге может отличаться в зависимости от языка системы, например, быть «Wi-Fi» вместо «Беспроводная сеть». Правильное значение будет отображено сразу после выполнения команды для показа списка сохранённых профилей Wi-Fi сетей как имя интерфейса.
Дополнительная информация
В завершение — некоторые дополнительные нюансы, которые могут быть полезными в контексте рассмотренной темы:
- Если зайти в (пример для Windows 11) Параметры — Сеть и Интернет — Wi-Fi — Управление известными сетями и открыть свойства какой-либо сохранённой сети, можно отключить автоматическое к ней подключение сняв отметку «Подключаться автоматически в радиусе действия». В результате автоматическое подключение к сети выполняться не будет, но её пароль всё также будет храниться в системе для подключения вручную при необходимости.

- Вы можете скрыть Wi-Fi сети соседей и просто ненужные Wi-Fi сети в списке доступных для подключения.

Если у вас остаются дополнительные вопросы, связанные с порядком подключения к Wi-Fi сетям в зоне действия, их можно задать в комментариях, я постараюсь помочь.
On Windows 10, if you have a device with more than one network adapter (such as Ethernet and Wi-Fi), each interface receives a priority value automatically based on its network metric, which defines the primary connection that your device will use to send and receive networking traffic.
Although, for the most part, Windows 10 does a pretty good job selecting an optimal connection to access the network, sometimes you may need to configure the order of the network adapters manually. For example, if you want to use a Wi-Fi over an Ethernet interface when both adapters are connected to the network.
You could disable those adapters you don’t use, but it may not be the best solution as you may need them as backups. Instead, a more straightforward solution is to adjust the interface metric to specify in which order your device should use each network adapter, which you can do using Control Panel and PowerShell.
In this Windows 10 guide, we’ll walk you through the steps to change the network adapter priorities to stay connected using your prefered adapter when using multiple interfaces.
- How to change network adapter priorities using Control Panel
- How to change network adapter priorities using PowerShell
How to change network adapter priorities using Control Panel
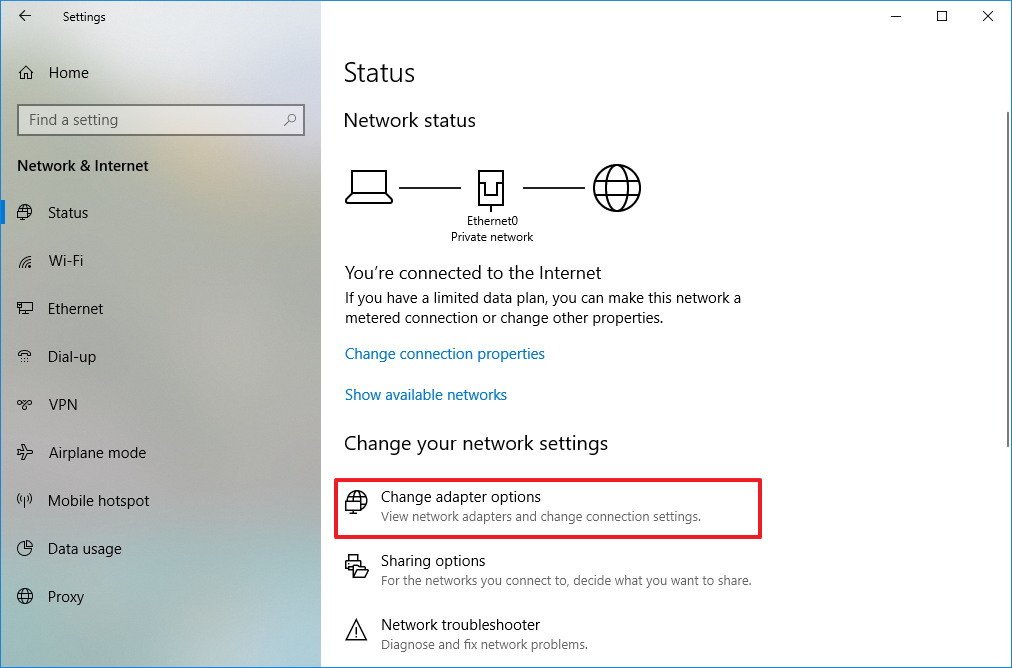
If you want to change the order in which Windows 10 uses network adapters, do the following:
- Open Settings.
- Click on Network & Internet.
- Click on Status.
- Click the Change Adapter options item.
- Right-click the network adapter you want to prioritize, and select Properties.
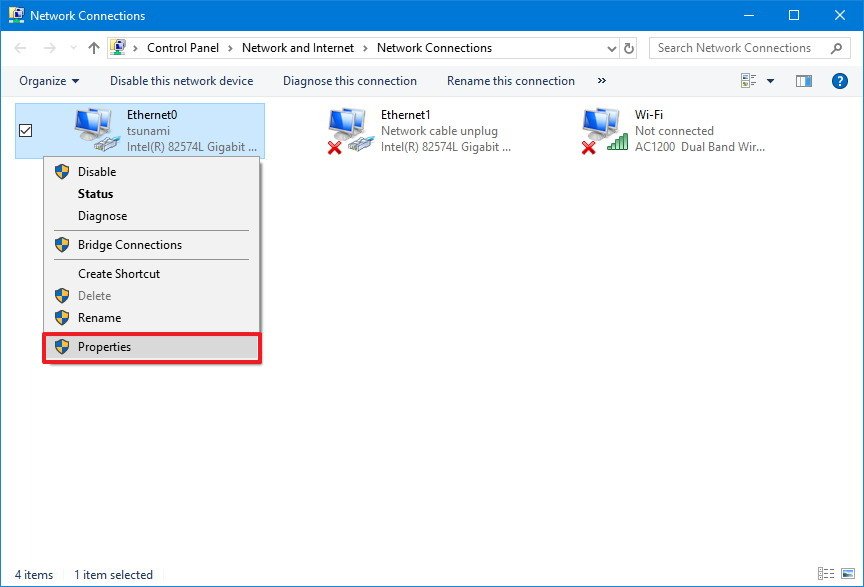
- Select the Internet Protocol Version 4 (TCP/IPv4) item.
- Click the Properties button.
- In the «General» tab, click the Advanced button.
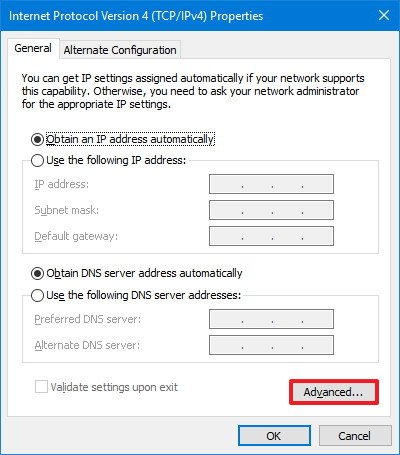
- Clear the Automatic metric option.
- In the «Interface metric» field assign a priority value for the adapter.Quick Tip: The lower the metric number means higher priority, and a higher number indicates lower priority.
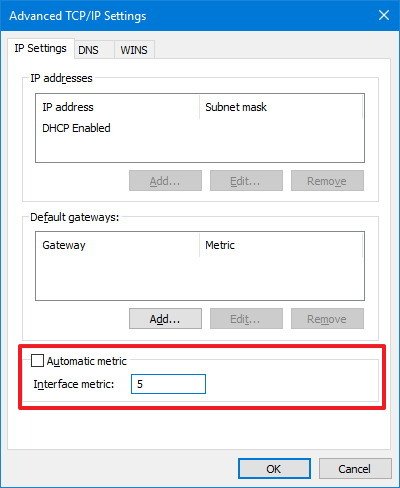
- Click the OK button.
- Click the OK button again.
- Click the Close button.
Once you’ve completed the steps, Windows 10 will prioritize the network traffic depending on your configuration.
The only caveat using the Control Panel experience is that depending on your network setup, you may need to adjust the metric for the Internet Protocol Version 6 (TCP/IPv6) as well, if that’s the protocol you’re using. (Usually, you will be using the TCP/IPv4 protocol.)
All the latest news, reviews, and guides for Windows and Xbox diehards.
At any time, you can revert the changes using the same instructions, but on step No. 9, make sure to check the Automatic metric option.
How to change network adapter priorities using PowerShell
Alternatively, you can change network adapters priorities on a device with multiple interfaces using PowerShell with these steps:
- Open Start.
- Search for Windows PowerShell, right-click the top result a select Run as administrator.
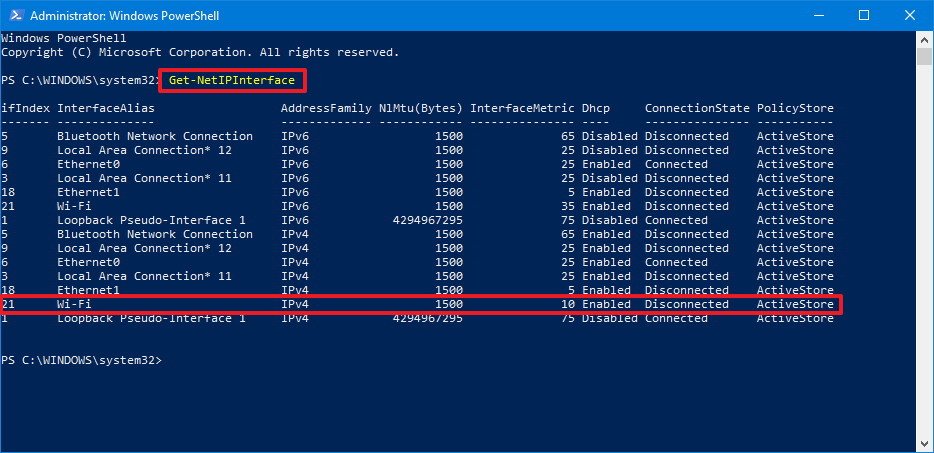
- Type the following command to identify the current interface metric and interface index number and press Enter:
Get-NetIPInterface
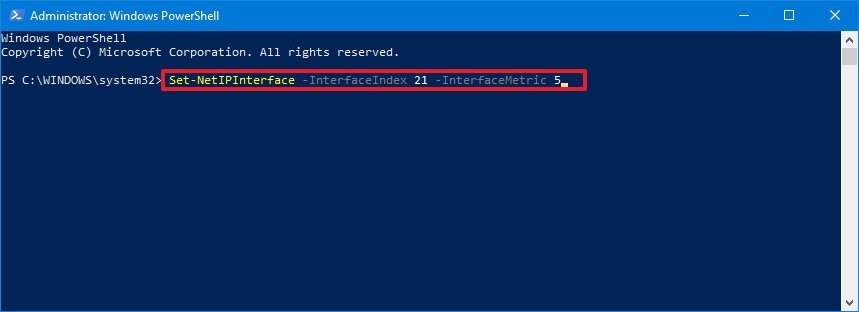
- Type the following command to change the priority order of the network adapter and press Enter:
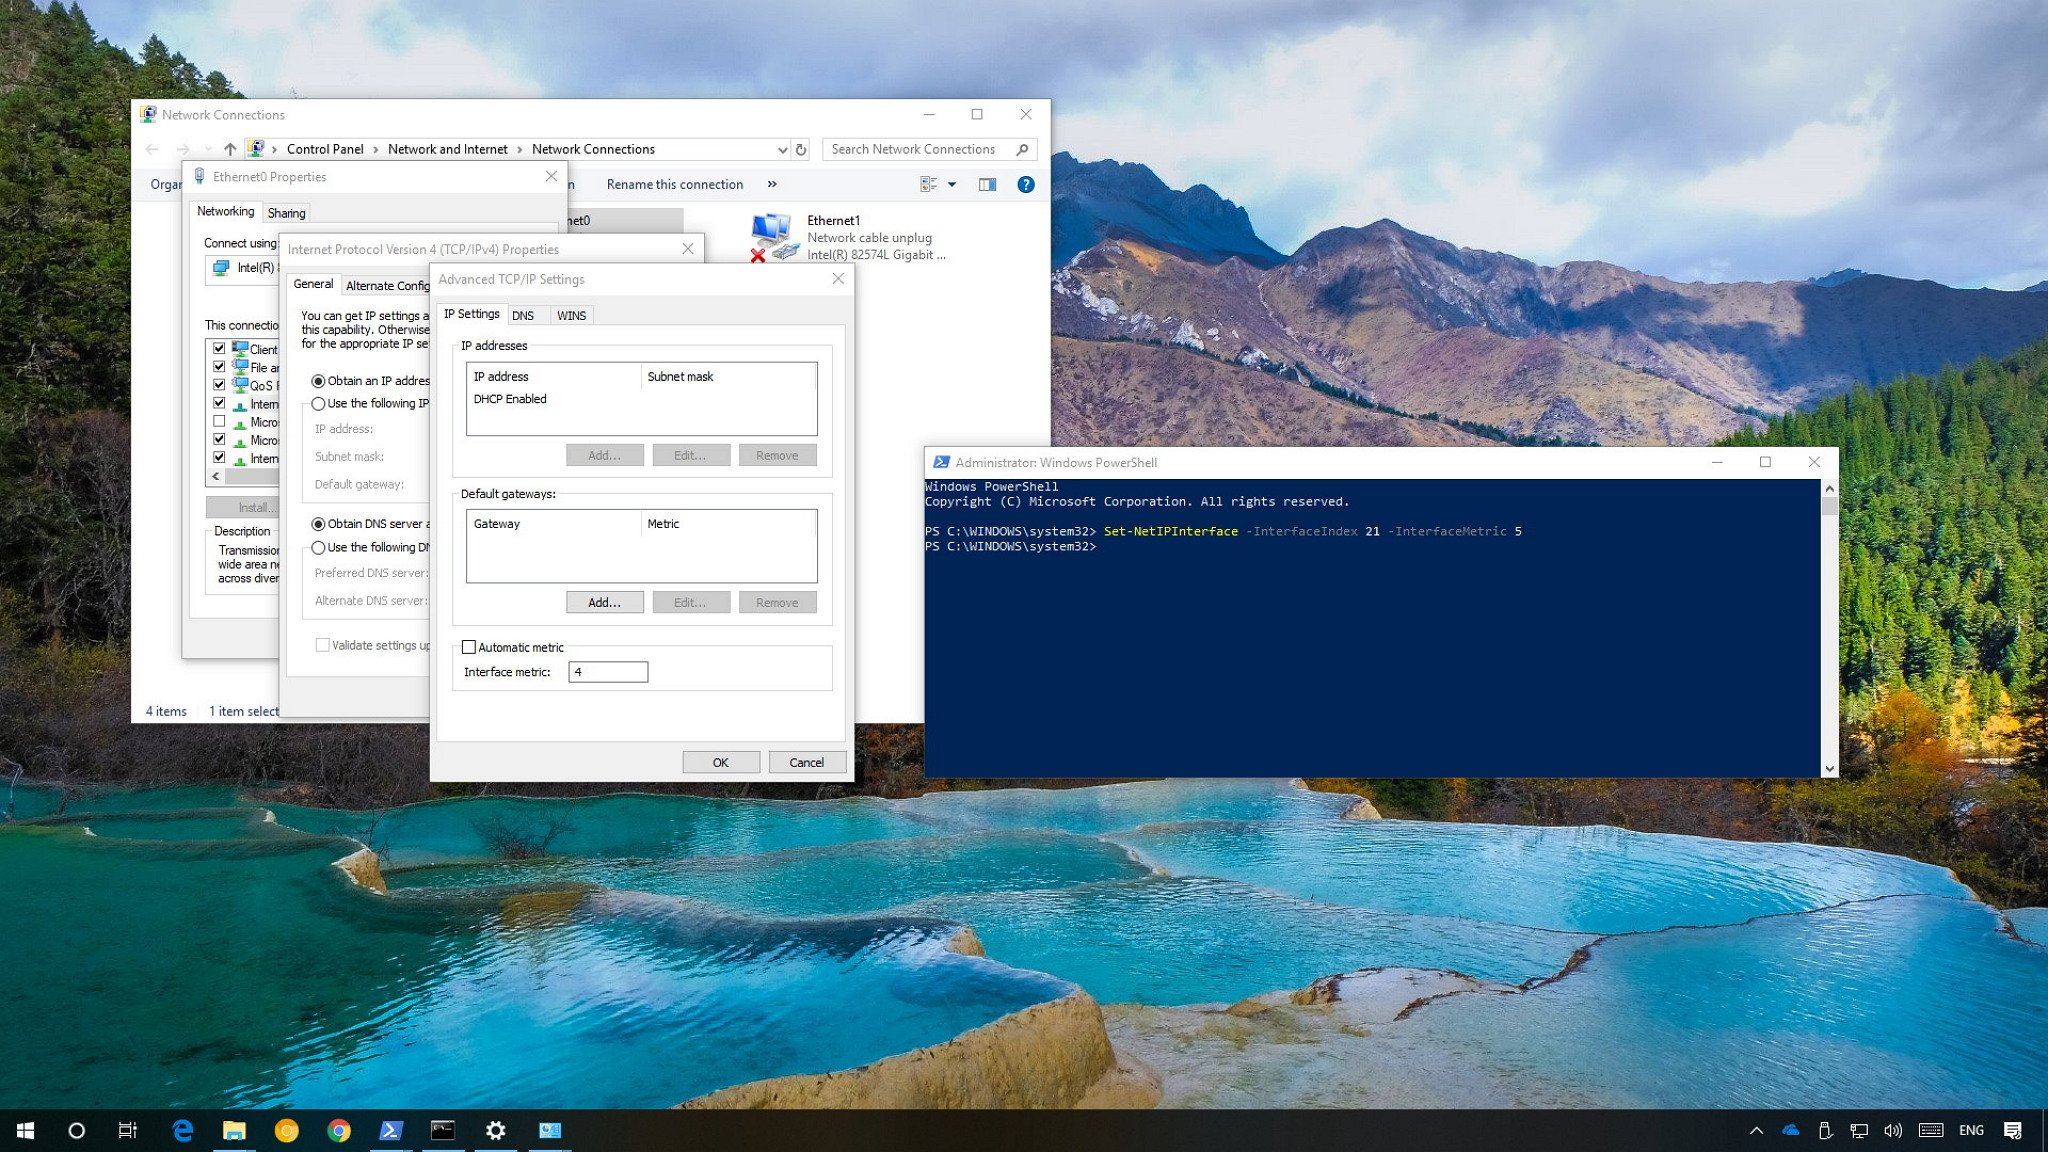
Set-NetIPInterface -InterfaceIndex 21 -InterfaceMetric 10In the command, make sure to change the -InterfaceIndex value to reflect the network adapter you want to prioritize and change the -InterfaceMetric value to assign a priority. Also, remember that a lower metric number means higher priority, and a higher metric number means lower priority.
- Type the following command to see the new metric applied to the network adapter and press Enter:
Get-NetIPInterface
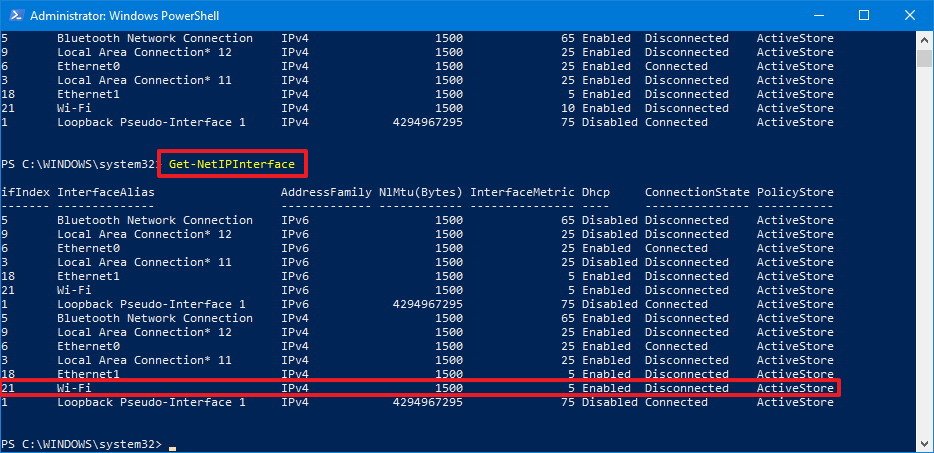
After completing the steps, Windows 10 will prioritize the network traffic depending on your configuration when multiple network adapters are connected to the network.
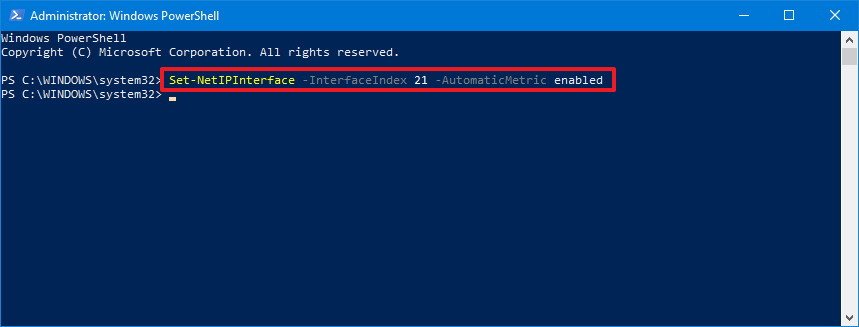
At any time, you can go back to the previous behavior allowing Windows 10 to decide the network adapter priority using these steps:
- Open Start.
- Search for Windows PowerShell, right-click the top result a select Run as administrator.
- Type the following command to identify the current interface metric and interface index number and press Enter:
Set-NetIPInterface -InterfaceIndex 21 -AutomaticMetric enabledIn the command, make sure to change the -InterfaceIndex value with the correct number of the network adapter you want to apply an automatic metric.
More Windows 10 resources
For more helpful articles, coverage, and answers to common questions about Windows 10, visit the following resources:
- Windows 10 on Windows Central – All you need to know
- Windows 10 help, tips, and tricks
- Windows 10 forums on Windows Central
Mauro Huculak has been a Windows How-To Expert contributor for WindowsCentral.com for nearly a decade and has over 15 years of experience writing comprehensive guides. He also has an IT background and has achieved different professional certifications from Microsoft, Cisco, VMware, and CompTIA. He has been recognized as a Microsoft MVP for many years.
Если на Вашем ПК встроено больше одного сетевого адаптера (Ethernet или Wi-Fi), то можно задать приоритет подключения для каждого адаптера.
В операционной системе Windows 10, если на вашем компьютере установлено более одного сетевого интерфейса, можно назначить приоритет на основное устройство, которое будет отправлять и получать сетевой трафик.
По умолчанию ОС Windows подключается к сетям в следующем порядке: 1. Подключение по локальной сети (Ethernet). 2. Беспроводная сеть (Wi-Fi). 3. Мобильная широкополосная связь.
Например, на Вашем домашнем ПК установлена сетевая карта Ethernet и Wi-Fi, Вы хотите, чтобы весь трафик в первую очередь шел через Wi-Fi, для этого нужно настроить приоритет.
Изменяем приоритет подключения сетевого интерфейса в настройках TCP/IP
1. Заходим в центр управления сетями и общим доступом, для этого щелкаем в трей по иконке сетевого подключения:
2. В открывшемся окне выбираем пункт «изменение параметров адаптера«:
3. В окне «Сетевые подключения» увидим все доступные сетевые адаптеры:
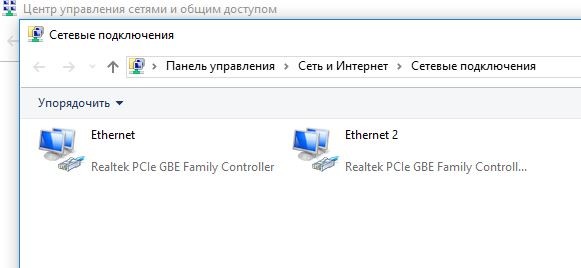
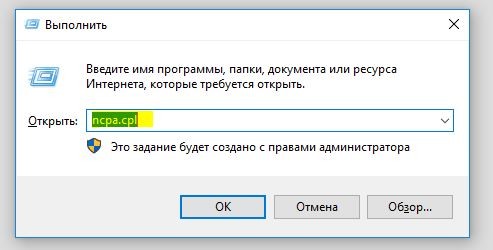
Так же для быстрого перехода в окно «Сетевые подключения» можно использовать горячие клавиши «Win+R«, в окне «Выполнить» набираем «ncpa.cpl«, жмем «ОК«:
4. Выбираем сетевое подключение, которое будет использоваться в приоритете и щелкаем по нему правой клавишей мыши, во всплывающем меню щелкаем по пункту «Свойства«:
5. Далее, двойной щелчок по «IP версии 4 (TCP/IPv4)» перекинет нас в свойства протокола:
6. Щелкаем по кнопке «Дополнительно«:
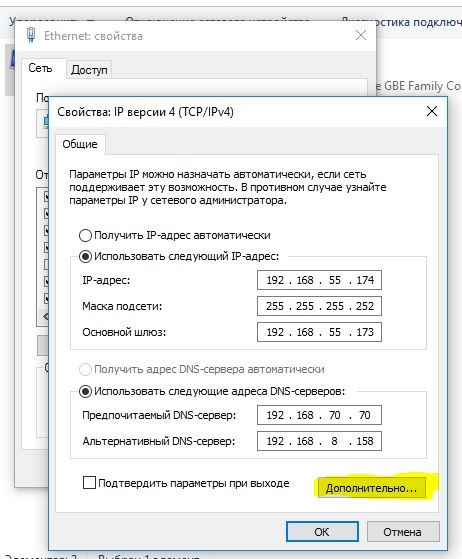
7. Убираем галочку на пункте «Автоматическое назначение метрики» и в «Метрике интерфейса» ставим значение «1«, нажимаем «ОК«:
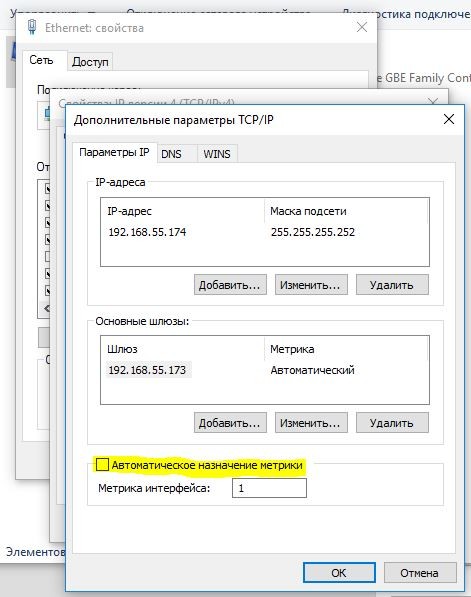
8. Теперь возвращаемся к 4 пункту, выбираем второе сетевое подключение и в дополнительных параметрах TCP/IP в метрике интерфейса ставим значение «2» и так далее в зависимости от количества сетевых адаптеров.