
1 min read
Video: Changing the printer port information for a locally installed printer in Windows 10
One of the common printing faults we see in our service department is a printer suddenly showing as ‘offline’ after a network change. In a standard printer environment, a locally installed printer is configured with the IP Address of the physical printer to determine where the print job needs to ‘go’.
If the network changes (new router, new ISP, etc.), this can ‘break’ printing until we put the correct port information in the print driver on the local workstation.
In this article, we are going to show the steps to fix this issue.
- Before we can begin in earnest, we must get the new/current IP address of the physical printer/copier. If you are not sure how to find this, contact your IT admin, or see our video on Locating the IP address of your copier.
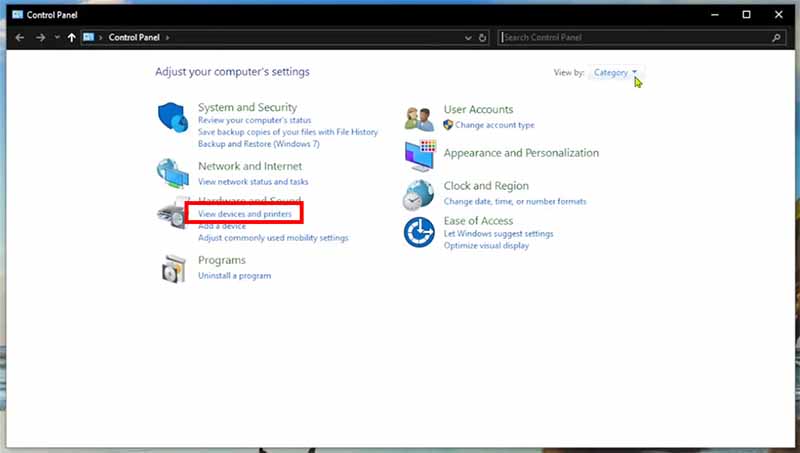
- Once you have that, we need to get to the Control Panel. Either hit the Windows button or select the “Type here to search”, type “Control Panel”, and hit enter.
- Once the Control panel is brought up, select “Devices and Printers”
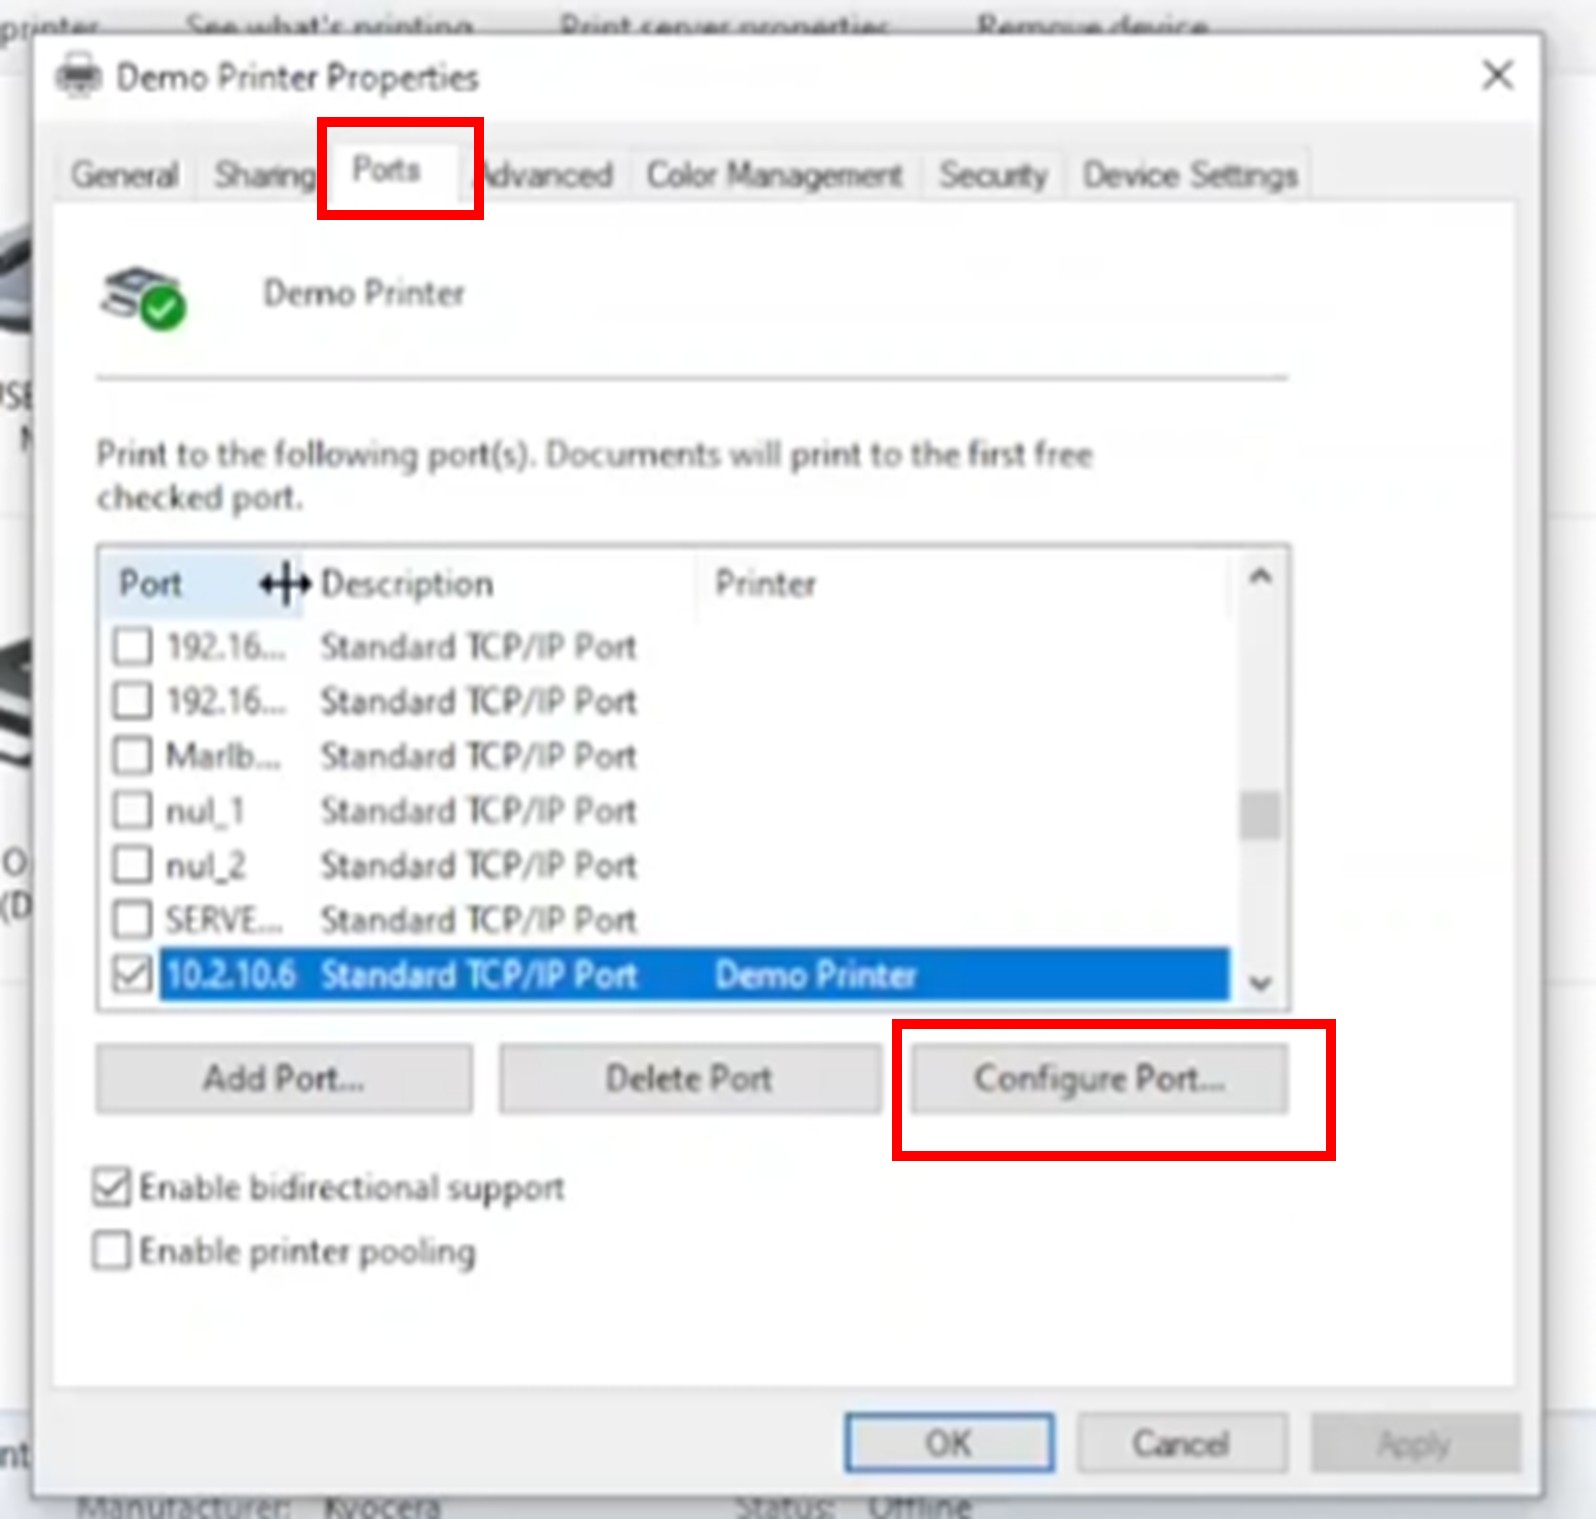
- Once in Devices and Printers, right click the printer that is offline, and select “Printer Properties”
- In the window that pops up, select the “Ports” tab and then select “Configure Port.”
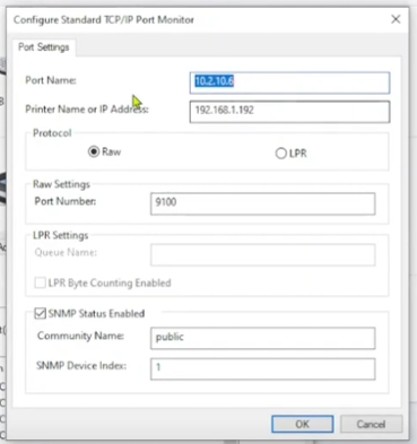
- In the next screen, enter the new, correct IP address in the “Printer name or IP address” field, and then select “Ok.”
- Once the new IP address is entered, if we did everything right the printer should come back online!
How to Create a MyQ Print DriverEnvelope Printing from the Second Tray on Ricoh 10 Series MFPs
Printing issues can be frustrating, especially when you’re in the middle of an important task. One common solution to many printing problems in Windows 10 is changing the printer port. A printer port acts as a communication channel between your computer and the printer. Sometimes, changing the port can resolve connectivity issues, driver conflicts, and other printing glitches. In this article, we will guide you through the step-by-step process of changing the printer port in Windows 10, helping you troubleshoot printing problems effectively.
What is a Printer Port?
A printer port refers to a communication channel that allows data to flow between a computer and a printer. It serves as a connection point where the computer sends print jobs and receives status updates from the printer. Common types of printer ports include USB, parallel (LPT), and network (Ethernet or Wi-Fi). The printer port plays a crucial role in establishing a stable and reliable connection, and understanding its functionality is essential for troubleshooting printing issues.
Follow these simple steps to change the printer port in Windows 10:-
Step 1. Open the Control Panel by clicking on the Start button and typing “Control Panel” in the search bar. Select it from the search results.
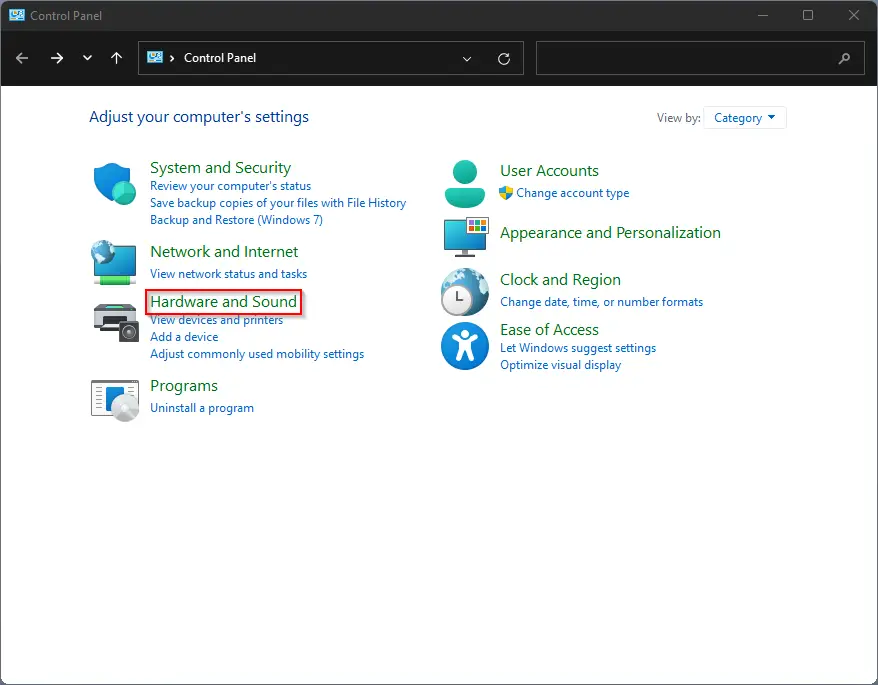
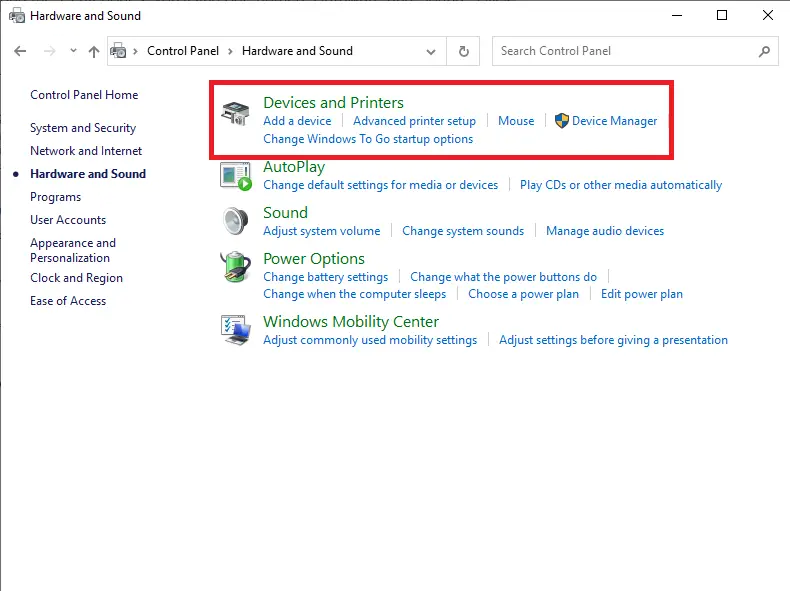
Step 2. In the Control Panel window, set “View by” to Category and click on the “Hardware and Sound” category.
Step 3. Locate and click on the “Devices and Printers” option. This will display a list of installed printers.
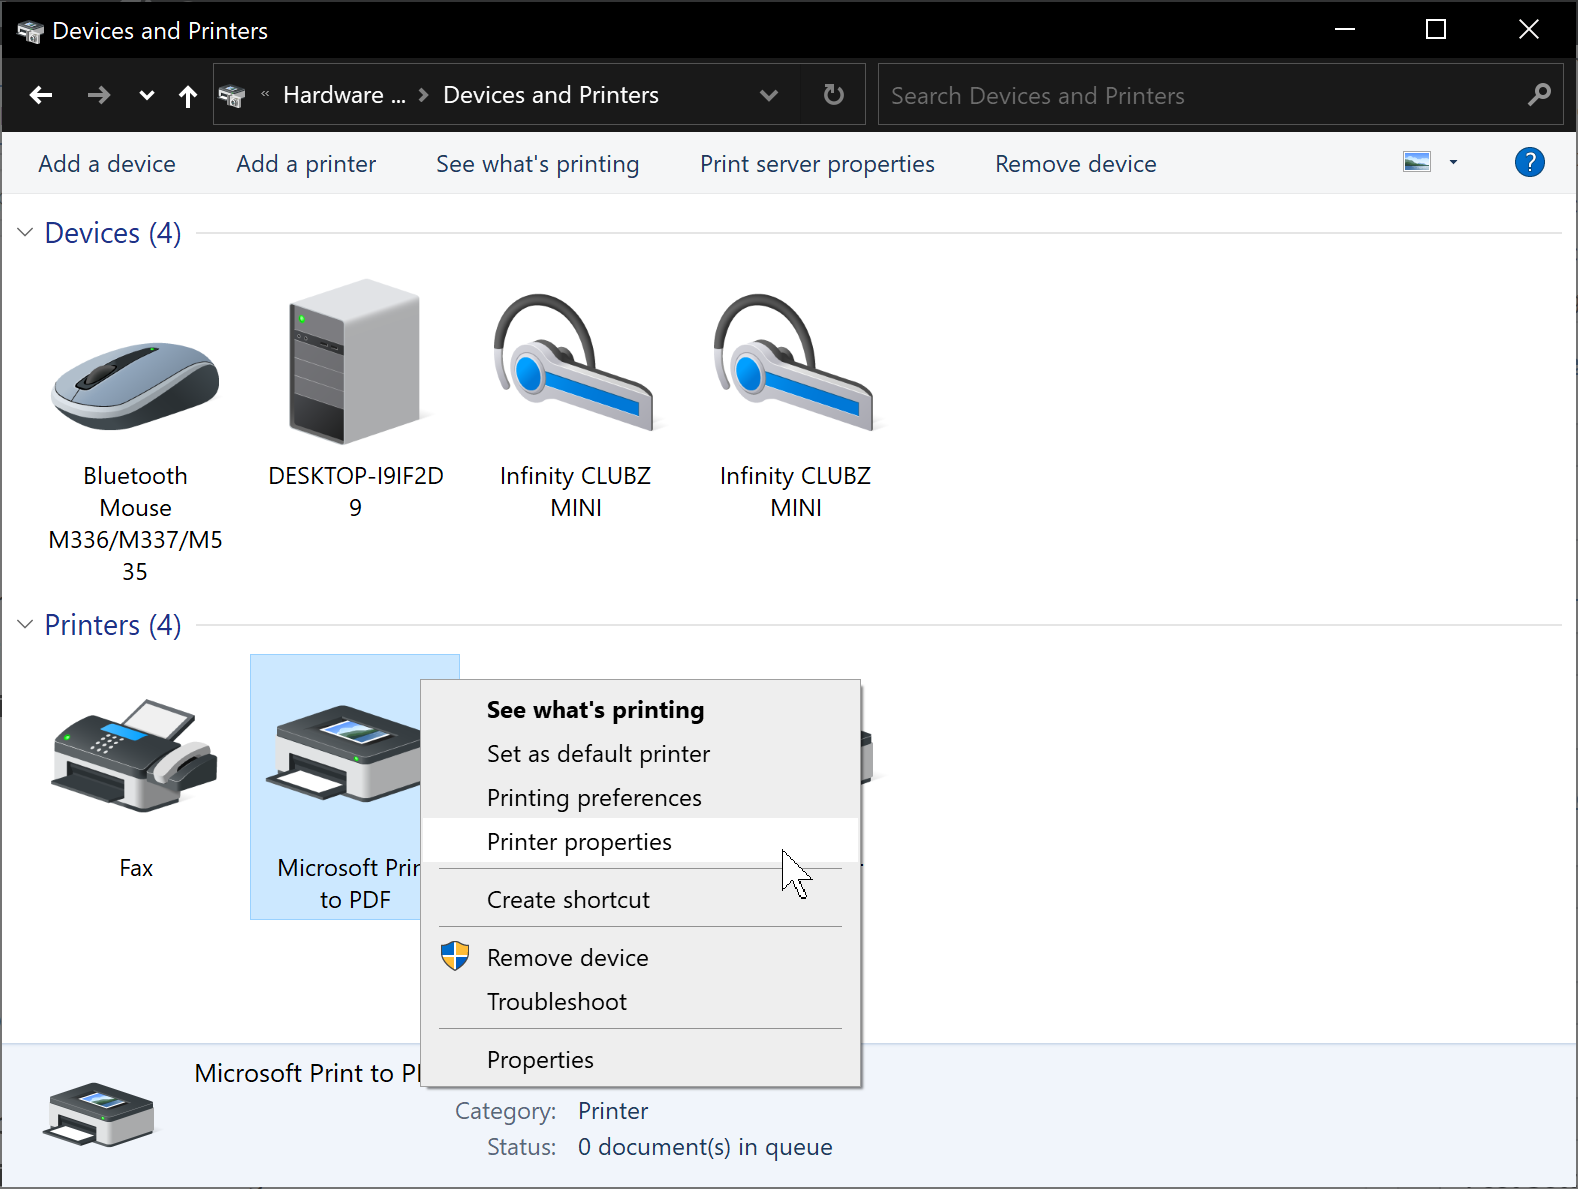
Step 4. From the list of printers, find the printer you want to change the port for and right-click on it.
Step 5. In the context menu that appears, click on “Printer properties.” Note that it is essential to select “Printer properties” and not “Properties,” as the latter will not provide the necessary options. Also, please note that if the “Print Spooler” service is not running, you will be unable to find the “Printer properties” option.
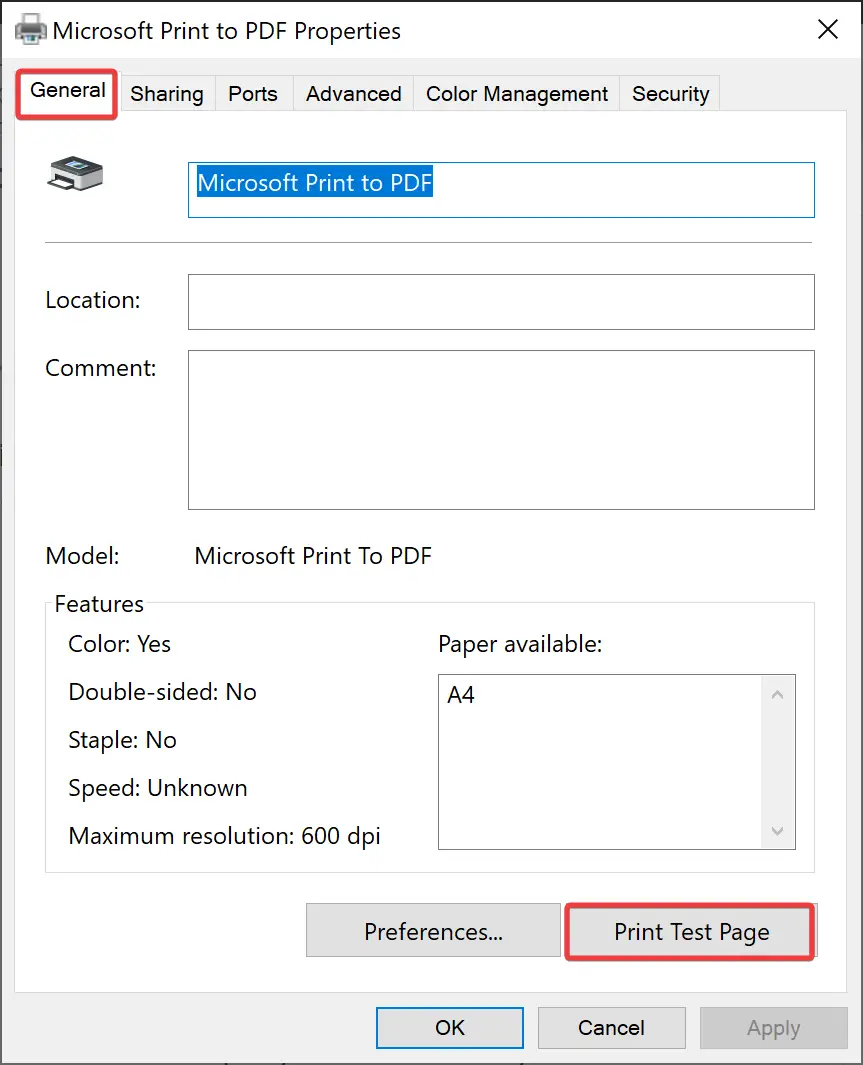
Step 6. In the Printer Properties window, navigate to the “General” tab.
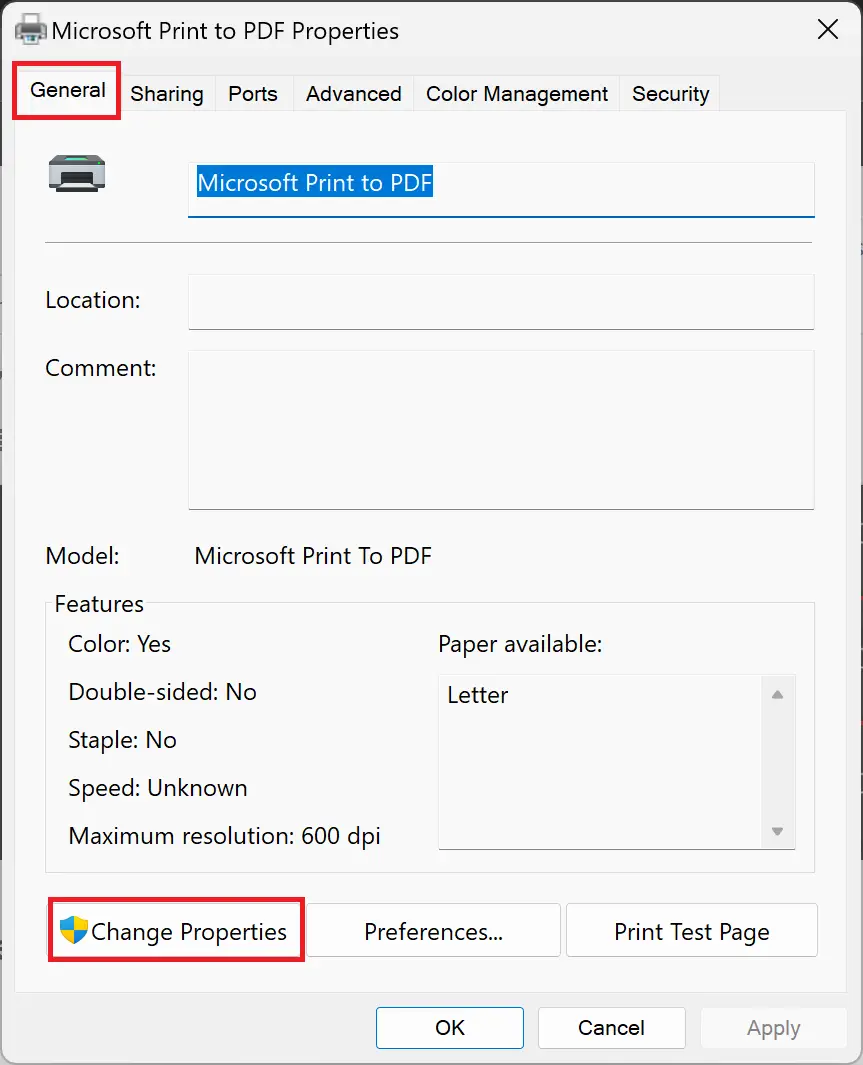
Step 7. Click on the “Change Properties” button.
Step 8. Switch to the Ports tab.
Step 9. You will see a list of ports currently assigned to the printer. Select the port that matches your printer’s current connection. Common port names include USB001, LPT1, or COM1. The port with a checkmark indicates the currently assigned port.
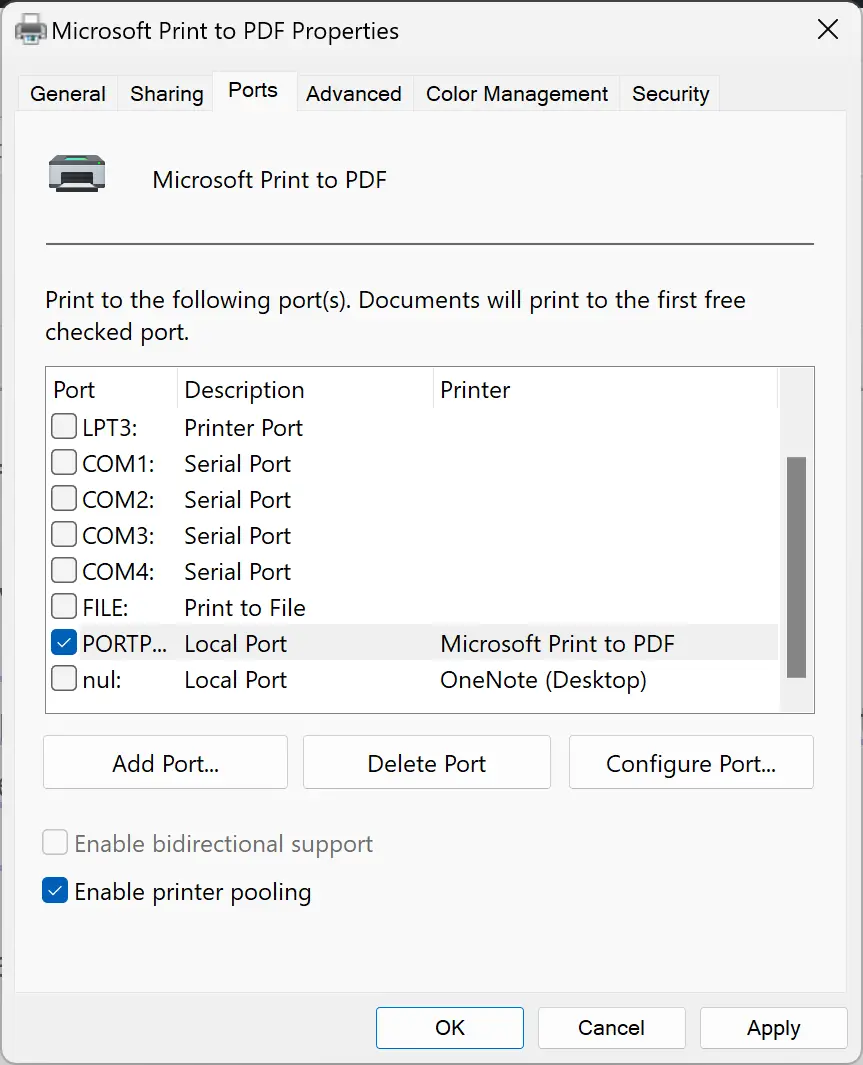
Step 10. Click Apply.
Step 11. Click OK.
How to Test the Printer?
After changing the printer port, it is crucial to test whether the new configuration has resolved the printing issue. So, close the Printer Properties window and return to the Devices and Printers screen. Right-click on the printer and select “Printer Properties” once again. Navigate to the “General” tab and click on the “Print Test Page” button.
If the test page prints successfully, the printer port change has likely resolved the issue. If not, you may need to try an alternative solution or consult with the printer manufacturer’s support.
Conclusion
Changing the printer port in Windows 10 can be a simple yet effective way to address printing problems. By following the step-by-step instructions outlined in this article, you can easily modify the printer port and potentially resolve connectivity issues, driver conflicts, and other printing glitches. Remember to test the printer after making the changes to ensure that the issue is resolved. If problems persist, consider reaching out to the printer manufacturer’s support for further assistance.
Change Printer Port in Windows 10:
Did you ever come across this problem where your printer stops functioning suddenly? If yes, then don’t panic as this is quite normal if you are using Windows 10. Usually, there is no technical fault in the printer device. This problem can occur because of software or port. Here in this article, we are going to explain how to change the printer port in Windows 10.
In the last couple of years, many users have been complaining about the need to change the printer port. There are times when you get stuck and you don’t understand how to fix your problem. If you are struggling with this problem, then worry not as here we are available with a solution that you can apply to fix it. One can easily fix this problem if he carries out the instructions properly.
As technology is advancing at a rapid pace, the use of printers will soon come to an end. Only large organizations and business proprietors will use printers for online storage and presentation purposes. Now, that we know enough about printer ports, let’s just dig into the solutions.
Identification of the port that your printer is connected to
First of all, launch the control panel, and then go to the section of «Hardware and Sound». After that, select devices and printers. Right-click on the printer and then Choose properties. Now, open the ports tab to see the ports.
Steps to change printer port in Windows 10
Changing the port of your printer is not a difficult job. In case you are experiencing an issue, then follow the steps given below.
1) Launch Devices and Printers
To go to the Devices and Printers section of your Windows 10, you need to go to the Start menu and then right-click on it. After that, a list of options will appear before you. Select Control Panel from there.
Now, you need to go to the «View by» section and change the category of icons from small to large. Now, select the option of «Devices and Printers». This is the location where you are going to find your printer if it is installed on your PC.
2) Change the Port of Your Printer
Once you are done locating your device, go to your device and then right-click on it. Now, a menu will appear before you. Select printer properties from there. After that, a window with many tabs will appear before you.
In the next step, you need to select the Ports option. The COM ports are useless if you are using a USB printer. The same thing applies to the LPT ports. So, this is what you need to ensure before you choose a port for your printer.
3) Setting up the Network Printer Feature
One more thing that we need to discuss here is networking. Many small companies and home users want to take advantage of this feature. If this is what you really want, then you must select the option of Virtual Printer Port.
After that, you must select the Add Port option. Now, a window will open up before you, where you will have to choose from IP or TCP port. After that, choose the option of New Port. A wizard will be displayed.
There, you need to click on Next. Another section will show up where you need to add the IP address or DNS server, which you programmed in your printer device. Once you are done making the addition, allow your printer to communicate with the network. When you are done with the process, select Apply.
So, these are the steps that you need to follow in order to change printer ports in Windows 10.
В наше время использование принтеров стало неотъемлемой частью нашей повседневной жизни. Иногда, когда возникают проблемы с работой принтера, необходимо изменить порт, чтобы вернуть функциональность устройства. В этой статье я подробно расскажу, как поменять порт принтера на компьютере Windows 10.
1. Проверьте подключение принтера к компьютеру
Первым шагом в изменении порта принтера является проверка правильного подключения принтера к компьютеру. Убедитесь, что принтер включен и кабель USB или сетевой кабель надежно подключены к компьютеру. Если используется беспроводное подключение, проверьте, что принтер и компьютер находятся в одной сети.
2. Откройте «Параметры» в Windows 10
Для изменения порта принтера в Windows 10 откройте «Параметры». Для этого нажмите на кнопку «Пуск» в левом нижнем углу экрана, затем щелкните на значке «Настроить» (шестеренка).
Примечание: Если в вашей версии Windows 10 отсутствует значок «Настроить», вы также можете открыть «Параметры» через Панель управления.
3. Выберите «Устройства» в меню «Параметры»
После того, как вы открыли «Параметры», выберите «Устройства» из списка доступных опций. В окне «Устройства» вы найдете различные настройки устройств, включая принтеры и сканеры.
4. Найдите свой принтер в списке устройств
На странице «Устройства» найдите раздел «Принтеры и сканеры» и выберите свой принтер из списка устройств. Если ваш принтер не отображается в списке, убедитесь, что он включен и правильно подключен к компьютеру. При необходимости перезагрузите компьютер и проверьте подключение еще раз.
5. Измените порт принтера

Чтобы изменить порт принтера, нажмите на имя вашего принтера, который отображается в списке устройств. Затем нажмите на кнопку «Управление» и выберите «Параметры принтера». В открывшемся окне принтера перейдите на вкладку «Порты».
6. Выберите новый порт
Во вкладке «Порты» вы увидите список доступных портов для вашего принтера. Щелкните правой кнопкой мыши на нужном порте и выберите «Удалить». Это позволит удалить текущий порт принтера.
Далее щелкните правой кнопкой мыши на пустом месте в окне и выберите «Обновить». В списке портов вы увидите новый порт для вашего принтера. Выберите новый порт, щелкнув на нем левой кнопкой мыши, и нажмите «ОК».
7. Проверьте работу принтера
После изменения порта принтера перезагрузите компьютер и проверьте работу принтера. Попробуйте напечатать тестовую страницу, чтобы убедиться, что принтер функционирует должным образом.
Итог

Изменение порта принтера на компьютере Windows 10 может быть полезным при возникновении проблем с работой принтера. Следуя простым шагам, описанным в этой статье, вы сможете быстро и легко изменить порт принтера и восстановить его функциональность.
- Убедитесь в правильном подключении принтера к компьютеру.
- Откройте «Параметры» в Windows 10.
- Выберите «Устройства» в меню «Параметры».
- Найдите свой принтер в списке устройств.
- Измените порт принтера.
- Выберите новый порт.
- Проверьте работу принтера.
Следуя этим простым инструкциям, вы сможете успешно изменить порт принтера на компьютере Windows 10 и продолжить использование принтера без проблем.
Как поменять порт принтера на компьютере Windows 10
Windows 10 – одна из самых популярных операционных систем, используемых на персональных компьютерах. Иногда при подключении принтера к компьютеру возникает необходимость поменять порт, чтобы осуществить более стабильную и эффективную работу с устройством. В этой статье мы рассмотрим, как поменять порт принтера на компьютере с операционной системой Windows 10, чтобы вы могли наслаждаться безпроблемной печатью.
Шаг 1: Открывание настроек устройств

Первым шагом в процессе изменения порта принтера является открытие настроек устройств на компьютере Windows 10. Для этого можно воспользоваться несколькими способами:
- Нажмите правой кнопкой мыши на значок «Пуск» в левом нижнем углу экрана. В появившемся контекстном меню выберите пункт «Настройки». После этого откроется окно с настройками операционной системы Windows 10.
- Другой способ – нажмите комбинацию клавиш Win + I. Это также откроет окно с настройками операционной системы.
Шаг 2: Поиск принтера в настройках устройств
После открытия настроек устройств вам нужно найти раздел «Принтеры и сканеры» и выбрать его. В этом разделе отображается список всех принтеров, подключенных к вашему компьютеру. Найдите в списке нужный принтер и выберите его.
Шаг 3: Поменять порт принтера
При выборе принтера откроются дополнительные параметры. В этом окне вы сможете изменить порт принтера. Чтобы сделать это, следуйте указаниям ниже:
- Нажмите на кнопку «Принтеры и сканеры» в списке слева, чтобы перейти к основным настройкам принтера.
- Выберите принтер, у которого нужно поменять порт.
- Нажмите на кнопку «Управление».
- В открывшемся меню выберите «Свойства принтера».
- После этого откроется новое окно, в котором находится список доступных портов принтера.
- Выберите нужный порт из списка.
- Нажмите кнопку «ОК», чтобы сохранить изменения.
Итог
Поменять порт принтера на компьютере Windows 10 – задача, которая может показаться сложной на первый взгляд, но на самом деле это просто и быстро. Всего несколько шагов – и вы сможете настроить принтер так, чтобы он работал без сбоев.

Не забывайте, что правильное подключение и настройка принтера может существенно повлиять на его производительность. Если у вас возникают сложности в процессе изменения порта принтера или вы не знаете, какой порт выбрать, рекомендуем обратиться к инструкции, прилагаемой к устройству, или обратиться за помощью к специалисту. Контактный центр производителя принтера также может предоставить вам необходимую поддержку.
Не бойтесь экспериментировать и улучшать настройки принтера. Всегда есть возможность вернуться к прежним настройкам, если что-то пойдет не так. Помните, что ваш принтер должен служить вам надежно и безупречно, и вы заслуживаете самое лучшее качество печати.
Как поменять порт принтера на компьютере Windows 10
Принтеры служат нам верой и правдой для печати документов, фотографий и другой информации. Во время работы с компьютером Windows 10 возможно вам потребуется поменять порт, к которому подключен принтер. Это может понадобиться, например, при изменении настроек сети или при использовании нового принтера. Эта статья поможет вам разобраться, как это сделать без особых сложностей. Давайте начнем.
Шаг 1: Открыть настройки принтера
Первым шагом необходимо открыть настройки принтера на компьютере Windows 10. Вы можете это сделать, нажав правой кнопкой мыши на значке «Пуск» в левом нижнем углу экрана и выбрав «Настройки» из контекстного меню. Затем выберите «Устройства» в открывшемся окне настроек.
После этого выберите вкладку «Принтеры и сканеры». Здесь отобразятся все принтеры, подключенные к вашему компьютеру.
Шаг 2: Выбрать принтер и открыть его свойства
На вкладке «Принтеры и сканеры» выберите принтер, у которого вы хотите поменять порт. Щелкните по нему один раз левой кнопкой мыши. В контекстном меню, которое появится, выберите «Свойства».
Шаг 3: Поменять порт принтера

После открытия свойств принтера перейдите на вкладку «Порты». Здесь отобразятся все доступные порты, которые можно использовать для подключения принтера.
Выберите новый порт для принтера. Для этого просто выделите его левой кнопкой мыши и нажмите кнопку «ОК».
Шаг 4: Проверить настройки и сохранить изменения
После выбора нового порта для принтера, проверьте другие настройки, такие как ориентация страницы, качество печати и другие параметры. При необходимости, внесите дополнительные изменения.
Когда настройки принтера соответствуют вашим требованиям, сохраните изменения, нажав кнопку «ОК» в окне свойств принтера.
Итог
Теперь вы знаете, как поменять порт принтера на компьютере Windows 10. Это довольно простая процедура, которая может пригодиться в различных ситуациях. Поменять порт принтера позволяет настраивать работу принтера под свои нужды и обеспечивает более удобную и эффективную работу с документами и информацией.
Не забывайте, что для корректной работы принтера на новом порте может потребоваться переустановка драйверов или другие дополнительные настройки. Если возникнут проблемы, смело обращайтесь к документации принтера или поддержке производителя.

Удачи в использовании вашего принтера на компьютере Windows 10!