
Applies ToWindows 11 Windows 10
Выберите режим питания, который вам нужен, и что вы хотите сделать на компьютере Windows 11. Вы можете определить, что для вас важнее всего: максимальное время работы от аккумулятора, максимальная производительность или баланс между этими двумя характеристиками.
Чтобы изменить режим питания, выберите Начните > Параметры> Системный>Power & батареи. В power modeвыберите нужный вариант.
Примечание: При выборе пользовательского плана питания изменить режим питания может быть не удастся. Если вы не можете настроить режим питания в Power &, откройте панель управления ,выберите Система и безопасность > Параметры Power Options, а затем выберите сбалансированный план питания.
Нужна дополнительная помощь?
Нужны дополнительные параметры?
Изучите преимущества подписки, просмотрите учебные курсы, узнайте, как защитить свое устройство и т. д.
Sign in to your MUO account

A power plan in Windows is a set of system/hardware settings that configure a PC’s energy consumption. Windows 11 has its predefined saver, balanced, high, and ultimate performance power plans. Those plans are more significant for laptop users who can optimize battery life by changing them.
There’s more than one way to adjust the power plan on a Windows 11 PC. Power plan settings are available in Control Panel and Settings, but you can also change them with the Command Prompt and shortcuts. Here are six different methods for changing the power plan in Windows 11.
1. How to Change the Power Plan With the Control Panel
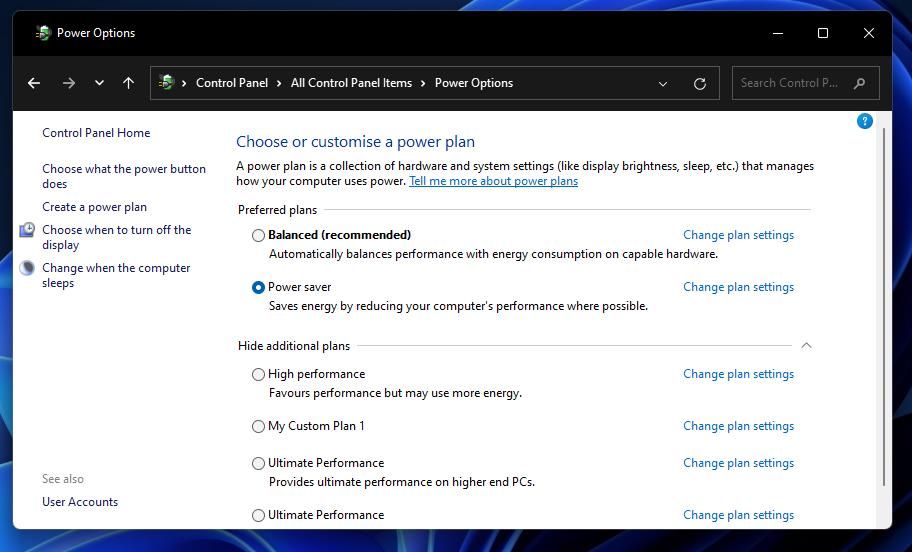
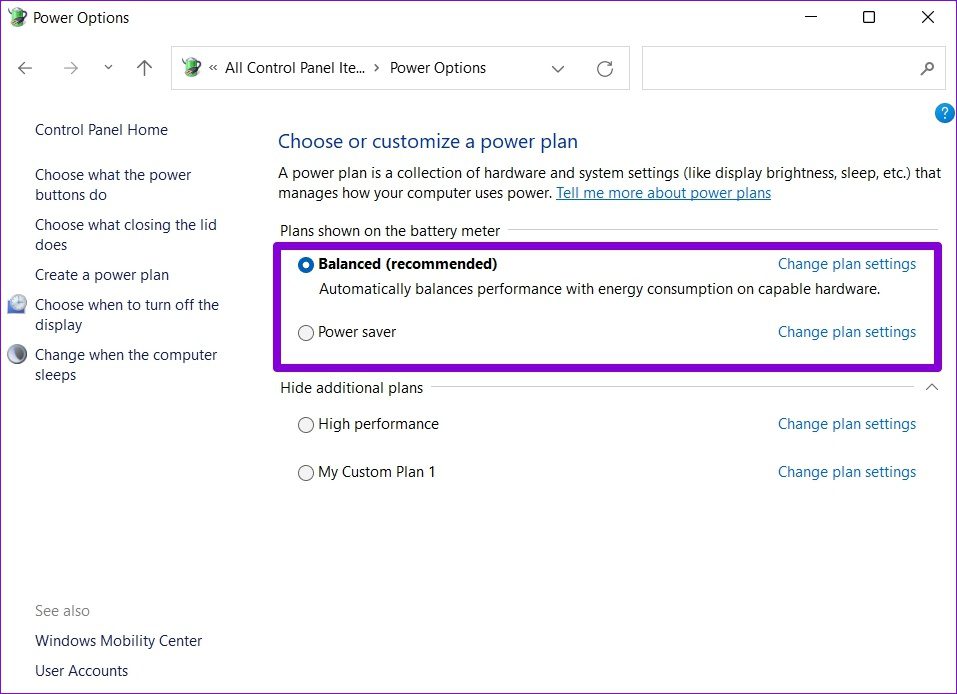
The Control Panel incorporates a Power Options applet from which you can change your plan setting. Unlike Settings, that applet also has a Create a power plan option. Plus you can reconfigure the Start menu’s Power button from there. This is how you can change your PC’s power plan via the Control Panel:
- Press the Power User menu’s Win + X key combo, and click Run to bring up its Open box.
- Enter Control Panel in the Open box within Run.
- Select OK to open and view the Control Panel in Windows 11.
-
If you’re in category view, click Small icons on the Control Panel’s View by menu.

-
Select Power Options to open that applet.

- Then select the Balanced, High performance, Power saver, or Ultimate Performance radio button to change your plan.
2. How to Change the Power Plan With Settings
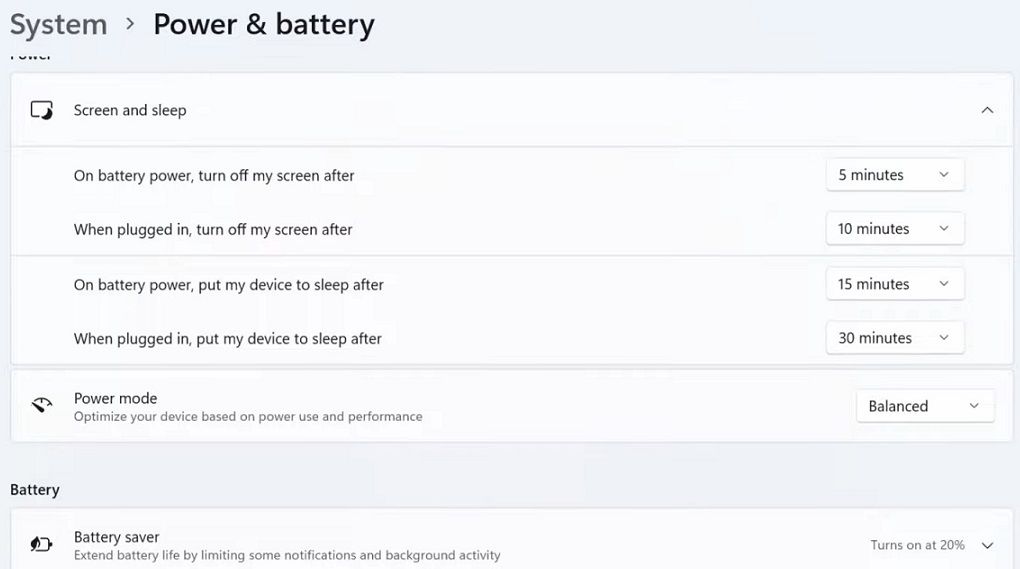
The Settings app in Windows 11 has a Power & battery section that displays your current battery level and usage history. There you can change power mode, screen, and sleep settings. These are the steps for changing the power plan in Settings:
- Go to your Start menu, and select its pinned Settings shortcut.
-
Select Power & battery within the System tab.

-
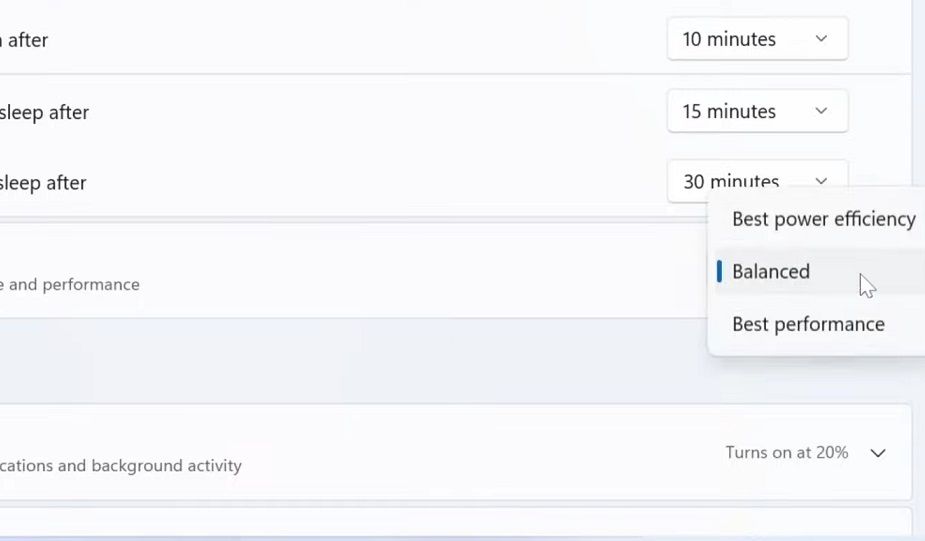
Then click the Power mode drop-down menu to open it up.

- Choose a Balanced, Best power efficiency (saver), or Best performance (high) mode setting on the menu.
3. How to Change the Power Plan With the Command Prompt
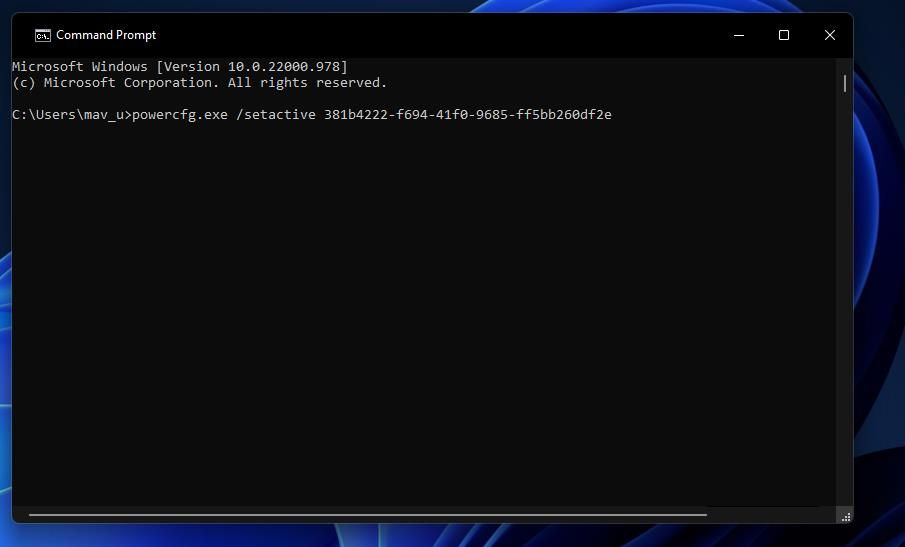
The Command Prompt has a powercfg.exe utility with which you can change the power plan. It has three separate commands for activating the balanced, saver, and high power modes in Windows 11. Those commands will change the Control Panel’s power plan setting when executed. You can set a power plan in Command Prompt like this:
- Press the Win + S keyboard buttons, and enter a CMD search keyword in the text box.
- Open Command Prompt by clicking the search result.
-
To change to a saver power plan, input this command and press the Enter button:
powercfg.exe /setactive a1841308-3541-4fab-bc81-f71556f20b4a -
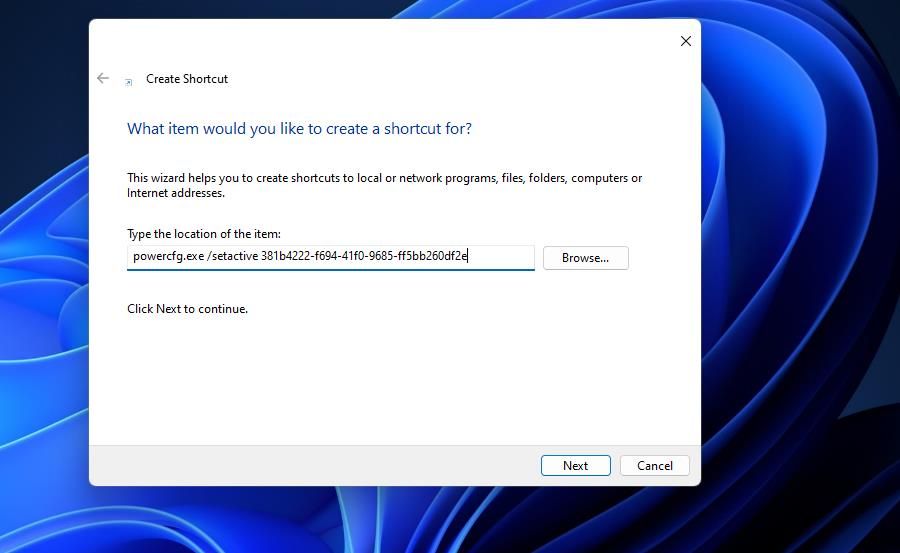
You can change to a balanced plan by running this command:
powercfg.exe /setactive 381b4222-f694-41f0-9685-ff5bb260df2e
-
Or input this command for the high power plan and hit Return:
powercfg.exe /setactive 8c5e7fda-e8bf-4a96-9a85-a6e23a8c635c
4. How to Change the Power Plan With Desktop Shortcuts
You can turn the Command Prompt commands specified in method three into handy desktop shortcuts. Then you’ll be able to quickly switch between power modes by clicking shortcuts for them on the desktop. Such shortcuts will be invaluable for users who frequently change their power plans. This is how you can add a power mode to the desktop:
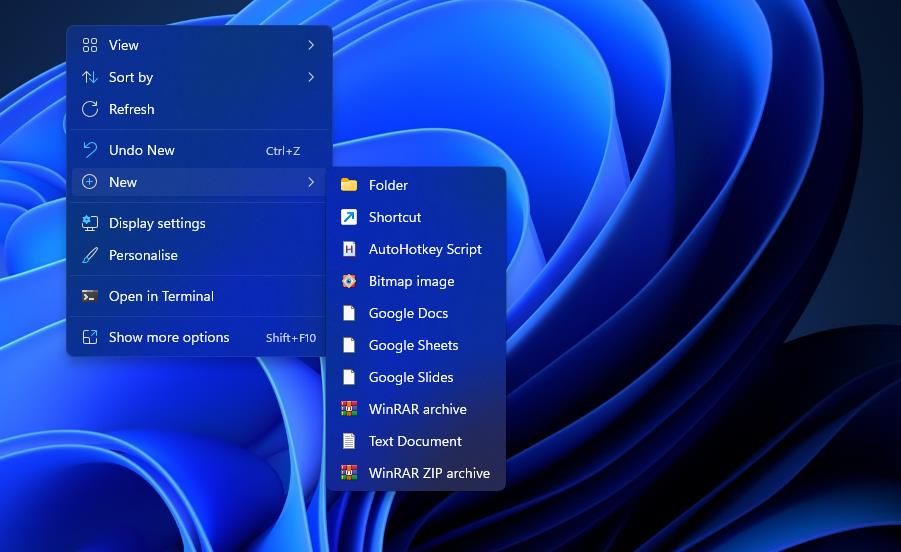
- Click somewhere on your desktop with the mouse’s right button to select a New option.
-
Select the Shortcut wizard option.

- Copy one of the power plan commands in method three by selecting the text for it and pressing the Ctrl + C copy hotkey.
-
Click inside the item location box and press Ctrl + V to paste in the command.

- Select the Create Shortcut’s wizard Next option.
- Input a suitable name for your power plan shortcut in the text box. For example, Power saver would be a suitable title for a desktop shortcut that sets that plan.
- Press Finish to add your power plan shortcut.
- Double-click the shortcut you’ve added to execute its command and change the power plan.
The power plan shortcuts won’t have default icons. You can add icons to them from Windows 11’s SHELL32 system set in these quick steps:
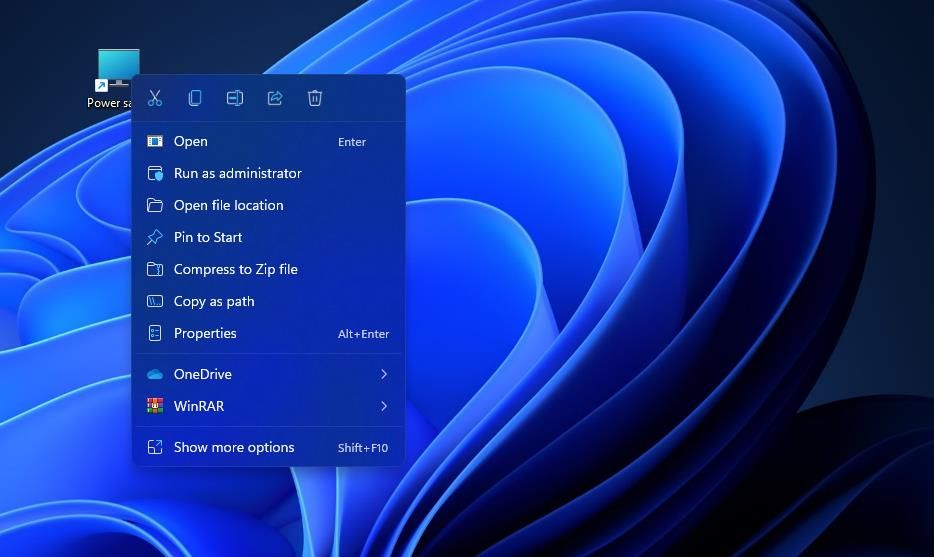
- Right-click a power plan desktop shortcut and select Properties.
- Click Change Icon to view the SHELL32 system icon set.
-
Choose an icon from there and click OK to make your selection.

- Select the properties window’s Apply option to add the new icon.
- Click OK or the X window button to exit.
5. How to Change the Power Plan With Hotkeys
A power plan shortcut on the desktop can become a hotkey with some additional tweaking. Adding a hotkey to one of your power mode shortcuts will enable you to change that plan by pressing a key combination for it. You can set up a power plan keyboard shortcut like this:
- Create a power plan desktop shortcut as covered in the previous method.
-
Right-click the power plan shortcut to select Properties.

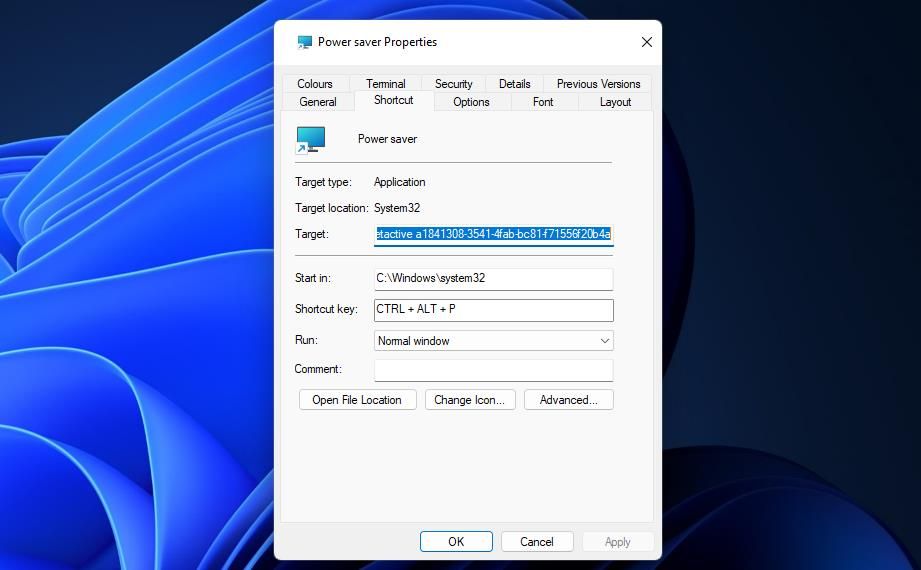
- Move the cursor over and click within the tab’s Shortcut key field.
-
Press P to establish a Ctrl + Alt + P hotkey for activating the power plan.

- Click Apply to set the hotkey for the power plan.
- Then click X or OK to close the Shortcut tab and its window.
- Repeat those steps to apply different hotkeys to all your power plan desktop shortcuts. Then you can press their custom keyboard shortcuts to switch power mode.
6. How to Change the Power Plan From the System Tray
You can also add shortcuts for changing the power plan to the system tray area with PowerPlanSwitcher. PowerPlanSwitcher is a freely available app that adds a handy menu power plan menu to the system tray. You can change the plan by selecting different options on that menu. Go through these steps to change the power plan from Windows 11’s system tray:
- Open PowerPlanSwitcher in the Microsoft Store, and click Get button to install.
- Press Open on the app’s MS Store page to run PowerPlanSwitcher.
-
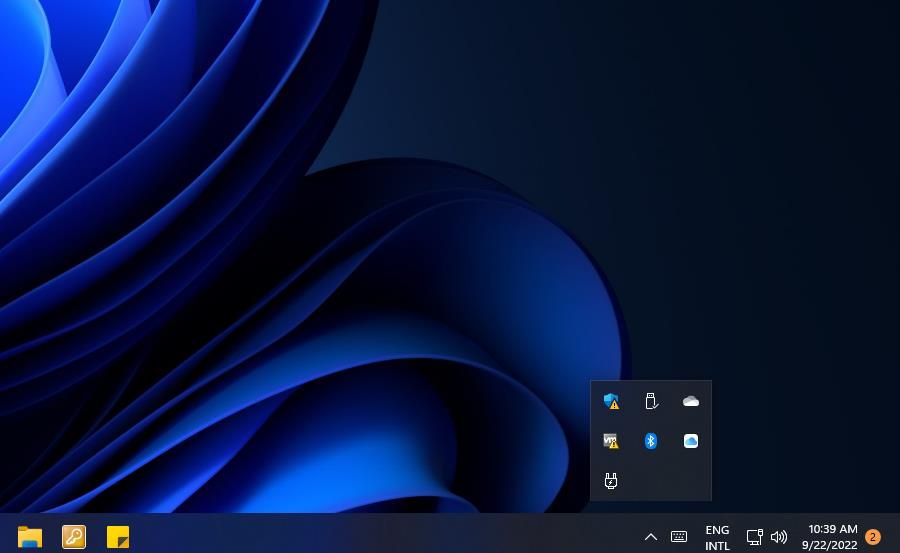
Click the PowerPlanSwitcher system tray icon to open that app’s menu. You may need to click a Show hidden icons button first to see the icon in the overflow menu.
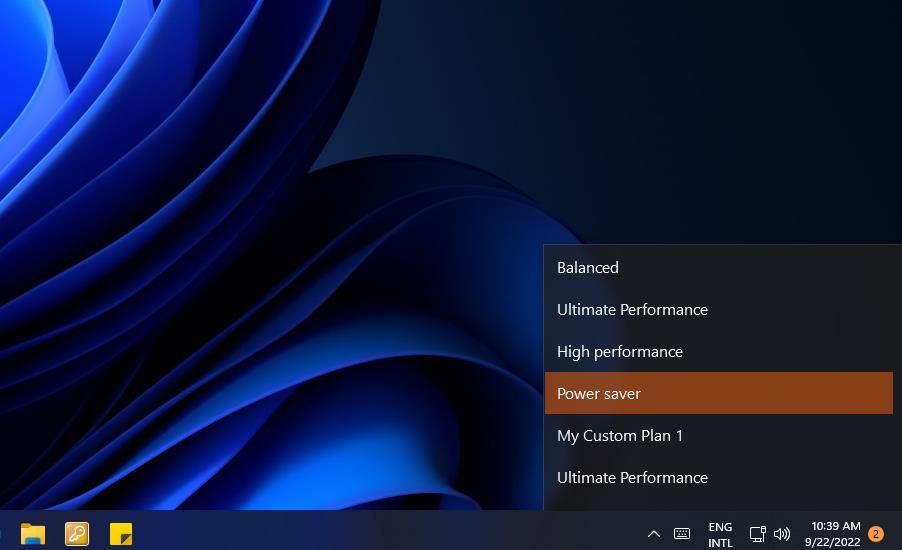
-
Then select a Balanced, Power saver, High, or Ultimate Performance option on the menu to change the plan.

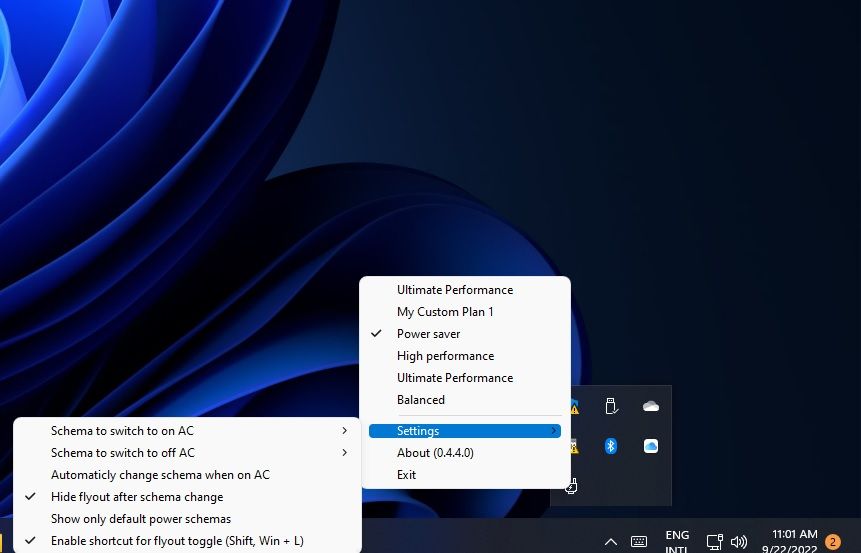
There’s also a hotkey for accessing that menu, but you’ll need to enable it. Right-click the PowerPlanSwitcher system tray icon to select Settings > Enable shortcut for flyout toggle. Then pressing Shift + Windows + L keys simultaneously will open the power plan menu.
Change the Power Plan One Way or Another
Changing the power plan now and then will adapt your PC’s energy consumption to suit your requirements better. The quickest methods for changing settings are usually the best ones. So, many users may prefer to change plans with shortcuts, as outlined in methods four, five, and six. The PowerPlanSwitcher app is a particularly convenient system tray menu with which to change power mode.
Quick Tips
- Switching between different power modes empowers you to optimize performance, extend battery life, or strike a balance in between.
- You can adjust the power mode on Windows through the Settings app, Control Panel, or Command Prompt.
- Control Panel gives you the option to create a custom power plan on your PC.
Method 1: Change the Power Plan Using the Settings App
By default, your PC is set to Balanced power mode, but you can change it to “Best performance” or “Best power efficiency” to prioritize performance or battery life, respectively. Here’s how:
Step 1: Press the Windows key + I to open the Settings app and head to System > Power & battery.

Step 2: Use the drop-down menu next to Power mode to switch between three modes: Balanced, Best power efficiency, and Best performance.

Method 2: Change the Power Plan via the Control Panel
Using the Control Panel is an old-school way of making changes to your PC. Here’s how to use it to change the power plan in Windows 11.
Step 1: Click the search icon on the taskbar. Type control panel and press Enter.

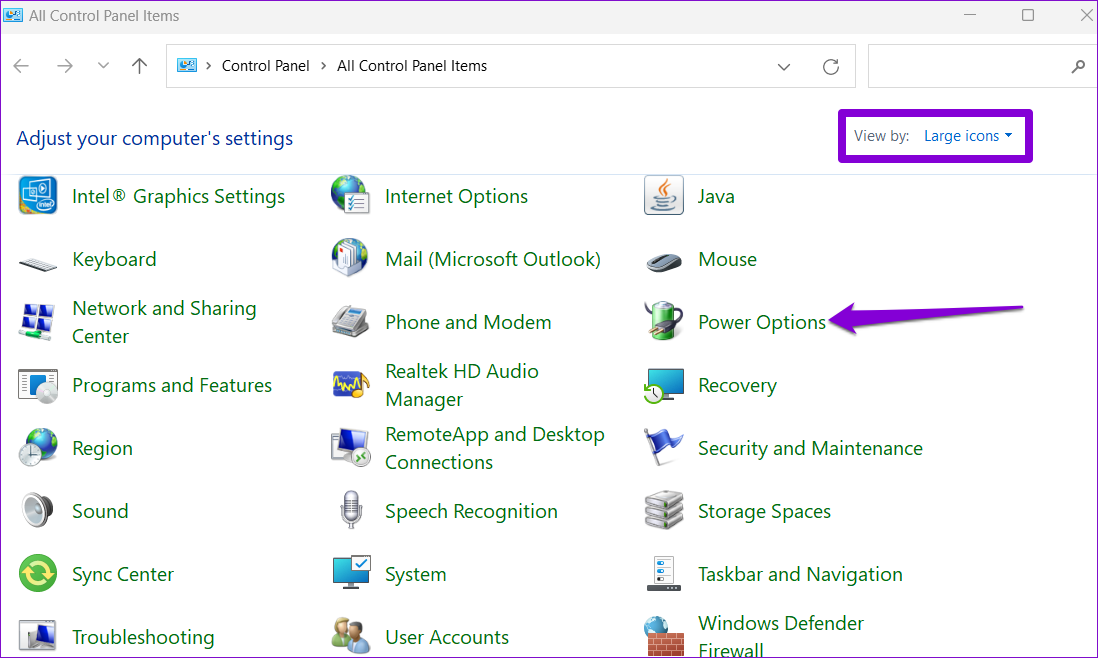
Step 2: Use the drop-down menu at the top right corner to change the view type to Large icons and go to Power options.
Step 3: Select the radio button on the left of the power mode to activate it.
Method 3: Change the Power Plan With Command Prompt
You can also use the command prompt on Windows 11 to communicate with your PC and change its power plan settings. Read on to learn how.
Step 1: Press the Windows key + S to open the search menu, type cmd, and press Enter.

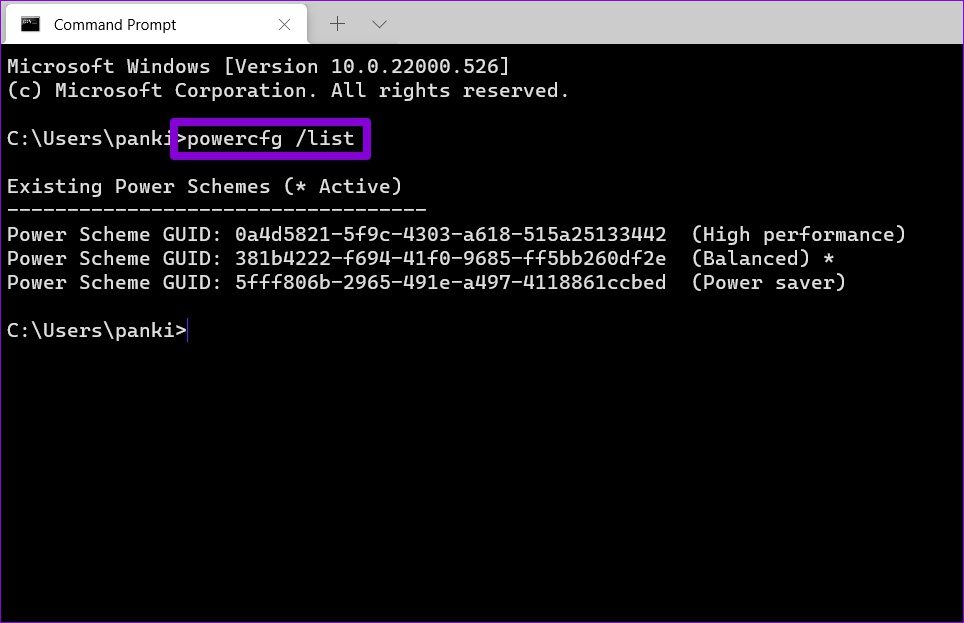
Step 2: In the console, type the below command and press Enter to view a list of available power plans.
powercfg /list
Note: The GUID number next to the plan is its unique identifier code that you can use to switch between various modes. Note the GUID number of the plan you wish to use.
Step 3: To change power mode, run the following command.
powercfg /setactive GUID
Replace GUID in the above command with the actual unique identifier code noted earlier.

It’s important to note that once you’ve changed the power mode via the Control Panel or Command Prompt, you can’t change modes via the Settings app. To fix this, use the Control Panel or Command Prompt and switch to the Balanced mode first.

Bonus: Create a Custom Power Plan on Windows 11
While Windows 11 already offers you three different power plans, you can also create a custom power plan that best suits your needs. Here’s how.
Step 1: Press the Windows key + R to open the Run dialog, type control, and press Enter.
Step 2: Click Power options. From the left column, click on Create a power plan.
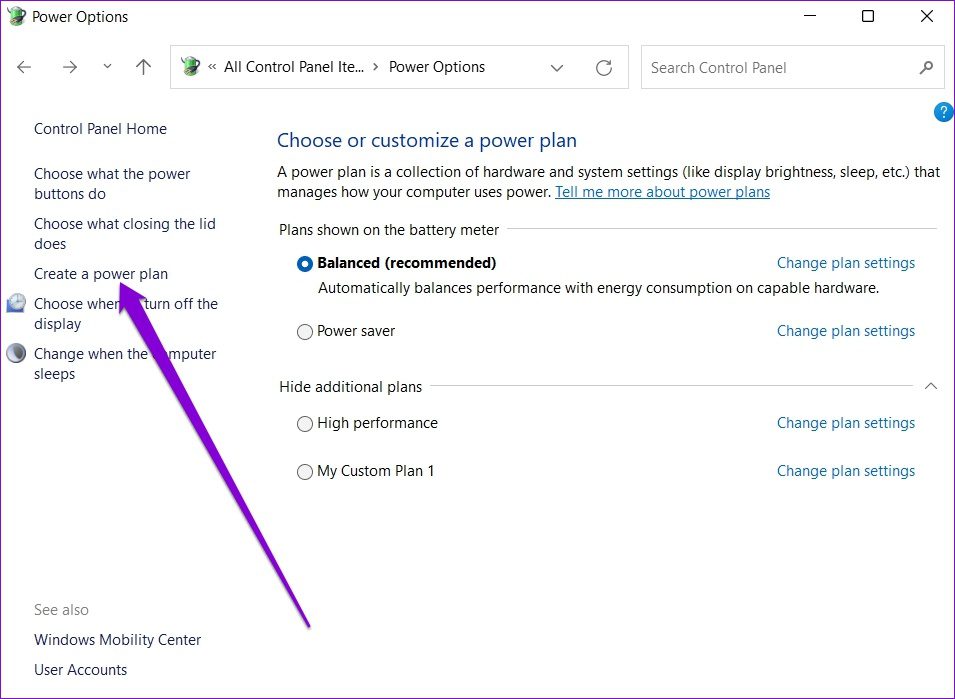
Step 3: Select one of the three basic plans to start with. Then, enter a suitable plan name and hit Next.

Step 4: Choose the preferred sleep and display settings for the plan and hit Create.

Was this helpful?
Thanks for your feedback!
The article above may contain affiliate links which help support Guiding Tech. The content remains unbiased and authentic and will never affect our editorial integrity.
Все способы:
- Шаг 1: Общие настройки электропитания
- Шаг 2: Дополнительные настройки электропитания
- Шаг 3: Дополнительные параметры схемы электропитания
- Вопросы и ответы: 2
Шаг 1: Общие настройки электропитания
Начнем разбор настроек электропитания со стандартных параметров, которые в Windows 11 доступны в приложении «Параметры». Все следующие функции и опции будут рассмотрены на примере ноутбука, поскольку для таких устройств параметров значительно больше. Поэтому учитывайте, что на ПК некоторые из них вы не найдете, что и логично, ведь в системном блоке нет встроенной батареи.
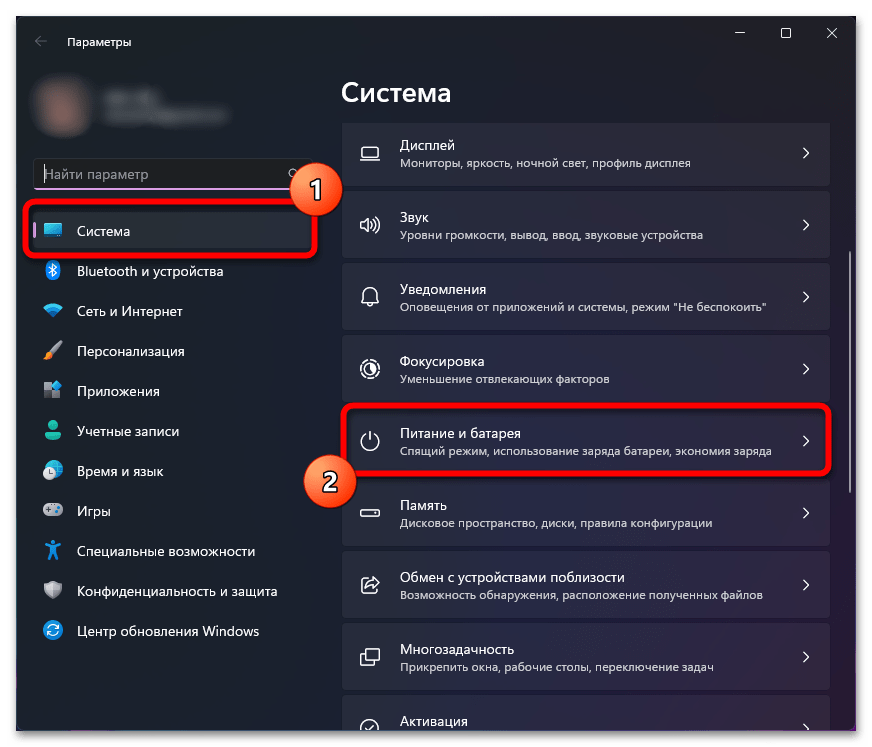
- Откройте «Пуск» и перейдите в «Параметры», щелкнув по значку с изображением шестеренки.
- Далее на панели слева выберите раздел «Система» и перейдите к категории «Питание и батарея». Если вы работаете за персональным компьютером, то данная категория будет называться просто «Питание».
- В ней вы сразу увидите много разной информации про уровень заряда батареи. При помощи графиков вы легко определите, насколько быстро она садится и какие приложения на это влияют. Далее будет показан список рекомендаций, которые повысят автономность. Можете использовать их, если самостоятельно не разбираетесь в оптимальных настройках, но хотите повысить время работы вашего устройства.
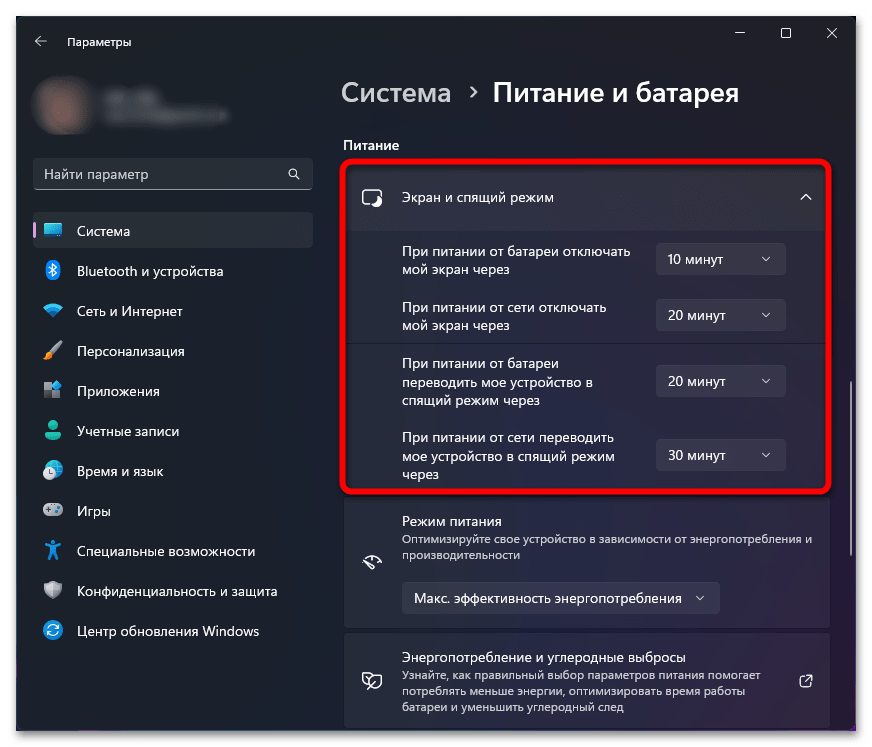
- Следом идут общие настройки для экрана и спящего режима. Из выпадающих списков напротив каждого параметра выбирается время, через которое экран потухнет и когда произойдет переход в спящий режим. Учитывайте, что значения можно установить самые разные как для работы от сети, так и от аккумулятора.
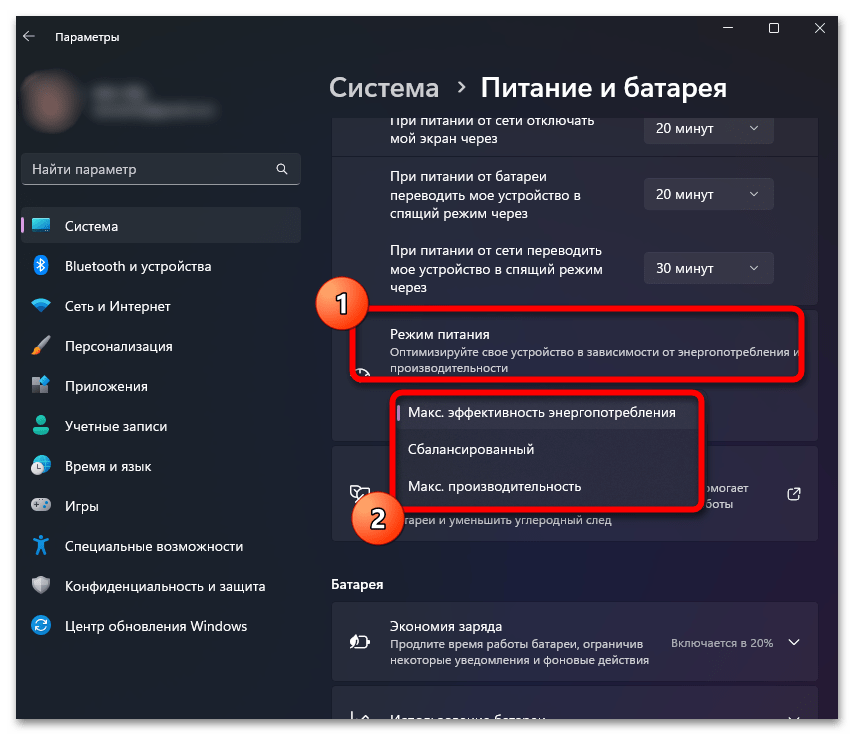
- «Режим питания» — основная настройка электропитания в Windows 11. Обычно имеет всего три пункта в списке, которые и определяют поведение вашего устройства, его автономность и производительность. Если хотите максимальную мощность, выбирайте «Макс. производительность». Для увеличения времени работы от батареи — «Макс. эффективность энергопотребления». Режим «Сбалансированный» подойдет тем юзерам, кто хочет доверить переключение энергопотребления операционной системе. Если он будет активен, то производительность и сбережение заряда начнут зависеть от того, работает лэптоп от сети или от батареи. Конечно, на ПК всегда лучше выбирать режим максимальной производительности, чтобы не было потери быстродействия.
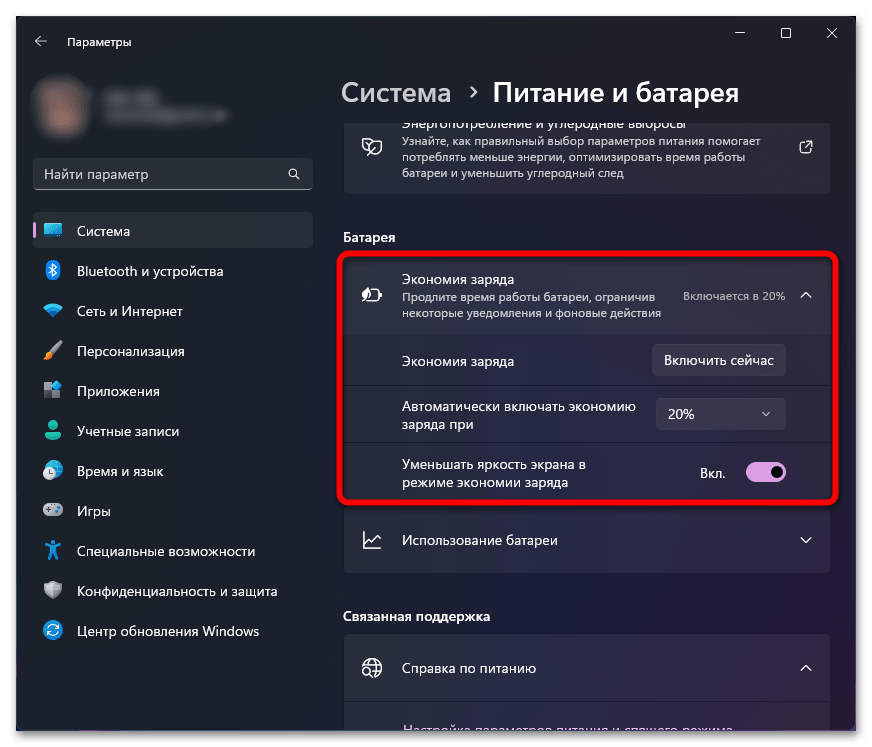
- Далее идет блок с названием «Батарея», и предназначен он именно для управления аккумулятором ноутбука. Вы можете решить, стоит ли ему экономить заряд, эффективно управляя производительностью, завершая фоновые процессы и регулируя яркость. Вместе с этим выбирается, при каком уровне заряда этот режим будет включаться. Кнопка «Включить сейчас» подойдет тем юзерам, кто сразу при отключении лэптопа от сети хочет перейти в сберегающий режим для наибольшей автономности.
- Дополнительно отметим еще один график внизу данного меню. Через него позволяется узнать, сколько времени экран был включен, как садилась батарея и какие приложения потребляют больше всего заряда аккумулятора. Это поможет вам определить фоновые задачи и в будущем завершать их, чтобы попросту не расходовать батарею.


Шаг 2: Дополнительные настройки электропитания
Некоторые настройки, доступные в Windows 11 для электропитания, не были перенесены в «Параметры», из-за чего пользователи не могут отыскать нужные им функции. В этом случае нужно просто обратиться к более старому и привычному меню с настройками, расположенном в «Панели управления». В нем вы найдете все, что будет нужно для настройки электропитания ноутбука и компьютера.
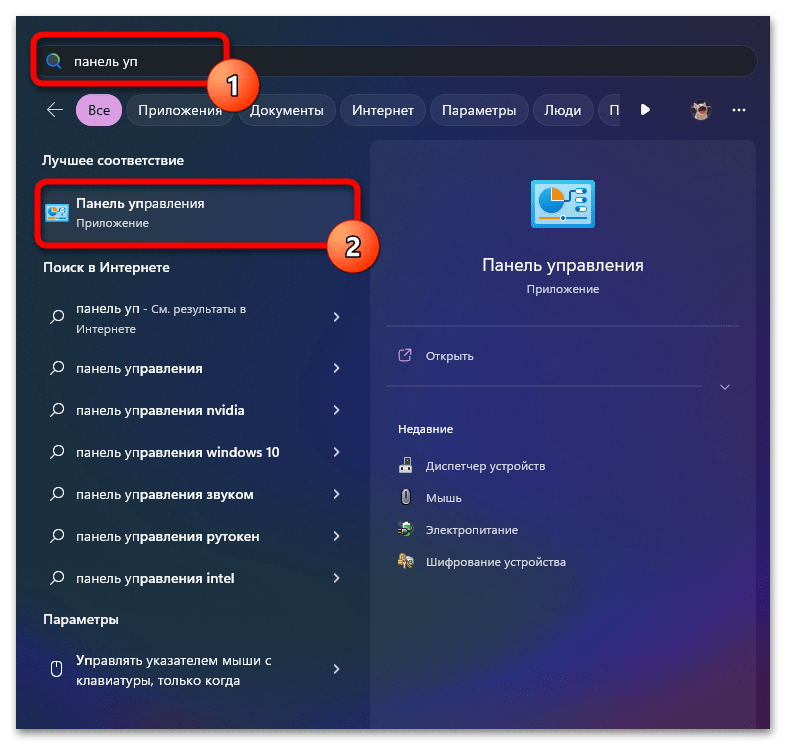
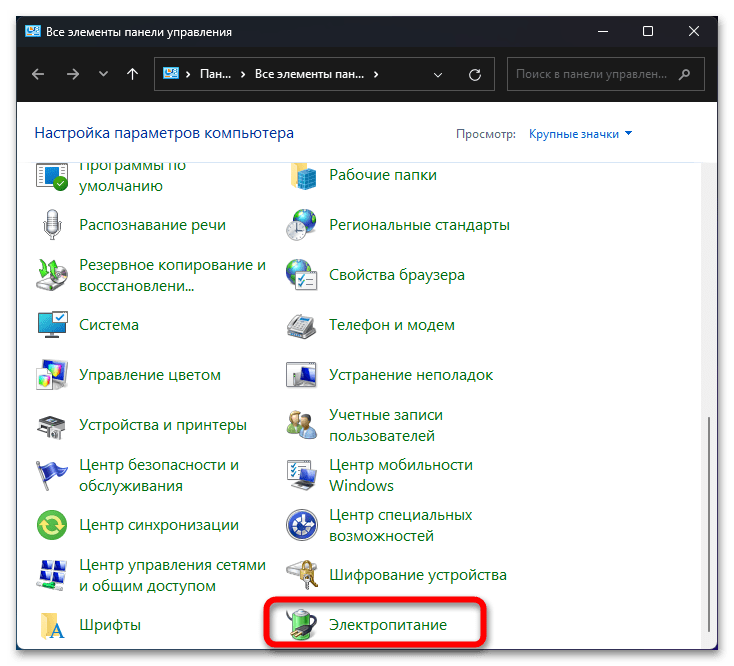
- Для начала нужно попасть в необходимое меню. Для этого приложение «Панель управления» найдите через «Пуск» и запустите.
- В нем найдите последний значок с названием «Электропитание». Щелкните по нему левой кнопкой мыши дважды для открытия окна с настройками.
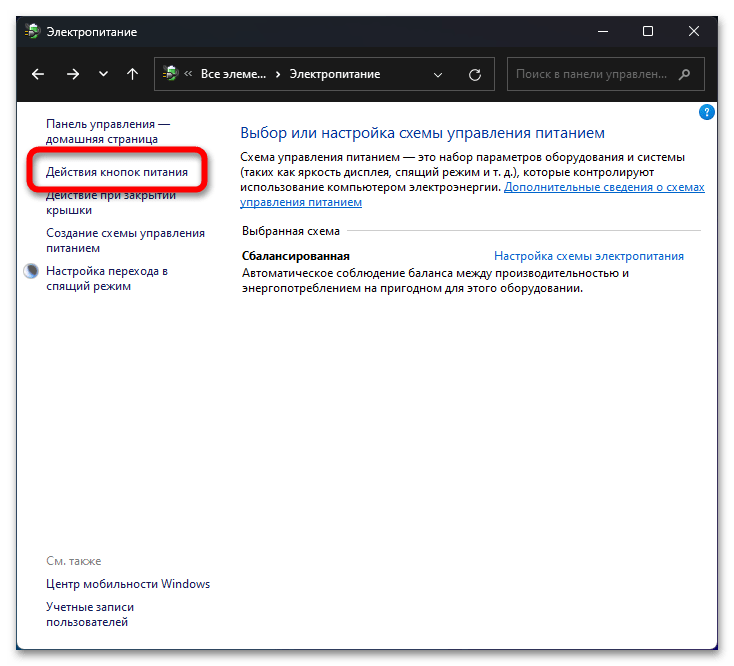
- Пройдемся по всем параметрам по порядку, поэтому для начала на панели слева нажмите по ссылке «Действия кнопок питания».
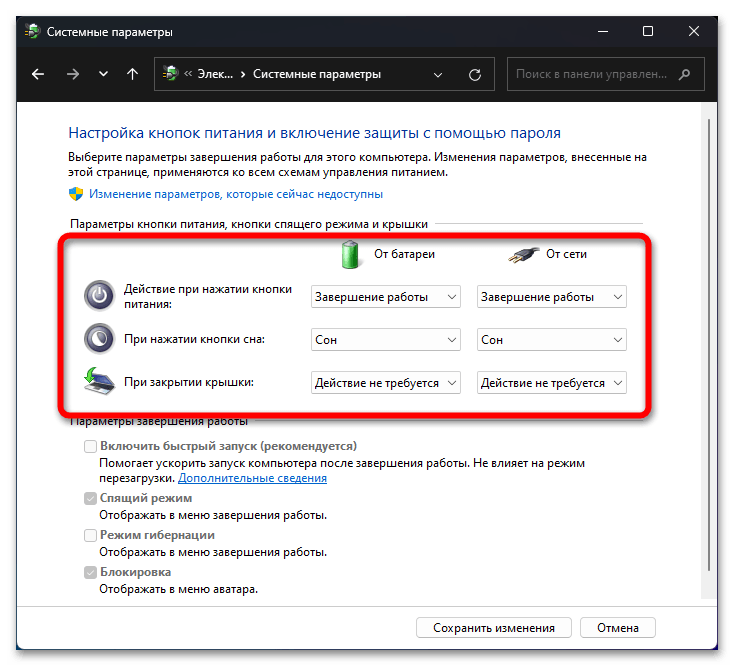
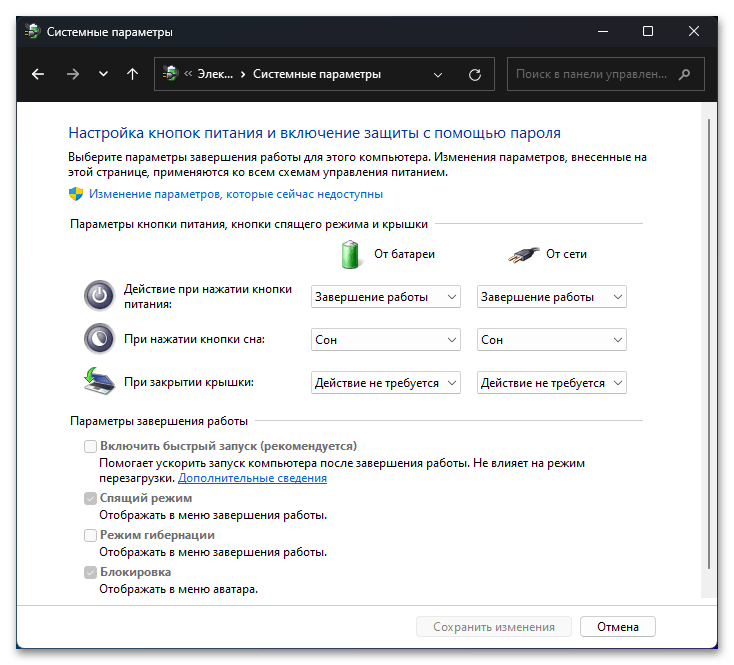
- Теперь настройте действие кнопки питания и сна при работе от батареи и сети. Это может быть переход в сон, режим гибернации, режим ожидания или завершение работы. Иногда здесь же отображается и действие при закрытии крышки ноутбука.
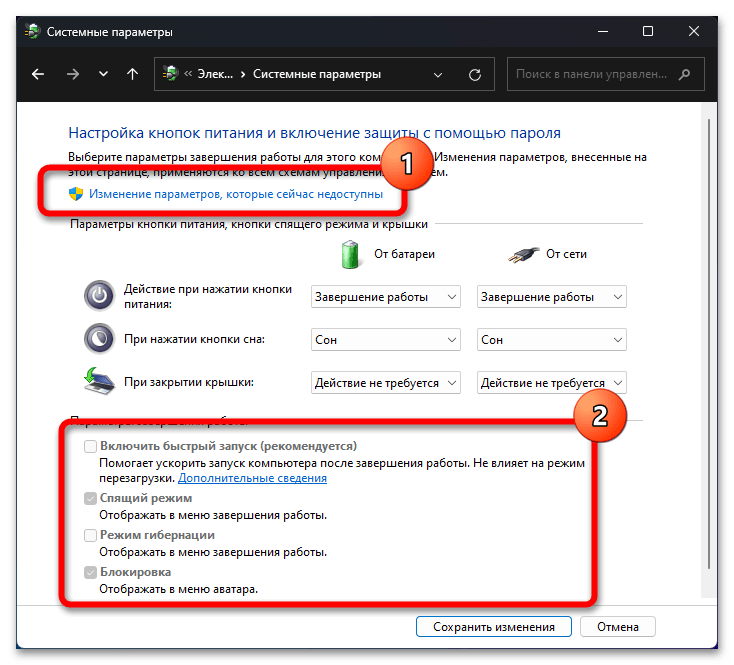
- Дополнительно можно разблокировать недоступные параметры, щелкнув по ссылке выше. Далее вы сможете снимать или устанавливать галочки возле быстрого запуска, спящего режима, режима гибернации и блокировки. Прочитайте описание каждого из этих режимов и решите, какой из них нужен конкретно в вашем случае.
- Если действия при закрытии крышки по каким-то причинам не отображаются в данном списке с настройками, нужно нажать по ссылке «Действие при закрытии крышки» в предыдущем окне.
- Далее вы получите доступ к тем же самым параметрам, о которых уже говорилось выше.
- Если вы используете на своем устройстве спящий режим, можно настроить и время перехода в него как в работе от сети, так и от батареи.
- После нажатия по ссылке для перехода к параметрам останется только выбрать подходящее время из списка. Вы увидите, что по умолчанию сначала отключается дисплей, а уже потом происходит переход в спящий режим. Что-то из этого или даже все можете смело отключить, если не хотите, чтобы состояние ноутбука или ПК изменялось автоматически при бездействии.


Шаг 3: Дополнительные параметры схемы электропитания
Еще в первом разделе материала мы выяснили, что в Windows 11 есть три разных схемы электропитания, от которых зависит производительность ноутбука и компьютера, а также автоматическое изменение состояния. Ни в одном из предыдущих меню не было дополнительных параметров таких схем, хотя они есть и могут быть изменены в соответствии с требованиями пользователя. Поэтому предлагаем остановиться на них более детально и разобраться с каждым, чтобы вы понимали, найдете ли среди них что-то полезное для себя.
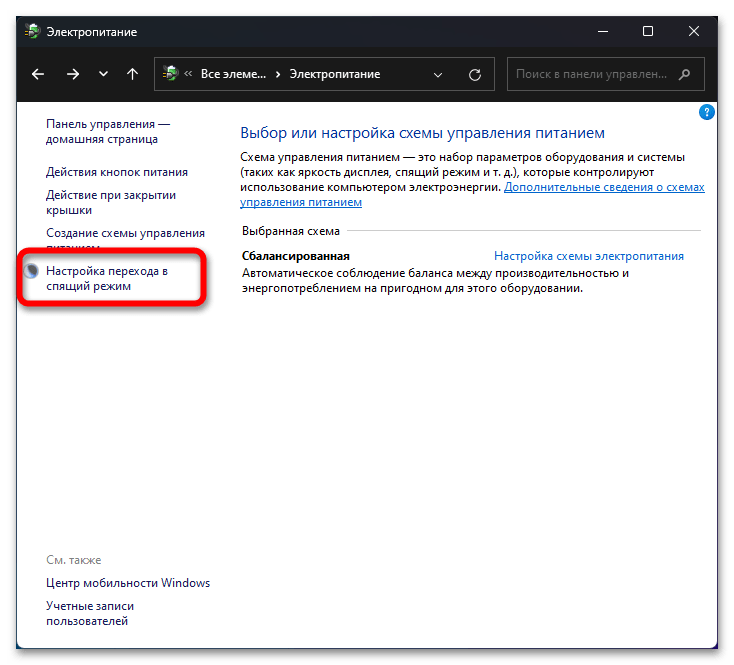
- В том же разделе «Электропитание», о переходе в который шла речь выше, нажмите возле выбранной схемы по ссылке «Настройка схемы электропитания».
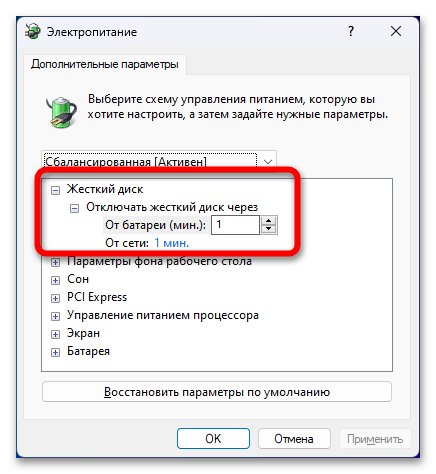
- В следующем окне щелкните по «Изменить дополнительные параметры питания».
- Теперь вы попадаете в те самые дополнительные параметры, которые упоминались во вступлении. Первая настройка определяет, через сколько минут после бездействия будет отключен жесткий диск при работе от сети и от батареи. По умолчанию установлено значение в одну минуту, но вы можете увеличить его, если ненадолго отходите от компьютера и при возвращении замечаете, что он восстанавливает свою работу достаточно долго.
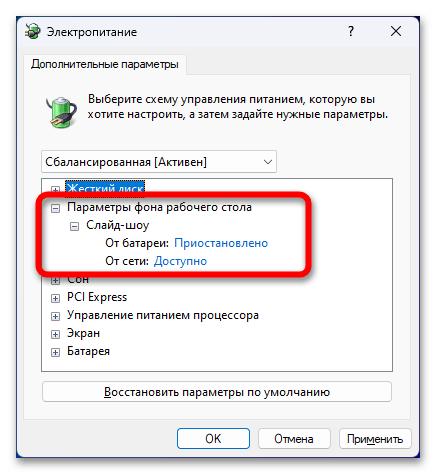
- «Параметры фона рабочего стола» нужны только в том случае, если на заставку было установлено слайд-шоу. Здесь вы выбираете, приостанавливать ли воспроизведение изображений при работе от сети и от батареи. Во втором случае отключение проигрывания поможет сохранить несколько процентов заряда.
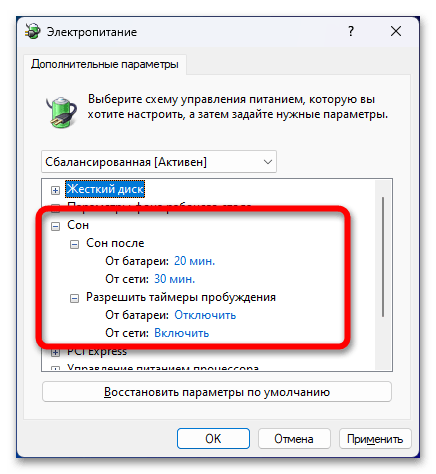
- Настройки сна повторяют те же самые, рассмотренные в предыдущих двух разделах, но можно проверить их и здесь, если не уверены в том, что предыдущие значения соответствуют действительности. Отметим только «Таймеры пробуждения»: выставьте с помощью их время, через которое ноутбук или компьютер будет автоматически выходить из сна.
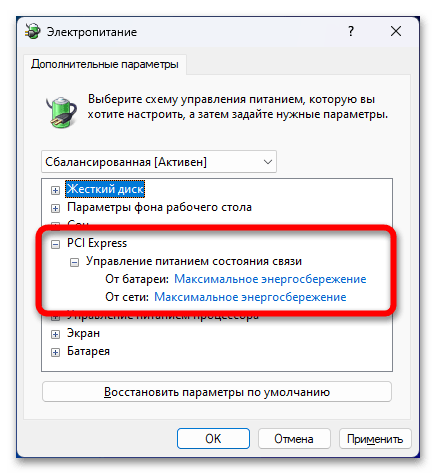
- «PCI Express» управляет питанием состояния связи. Изменять значение нужно только в том случае, если обладаете игровым ноутбуком с подключенными устройствами по PCI, максимальная производительность которых нужна на постоянной основе.
- Далее идет управление питанием процессора. Минимальное состояние рекомендуется оставить по умолчанию, а максимальное выбирайте в соответствии с тем, хотите ли вы нагружать ЦП на полную мощность. Стандартно стоит 100%, и дополнительно это позволяет включать режим турбо, когда нагрузка становится слишком большой. Такая функция нужна для повышения производительности вышей системы. Уменьшение значения до примерно 80% может немного снизить производительность, но время работы от батареи значительно увеличится.
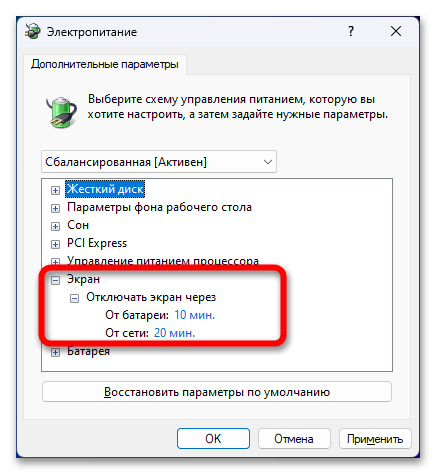
- Отключение экрана мы уже тоже затрагивали раньше, но если хотите, меняйте время отключения и через данное меню.
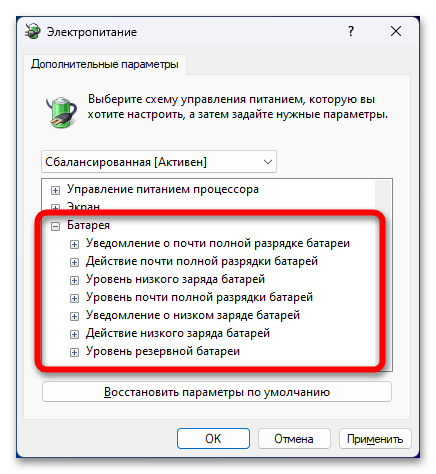
- Предстоит только разобраться с большим разделом под названием «Батарея». Название каждого пункта в нем уже говорит само за себя. Тут вы регулируете отображение уведомлений о разрядке, выбираете, какой процент заряда батареи считается низким, и нужно ли указывать уровень резервной батареи дополнительно.
- Ничего необычного в настройке каждого пункта нет. Просто раскрывайте параметр и выбирайте нужное значение при работе от сети и от батареи.
- Обратите внимание, что внизу есть кнопка «Восстановить параметры по умолчанию». Возвращайтесь в данное меню в любой момент, чтобы использовать ее и сбросить настройки до стандартных, если вдруг после изменения что-то пошло не так.


Наша группа в TelegramПолезные советы и помощь
On Windows 11, power modes («power plans» or «power schemes») are collections of settings to manage a device’s power usage. The system, by default, uses the «balanced» mode, which optimizes power for performance and battery life. However, you can always change the settings to «best power efficiency» to prolong the battery life as much as possible or «best performance» to get the most out of the device while increasing power usage.
In this how-to guide, I’ll explain the steps to change the power mode on your laptop or desktop computer to improve performance or battery life.
Recent updates
These instructions has been updated to ensure accuracy and reflect changes to the process in the operating system.
How to adjust power modes on Windows 11
To change the default power more on Windows 11, use these steps:
- Open Settings.
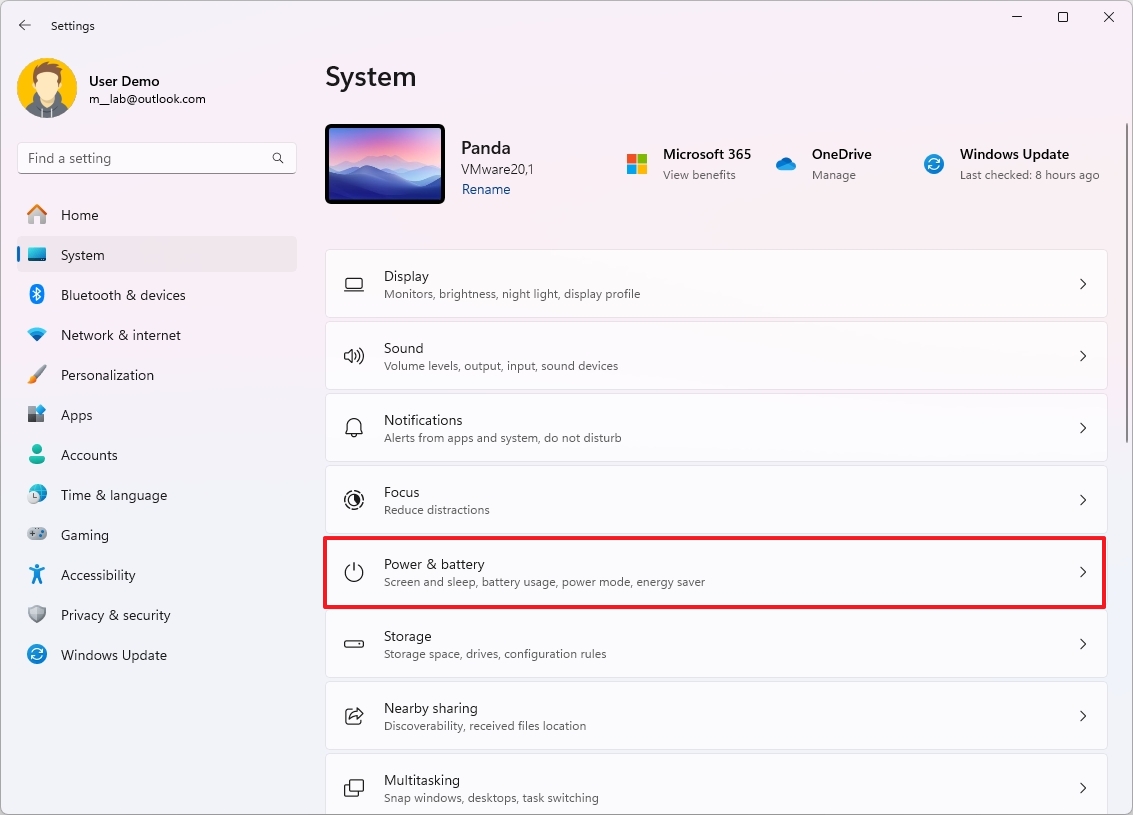
- Click on System.
- Click the Power & battery page on the right side.
- Quick tip: If the device is not connected to a battery, the page will appear as «Power.»
- Click the Power Mode setting.
- Select the option for when the computer is plugged in or running on battery:
- Best Power Efficiency: This option preserves the most energy while lowering the system’s performance. If you use a laptop, this option will offer the most battery life.
- Balanced: Windows 11 automatically balances energy and performance for an optimal experience.
- Best Performance: Uses the most energy to increase the system’s performance.
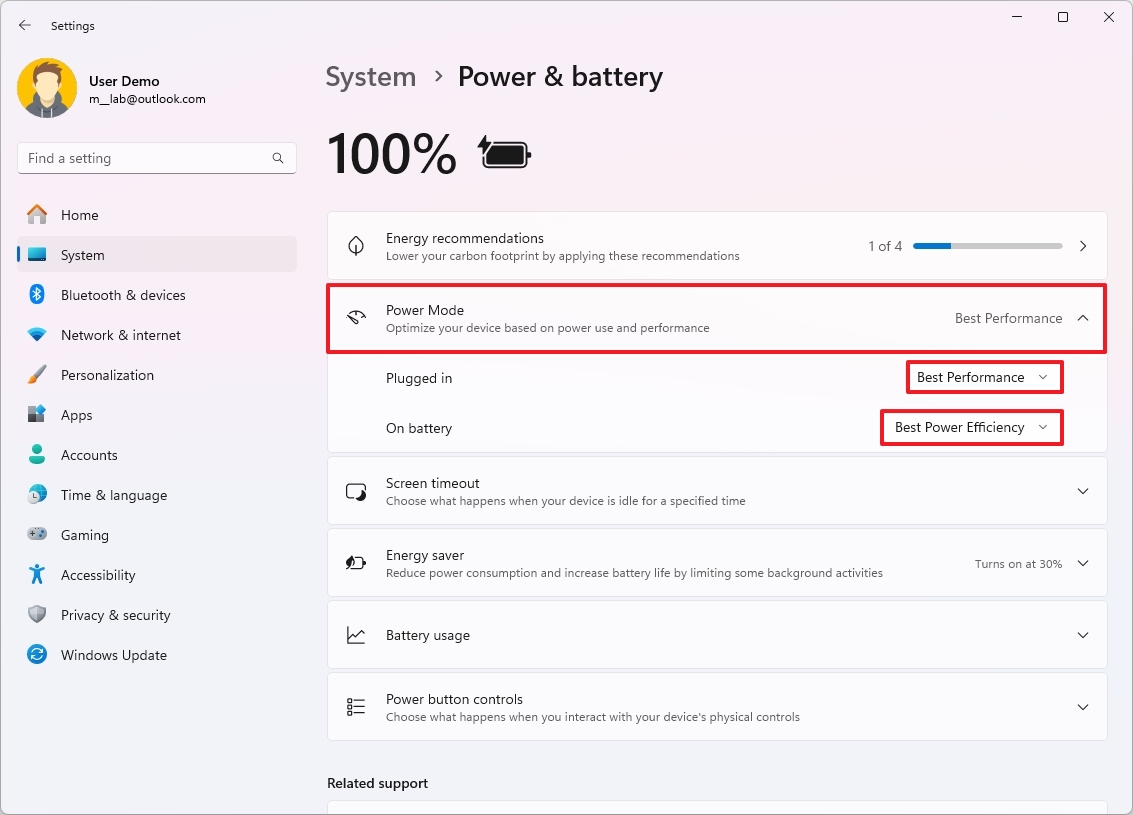
Once you complete the steps, the new power scheme will apply to the device.
On Windows 10, you could cycle through the power modes from the Taskbar, but on Windows 11, you can only do this from the «Power» settings or using the legacy settings or Command Prompt.
How to adjust power modes through Control Panel
To change the power mode for battery life or high performance, use these steps:
- Open Control Panel.
- Click on Hardware and Sound.
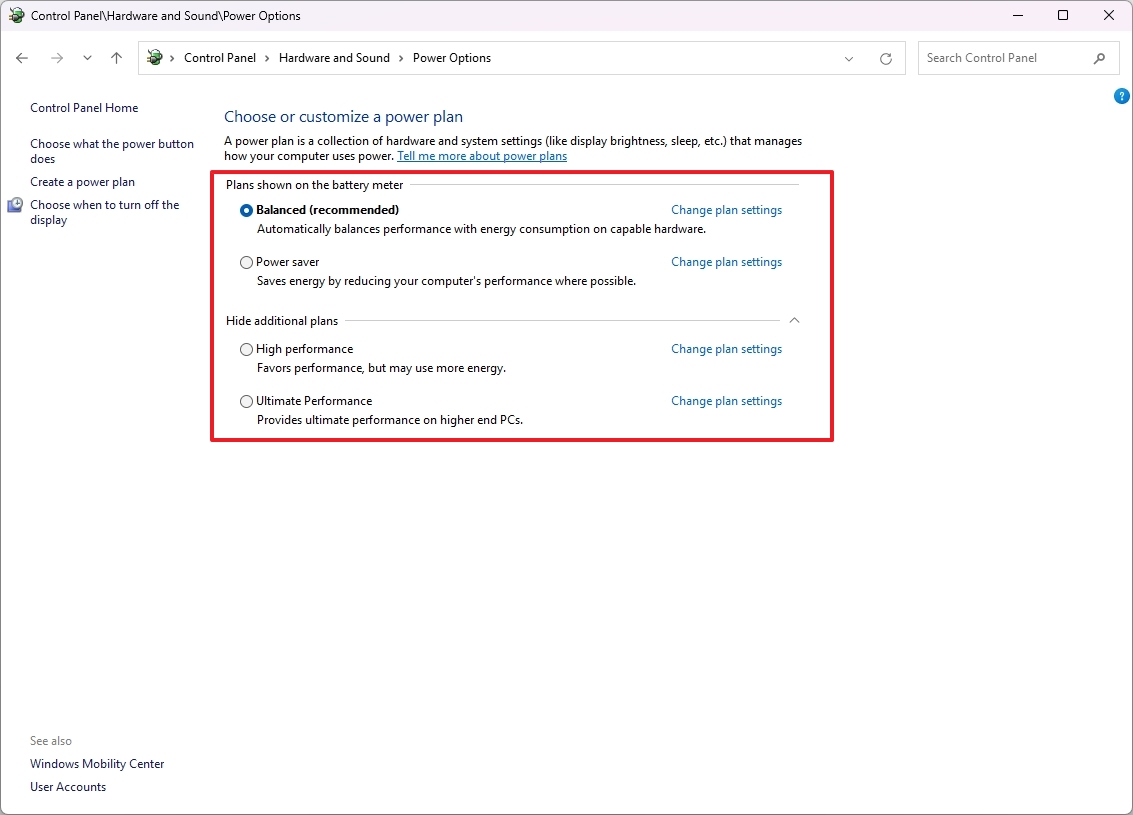
- Click on Power Options.
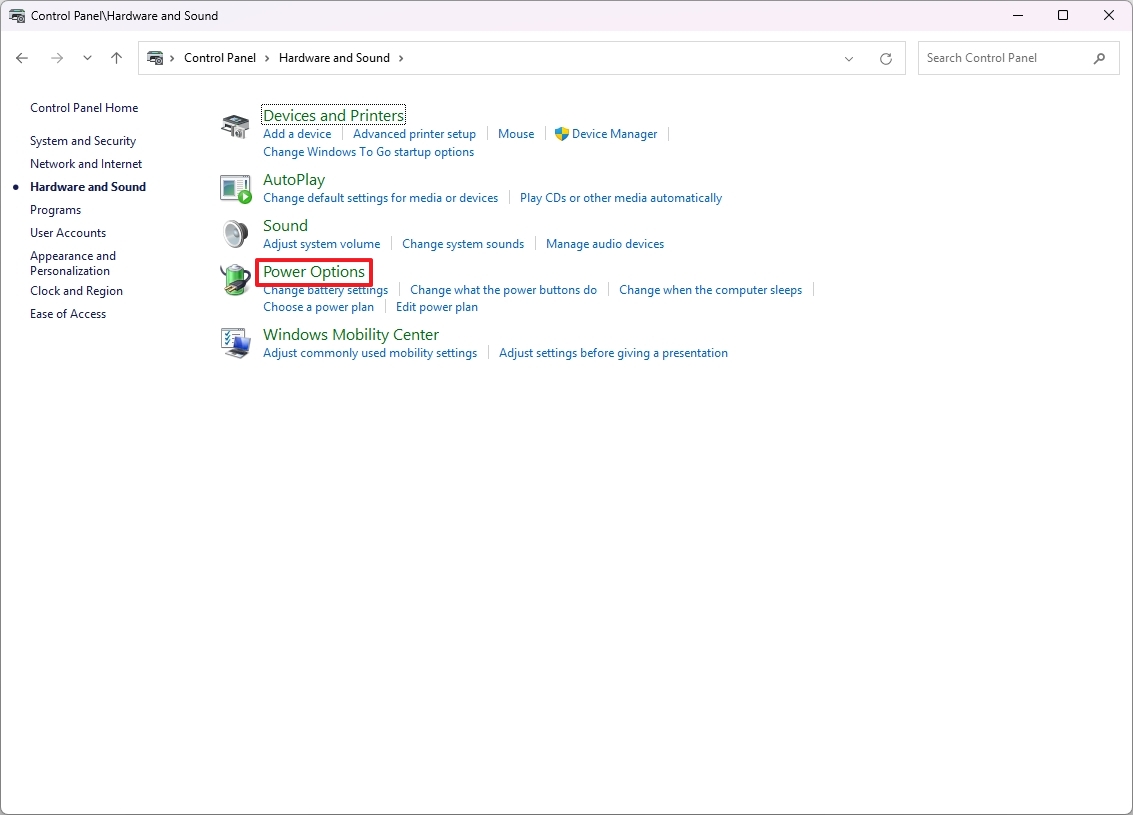
- Choose from one of the available power plans:
- Balanced: The system automatically balances power and performance for an optimal experience.
- Power Saver: This option preserves the most power while lowering the system’s performance. It offers the most battery life if you use a laptop.
- High performance: It uses the most energy but offers the most performance.
- Ultimate Performance: If available on your high-end device, this option prioritizes performance over energy efficiency, even more than the «High performance» option.
- Quick note: The available power plans may differ since manufacturers can sometimes create or remove custom modes.
After you complete the steps, the Windows device will start using the power mode you specified to improve battery or performance.
All the latest news, reviews, and guides for Windows and Xbox diehards.
How to adjust power modes with Command Prompt
To choose between balanced, high-performance, or power-saver modes with Command Prompt, use these steps:
- Open Start.
- Search for Command Prompt, right-click the top result, and select the Run as administrator option.
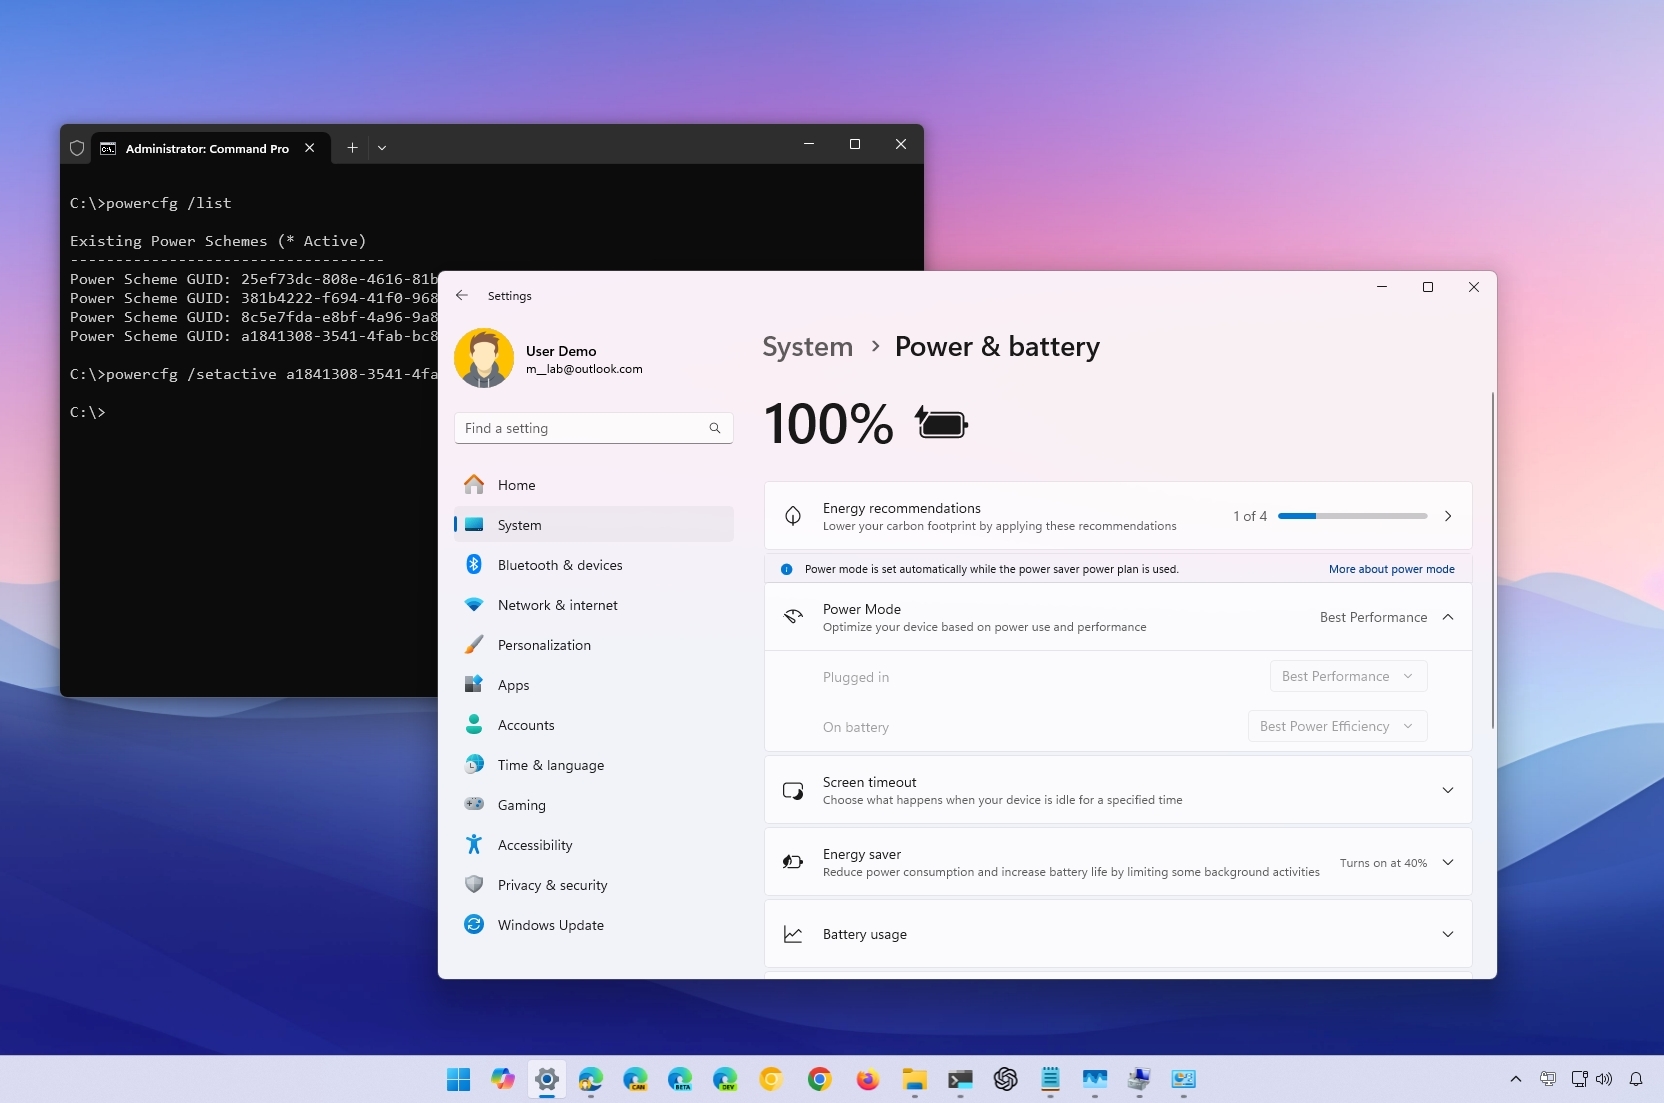
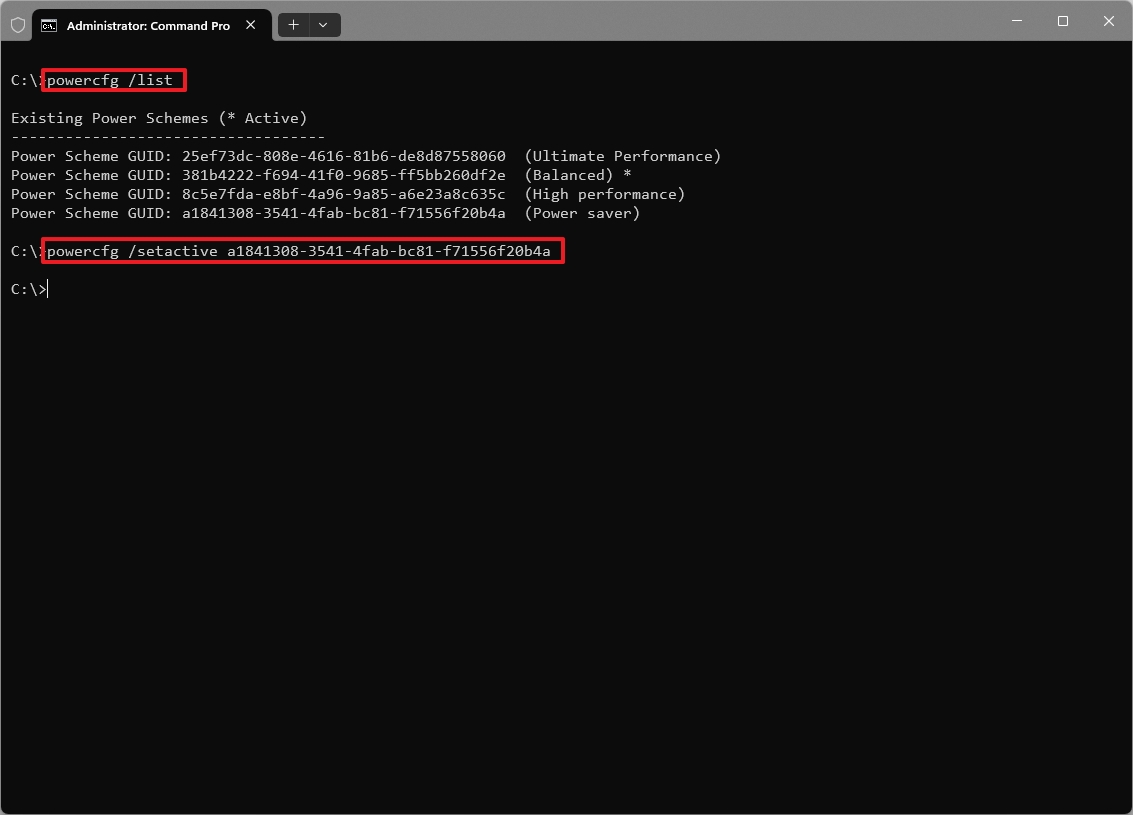
- Type the following command to identify all the power schemes and which one is active, and press Enter: powercfg /list
- Confirm the available power scheme’s unique identifier (GUID).
- Quick note: The one with the asterisk (*) is the active power mode.
- Type the following command to change the power mode and press Enter: powercfg /setactive GUID
In the command, change GUID for the unique identifier that corresponds to the power mode you want to use. The number may be different on your computer. For example, this command makes the «Power Saver» the active power mode to save battery life: powercfg /setactive a1841308-3541-4fab-bc81-f71556f20b4a
Once you complete the steps, the command will apply the new power mode on Windows 11.
While you can change the power modes in several different ways, when setting the «High performance» or «Power Saver» modes using Control Panel or Command Prompt, you won’t be able to change the modes from the Settings app. If this is the case, you’ll need to select the «Balanced» mode, and only then will the option be available on the Power settings page.
More resources
For more in-depth insights, troubleshooting tips, and the latest updates on Windows 11 and 10, be sure to explore these resources:
- Windows 11 on Windows Central — All you need to know
- Windows 10 on Windows Central — All you need to know
Mauro Huculak has been a Windows How-To Expert contributor for WindowsCentral.com for nearly a decade and has over 15 years of experience writing comprehensive guides. He also has an IT background and has achieved different professional certifications from Microsoft, Cisco, VMware, and CompTIA. He has been recognized as a Microsoft MVP for many years.