Способ 1: Штатные «Параметры»
В Windows 10 можно настроить IP-адрес как вручную, так и использовать данные, которые предоставляются провайдером по умолчанию. Причем делается это и в обновленном интерфейсе системных «Параметров», и через классическую «Панель управления». В первом случае действовать нужно следующим образом:
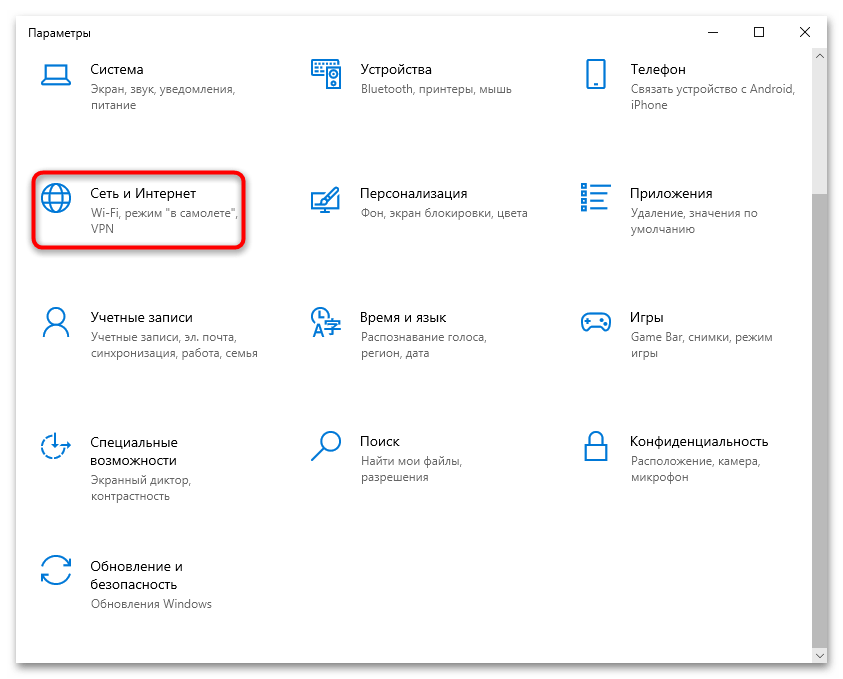
- Кликните по кнопке «Пуск», затем выберите запуск системных «Параметров», нажав на иконку, стилизованную под шестерню.
- Из появившегося окна выберите раздел «Сеть и Интернет».
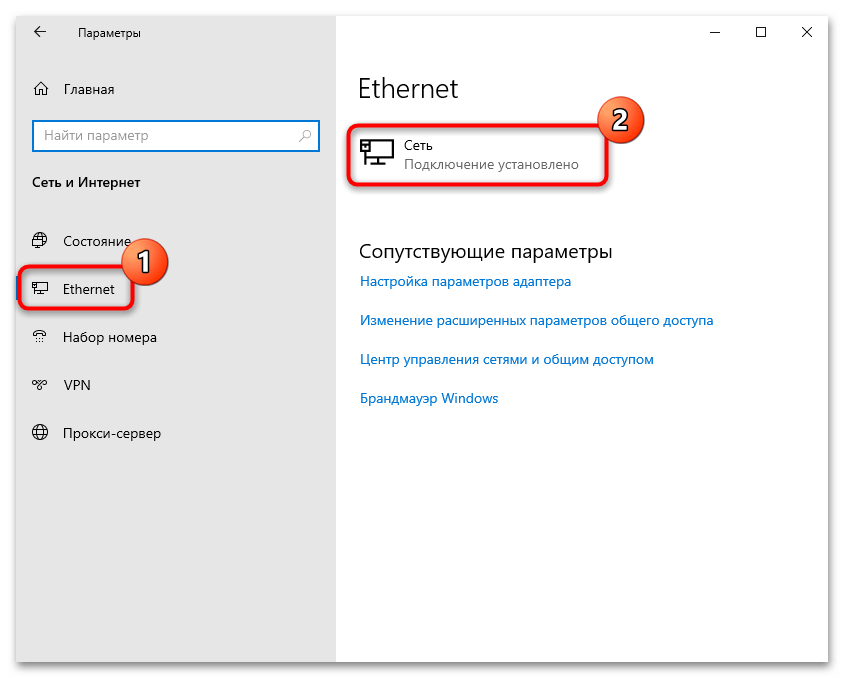
- Далее через панель слева переключитесь на вкладку «Ethernet», а в центральной части окна выберите активное соединение.
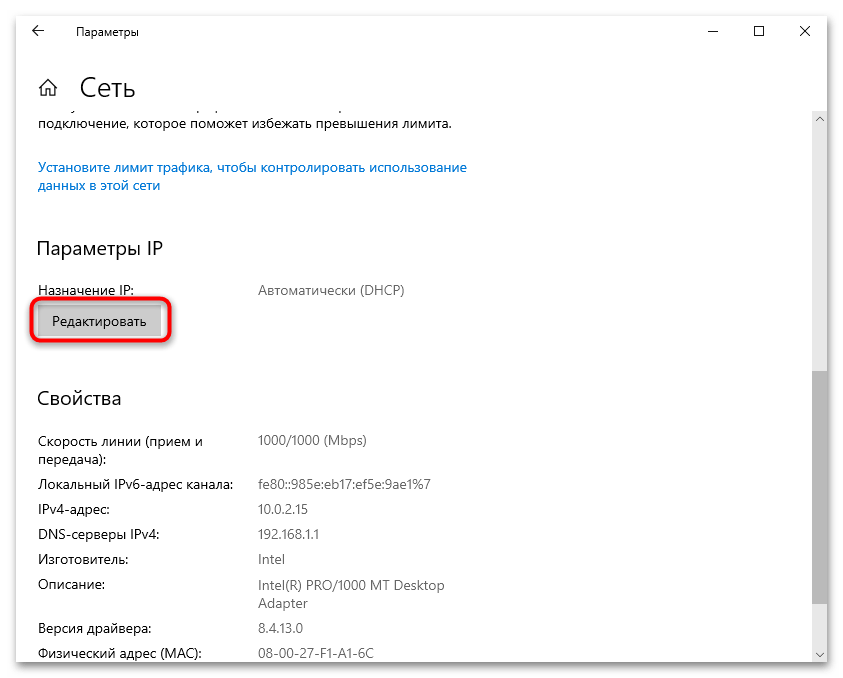
- Откроется новое окно, где в блоке «Параметры IP» кликните по кнопке «Редактировать».
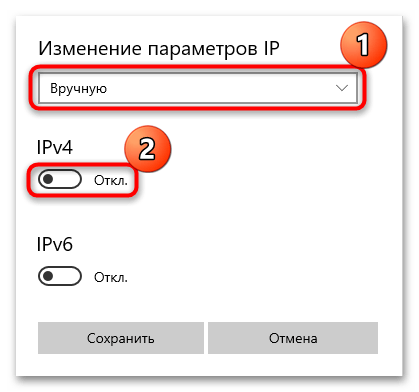
- Если нужна автоматическая настройка, то выберите соответствующий пункт из выпадающего списка – «Автоматически (DHCP)», затем нажмите на кнопку «Сохранить». Как правило, именно автоматические параметры IP-адреса являются наиболее предпочтительными, поскольку обычно провайдеры все данные предоставляют по протоколу DCHP, что избавляет от ручной настройки IP.
- Если же надо самостоятельно ввести данные, тогда вместо «Автоматически (DCHP)» выберите пункт «Вручную». Станут активны два протокола: IPv4 и IPv6. Активируйте один из них (для большинства пользователей это первый вариант) с помощью переключателя, чтобы внести правки.
- Далее потребуется ввести некоторые данные самостоятельно, а именно: IP-адрес, длину префикса подсети, шлюз, DNS-адреса.

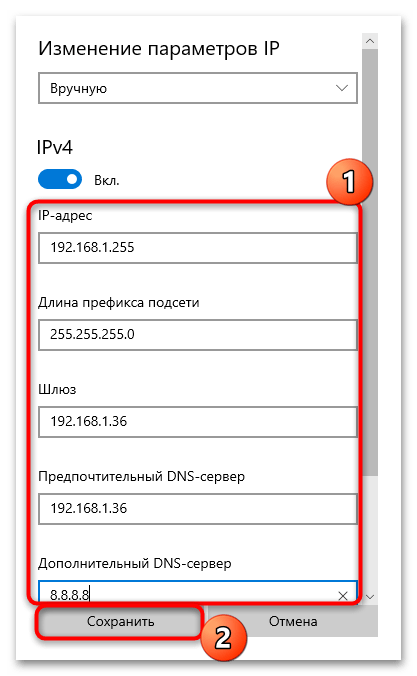
Параметры у каждого пользователя уникальные, поэтому универсальной инструкции в этой ситуации нет. Провайдер обязан предоставить их для ручной настройки сетевых протоколов, и обычно эти данные идут в комплекте с договором о подключении. Либо вы можете связаться с технической поддержкой по телефону и запросить эти сведения.
Способ 2: «Панель управления»
Изменить сетевые протоколы, в частности IP-адрес, в Windows 10 можно и через классическую «Панель управления», которая привычна для пользователей более ранних выпусков этой операционной системы.
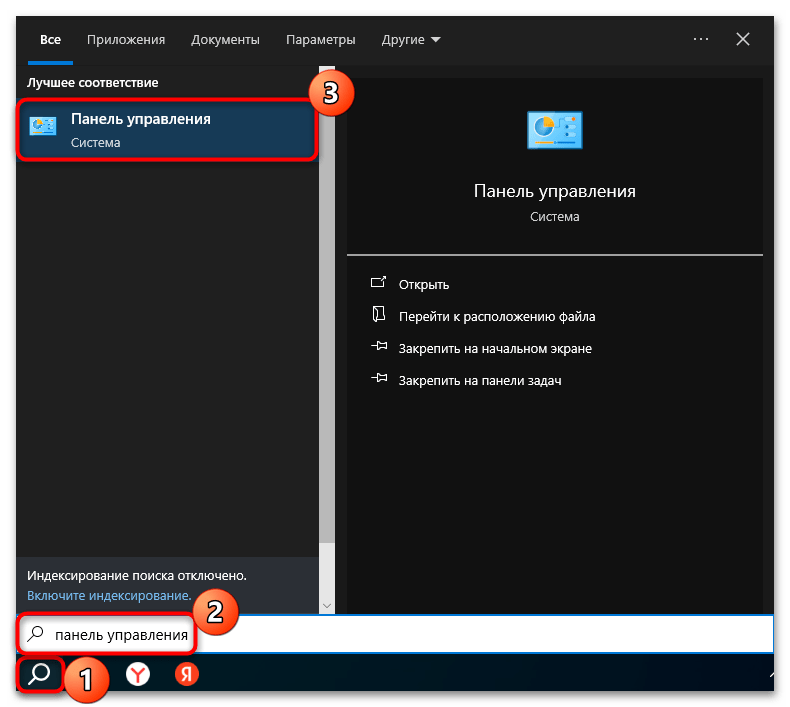
- Запустите «Панель управления». Чтобы отыскать средство, можно воспользоваться строкой системного поиска.
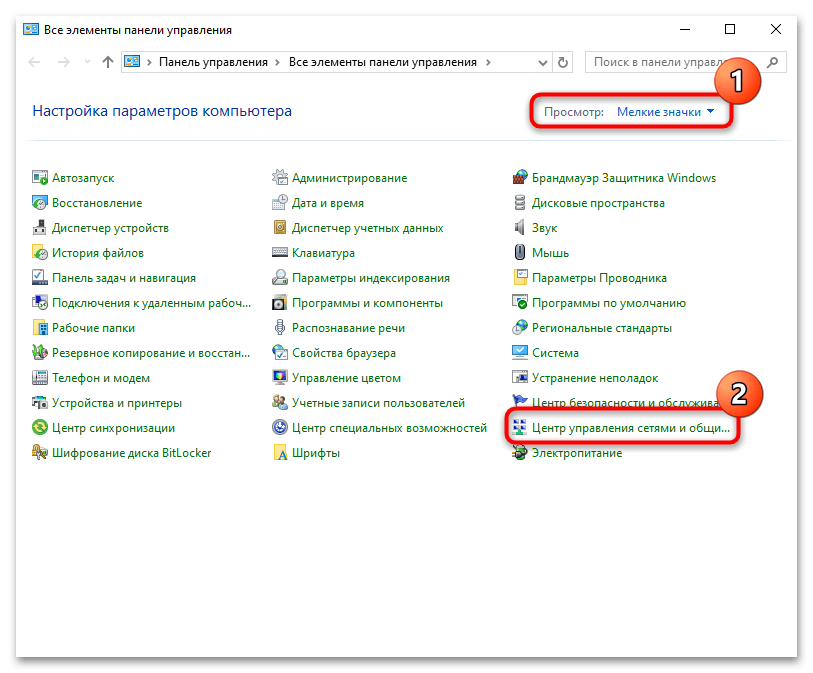
- У опции «Просмотр» выставьте крупные или мелкие значки для удобства, после чего кликните по разделу «Центр управления сетями и общим доступом».
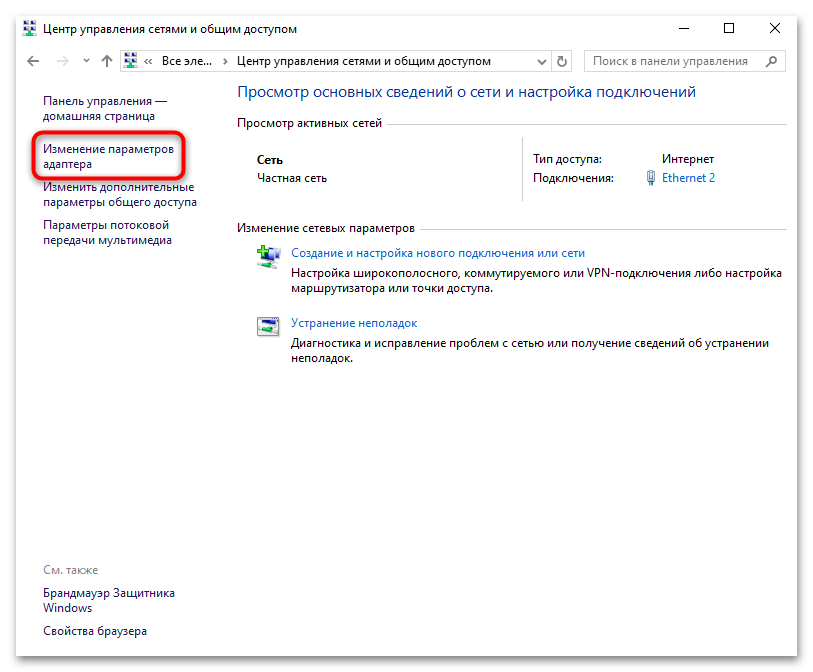
- В открывшемся окне кликните по строке «Изменение параметров адаптера».
- Далее в списке доступных соединений найдите активное и кликните по нему правой кнопкой мыши, затем из контекстного меню выберите пункт «Свойства».
- В списке компонентов выделите строку «IP версии 4 (TCP/IPv4)» и щелкните по кнопке «Свойства».
- Чтобы получить все сетевые данные автоматически, отметьте соответствующие пункты для IP-адреса и DNS-сервиса, затем сохраните настройки.
- Если требуется ручная настройка, выберите опцию «Использовать следующий IP-адрес», после чего поля ниже станут активными. Останется прописать необходимые данные: IP, маску подсети, основной шлюз. То же самое можно проделать и с DNS-серверами. Если изменения были внесены, не забудьте сохранить настройки.
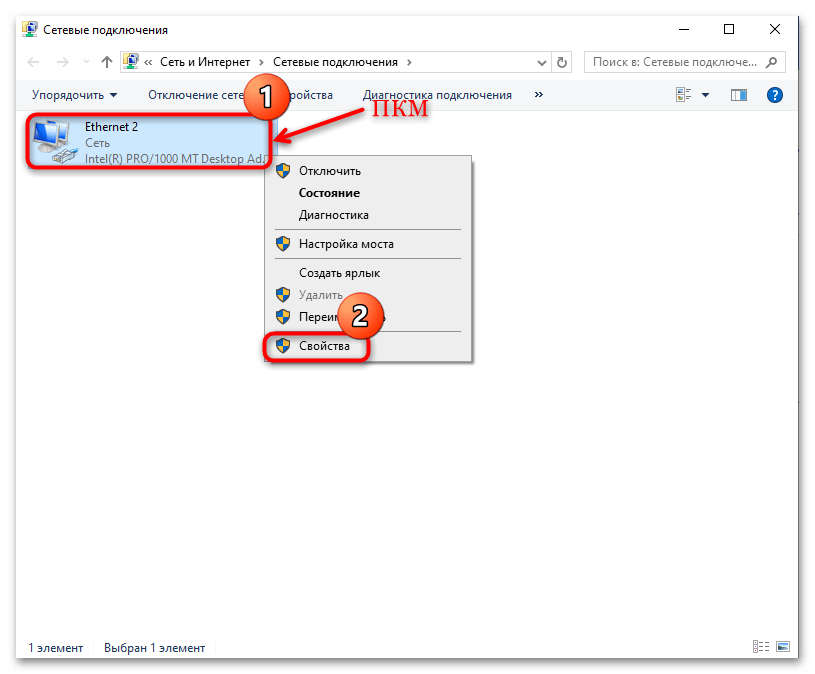
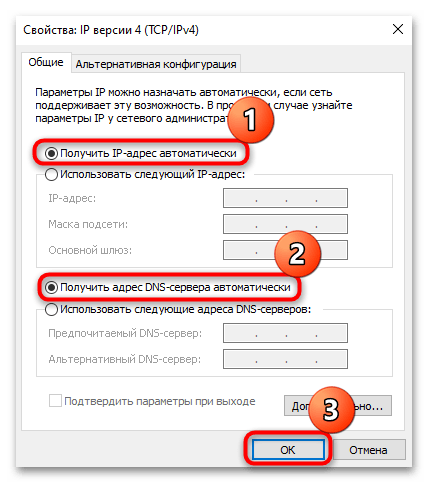
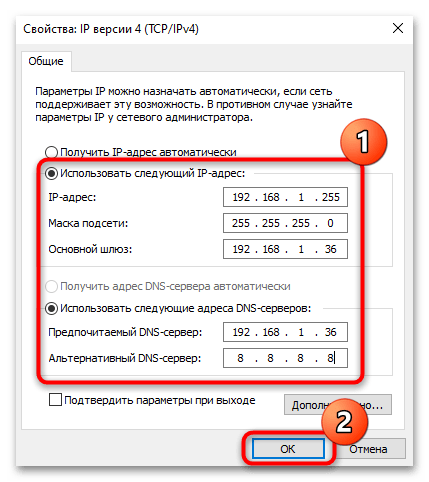
Если надо настроить сетевой протокол IPv6, проделайте с ним то же самое: в окне со свойствами подключения выделите его, нажмите на кнопку «Свойства» и действуйте аналогичным с инструкцией выше образом.
Способ 3: «Командная строка»
Вручную изменить статический IP-адрес, зная его данные, можно и более простым способом – с помощью специальной команды.
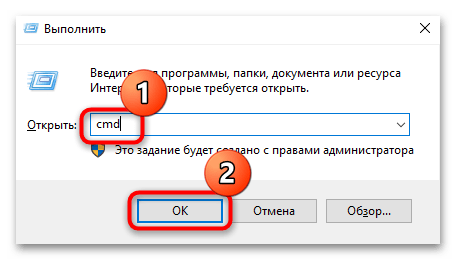
- Запустите «Командную строку» от имени администратора. Для этого можете использовать строку системного поиска или диалоговое окно «Выполнить» (нажатие на клавиши «Win + R») и команду
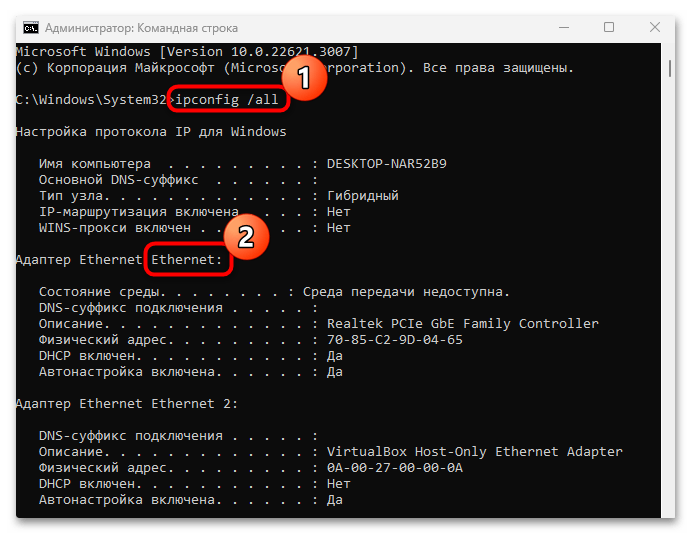
cmd, после чего нажмите на кнопку «ОК» или клавишу «Enter». - Далее нужно узнать конфигурации сетевых адаптеров: введите команду
ipconfig /allи выполните ее, нажав на клавишу «Enter». В отобразившемся списке найдите тот адаптер, для которого надо настроить IP. - Вставьте команду, задающую новые параметры для IP-адреса, где под «Ethernet» следует использовать название вашего адаптера, а дальше – уникальные пользовательские данные IP. Нажмите на клавишу ввода, чтобы выполнить ее.
netsh interface ip set address name="Ethernet" static 192.168.1.10 255.255.255.0 192.168.1.1
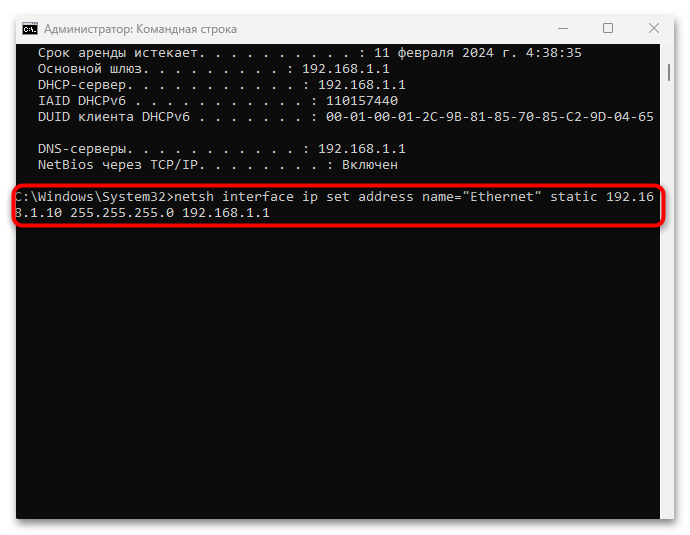
Таким образом, с помощью одной лишь команды получится быстро изменить и настроить статический IP-адрес. Все же стоит упомянуть и команды, с помощью которых меняются и DNS для предпочтительного и дополнительного адреса, где вместо «Ethernet» прописывается название вашего сетевого адаптера и цифры, свойственные серверам:
netsh interface ip set dns name="Ethernet" source="static" address="адрес_DNS-сервера" и
netsh interface ip add dns name="Ethernet" address="адрес_DNS-сервера" index=2.
Наша группа в TelegramПолезные советы и помощь
Сетевые & параметры Интернета в Windows позволяют управлять сетевыми подключениями и параметрами Интернета. Независимо от того, требуется ли подключение к Wi-Fi, настройка VPN или устранение неполадок с сетью, эти параметры предоставляют все необходимые параметры, чтобы обеспечить беспроблемную работу в Интернете. Изучите различные разделы, чтобы настроить параметры сети и обеспечить надежное подключение.
Чтобы получить доступ к этим параметрам, можно:
-
Нажмите кнопку Пуск и введите параметры. Выберите Параметры > Сеть & Интернет .
-
Щелкните правой кнопкой мыши значок Сеть или Wi-Fi на панели задач, а затем выберите Параметры сети и Интернета.
Перейдите в раздел Сетевые & параметры Интернета
Кроме того, параметры Сети & Интернет позволяют быстро проверка состояние сетевого подключения. Состояние сетевого подключения отобразится в верхней части окна.
Поиск своего IP-адреса
Совет: Чтобы быстро просмотреть сведения о подключенной сети, перейдите в раздел Сеть & параметры Интернета , а затем выберите Свойства рядом с подключенной сетью.
-
Перейдите в раздел Сеть & параметры Интернета, а затем выберите соответствующий параметр:
-
Для Wi-Fi подключения выберите Wi-Fi, а затем выберите Wi-Fi сеть, к которому вы подключены.
-
Для подключения Ethernet выберите Ethernet.
-
-
В разделе Свойства найдите IP-адрес, указанный рядом с IPv4-адресом.
Установление лимита трафика
Windows может контролировать соблюдение лимита тарифного плана и находить способы уменьшения объема используемых данных. После того как вы настроите ограничение на данные, мы соведем вам, когда вы приближаетесь к нему и когда вы превысите его.
-
Перейдите в раздел Сетевые & параметры Интернета.
-
Выберите Использование данных рядом с состоянием сетевого подключения для сети, к которому вы подключены.
-
Чтобы ввести ограничение на данные для этой сети, выберите Ввести ограничение, выберите тип ограничения для плана данных, введите другие сведения об ограничении, а затем нажмите кнопку Сохранить.
Включение и выключение режима «в самолете»
Режим «в самолете » позволяет быстро выключить все беспроводные подключения на компьютере. Некоторые примеры беспроводной связи: Wi-Fi, сотовая связь, Bluetooth и NFC.
Включить или выключить режим в самолете можно двумя способами:
-
Выберите значок Сеть, громкость или батарея на панели задач, а затем выберите Режим в самолете.
-
Перейдите в раздел Сеть & Интернет
параметры > режиме в самолете, а затем выберите переключатель Вкл. или Выкл.
Примечание: В режиме «в самолете» сохраняются параметры, которые вы использовали в прошлый раз. При включении режима «в самолете» Windows запоминает, был ли у вас Wi-Fi или Bluetooth в последний раз, и сохраняет этот параметр, чтобы Wi-Fi или Bluetooth снова были включено. Если вы хотите вернуться к параметрам по умолчанию с отключенными Wi-Fi и Bluetooth, отключите их, пока вы находитесь в режиме «в самолете» — они останутся отключенными при следующем использовании режима «в самолете». Они также останутся вне, когда вы выходите из режима самолета.
Сделать сеть общедоступной или частной
При первом подключении к сети в Windows 11 она по умолчанию устанавливается как общедоступная. Это рекомендуемый параметр. Однако его можно задать как общедоступный или частный в зависимости от сети и того, что вы хотите сделать:
-
Общедоступная сеть (рекомендуется). Используйте его для сетей, к которые вы подключаетесь дома, на работе или в общественном месте. В большинстве случаев его следует использовать. Ваш компьютер будет скрыт от других устройств в сети. Таким образом, вы не можете использовать компьютер для общего доступа к файлам и принтерам.
-
Частная сеть. Ваш компьютер можно обнаружить на других устройствах в сети, и вы можете использовать его для общего доступа к файлам и принтерам. Вы должны знать и доверять людям и устройствам в сети.
Изменение сети на общедоступную или частную
Совет: Чтобы быстро просмотреть сведения о подключенной сети, перейдите в раздел Сеть & параметры Интернета , а затем выберите Свойства рядом с подключенной сетью.
-
Перейдите в раздел Сеть & параметры Интернета , а затем выберите соответствующий параметр:
-
Для Wi-Fi подключения выберите Wi-Fi, а затем выберите Wi-Fi сеть, к которому вы подключены.
-
Для подключения Ethernet выберите Ethernet.
-
-
На экране сети в разделе Тип профиля сети выберите Общедоступный (рекомендуется) или Частный.
Изменение параметров TCP/IP
Протокол TCP/IP определяет порядок обмена данными между вашим компьютером и другими компьютерами. Чтобы упростить управление параметрами TCP/IP, рекомендуется использовать протокол DHCP. DHCP автоматически назначает IP-адреса устройствам в сети, если сеть поддерживает их. Если вы используете DHCP, вам не нужно изменять параметры TCP/IP при перемещении устройства в другое расположение.
Если вам нужно обновить назначение IP-адресов устройства, выполните следующие действия.
-
Перейдите в раздел Сеть & параметры Интернета, а затем выполните одно из следующих действий.
-
Для Wi-Fi сети выберите Wi-Fi > Управление известными сетями. Выберите сеть, для которой необходимо изменить параметры.
-
Для сети Ethernet выберите Ethernet, а затем выберите сеть Ethernet, к которой вы подключены.
-
-
Рядом с полем Назначение IP-адресов выберите Изменить.
-
В разделе Изменить параметры IP выберите параметр Автоматически (DHCP) или Вручную.
-
Если выбрать параметр Автоматически (DHCP), параметры IP-адресов и адрес DNS-сервера устанавливаются автоматически маршрутизатором или другой точкой доступа (рекомендуется).
-
Если выбрать параметр Вручную, вы сможете вручную задать параметры IP-адресов и адрес DNS-сервера.
-
-
В разделе Изменить параметры IP выберите параметр Вручную и включите параметр IPv4.
-
Чтобы указать IP-адрес, в полях IP-адрес, маска подсети и шлюз введите параметры IP-адреса.
-
Чтобы указать адрес DNS-сервера, в полях Предпочитаемый DNS-сервер и Альтернативный DNS-сервер введите адреса основного и дополнительного DNS-серверов.
-
Чтобы указать, нужно ли использовать зашифрованное (DNS через HTTPS) или незашифрованное соединение с указанным DNS-сервером или серверами, для DNS по ПРОТОКОЛУ HTTPS выберите нужный параметр:
Примечание: Параметр DNS через HTTPS недоступен в Windows 10.
-
Выкл. Все запросы DNS будут отправляться на DNS-сервер без шифрования в виде открытого текста по протоколу HTTP.
-
В (автоматический шаблон): запросы DNS шифруются и отправляются на DNS-сервер по протоколу HTTPS. Запросы DNS будут использовать параметры по умолчанию для автоматического шаблона или пытаться обнаружить их автоматически.
-
В (шаблон вручную): запросы DNS шифруются и отправляются на DNS-сервер по протоколу HTTPS. Они будут использовать параметры, которые вы вводите в поле шаблона DNS через HTTPS .
-
Если вы используете DNS по протоколу HTTPS (автоматический или ручной шаблон), включите или выключите функцию Fallback на обычный текст :
-
Если он включен, dns-запрос будет отправлен в незашифрованном виде, если он не может быть отправлен по протоколу HTTPS.
-
Если он отключен, запрос DNS не будет отправлен, если его невозможно отправить по протоколу HTTPS.
-
-
-
После внесения необходимых изменений, нажмите кнопку Сохранить.
-
В разделе Изменение параметров IP-адресов сети или Изменение параметров IP-адреса выберите Вручную, а затем включите протокол IPv6.
-
Чтобы указать IP-адрес, в полях IP-адрес, Длина префикса подсети и Шлюз введите параметры IP-адреса.
-
Чтобы указать адрес DNS-сервера, в полях Предпочитаемый DNS-сервер и Альтернативный DNS-сервер введите адреса основного и дополнительного DNS-серверов.
-
Чтобы указать, нужно ли использовать зашифрованное (DNS через HTTPS) или незашифрованное соединение с указанным DNS-сервером или серверами, для DNS по ПРОТОКОЛУ HTTPS выберите нужный параметр:
Примечание: Параметр DNS через HTTPS недоступен в Windows 10.
-
Выкл. Все запросы DNS будут отправляться на DNS-сервер без шифрования в виде открытого текста по протоколу HTTP.
-
В (автоматический шаблон): запросы DNS шифруются и отправляются на DNS-сервер по протоколу HTTPS. Запросы DNS будут использовать параметры по умолчанию для автоматического шаблона или пытаться обнаружить их автоматически.
-
В (шаблон вручную): запросы DNS шифруются и отправляются на DNS-сервер по протоколу HTTPS. Они будут использовать параметры, которые вы вводите в поле шаблона DNS через HTTPS .
-
Если вы используете DNS по протоколу HTTPS (автоматический или ручной шаблон), включите или выключите функцию Fallback на обычный текст :
-
Если он включен, dns-запрос будет отправлен в незашифрованном виде, если он не может быть отправлен по протоколу HTTPS.
-
Если он отключен, запрос DNS не будет отправлен, если его невозможно отправить по протоколу HTTPS.
-
-
-
После внесения необходимых изменений, нажмите кнопку Сохранить.
Примечание: Чтобы установить IPv4, запустите командную строку с правами администратора, введите netsh interface ipv4 install, а затем нажмите клавишу ВВОД.
-
Home
-
Partition Magic
- How to Change IP Address on Windows 10 [Step-by-Step Guide]
By Ariel | Follow |
Last Updated
Sometimes, we have to change IP address out of many reasons. How to change IP address on Windows 10? If you are also searching for the answer, you can follow this Windows 10 guide provided by MiniTool to change IP address.
Before You Do
How to change your IP address? In order to change IP address Windows 10 smoothly, it’s required to log in to Windows 10 using an administrator account. Besides, you need to find the IP address of your router and computer. To do so, follow the steps below.
Step 1. Press the Win + I keys to open the Settings app and go to the Network & Internet section.
Step 2. In the Status tab, scroll down the right sidebar and click on the View your network properties option.
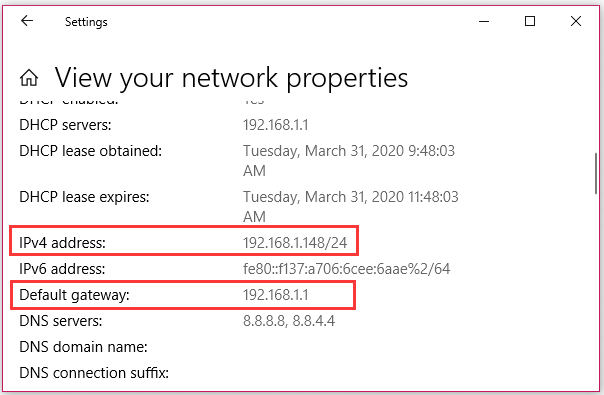
Step 3. Now, scroll down the new screen to find the Default gateway and IPv4 address sections. The router’s IP address is next to the Default gateway and the IPv4 address identifies your computer. Remember the IP addresses you have found.
Now, let’s see how to change IP address Windows 10 in the following part.
How to Change My IP Address in Windows 10
Here we will walk you through 2 methods. Each method will be discussed in detail. Now, let’s start learning how to change IP address Windows 10.
Method 1. Change IP Address Windows 10 Using the Settings App
The first and simplest way to change IP address is to use the Settings app. Here’s a full guide for you:
Step 1. Open the Settings app by pressing Win + I keys and then click on Network & Internet.
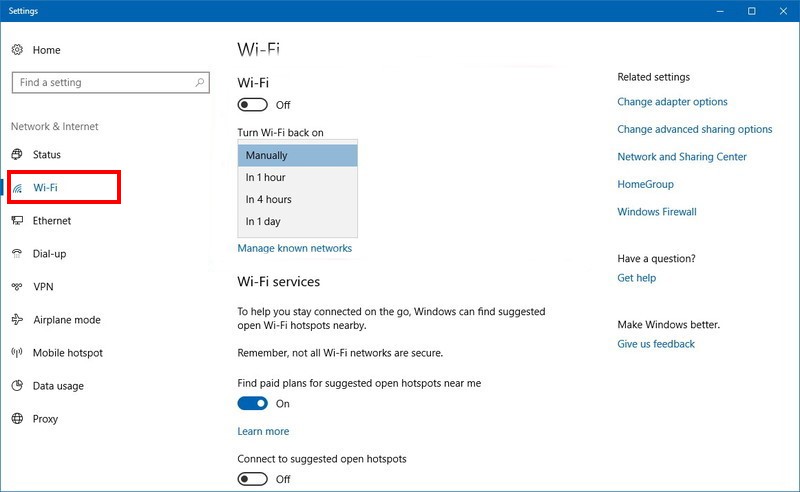
Step 2. In the pop-up window, select the network type based on your situation. If your device connects to the Internet through a wireless card, select the Wi-Fi section. If your device is using a wired connection, select the Ethernet section.
Step 3. Scroll down the right sidebar to locate the IP settings section and click on the Edit button.
Step 4. In the pop-up dialog box, select Manual from the drop-down menu and enable the IPv4 switch.
Tip: If you want the Windows 10 IP address is to be assigned by the router automatically, you can select Automatic (DHCP) option from the drop-down menu.
Step 5. Enter all the required details below including IP address, Subnet prefix length, Gateway, etc.
IP address: It refers to the static IP address that you want to use.
Subnet prefix length: It refers to the prefix length that determines the size of the subnet.
Gateway: It refers to the IP address of your router.
The Preferred DNS and Alternate DNS settings are not mandatory to enter. The setting will be automatically assigned by your router if they are blank.
Step 6. After the details are entered, click on the Save button to change IP address.
Method 2. Change IP Address Windows 10 in Control Panel
In addition to the above method, you can change IP address Windows 10 through the Control Panel. Here’s how to do that:
Step 1. Type control in the search window and select the Control Panel app from the best match.
Step 2. Change the View by to Category, and then click on View network status and tasks under the Network and Internet section.
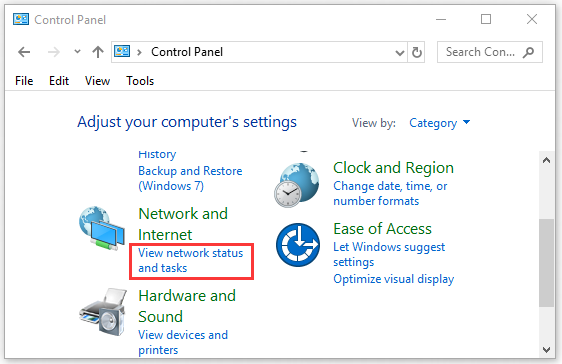
Step 3. Navigate to the View your active networks tab and click on your Internet connection next to it.
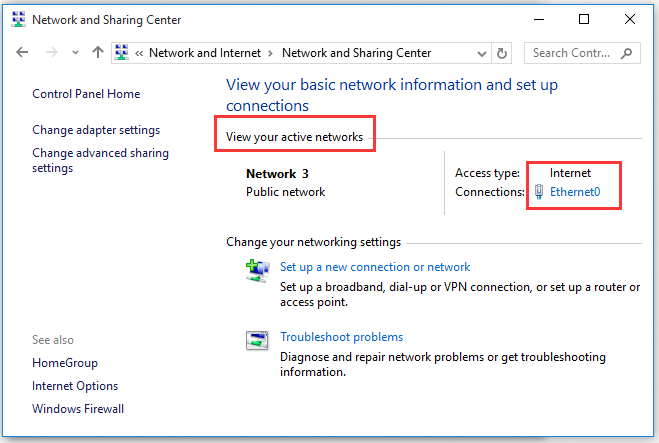
Step 4. In the pop-up window, click on Properties and then select the Internet Protocol Version 4 or IPv6, which depends on the IP address that you’re ready to change.
Step 5. Click on the Properties button.
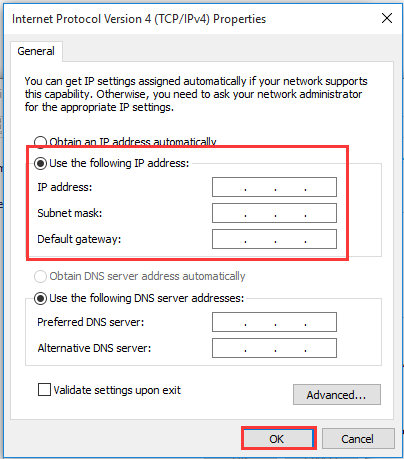
Step 6. In the Properties window, select the Use the following IP address option if you want to set a static IP address.
Step 7. Then you need to enter all the required details manually including IP address, subnet mask, and Default gateway. After that, click on OK to save the changes and exit the window.
How to change your IP address in Windows 10? I believe that already have known detailed steps. Now, it’s your turn to have a try.
About The Author
Position: Columnist
Ariel has been working as a highly professional computer-relevant technology editor at MiniTool for many years. She has a strong passion for researching all knowledge related to the computer’s disk, partition, and Windows OS. Up till now, she has finished thousands of articles covering a broad range of topics and helped lots of users fix various problems. She focuses on the fields of disk management, OS backup, and PDF editing and provides her readers with insightful and informative content.
How to Change IP address in Windows 10: IP address is the unique numerical label each device possesses on any particular computer network. This address is used to send and receive messages between the devices on a network.
The dynamic IP address is provided by the DHCP server (your router). A device’s dynamic IP address changes every time it connects to the network. The static IP address, on the other hand, is provided by your ISP and remains the same until it manually changes by the ISP or the administrator. Having dynamic IP addresses reduces the risk of being hacked than having static IP addresses.

On a local network, you might want to have resource sharing or port forwarding. Now, both of these require a static IP address to work. However, the IP address assigned by your router is dynamic in nature and will change every time you restart the device. In such a situation, you will need to manually configure a static IP address for your devices. There are many ways to do it. Let’s check them out.
Table of Contents
Make sure to create a restore point just in case something goes wrong.
Method 1: USE CONTROL PANEL TO CHANGE IP ADDRESS
1.Use the search field beside the windows icon on the taskbar and search for the control panel.
2.Open control panel.
3.Click on ‘Network and Internet’ and then on ‘Network and sharing center’.

4.Click on ‘Change adapter settings’ on the left side of the window.

5.Network connection windows will open.

6.Right-click on the relevant network adapter and click on properties.
7.In the networking tab, select ‘Internet Protocol Version 4 (TCP/IPv4)’.
8.Click on Properties.
9.In the IPv4 Properties window, select the ‘Use the following IP address’ radio button.
10.Enter the IP address you want to use.
11.Enter the subnet mask. For a local network that you use at your home, subnet mask would be 255.255.255.0.
12.In the Default gateway, enter your router’s IP address.
13.In the Preferred DNS server, enter the IP address of the server which provides DNS resolutions. It is usually your router’s IP address.
14.You can also add an alternate DNS server to connect to in case your device can’t reach the preferred DNS server.
15.Click on OK to apply your settings.
16.Close the window.
17.Try navigating a website to see if it works.
This how you can easily Change IP Address in Windows 10, but if this method doesn’t work for you then make sure to try the next one.
Method 2: USE COMMAND PROMPT TO CHANGE IP ADDRESS
1.Press Windows Key + X then select Command Prompt(Admin).
2.To see your current configurations, type ipconfig /all and hit Enter.

3.You will be able to see the details of your network adapter configurations.

4.Now, type:
netsh interface ip set address name=”yourNetworkAdapter” static 10.20.30.40 255.255.255.0 2.4.6.8
Note: These three addresses being your device’s static IP address you want to assign, subnet mask, and default getaway address, respectively.

5.Press enter and this will assign a static IP address to your device.
6.To set your DNS server address type the following command and hit Enter:
netsh interface ip set dns name=”yourNetworkAdapter” static 10.20.30.1
Note: The last address being that of your DNS server.

7.To add an alternate DNS address, type
netsh interface ip add dns name=”alternateServer” 8.8.8.8 index=2
Note: This address will be the alternate DNS server address.

8.Try navigating a website to see if it works.
Method 3: USE POWERSHELL TO CHANGE IP ADDRESS
1.Press Windows Key + S to bring up the Search then type PowerShell.
2.Right-click on Windows PowerShell shortcut and select ‘Run as administrator’.
3.To see your current IP configurations, type Get-NetIPConfiguration and hit Enter.

4.Note down the following details:
InterfaceIndex
IPv4Address
IPv4DefaultGateway
DNSServer
5.To set a static IP address, run the command:
New-NetIPAddress -InterfaceIndex 13 -IPAddress 10.20.30.40 –PrefixLength 24 -DefaultGateway 2.4.6.8
Note: Here, replace InterfaceIndex number and DefaultGateway with the those you noted down in previous steps and IPAddress with the one you want to assign. For subnet mask 255.255.255.0, PrefixLength is 24, you can replace it if you require to with correct bit number for subnet mask.
6.To set DNS server address, run the command:
Set-DnsClientServerAddress -InterfaceIndex 3 -ServerAddresses 10.11.12.13
Or, if you want to add another alternate DNS address then use the command:
Set-DnsClientServerAddress -InterfaceIndex 3 –ServerAddresses 10.11.12.13, 8.8.8.8
Note: Use the relevant InterfaceIndex and DNS server addresses.
7.This how you can easily Change IP Address in Windows 10, but if this method doesn’t work for you then make sure to try the next one.
Method 4: CHANGE IP ADDRESS IN WINDOWS 10 SETTINGS
Note: This method works only for wireless adapters.
1.Press Windows Key + I to open Settings then click on ‘Network & Internet’.

2.Click on Wi-Fi from the left pane and select your required connection.

3.Scroll down and click on Edit button under IP settings.

4.Select ‘Manual’ from the drop-down menu and toggle on the IPv4 switch.

5.Set IP address, Subnet prefix length (24 for subnet mask 255.255.255.0), Gateway, Preferred DNS, Alternate DNS and click on Save button.
Using these methods, you can easily set a static IP address for your computer.
Recommended:
- How to Setup Gmail in Windows 10
- Add a Printer in Windows 10 [GUIDE]
- Microsoft Word has Stopped Working [SOLVED]
- How to Disable Google Chrome PDF Viewer
I hope the above steps were able to help you Change IP address in Windows 10 but if you still have any questions regarding this guide then feel free to ask them in the comment’s section.
Have you ever wondered how to change the IP address in Windows 10 or Windows 11? Do you want to learn how to do that from the Settings app or the Control Panel? Maybe you’re a command-line fan and want to learn how to change the IP address from Command Prompt or PowerShell? Read on and find out how all of these are done in both Windows 11 and Windows 10:
NOTE: To be able to change your IP address in either Windows 10 or Windows 11, you must log in using an administrator account. Also, you should already know what IP addresses and subnet masks are, how to find what your local IP is, and how to find the IP address of your router.
1. How to change the IP address in Windows 10 using the Settings app
Because it relies on the visual interface of the operating system, this is probably the easiest method for changing the IP address of your Windows 10 computer or device. First, open the Settings app: a quick way to do that is to push the Settings button from the Start Menu or to press Windows + I on your keyboard simultaneously. In the Settings app, open the Network & Internet category.
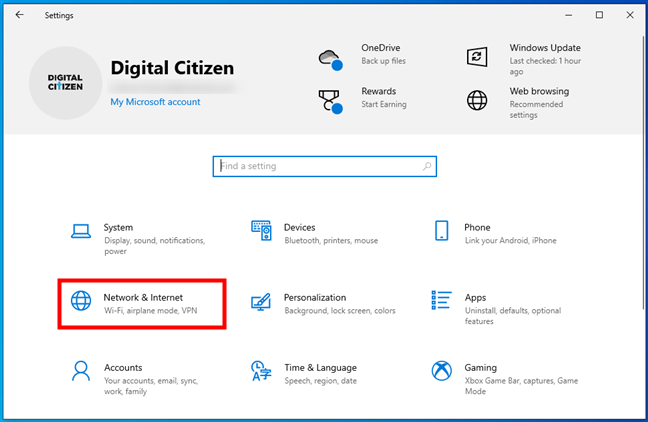
The Network & Internet settings in Windows 10
On the left sidebar, select your network type. If you’re using a wireless card, click or tap on Wi-Fi. If you’re using a wired connection, go to Ethernet. On the right side of the window, click or tap on the name of your network connection.
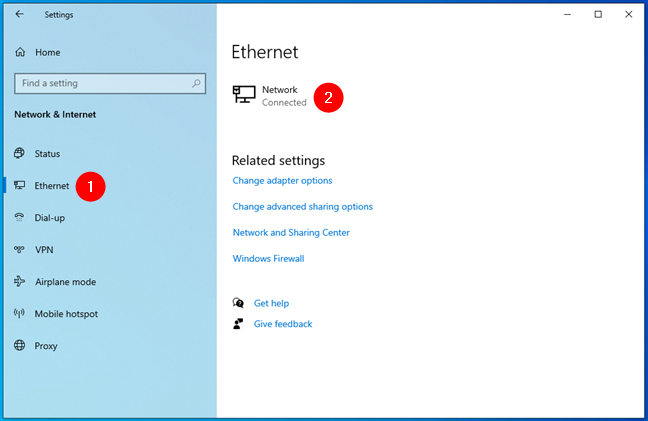
The currently connected network
Scroll down on your network connection details page until you find the section called IP settings. Then, click or tap on Edit, under IP assignment.
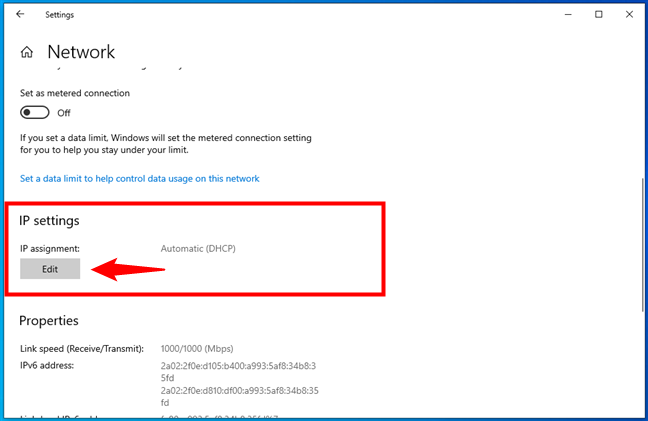
The Edit button from the IP assignment area
The Settings app now shows the “Edit IP settings” dialog. This is where you can change the IP address of your computer or device. If you want the IP address of your Windows 10 PC to be assigned automatically by your router, select Automatic (DHCP). This is also called a dynamic IP address.
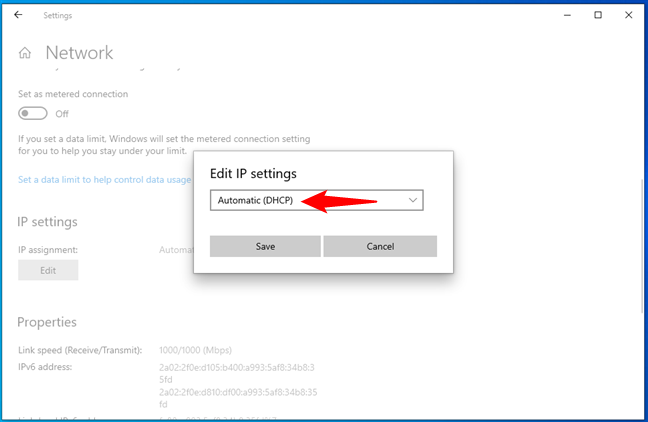
Edit IP settings to get an IP address automatically via DHCP
If you want to set your own static IP address, select Manual and then enable the IPv4 and/or IPv6 switches, depending on what internet protocols you want to use. Note that each of them has its own distinct IP address, so you must enter the required details for both IPv4 and IPv6 if you choose to enable both.
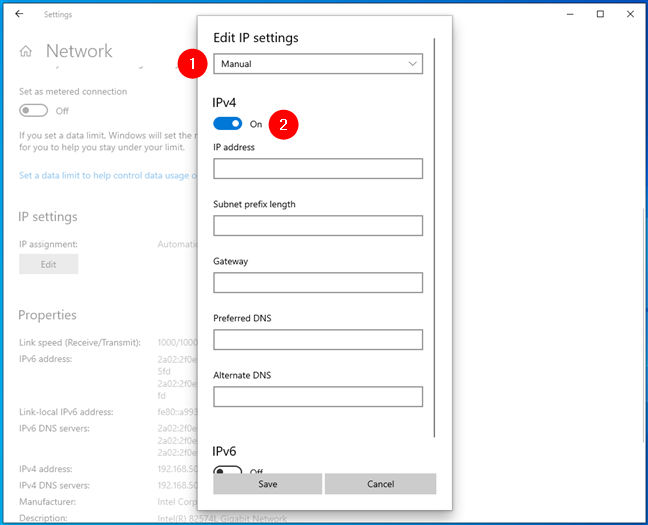
Edit IP settings to change the IPv4 address in Windows 10
To change your IP address to a static one, regardless of whether you set it for your IPv4 or IPv6 protocols, you have to enter the following details:
- IP address: Type the static IP address that you want to use. For example, I want to change the IP address (IPv4) of my Windows 10 PC to 192.168.50.10.
- Subnet prefix length: Type the prefix length that determines the size of the subnet. For example, I configured my router to use a subnet mask of 255.255.255.0, which means that I have to enter a “Subnet prefix length” of 24 (the number of 1 bits in the netmask). If I had a subnet mask of 255.255.0.0, the prefix length would have been 16, and so on.
- Gateway: Type the IP address of your router. In my case, that’s 192.168.50.1.
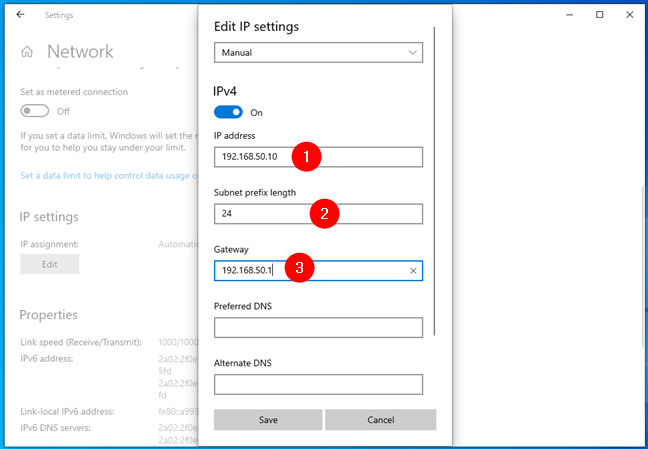
Setting a static IP address in Windows 10
The Preferred DNS and Alternate DNS settings are not mandatory — if you leave them blank, they are automatically assigned by your router. However, if you want to change them too, you can do so. TIP: Here are more ways to change DNS settings in Windows.
Once you’ve entered all the details, click or tap on Save, and Windows 10 changes your IP address.
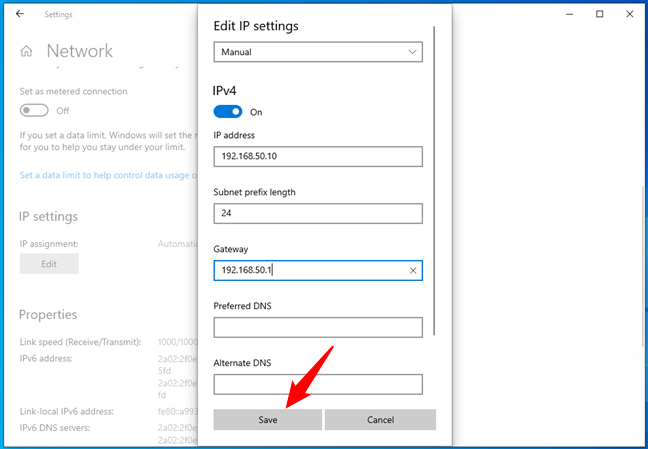
Start using the new IP address in Windows 10
IMPORTANT: If you choose to use a static IP address, ensure all the details you enter are correct; otherwise, your Windows 10 PC loses internet connectivity. If that happens, change your IP address back to Automatic (DHCP) so that your router can change it to something that works.
2. How to change the IP address in Windows 11 using the Settings app
As it involves mainly clicks or taps and anyone can follow its steps, this is likely the easiest way of changing the IP address of your Windows 11 PC. Here’s how it goes:
Open the Settings app: a quick way to do that is to use its Pinned shortcut from the Start Menu or press Windows + I on your keyboard. Once you’ve opened it, select Network & internet on the left sidebar.
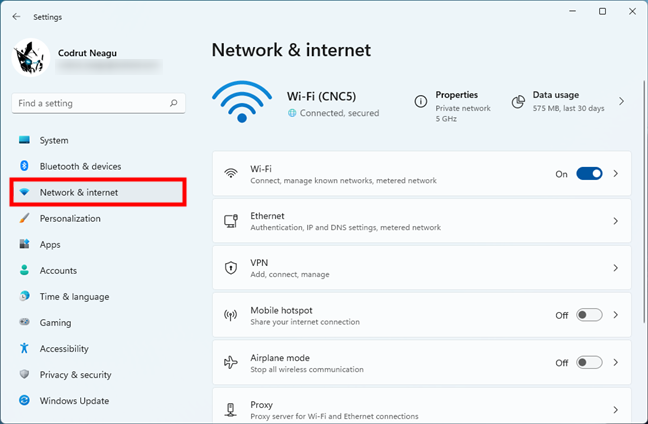
The Network & internet settings in Windows 11
On the right, click or tap on the type of network you’re currently using. If you connect to the internet (or local area network) using a wireless card, select Wi-Fi. If you’re accessing the internet (or LAN) using a wired connection, click or tap on Ethernet.
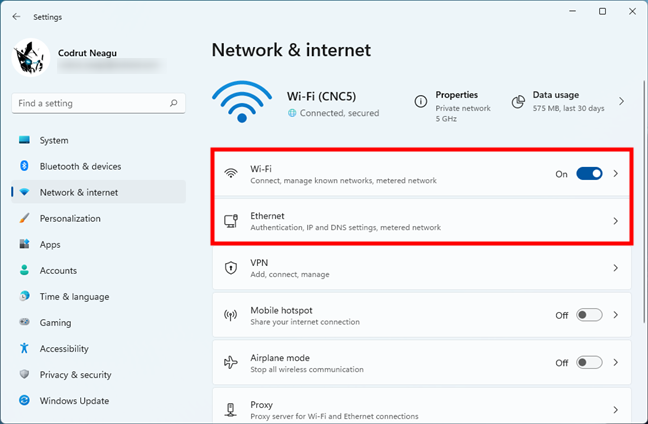
Wi-Fi or Ethernet network connection
Next, click or tap on the properties entry of your network connection.
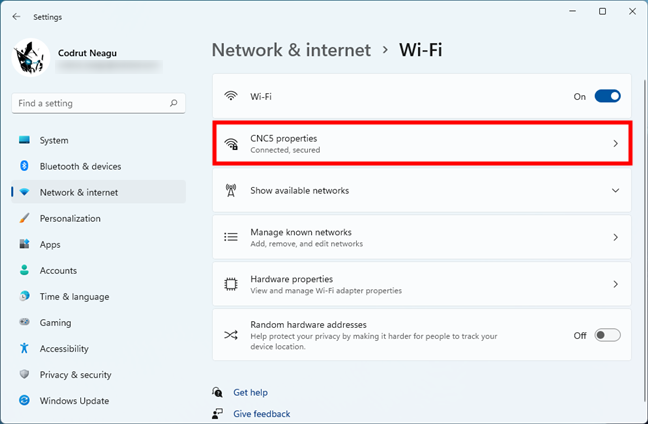
The network’s properties
This opens a page filled with details about the selected network connection. On it, scroll down and click or tap the Edit button next to IP assignment.
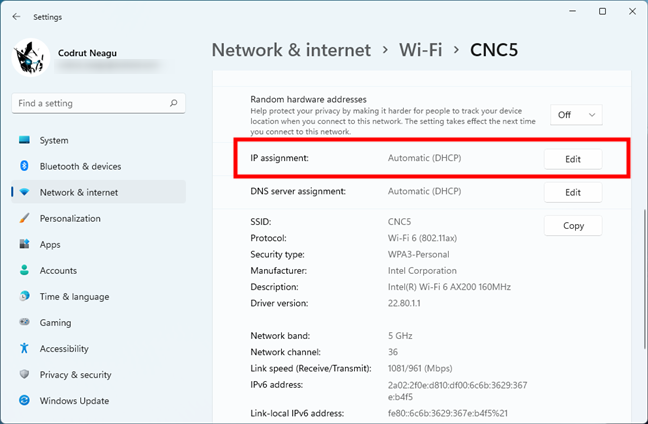
The Edit button next to IP assignment
As a result, the Settings app loads a dialog called “Edit network IP settings,” where you can set the IP address of your Windows 11 PC. If you want to use a dynamic IP address assigned automatically by the router, choose Automatic (DHCP).
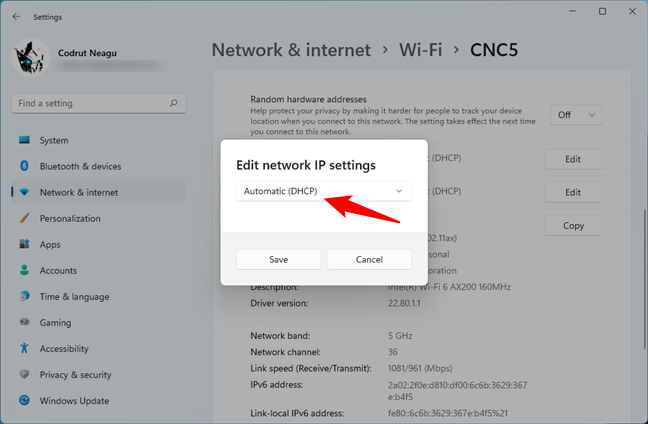
Let Windows 11 get an IP address automatically via DHCP
If you want to set a static IP address for your Windows 11 computer, select Manual. Then, turn on the IPv4 and/or IPv6 switches, depending on the internet protocols you intend to use. Keep in mind that each one needs a distinct IP address, so you’ll have to specify details for both IPv4 and IPv6 if you decide to enable both.
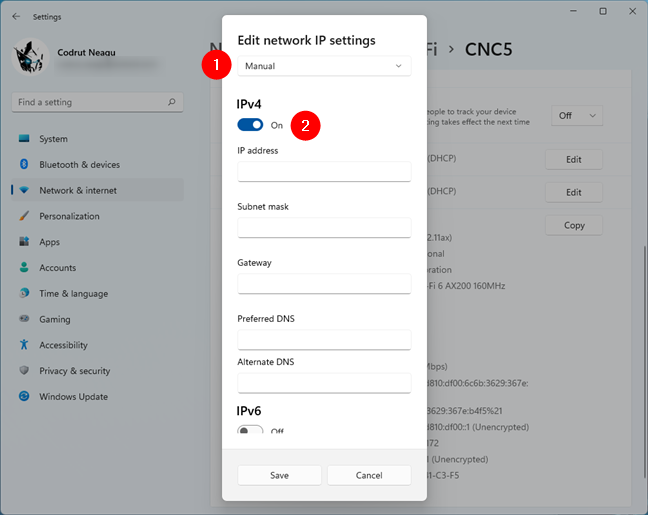
Edit IP settings to change the IPv4 address in Windows 11
In order to set a static IP address for either IPv4 or IPv6, you have to provide the next details:
- IP address: Enter the static IP address you want to use. For instance, I’m changing the IP address (IPv4) of my Windows 11 computer to 192.168.50.10.
- Subnet mask: Type the subnet mask used by your network. For example, I’ve configured my mesh Wi-Fi to use a 255.255.255.0 subnet mask, which means that this is the number sequence I need to enter.
- Gateway: Specify the IP address of your router or mesh Wi-Fi. In my case, that’s 192.168.50.1.
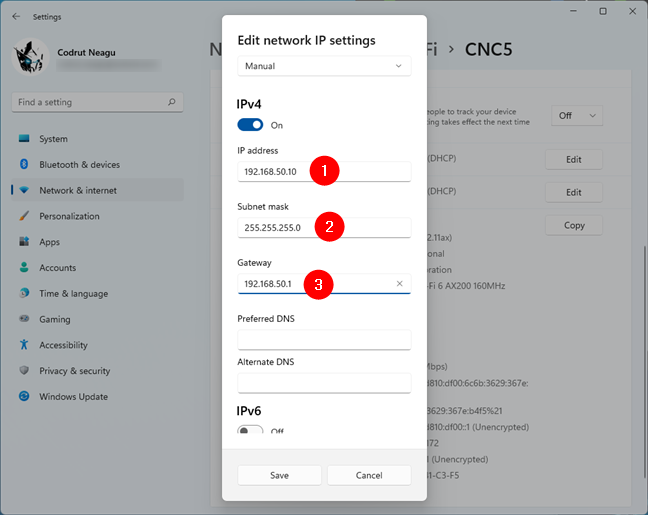
Setting a static IP address in Windows 11
These are all the settings you need to configure in order to change your IP address in Windows 11. However, there are two more options in the “Edit network IP settings” dialog: Preferred DNS and Alternate DNS. While not necessarily required (if they’re blank, your router automatically assigns them), you can change them, too, if you want. Here are more details about DNS: What is DNS? How is it useful?.
Once you’ve finished editing your network IP settings, click or tap the Save button, and your IP address is immediately changed in Windows 11.
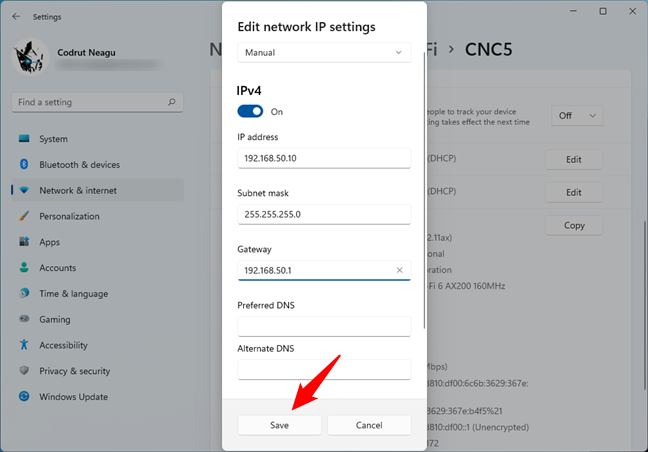
How to set a static IP address in Windows 11
IMPORTANT: If you’ve changed your IP address and your Windows 11 PC lost internet connectivity, you’ve probably entered an incorrect IP address. In that case, switch back to using Automatic (DHCP) to let your router assign a new one for your computer, one that works.
3. How to change the IP address in Windows using the Control Panel
In both Windows 11 and Windows 10, you can also change your IP address from the Control Panel. Open the Control Panel and click or tap on “View network status and tasks” under “Network and Internet.”
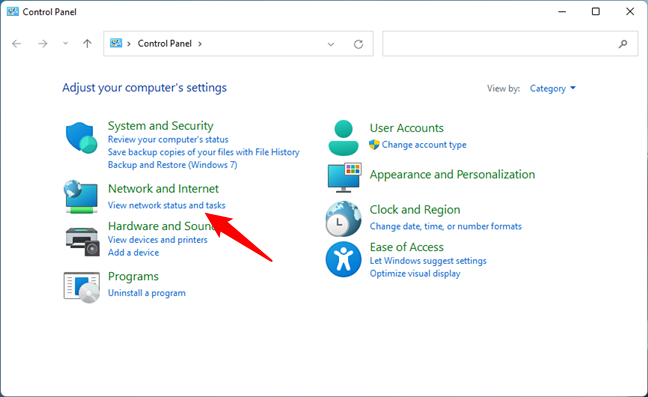
View network status and tasks in Control Panel
In the Network and Sharing Center, click or tap on your internet connection from the “View your active networks” area.
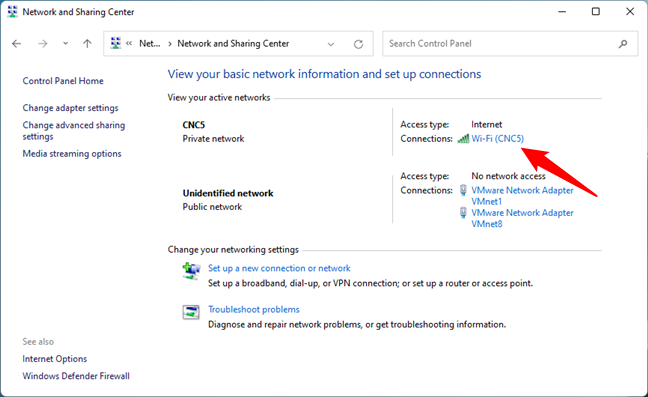
The network connection in use
In your network’s Status window, click or tap on Properties. Then, in the Properties window, select Internet Protocol Version 4 (TCP/IPv4) or Internet Protocol Version 6 (TCP/IPv6), depending on the IP address that you want to change, and press the Properties button. Note that if you want to change both types of IP addresses, you’ll have to repeat the next steps for each of them.
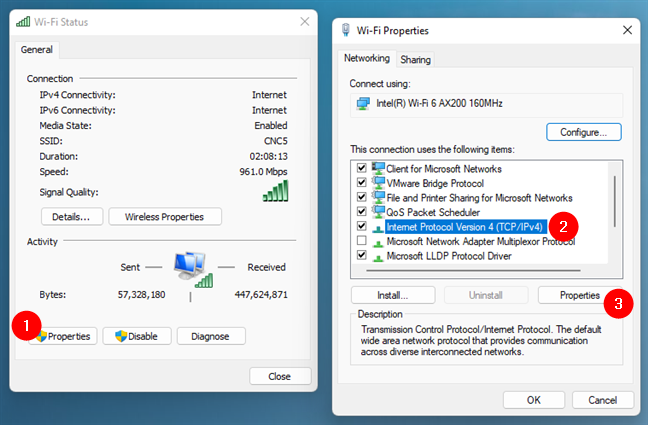
Opening the Properties of Internet Protocol Version 4 (TCP/IPv4)
The previous action opens a window called Internet Protocol Version 4 (TCP/IPv4) Properties or Internet Protocol Version 6 (TCP/IPv6) Properties, depending on what you chose earlier. This is where you can change your IP address:
If you want to use a dynamic IP address that’s automatically assigned to your Windows PC by your router, select “Obtain an IP address automatically.” Then, click or tap on OK and close all the windows you’ve opened previously.
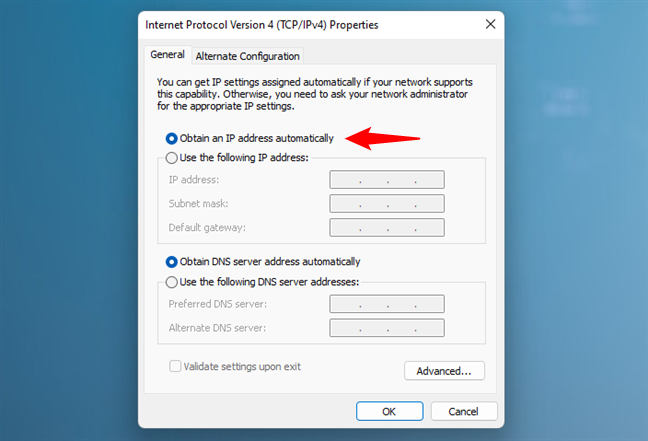
Obtain an IP address automatically via DHCP
If you want to set a static IP address for your network adapter, select “Use the following IP address.” Then, enter the required details manually: IP address, Subnet mask, and Default gateway, just like we’ve shown you in the previous chapters of this guide.
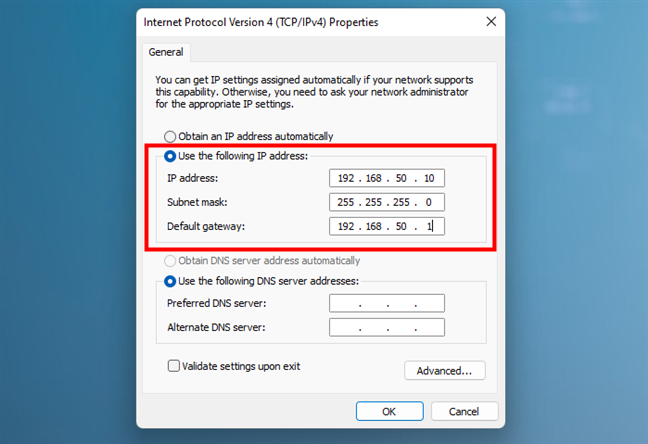
Use Control Panel to set a static IP address in Windows
Save your new IP address settings by clicking or tapping on OK, then close all the windows opened during the process.
4. How to change the IP address in Windows 10 and Windows 11 using commands
You can also change the IP address using any of the command-line tools in Windows. Launch PowerShell, run Command Prompt, or open a tab for any of them in Windows Terminal. Then, regardless of what your favorite console is, run this command:
netsh interface ip show config
In the displayed results, identify the network adapter for which you want to change the IP address. For example, the name of my network interface is Wi-Fi, as shown in the screenshot below.
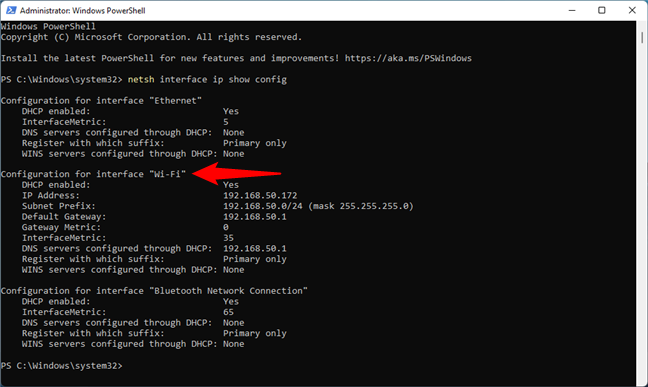
Find the name of your network adapter in CMD or PowerShell
If you want to change the IP address to a dynamic one that’s automatically assigned by your router via DHCP, run the following command:
netsh interface ip set address “Network Interface Name” dhcp
Replace Network Interface Name with the name of your network connection. For example, I need to run:
netsh interface ip set address “Wi-Fi” dhcp
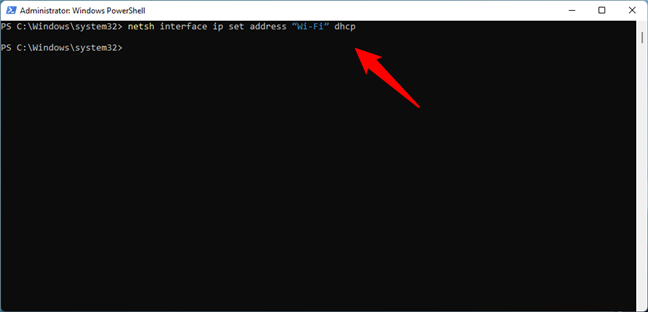
Use this command to set a dynamic IP address
If you want to set a static IP address, run this command:
netsh interface ip set address name= “Network Interface Name” static [IP address] [Subnet Mask] [Gateway]
Replace [IP address] [Subnet Mask] [Gateway] with the ones that match your network configuration. In my case, as I want to change my IP address to 192.168.50.10, I have to run:
netsh interface ip set address name=“Wi-Fi” static 192.168.50.10 255.255.255.0 192.168.50.1
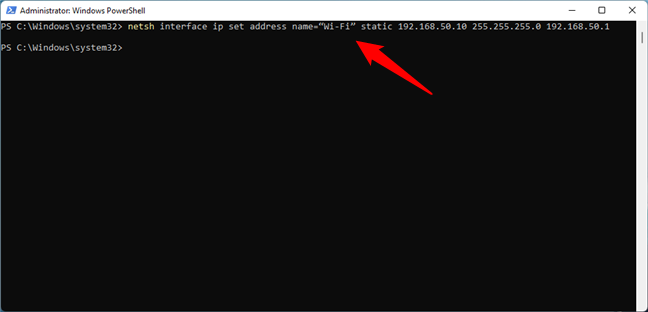
Use this command to set a static IP address in CMD or PowerShell
That’s it!
How do you change the IP address in Windows 10 or Windows 11?
Now you know not just one, but four different methods to change your IP address and set it to dynamic or static. What’s your favorite way of doing this? Do you know other methods? If you do, or if you have something to add to this guide, don’t hesitate to comment.
