
Everyone knows how about the Windows «look», but what if you’re feeling a bit tired of seeing the same old thing each time you switch on your computer?
Windows 10 and the earlier Windows 7 each have good options for tweaking the login screen. Here’s how to access those options and configure the login screen to look just how you want.
Customize the Login Screen on Windows 10
You have two options for customizing the Windows 10 login screen: the message, and the background.
Change the Windows 10 Login Screen Message
Whether you use a desktop, laptop, or even a Surface-like tablet, it’s possible to set a custom login screen message. This has various uses, from delivering a corporate message, to making the end user smile. It might also be useful if your device goes missing, displaying your address to the finder.
Note that the actual login screen itself will remain unchanged. Rather, a new screen will be displayed, with an OK prompt, before the login screen.
Start by opening the Registry Editor by pressing WIN+R and typing regedit. Click OK, then browse the left-hand pane for HKEY_LOCAL_MACHINE. Expand this entry, following the path Software\Microsoft\Windows\Current Version\Policies\System.
Under System, in the right-hand pane, you should see a registry item, legalnoticecaption. Right-click this and select Modify, and under Value Data input a heading for your new message. Some sort of hail, or attention-grabbing phrase, should do.
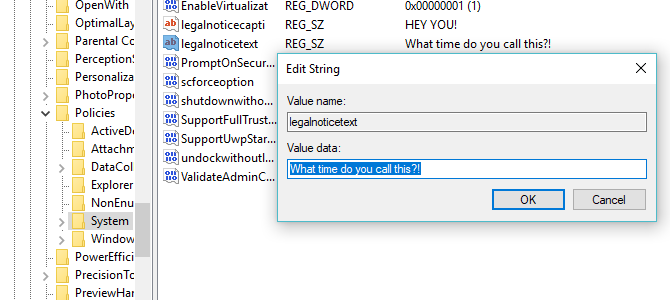
Next, find legalnoticetext. Again, right-click to Modify, this time entering into Value Data a more detailed message.
This might be something like «Log in to access the ACME Plc network» or «If found, please return to…» Ultimately, it needs to be a message that serves some sort of purpose, otherwise there’s not much point in changing anything!
With the message input, click OK to confirm, then exit the Windows Registry. Next, restart Windows to apply the registry tweak.
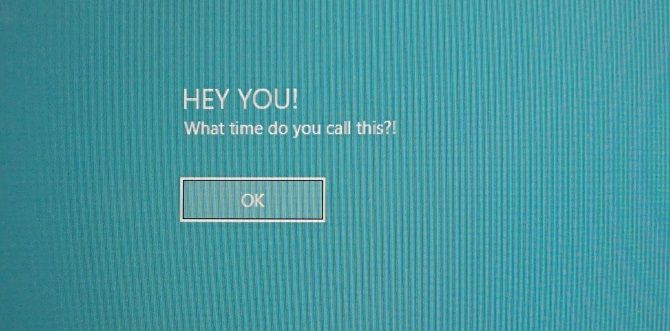
Your new Windows 10 login message should be displayed! You’ll need to click OK to reach the login screen.
It isn’t only this message you can tweak from the Windows Registry. Here are five more registry tweaks you can make in Windows 10.
Add a New Windows 10 Login Screen Background
In addition to the login screen message, you can also change the background.
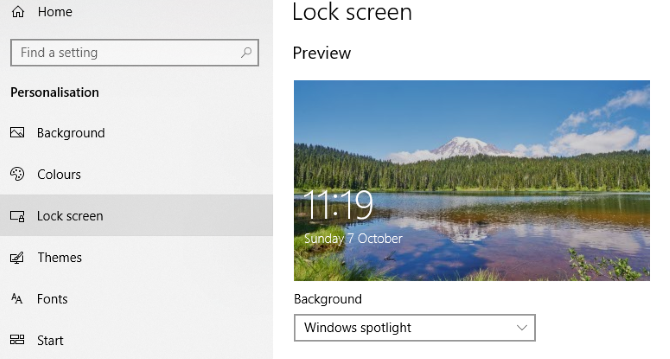
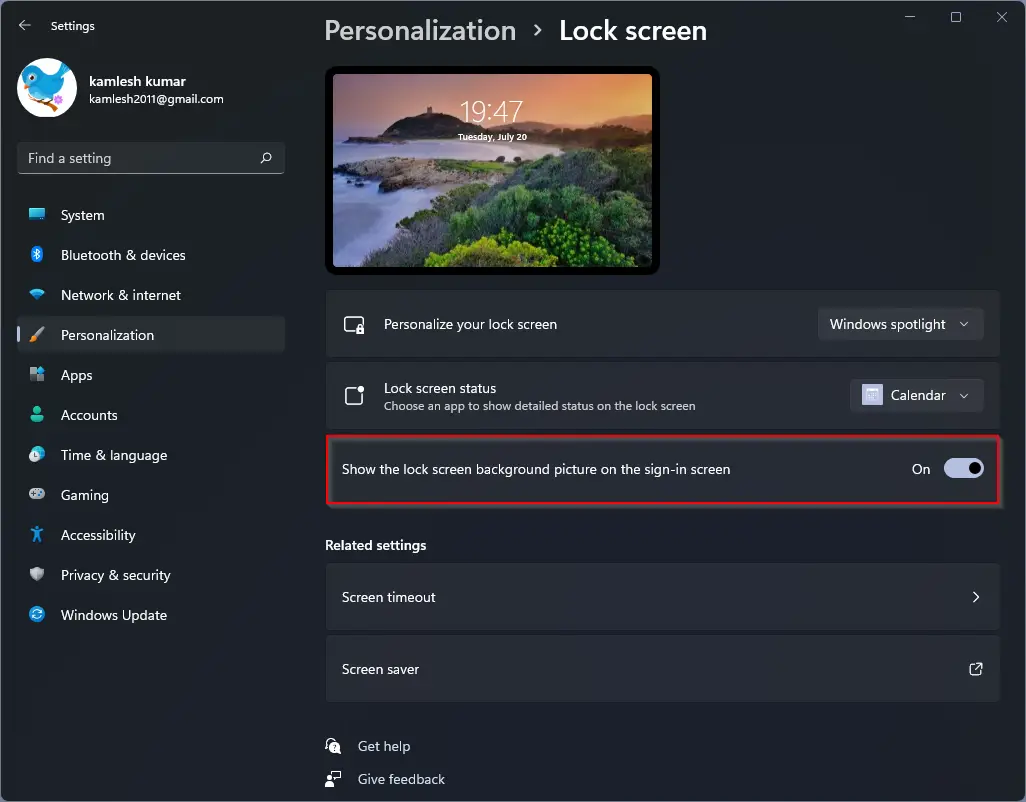
Hit WIN+I to open the Settings screen and select Personalization > Lock Screen. Find the Background drop-down menu and select between Windows spotlight (images from Microsoft), Picture, and Slideshow. The latter two options let you select images from your own library.
Now, as this new image is specifically for the lock screen at this stage, you’ll also need to ensure the Show lock screen background picture on the sign-on screen option is switched to On. Otherwise, the lock screen with display a different image, or remain blank. Once you’re done, close the Settings screen. (Check our full guide to the Windows 10 Settings menu for more.)
Again, you should sign out of Windows to check that the tweak has been applied. If all has gone to plan, you should have a new Windows 10 lock screen background and accompanying message!
Unfortunately, that’s as far as you can go in Windows 10. Tweaks are limited to the login screen message and background; you cannot change the font. However, other Windows 10 tweaks are available, such as switching the desktop wallpaper to an animated background.
Customize the Windows 7 Login Screen
While tweaks are limited on Windows 10, things are a bit more generous on Windows 7. Here, you can customize the login screen message, as well as the login screen font.
Change the Windows 7 Login Screen Message
Intended for Windows 7 32-bit or 64-bit computers with Service Pack 1 installed, the following can be done with or without User Account Control active. You will also need a copy of Resource Hacker, a free tool designed to enable you to modify, add, rename, delete and view resources in Windows EXE files.
While this is downloading, open C:\Windows\System32\en-US\ (note that non-English versions of Windows will have a different folder name, such as \es-ES\ for Spanish) and find winlogon.exe.mui.

Right-click this file and select Properties > Security > Advanced > Owner.
In this window, click Edit and then under Change owner to, select your own login name and click Apply. Click OK to proceed and select OK to exit these windows and the original Properties box.
Once done, return to Properties > Security and select Edit. In the following box, click Add and search for your login name; it should resolve as PCNAME\USERNAME.
Select this, click OK to add the login, and you will be returned to the Security tab. From here, click Advanced > Permissions > Change Permissions, and under Permission Entries select the newly added entry and click Edit.
Select the Full Control checkbox in the Allow column, then click OK, and then Apply to exit.
You should then copy the winlogon.exe.mui to a new location, preferably your desktop.
Next, install Resource Hacker and launch the software from the Windows Start menu by right-clicking and selecting Run as Administrator.
Agree to the UAC notice and when the application has loaded open File > Open.In the Files of type box select All files (*.*), browse to the desktop and load winlogon.exe.mui into Resource Hacker.
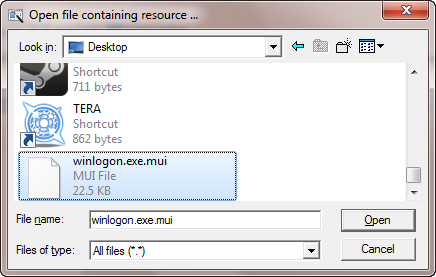
You will see that the tool has a similar interface to the Windows Registry Editor, so expand String Table > 63 > 1033 and in the right pane update the entries in quotes on lines 1002 and 1005—this will be your new Windows 7 login screen message!
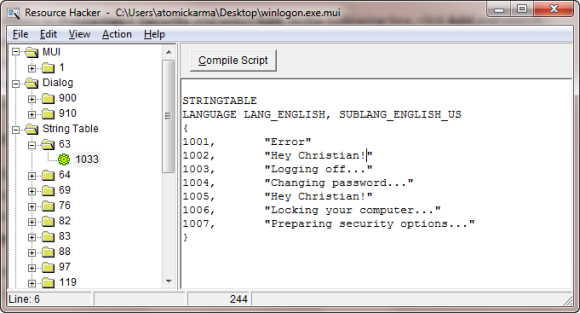
Ensure the quotes remain in place, and click Compile Script then File > Save to complete the process.
Close Resource Hacker and copy the winlogon.exe.mui file back to C:\Windows\System32\en-US\ (choosing Copy and Replace). Open Start and type CMD, right-clicking the resulting command prompt icon and selecting Run as administrator.
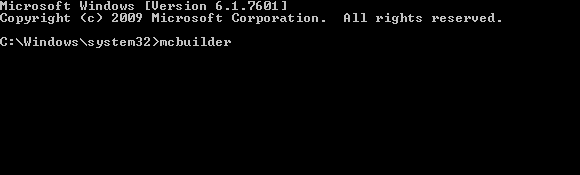
Type mcbuilder and tap Enter, then wait until the process is complete (the cursor will flash on a new line).
When done, type exit and tap Enter to close the command prompt.
You’ll need to restart Windows to complete the process and confirm your changes.
To undo this and restore the original message, simply start the process again, replacing your custom message with «Welcome».
Alternatively, delete winlogon.exe.mui and replace it with the winlogon.exe_original.mui file created by Resource Hacker, making sure to give it the old filename.
Select a New Windows 7 Login Screen Font
While changing the login screen message might take a while, changing the font is much quicker.
Open Start and type regedit, tapping Enter to launch the utility and agreeing to any UAC prompts (before proceeding use File > Export to make a backup of your Windows Registry—useful if an error is made).
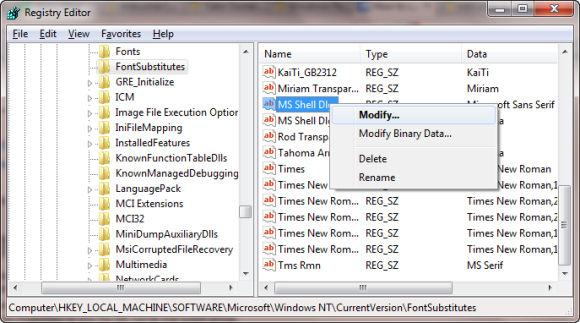
Expand the path HKEY_LOCAL_MACHINE\SOFTWARE\Microsoft\Windows NT\CurrentVersion\FontSubstitutes and find MS Shell Dlg in the right pane#
Right click on this and select Modify.
In the resulting box, input the name of the font you wish to use (check C:\Windows\Fonts for a list of currently installed choices), and repeat for the entry MS Shell Dlg 2 (note that the default option is Tahoma).
Once this is done, close the Windows registry and restart your computer to apply the changes. (While you can also logoff and login, locking your computer will not display the new font.)
The Login Text Is Too Light/Dark!
Changing the color of the Windows login screen font isn’t possible.
However, you can change the weight of the text—that is, how prominent it appears in front of your chosen background.
To do this, return to the Windows Registry Editor and expand the path HKLM\SOFTWARE\Microsoft\Windows\CurrentVersion\Authentication\LoginUI.

In the right-hand pane, right-click some empty space, and select New > DWORD, naming it ButtonSet.
Once this is done, double click to edit the value, clicking OK when you’re done. You have a choice of the following:
0: This gives lighter text shadows, darker buttons and is the default choice.
1: Suitable for lighter backgrounds, this option offers darker text shadows and lighter buttons.
2: Intended for a darker background, text shadows are removed, and buttons are opaque.
When your choice is made, close Registry Editor and restart Windows to check the results.
Change Your Windows Login Screen!
We’ve looked at login screen tweaks for two versions of Windows, those that are currently most popular: Windows 7, and Windows 10.
To recap, if you want to tweak the Windows 10 login screen, you must:
- Open the Windows Registry
- Expand HKEY_LOCAL_MACHINE. Expand this entry, following the path Software / Microsoft / Windows / Current Version / Policies / System
- Right-click legalnoticecaption, select Modify, and under Value Data input your new message.
For tweaks to the Windows 7 login screen, meanwhile, you can:
- Change the login screen message
- Change the login screen font
- Adjust the weight of the text, making it lighter or darker
Although third party software and changes to the Windows Registry are required to make these customizations, the results can be impressive, especially when combined with a custom login screen background.
Looking for more Windows tweaks? Here are six tools for tweaking the Windows 10 Start menu.
В Windows 10 нет простого способа изменения фона экрана входа в систему (экран с выбором пользователя и пароля), присутствует лишь возможность изменить фоновое изображение экрана блокировки, при этом для экрана входа продолжает использоваться стандартная картинка.
Также на данный момент мне неизвестен способ изменить фон при входе, не используя сторонние программы. Поэтому в текущей статье на данный момент лишь один способ: с использованием бесплатной программы Windows 10 Logon Background Changer (русский язык интерфейса присутствует). Есть также способ просто отключить изображение фона без использования программ, который я также опишу.
Примечание: подобного рода программы, меняющие системные параметры, могут в теории привести к проблемам с работой операционной системы. Поэтому будьте осторожны: в моем тесте всё прошло успешно, но я не могу гарантировать, что также беспроблемно будет работать и у вас.
Обновление 2018: в последних версиях Windows 10 фон экрана блокировки можно менять в Параметры — Персонализация — Экран блокировки, т.е. далее описанные способы более не актуальны.
Использование W10 Logon BG changer для изменения фона на экране ввода пароля
Очень важно: сообщают, что на Windows 10 версии 1607 (Anniversary Update) программа вызывает проблемы и невозможность зайти в систему. На оф. сайте разработчика также указано, что на сборках 14279 и более поздних не работает. Лучше используйте стандартные возможности настройки экрана входа в Параметры — Персонализация — Экран блокировки.
Описываемая программа не требует установки на компьютер. Сразу после загрузки zip-архива и его распаковки, требуется запустить из папки GUI исполняемый файл W10 Logon BG Changer. Для работы программе требуются права администратора.

Первое, что вы увидите после запуска — предупреждение о том, что всю ответственность за использование программы вы берете на себя (о чем я также предупредил в начале). А уже после вашего согласия запустится главное окно программы на русском языке (при условии, что в Windows 10 он используется в качестве языка интерфейса).
Использование утилиты не должно вызвать сложностей даже у начинающих пользователей: для того, чтобы изменить фон экрана входа в Windows 10, кликните по изображению картинки в поле «Название файла фона» и выберите новое изображение фона со своего компьютера (рекомендую, чтобы оно было в том же разрешении, что и разрешение вашего экрана).
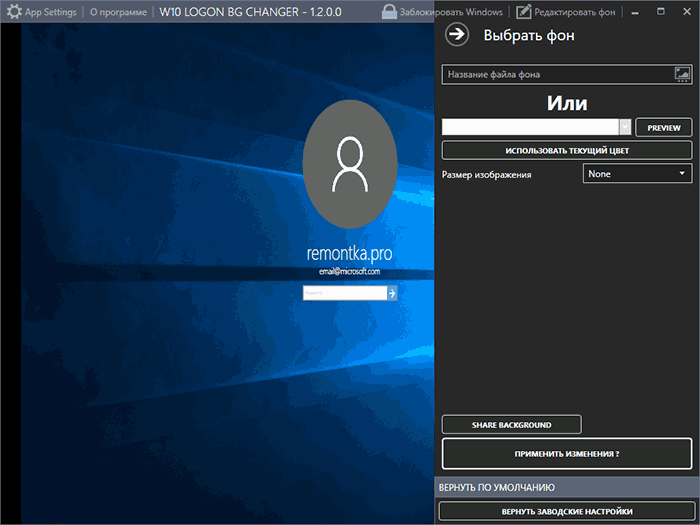
Сразу после выбора, в левой части вы увидите, как это будет выглядеть при входе в систему (в моем случае все отображалось несколько сплющенным). И, если результат вас устраивает, можете нажать кнопку «Применить изменения».
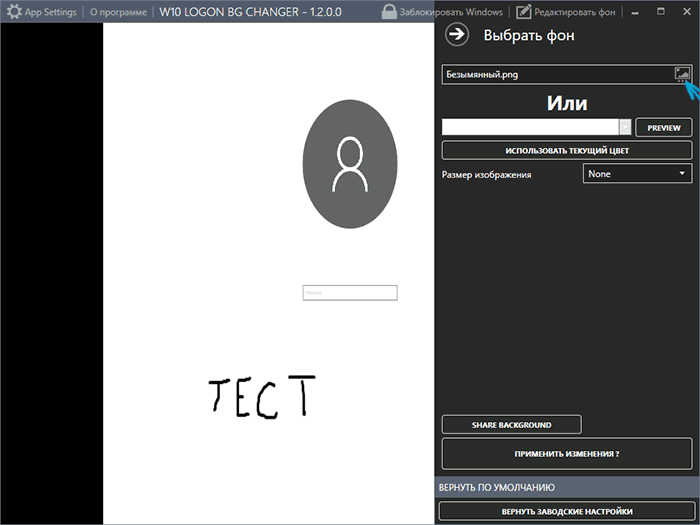
После получения уведомления о том, что фон успешно изменен, вы можете закрыть программу, а затем выйти из системы (или заблокировать ее клавишами Windows + L), чтобы увидеть, все ли сработало.

Дополнительно, имеется возможность установки одноцветного фона блокировки без картинки (в соответствующем разделе программы) или возврата всех параметров к их значениям по умолчанию (кнопка «Вернуть заводские настройки» внизу).
Скачать программу Windows 10 Logon background changer можно с официальной страницы разработчика на GitHub.
Дополнительная информация
Существует способ отключения фонового изображения на экране входа в Windows 10 с помощью редактора реестра. При этом для цвета фона будет использоваться «Основной цвет», который задается в параметрах персонализации. Суть способа сводится к следующим шагам:
- В редакторе реестра перейдите к разделу HKEY_LOCAL_MACHINE\ Software\ Policies\ Microsoft\ Windows\ System
- Создайте параметр DWORD с именем DisableLogonBackgroundImage и значением 00000001 в этом разделе.
При смене последней единицы на ноль, стандартный фон экрана ввода пароля снова возвращается.
Windows 11 offers to customize your desktop experience with various old and new features. Some features are newly introduced on Windows 11, while many features are carried forward from its predecessor, Windows 10. Login Screen Background changing facility was earlier available on Windows 10, and it is still part of Windows 11.
Before proceeding with the steps, you should know about the Login Screen and Lock Screen of Windows 11.
What are Login Screen and Lock Screen?
On Windows 11, the login screen and lock screen backgrounds are separate from the desktop background. The login screen or sign-in screen is the screen you see when your PC turns on and asks for your password or PIN. You can also reach to lock screen by pressing the Windows + L keys from the keyboard. After that, click anywhere on the Lock Screen to see the login or sign-in screen. However, the login screen and lock screen can be configured simultaneously in Settings under the Lock screen.
How to Change Login Screen and Lock Screen Background in Windows 11?
Follow these steps to change Login Screen and Lock Screen Background in Windows 11:-
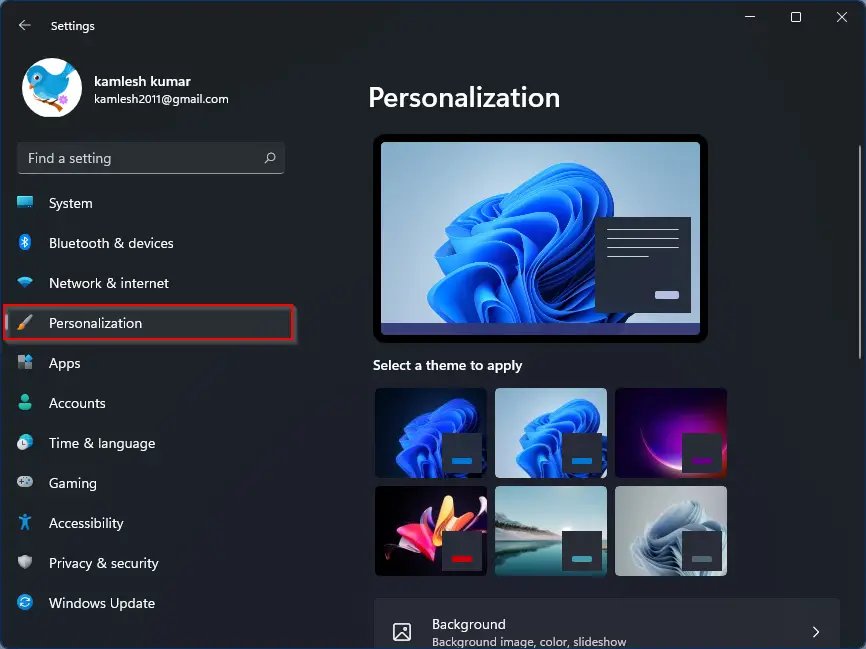
Step 1. Open the Settings app by pressing Windows + I keys simultaneously from the keyboard or any other method. If the Settings app is not opening or crashing, you can quickly fix it by resetting it. Once the Settings app is opened, click on the Personalization category from the left side pane.
Step 2. On the right side pane, scroll down and then click on the Lock screen tab.
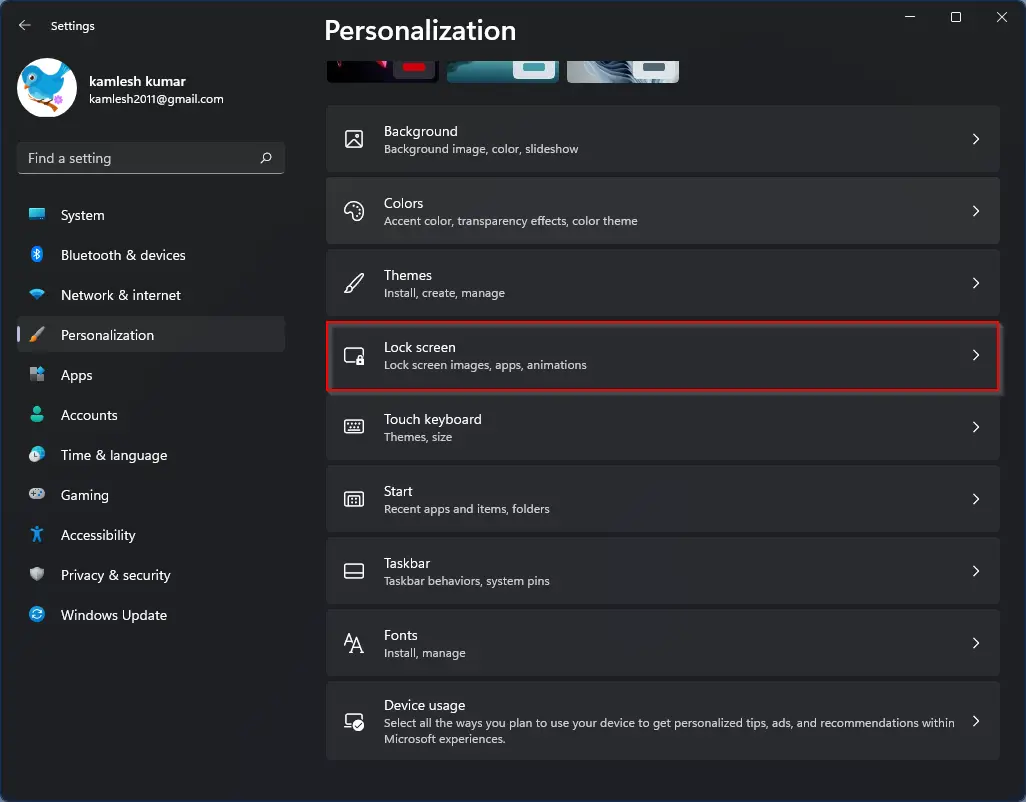
Step 3. Turn On the toggle switch next to the “Show the lock screen background picture on the sign-in screen” option.
Step 4. Now, on the same window, click on the drop-down next to Personalize your lock screen option.
Here, you will see these options:-
- Windows spotlight – If you select the Windows spotlight option, the lock screen background image will be downloaded automatically from the Microsoft server and display different images periodically.
- Picture – If you prefer to select an image from your PC, selecting the Picture option will allow you to choose from a selection of thumbnails or upload your own images.
- Slideshow -The Slideshow option allows you to choose multiple images to become part of a rotating picture slideshow.
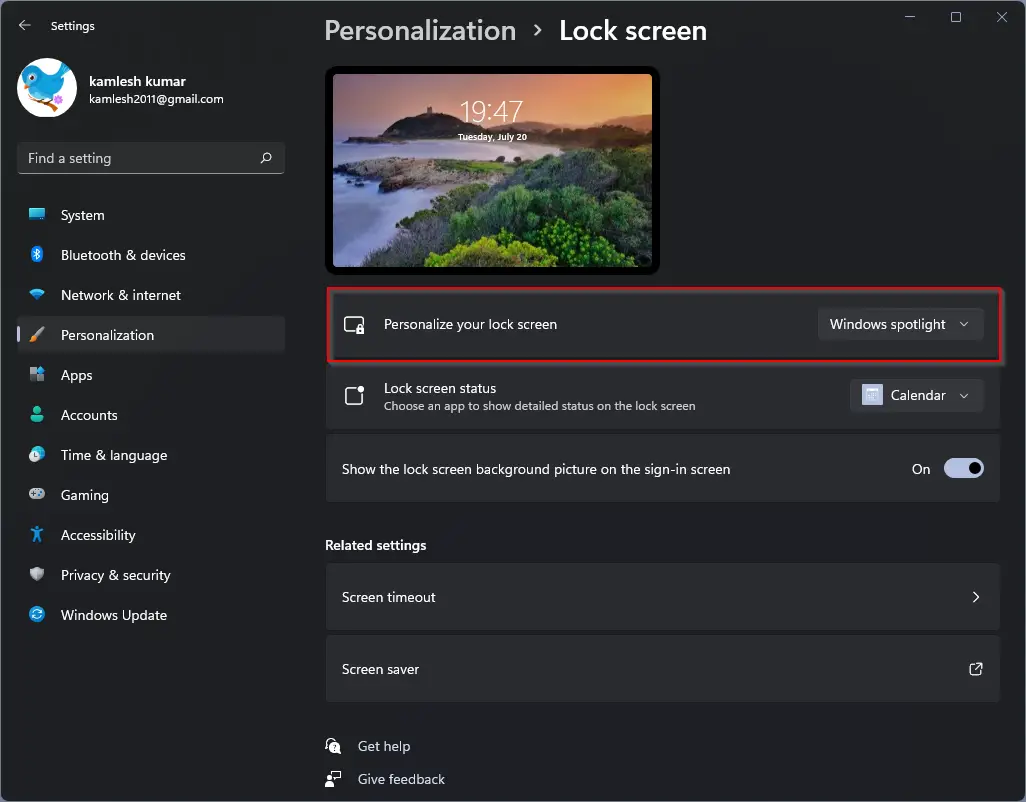
If you wish to select an image from your PC, you can either select “Picture” or “Slideshow.” Then you will have the option to choose the picture(s) from your computer. Select the desired image from your PC, and it will be used as a login screen background by Windows 11.
How to Change Login Screen Background Image on Windows 11 with Registry Editor?
Follow these steps to change Login Screen Background Image on Windows 11 with Registry Editor:-
Step 1. Open Registry Editor.
Step 2. Then, navigate or browse to the following registry key in the left sidebar:-
HKEY_LOCAL_MACHINE\SOFTWARE\Microsoft\Windows\CurrentVersion\Authentication\LogonUI\Background
Step 3. On the right side, look for a REG_DWORD “OEMBackground.” If the “OEMBackground” value doesn’t exist, right-click on an empty area in the right pane and select “New” > “DWORD (32-bit) Value“. Name the new value “OEMBackground” (without quotes).
Step 4. Now, double-click on the “OEMBackground” REG_DWORD and set the value data to “1“.
Step 5. Navigate to the folder where your desired background image is located and rename the image file to “backgroundDefault.jpg” (without quotes) and copy it to the following location: C:\Windows\System32\oobe\info\backgrounds
If the “backgrounds” folder doesn’t exist, create a new folder and name it “backgrounds” (without quotes).
That’s it.
Restart your computer to see the new login screen background image.
How to Change Login Screen Background Image on Windows 11 with Group Policy Editor?
Follow these steps to change Login Screen Background Image on Windows 11 with Group Policy Editor:-
Note: Group Policy Editor is only available on Windows 11 Pro, Education, and Enterprise editions.
Step 1. Open Local Group Policy Editor on your PC.
Step 2. Navigate or browse the following policy path:-
Computer Configuration > Administrative Templates > System > Logon
Step 3. On the right sidebar, double-click on the “Always use custom login background” policy setting.
Step 4. Set the policy setting to “Enabled.”
Step 5. Click “Apply” and “OK” to save the changes.
Log out of your account or restart your computer to see the new login screen background image.
Conclusion
In conclusion, Windows 11 offers a variety of options to customize the desktop experience, including changing the login screen and lock screen background images. The login screen and lock screen backgrounds are separate from the desktop background, and users can configure them simultaneously in the Settings app. Users can choose from Windows Spotlight, Picture, or Slideshow options to set their preferred background image. Additionally, users can change the login screen background image by using Registry Editor or Group Policy Editor, depending on their Windows 11 edition. Overall, changing the login screen and lock screen background images in Windows 11 is a simple process that can enhance the visual appeal of the user interface.
Вы тут: Главная → Windows → Как грамотно настроить язык ввода на экране входа в Windows
Сегодня я расскажу, как работает язык ввода до входа в систему и после него, а также разберу настройку в специфических случаях с помощью групповой политики. Эта запись продолжает серию статей о тонкостях языковых настроек.
[+] Сегодня в программе
Как настроить язык ввода по умолчанию после входа в систему
Вы вошли в систему, открыли меню Пуск и начали печатать. Какой язык вы видите в поле ввода, тот и задан по умолчанию. Из коробки он соответствует верхнему предпочитаемому языку, но вы можете переопределить его в дополнительных параметрах клавиатуры. Смотрите также Как грамотно настроить язык интерфейса Windows, магазинных приложений и ввода по умолчанию.
Как работает язык ввода по умолчанию на экране входа в систему
Исторически предпочтения языка ввода на экране приветствия задаются для всех пользователей в разделе HKEY_USERS (освежить память на предмет HKU vs HKCU вам поможет мой разбор 2009 года).
[HKEY_USERS\.DEFAULT\Keyboard Layout\Preload]
"1"="00000409";EN
"2"="00000419";RU
Однако начиная с Windows 8 поведение изменилось и теперь учитывает языковые предпочтения каждого пользователя, нежели форсирует один язык для всех сразу.
Язык ввода по умолчанию, заданный в своей учетной записи, одновременно определяет ее настройки до и после входа в систему.
Когда вы явно указываете язык в дополнительных параметрах клавиатуры, изменение ожидаемо записывается в параметр InputMethodOverride раздела HKCU\Control Panel\International\User Profile. Однако система также меняет значения параметров в разделе реестра HKCU\Keyboard Layout\Preload.
Изменения в разделе HKCU означают, что конфигурация одной учетной записи не влияет на другие. Например, в системе две учетные записи – у первой язык ввода по умолчанию английский, а у второй — русский. Если на экране входа вы выберете первую, у нее будет английский язык, а если вторую – русский.
При этом настройки HKCU преобладают над HKU!
Поэтому только административным копированием (control intl.cpl,,1) или внесением изменений в раздел реестра HKU (что одно и то же) у вас не получится задать единый язык на экране входа для всех пользователей.
То же самое верно и для попыток настроить разные языки для одного пользователя.
Как настроить разные языки ввода на экране входа в систему и после входа
Из описания выше вытекает нестыковка в одном сценарии. Если у человека пароль учетной записи задан на английском языке, а в системе он хочет иметь русский язык ввода по умолчанию, то не вполне очевидно, как добиться желаемого результата.
Так ли это необходимо
Мне понятен сценарий, но желание странное, на мой взгляд. Есть пара способов обойтись без удовлетворения специальных потребностей.
- Можно использовать цифровой ПИН-код, что вполне приемлемо в домашних условиях. Я понимаю, что любителей сложных паролей это не устроит, но в то же время с трудом представляю, почему у таких опытных пользователей язык ввода в ОС русский

- Можно менять не язык ввода на экране входа, а язык пароля, т.е. установить пароль пользователя на предпочитаемом языке! В самом деле, если вы настроили русский язык ввода после входа в систему, то зачем вам пароль на английском?

Если желание задать разные языки непреодолимо или в организации требуется установить всем на экране входа английский язык, читайте дальше!
Решение: групповая политика
Несколько читателей сообщили, что описанное далее решение работает нестабильно или совсем не работает в Windows 10 20H2. Я не смог воспроизвести проблему у себя на 20H2 и 21H1. Если у вас не работает групповая политика, мне нечем помочь. Заносите баг в центр отзывов и/или пишите в техподдержку Microsoft.
Задача решается с помощью групповой политики Disallow copying of user input methods to the system account for sign in, которая появилась в Windows 8 наряду с новым поведением. Из официального описания:
Этот параметр политики предотвращает автоматическое копирование пользовательских методов ввода в системную учетную запись для использования на экране входа.
Формулировка не совсем точная, потому что копирование выполняется не только в системные аккаунты (что не существенно), но и на экран входа пользователя. Кстати, политика сломалась в версии Windows 10 1709, но ее починили в 1809.
Включить политику можно в gpedit.msc или в реестре, например, из командной строки от имени администратора:
reg add "HKLM\Software\Policies\Microsoft\Control Panel\International" /v BlockUserInputMethodsForSignIn /t REG_DWORD /d 1 /f
При этом вам надо учитывать, что политика фиксирует язык, настроенный для экрана входа в систему, т.е. в HKU. Администратор, конечно, может поменять его в любой момент. Но если в системе есть пользователи с паролями на разных языках, кому-то из них придется переключать раскладку каждый раз.
Настройка
Вы можете просто импортировать приведенный ниже REG-файл и сразу же перезагрузить ОС.
Windows Registry Editor Version 5.00

[HKEY_USERS\.DEFAULT\Keyboard Layout\Preload]
"1"="00000409";EN
"2"="00000419";RU

;Disallow copying of user input methods to the system account for sign in
[HKEY_LOCAL_MACHINE\SOFTWARE\Policies\Microsoft\Control Panel\International]
"BlockUserInputMethodsForSignIn"=dword:00000001
Вручную действуйте так:
- Включите политику «Запретить копирование пользовательских методов ввода в системную учетную запись для входа» и перезагрузитесь.
- В Параметрах выберите язык ввода, который вы хотите задать на экране входа для всех пользователей и скопируйте настройки текущего пользователя с помощью административных языковых параметров (
control intl.cpl,,1)
или
Задайте желаемые параметры вHKEY_USERS\.DEFAULT\Keyboard Layout\Preload. - В параметрах задайте язык ввода, который вы хотите иметь после входа в систему в своей учетной записи.
Теперь язык ввода на экране приветствия не будет меняться у пользователей в зависимости от языка ввода, который они задали в Параметрах.
Замечание о языке ввода на экране блокировки
Рассматриваемые выше параметры реестра и политика распространяются на экран входа, но не на экран блокировки.
Когда пользователь блокирует учетную запись, язык ввода по умолчанию на экране блокировки будет тем, который был на момент блокировки.
Поведение зависит от того, включена ли у пользователя настройка Позволить выбирать метод ввода для каждого окна приложения (первая картинка в статье), которая выключена по умолчанию.
- Если настройка выключена, на экран блокировки проецируется язык ввода последнего активного приложения. Допустим, у пользователя русский язык ввода по умолчанию. Он печатал в Word на английском языке, а потом заблокировал аккаунт (или сработала политика блокировки). В этом случае на экране блокировки будет английский язык, а не русский.
- Если настройка включена, экран блокировки принимает язык оболочки — панели задачи и меню Пуск. Поэтому на этом экране язык всегда будет тот, что задан у пользователя в качестве языка ввода по умолчанию.
Мне неизвестен способ форсирования конкретного языка на экране блокировки. Если знаете, сообщите, и я добавлю его в статью. В качестве обходного пути следует включить настройку и устанавливать пароль на предпочитаемом языке ввода.
Заключение
Решение написать в блог я принял после очередного вопроса, как это нередко бывает. Поведение далеко не новое, но любопытное, согласитесь. И оно заслуженно пополнило большую коллекцию нестыковок в блоге.
Если честно, я сам узнал об изменении, только когда в форуме люди сообщили о неработающей политике. У меня всегда задан английский язык ввода, а ставить какой-то другой язык на экран входа даже мысли не возникало. Поэтому сам я наступить на грабли не мог. Но да, меня бомбит, когда сажусь за чужой ПК с русским языком ввода по умолчанию  А вас?
Какой у вас язык ввода по умолчанию после входа в систему?
- Английский в локализованной ОС (65%, голосов: 213)
- Английский в английской ОС (19%, голосов: 62)
- Не английский в локализованной ОС (14%, голосов: 45)
- Не английский в английской ОС (1%, голосов: 3)
- Другое / Моего варианта тут нет (1%, голосов: 3)
Проголосовало: 326 [архив опросов]
Загрузка …