Как изменить настройки биос из windows 10

Вы можете использовать PowerShell для просмотра или изменения настроек BIOS/UEFI на компьютере Windows. В этой статье мы рассмотрим, как получить или изменить настройки BIOS компьютера через Windows PowerShell на обычном компьютере и на брендовых устройствах популярных производителей (HP, Lenovo, Dell, Toshiba).

Содержание:

  • Получаем информацию из BIOS/UEFI с помощью PowerShell
  • Получить и изменить настройки BIOS с помощью модуля Get-BIOS
  • Управление BIOS из PowerShell на компьютерах Lenovo
  • Доступ к настройкам BIOS из PowerShell на компьютерах Hewlett-Packard
  • Настройка BIOS на устройствах DELL из PowerShell

Получаем информацию из BIOS/UEFI с помощью PowerShell

Базовая информация о BIOS (UEFI) компьютера доступна в WMI классе Win32_BIOS. Вы можете вывести всю доступную информацию о BIOS с помощью командлета Get-WmiObject.

Get-WmiObject -Class Win32_BIOS

Get-WmiObject Win32_BIOS вывести версию BIOS

По умолчанию команда возвращает информацию о версии BIOS (SMBIOSBIOSVersion + Manufacturer), серийный номер и модель компьютера (SerialNumber, Version).

Полный список параметров BIOS, который доступен в WMI классе Win32_BIOS можно вывести командой:

Get-WmiObject -Class Win32_BIOS | Format-List *
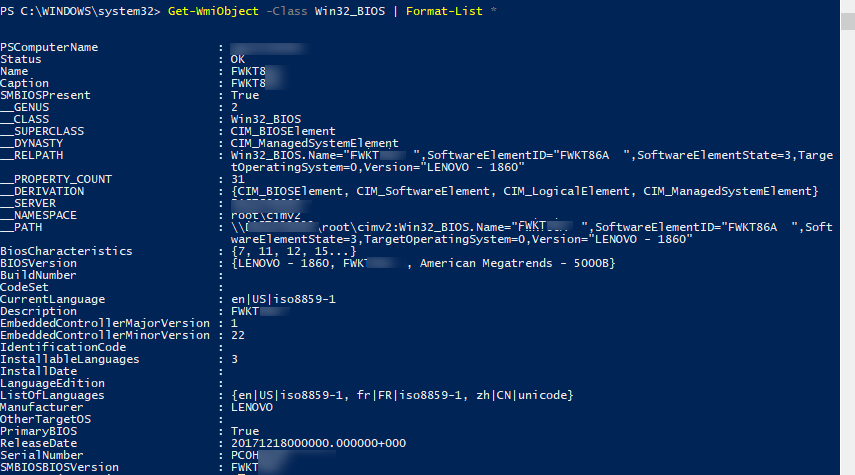
Get-WmiObject -Class Win32_BIOS

Можно вывести только интересующие вас настройки BIOS. Например, версию BIOS, серийный номер компьютера, производителя и дату выпуска:

Get-WmiObject -Class Win32_BIOS | Select SMBIOSBIOSVersion, Manufacturer, SerialNumber, ReleaseDate

Можно получить информацию BIOS удаленного компьютера:

Get-WmiObject -Class Win32_BIOS -ComputerName MSK-WKS2210

Информация о BIOS компьютера хранится в реестре Windows. Вы можете получить нужную информацию BIOS напрямую из реестра с помощью PowerShell:

Get-ItemProperty -Path HKLM:\HARDWARE\DESCRIPTION\System\BIOS
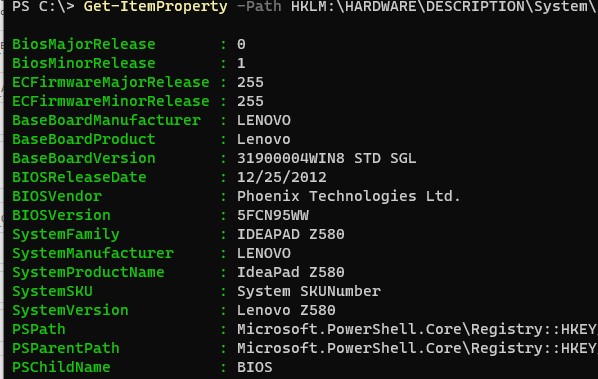
nayti-parametry bios/uefi хранятся в реестре

Класс Win32_BIOS является универсальным и может быть использован для получения базовой информации о BIOS на любом устройстве Windows.

Однако, некоторые производители оборудования предоставляют специальные WMI классы для обращения к BIOS из Windows (необходимо, чтобы на компьютере были установлены родные драйвера от производителя).

Получить и изменить настройки BIOS с помощью модуля Get-BIOS

Для получения настроек BIOS/UEFI брендовые компьютеров Dell, HP, Lenovo, Toshiba можно использовать отдельный модуль из PSGallery, который называется Get-BIOS.

Установите модуль из онлайн галереии PowerShell (также вы можете установить PowerShell модуль офлайн):

Install-Module GetBIOS

Чтобы вывести настройки BIOS вашего компьютера, выполните команду:

Get-BIOS
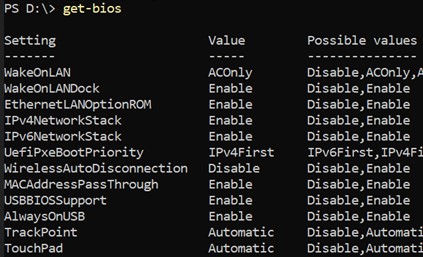
get-bios вывести настройки BIOS с помощью PowerShell

На компьютерах Dell можно вывести описание настроек BIOS с помощью параметра:

Get-BIOS -ShowDescription

Также от этого же разработчика есть модуль, который позволяет изменить настройки BIOS на устройствах Dell/Lenovo/HP.

Install-Module SetBIOS

Для изменения настроек BIOS вашего устройства, нужно сформировать CSV файл в формате {Setting, Value}.

Чтобы применить CSV файл с натсройками BIOS, выполните команду:

Set-BIOS -Path "YourPath.csv"

Если BIOS защищен паролем, добавьте в параметр -Password.

Управление BIOS из PowerShell на компьютерах Lenovo

На компьютерах Lenovo текущие настройки BIOS хранятся в оттельном WMI классе. Вы можете вывести список параметров BIOS и их текущие значения так:

Get-WmiObject -class Lenovo_BiosSetting -namespace root\wmi | select-object InstanceName, currentsetting
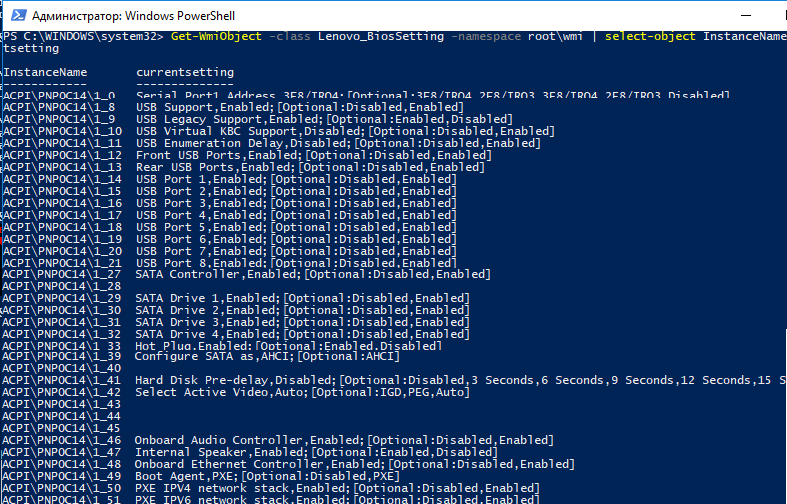
Получить настройки BIOS на компьютере Lenovo из Powershell

Проверим, что на компьютере Lenovo установлен пароль для входа в BIOS:

(gwmi -Class Lenovo_BiosPasswordSettings -Namespace root\wmi).PasswordState

Если команда вернула 0, значит пароль для входа в BIOS не установлен.

проверить наличие пароля BIOS Lenovo_BiosPasswordSettings - data-lazy-src=

Изменить пароль BIOS на устройстве:

(gwmi -Class Lenovo_SetBiosPassword -Namespace root\wmi).SetBiosPassword("pap,oldPassword,newPassword,ascii,us")

Вы можете изменить некоторые параметры BIOS на компьютерах Lenovo. Например, включим на компьютере WOL:

$getLenovoBIOS = gwmi -class Lenovo_SetBiosSetting -namespace root\wmi
$getLenovoBIOS.SetBiosSetting("WakeOnLAN,Enable")
$SaveLenovoBIOS = (gwmi -class Lenovo_SaveBiosSettings -namespace root\wmi)
$SaveLenovoBIOS.SaveBiosSettings()

Сбросить настройки BIOS устройства Lenovo на заводские:

$DefaultSettings = Get-WmiObject -Namespace root\wmi -Class Lenovo_LoadDefaultSettings
$DefaultSettings.LoadDefaultSettings("CurrentBIOSPassword,ascii,us")

Доступ к настройкам BIOS из PowerShell на компьютерах Hewlett-Packard

На компьютерах/ноутбуках от HP можно использовать следующую команду для получения параметров BIOS, их значений и доступных опций:

Get-WmiObject -Namespace root/hp/instrumentedBIOS -Class hp_biosEnumeration | select Name, value, possiblevalues –AutoSize

Вы можете изменить некоторые настройки BIOS на компьютерах HP из PowerShell. Например, отключить загрузку компьютера с USB устройств.

$getHPBios = gwmi -class hp_biossettinginterface -Namespace "root\hp\instrumentedbios"
$getHPBios.SetBIOSSetting('USB Storage Boot','Disable')

Если для изменения настроек BIOS требуется указать пароль, вы можете использовать следующий скрипт:

$HPBIOSPassword = "<utf-16/>"+"P@$$w0rd"
$getHPBios = gwmi -class hp_biossettinginterface -Namespace "root\hp\instrumentedbios"
$getHPBios.SetBIOSSetting(‘Network (PXE) Boot','Disable',$HPBIOSPassword)

Если последняя команда вернула “Return 0”, значит она отработала успешно. Можно сделать простейший обработчик:

$ChangeBIOS_State = $bios.setbiossetting(Network (PXE) Boot', 'Disable' , $HPBIOSPassword)
$ChangeBIOS_State_Code = $ChangeBIOS_State.return
If(($ChangeBIOS_State_Code) -eq 0)
{
write-host "OK"
}
Else
{
write-host "Error - (Return code $ChangeBIOS_State_Code)" -Foreground Red
}

Если вы хотите включить в BIOS LAN/WLAN Switching на ноутбуке HP для автоматического отключения от Wi-FI при наличии Ethernet подключения, выполните команду:

$getHPBios.SetBIOSSetting('LAN/WLAN Switching','Enable')

Кроме того, вы можете установить на устройство Hewlet Packard расширение HP Client Management Script Library, CMSL (https://www.hp.com/us-en/solutions/client-management-solutions/download.html). В состав CMSL входят несколько PowerShell модулей, который позволяют получить или изменить настройки BIOS/UEFU, обновить прошивку и т.д.

Экспорт настроек BIOS в текстовый файл:

Get-HPBIOSSettingsList | Out-File -FilePath ‘C:\ProgramData\HP\CMSL\Logs\CurrentBIOSSettings.txt’

Включить WLAN Auto Switch:

Set-HPBIOSSettingValue -Name "LAN/WLAN Auto Switching" -Value Enable -Password BiosPass000rd

Настройка BIOS на устройствах DELL из PowerShell

На компьютерах DELL для просмотра и управления параметрами BIOS вы можете использовать WMI класс DCIM-BIOSService или более новый класс root\dellomci (доступен после установки пакета OMCI — Open Manage Client Instrumentation).

Чтобы вывести порядок использования загрузочных устройств в BIOS на компьютерах Dell, выполните:

Get-WmiObject -NameSpace root\dellomci Dell_BootDeviceSequence | sort bootorder | select BootDeviceName, BootOrder

класс dellomci для получения параметров bios на компьютерах DELL

Например, вы можете включить Wake on LAN в BIOS следующим образом:

(Get-WmiObject DCIM-BIOSService -namespace rootdcimsysman).SetBIOSAttributes($null,$null,"Wake-On-LAN","4")

Кроме того, для компьютеров Dell можно использовать официальный PowerShell модуль DellBIOSProvider, который устанавливается при установке драйверов либо вы можете установить его вручную командой:

Install-Module -Name DellBIOSProvider -Force

С помощью этого модуля вы можете получить порядок загрузки на компьютере Dell:

Get-Item DellSmbios:\BootSequence\Bootsequence

Проверить, задан ли пароль BIOS:

Get-Item -Path DellSmbios:\Security\IsAdminPasswordSet

Изменить пароль BIOS на устройстве Dell:

Set-Item -Path Dellsmbios\Security\AdminPassword –Value 0ldDellP@ss –Password Newde11P@ss

Мы рассмотрели, как получить и изменить настройки BIOS на устройствах Windows с помощью PowerShell. Это позволит вам стандартизировать настройки BIOS/UEFI на всех компьютерах в вашей сети (с помощью SCCM, Intune, MDT, и т.д.

Warp Terminal

Changing the boot order, booting from USB or fixing possible boot issues. There could be a number of reasons why you would want to access the UEFI settings.

In this tutorial, I’ll show you three ways to access the UEFI settings in Windows 10:

  • Using the designated key at boot time
  • Using the UEFI settings from within Windows 10 (requires reboot as well)

Before you see the steps, please verify if your system is using UEFI or BIOS.

Method 1: Use F2/F10 or F12 keys at boot time to access UEFi settings

This is the classic method of accessing UEFI or the BIOS system.

Turn on your system. At the screen that shows the logo of your system manufacturer, press the F2 or F10 or F12 key. You may try pressing all of them one by one if you are not sure. But be quick when you do that otherwise it will boot into the operating system.

This key is different for different brand of computers. Some may even use Esc or Del keys for this purpose.

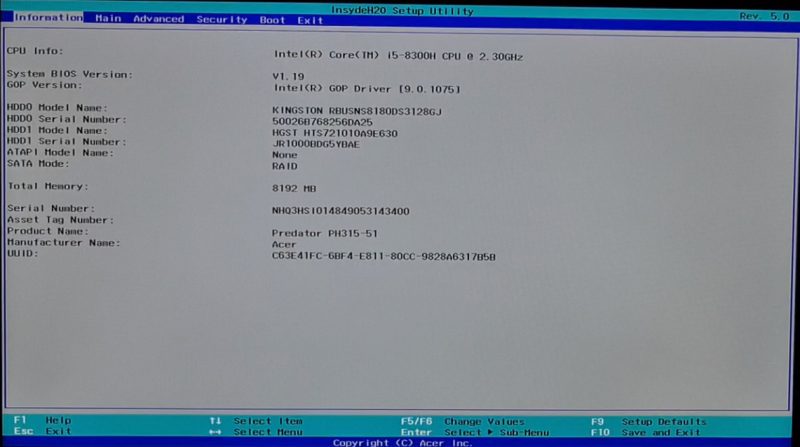
acer predator boot

Quickly press F2, F10 or F12 keys at the screen showing your system manufacturer’s logo

If it works, you should see the familiar BIOS screen. UEFI is underlying mechanism and it adds a few options in the boot settings. But the boot settings interface looks the same as the legacy BIOS system in many computers.

acer uefi settings

Most system will have UEFI settings interface same as the classic BIOS settings

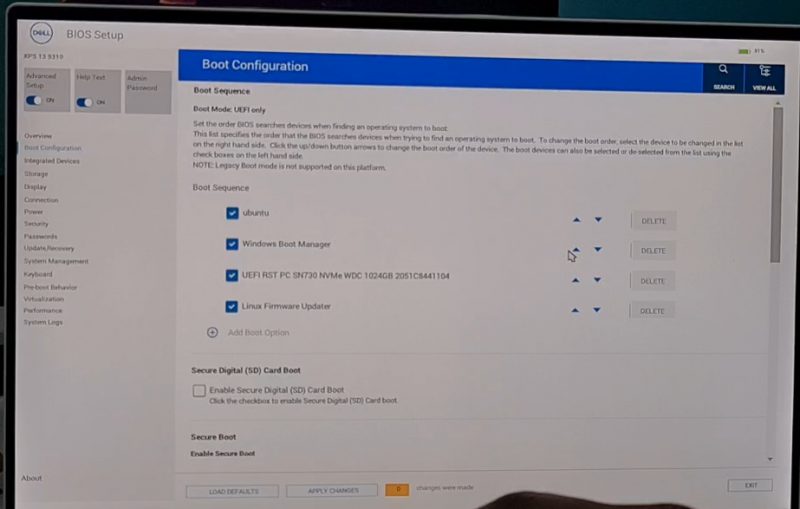
I have seen some newer computers have a totally different boot settings interface. This could differ from system to system.

dell xps uefi settings

Some newer systems have a different UEFI interface

This should work on your system but if it keeps on booting to Windows, no need to be disappointed. You may access the UEFI settings from within Windows as well. The next method shows the steps.

Method 2: Access UEFI firmware settings from within Windows 10

Windows 10 provides a way to access the UEFI settings from within Windows itself. Please bear in mind that while you may opt to access UEFI this way, your system will be restarted and boots into the BIOS/UEFI.

Follow the steps below for accessing UEFI settings in Windows 10.

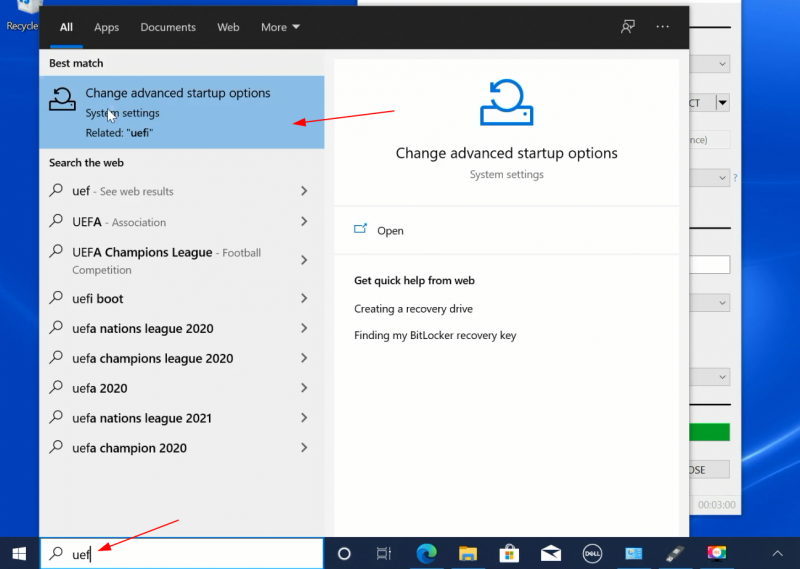
Step 1: Login to Windows and click on Menu. Search for UEFI and go to Change advanced startup options:

Accessing UEFI Settings Windows

Go to ‘Change advanced startup options’

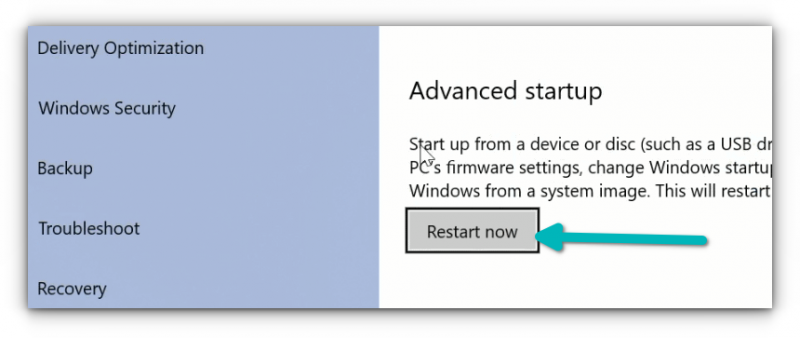
Step 2: In here, click on the Restart now button under Advanced startup option.

access uefi settings from windows

Click on Restart now button

📋

Alternative shortcut: What you did just above can be achieved with an alternative way. You may click on the Windows menu, hit the power icon to display Shutdown, Restart and Sleep option. Press and hold the shift key and click restart at the same time. This will have the same effect as going to the ‘advanced startup option’ and clicking the ‘restart now’ button.

It will not restart your system immediately. Instead, you should see a blue screen with ‘Please wait’ displayed.

please wait while restarting windows to uefi settings

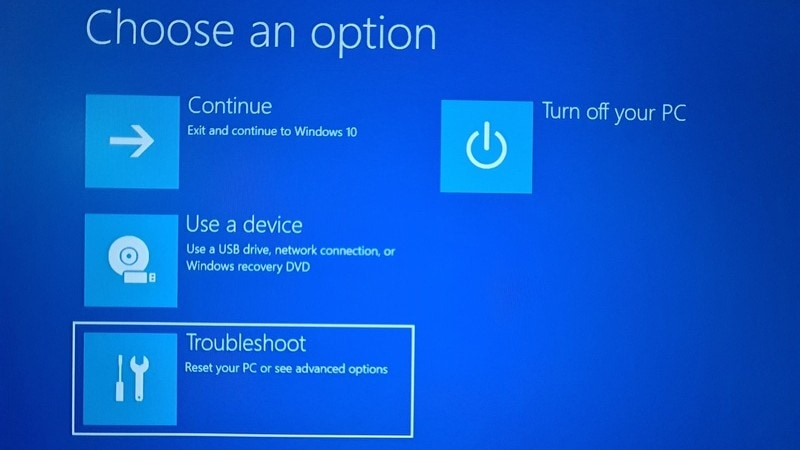
After a few seconds, you should see a blue screen with a few options to choose from. At this screen, you can choose to:

  • Exit and continue using Windows 10 without restarting your system
  • Turn off your system
  • Boot into a USB device
  • Access the Troubleshoot option for more advanced settings

You have to click on Troubleshoot option.

windows uefi settings selection

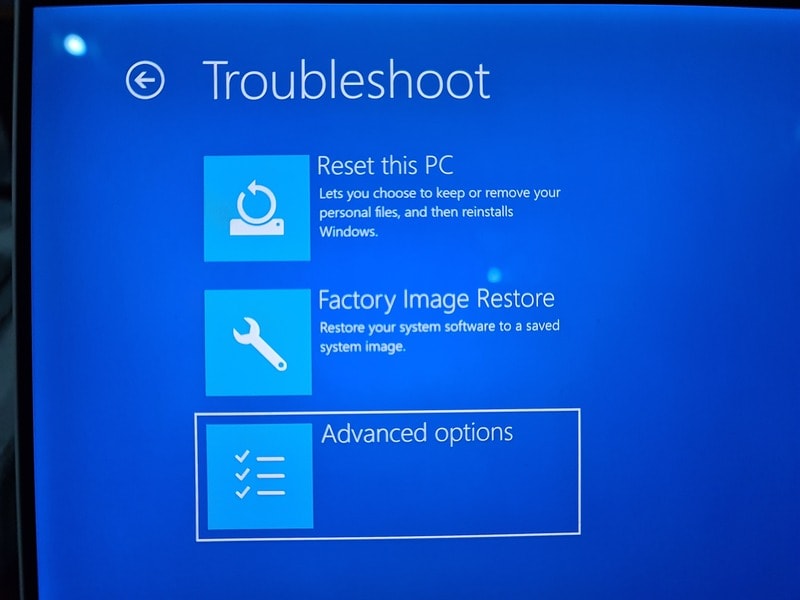
Now, some systems will give you the UEFI Firmware Settings on this screen. Some system may require you to choose an Advanced options.

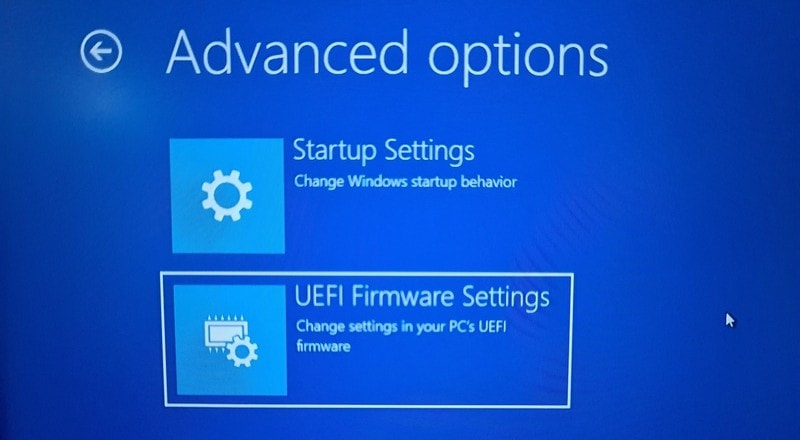
If you see the UEFI Firmware Settings option, well, click on it. Otherwise, click the Advanced options.

accessing advanced UEFI settings from Windows

When you see the UEFI Firmware Settings, click on it.

Accessing UEFI firmware settings

It will notify that you’ll have to restart in order to change any UEFI firmware settings (or UEFI settings in short). Click on the Restart button.

Restart boot settings UEFI

Your system will restart now and when it boots again, you’ll find yourself in the BIOS/UEFI settings interface.

acer uefi settings

UEFI/BIOS Settings Interface

That’s it. This is what you need to do to access UEFI firmware settings in Windows 10. Whenever I dual boot Linux and Windows, I use this method for using the live USB of Linux.

There is also a tutorial for accessing UEFI settings from Linux.

How to Access UEFI Settings From Linux

A simple beginner’s tutorial discussing various ways of accessing UEFI firmware settings in a Linux computer.

It’s FOSSSagar Sharma

I hope you find this tutorial helpful. Any questions or suggestions? Please feel free to leave a comment below.

About the author

Abhishek Prakash

Created It’s FOSS 11 years ago to share my Linux adventures. Have a Master’s degree in Engineering and years of IT industry experience. Huge fan of Agatha Christie detective mysteries 🕵️‍♂️

 
You should not be confused with UEFI, actually, it is the short form for the Unified Extensible Firmware Interface. and just after booting Windows 10 PC, you see the text written Press Del to Enter Setup which guides to open UEFI. But due to fast Startup, it is just uninterruptible. So you need to discover another way to go to UEFI BIOS in Windows 10. So we are writing the Windows 10 tips here to show you How to Access UEFI (BIOS) Settings on Windows 10. The tips are working for Windows 8 and 8.1 too.

In the coming passages, you will read How to Access UEFI (BIOS) Settings on Windows 10. Certain approaches are valid and functional for the sake of the former editions as 8 moreover 8.1 too.

You may like to Read:

How to Create Windows To Go Startup Options Shortcut Manually

How to Access UEFI (BIOS) Settings on Windows 10

Usually, you can access it as it was in Windows 8/8.1 it has a little bit different. Let us see how:

  • On Windows 10, tap on Start symbol at the taskbar.
  • Check for Settings and click the same option to navigate it on your screen.
  • On the home page, take the option Update & Security.
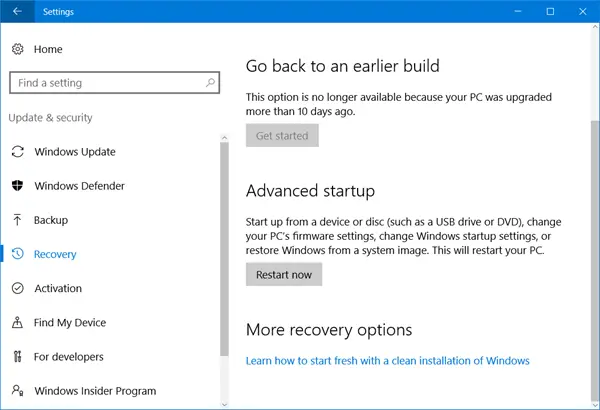
  • Under Update and Security, choose a Recovery option. Then you will see the Advance Startup on the right partition of the screen. And click on Restart now button.

Note: When you click Restart now tab your PC will start to boot and it may take few minutes to again restart.

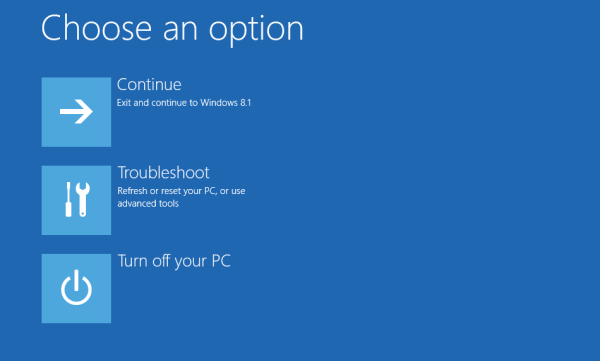
  • During rebooting it will bring you to Advance Startup Screen, there hit the Troubleshoot option.
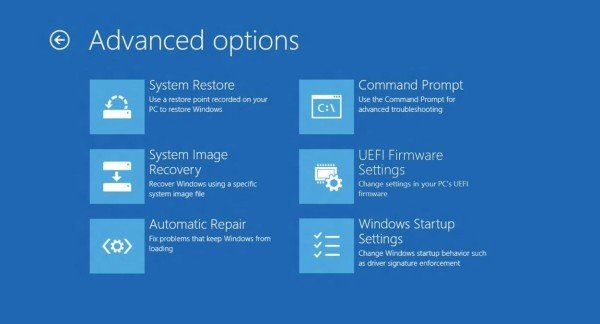
  • Under troubleshoot, tap on Advanced Options at the bottom part.
  • The screen shows 5 choices. Go along with Startup Settings.
  • On the next screen. you see a group of 7 options. Restart without doing anything. Restarting your system will bring these options allocated with function keys.
  • Your display showcases 9 different options here and for each, one function key from F1 to F9 is assigned. To choose any one of these you need to press the concerned function key. F10 brings more options and Enter takes you to OS.
  • When you press F10 anymore you get Launch Recovery Environment.

Now, you need to know that UEFI interface which was present in earlier versions has gone. But you get Launch Recovery Environment.

Download Windows Speedup Tool to fix errors and make PC run faster

In this article, we’ll discuss how to reboot the system into BIOS or UEFI Firmware Settings. Windows 11/10 is designed to have a really fast boot time. In fact, it’s too fast to interrupt. Most of the decisions happen during the boot and are over in the first 2-3 seconds itself. These 2-3 seconds include the time allowed for firmware initialization and POST (< 2 seconds). In SSD-based UEFI systems, the “F8 window” is always visible for less than 200 milliseconds. Because of this Microsoft had to find out alternative ways to boot into BIOS or UEFI Firmware Settings.

In Steven Sinofsky’s article at MSDN, he addressed this problem and how they came up with a fix for this problem.

We ultimately solved these problems with a combination of three different solutions. Together they create a unified experience and solve the scenarios without needing to interrupt boot with a keystroke:

  1. We pulled together all the options into a single menu – the boot options menu – that has all the troubleshooting tools, the developer-focused options for Windows startup, methods for accessing the firmware’s BIOS setup, and a straightforward method for booting to alternate devices such as USB drives.
  2. We created failover behaviors that automatically bring up the boot options menu (in a highly robust and validated environment) whenever there is a problem that would keep the PC from booting successfully into Windows.
  3. Finally, we created several straightforward methods to easily reach the boot options menu, even when nothing is wrong with Windows or boot. Instead of these menus and options being “interrupt-driven,” they are triggered in an intentional way that is much easier to accomplish successfully.

Each of these solutions addresses a different aspect of the core problem, and together they create a single, cohesive end-to-end experience.

In this article, I’ll show how to access that menu.

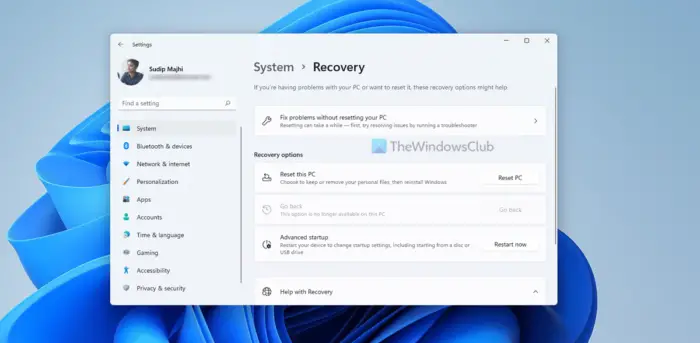
  • In Windows 11, open Windows Settings > System > Recovery.

How to access UEFI Firmware settings on Windows 11/10

  • In Windows 10, open Settings > Update & Security > Recovery > Advanced startup. It looks as follows:

access UEFI Firmware settings

  • While rebooting it will take you to Advanced Start-up screen, there click on Troubleshoot.

bios4

  • Under Advanced options select UEFI Firmware settings.

bios5

Now it should take you to the BIOS you need.

Sometimes I wonder why we need to go through these processes to get to the BIOS, it’s a little too much. Well, we asked for a fast boot time, and we got it. So it’s a small price to pay for a great performance.

How do I enter UEFI BIOS in Windows?

To enter the UEFI BIOS in Windows 11, you need to use the Windows Settings. Press Win+I to open the Windows Settings panel and go to System > Recovery. Then, head to the Advanced startup section and click on the Restart now button. Your computer will restart into the UEFI BIOS automatically.

Why are there no UEFI firmware settings?

If your motherboard doesn’t support UEFI, you cannot find anything related to this functionality. Although it is present on almost all the latest motherboards, you may not find the same if you have an old motherboard. However, you can try to boot your PC into UEFI BIOS using the aforementioned method to be confirmed.

Well, if you know any other alternative options do let us know.

Shyam aka “Captain Jack” is a Microsoft MVP alumnus and a Windows Enthusiast with an interest in Advanced Windows troubleshooting. Suggestions made and opinions expressed by him here are his personal ones and not of his current employers.

Большинство современных материнских плат поддерживают два режима загрузки: новый UEFI и устаревший Legacy. В некоторых случаях для загрузки с определённого накопителя или при возникновении проблем с запуском ОС после сброса настроек БИОС, может потребовать переключить тип загрузки с одного на другой.

В этой простой инструкции о том, как изменить один UEFI на Legacy или Legacy на UEFI с примерами переключения для разных БИОС и дополнительная информация, которая может быть полезной в контексте рассматриваемой темы.

Изменение режима загрузки в настройках БИОС/UEFI

Прежде чем приступить, отдельно отмечу, что материал касается только изменения типа загрузки в БИОС/UEFI, но не изменения типа загрузки уже установленной системы. Если вас интересует вопрос изменения типа загрузки уже установленной Windows 11/10 с Legacy на UEFI, вы можете использовать встроенный инструмент mbr2gpt.

Действия по изменению типа загрузки производятся в настройках БИОС, перейти в которые обычно можно, нажав клавишу Del при включении на настольных ПК или какую-любо клавишу (обычно — F2, но есть и другие варианты) на ноутбуке. На сайте есть отдельная инструкция по входу в БИОС на различных устройствах.

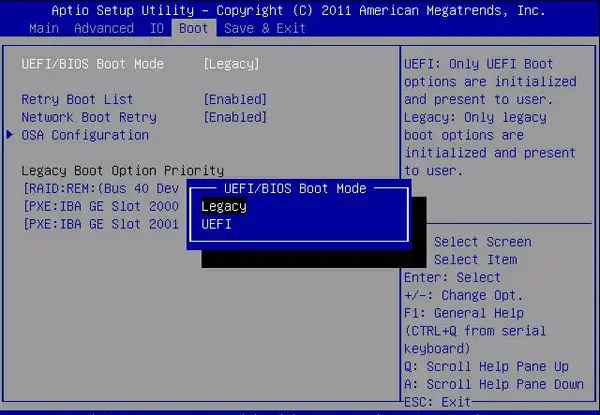
В большинстве случаев нужная настройка находится на вкладке «Boot» (Загрузка) в настройках БИОС, иногда для доступа к ней необходимо перейти в «Advanced Mode» по клавише F7 (информация об этом будет указана внизу экрана конфигурации). Далее — примеры того, как может называться и где находится нужный параметр переключения типа загрузки между UEFI и Legacy:

  1. Пункт может называться «Boot Mode» или похожим образом, с возможностью выбора между UEFI и Legacy режимом, на некоторых устройствах есть опция «UEFI с поддержкой CSM/Legacy», при таком выборе будет работать оба типа загрузки.
    Boot Mode в БИОС

  2. На некоторых материнских платах информация о режиме загрузки (Boot Mode) на вкладке Boot может быть предназначена только для получения сведений, а само переключение выполняться в другом расположении, например, на некоторых материнских платах MSI — в разделе Advanced — Windows OS configuration — BIOS Mode.
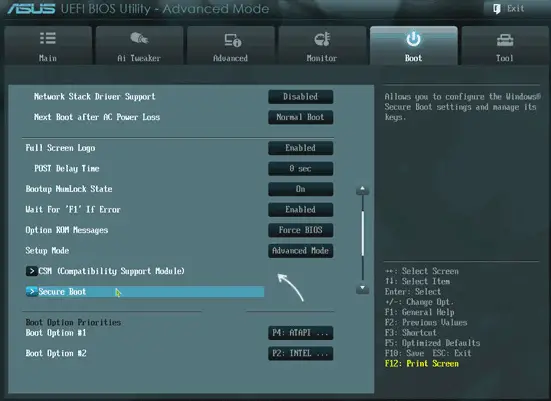
  3. CSM, Compatibility Support Module, Legacy Support — требуется отключить (установить в Disabled) если требуется только UEFI загрузка, включить, если необходима поддержка двух типов загрузки: в последнем случае тип загрузки будет определяться подключенным накопителем, а если он поддерживает оба типа загрузки, то выбором этого накопителя с пометкой или без пометки UEFI в настройках устройств загрузки или Boot Menu.
    Включение и отключение CSM в БИОС

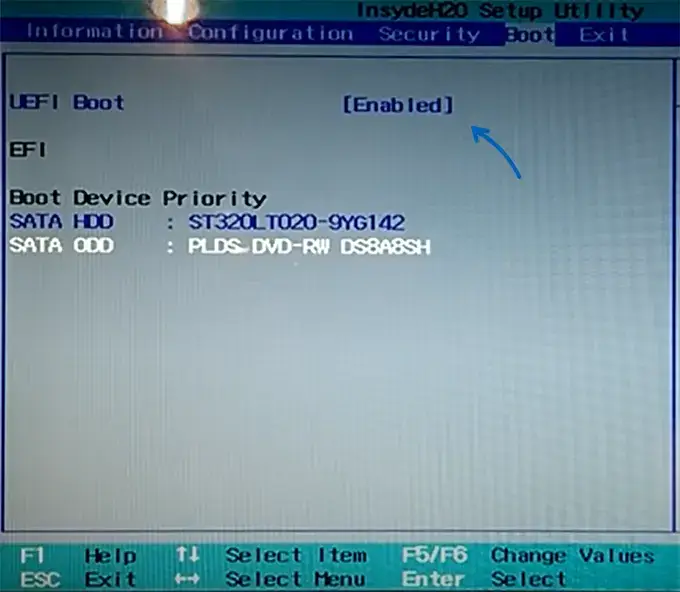
  4. UEFI Boot — с опциями Enabled (Включена UEFI) и Disabled (Отключено).
    Включение и отключение UEFI Boot в БИОС

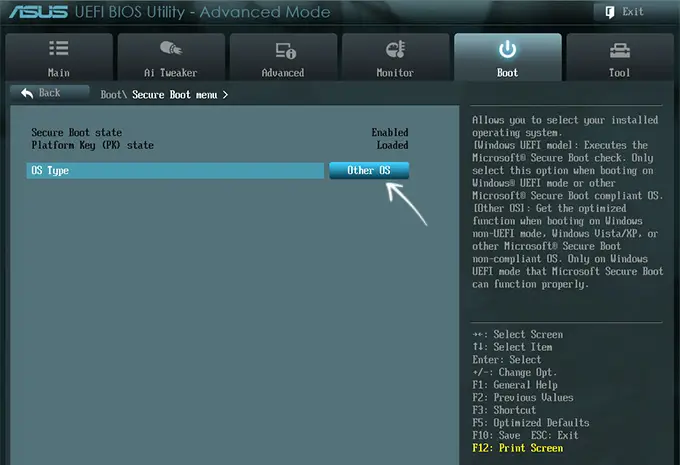
  5. OS Type — выбор типа ОС между UEFI и Legacy (CSM, Other OS), либо между Windows и «Другой ОС», в последнем случае Windows будет означать UEFI загрузку, а «Другая ОС» — Legacy загрузку.
    Выбор типа ОС — UEFI или Legacy

  6. Загрузка модуля CSM, Windows 10/8 Features — если требуется только Legacy загрузка, включить модуль CSM, также можно установить Windows 10/8 Features в Other OS (Другая ОС) и наоборот.
    Настройки Compatibility Support Module

Это лишь несколько примеров, но по аналогии вы, вероятно, сможете найти нужную опция и поменять UEFI и Legacy загрузку или наоборот на вашем компьютере или ноутбуке. После изменения настроек не забудьте сохранить их, обычно это выполняется нажатием клавиши F10 и подтверждением сохранения.

Если найти необходимый пункт не удалось, либо возникли иные проблемы, напишите модель устройства в комментариях, я подскажу и, возможно, добавлю информацию выше.

Что следует учитывать при переключении между режимами UEFI и Legacy в БИОС:

  • Если система была установлена в другом режиме, она перестанет запускаться, поскольку для них используются разные загрузчики.
  • Secure Boot (Безопасная загрузка) работает только для UEFI-загрузки. В некоторых случаях без предварительного отключения Secure Boot нельзя включить Legacy загрузку. Если вам требуется использовать только Legacy загрузку, отключите Secure Boot (обычно где-то в разделе Security).
  • Для отключения Secure Boot и включения возможности переключиться на Legacy режим в некоторых БИОС может потребоваться установить пароль администратора, сохранить настройки, после чего зайти в БИОС с установленным паролем.
  • При включении режима загрузки UEFI и полном отключении Legacy загрузки флешки и другие накопители без UEFI-загрузчика перестанут отображаться в меню настройки порядка устройств загрузки.
  • Некоторые новые ноутбуки (на ПК пока не встречал) не имеют возможности переключения загрузки на Legacy (CSM) режим, в этом случае единственный вариант — подготовить загрузочную флешку для UEFI-режима и выполнить загрузку именно в нём.

Будет отлично, если вы сможете поделиться информацией о том, где нужная настройка находилась в вашем случае, при условии, что вариант не был представлен в списке выше — это может помочь другим читателям.

Понравилась статья? Поделить с друзьями:
0 0 голоса
Рейтинг статьи
Подписаться
Уведомить о
guest

0 комментариев
Старые
Новые Популярные
Межтекстовые Отзывы
Посмотреть все комментарии
  • Виджет яндекс почта на рабочий стол для windows 10
  • Запуск windows длится очень долго
  • Samsung ml 2510 драйвер windows 10 64
  • Root tap0901 драйвер windows 7 x64
  • Замена стандартного блокнота windows