
MAC Address or Media Access Control Address is a unique address or code assigned to a device capable of communicating within a network. MAC addresses can be found on any device that uses communication technologies such as WiFi, Ethernet, or Bluetooth. These addresses are physical identifiers that come inscribed in hardware right from the time they are manufactured. For each of these communicating technologies installed on your PC, the Media Access Control addresses are different.
If you want to change the Wi-Fi MAC Address on your Windows 10 PC, we shall discuss how to, but first, get to know more about the MAC address a bit more.
Table of Contents
MAC addresses can be used to identify devices connected to a network. The device can be tracked, allowed access, or restricted on the network based on these addresses. There are various reasons one would feel the need to change the MAC address, but the most common one is spoofing the network to bypass a local MAC address.
Is it possible to Change MAC Address in Windows 10?
Although MAC addresses are supposed to be permanent but dynamic, it is possible to change a device’s MAC address. You can change the MAC address on your PC, including the WiFi MAC address.
Methods to Change MAC Address in Windows 10?
In the section below, we look at the methods you can use to change your PC’s Wi-Fi MAC address.
1 – Change the MAC Address in Device Manager
The best and the simplest way to change the WiFi MAC address in Windows 10 PC is through the Device Manager. Let us take a look at the steps involved in this process.
Step 1: Press Windows + X keys on your keyboard together. Locate the Device Manager option in the menu that will open. This will launch the Device Manager window.
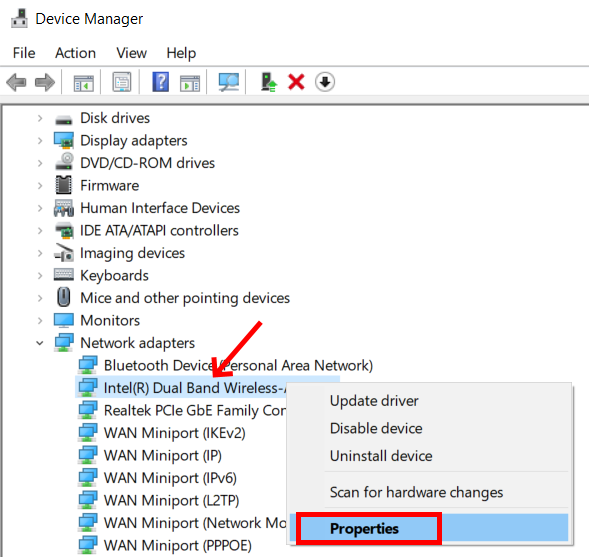
Step 2: Now, in the Device Manager window, click on the Network adapter option. This will expand the list of network adapter drivers. As you want to change the WiFi MAC address, make a right-click on the Wireless driver. A context menu will open up. Here, select the Properties option.
Step 3: In the Properties window that will open, go to the Advanced tab. Here, go to the Property section and look for the Locally Administered Address option; select it. Now, on the same window on the right, you will see a Value window; click on it. In this section, you will need to enter a Hexadecimal value of 12 characters. It could be a random Hexadecimal value. If you want, you can get one from here: Random MAC Address Generator. This website, just like the name says, generates random MAC addresses that you can use. Just make sure to enter only the characters and not the separators(:).
After entering a value, click Ok.
Step 4: To make the new MAC address in use, close down the Device Manager window, then restart your computer.
The new address would not be applied unless the restart takes place.
Making sure that the MAC address is changed
Once the PC restarts, you will have to make sure that the MAC address has changed. How to do that? Follow the steps:
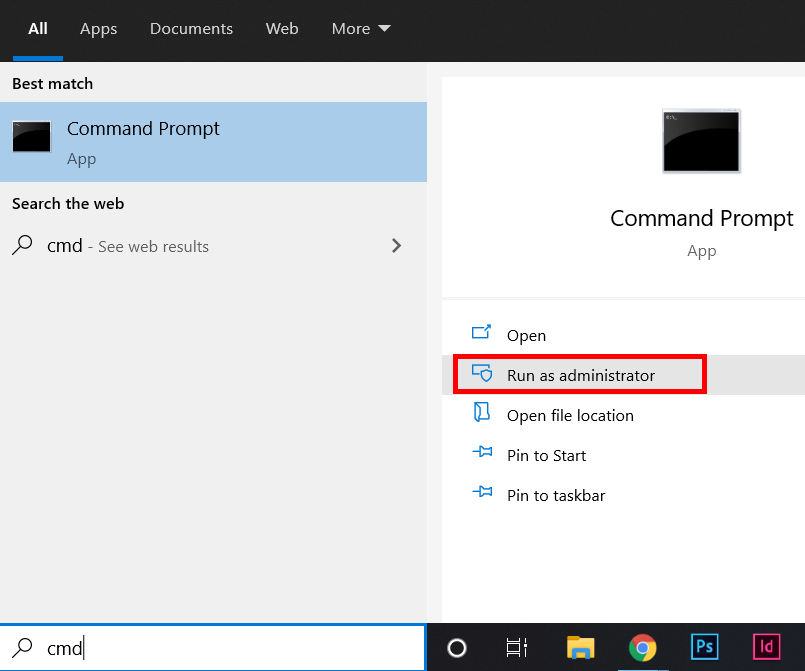
Press the Windows key + S to open the Start search menu. Here, type cmd. From the search result’s right pane, double click on the Run as administrator option.
This will run the CMD application in administrator mode. In the CMD window, type the following command and press the Enter button:
ipconfig/all
Here, you will be able to see a list of information. Look for the Physical Address section. Here, you will be able to see the new MAC address.
Whether you choose to change your MAC address, you can use this command to view the changed MAC address of the network adapter.
2 – Change the MAC Address in Control Panel
You can also choose to change your MAC address for the WiFi network adapter through the Network and Sharing Center in Contol Panel. Check out the steps provided below:
Step 1: Open Control Panel on your PC. For this, press the Start button and type Control. You will see the Control panel in the search results; click on it.
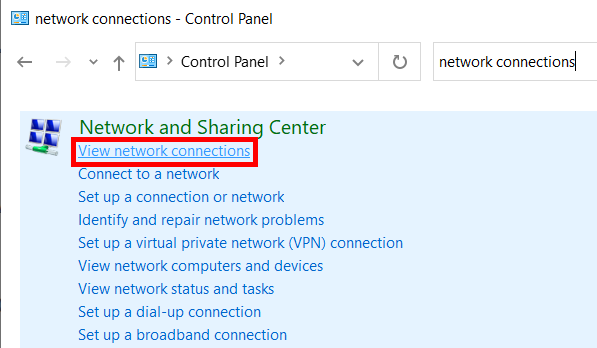
Step 2: In the Control Panel search bar, type network connections. From the Control Panel window results, you will find many options under the Network and Sharing Center section. From these results, select the View network connections option.
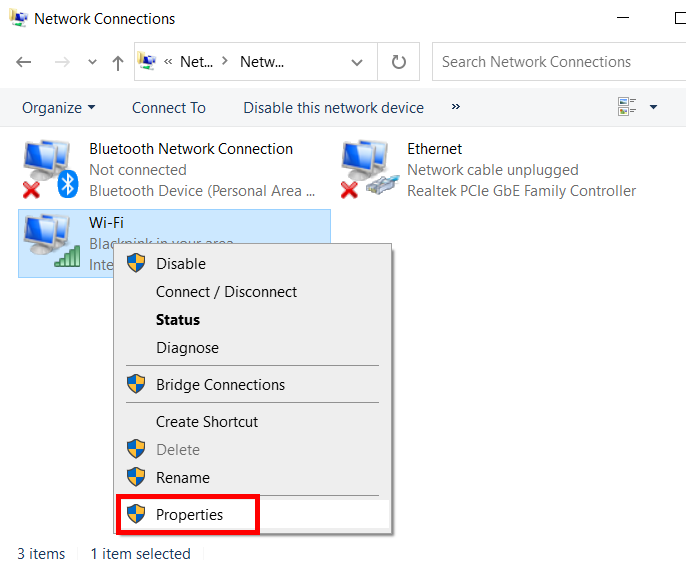
Step 3: You will now be able to view the network connections available on your PC. Identify the Wireless connection, make a right-click on it, then select the Properties option.
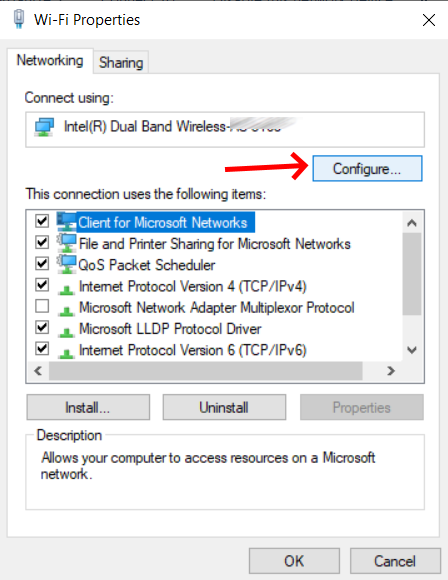
Step 4: The Wireless adapter properties window will open. Here, click on the Configure option.
Step 5: A new window will open, something similar to where we changed the final solution’s MAC address. Go to the Advanced tab and repeat the same process mentioned in Step 3 of the previous answer.
After changing the MAC address successfully, do not forget to restart your PC to apply the changes. Now, open Command Prompt with admin privileges and run the ipconfig/all command to ensure the changes.
3 – Use Registry Editor to Change MAC Address
Registry Editor can also be used to change the MAC address on your PC. Although the process is a bit lengthy, it is pretty straightforward to follow. All you need to do is carry out the steps provided below as given.
Also, make sure to make the changes very carefully, as a misstep in the Registry Editor could render your PC useless. Here are the steps:

Step 1: Press the Start button in the Start search menu, type registry editor. In the search result, go to the right panel and click on the Run as administrator option. This will launch the Registry Editor with administrator privileges, enabling you to change your MAC address of Windows 10.
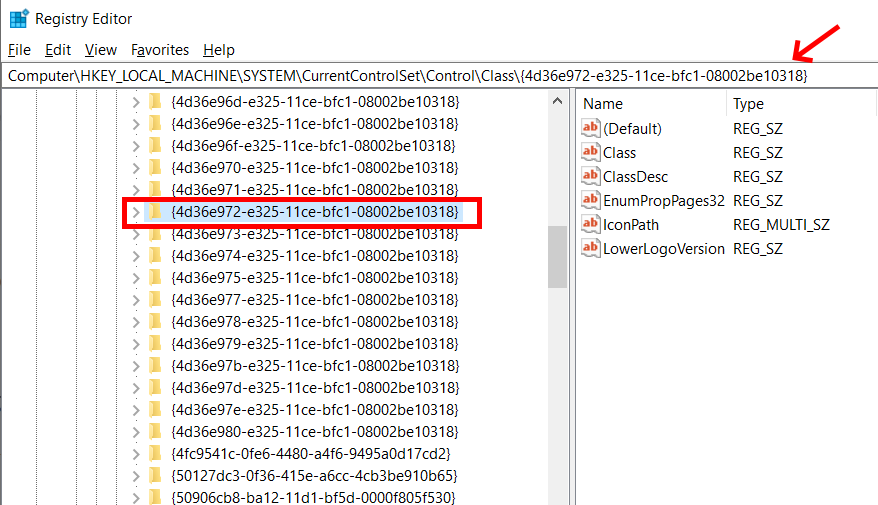
Step 2: Go to the left pane of the Registry Editor and navigate to the following location:
Computer\HKEY_LOCAL_MACHINE\SYSTEM\CurrentControlSet\Control\Class\{4d36e972-e325-11ce-bfc1-08002be10318}
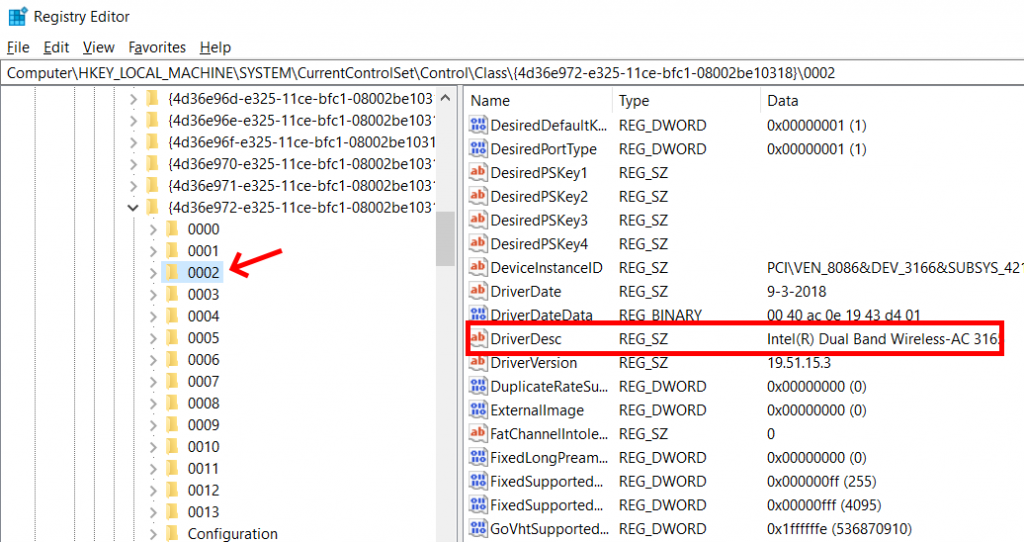
Step 3: Click on the 4d36e972-e325-11ce-bfc1-08002be10318 directory to expand its list. Now, click on each of the sub-directories, like 0000, 0001, etc. After selecting each of these, go to the right panel and look for the DriveDesc entry. This will tell you if the device that you have selected is WiFi (wireless).
Step 4: After identifying the wireless sub-directory, make a right-click to New and select the String Value option.
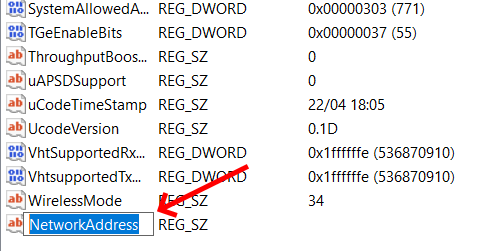
Step 5: On the right pane of the Registry Editor, a new entry will appear; name it NetworkAddress.
Step 6: Make a right-click on the NetworkAddress entry and select the Modify option from the context menu.

Step 7: An Edit String window will open up. Here, in the Value data field, enter a 16 character MAC address. You can make use of the MAC address generator that I mentioned earlier in Method 1. Click Ok after entering the value.
After making the change, restart your PC to apply the difference to your MAC address.
4 – Change MAC Address through Command Prompt
You can also make use of the Command Prompt to change your MAC address on the PC. For this, you will need to launch Command Prompt in Admin mode. Also, it is recommended to change the MAC address in the CMD window after you have followed the steps provided in the Registry Editor process. This is because you will need some information from the registry editor. To be precise, you will require the sub-directory name under the 4d36e972-e325-11ce-bfc1-08002be10318 associated with the WiFi adapter. In the last process, the sub-directory was 0002. Thus we will be using the same. You can replace it according to your PC’s configuration. Here are the steps:
Step 1: Open Command Prompt with Admin privileges. For this, press Windows key + S at a time. The start search panel will open up. Here, type cmd. In the search result, select the Run as administrator option. Alternatively, you can also use PowerShell for the same. To launch Powershell, type Powershell in the search bar. From the search result, select the run as administrator option.
Step 2: In the CMD / PowerShell window, type the following command:
reg add HKEY_LOCAL_MACHINESYSTEMCurrentControlSetControlClass{4D36E972-E325-11CE-BFC1-08002BE10318}_0002 /v NetworkAddress /d 012df566e30a /f
In the above command, make sure to replace the 0002 with the wireless directory according to your Registry Editor and 012df566e30a with the new MAC address you want to set.
It was once done; press Enter button after typing in the command. After the command has been executed, go ahead and close Command Prompt window. Also, restart your PC once.
Note: You can use the above process if you need to change your Wi-Fi MAC address in Windows 10 frequently.
Recommended for You:
How to Enable 5ghz WiFi on Windows 10
How to Enable WiFi in Windows 10
Solved: DHCP is Not Enabled For WiFi in Windows 10
Mac Flooding: How Does it Work?
Обновлено:
Опубликовано:
Что такое MAC-адрес простыми словами.
Если Вы хотите узнать текущий физический адрес сетевой карты, воспользуйтесь статьей Как узнать mac-адрес.
Способ 1. Воспользоваться встроенными средствами
1. Открываем диспетчер устройств.
В Windows 11 / 10 / 8 нажимаем комбинацию клавиш Win + X и выбираем Диспетчер устройств:
В Windows 7 кликаем по Компьютер правой кнопкой мыши и выбираем Управление:

В открывшемся окне переходим на Диспетчер устройств:
2. Раскрываем группу устройств Сетевые адаптеры, кликаем правой кнопкой мыши по тому, для которого меняем mac адрес и выбираем Свойства:

3. Переходим на вкладку Дополнительно — кликаем по Network Address — меняем переключатель в положение Значение — вписываем новый MAC-адрес:
Способ 2. Использовать программу MACChange
Скачиваем программу MACChange и запускаем ее. Откроется мастер установки. Принимаем лицензионное соглашение и нажимаем несколько раз Next, принимая значения по умолчанию, и Install.
Процесс инсталляции займет несколько секунд. Теперь запускаем программу с рабочего стола.
В открывшемся окне выбираем сетевую карту для смены адреса, кликаем по значку генерирования нового mac-адреса и нажимаем по кнопке Change:

Если появилось сообщение «Updating MAC address. Completed», значит все прошло успешно.
Чтобы вернуть настройки, нажмите по кнопке Set Default.
Способ 3. С помощью реестра Windows
Запускаем реестр командой regedit.
Переходим в раздел HKEY_LOCAL_MACHINE\SYSTEM\CurrentControlSet\Control\Class\{4D36E972-E325-11CE-BFC1-08002BE10318}
* 4D36E972-E325-11CE-BFC1-08002BE10318 — это общий идентификатор класса сетевых устройств. Он одинаковый на всех компьютерах с операционной системой Windows.
Если сетевых адаптеров несколько, мы увидим пронумерованные разделы — 0000, 0001, 0002 и так далее. Необходимо пройти по всем в поисках нужного:

Если среди списка параметров нет «NetworkAddress», создаем строковый параметр:
Называем его NetworkAddress и присваиваем значение с новым mac-адресом:
Способ 4. Командная строка
Встроенными средствами Windows не предусмотрена смена MAC-адреса через командную строку. Но выход есть.
Скачиваем архив с программой macshift и распаковываем его в любую папку.
Открываем cmd.exe от администратора и при помощи команды cd переходим в папку, в которую распаковали архив.
Вводим следующую команду:
macshift -i «Ethernet» A1B2C3D4E5F6
* где Ethernet — имя сетевого соединения (его можно посмотреть командой getmac /v /fo list); A1B2C3D4E5F6 — mac-адрес.
Какой способ помог вам?
Если вам удалось решить задачу, поделитесь своим опытом для других. Что помогло:
* в процентах показаны результаты ответов других посетителей.
Вчера написал о том, как узнать MAC-адрес компьютера, а сегодня речь пойдет о его смене. Зачем может понадобиться его поменять? Самая вероятная причина — если ваш провайдер использует привязку по этому адресу, а вы, скажем, купили новый компьютер или ноутбук.
Пару раз встречал споры на тему того, что MAC-адрес изменить нельзя, ведь это аппаратная характеристика, а потому поясню: на самом деле, «зашитый» в сетевой карте MAC-адрес вы, действительно, не измените (это возможно, но требует дополнительного оборудования — программатора), но это и не нужно: для большей части сетевого оборудования потребительского сегмента, MAC-адрес, заданный на программном уровне, драйвером, имеет приоритет над аппаратным, что и делает описанные ниже манипуляции возможными и полезными.
Изменение MAC-адреса в Windows с помощью диспетчера устройств
Примечание: первые две цифры задаваемого MAC-адреса не нужно начинать с 0, а заканчивать следует 2, 6, A или E. В противном случае, на некоторых сетевых картах смена может не сработать.
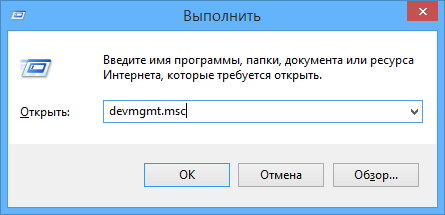
Для начала, запустите диспетчер устройств Windows 7 или Windows 8 (8.1). Быстрый способ сделать это — нажать клавиши Win+R на клавиатуре и ввести devmgmt.msc, после чего нажать клавишу Enter.
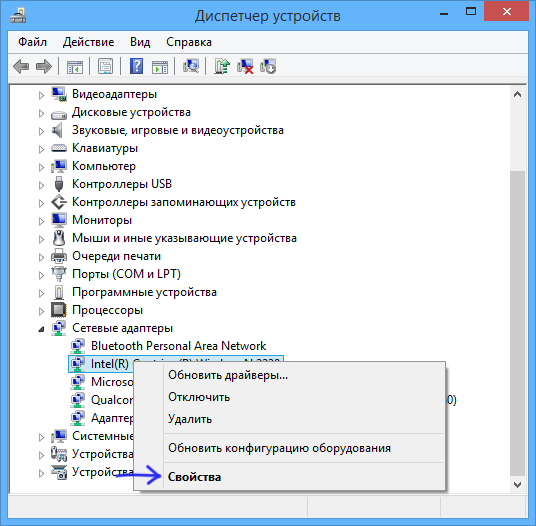
В диспетчере устройств откройте раздел «Сетевые адаптеры», кликните правой кнопкой мыши по сетевой карте или Wi-Fi адаптеру, MAC-адрес которого нужно изменить и нажмите «Свойства».
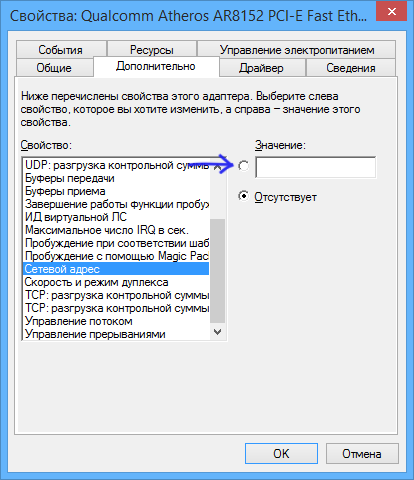
В окне свойств адаптера выберите вкладку «Дополнительно» и найдите пункт «Сетевой адрес», и установите его значение. Чтобы изменения вступили в силу, нужно либо перезагрузить компьютер, либо отключить и включить сетевой адаптер. MAC-адрес состоит из 12 цифр 16-ричной системы и задавать его нужно, не используя двоеточия и другие знаки препинания.
Примечание: не для всех устройств можно проделать вышеописанное, для некоторых из них пункта «Сетевой адрес» не будет на вкладке «Дополнительно». В этом случае, следует воспользоваться другими способами. Для проверки, вступили ли изменения в силу, можно использовать команду ipconfig /all (подробнее в статье про то, как узнать MAC-адрес).
Изменение MAC-адреса в редакторе реестра
Если предыдущий вариант вам не помог, то можно воспользоваться редактором реестра, способ должен работать в Windows 7, 8 и XP. Для запуска редактора реестра нажмите клавиши Win+R и введите regedit.
В редакторе реестра откройте раздел HKEY_LOCAL_MACHINE\SYSTEM\CurrentControlSet\Control\Class\{4D36E972-E325-11CE-BFC1-08002BE10318}

В этом разделе будет содержаться несколько «папок», каждая из которых соответствует отдельному сетевому устройству. Найдите то из них, MAC-адрес которого нужно изменить. Для этого обращайте внимание на параметр DriverDesc в правой части редактора реестра.
После того, как вы нашли нужный раздел, кликните правой кнопкой мыши по нему (в моем случае — по 0000) и выберите — «Создать» — «Строковый параметр». Назовите его NetworkAddress.
Дважды кликните по новому параметру реестра и задайте новый MAC-адрес из 12 цифр шестнадцатеричной системы счисления, не используя двоеточий.
Закройте редактор реестра и перезагрузите компьютер для того, чтобы изменения вступили в силу.
Every device that connects to the internet is required to provide or declare its IP Address and also its MAC (Media Access Control) Address to the Network.
While the IP Address of a computer is dynamically assigned by the Router, its MAC Address is assigned at Hardware level and remains the same for the entire life of your computer.
Since, the MAC Address of a device is coded at Hardware level, there is really no way to change the original MAC Address of a device.
However, it is possible mask or hide the real MAC Address of a computer by forcing the computer to declare or broadcast a different MAC Address to the Network.
Advertisement
Change MAC Address of Windows Computer
In general, users want to change the MAC Address of their computers to bypass blocked networks and also to test MAC Address filtering.
Before going ahead with the steps to change MAC Address, it is important that you note down the the actual MAC Address of your computer. This can be useful, if you run into problems after changing MAC Address and need to go back to the original or default MAC Address.
Also, if your Wi-Fi Network is using MAC Filtering, you need to make sure that the New MAC Address is white listed on the Modem/Router.
1. Find MAC Address of Computer Using Settings
Since, a computer can connect to the internet using both Wi-Fi and Ethernet, it will have two MAC Addresses, one for Ethernet and the other one for Wi-Fi.
1. Open Settings > click on Network & Internet Icon.
2. On the next screen, select your Network (Wi-Fi or Ethernet) in the left-pane. In the right-pane, double-click on your Network Name.

3. On the next screen, the MAC Address of your computer will be listed under “Properties” section, next to Physical Address (MAC) entry.

You can copy the MAC Address to a text file and keep the file at a safe location on your computer.
2. Change MAC Address Using Device Manager
If required, you can change the MAC Address of your computer using the following steps.
1. Right-click on the Start button and click on Device Manager.
Advertisement
2. On Device Manager screen, expand Network Adapters entry > right-click on the Network Adapter for your computer and click on Properties.

3. On properties screen, switch to Advanced Tab > select Network Address entry > check Value entry and type New MAC Address.

4. Click on OK to save the New MAC Address on your computer.
Note: Enter New MAC Address without using hyphens.
3. How to Confirm if NEW MAC Address is Working?
After changing MAC Address, you can follow the steps below to confirm if New MAC Address is working.
1. Open Command Prompt (Admin) > type ipconfig/all and press the Enter key.
2. Once the command is executed, you should find the NEW MAC Address listed under “Ethernet Adapter” or “Wireless Adapter” section next to Physical Address entry.

You should be able to use the New MAC Address without encountering any problems, unless you are using MAC filtering and the NEW MAC Address is not listed on your Router.