
Перед тем как менять параметры IP самостоятельно, рекомендуем куда-то записать текущие значения, поскольку они могут пригодиться во время редактирования, а также на случай, когда потребуется вернуть предыдущие адреса.
Способ 1: «Параметры»
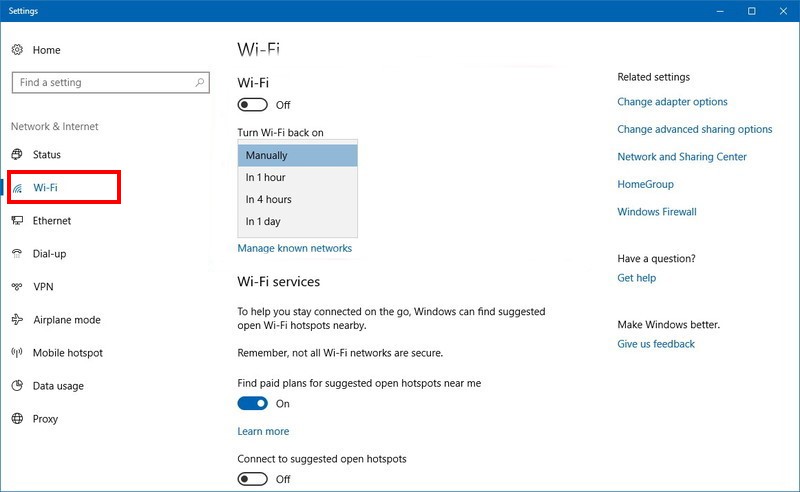
Обычно компьютеру автоматически присваивается IP-адрес провайдером. Но изменить его параметры можно вручную с помощью соответствующего раздела в системных «Параметрах». Этот вариант, скорее, подойдет для проводного типа соединения, когда ПК или ноутбук напрямую подсоединен к маршрутизатору:
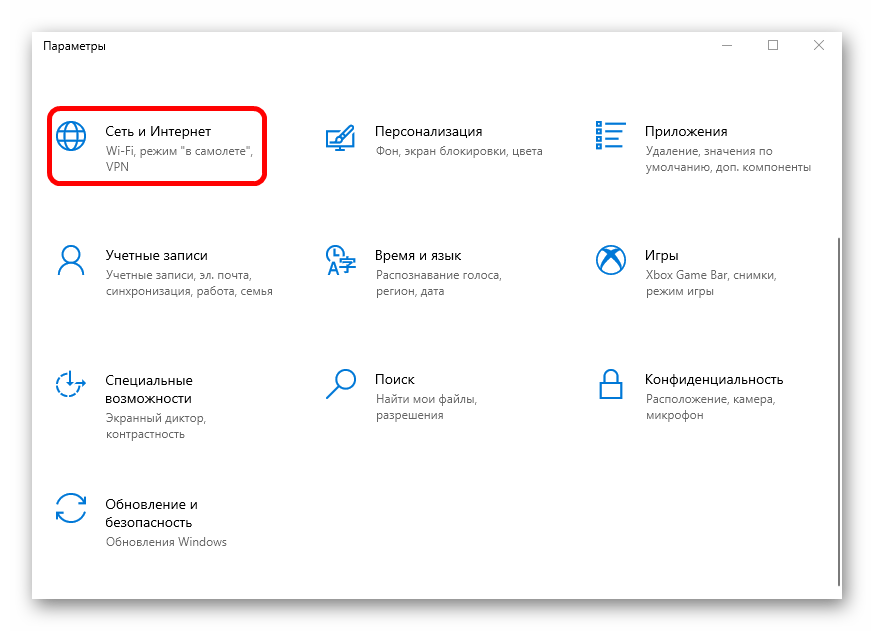
- Нажмите на кнопку «Пуск», затем выберите приложение «Параметры».
- Перейдите в раздел «Сеть и Интернет».
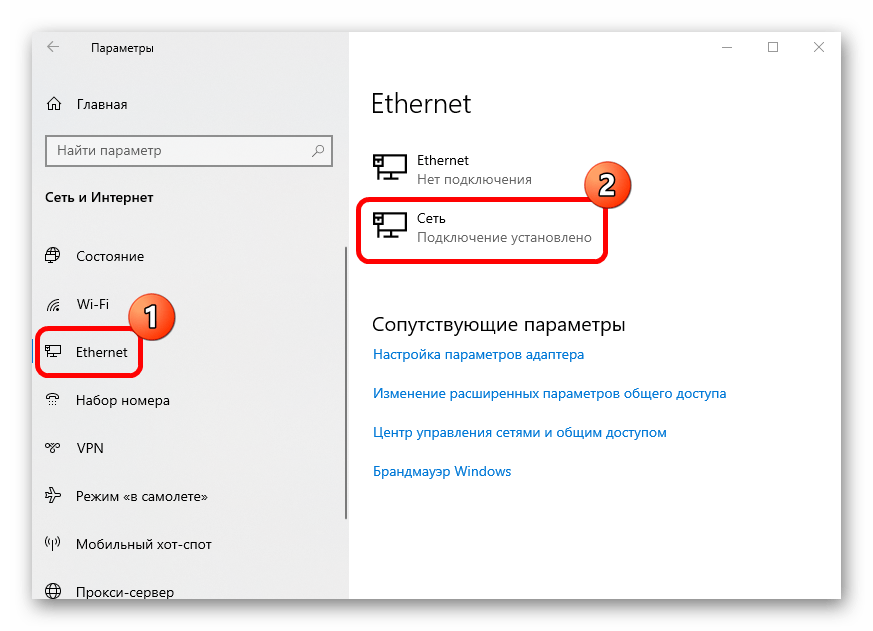
- Нажмите на вкладку слева «Ethernet», а в центральной части окна выберите активное соединение.
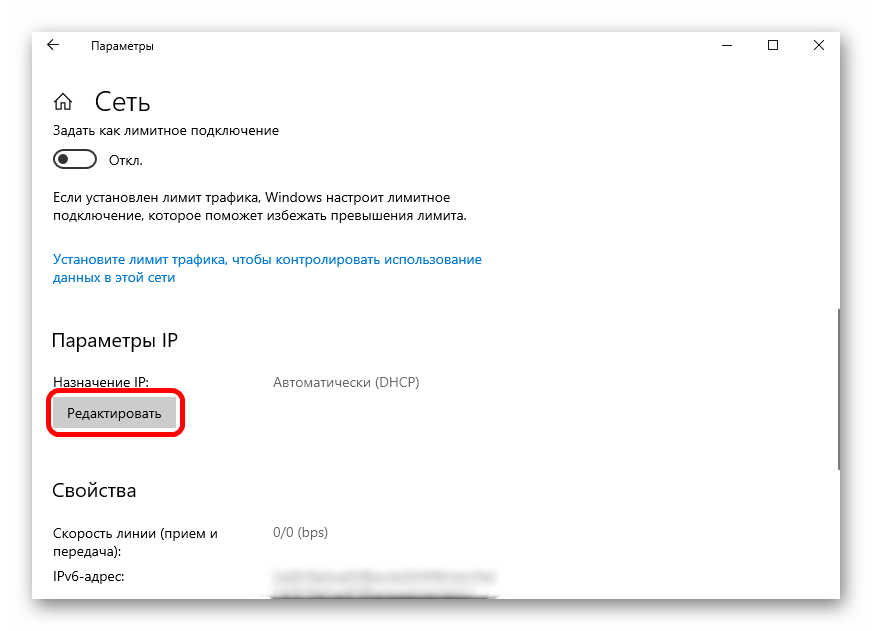
- Пролистайте до блока «Параметры IP» и кликните по кнопке «Редактировать».
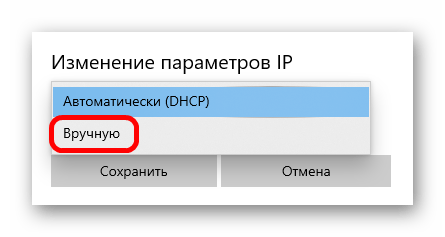
- Во всплывающем окне нажмите на выпадающее меню и выберите пункт «Вручную».
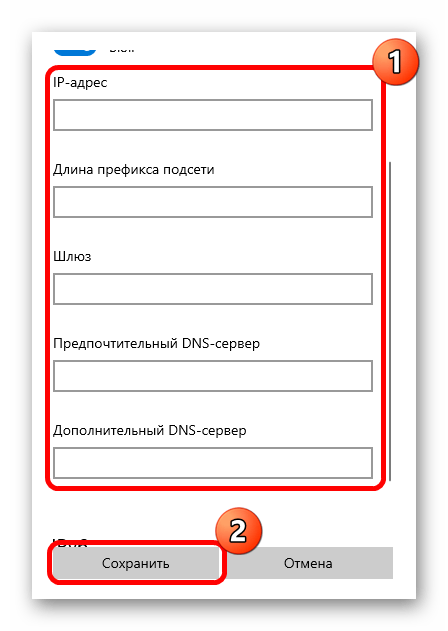
- Отобразятся два варианта для изменения: «IPv4» и «IPv6». Чтобы изменить тот или иной протокол, переведите тумблер в активное состояние.
- Появятся дополнительные текстовые поля для ручного ввода параметров: IP-адрес, сервера DNS, шлюз и длина префикса подсети. Как только все данные будут введены, нажмите на кнопку «Сохранить».

Следует отметить, что при редактировании параметров необходимо быть уверенным, что все данные верны, иначе подключение к интернету может быть нарушено. Если у вас не получается сохранить новые параметры, то ознакомьтесь с нашей отдельной инструкцией:
Подробнее: Что делать, если не удается сохранить параметры IP-адреса в Windows 10
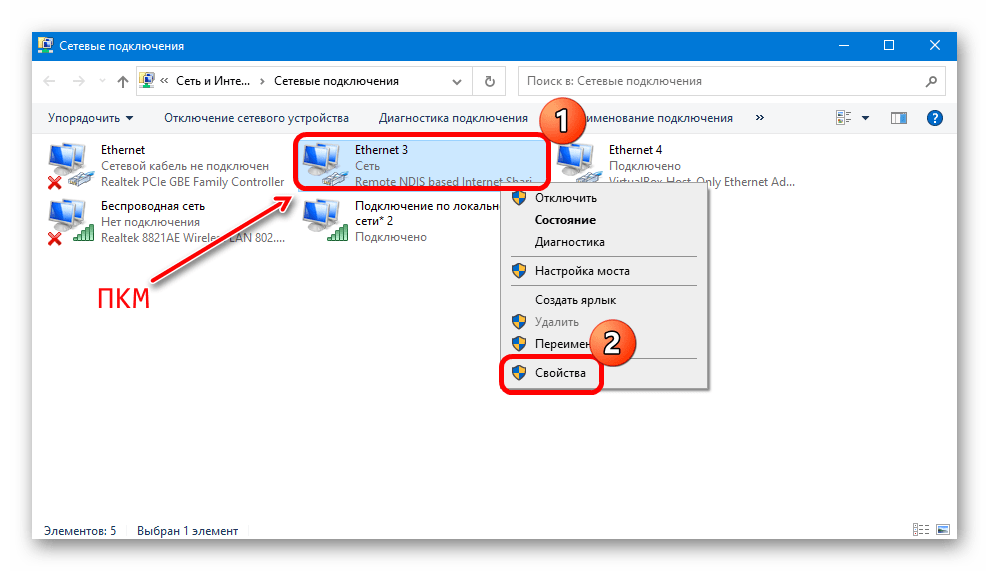
Способ 2: «Свойства сетевого адаптера»
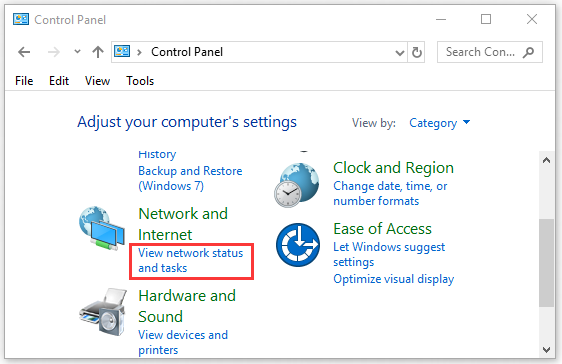
Этот метод классический, поскольку используется «Панель управления», свойственная и предыдущим Windows. Через нее нужно перейти в окно с настройкой свойств сетевого адаптера:
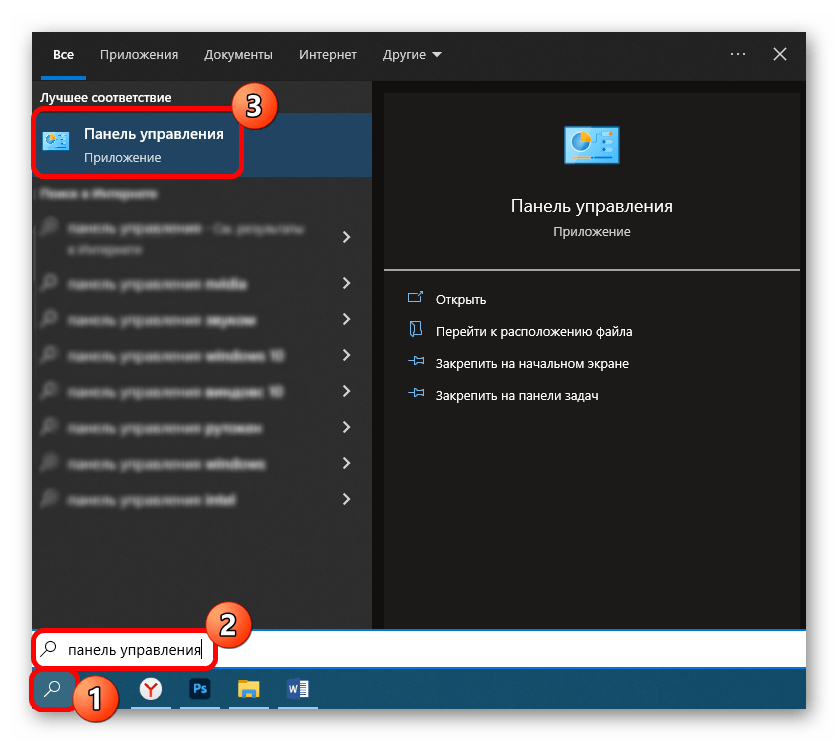
- Через строку системного поиска отыщите средство «Панель управления».
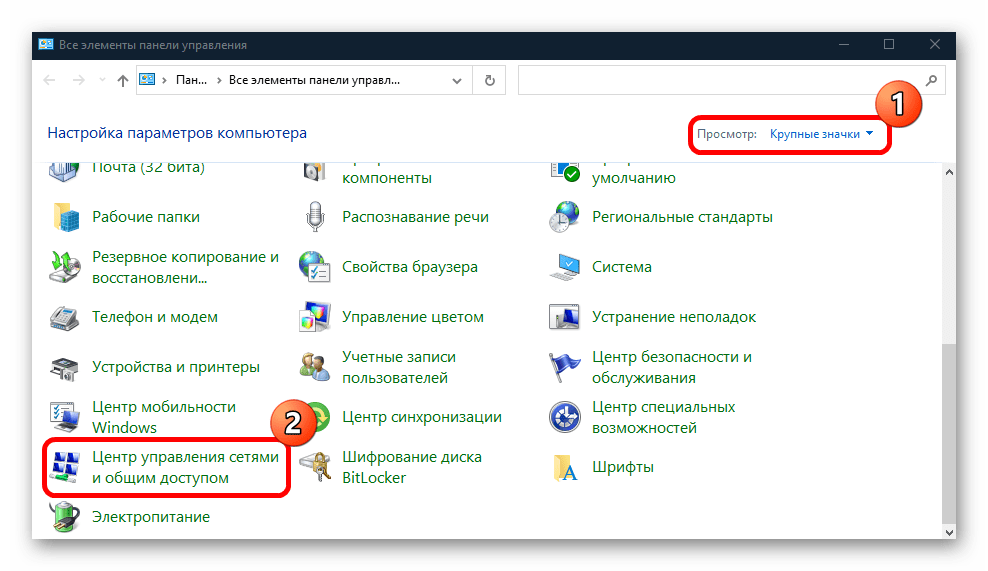
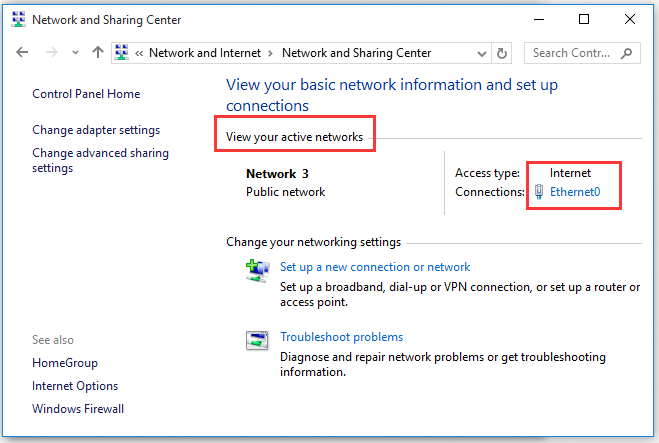
- Для удобства просмотра разделов выберите «Крупные значки» в верхнем правом углу, затем перейдите в «Центр управления сетями и общим доступом».
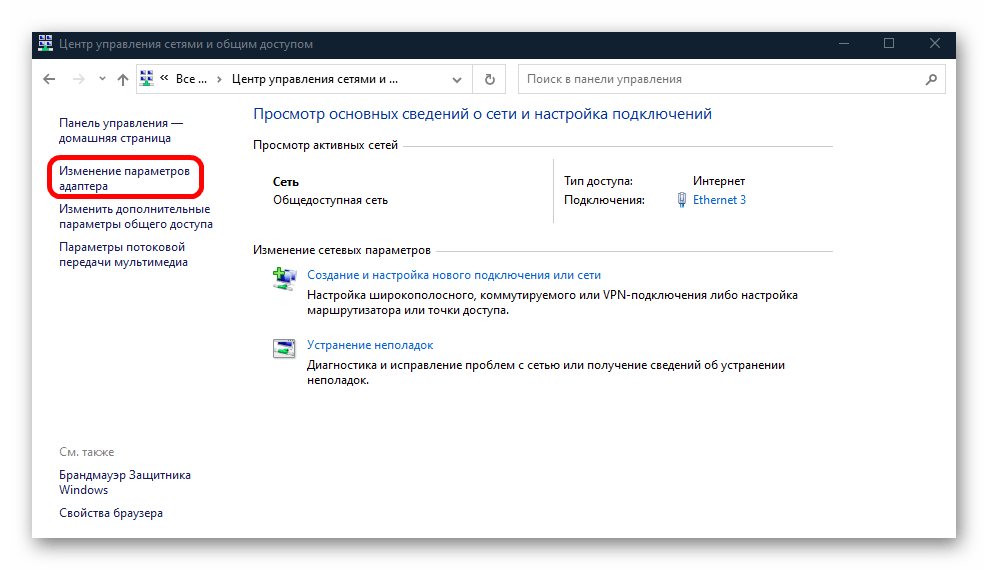
- В новом окне щелкните по ссылке «Изменение параметров адаптера» на левой панели.
- Отобразится список всех подключений, которые были на ПК или ноутбуке. Отыщите нужное, затем щелкните по нему правой кнопкой мыши и из меню выберите пункт «Свойства».
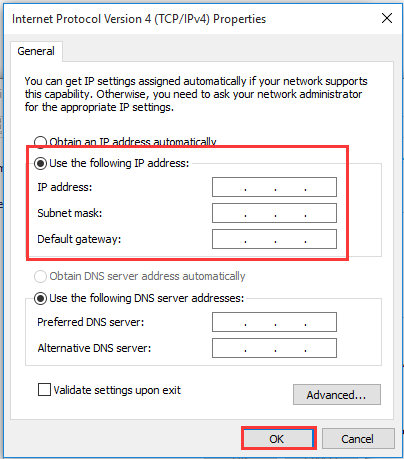
- На вкладке «Сеть» выделите нажатием левой кнопкой мыши пункт «IP версии 4 (TCP/IPv4)», а потом кликните по кнопке «Свойства».
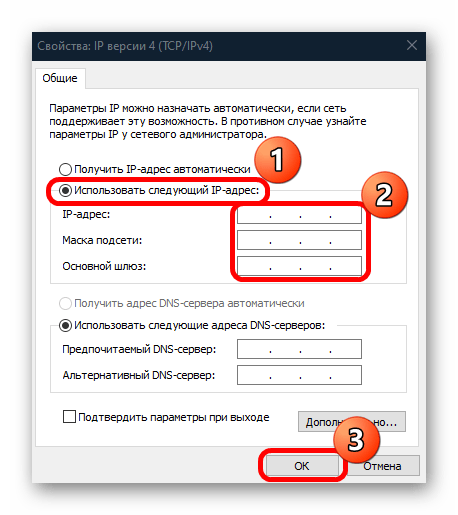
- Поставьте отметку у опции «Использовать следующий IP-адрес», после чего ниже поля станут доступными для редактирования. Введите нужные значения. Так же можно поступить и со сменой DNS-сервера. Сохраните настройки.
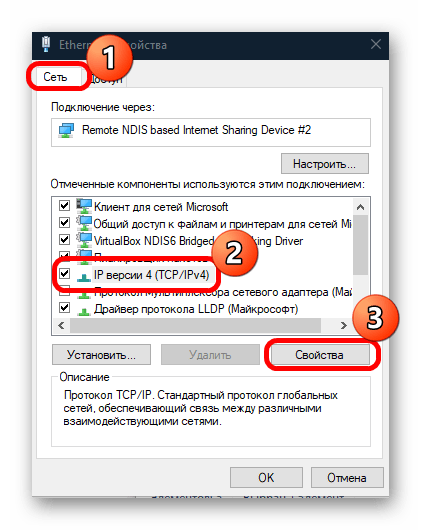
Аналогичные действия при необходимости есть возможность проделать и с протоколом «IP версии 6 (TCP/IPv6)», выбрав его в списке окна со свойствами сети.
Способ 3: «Командная строка»
Изменить некоторые параметры IP, в частности статический IP-адрес и DNS-сервер, можно, используя команды. Зная их, не придется копаться в настройках, что может сэкономить время:
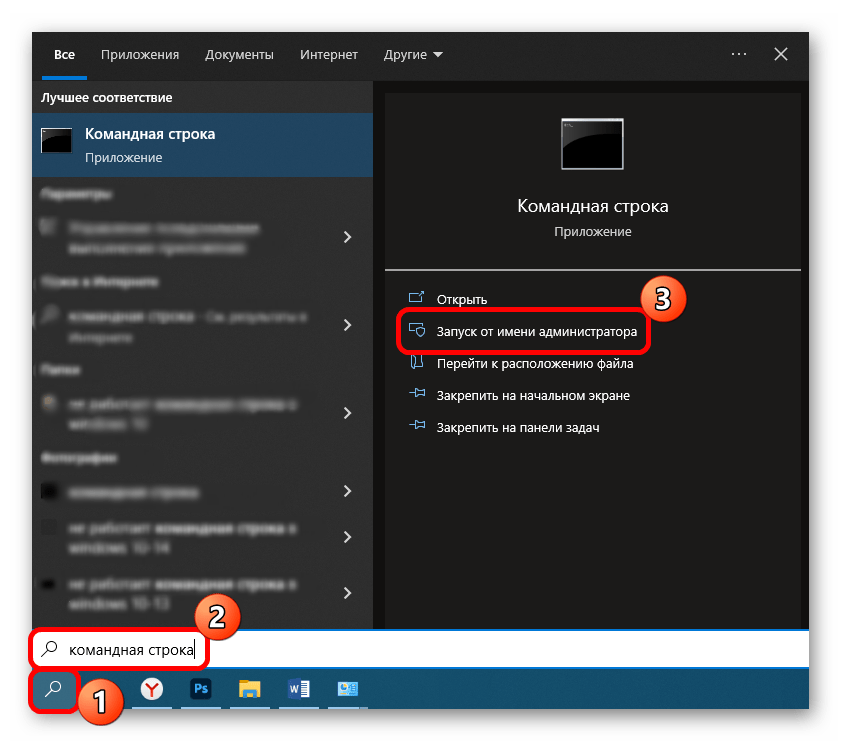
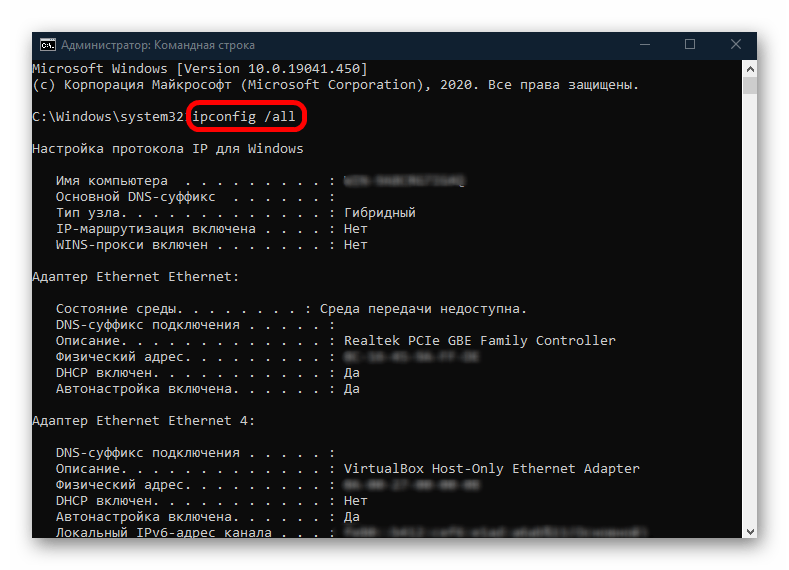
- Запустите «Командную строку» от имени администратора. Для этого воспользуйтесь поисковой строкой на нижней панели.
- Чтобы посмотреть все конфигурации сетевых адаптеров, введите команду
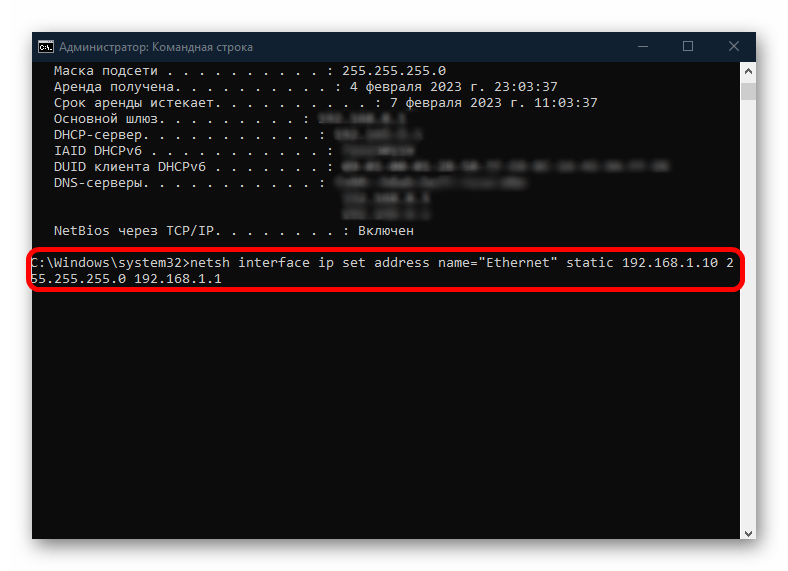
ipconfig /allи нажмите на клавишу «Enter». В списке отыщите тот адаптер, параметры IP которого собираетесь изменить. - Чтобы задать сетевому адаптеру статический IP-адрес, вставьте
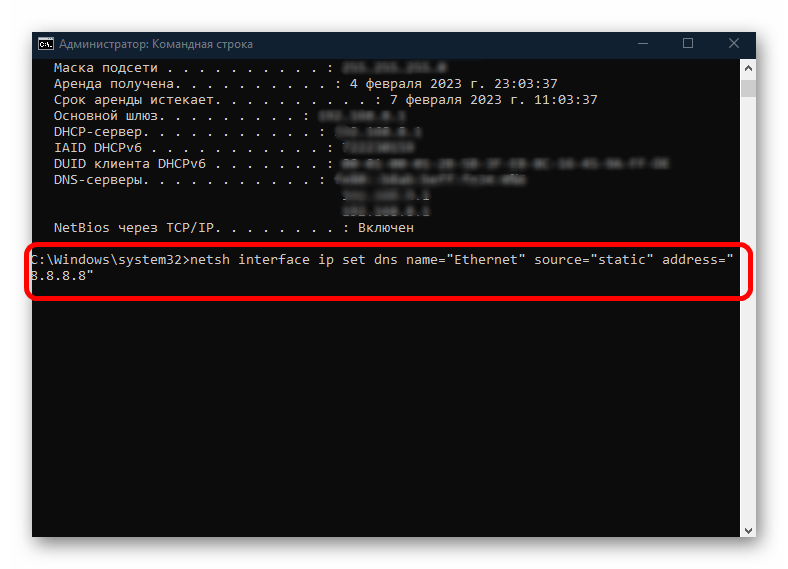
netsh interface ip set address name="Ethernet" static 192.168.1.10 255.255.255.0 192.168.1.1, где нужно прописать свои параметры: вместо «Ethernet» – имя вашего адаптера, а цифры обозначают данные IP-адресов. Выполните команду клавишей ввода. - Далее можете заменить предпочитаемый и альтернативный DNS-серверы, поочередно выполнив команды
netsh interface ip set dns name="Ethernet" source="static" address="адрес_DNS-сервера"иnetsh interface ip add dns name="Ethernet" address="адрес_DNS-сервера" index=2, не забывая прописывать вместо «Ethernet» и цифр свои данные.
То же самое можно проделать и через консоль «Windows PowerShell», запущенную с расширенными правами.
Наша группа в TelegramПолезные советы и помощь

Changing your IP address can improve your privacy, resolve network issues, or even bypass certain restrictions. In this tutorial, we’ll walk you through the steps to change your IP address on Windows 10 and 11. Whether you’re using an Ethernet or wireless connection, this guide will cover everything you need to know.
Key Takeaways
- Learn how to manually change your IP address on both Windows 10 and Windows 11.
- Understand the difference between DHCP-assigned IP addresses and static IP addresses.
- Get tips on using Google’s DNS for faster and more reliable connections.
1. Accessing the Control Panel

- From your desktop, click the Start button or press the Windows key + S to open the search bar.
- Type in “Control Panel” and select the best match.
- In the Control Panel, change the view to Small Icons for easier navigation.
2. Navigate to Network and Sharing Center

- Once in the Control Panel, find and click on Network and Sharing Center.
- On the left side, select Change Adapter Settings to view all network adapters on your system.
3. Selecting the Correct Network Adapter

- Identify the network adapter you’re using. If you’re on a desktop, this is typically labeled Ethernet.
- For laptops or devices using Wi-Fi, look for the wireless network adapter.
Example: If you’re using a VPN like ProtonVPN, you might see additional adapters like Ethernet 3 for VPN connections. Ignore these and focus on your main network adapter.
4. Viewing Current Network Settings

- Right-click on your network adapter and select Status.
- Click on Details to view your current network connection settings. Pay attention to the IPv4 address and whether DHCP is enabled.
5. Changing Your IP Address

- Close the details window and select Properties for your network adapter.
- In the list of options, find Internet Protocol Version 4 (TCP/IPv4) and double-click it.
- Choose Use the following IP address to manually enter a new IP.
6. Finding an Available IP Address

- Open PowerShell as an administrator (or Command Prompt, depending on your setup).
- Type
IPConfigand press Enter to see all assigned IP addresses. - To find an available IP address, use the command
arp -a, which will list all IP addresses on your network.Pro Tip: Make sure the IP address you choose isn’t already in use to avoid conflicts. The range is typically from 192.168.x.2 to 192.168.x.255, with your router usually assigned to .1.
7. Entering Your New IP Address

- Back in the Internet Protocol settings, enter the new IP address you’ve selected.
- The Subnet Mask field should fill automatically. If not, it is usually 255.255.255.0 for home networks.
- Enter your router’s IP address as the Default Gateway (you can find this in the IPConfig results or typically set to 192.168.x.1).
- For DNS Servers, you can use Google’s DNS by entering 8.8.8.8 and 8.8.4.4 for faster, reliable resolution.
8. Confirming Your New IP Address

- After applying the changes, right-click your network adapter again and choose Status.
- Click Details to verify your new IP address and ensure that DHCP is disabled, confirming you’ve set a static IP.
9. Reverting to a DHCP IP Address (Optional)

- If you need to switch back to a dynamically assigned IP address, simply return to the Internet Protocol settings and choose Obtain an IP address automatically.
- You can also revert your DNS settings to be assigned automatically by the router.
Why Change Your Local IP Address?

Changing your local IP address can be useful for several reasons related to your device’s interaction within your local network:
- Avoid Network Conflicts: If two devices on the same network accidentally share the same IP address, it can cause connectivity issues. Changing your local IP address can resolve these conflicts and ensure smooth network performance.
- Better Device Management: Assigning a static local IP address to a device, like a printer or a server, can make it easier to manage and access consistently within your network.
- Improved Local Security: In some cases, changing your local IP address can help protect your device from being easily targeted by others on the same network. This can add an extra layer of security in shared or public networks.

Remember, changing your local IP address only affects how your device is identified within your local network and does not change your public IP address, which is assigned by your Internet Service Provider (ISP). However, your public IP can be changed with a VPN like ProtonVPN.
Conclusion
Changing your IP address on Windows 10 or 11 can be an essential skill for managing your network and protecting your privacy. Whether you’re switching to a static IP or troubleshooting network issues, these steps should help you achieve your goals. Remember to choose IP addresses carefully and verify changes to avoid conflicts.
FAQs
1. What is the difference between a dynamic and static IP address?
A dynamic IP is automatically assigned by your router, while a static IP is manually set by the user and does not change unless done so manually.
2. Can changing my IP address affect my internet connection?
Yes, if done incorrectly. Choosing an IP address that’s already in use can lead to conflicts, resulting in no network access.
3. Is it safe to use Google’s DNS?
Yes, Google’s DNS is considered safe and can even speed up your browsing experience. The addresses are 8.8.8.8 and 8.8.4.4.
4. Will this process work on other versions of Windows?
The steps are similar for Windows 8, but this guide is specifically for Windows 10 and 11. Windows 7 has a different interface but follows a similar logic.
5. Can I change my public IP address using this method?
No, this tutorial changes your local IP address on your network. To change your public IP, you usually need to contact your ISP or use a VPN.
-
Home
-
Partition Magic
- How to Change IP Address on Windows 10 [Step-by-Step Guide]
By Ariel | Follow |
Last Updated
Sometimes, we have to change IP address out of many reasons. How to change IP address on Windows 10? If you are also searching for the answer, you can follow this Windows 10 guide provided by MiniTool to change IP address.
Before You Do
How to change your IP address? In order to change IP address Windows 10 smoothly, it’s required to log in to Windows 10 using an administrator account. Besides, you need to find the IP address of your router and computer. To do so, follow the steps below.
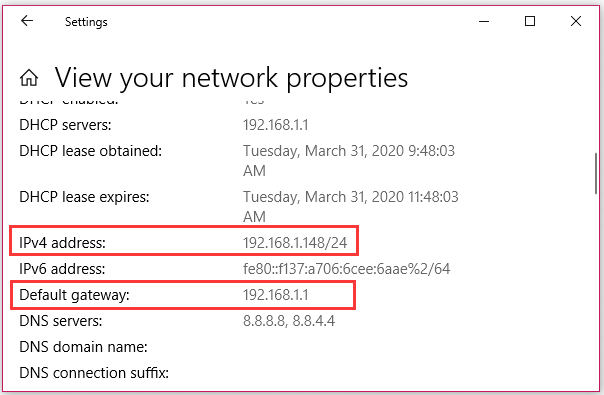
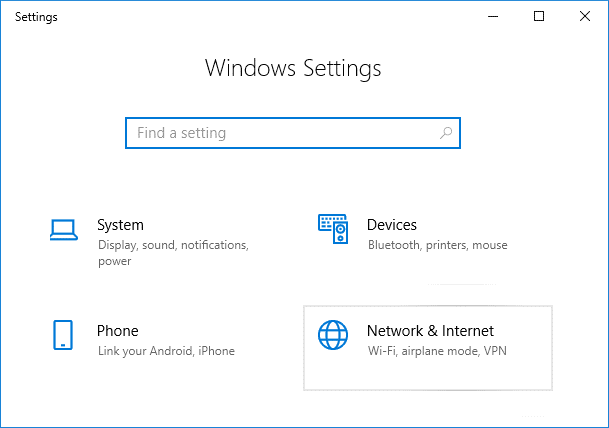
Step 1. Press the Win + I keys to open the Settings app and go to the Network & Internet section.
Step 2. In the Status tab, scroll down the right sidebar and click on the View your network properties option.
Step 3. Now, scroll down the new screen to find the Default gateway and IPv4 address sections. The router’s IP address is next to the Default gateway and the IPv4 address identifies your computer. Remember the IP addresses you have found.
Now, let’s see how to change IP address Windows 10 in the following part.
How to Change My IP Address in Windows 10
Here we will walk you through 2 methods. Each method will be discussed in detail. Now, let’s start learning how to change IP address Windows 10.
Method 1. Change IP Address Windows 10 Using the Settings App
The first and simplest way to change IP address is to use the Settings app. Here’s a full guide for you:
Step 1. Open the Settings app by pressing Win + I keys and then click on Network & Internet.
Step 2. In the pop-up window, select the network type based on your situation. If your device connects to the Internet through a wireless card, select the Wi-Fi section. If your device is using a wired connection, select the Ethernet section.
Step 3. Scroll down the right sidebar to locate the IP settings section and click on the Edit button.
Step 4. In the pop-up dialog box, select Manual from the drop-down menu and enable the IPv4 switch.
Tip: If you want the Windows 10 IP address is to be assigned by the router automatically, you can select Automatic (DHCP) option from the drop-down menu.
Step 5. Enter all the required details below including IP address, Subnet prefix length, Gateway, etc.
IP address: It refers to the static IP address that you want to use.
Subnet prefix length: It refers to the prefix length that determines the size of the subnet.
Gateway: It refers to the IP address of your router.
The Preferred DNS and Alternate DNS settings are not mandatory to enter. The setting will be automatically assigned by your router if they are blank.
Step 6. After the details are entered, click on the Save button to change IP address.
Method 2. Change IP Address Windows 10 in Control Panel
In addition to the above method, you can change IP address Windows 10 through the Control Panel. Here’s how to do that:
Step 1. Type control in the search window and select the Control Panel app from the best match.
Step 2. Change the View by to Category, and then click on View network status and tasks under the Network and Internet section.
Step 3. Navigate to the View your active networks tab and click on your Internet connection next to it.
Step 4. In the pop-up window, click on Properties and then select the Internet Protocol Version 4 or IPv6, which depends on the IP address that you’re ready to change.
Step 5. Click on the Properties button.
Step 6. In the Properties window, select the Use the following IP address option if you want to set a static IP address.
Step 7. Then you need to enter all the required details manually including IP address, subnet mask, and Default gateway. After that, click on OK to save the changes and exit the window.
How to change your IP address in Windows 10? I believe that already have known detailed steps. Now, it’s your turn to have a try.
About The Author
Position: Columnist
Ariel has been working as a highly professional computer-relevant technology editor at MiniTool for many years. She has a strong passion for researching all knowledge related to the computer’s disk, partition, and Windows OS. Up till now, she has finished thousands of articles covering a broad range of topics and helped lots of users fix various problems. She focuses on the fields of disk management, OS backup, and PDF editing and provides her readers with insightful and informative content.
How to Change IP address in Windows 10: IP address is the unique numerical label each device possesses on any particular computer network. This address is used to send and receive messages between the devices on a network.
The dynamic IP address is provided by the DHCP server (your router). A device’s dynamic IP address changes every time it connects to the network. The static IP address, on the other hand, is provided by your ISP and remains the same until it manually changes by the ISP or the administrator. Having dynamic IP addresses reduces the risk of being hacked than having static IP addresses.

On a local network, you might want to have resource sharing or port forwarding. Now, both of these require a static IP address to work. However, the IP address assigned by your router is dynamic in nature and will change every time you restart the device. In such a situation, you will need to manually configure a static IP address for your devices. There are many ways to do it. Let’s check them out.
Table of Contents
Make sure to create a restore point just in case something goes wrong.
Method 1: USE CONTROL PANEL TO CHANGE IP ADDRESS
1.Use the search field beside the windows icon on the taskbar and search for the control panel.
2.Open control panel.
3.Click on ‘Network and Internet’ and then on ‘Network and sharing center’.

4.Click on ‘Change adapter settings’ on the left side of the window.

5.Network connection windows will open.

6.Right-click on the relevant network adapter and click on properties.
7.In the networking tab, select ‘Internet Protocol Version 4 (TCP/IPv4)’.
8.Click on Properties.
9.In the IPv4 Properties window, select the ‘Use the following IP address’ radio button.
10.Enter the IP address you want to use.
11.Enter the subnet mask. For a local network that you use at your home, subnet mask would be 255.255.255.0.
12.In the Default gateway, enter your router’s IP address.
13.In the Preferred DNS server, enter the IP address of the server which provides DNS resolutions. It is usually your router’s IP address.
14.You can also add an alternate DNS server to connect to in case your device can’t reach the preferred DNS server.
15.Click on OK to apply your settings.
16.Close the window.
17.Try navigating a website to see if it works.
This how you can easily Change IP Address in Windows 10, but if this method doesn’t work for you then make sure to try the next one.
Method 2: USE COMMAND PROMPT TO CHANGE IP ADDRESS
1.Press Windows Key + X then select Command Prompt(Admin).
2.To see your current configurations, type ipconfig /all and hit Enter.

3.You will be able to see the details of your network adapter configurations.

4.Now, type:
netsh interface ip set address name=”yourNetworkAdapter” static 10.20.30.40 255.255.255.0 2.4.6.8
Note: These three addresses being your device’s static IP address you want to assign, subnet mask, and default getaway address, respectively.

5.Press enter and this will assign a static IP address to your device.
6.To set your DNS server address type the following command and hit Enter:
netsh interface ip set dns name=”yourNetworkAdapter” static 10.20.30.1
Note: The last address being that of your DNS server.

7.To add an alternate DNS address, type
netsh interface ip add dns name=”alternateServer” 8.8.8.8 index=2
Note: This address will be the alternate DNS server address.

8.Try navigating a website to see if it works.
Method 3: USE POWERSHELL TO CHANGE IP ADDRESS
1.Press Windows Key + S to bring up the Search then type PowerShell.
2.Right-click on Windows PowerShell shortcut and select ‘Run as administrator’.
3.To see your current IP configurations, type Get-NetIPConfiguration and hit Enter.

4.Note down the following details:
InterfaceIndex
IPv4Address
IPv4DefaultGateway
DNSServer
5.To set a static IP address, run the command:
New-NetIPAddress -InterfaceIndex 13 -IPAddress 10.20.30.40 –PrefixLength 24 -DefaultGateway 2.4.6.8
Note: Here, replace InterfaceIndex number and DefaultGateway with the those you noted down in previous steps and IPAddress with the one you want to assign. For subnet mask 255.255.255.0, PrefixLength is 24, you can replace it if you require to with correct bit number for subnet mask.
6.To set DNS server address, run the command:
Set-DnsClientServerAddress -InterfaceIndex 3 -ServerAddresses 10.11.12.13
Or, if you want to add another alternate DNS address then use the command:
Set-DnsClientServerAddress -InterfaceIndex 3 –ServerAddresses 10.11.12.13, 8.8.8.8
Note: Use the relevant InterfaceIndex and DNS server addresses.
7.This how you can easily Change IP Address in Windows 10, but if this method doesn’t work for you then make sure to try the next one.
Method 4: CHANGE IP ADDRESS IN WINDOWS 10 SETTINGS
Note: This method works only for wireless adapters.
1.Press Windows Key + I to open Settings then click on ‘Network & Internet’.
2.Click on Wi-Fi from the left pane and select your required connection.

3.Scroll down and click on Edit button under IP settings.

4.Select ‘Manual’ from the drop-down menu and toggle on the IPv4 switch.

5.Set IP address, Subnet prefix length (24 for subnet mask 255.255.255.0), Gateway, Preferred DNS, Alternate DNS and click on Save button.
Using these methods, you can easily set a static IP address for your computer.
Recommended:
- How to Setup Gmail in Windows 10
- Add a Printer in Windows 10 [GUIDE]
- Microsoft Word has Stopped Working [SOLVED]
- How to Disable Google Chrome PDF Viewer
I hope the above steps were able to help you Change IP address in Windows 10 but if you still have any questions regarding this guide then feel free to ask them in the comment’s section.

ip address windows 10
When working in a larger environment, we are often asked to change our IP address. To change IP address in Windows 10, we have come up with a visual guide with really simple and easy steps. Follow this Windows 10 guide and change IP address in Windows 10. Let’s tell you about it in detail.
The need for changing IP address, sometimes, it is needed that we change IP address in Windows 10. This mostly happens when we are a part of a large organization like a college or a company and any change in IP policy might want us to change our machine’s IP address.
So, here are the steps on how to change IP address in Windows 10:
On the taskbar of your computer, right click on the internet icon and click on “Open Network and Sharing Center”
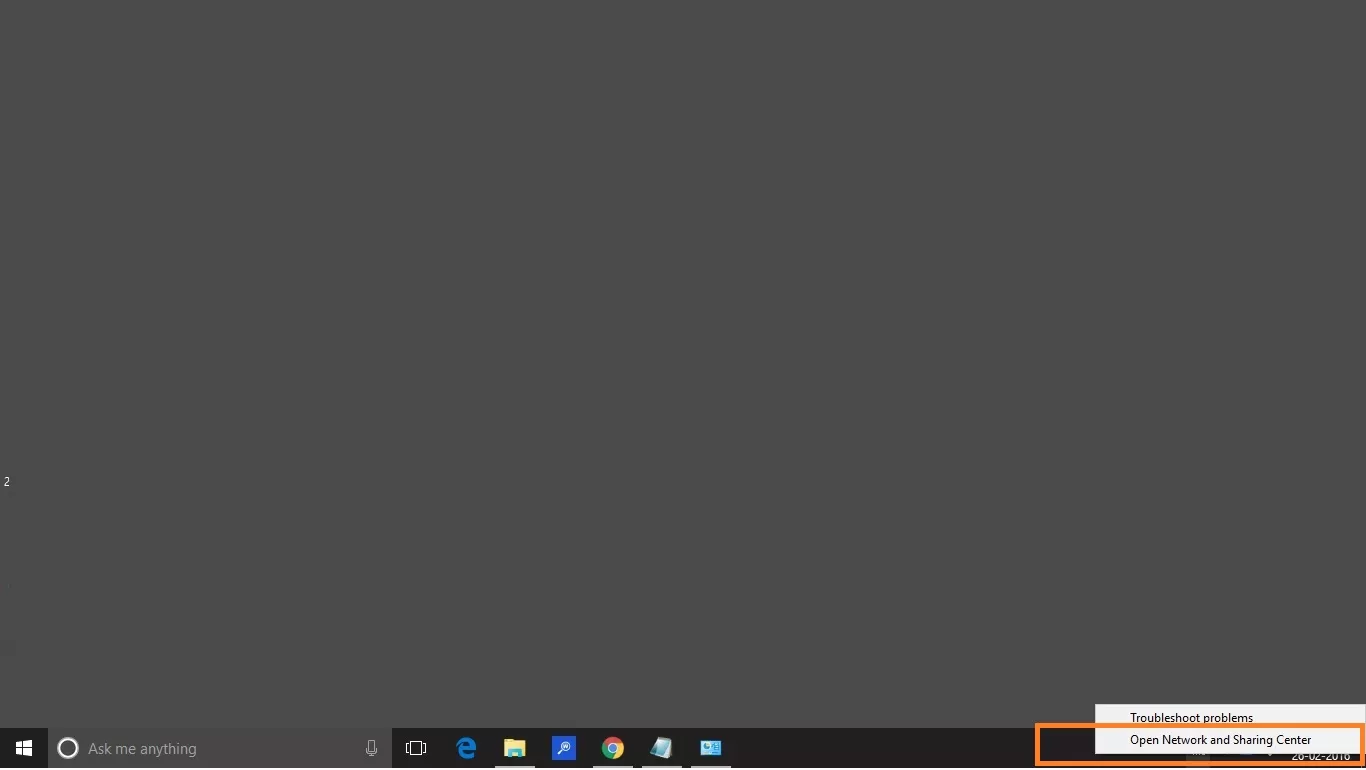
In the Network and Sharing center, click on the connections
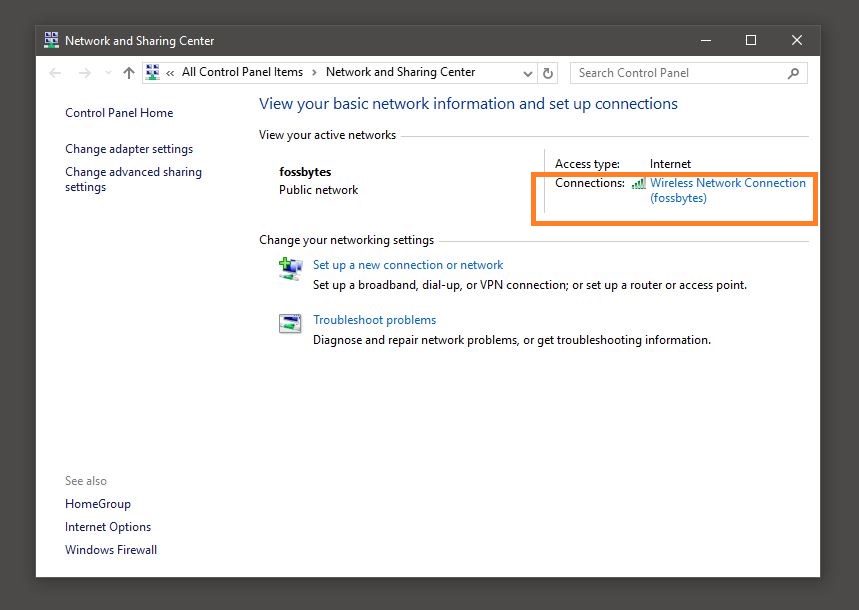
A new Wireless Network Connection Status window will open up. Click on the properties.
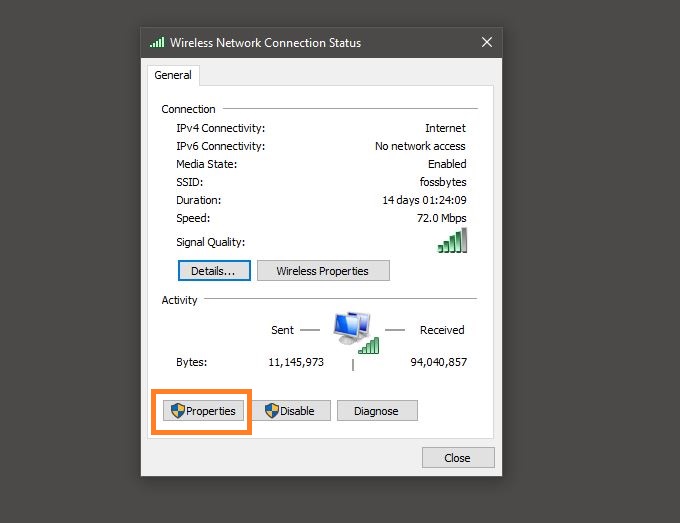
A network connection status pop-up window will open up. Click on Internet Protocol Version 4 (TCP/ IP v4) if you want to change the IPv4 address of your computer.
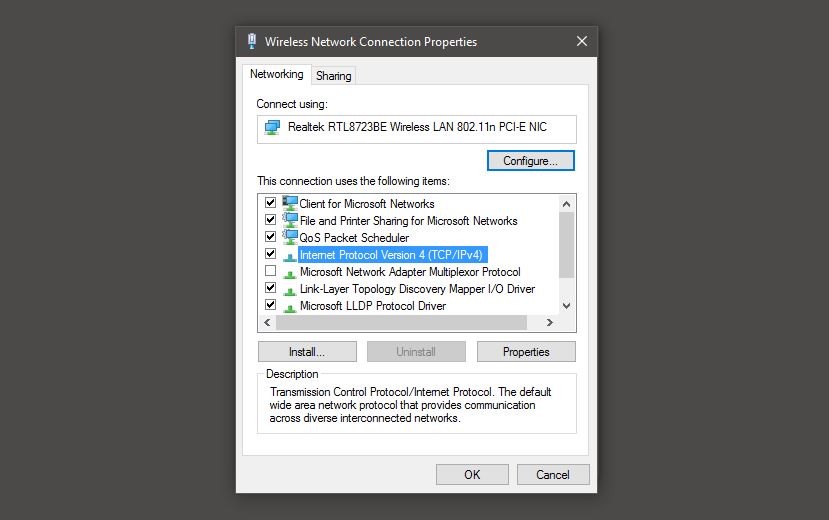
Now fill in the required IP address and press OK.
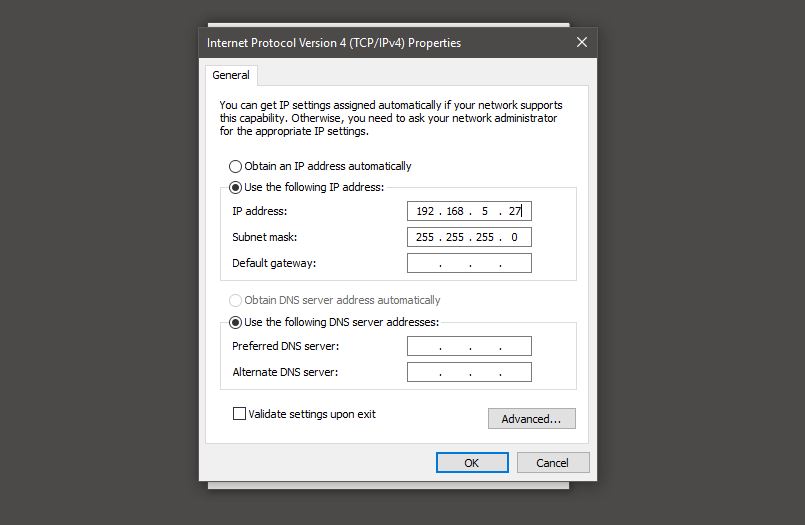
And this is how you change the IP address in Windows 10. Sometimes, along with the IP address, you are also given Subnet mask, Default gateway and DNS Server address by your network administrator. You can use those addresses to fill in the required details.
Also read: How To Set Up A VPN In Windows 10: The Ultimate Guide
A passionate adventure traveller over Trekkerpedia.com and Author of the book ‘The Girl from the Woods’.