
If you’ve to manage multiple printers attached with your Windows operating system, this article is for you. In this post, we’ll see how you can change installed printer’s name from default to friendly one. This will help you to manage the printers in a more simplified and better way.
To rename printers, you can adopt either of the below mentioned methods. Note that you’ll need administrative privileges to rename a printer. So without wasting the time anymore, here’s the how-to part:
Page Contents
How To Change Printer Name In Windows 10/8.1/8/7
Method 1 – Using Windows PowerShell In Windows 10
1. Right click Start Button or press + X keys and select Windows PowerShell (Admin).
2. In administrative Windows PowerShell window, type/paste Get-Printer and press Enter key.
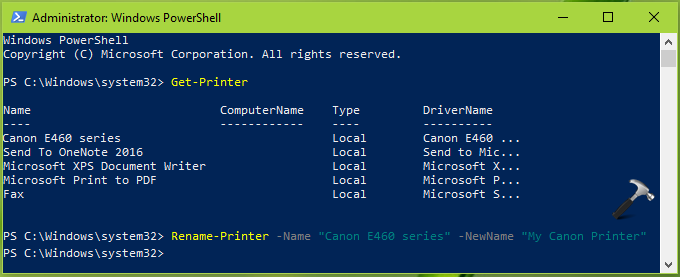
3. As a result a list will of all installed printers on the machine will be displayed. Under Name, take a note of the printer’s exact name which you want rename.
4. Finally type following command substituting your printer’s exact name plus new name and press Enter key:
Rename-Printer -Name "<Printer's exact name>" -NewName "<Printer's new name>"
5. Close Windows PowerShell and check, your printer should have new name associated now.
Method 2 – Using Settings App In Windows 10
1. Right click Start Button or press + X keys and select Settings.
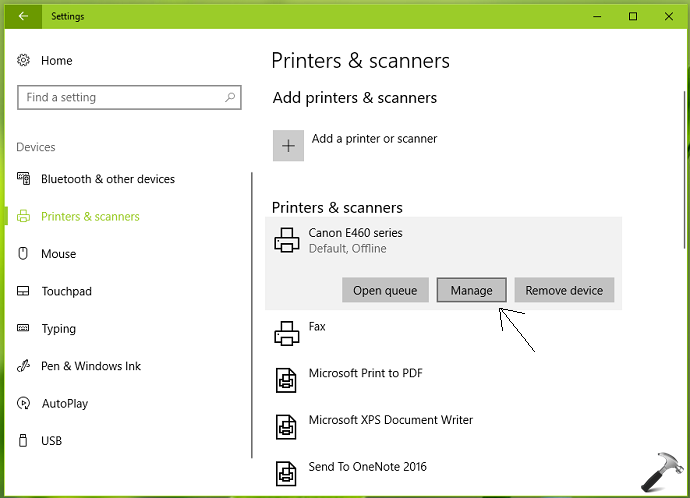
2. In the Settings app, navigate to Devices > Printers & scanners.
3. Now in right pane of Printers & scanners, click on your printer and then click Manage.
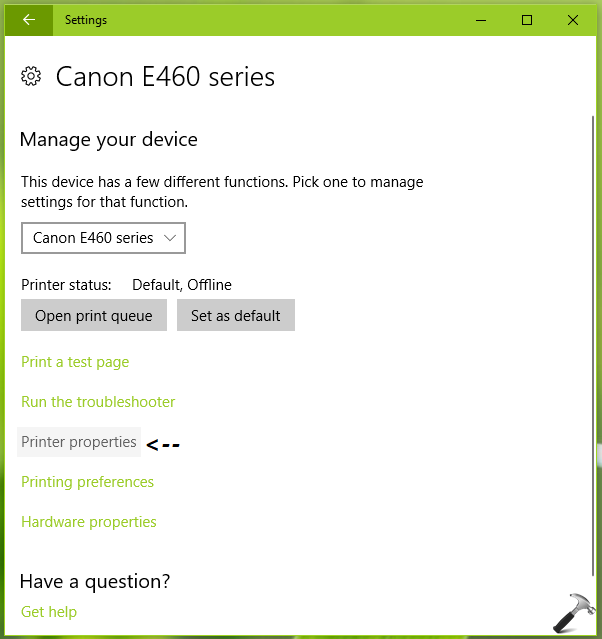
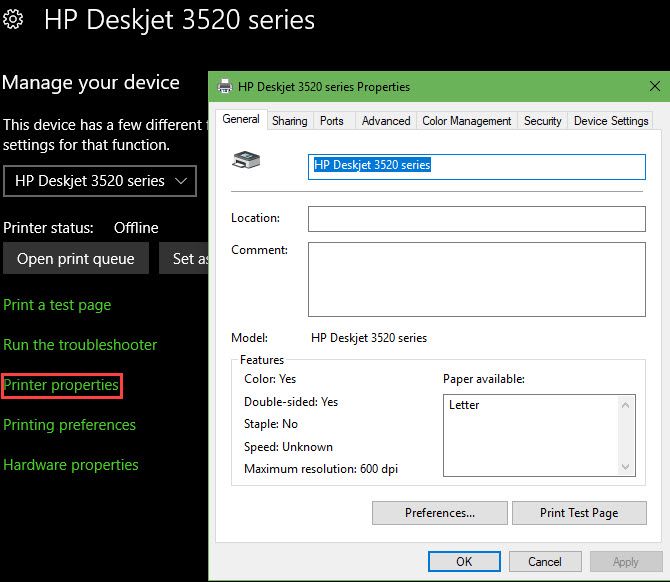
4. Moving on, in next screen, click on Printer properties link.
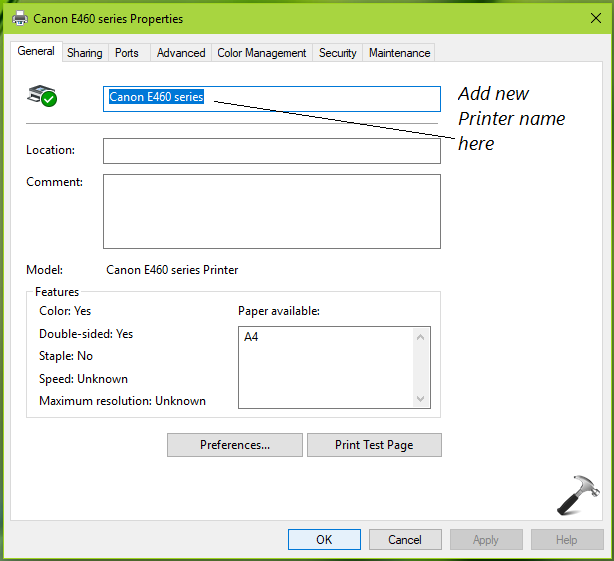
5. Finally, in printer property sheet, on General tab, replace the printer’s existing name with new name you want (refer below shown screenshot). Click OK. This would rename your printer with name you want.
Method 3 – Via Registry Editor In Windows 8.1/8/7
The registry method is not applicable to Windows 10. But if you’ve Windows 8.1/8/7, you can try it on those operating systems.
1. Open Registry Editor.
2. Go to HKEY_LOCAL_MACHINE\SOFTWARE\Microsoft\Windows NT\CurrentVersion\Print\Printers registry key.
3. Under Printers, locate the sub-key for the printer you want to rename. Once you locate the registry sub-key to printer, in the right pane, look for Name registry string (REG_SZ).
4. Double click on the registry string and type its Value data as the printer name you want. Click OK.
5. If the printer is shared one, you need to similarly change Share Name registry string’s Value data with new printer name.
6. Close Registry Editor and reboot.
So in this way you can rename printer in Windows.
That’s it!
RELATED ARTICLES
Sign in to your MUO account
Device names are an often overlooked, but important, detail when setting up your devices. When you’re troubleshooting your network or otherwise need to distinguish between machines, it’s a lot easier when they have names like Bill’s Laptop instead of COMPUTER-8319.
The same is true for printers. Windows keeps track of all printers you’ve connected to your PC, whether they’re on your current network or not. If you have two printers with similar names, you might want to rename them so they’re easier to keep track of.
How to Rename Your Printer in Windows 10
- Open the Settings app. The Windows Key + I shortcut will do this instantly.
- Enter the Devices category and select the Printers & scanners tab on the left.
- Click the printer you’d like to adjust and select Manage. If you don’t see yours listed, make sure you’ve set your printer up correctly.
- On the resulting screen, select Printer properties.
- You’ll see a new dialogue with all sorts of options for your printer. On the General tab, change the name next to the printer icon.
- While you’re here, you can also add a Location and Comment if that helps you further distinguish printers.
How to Rename Your Printer in Windows 7 or 8.1
- Open the Control Panel by searching for it in the Start Menu.
- In the top-right, change View by to Small icons or Large icons if it currently says Category.
- Select the Devices and Printers entry.
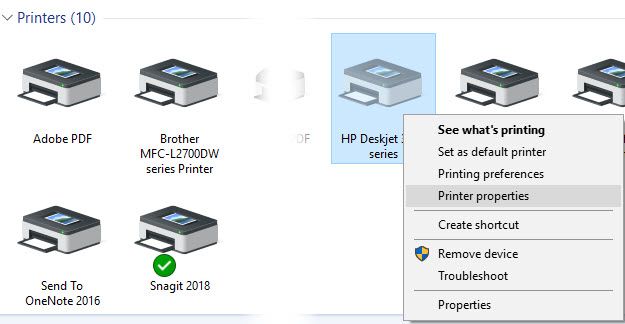
- Scroll to the Printers header and find the printer you want to rename. Right-click it and choose Printer properties.
- You’ll see the same dialog box as above, allowing you to change the printer name, location, and comments.
For more help with printers, check out the easiest ways to share printers on a network.
Are the printer names on the Windows printer menu confusing or difficult to identify?
Even if you are very familiar with the printer model that you have purchased, it can be difficult when Windows uses an unconventional name for that printer.
Plus, if you have used other printers on your computer, the one that you want might have a very similar name to another one you’ve used, which only adds to the confusion.
Luckily you can change the name of a Windows printer so that it’s easier for you to select it in the future.
- Click Start.
- Choose Devices & Printers.
- Right-click on the printer and choose Printer Properties.
- Delete the current printer name and enter the new one.
- Click OK.
Our guide continues below with additional information on how to change a printer name in Windows, including pictures of these steps.
This Windows 7 printer offline guide will show you some other troubleshooting options that you can utilize if you are running into issues with your printer.
It’s possible that you have more than one printer installed on or connected to your computer. If you have ever gotten a new computer or used your computer in a different place, then you may have had reason to print to a different computer.
Windows will not delete that printer when it is no longer visible to your computer in case you ever need to print to it again.
Unfortunately, this can make it confusing when you need to print a document but aren’t sure which printer is the correct one.
One helpful way to manage this confusion is by renaming your printer. This lets you specify the name of your printer with something that is easier to identify. (I personally like to use the physical location of the printer, or some other characteristic of it that is easy to remember.) You will then be able to select the printer by its new name whenever you want to print to it.
If you need to make international calls from your mobile phone, then our dial assist iPhone article can give you some information about a setting that might make that difficult.
How to Change the Name of a Printer on a Windows 7 Computer (Guide with Pictures)
The steps in this article were performed on a Windows 7 computer.
Note that changing the printer name in this manner will also change how that printer is displayed in lists of available printers in the applications on your computer.
If the printer name does not update in an application that is currently open, you may need to quit and restart that application.
Step 1: Click the Start button at the bottom-left corner of the screen.
Step 2: Click the Devices and Printers option in the right column of this menu.

Step 3: Scroll down to find the printer that you want to rename.

Step 4: Right-click the printer, then click the Printer Properties option.
Note that this step is a cause of confusion for many people, as there is a Printer Properties and a Properties option on this menu. You need to click the Printer Properties option.

Step 5: Click inside the printer name field at the top of the window, delete the current printer name, then enter the new printer name. Click the OK button at the bottom of the window when you are done.

Now that you know how to change a printer name in Windows you will be able to fix problems that you were having when attempting to select the correct printer in your applications.
You can then open a program, like Microsoft Word, and go as if you were about to print a document. You should now see the printer listed with its new name. If not, you may need to restart the program and open it again for the change to take effect.

Are you having trouble with print jobs that are stuck in your print queue? Learn how to manage the print spooler in Windows 7 to find a way to fix frustrating issues that can arise with your printer.
Matthew Burleigh has been writing tech tutorials since 2008. His writing has appeared on dozens of different websites and been read over 50 million times.
After receiving his Bachelor’s and Master’s degrees in Computer Science he spent several years working in IT management for small businesses. However, he now works full time writing content online and creating websites.
His main writing topics include iPhones, Microsoft Office, Google Apps, Android, and Photoshop, but he has also written about many other tech topics as well.
Read his full bio here.
Как это работает:
-
Останавливаем службу «Диспетчер очереди печати» в оснастке «Управление компьютером», или командой:
net stop spooler -
Запускаем редактор реестра «regedit», и находим нужный принтер в следующей ветке:
HKEY_LOCAL_MACHINE\SYSTEM\CurrentControlSet\Control\Print\Printers\"Имя принтер"
Сетевые принтеры обычно называются так:
,,http://example.com:555,"Имя принтера" -
Для смены имени принтера требуется сменить следующие параметры:
значение «Name» в корневой веткена новое
значение «printerName»в ветке \DsSpoolerна новое
значение «uNCName»в ветке \DsSpoolerна\\имя компьютера(ip)\\\новое имя
так же меняем название самого контеёнера на новое -
Запускаем службу «Диспетчер очереди печати» в оснастке «Управление компьютером», или командой:
net start spooler
Названия принтеров в меню принтеров Windows сбивают с толку или их трудно идентифицировать?
Даже если вы хорошо знакомы с моделью приобретенного вами принтера, могут возникнуть трудности, если Windows использует нестандартное имя для этого принтера.
Кроме того, если вы использовали другие принтеры на своем компьютере, тот, который вам нужен, может иметь очень похожее имя на другой, который вы использовали, что только добавляет путаницы.
К счастью, вы можете изменить имя принтера Windows, чтобы вам было легче выбирать его в будущем.
Как изменить имя принтера
- Нажмите Начинать.
- Выбирать Устройства и принтеры.
- Щелкните правой кнопкой мыши принтер и выберите Свойства принтера.
- Удалите текущее имя принтера и введите новое.
- Нажмите ХОРОШО.
Наше руководство продолжается ниже дополнительной информацией о том, как изменить имя принтера в Windows, включая изображения этих шагов.
Это автономное руководство по принтеру для Windows 7 покажет вам некоторые другие варианты устранения неполадок, которые вы можете использовать, если у вас возникли проблемы с принтером.
Возможно, на вашем компьютере установлено или подключено несколько принтеров. Если вы когда-либо приобретали новый компьютер или использовали его в другом месте, возможно, у вас была причина печатать на другом компьютере.
Windows не удалит этот принтер, когда он больше не будет виден вашему компьютеру, на тот случай, если вам когда-нибудь снова понадобится печатать на нем.
К сожалению, это может запутать, когда вам нужно напечатать документ, но вы не уверены, какой принтер является правильным.
Один полезный способ справиться с этой путаницей — переименовать принтер. Это позволяет вам указать имя вашего принтера так, чтобы его было легче идентифицировать. (Лично я предпочитаю использовать физическое местоположение принтера или какую-либо другую его характеристику, которую легко запомнить.) После этого вы сможете выбрать принтер по его новому имени, когда захотите печатать на нем.
Действия, описанные в этой статье, были выполнены на компьютере с Windows 7.
Обратите внимание, что изменение имени принтера таким образом также изменит способ отображения этого принтера в списках доступных принтеров в приложениях на вашем компьютере.
Если имя принтера не обновляется в приложении, которое в данный момент открыто, вам может потребоваться закрыть и перезапустить это приложение.
Шаг 1: Нажмите на Начинать кнопку в левом нижнем углу экрана.
Шаг 2: Нажмите на Устройства и принтеры в правой колонке этого меню.

Шаг 3: Прокрутите вниз, чтобы найти принтер, который вы хотите переименовать.

Шаг 4: Щелкните правой кнопкой мыши принтер, затем щелкните значок Свойства принтера вариант.
Обратите внимание, что этот шаг вызывает путаницу у многих людей, так как Свойства принтера и Характеристики вариант в этом меню. Вам нужно нажать кнопку Свойства принтера вариант.

Шаг 5: Щелкните внутри поля имени принтера в верхней части окна, удалите текущее имя принтера, затем введите новое имя принтера. Нажмите на ХОРОШО кнопку в нижней части окна, когда вы закончите.

Теперь, когда вы знаете, как изменить имя принтера в Windows, вы сможете исправить проблемы, с которыми вы сталкивались при попытке выбрать правильный принтер в своих приложениях.
Затем вы можете открыть программу, например Microsoft Word, и начать, как если бы вы собирались распечатать документ. Теперь вы должны увидеть принтер в списке с новым именем. Если нет, вам может потребоваться перезапустить программу и снова открыть ее, чтобы изменения вступили в силу.

У вас возникли проблемы с заданиями на печать, которые застряли в вашей очереди печати? Узнайте, как управлять диспетчером очереди печати в Windows 7, чтобы найти способ исправить неприятные проблемы, которые могут возникнуть с вашим принтером.