
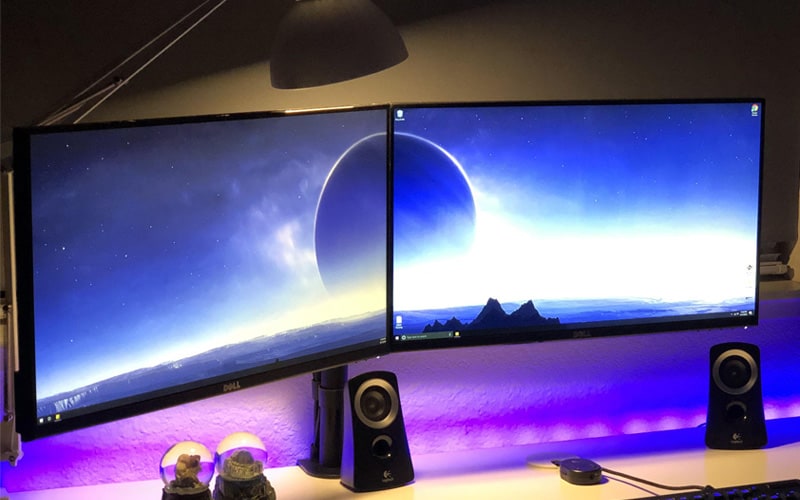
Having a dual monitor setup is always a productivity boost. Thankfully, the Windows operating system natively allows users to manage primary and secondary monitors without having to use third-party software.
When the first display device is connected to a Windows 11/10 PC, it automatically becomes the primary display monitor. This means it will host your desktop, as well as all other windows that you have open. When more monitors are connected, they are then detected as the secondary monitor, tertiary, etc.
This article guides you through multiple ways to change the primary monitor on your Windows PC, and also how to align them according to your actual setup. For example, if your dial-monitor setup is placed on top of each other, you can adjust them so. This will allow you to move your mouse cursor and windows up and down (instead of sideways) to move between the two displays.
Table of Contents
Changing your primary display will allow you to select which display device hosts your main content. If you have 3 displays connected and are aligned in a horizontal series, you can set your middle screen to be the primary display.
Change Primary Monitor in Windows 11
Follow these steps to change your primary monitor if you are using Windows 11:
-
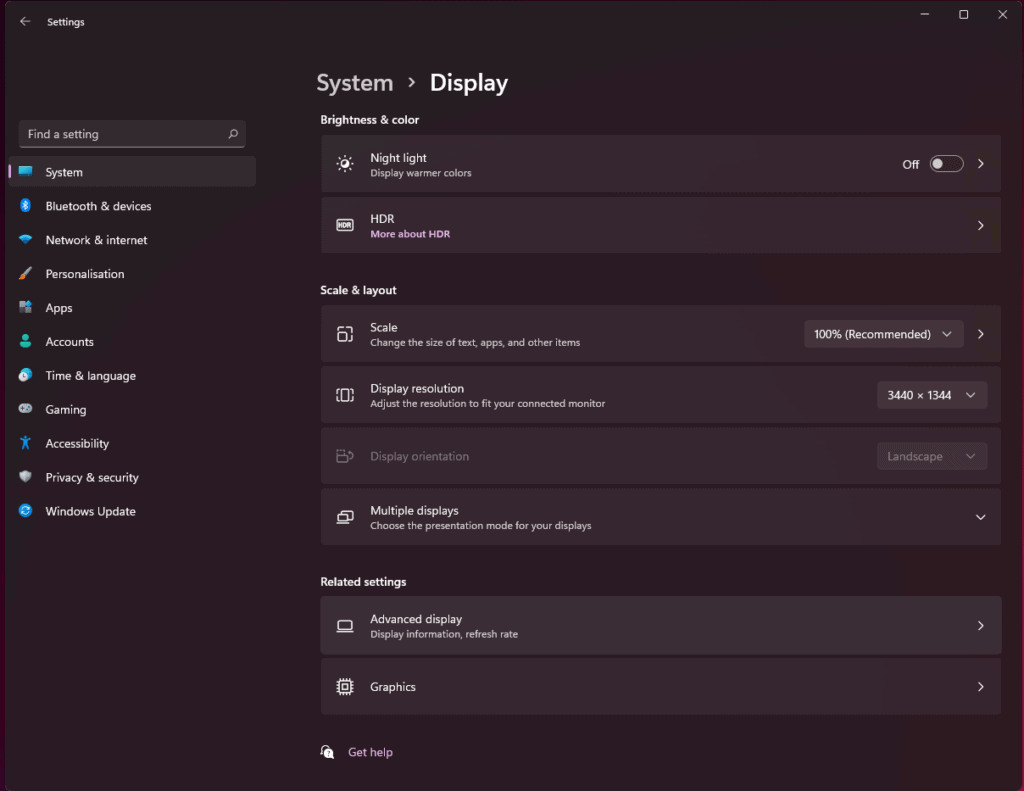
Navigate to the following: This will open the Display Settings menu. (Press the Windows key + I buttons to open Settings directly).
Settings app >> System >> Display
-
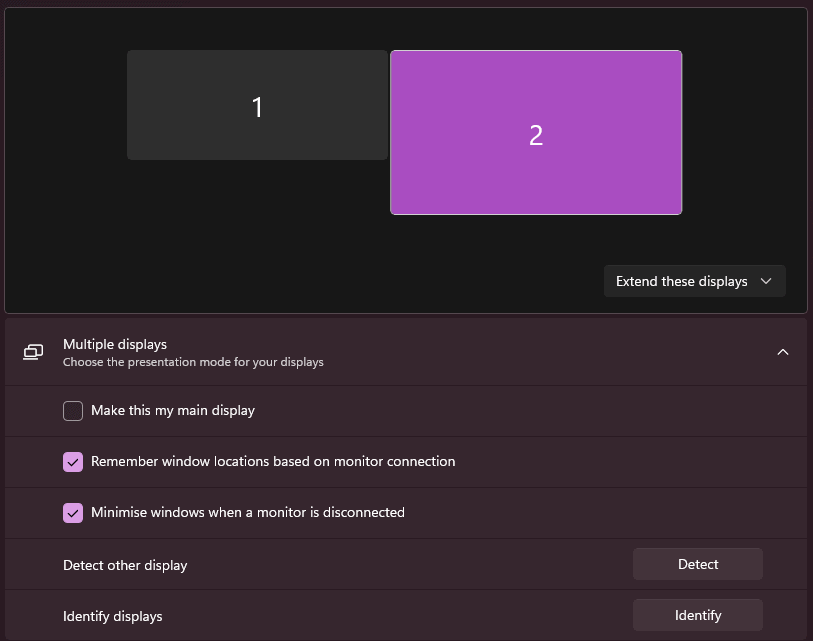
Click the Identify button, which displays a number on each screen to identify which screen is primary, secondary, etc.

Identify screens -
Now click on the screen number you want to make primary.
Select screen -
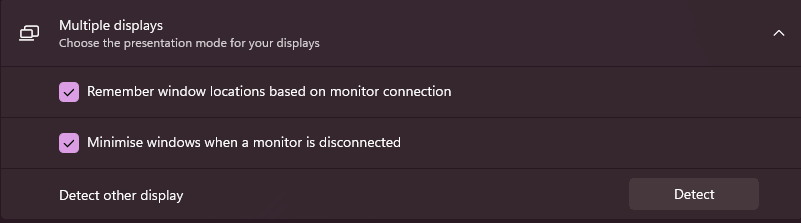
Now expand “Multiple displays” and then check the box next to “Make this my main display.”
Make it the primary display


The selected monitor will now be your primary display. When the “Make this my main display” option is grayed out – this means the selected monitor is already your primary one.

If you have a dedicated NVidia graphics card, you can also change the primary monitor in Windows 11 or Windows 10 using the NVidia Control Panel.
Change Primary Monitor in Windows 10
If you are using Windows 10, then follow these steps to change your primary monitor:
-
Navigate to the following:
Settings app >> System >> Display
-
Now select the monitor that you want to make primary, then scroll down and check the box next to “Make this my main display” under Multiple displays.

Change primary display in Windows 10

Similar to Windows 11, the option will then be grayed out and the selected monitor will become your primary display.
The methods we have discussed up until now are the Windows native methods that allow you to change your primary monitor. However, if you are a fan of the Windows command line, then the following methods might be your cup of tea.
How to Change Primary Monitor from Command Prompt in Windows
To change your primary monitor using Command Prompt, you must use third-party command-line tools.
Using NirSoft NirCmd
NirCmd is a command-line tool that allows you to perform multiple tasks directly from the Command Prompt, which otherwise is not possible. Here are the steps to change your primary display using this tool:
-
To start with, download the NirCmd tool from the given link and then extract its contents into a separate folder.
-
Now open Command Prompt with administrative privileges and then navigate to the extracted folder directory using this cmdlet. Replace PathToFolder with the complete path to the extract NirCmd folder.
cd /d PathToFolder
Change directory -
Now use the following cmdlet to change your primary monitor while replacing Integer with the display identifier of the monitor you want to set as your primary display.
nircmd.exe setprimarydisplay IntegerNote: The Integer used in the command line will not be the same as the one you see on your displays when you identify the monitors. This is because while using the command line, the monitor indexes (identifiers) are changed.
In our case, the Integer “10” sets the secondary monitor as the primary, and the Integer “9” sets the first monitor as primary. You may have to adapt the hit-and-trial method to check which monitor is configured as primary.

Change primary monitor using NirCmd


When the correct identifier is used, you will notice that your display kind of zooms out and then zooms back in, signifying a change in the display settings. However, you must confirm which monitor has been configured as the primary display.
Using NirSoft MultiMonitorTool
MultiMonitorTool is another command-line tool used to manage your display settings. Follow these steps to use the MultiMonitorTool to change your primary monitor:
-
Start by downloading MultiMonitorTool and then extract its content into a separate folder.
-
Now open Command Prompt with administrative privileges and then navigate to the extracted folder directory using this cmdlet. Replace PathToFolder with the complete path to extract MultiMonitorTool folder.
cd /d PathToFolder
Change directory -
Now use the following cmdlet to change your primary monitor while replacing Integer with the display identifier of the monitor you want to set as your primary display.
MultiMonitorTool.exe /SetPrimary IntegerNote: Similar to NirCmd, you will have to perform the hit-and-trial method while changing the Integer value to identify the correct index for the monitor you wish to set as the primary display.
Change primary monitor using MultiMonitorTool


This will now change your primary display as you can see that the screen zooms out and then zooms back in, which signifies a change in your display settings. However, you will still need to confirm that the correct monitor has been configured as your primary display.
How to Change Display Orientation in Windows
Display orientation is the way your monitors are aligned. If you have only two monitors connected, they could be side-by-side, or in the top-and-bottom orientation. If more than two monitors are connected, they can be aligned in any way!
Furthermore, as it happens with many of us, it could be possible that you drag the mouse cursor from the left end of your screen onto the second monitor, which is placed on its right side.
You can manage your screen’s orientation with respect to one another so your computer knows in which direction the other displays are correctly configured.
-
To change the orientation of the displays, navigate to the following:
Settings app >> System >> Display
-
Here, hold down your screen and then drag it into a different position that is identical to your real monitor setup.
Drag and drop the screens to adjust the orientation -
Once the settings are done, click Apply to save the changes.
Apply settings


You can now move across your multiple displays in the direction in which they are aligned.
If you encounter any errors while setting up your primary monitor and have any tips for us, you can always ask us in the comments section below.
Frequently Asked Questions
How to shift a window from one monitor to the other?
If a window opens on the wrong monitor when you have multiple displays connected, you can simply switch it to the right one using the Windows Key + Shift + Left/Right Arrow Key shortcut keys to shift it to the previous or next display device.
How to fix the new window opens on the wrong monitor?
To open a window on the correct monitor, you must set it as the primary display device. To do so, go to Settings app >> System >> Display, select the monitor you want to set as the primary display, then check the box next to “Make this my main display.”
How do I check which monitors are primary and secondary?
You can display the number on the screen to identify which monitor is primary, secondary, and so on. For the primary monitor, it will display “1,” for the secondary, it will display “2,” and so on.
To identify your displays, navigate to Settings app >> System >> Display then click Identify. This will show the indexes on your screen for almost 2 seconds.
Windows 11’s Primary Monitor Settings are in the same place as before, but come with a few handy tricks this time
PC Guide is reader-supported. When you buy through links on our site, we may earn an affiliate commission. Read More
Table of Contents
- How to Change Primary Monitor in Windows 11
- Get into Settings
- Display Options
- Troubleshoot
- Monitor Menu
- Helpful Additon in Windows 11
Getting your monitors set up is an easy fare, but those less technically savvy might find themselves lost in the midst of yet another redesign by Microsoft of the Windows Settings app.
Replacing Control Panel at this point, the Settings app functions and has most things set in the same place as the previous OS, but it can still feel like a mess overall.
Once you’re there, a multiple monitor workflow is a cinch and you’ll be up and running in no time, including deciding which monitor you want to use as your primary.
How to Change Primary Monitor in Windows 11
So, you want to change your primary monitor in Windows 11 but you don’t know the steps due to the changes in the new OS. Don’t fret, these are all the steps you need to take to get it done so you can get your battle station up and running exactly the way you like it.
Get into Settings
First head into your settings menu. You can get here via the start menu and then settings in the new pop-up window.
However, next to it is the search icon, which will let you type in “Change primary display” to get straight into the right settings page without the need to navigate through everything.
The search bar tactic also works in Windows 10, letting you skip over a lot of bad organization by Microsoft in the settings menu.
Display Options
Now you need to click on Multiple Monitors.
This setting will be greyed out if the PC cannot find the monitor you want to change to the new primary one.
If you’re having problems with the PC identifying the monitor, you’ll need to do a little troubleshooting.
Troubleshoot
First, let’s actually check we’re plugged into the right port. It’s daft, but more often than not people who are setting up multiple monitors will forget to plug them into the graphics card and into the motherboard instead. Windows will let you run two different brands GPUs at once – onboard Intel and NVIDIA for example – if you alter the BIOS, but that’s for another time.
For now, unplug the device from the motherboard and into the GPU. Most GPUs don’t actually have two HDMI cables, so you might need to fit in with either a USB-C cable (in the slot intended for VR) or a Display Port cable.
If you’re still having issues after doing this, try pressing the Windows Key + P. This will bring up the monitor quick settings, which might have it set to show only one screen at a time.
Still not working? Try another cable before we move on. Simple solutions for the most irritating problems.
The last main solution is to update your drivers on both the graphics card and if you’re using the onboard card included with Intel-based motherboards, you’ll want to head to Device Manager (Search > Device Manager).
At the top of the list is your PC, right-click and have it scan for any changes. The next step is to update the drivers. If you’re on NVIDIA, you can do this through the GeForce Experience, while AMD has its own software for managing this for you.
If you want to do it through Device Manager, right-click on the device and press Update Driver.
Monitor Menu
Now that you’re in the menu, it’ll display your two or more monitors, with a rough estimate of their size and position in relation to how you’ll move your mouse between the two. Here you can not only drag the icons around if you move your monitors but do what we came here for:
Changing the primary monitor.
Click the icon for which monitor you want your main display to be and from here on out, everything will almost always load up on that screen first.
Helpful Additon in Windows 11
The new thing with Windows 11 is that it’ll attempt to remember where different program windows were if you happen to disconnect a monitor. This is great news for laptop owners who move from a dock or wired connection to another place, as when you come back to the setup, you’ll immediately be back where you were without the hassle of having to reorganise yourself for five minutes after Windows has played 52-card-pick-up with your desktop.
Switching monitor 1 and 2 in Windows 11 is a breeze once you know where to look. By adjusting the display settings, you can easily reorder your monitors to fit your needs. Whether you’re looking to streamline your workflow or just want a better viewing experience, this guide will walk you through the necessary steps.
In this section, we’ll cover the steps to switch your primary and secondary monitors on Windows 11. This will help you to adjust which screen is considered your main display and how you want your workspace to be arranged.
Step 1: Right-click on your desktop
Right-click anywhere on your desktop and select “Display settings” from the context menu.
When you right-click on the desktop, a list of options will appear. Choosing “Display settings” will bring you to the settings menu where you can manage multiple monitors.
Step 2: Identify your monitors
Click the “Identify” button to see which monitor is labeled as 1 and which as 2.
This button will display a large number on each screen, helping you to identify which monitor is currently set as 1 and which as 2.
Step 3: Select the monitor you want to be primary
Click on the monitor you want to set as your primary display.
Clicking on a monitor in the display settings will highlight it, allowing you to adjust its settings, such as making it your main display.
Step 4: Set the selected monitor as your main display
Check the box that says “Make this my main display.”
This checkbox will appear under the display settings for the selected monitor. Checking it will set the chosen screen as the primary monitor where your taskbar and Start menu will appear.
Step 5: Apply the changes
Click “Apply” to save your changes.
After making your selection, you need to click the “Apply” button to update your display settings. Your monitors will flicker briefly as the settings take effect.
Once you’ve completed these steps, your monitors will be rearranged according to your new settings. Your primary monitor will now show the taskbar and Start menu, making it the main focus of your workspace.
Tips for Switching Monitor 1 and 2 in Windows 11
- Always ensure your monitor cables are correctly connected and secured before making changes in the settings.
- If you’re using a laptop with an external monitor, set the external monitor as the primary display for a larger workspace.
- Use the “Multiple displays” dropdown to choose how you want your screens to interact (duplicate, extend, or show only on one).
- Regularly update your graphics drivers to avoid any display issues.
- If your monitors are not correctly recognized, try restarting your PC or re-plugging the cables.
Frequently Asked Questions
Can I switch my monitors back easily?
Yes, you can follow the same steps to change back to your original settings at any time.
What if my monitors aren’t displaying correctly?
Ensure your cables are firmly connected and try restarting your computer. If problems persist, updating your graphics drivers might help.
Do these steps work with any type of monitor?
Yes, these steps work with any monitors connected to your Windows 11 PC, whether they are identical models or different ones.
What do I do if the “Make this my main display” option is grayed out?
This might happen if your current primary display is disabled. Ensure all monitors are enabled and connected properly.
Will rearranging my monitors affect my desktop icons?
Rearranging your monitors may move desktop icons, especially if you change the primary display. You may need to manually rearrange your icons afterward.
Summary
- Right-click on your desktop.
- Select “Display settings.”
- Click “Identify.”
- Click the monitor you want to be primary.
- Check “Make this my main display.”
- Click “Apply.”
Conclusion
Switching monitor 1 and 2 in Windows 11 is a straightforward task that can greatly enhance your computing experience. Whether you’re setting up a new workspace or tweaking your current setup, knowing how to adjust your display settings is crucial. Always remember to double-check your connections and monitor settings to ensure everything runs smoothly. For more tips and tricks on optimizing your Windows 11 experience, don’t hesitate to explore further reading or reach out to tech forums. And now that you know how to manage your monitors, why not give it a try and see how it improves your productivity?
Matthew Burleigh has been writing tech tutorials since 2008. His writing has appeared on dozens of different websites and been read over 50 million times.
After receiving his Bachelor’s and Master’s degrees in Computer Science he spent several years working in IT management for small businesses. However, he now works full time writing content online and creating websites.
His main writing topics include iPhones, Microsoft Office, Google Apps, Android, and Photoshop, but he has also written about many other tech topics as well.
Read his full bio here.
All Windows versions allow users to connect two or more monitors to their system, with one serving as the primary monitor and the other as an external monitor. You can also select which monitors to use as primary and which as secondary. In this guide, we will show you three different and quick methods over how to change the primary monitor on Windows 11 with ease.
Meanwhile, Multi-monitor setups are commonly used by gamers and streamers. As it will allow them to monitor the health of the stream on one monitor while playing games on their secondary high-end monitor. Below you’ll learn more about dual monitor on Windows 11.
Table of Contents
All versions of the Windows operating system currently supported by Microsoft support dual and even multiple monitors. This means that you can have more than one monitor connected to your computer and display whatever you want to increase productivity and ease of use. Windows 11, the latest in a long list of Windows operating systems, also supports multiple monitors. Windows 11 is quite capable of supporting multiple monitors. Multi-monitor support is a boon for power users, as most of them. multiple-monitors attached to your computers.
When you connect extra than simply one monitor to a laptop walking at the Windows Operating System, Windows makes one of the monitors the number one monitor (in nearly all cases, that is the monitor that became linked to the laptop first) and the relaxation of the video display units the secondary, tertiary and so forth video display units. The number one monitor is the default screen Windows presentations the entirety on, that is why being capable of decide which display linked for your laptop you need to be the number one display is immensely important.
Thankfully, Windows 11 now no longer best permits customers with a couple of video display units to select their number one display at any given time however the method used to accomplish that is likewise quite simple.
You can customise how the desktop appears on the monitor. These are the various settings available to you.
- PC screen: See things on one display only
- Duplicate: See things on all displays
- Extend: See your desktop across multiple displays
- Second screen only: See everything on the second display
In most cases, you’ll want to use your displays in extended mode and designate one monitor as the main or primary display. The primary display serves as the active desktop, displaying the clock and taskbar corner icons. The active display displays the sign-in message, CTRL + ALT + DEL, and all apps and items will launch automatically on the active or main display.
To get your main display in Windows 11, follow the steps below:
Method 1. Change the Primary Monitor on Windows 11 via Settings
Again, as mentioned above, it’s always good to use the extend mode and have one display as a main or primary display when using Windows with dual monitors.
To do that, follow the steps below:
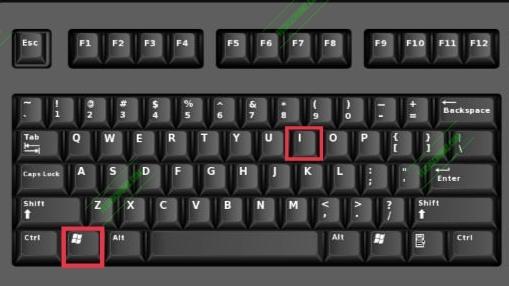
Step 1. Open the Settings app by using the ‘Windows + I‘ shortcut keys.
Step 2. In Windows Settings window, click ‘System‘ from the left pane, select ‘Display‘ on the right pane of your screen.

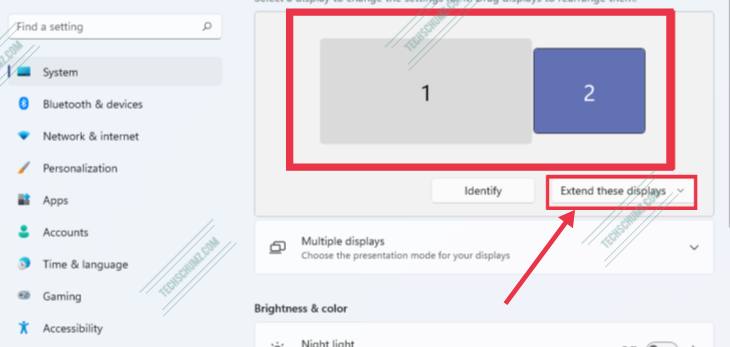
Step 3. On the Display window, you will see two displays. You can use the ‘Identify‘ button to identify each monitor by number. You can then use select the option to Extend these displays as highlighted below.
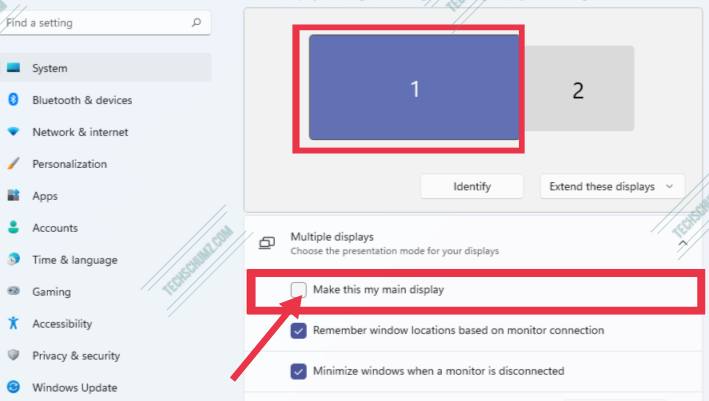
Step 4. Finally, click the display you want as your main or primary display, then check the highlighted box to ‘Make this my main display’.
This will immediately switch your app icons and make it the main display. In some cases, you’ll need to restart to fully see all apps icons and clock switched over to the main monitor.
Method 2. Change The Main Display on Windows 11 using NVIDIA Control Panel
This option is only available if you have NVIDIA graphics and drivers installed.
- Open the ‘NVIDIA Control Panel’.
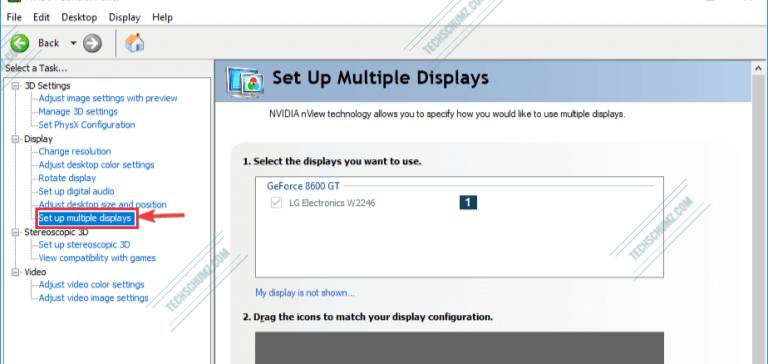
- Click on the ‘Set up multiple displays‘ link.
- Right click on the display number you want to make the main display, click on Make primary, and click/tap on Apply.
- That’s it! Now you can close the NVIDIA Control Panel.
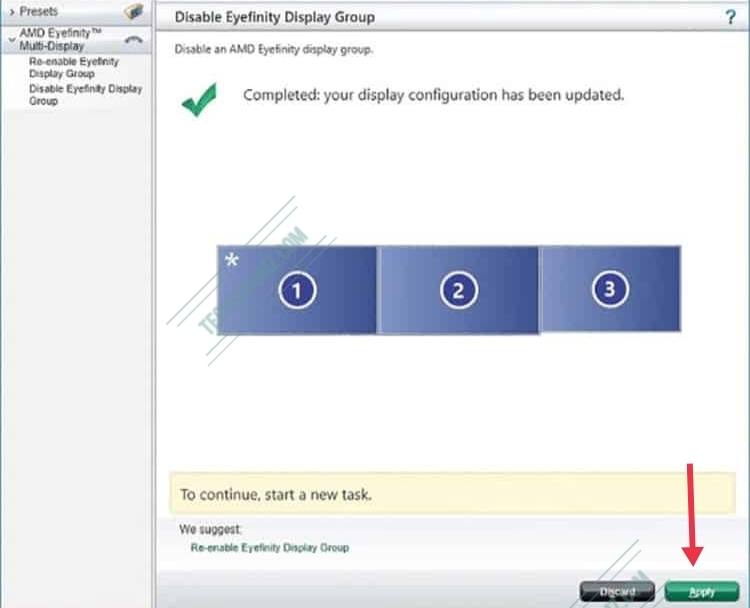
Method 3. Set a Monitor as Default Display on Windows 11 via AMD Radeon Settings
This option is only available if your computer has AMD graphics and drivers installed.
- Open AMD Radeon Settings.
- Click on Display, and select the Display Number you want to make the main display.
- Toggle on the Preferred Display button to Enable.
- That’s it, you can close the AMD Radeon Settings.
Conclusion
Thay’s it! This guide showed you how to set or change the primary monitor on Windows 11 with dual displays using three different ways. We hope you find this guide useful. If you encounter any questions, please let us know in the comments section below.
More Windows 11 related articles:
- How To Disable SmartScreen on Windows 11
- How to Pair and Connect AirPods to a Windows 11 PC
- How to Enable Wake on LAN on Windows 11

This tutorial will show you how to set a display to be the main display when you have multiple displays connected to your Windows 11 PC.
If you have more than one display connected to your PC, then you will be able to select which display you want to use as the main (primary) display by default for all users.
The display set to be the main display will act as the active desktop, show the clock and taskbar corner icons. The sign-in, lock, Ctrl+Alt+Del screens, and most items will open on the main display by default when you initially open them.
Contents
- Option One: Change Main Display in Settings
- Option Two: Change Main Display in NVIDIA Control Panel
- Option Three: Change Main Display in Intel Graphics Control Panel
- Option Four: Change Main Display in AMD Radeon Settings
Option One
Change Main Display in Settings
1 Open Settings (Win+I).
2 Click/tap on System on the left side, and click/tap on Display on the right side. (see screenshot below)

3 Select the display at the top you want to make the main display. (see screenshot below step 6)
If you are not sure which display belongs to what number, then you can click/tap on the Identify button to have each display’s number briefly appear on the displays to see.
4 Click/tap on Multiple displays to expand it open. (see screenshot below step 6)
5 Check Make this my main display. (see screenshot below step 6)
If Make this my main display is already checked and grayed out, then this display is already set as the main display.
6 You can now close Settings if you like.

Option Two
Change Main Display in NVIDIA Control Panel
This option is only available if you have NVIDIA graphics and drivers installed.
1 Open the NVIDIA Control Panel.
2 Click/tap on the Set up multiple displays link under Display in the left pane. (see screenshot below step 3)
3 Right click on the display number you want to make the main display, click/tap on Make primary, and click/tap on Apply. (see screenshot below)
The display number with an asterisk (*) on it is the current primary (main) display.
You can click/tap on Identity in the context menu to briefly display the number on the display it is for.

4 Click/tap on Yes to confirm. (see screenshot below)
You will only have 20 seconds to click/tap on Yes before your changes automatically revert back to what it was set to before.

5 You can now close the NVIDIA Control Panel if you like.
Option Three
Change Main Display in Intel Graphics Control Panel
This option is only available if your computer has Intel graphics and drivers installed.
1 Open Intel Graphics Control Panel from All apps in the Start menu.
2 Click/tap on the Display icon at the bottom. (see screenshot below)

3 Click/tap on Multiple Displays in the left pane. (see screenshot below step 4)
4 Select the display you want in the Primary Display drop menu, and click/tap on Apply. (see screenshot below)

5 Click/tap on Yes to confirm. (see screenshot below)
Your changes will automatically be reverted in 15 seconds if you do not click/tap on Yes to confirm.

6 You can now close the Intel Graphics Control Panel if you like.
Option Four
Change Main Display in AMD Radeon Settings
This option is only available if your computer has AMD graphics and drivers installed.
1 Open AMD Radeon Settings.
2 Click/tap on Display. (see screenshot below)
3 Select the Display # you want to make the main display.
4 Toggle on the Preferred Display button to Enable.
5 You can now close AMD Radeon Settings if you like.

That’s it,
Shawn Brink