
-
Home
-
News
- How to Change the Default Installation Location on Windows 10?
By Stella | Follow |
Last Updated
Your Windows 10 computer has a default installation location. As long as you don’t manually change the installation folder during the installation process, that new program will be installed to that default installation location. If you don’t want new programs to take up disk space on C drive, you can change the default installation location on Windows 10. In this post, MiniTool Software will show you two methods.
When you install a new program on your computer, it will be installed to a default installation location. This folder is usually in drive C. If you are using a 32-bit Windows 10, that default installation location should be C:\Program Files(x86). If it is a 64-bit Windows 10, that folder should be C:\Program Files.
As time goes by, more and more programs will be installed on drive C your C drive may run out of space. If you encounter this issue, you can take some measures to free up disk space. On the other hand, you can change the default installation location on Windows 10 to avoid this situation.
In this article, we will show you two methods to change the install drive on Windows 10. You can just select the method you want to use to solve your issue.
How to Change Default Installation Location on Windows 10?
- Use Registry Editor to Change Default Install Drive on Windows 10
- Use Settings to Change Default Install Drive on Windows 10
Use Registry Editor to Change Default Install Location on Windows 10
You are allowed to change the default installation location on your Windows 10 computer via Registry Editor. Here is a guide:
1. Use Windows Search to search for regedit and select Registry Editor from the search results to open it.
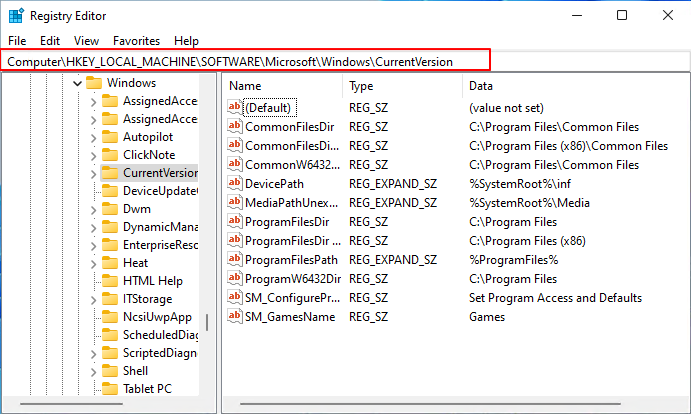
2. Go to the following path:
HKEY_LOCAL_MACHINE\SOFTWARE\Microsoft\Windows\CurrentVersion
3. Click the CurrentVersion folder to open it. You will see some options on the right panel.
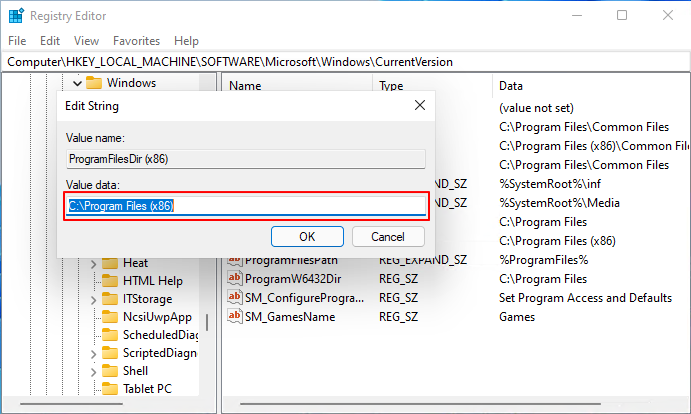
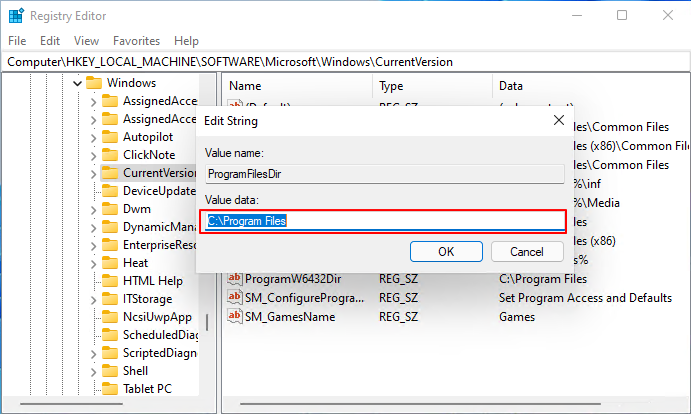
4. If you are using 64-bit Windows 10, you can see both ProgramFilesDir and ProgramFilesDir(x86) on the list. Double click on any of them to open the Edit String By default, the content in Value data is C:\Program Files. You can change it to any location you want to save the installed programs.

5. Click OK to save the change.
6. Close Registry Editor.
7. Reboot your computer.
Use Settings to Change Default Install Location on Windows 10
You can also change the default installation drive via Settings. This is a very simple method:
1. Click Start.
2. Go to Settings > System > Storage.
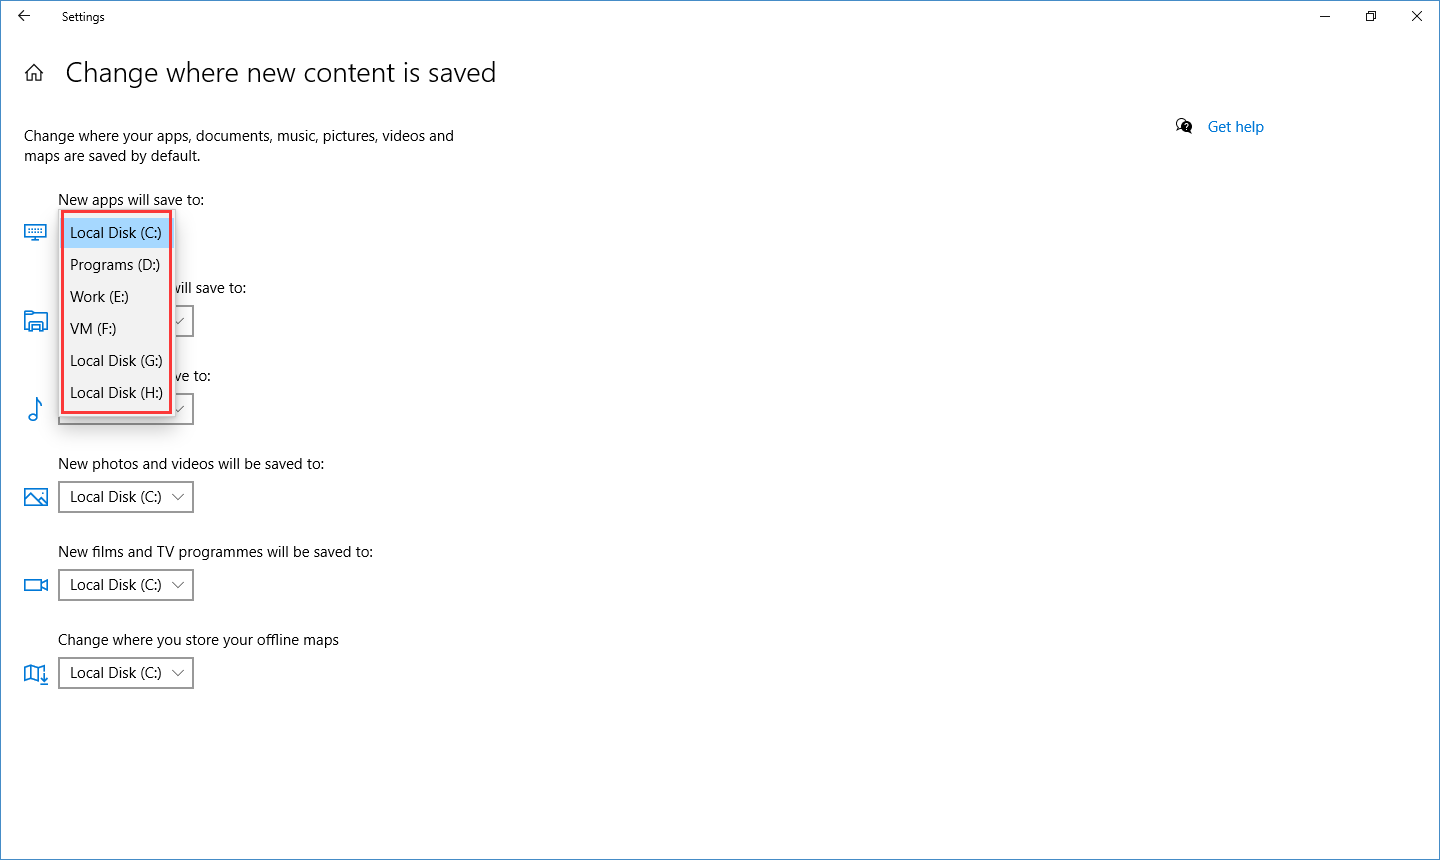
3. Click the Change where new content is saved link.
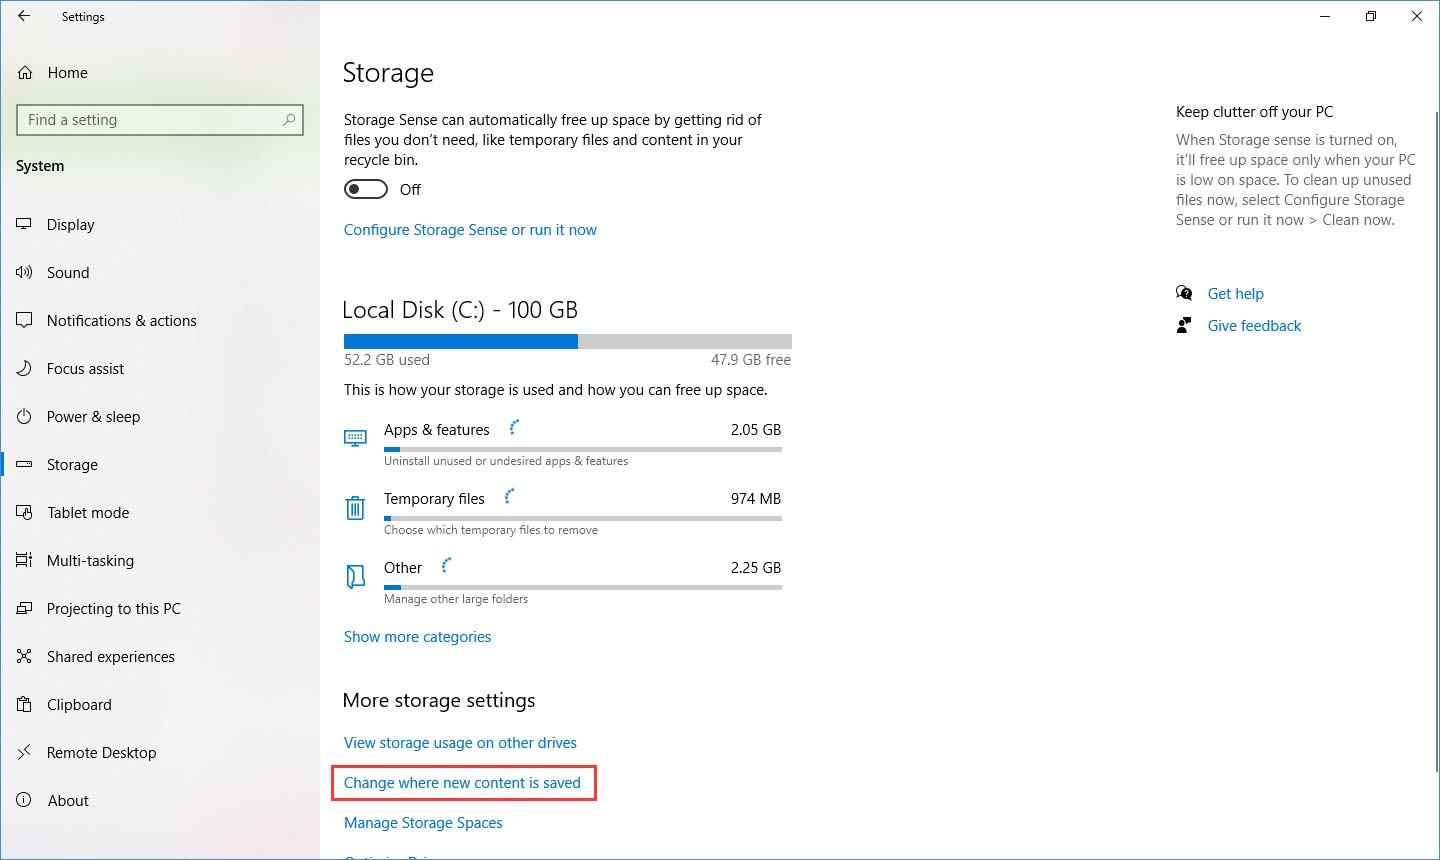
4. Expand the list for New apps will save to and then select the location you want to use to save the newly installed apps.
5. Click Apply to save the change.

Those are the two methods to change the default installation location on your Windows 10 computer. You can just select your preferred way to do the job.
If You Want to Recover Your Lost Data
Sometimes, you may delete your important data from the installation location. You can use free data recovery software to get your data back. MiniTool Power Data Recovery is worth trying.
This software is specially designed to recover data from external hard drives, internal hard drives, memory cards, SD cards, and more. You can use the trial edition to scan the target drive and see whether it can find the files you want to recover.
MiniTool Power Data Recovery TrialClick to Download100%Clean & Safe
If you are sure this software works to scan for your needed files, you can use a full edition to recover them without limits.
About The Author
Position: Columnist
Stella has been working in MiniTool Software as an English Editor for more than 8 years. Her articles mainly cover the fields of data recovery including storage media data recovery, phone data recovery, and photo recovery, videos download, partition management, and video & audio format conversions.
You are here:
Home » Windows 10 » Change Default Installation Directory In Windows 10/8/7
By default, Windows installs all the programs in C:\Program Files or C:\Program Files (x86) directory depending on the type of Windows 10 and the program you are installing.
You might want to change the default installation directory if your “C” drive is running out of free space. While some programs allow you to select the install drive and directory, most programs don’t offer the option to select installation drive. For instance, setup of antivirus programs like Kaspersky Internet Security and Norton doesn’t offer an option to select the default installation directory during the product installation.
If you want to change the default installation location of programs in Windows 10/8/7, there is an easy workaround. You just need to edit the registry to change the default installation directory or path. And if you want to move installed programs, please refer to our how to move installed programs to another drive in Windows 10 guide.
To start with this guide, make sure you have enough free space in your new directory which you are going to make as default one.
You need to do a small registry change in order to change your default installation directory as follows:
Changing the default installation directory
IMPORTANT: We recommend you create a manual system restore point or backup registry so that you can easily restore original settings if required.
WARNING: This is an advanced guide. So, proceed at your own risk.
Step 1: Type Regedit in Start menu/taskbar search box or in the Run dialog box and hit enter key to continue.
Step 2: Navigate to the following registry key in the Registry Editor:
HKEY_LOCAL_MACHINE\SOFTWARE\Microsoft\Windows\CurrentVersion
Step 3: On the right side, locate the value named “ProgramFilesDir” and change the default value “C:\Program Files” to your new directory path (address).

Next, find ProgramFileDir (x86), double-click on it and change it value data to a location where you want to install programs by default.

Step 4: Finally, close the Registry Editor and reboot your system to apply the change. You might need to restart your computer to apply the change. Download a program and try to install it and check if it’s installed in the new installation directory.
If you are experiencing any issues, please restore Windows 10 to an earlier date using the previously created restore point.
PS: This tweak should work fine with Windows 7 and Windows 8/8.1 as well.
Don’t forget to check out how to move installed apps to another drive in Windows 10 guide.
- Complex Level: Easy
- Applies to: Switch and change the location of installed apps on Windows 11/10/8.1/8/7/XP and Vista, etc.
This page shows new Windows 11 users how to change where new content is saved in Windows 11, especially for applications like Office, Adobe software, and even some extremely huge games.
| Workable Solutions | Step-by-step Troubleshooting |
|---|---|
| Fix 1. Use App Migration Software | Try every USB port available. Determine whether you’re using USB 2.0 or 3.0…Full steps |
| Fix 2. Use Apps and Features | Step 1. Press the Windows + I keys to open Windows settings, click on «System» and select «Apps and Features.»….Full steps |
| Fix 3. Use CMD Command-Line | Step 1. Open your C drive and find out the app you want to move to another drive…Full steps |
| Fix 4. Using Registry Editor | Step 1. Press the Windows + R keys to open the run dialog, type regedit, and click «OK»…Full steps |
According to experienced and professional Windows administrators, we collect four efficient ways to move apps around Windows 11 successfully without losing any app data or boot issues. Let’s see:
- #1. Third-Party App Migration Software
- #2. Apps and Features Tool in Windows 11
- #3. CMD Command Line
- #4. Registry Editor
Among the four methods, which method suits you the most? Check the comparison table, and you’ll learn which method suits you the most:
| Comparison | App Migration Software | Apps and Features | CMD | Registry |
|---|---|---|---|---|
| Transfer Content |
|
|
|
|
| Difficulty Level | Easy | Easy | Medium | Complex |
From the comparison table, it’s clear that the third-party app migration software is the most comprehensive solution for Windows 11 users to change the location of installed applications. However, if you are looking for an easy and efficient method, you can’t miss Method 1. Let’s see how to migrate apps and change the install location of your programs in Windows 11 now.
#1. Use App Migration Software
Professional app migration software can directly help you move the installed C drive programs, software, and even games to another local drive on your computer without any boot issues. EaseUS Todo PCTrans Professional, with its App Migration feature, is exactly what you need.
It allows you to directly move multiple programs and apps from C drive to D or even a second hard drive at one time on your computer without losing any personal data or boot issues. Here are the detailed steps:
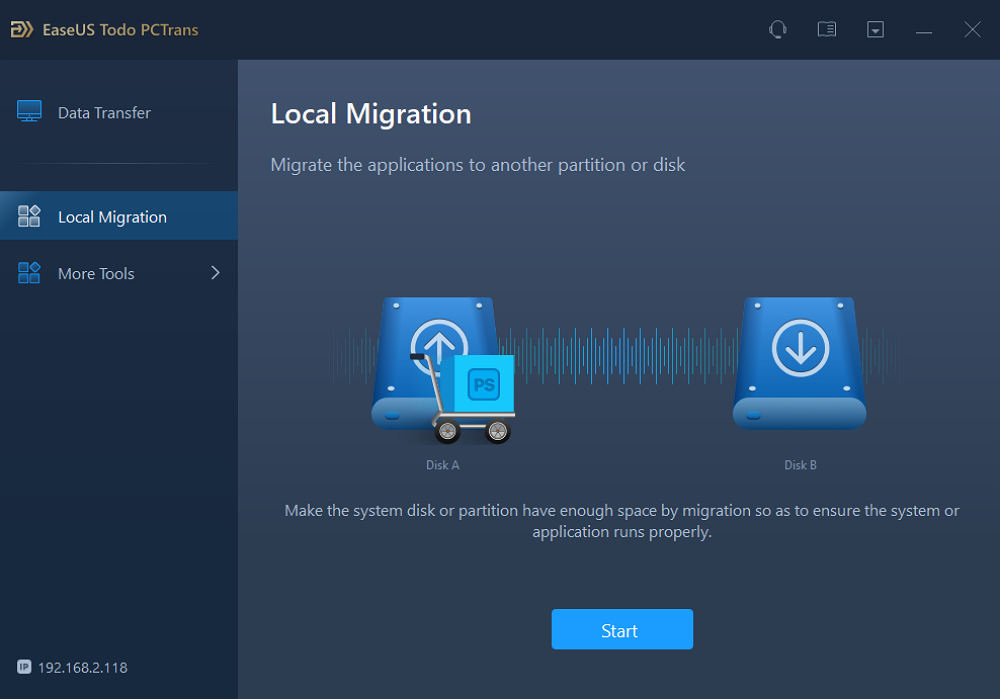
Step 1. Run EaseUS Todo PCTrans on your PC
Go to «Loacal Migration» and click «Start» to continue.
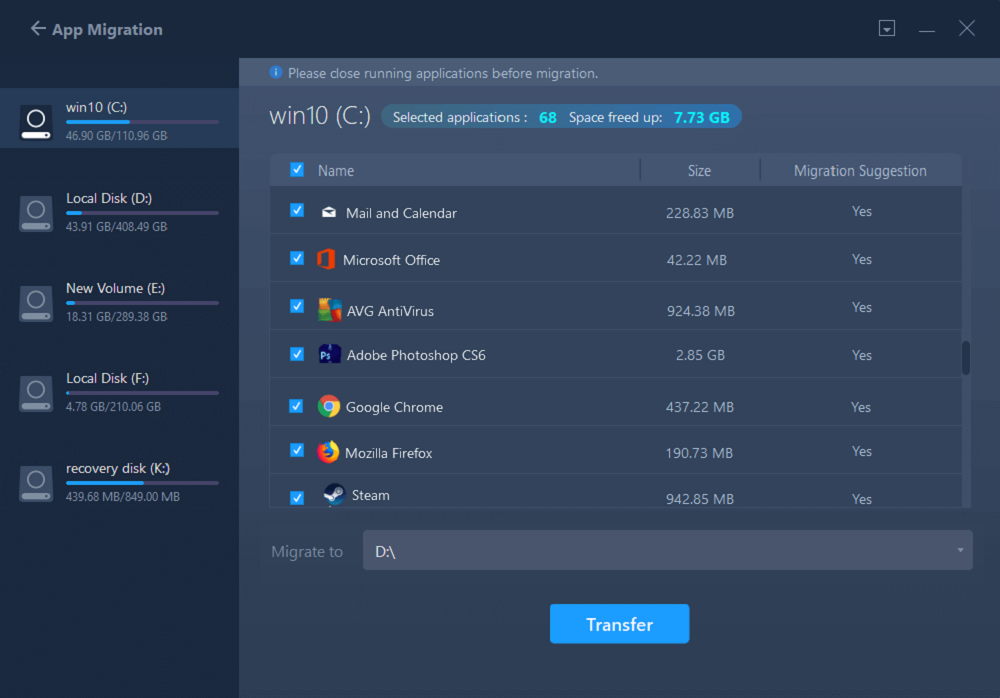
Step 2. Select programs to move from C drive to another drive
1. Tick the C drive and select programs (marked as «Yes») that you want to transfer.
2. Click the triangle icon to select another drive on your computer as the destination, and click «Transfer» to start the process.
Step 3. Finish the transferring
Wait patiently until the transferring process finishes and click «OK» to confirm.
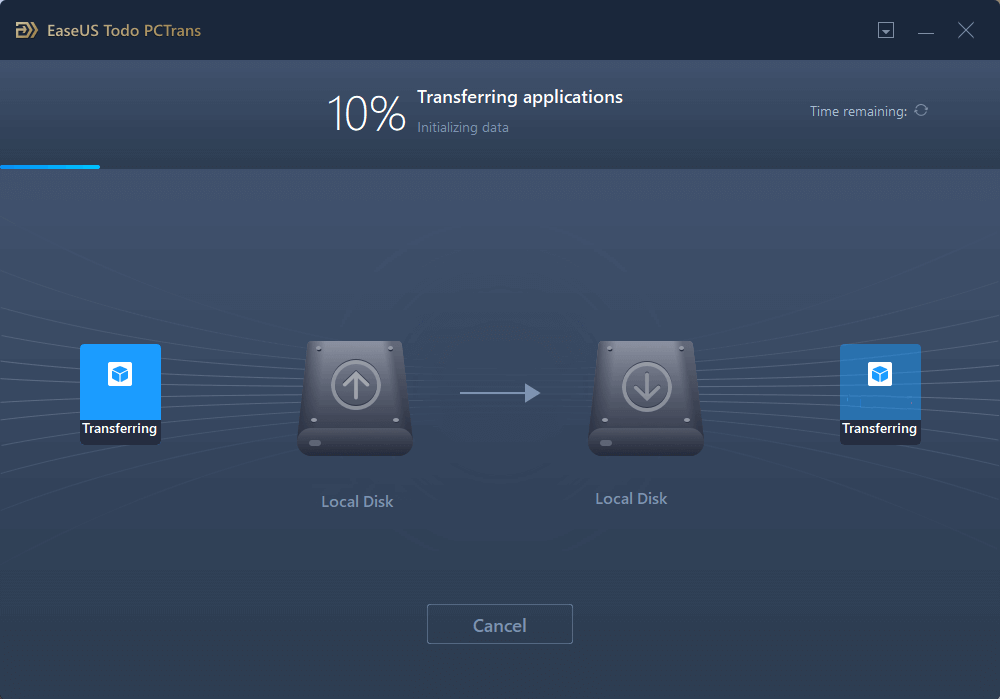
When it has done, you can restart PC if necessary. This will keep all changes on your PC and then you can run and programs from another hard drive without reinstallation.
Aside from this, you can also apply EaseUS Todo PCTrans to:
- Move apps from other drives to the C drive
- Move the Desktop folder to another drive
- Transfer apps or programs to another computer
- Backup and rescue data and programs in computer
- More…
#2. Use the Apps and Features Tool
Apps and Features tool is a Windows built-in tool that helps change the location of some installed programs on Windows computers. Windows 11 users can also apply this tool to switch some C drive installed programs from C to other drives.
Here are the steps:
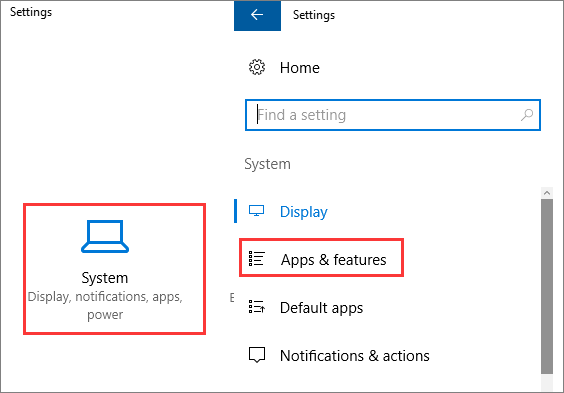
Step 1. Press the Windows + I keys to open Windows settings, click on «System,» and select «Apps and Features».
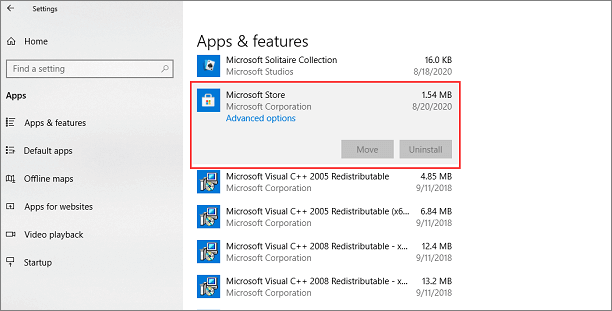
Step 2. Wait for the Apps and Feature to open, select the programs or applications you’d like to transfer, and click «Move.»
Step 3. Select the drive where you want to move the program to, such as D: drive.
Step 4. Click «Move» to confirm.
If you need to move several programs, you’ll need to repeat the process several times. For a more efficient way, you can totally trust EaseUS Todo PCTrans.
#3. Use CMD Command-Line
Another efficient but more complex solution to move apps around Windows 11 is to run CMD command lines. To do so, you must be careful while running the following steps on your PC.
Some experienced Windows administrators recommend that you create a restore point in Windows 11 if you face any issues while moving apps around Windows 11.
Here are steps to move apps around in Windows 11 using CMD:
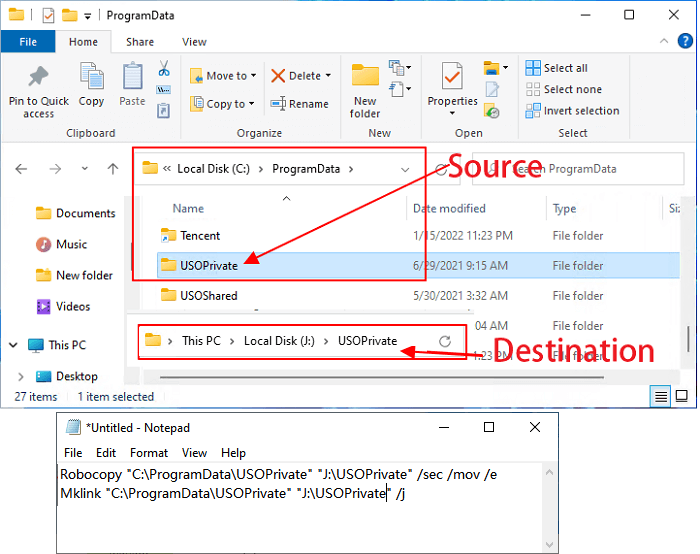
Step 1. Open your C drive and find out the app you want to move to another drive.
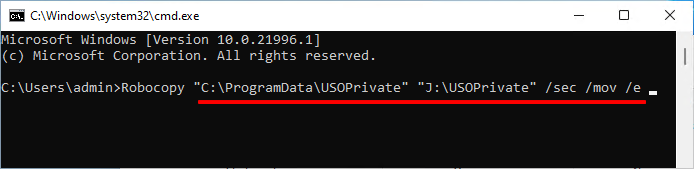
Step 2. Create a text document, copy and paste the two command lines in the file:
- Robocopy «Source» «Destination» /sec /mov /e
- Mklink «Source» «Destination» /j
Replace the Source with the path location of the target program in your C drive.
Replace the Destination with the path where you want to move the app to on your PC.
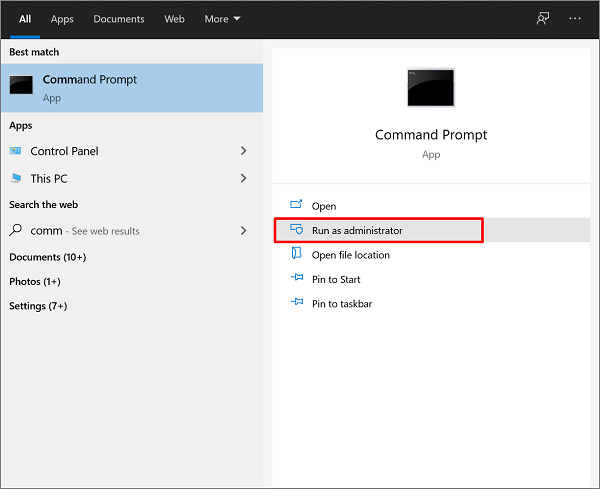
Step 3. Type cmd in the search box, right-click Command Prompt, and select «Run as Administrator».
Step 4. Once the command prompt opens, type the first line in your text file and hit Enter:
- Robocopy «Source» «Destination» /sec /mov /e
Step 5. Type the second line in the command prompt and hit Enter:
- Mklink «Source» «Destination» /j
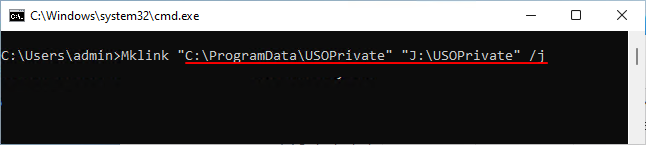
Wait for the process to complete. After this, you can open the target new drive and see if the selected app folder has been successfully moved here.

Note: You need to be very careful while running the command lines, and if any error occurs, it could be Windows that doesn’t allow you to do so. In this case, you should stop the operation and return to Method 1 for help.
If you are running Windows 10, click the following link to learn details about how to change program file location on Windows 10:
#4. Run Registry Editor
The last workaround for moving apps from C to another drive in Windows 11 is using Registry Editor. And before you start, you should also confirm where you want to move the apps.
Here are the steps:
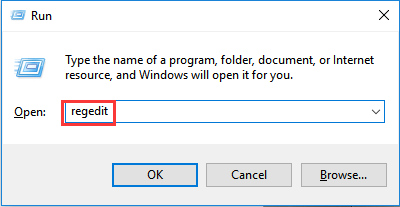
Step 1. Press the Windows + R keys to open the run dialog, type regedit, and click «OK».
Step 2. Once Registry Editor opens, follow the path here to open the folder in Registry:
HKEY_LOCAL_MACHINE\SOFTWARE\Microsoft\Windows\CurrentVersion
Step 3. Double-click on the ProgramFilesDir (x86) key and change the default value «C:\ProgramFiles» to the new drive path.
Step 4. Click «OK».
Step 5. Double-click on «ProgramFilesDir» and change the default value from «C:\ProgramFiles» to your new drive path.
Step 6. Click «OK», close Registry, and restart your computer.
Bonus Tip: How to Change Windows 11 Default Installation Folder
Aside from the above four methods to change the location of installed programs in Windows 11, it’s also important that you change the Windows 11 default installation folder to save disk space in the C drive.
Here are the steps that you can follow:
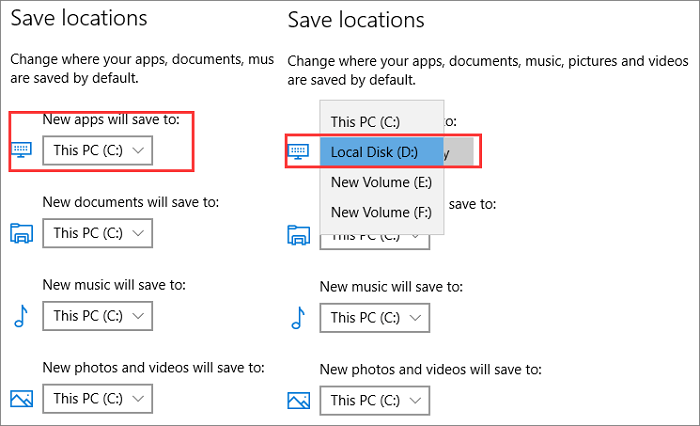
Step 1. Press Windows + I to open Windows Settings, and click «System» > «Storage.»
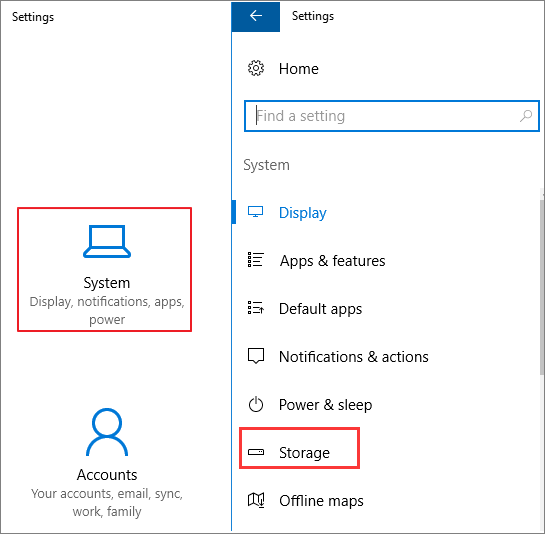
Step 2. At the Save locations section, click the «New apps will save to:» column, and select a new drive to change where your apps, documents, music, pictures, and videos are saved by default.
Let’s share this post to provide help for users who want to change the location of an installed program in Windows 11:
Why Need to Change the Location of an Installed Program in Windows 11
Though being designed with many new features, such as a new user desktop-centered Start menu and taskbar on Windows 11, Microsoft still keeps the most classic Windows system design in its newest operating system — Windows 11. All new content will automatically be saved and installed on the Local System C (This PC) Drive, which is still the same on Windows 11.
As a result, the C drive will soon get full with the following content:
- Downloaded content.
- Installed applications and software.
- Operating system.
- Personal folders, like Documents Pictures.
- Desktop contents, etc.
How will you resolve this issue when the C drive gets full in Windows 11? You can fix this issue in many ways, such as changing the default download location, moving user folders like Documents, Pictures, and Desktop to another drive, deleting useless large files, etc. Changing the location of installed programs in Windows 11 is also a very efficient way to free up large space in the system C drive.
Conclusion
This page covers four reliable methods that help move installed programs in Windows 11 from a C drive to another drive without any boot issues. Among the four methods, Windows beginners can totally trust EaseUS Todo PCTrans to migrate apps from C to another drive.
Experienced Windows users can also try the other three methods if they only want to move some basic apps around Windows 11. Changing the location of installed programs in Windows 11 is possible and easy. As long as you turn to the correct methods, you can directly execute the operation like an expert on your own.
When we install new applications on our system, by default, they are installed in the system drive, which is usually the C drive. The 32-bit apps are installed in the “C:\Program Files(x86)” folder and the 64-bit apps are installed in the “C:\Program Files” folder by default.
If you are running out of space in your C drive, you can move some apps to other drives without having to delete them and then reinstall them at a new location.
Table of Contents
Program Files is one of the most important folders in C drive which takes ample space as more software is installed on the system. One way of freeing up space in the C drive is to change the default installation location of the Microsoft Store apps as well as Win32 apps. This will not move the currently installed programs but all future programs will be installed in the new location without manually changing the default installation path each time while installing an app.
Let us show you how you can move existing applications to another drive, and how to change the default location for the Windows apps so all new ones are installed in another drive. The methods discussed in this post can also be applied to Windows 7 and Windows 8.1.
Changing The Default Installation Folder for Windows Apps
Through Windows Settings
Note: The following method is focused on Windows 11. However, the same can be applied to Windows 10 with a few minor navigational changes.
Follow the steps given below to change the default installation location for Windows apps:
- Navigate to the following:
Settings app >> System >> Storage >> Advanced Storage Settings >> Where new content is saved - Now click on the drop-down menu under “New apps will be saved to” and select another drive to save the future applications to.

- When selected, click Apply.


All new applications will now be saved to the selected drive. The installations will automatically make the new folders and directories along the way if and when required within the selected drive.
Using Windows Registry
The same can be achieved through Windows Registry. This method is the same for all Windows versions. Perform the following steps to change the default location of the installation folder for new installing programs:
Misconfiguration of critical values in the system’s registry could be fatal for your operating system. Therefore, we insist that you create a system restore point before proceeding forward with the process.
- Open the Registry Editor by typing in regedit in Run.

- Now paste the following in the address bar at the top for quick navigation:
Computer\HKEY_LOCAL_MACHINE\SOFTWARE\Microsoft\Windows\CurrentVersion
- On right hand side window, you will see ProgramFilesDir and ProgramFilesDir (x86). Each of these defines the default location of where the 64-bit and 32-bit applications are to be installed, respectively. Double-click on both of them one after the other and define the new location where you wish to install the applications by default. We suggest that you create separate folders for 64 and 32-bit apps.
- Now restart the computer for the changes to take effect.


You can then begin installing the new Store or Win32 applications on your PC, and they will be installed in the new drive.
That said, you can also free up space by moving existing apps to another drive other than C.
How to Move Windows Apps to Another Drive
You can only move the Store apps from one drive to another. Win32 applications cannot be moved. Follow the steps below to move Windows applications:
Note: The following method is focused on Windows 11. However, the same can be applied to Windows 10 with a few minor navigational changes.
- Navigate to the following:
Settings app >> Apps >> Apps & features - Here, look for the app that you want to move from the list and click on the ellipses (3 dots) in front of it. For Windows 10, click on the app to expand it.
- Now click Move from the expanded menu.
- Now select the drive you want to move the app to and click Move.


The application will now move from the main drive to the other drive.
If you do see that the Move button is greyed out, then the application cannot be moved. If you see that it has been replaced by the Modify button, then it is a Win32 application, which can also not be moved.

Unfortunately, there is no convenient way to move a Win32 application. The only method to do so is to uninstall it and then select a new location through the installation wizard while reinstalling the app.
Closing Words
Apply these manageable and painless steps to change your default folder for application installation. This may help you in making your system drive’s space manageable and in control. Now move any of your large files, games, or software between storage drives in a few easy steps.
Все способы:
- Вариант 1: Изменение места сохранения файлов
- Вариант 2: Изменение загружаемой операционной системы
- Вопросы и ответы: 37
Под «установкой диска D основным» понимается 2 разных задачи: сохранение всех файлов на этот диск или автоматическая загрузка второй операционной системы, установленной на D, при включении компьютера. Далее мы разберем оба варианта, а вы сразу же переходите к тому, который отражает ваш запрос.
Вариант 1: Изменение места сохранения файлов
Сейчас практически у всех пользователей жесткий диск разбит на два логических (C и D), либо этими буквами именуются действительно два разных накопителя. В обоих случаях, особенно в связке SSD + HDD, где твердотельный накопитель маленького объема, на системном диске C рано или поздно перестает хватать места для скачивания любых пользовательских файлов. Операционная система Windows 10 позволяет изменить их место сохранения на диск D. После этого критически важные обновления для ОС продолжат скачиваться на C, а вот все малозначимые и не влияющие на работоспособность Виндовс файлы начнут сохраняться на D.
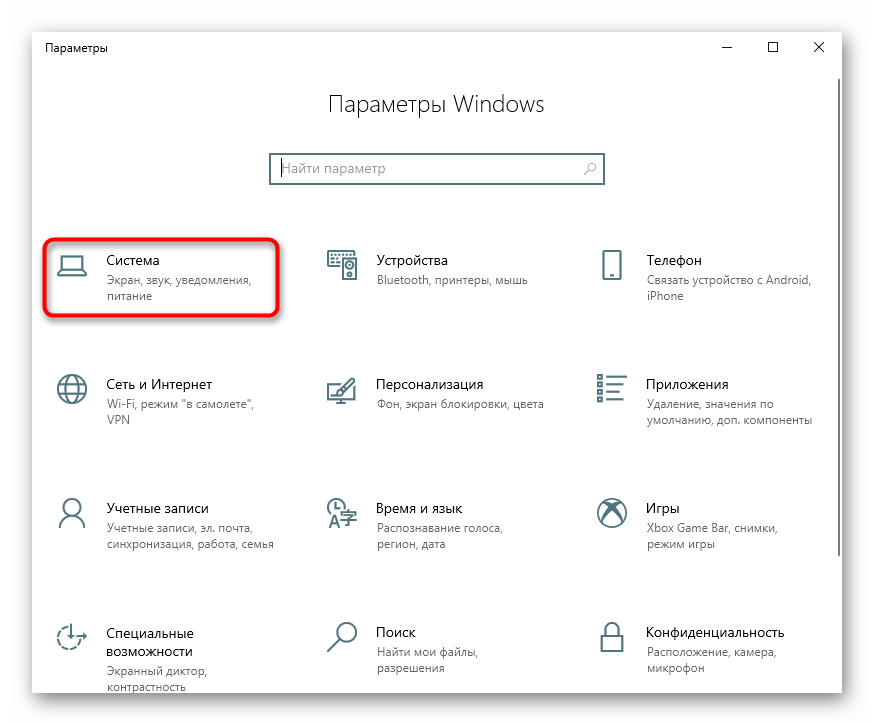
- Откройте «Пуск» и перейдите в «Параметры».
- Перейдите в первый же раздел «Система».
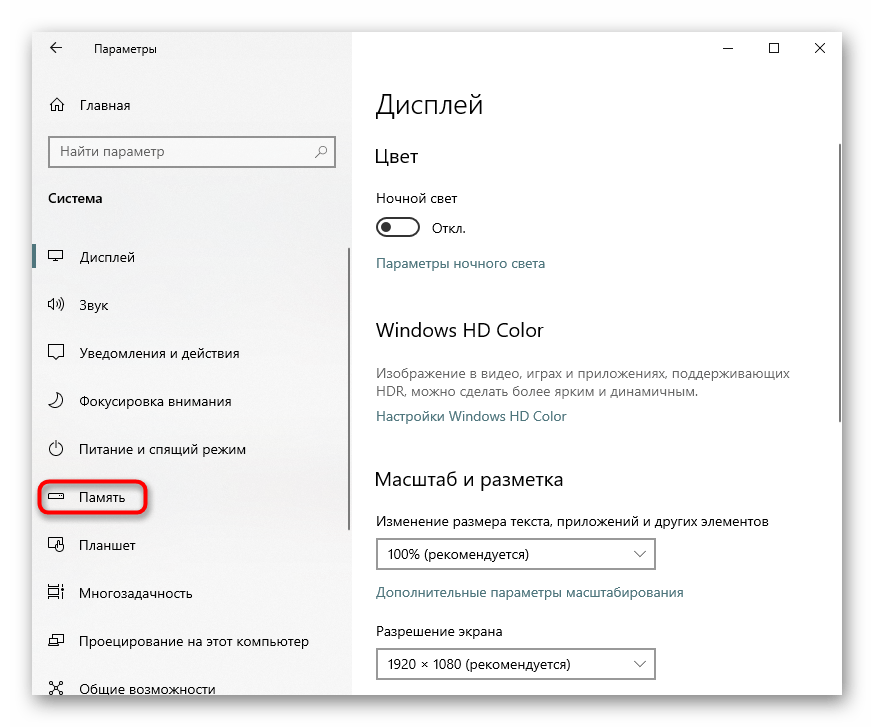
- Тут вам нужен подраздел «Память», находящийся на панели слева.
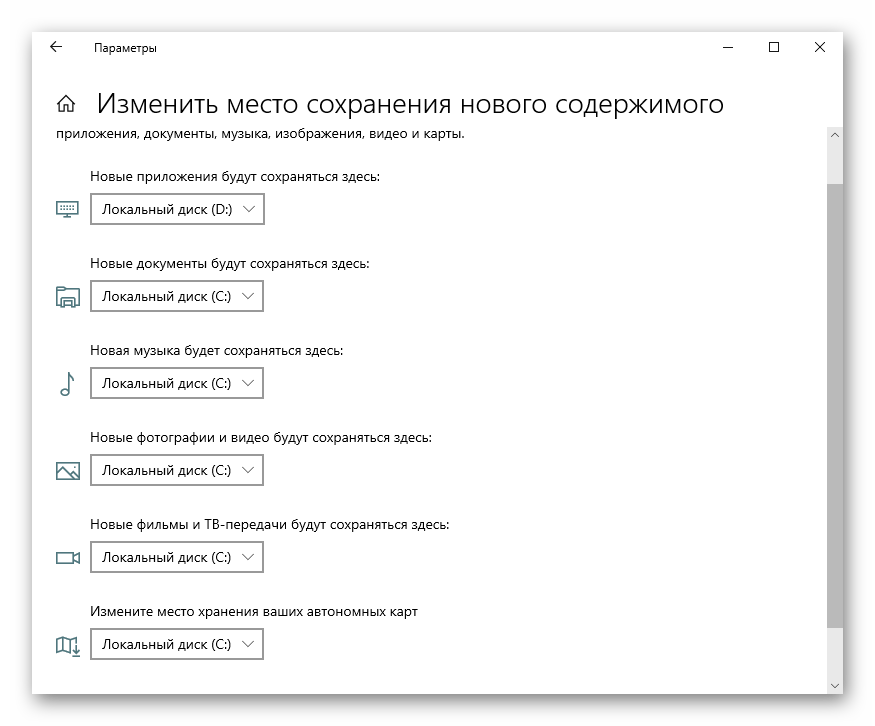
- Найдите кликабельную ссылку «Изменить место сохранения нового содержимого».
- Здесь представлен список всего, что можно переносить на диск D.
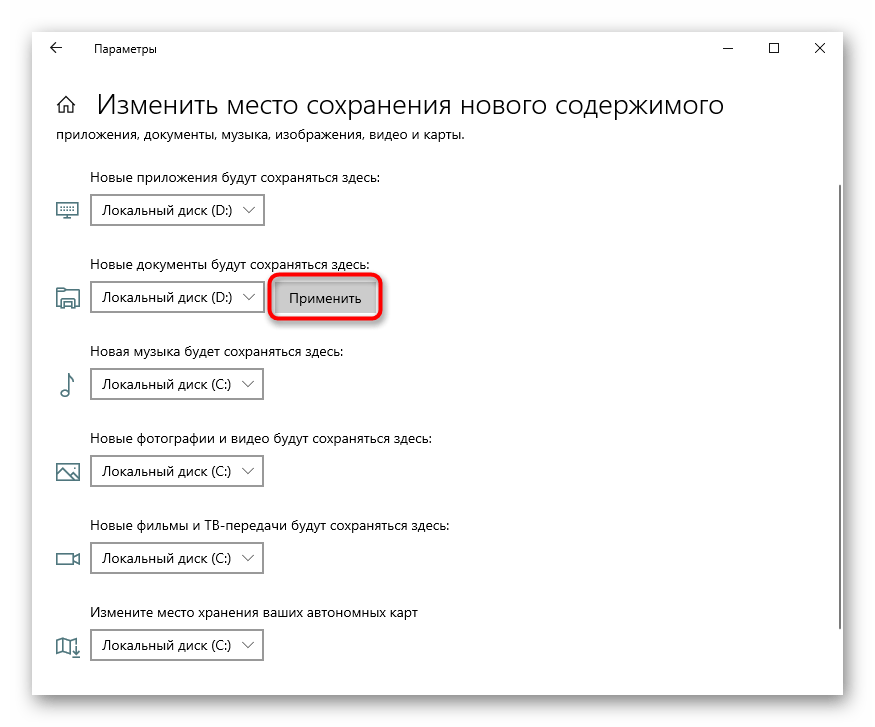
- Измените все или некоторые пункты, не забывая каждый раз нажимать «Применить». После этого окно можно просто закрыть.

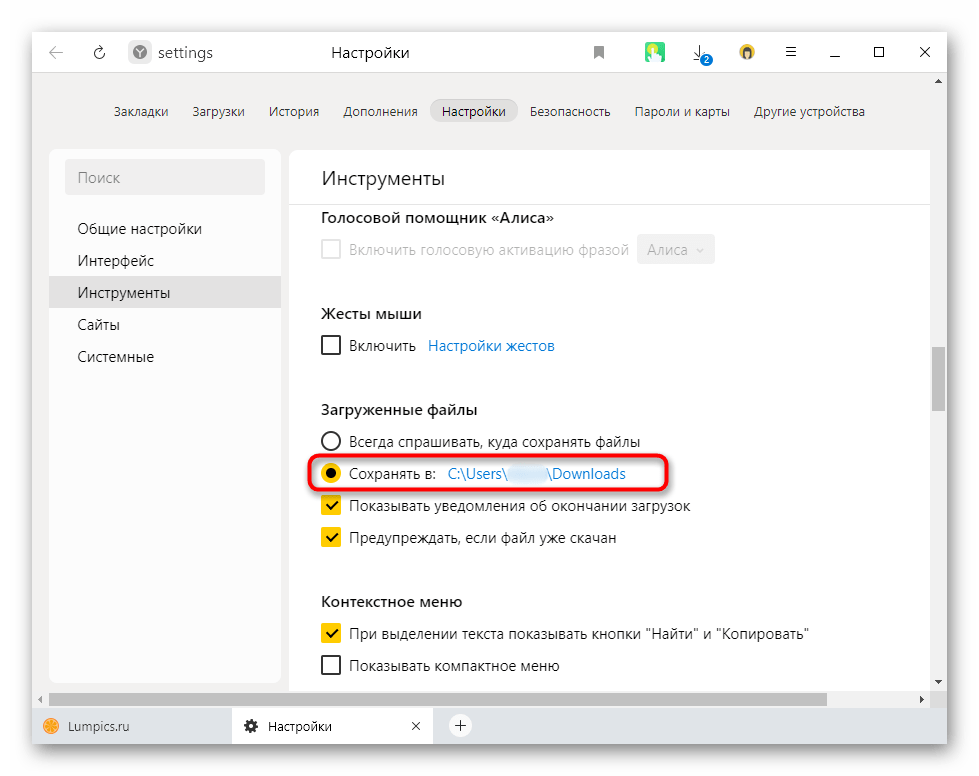
Но не забывайте, что это были только лишь основные настройки: многие программы, преимущественно браузеры, продолжат сохранять все в указанную ранее папку. Обычно это диск C, поэтому не забывайте зайти в настройки своего веб-обозревателя и изменить там путь, по которому происходит скачивание на ваш компьютер. То же самое касается торрент-клиентов, игровых клиентов и других приложений, подразумевающих загрузку.
Инструкция никак не повлияет на независимые установщики новых программ: по умолчанию они всегда будут предложить выполнить инсталляцию на диск C, поэтому вам каждый раз потребуется вручную менять путь. Изменить это на автоматический выбор D, к сожалению, получится только редактированием реестра.
Внимание! Не рекомендуем выполнять дальнейшие действия пользователям без опыта и без особой необходимости! Изменение параметра реестра может привести к нарушению работоспособности Windows и проблемам с запуском некоторых программ!
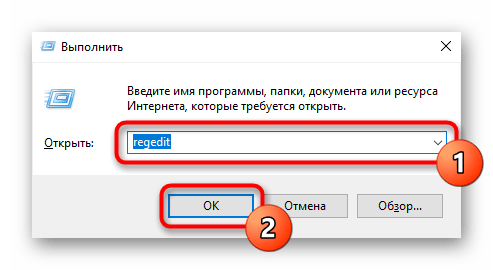
- Сочетанием клавиш Win + R вызовите окно «Выполнить»,где введите
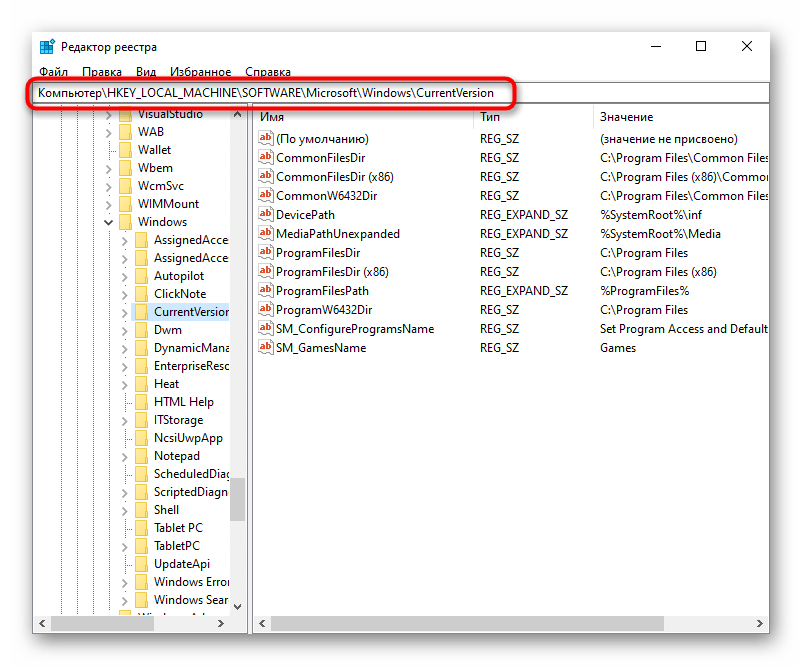
regedit. Нажмите «ОК». - Скопируйте и вставьте в адресную строку следующий путь:
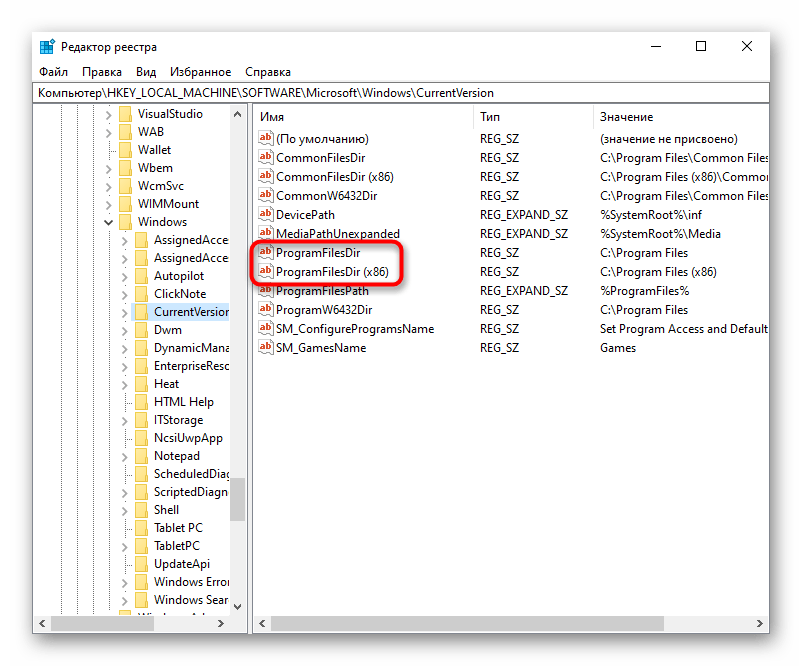
HKEY_LOCAL_MACHINE\SOFTWARE\Microsoft\Windows\CurrentVersion, после чего нажмите Enter. - Сперва понадобится выбрать параметр «ProgramFilesDir», а потом — «ProgramFilesDir (x86)». Если система 32-битная, то редактироваться будет только последний параметр.
- Откройте его, кликнув дважды ЛКМ, и в поле «Значение» измените букву с C на D. В 64-битной системе то же самое понадобится проделать и со вторым параметром.
- Останется только перезагрузить компьютер для применения изменений.

Вариант 2: Изменение загружаемой операционной системы
У некоторых юзеров, напротив, на два разных диска (C и D) установлены две операционные системы. И если из них по умолчанию загружается та, что установлена на диске С, это можно легко изменить через «Конфигурацию системы».
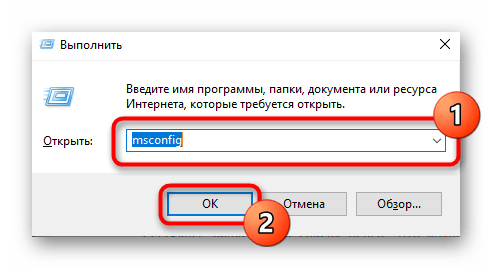
- Нажмите сочетание клавиш Win + R и впишите команду
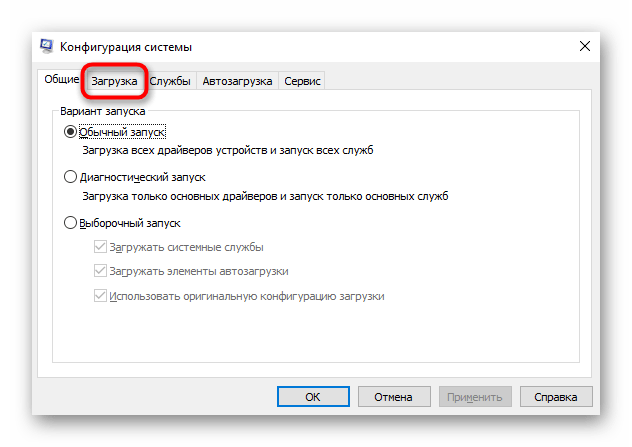
msconfig, после чего кликните «ОК». - Переключитесь на вкладку «Загрузка».
- Выделите ту ОС, что установлена на диске D, и нажмите кнопку «Использовать по умолчанию». Подтвердите изменения кнопкой «ОК».
- Перезапустите ПК.

Чтобы изменить загружаемую операционную систему и отключить уведомление о выборе ОС при включении компьютера, можно поступить несколько иначе.
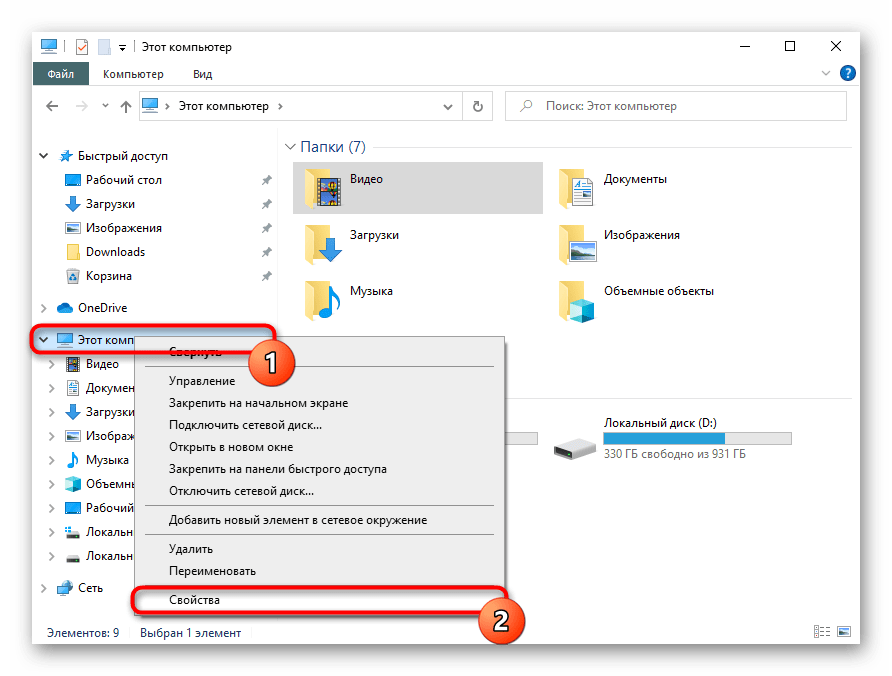
- Нажмите по ярлыку «Этот компьютер» правой кнопкой мыши и перейдите в «Свойства». Если его нет на рабочем столе, откройте «Проводник» и сделайте то же самое, воспользовавшись левой панелью.
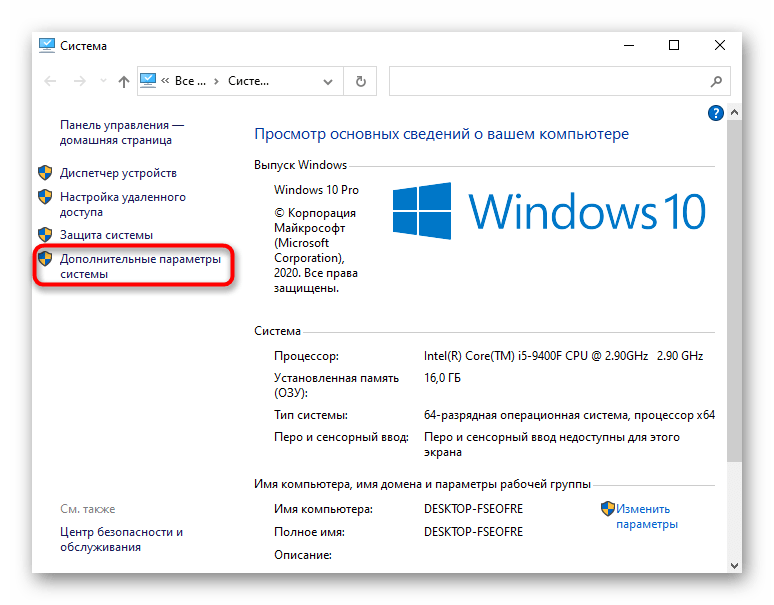
- Опять же, через левую панель переключитесь в «Дополнительные параметры системы».
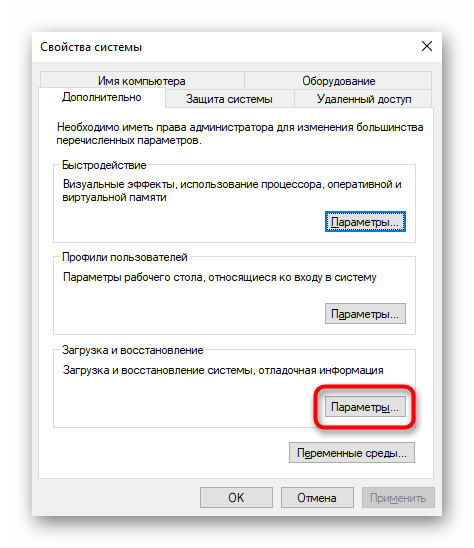
- На вкладке «Дополнительно», открытой по умолчанию, найдите блок «Загрузка и восстановление» и перейдите в «Параметры».
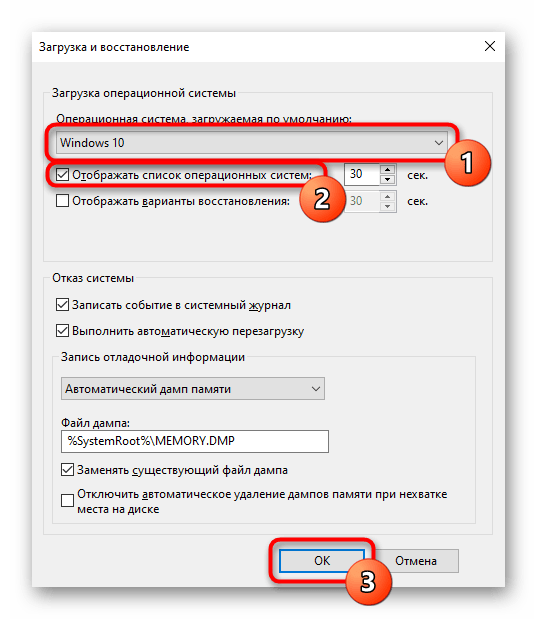
- Здесь через выпадающее меню измените ОС, загружаемую по умолчанию, на ту, что инсталлирована на диск D, а затем снимите галочку с пункта «Отображать список операционных систем». Сохраните изменения на «ОК». Они вступят в силу после перезагрузки ПК.
Наша группа в TelegramПолезные советы и помощь