
A quick overview and a simple Windows CMD script to make your terminal output a little more lively
- Download source code — 1.9 KB
Introduction
The default text output to a terminal is monochromatic and doesn’t provide a simple method to provide context. For instance, you may want an error to appear in red, success in green, or important info to be output in bold.
Adding color to your terminal output is straightforward and involves outputting the correct control characters before your text.
This is a companion article to How to change text color in a Linux terminal.
Terminal Colors
To output colored text, you need to echo the control characters for the required color, then output your text, and then (to be tidy) reset the output back to defaults. The following table lists the codes:
| Color | Foreground | Background |
|---|---|---|
| Default | ESC[39m | ESC[49m |
| Black | ESC[30m | ESC[40m |
| Dark red | ESC[31m | ESC[41m |
| Dark green | ESC[32m | ESC[42m |
| Dark yellow (Orange-ish) | ESC[33m | ESC[43m |
| Dark blue | ESC[34m | ESC[44m |
| Dark magenta | ESC[35m | ESC[45m |
| Dark cyan | ESC[36m | ESC[46m |
| Light gray | ESC[37m | ESC[47m |
| Dark gray | ESC[90m | ESC[100m |
| Red | ESC[91m | ESC[101m |
| Green | ESC[92m | ESC[101m |
| Orange | ESC[93m | ESC[103m |
| Blue | ESC[94m | ESC[104m |
| Magenta | ESC[95m | ESC[105m |
| Cyan | ESC[96m | ESC[106m |
| White | ESC[97m | ESC[107m |
and the reset code is ESC[0m where ESC is the escape code.
The format of the string for foreground color is:
"ESC[" + "<0 or 1, meaning normal or bold>;" + "<color code> + "m"
and for background:
"ESC[" + "<color code>" + "m"
These codes can be output together in order to change fore- and back-ground colors simultaneously.
Using the Code
Before you can output the color code, you need to generate the ESC sequence. It’s probably easiest to do that once and store it for later:
:: Sets up the ESC string for use later in this script
:setESC
    for /F "tokens=1,2 delims=#" %%a in ('"prompt #$H#$E# & echo on & for %%b in (1) do rem"') do (
      set ESC=%%b
      exit /B 0
    )
    exit /B 0
This will set a variable ESC with the correct sequence.
A simple example of outputting red text:
setlocal enabledelayedexpansion call :setESC echo !ESC
Handling Contrast
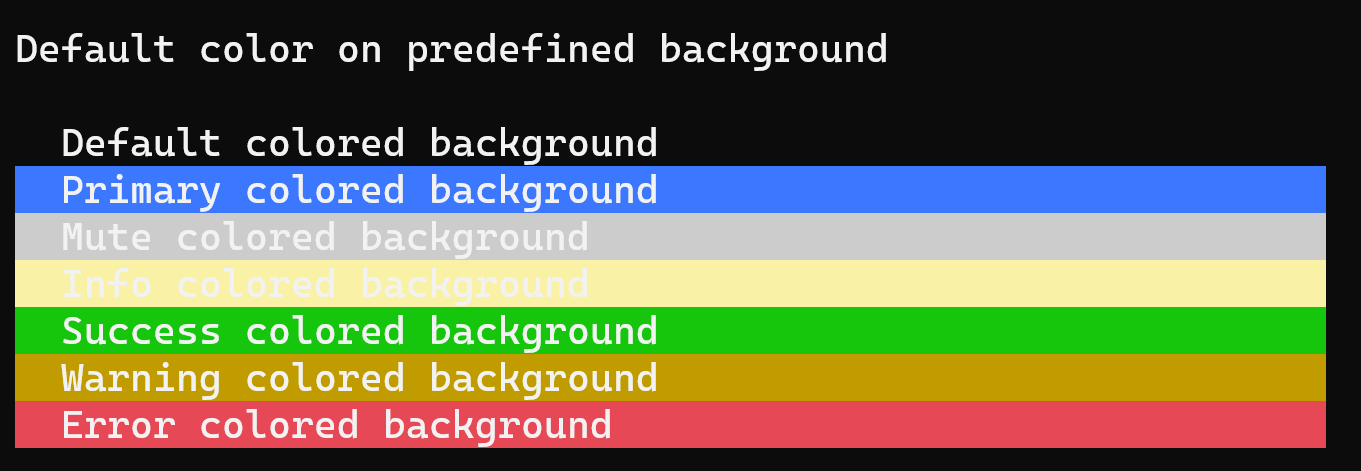
Suppose we have defined a set of predefined colors and we want to use them to ensure consistency:
set color_primary=Blue
set color_mute=Gray
set color_info=Yellow
set color_success=Green
set color_warn=DarkYellow
set color_error=Red
If we output text using these as background colors, we get:
call :WriteLine
call :WriteLine "Default color on predefined background"
call :WriteLine

call :WriteLine "  Default colored background" "Default"
call :WriteLine "  Primary colored background" "Default" %color_primary%
call :WriteLine "  Mute colored background"    "Default" %color_mute%
call :WriteLine "  Info colored background"    "Default" %color_info%
call :WriteLine "  Success colored background" "Default" %color_success%
call :WriteLine "  Warning colored background" "Default" %color_warn%
call :WriteLine "  Error colored background"   "Default" %color_error%

Things are a bit murky so let’s add one more function that will provide a contrasting foreground on whatever background we choose.
:: Sets the name of a color that will providing a contrasting foreground
:: color for the given background color.
::
:: string background color name.
:: on return, contrastForeground will be set
:setContrastForeground

    set background=%~1

    if "!background!"=="" background=Black

    if /i "!background!"=="Black"       set contrastForeground=White
    if /i "!background!"=="DarkRed"     set contrastForeground=White
    if /i "!background!"=="DarkGreen"   set contrastForeground=White
    if /i "!background!"=="DarkYellow"  set contrastForeground=White
    if /i "!background!"=="DarkBlue"    set contrastForeground=White
    if /i "!background!"=="DarkMagenta" set contrastForeground=White
    if /i "!background!"=="DarkCyan"    set contrastForeground=White
    if /i "!background!"=="Gray"        set contrastForeground=Black
    if /i "!background!"=="DarkGray"    set contrastForeground=White
    if /i "!background!"=="Red"         set contrastForeground=White
    if /i "!background!"=="Green"       set contrastForeground=White
    if /i "!background!"=="Yellow"      set contrastForeground=Black
    if /i "!background!"=="Blue"        set contrastForeground=White
    if /i "!background!"=="Magenta"     set contrastForeground=White
    if /i "!background!"=="Cyan"        set contrastForeground=Black
    if /i "!background!"=="White"       set contrastForeground=Black

    exit /B 0
We’ve already wired this up in the Write methods: If the foreground color is set as «Contrast«, then the foreground will be set as something that has a decent contrast to the given background.
To use, we simply do:
call :WriteLine "  Primary colored background" "Contrast" %color_primary%
call :WriteLine "  Mute colored background"    "Contrast" %color_mute%
call :WriteLine "  Info colored background"    "Contrast" %color_info%
call :WriteLine "  Success colored background" "Contrast" %color_success%
call :WriteLine "  Warning colored background" "Contrast" %color_warn%
call :WriteLine "  Error colored background"   "Contrast" %color_error%

Interesting Points
A challenge in this was outputting text via a CMD shell without a newline. The <var>echo</var> command, by default, adds a line feed. To output text in a CMD script without including a line feed, simply use:
<NUL set /p ="My string goes here"
How to Change Text Color in a Windows Terminal
A quick overview and a simple Windows CMD script to make your terminal output a little more lively
Introduction
The default text output to a terminal is monochromatic and doesn’t provide a simple method to provide context. For instance, you may want an error to appear in red, success in green, or important info to be output in bold.
Adding color to your terminal output is straightforward and involves outputting the correct control characters before your text.
This is a companion article to How to change text color in a Linux terminal.
Terminal Colors
To output colored text, you need to echo the control characters for the required color, then output your text, and then (to be tidy) reset the output back to defaults. The following table lists the codes:
| Color | Foreground | Background |
|---|---|---|
| Default | ESC[39m | ESC[49m |
| Black | ESC[30m | ESC[40m |
| Dark red | ESC[31m | ESC[41m |
| Dark green | ESC[32m | ESC[42m |
| Dark yellow (Orange-ish) | ESC[33m | ESC[43m |
| Dark blue | ESC[34m | ESC[44m |
| Dark magenta | ESC[35m | ESC[45m |
| Dark cyan | ESC[36m | ESC[46m |
| Light gray | ESC[37m | ESC[47m |
| Dark gray | ESC[90m | ESC[100m |
| Red | ESC[91m | ESC[101m |
| Green | ESC[92m | ESC[101m |
| Orange | ESC[93m | ESC[103m |
| Blue | ESC[94m | ESC[104m |
| Magenta | ESC[95m | ESC[105m |
| Cyan | ESC[96m | ESC[106m |
| White | ESC[97m | ESC[107m |
and the reset code is ESC[0m where ESC is the escape code.
The format of the string for foreground color is:
"ESC[" + "<0 or 1, meaning normal or bold>;" + "<color code> + "m"
and for background:
"ESC[" + "<color code>" + "m"
These codes can be output together in order to change fore- and back-ground colors simultaneously.
Using the Code
Before you can output the color code, you need to generate the ESC sequence. It’s probably easiest to do that once and store it for later:
:: Sets up the ESC string for use later in this script
:setESC
    for /F "tokens=1,2 delims=#" %%a in ('"prompt #$H#$E# & echo on & for %%b in (1) do rem"') do (
      set ESC=%%b
      exit /B 0
    )
    exit /B 0
This will set a variable ESC with the correct sequence.
A simple example of outputting red text:
setlocal enabledelayedexpansion call :setESC echo !ESC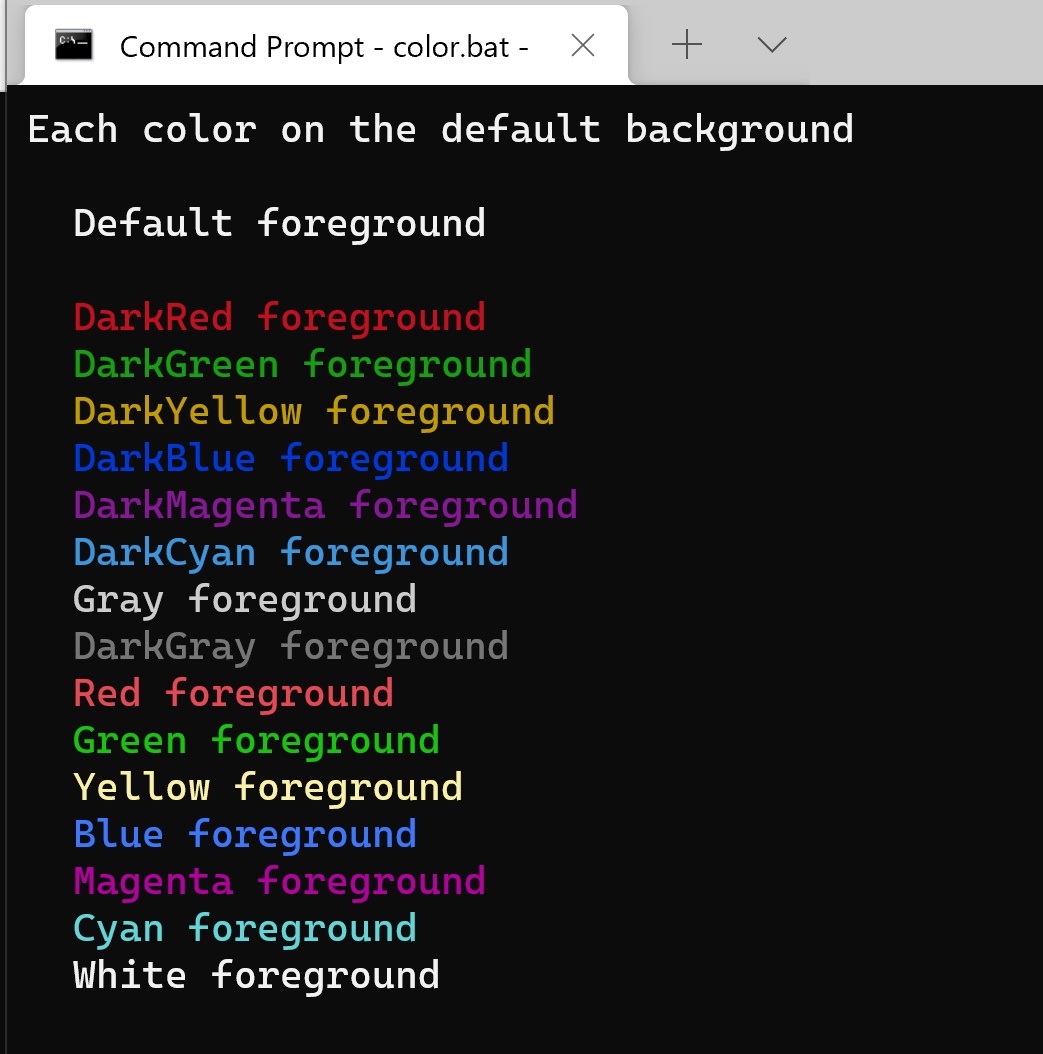
Handling Contrast
Suppose we have defined a set of predefined colors and we want to use them to ensure consistency:
set color_primary=Blue
set color_mute=Gray
set color_info=Yellow
set color_success=Green
set color_warn=DarkYellow
set color_error=Red
If we output text using these as background colors, we get:
call :WriteLine
call :WriteLine "Default color on predefined background"
call :WriteLine

call :WriteLine "  Default colored background" "Default"
call :WriteLine "  Primary colored background" "Default" %color_primary%
call :WriteLine "  Mute colored background"    "Default" %color_mute%
call :WriteLine "  Info colored background"    "Default" %color_info%
call :WriteLine "  Success colored background" "Default" %color_success%
call :WriteLine "  Warning colored background" "Default" %color_warn%
call :WriteLine "  Error colored background"   "Default" %color_error%
Things are a bit murky so let’s add one more function that will provide a contrasting foreground on whatever background we choose.
:: Sets the name of a color that will providing a contrasting foreground
:: color for the given background color.
::
:: string background color name.
:: on return, contrastForeground will be set
:setContrastForeground

    set background=%~1

    if "!background!"=="" background=Black

    if /i "!background!"=="Black"       set contrastForeground=White
    if /i "!background!"=="DarkRed"     set contrastForeground=White
    if /i "!background!"=="DarkGreen"   set contrastForeground=White
    if /i "!background!"=="DarkYellow"  set contrastForeground=White
    if /i "!background!"=="DarkBlue"    set contrastForeground=White
    if /i "!background!"=="DarkMagenta" set contrastForeground=White
    if /i "!background!"=="DarkCyan"    set contrastForeground=White
    if /i "!background!"=="Gray"        set contrastForeground=Black
    if /i "!background!"=="DarkGray"    set contrastForeground=White
    if /i "!background!"=="Red"         set contrastForeground=White
    if /i "!background!"=="Green"       set contrastForeground=White
    if /i "!background!"=="Yellow"      set contrastForeground=Black
    if /i "!background!"=="Blue"        set contrastForeground=White
    if /i "!background!"=="Magenta"     set contrastForeground=White
    if /i "!background!"=="Cyan"        set contrastForeground=Black
    if /i "!background!"=="White"       set contrastForeground=Black

    exit /B 0
We’ve already wired this up in the Write methods: If the foreground color is set as «Contrast«, then the foreground will be set as something that has a decent contrast to the given background.
To use, we simply do:
call :WriteLine "  Primary colored background" "Contrast" %color_primary%
call :WriteLine "  Mute colored background"    "Contrast" %color_mute%
call :WriteLine "  Info colored background"    "Contrast" %color_info%
call :WriteLine "  Success colored background" "Contrast" %color_success%
call :WriteLine "  Warning colored background" "Contrast" %color_warn%
call :WriteLine "  Error colored background"   "Contrast" %color_error%

Interesting Points
A challenge in this was outputting text via a CMD shell without a newline. The <var>echo</var> command, by default, adds a line feed. To output text in a CMD script without including a line feed, simply use:
<NUL set /p ="My string goes here"

Anson Heung
Posted on
• Edited on
Windows Terminal is a modern terminal application for developers who frequently uses command-line tools such as Powershell. In this article, I’ll show you how to customize the hell out of Windows Terminal and Powershell so that you can flex on your friends and colleagues 😎.
Here’s our final result 👇

Before we begin, please download Windows Terminal from the Microsoft Store.
Table of Contents:
- Windows Terminal Settings
- Oh My Posh
- Winfetch
Windows Terminal Settings
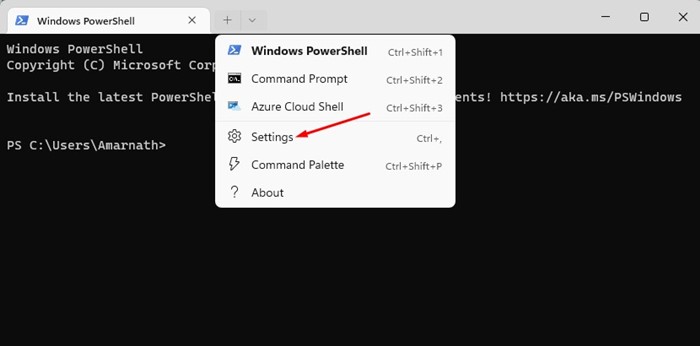
You can open settings via the Ctrl+, shortcut or the dropdown menu:

Color Scheme
My color scheme is a slightly modified version of Sonokai Shusia. To install the color scheme:
- Open Settings in Windows Terminal and press the “Open JSON file” button at the bottom left corner. It will open
settings.jsonin Notepad. -
In
settings.json, scroll down to find the"schemes"field, which accepts an array of color scheme objects. Next, paste in my color scheme object before the first object in the array (note that object order does not matter).{ ... "schemes": [ { "name": "Sonokai Shusia", "background": "#2D2A2E", "black": "#1A181A", "blue": "#1080D0", "brightBlack": "#707070", "brightBlue": "#22D5FF", "brightCyan": "#7ACCD7", "brightGreen": "#A4CD7C", "brightPurple": "#AB9DF2", "brightRed": "#F882A5", "brightWhite": "#E3E1E4", "brightYellow": "#E5D37E", "cursorColor": "#FFFFFF", "cyan": "#3AA5D0", "foreground": "#E3E1E4", "green": "#7FCD2B", "purple": "#7C63F2", "red": "#F82F66", "selectionBackground": "#FFFFFF", "white": "#E3E1E4", "yellow": "#E5DE2D" }, ... ] } -
Save your changes and head back to Windows Terminal. Go to Settings → «Windows Powershell» profile → «Appearance» tab → «Color Scheme», and choose the new color scheme. Then, press «Save».


If you don’t like my custom theme, check out Windows Terminal Themes website. There are 200+ themes to choose from and you get a quick preview of each theme 🌈.
Nerd Font
Nerd Fonts refer to programming fonts that are patched with a high number of glyphs (icons). Using a nerd font in Windows Terminal is essential because normal monospace fonts cannot render icons properly:

It’s likely that the programming font you’re using (eg. Cascadia Code, Fira Code) already has a Nerd Font version. Check out this link to see the full list of patched Nerd Fonts that you can install.
In my setup, I use Fira Code Nerd Font. The link will download a ZIP file that contains many TrueType font files. It’s OK to only install the files where the name looks something like Fira Code XXXXX Nerd Font Complete Windows Compatible.
After installing Nerd Font:
- Restart your Windows Terminal by closing and re-opening it.
- Go to Settings → “Windows Powershell” profile → “Appearance” tab → “Font face”, and choose your newly installed Nerd Font:

Now, your Terminal should look a bit more pleasing to the eyes:

Oh My Posh
Oh My Posh is a prompt theme engine that lets you beautify the prompt string. This engine requires your Terminal to use a Nerd Font so make sure that you followed along the previous steps.
Setup
-
Install “App Installer” from Microsoft Store to get the
wingetWindows Package Manager CLI.- ⚠ Requires Windows 10 1809 (build 17763) or later
- Check out Oh My Posh’s documentation for alternative installation options.
-
Restart your Windows Terminal and run
wingetto check if the package manager is correctly installed. -
In your Windows Terminal, run
winget install JanDeDobbeleer.OhMyPosh -
Restart your Windows Terminal. Next, try running
oh-my-poshin Powershell to see if it’s correctly installed.
-
Run the following command to open your Powershell profile.
notepad $PROFILEIf notepad shows a prompt saying that “Microsoft.Powershell_profile.ps1” is not found and asks if you would like to create the file, press “Yes” to create the file.
-
Inside the file, paste in the following code and save the file. This will load Oh My Posh on start-up with the default theme.
oh-my-posh --init --shell pwsh --config ~/AppData/Local/Programs/oh-my-posh/themes/jandedobbeleer.omp.json | Invoke-Expression -
Restart your Terminal. Your Powershell should now load Oh My Posh automatically


Change Theme
Oh My Posh comes with >70 themes included out-of-the-box. Check out the “Themes” page documentation for a gallery of preinstalled themes.
All themes are located in ~\AppData\Local\Programs\oh-my-posh\themes if you used winget to install Oh My Posh. If you used an alternative installation method, visit the documentation and select your installation method to see where the themes are located.
Suppose you want to use the powerlevel10k_rainbow preinstalled theme:
-
Open Windows Terminal and run
notepad $PROFILEin Powershell just like we did previously. -
In the opened file, change the path after
--configso that it usespowerlevel10k_rainbow.omp.json:oh-my-posh --init --shell pwsh --config ~/AppData/Local/Programs/oh-my-posh/themes/powerlevel10k_rainbow.omp.json | Invoke-Expression -
Restart your Terminal:


Custom Themes
You can easily create your own theme by writing your own JSON files. Here are some useful links:
- “Configuration → General” page of the docs — Learn how to create custom themes
- Nerd Font’s cheatsheet — List of different glyphs that you can use
I created a custom theme called p10k_classic, which is inspired by a preinstalled theme called powerlevel10k_classic.
To use my theme:
-
Visit the GitHub Gist link and click the “Download ZIP” button at the top right corner.
-
Extract
p10k_classic.omp.jsoninto a location of your choice. For example, let’s place it in the root folder (~). -
Open Windows Terminal and run
notepad $PROFILEin Powershell. -
In the opened file, change the path after
--configso that it uses~/p10k_classic.omp.jsonoh-my-posh --init --shell pwsh --config ~/p10k_classic.omp.json | Invoke-Expression -
Restart your Terminal:


Winfetch
As an added bonus, we’ll install winfetch, a command-line tool that prints out system information. This is a great alternative to neofetch, which only works on Linux.
Setup
This wiki page lists several ways to install winfetch. We’re using the first recommended method: PSGallery.
-
Run Windows Terminal as administrator. To do that, search “Windows Terminal” in the Start Menu, right click the item, and press “Run as administrator”

-
In Powershell, run the command:
Install-Script -Name pwshfetch-test-1Choose “Yes” for any prompts you encountered.
-
Run
notepad $PROFILEto open Powershell profile. Add the following line of code at the end:Set-Alias winfetch pwshfetch-test-1 -
Restart your Terminal. Then, run
winfetchto see if it’s correctly installed.


The default winfetch config is saved to ~\.config\winfetch\config.ps1. Check out the “Configuration” wiki page to see all available configuration options.
Custom Image
The Windows logo at the left can be changed to a custom “image” (more like a low resolution pixel art because Windows Terminal cannot render full resolution images).
For example, I want to display my GitHub profile picture, which is a 8-bit Luigi art:
-
Save this image and place it in a location of your choice. For example, I save it at the root folder (
~) with the nameluigi.png. -
Open
~\.config\winfetch\config.ps1in Notepad. Change the first two variables to the following:# ===== WINFETCH CONFIGURATION ===== $image = "C:\Users\User\luigi.png" # ABSOLUTE path $noimage = $false⚠ I used absolute path in
$imagebecause winfetch in my PC is having trouble processing a relative path (~/luigi.png). The full path of my root folder isC:\Users\User. -
Save the file and run
winfetchin Powershell:

More Configuration
By default, winfetch only shows information about your C drive. To show all available drives, open ~\.config\winfetch\config.ps1 and uncomment the field:
# Configure which disks are shown
# $ShowDisks = @("C:", "D:")
# Show all available disks
$ShowDisks = @("*")
Enter fullscreen mode
Exit fullscreen mode
You can also display a bar chart for the memory (RAM) and disk usage:
# Configure how to show info for levels
# Default is for text only.
# 'bar' is for bar only.
# 'textbar' is for text + bar.
# 'bartext' is for bar + text.
# $cpustyle = 'bar'
$memorystyle = 'bartext'
$diskstyle = 'bartext'
# $batterystyle = 'bartext'
Enter fullscreen mode
Exit fullscreen mode
Here’s our final result:

That’s all the steps you needed to beautify your Terminal 🌈. Now it’s time for you to show off in front of your friends and colleagues! 😁
Thanks for reading! If you find it useful, don’t forget to like and share this post 🙌
- My GitHub
- Personal website
Back in 2020, Microsoft introduced Windows Terminal app to Windows 10 users. After months of testing, the Windows Terminal app arrived in the stable builds of Windows 10.
For those who don’t know, Windows Terminal is a utility that combines many command line tools and shells such as Command Prompt, WSL, PowerShell, and more.
The new Windows Terminal allows you to use multiple command line tools from a single place. It provides better features such as a tabbed interface, split panes, and the ability to customize the appearance.
Also Read: 5 Best Apps to Customize Your Windows 11 PC
The Windows Terminal app is also available for Windows 11 and is fully customizable. You can easily customize or change the appearance of the Windows Terminal app on Windows 11 to suit your theme. Here’s how to change Windows Terminal Theme in Windows 11.
Change Color Scheme in Windows Terminal
Well, change the color scheme in the Windows terminal; you must follow some of the simple steps we have shared below. Here’s how to change the color scheme in Windows Terminal.
1. First, click the Windows 11 Search and type in Windows Terminal. Next, open the Windows Terminal app from the list of matching results.
2. On the Windows Terminal, click on the drop-down arrow shown in the screenshot below.
3. From the list of options, click on Settings.
4. On the Settings page, select the Profile on which you want to apply a new color scheme.
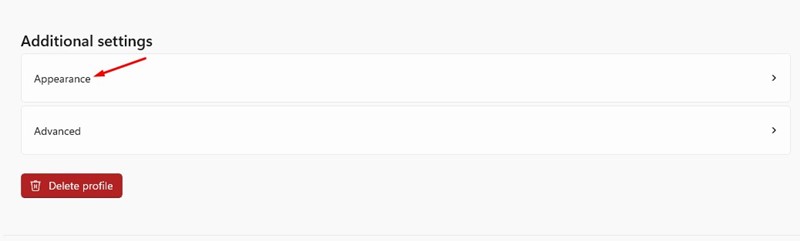
5. On the right, scroll down to the Additional Settings and click on Appearance.
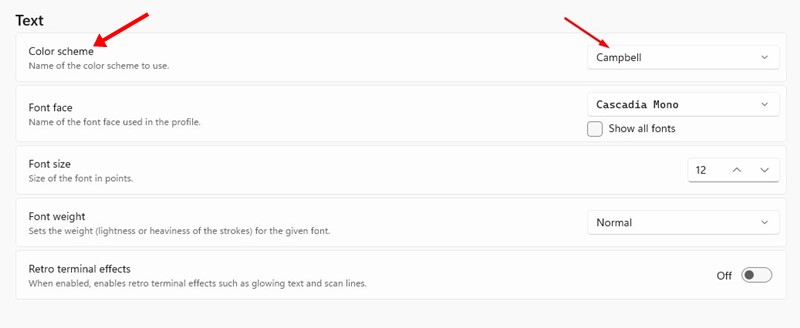
6. On the Appearance, click on the drop-down menu beside Color Scheme and select the one that best suits you.
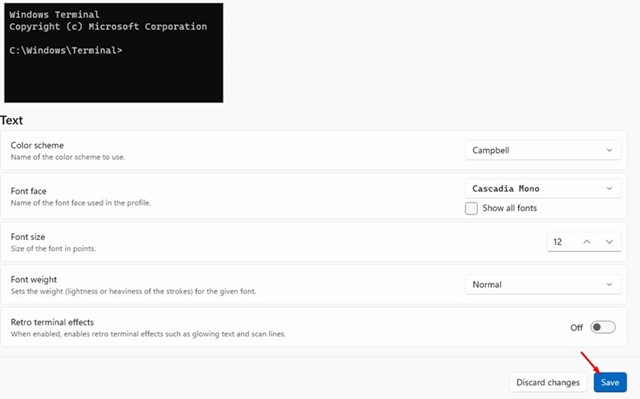
7. Once done, click on the Save button at the bottom-right corner.
That’s it! This is how you can change the Color Scheme of the Windows Terminal app on Windows 11.
Change Windows Terminal Font, Font Size & Weight
You can also change Windows Terminal’s font, size, and weight per your requirement. For that, follow some of the simple steps we have shared below.
1. First, click the Windows 11 Search and type in Windows Terminal. Next, open the Windows Terminal app from the list of matching results.
2. On the Windows Terminal, click on the drop-down arrow shown in the screenshot below.
3. From the list of options, click on Settings.
4. On the Settings page, select the Profile of which you want to change the font. Select Defaults if you want to apply changes to all command line tools.
5. On the right, scroll down to the Additional Settings and click on Appearance.
6. Now, you will find various text customization options. To change the font, click on the drop-down menu beside the font face and select the new font.
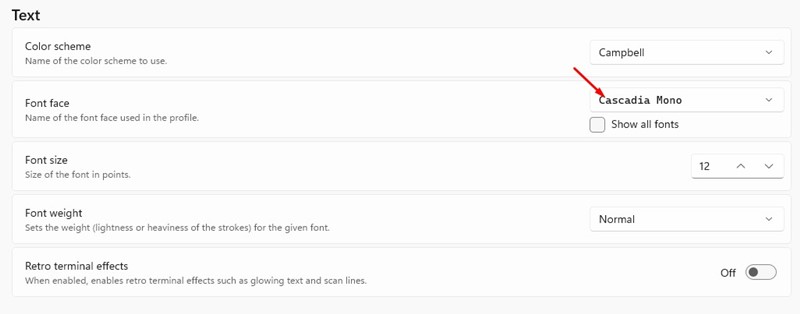
7. Similarly, you can also change the font size and weight.
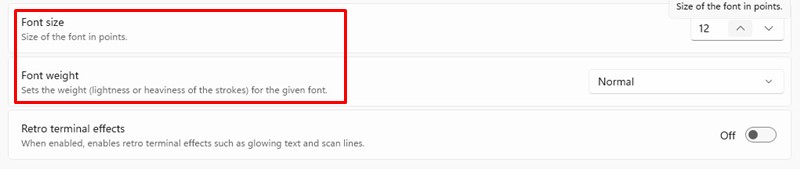
8. After making all changes, click on the Save button.
That’s it! You can change the Color Scheme and Font on the Windows Terminal app.
Also read: How to Enable & Customize Live Captions on Windows 11
So, these are some of the easy steps that would help you modify the color scheme and font used in the Windows Terminal app. If you need any more help related to customizing Windows Terminal on Windows 11, let us know in the comments below.
In this blog post, we will learn how to customize Windows Terminal. First, we will understand the two important settings.json and defaults.json configuration files to build a better understanding. If you are completely new to Windows Terminal, then I would highly recommend you to go through the introductory post of installing and understanding Windows Terminal. At the time of writing the current version of Windows Terminal is 1.0
“Windows Terminal is a modern terminal application for users of command-line tools and shells like Command Prompt, PowerShell, and Windows Subsystem for Linux (WSL). Its main features include multiple tabs, panes, Unicode and UTF-8 character support, a GPU accelerated text rendering engine, and the ability to create your own themes and customize text, colors, backgrounds, and shortcut key bindings“. [source: Microsoft Docs]
Configuration Files
The best feature of Windows Terminal is the ability to customize it. The user can customize, its text color, cursor shape, background color, background image, opacity, icon settings, etc. The user can have multiple customized profiles and can have global settings to apply to all the available profiles as well. All these settings are stored in different JSON configuration files. Let us look into these files and have a brief overview of them.
settings.json
This file contains details about the default profiles, settings that can be applied to all available profiles, a list of available profiles, a place to declare custom color schemes and custom key bindings.
The settings.json file can be opened by using the shortcut “Ctrl + ,” or from the drop-down menu and select Settings

The content of the settings.json file is given below, please note that your file will have the details based on your machine and the details might look a bit different then what is given below.
// This file was initially generated by Windows Terminal 1.0.1401.0
// It should still be usable in newer versions, but newer versions might have additional
// settings, help text, or changes that you will not see unless you clear this file
// and let us generate a new one for you.

// To view the default settings, hold "alt" while clicking on the "Settings" button.
// For documentation on these settings, see: https://aka.ms/terminal-documentation
{
  "$schema": "https://aka.ms/terminal-profiles-schema",

  "defaultProfile": "{61c54bbd-c2c6-5271-96e7-009a87ff44ba}",

  // You can add more global application settings here.
  // To learn more about global settings, visit https://aka.ms/terminal-global-settings

  // If enabled, selections are automatically copied to your clipboard.
  "copyOnSelect": false,

  // If enabled, formatted data is also copied to your clipboard
  "copyFormatting": false,

  // A profile specifies a command to execute paired with information about how it should look and feel.
  // Each one of them will appear in the 'New Tab' dropdown,
  //   and can be invoked from the commandline with `wt.exe -p xxx`
  // To learn more about profiles, visit https://aka.ms/terminal-profile-settings
  "profiles": {
    "defaults": {
      // Put settings here that you want to apply to all profiles.
      "theme": "dark"
    },
    "list": [
      {
        // Make changes here to the powershell.exe profile.
        "guid": "{61c54bbd-c2c6-5271-96e7-009a87ff44ba}",
        "name": "Windows PowerShell",
        "commandline": "powershell.exe",
        "hidden": false
      },
      {
        // Make changes here to the cmd.exe profile.
        "guid": "{0caa0dad-35be-5f56-a8ff-afceeeaa6102}",
        "name": "Command Prompt",
        "commandline": "cmd.exe",
        "hidden": false
      },
      {
        "guid": "{b453ae62-4e3d-5e58-b989-0a998ec441b9}",
        "hidden": false,
        "name": "Azure Cloud Shell",
        "source": "Windows.Terminal.Azure"
      }
    ]
  },

  // Add custom color schemes to this array.
  // To learn more about color schemes, visit https://aka.ms/terminal-color-schemes
  "schemes": [

  ],

  // Add custom keybindings to this array.
  // To unbind a key combination from your defaults.json, set the command to "unbound".
  // To learn more about keybindings, visit https://aka.ms/terminal-keybindings
  "keybindings": [
    // Copy and paste are bound to Ctrl+Shift+C and Ctrl+Shift+V in your defaults.json.
    // These two lines additionally bind them to Ctrl+C and Ctrl+V.
    // To learn more about selection, visit https://aka.ms/terminal-selection
    {
      "command": {
        "action": "copy",
        "singleLine": false
      },
      "keys": "ctrl+c"
    },
    {
      "command": "paste",
      "keys": "ctrl+v"
    },

    // Press Ctrl+Shift+F to open the search box
    {
      "command": "find",
      "keys": "ctrl+shift+f"
    },

    // Press Alt+Shift+D to open a new pane.
    // - "split": "auto" makes this pane open in the direction that provides the most surface area.
    // - "splitMode": "duplicate" makes the new pane use the focused pane's profile.
    // To learn more about panes, visit https://aka.ms/terminal-panes
    {
      "command": {
        "action": "splitPane",
        "split": "auto",
        "splitMode": "duplicate"
      },
      "keys": "alt+shift+d"
    }
  ]
}
defaults.json
The defaults.json file as the name suggests contains all the default configuration of the terminal application. This file contains details like the launch settings, tab configurations, default color schemes, profile details, and all available default key bindings.
One thing to note is this file is an auto-generated file and changes made to this file will not work if you want to apply any changes this needs to be done in settings.json file. To open the defaults.json file, go to the Settings menu item and hold your Alt key and click Settings.

The content of the file is shown below, please note your default.json might look a bit different based on your available profiles on your machine, but most of the details will be the same.
// THIS IS AN AUTO-GENERATED FILE! Changes to this file will be ignored.
{
    "defaultProfile": "{61c54bbd-c2c6-5271-96e7-009a87ff44bf}",

    // Launch Settings
    "initialCols": 120,
    "initialRows": 30,
    "launchMode": "default",

    // Selection
    "copyOnSelect": false,
    "copyFormatting": true,
    "wordDelimiters": " /\\()\"'-.,:;<>~!@#$%^&*|+=[]{}~?\u2502",

    // Tab UI
    "alwaysShowTabs": true,
    "showTabsInTitlebar": true,
    "showTerminalTitleInTitlebar": true,
    "tabWidthMode": "equal",

    // Miscellaneous
    "confirmCloseAllTabs": true,
    "theme": "system",
    "rowsToScroll": "system",
    "snapToGridOnResize": true,

    "profiles":
    [
        {
            "guid": "{61c54bbd-c2c6-5271-96e7-009a87ff44bf}",
            "name": "Windows PowerShell",
            "commandline": "powershell.exe",
            "icon": "ms-appx:///ProfileIcons/{61c54bbd-c2c6-5271-96e7-009a87ff44bf}.png",
            "colorScheme": "Campbell",
            "antialiasingMode": "grayscale",
            "closeOnExit": "graceful",
            "cursorShape": "bar",
            "fontFace": "Cascadia Mono",
            "fontSize": 12,
            "hidden": false,
            "historySize": 9001,
            "padding": "8, 8, 8, 8",
            "snapOnInput": true,
            "startingDirectory": "%USERPROFILE%",
            "useAcrylic": false
        },
        {
            "guid": "{0caa0dad-35be-5f56-a8ff-afceeeaa6101}",
            "name": "Command Prompt",
            "commandline": "cmd.exe",
            "icon": "ms-appx:///ProfileIcons/{0caa0dad-35be-5f56-a8ff-afceeeaa6101}.png",
            "colorScheme": "Campbell",
            "antialiasingMode": "grayscale",
            "closeOnExit": "graceful",
            "cursorShape": "bar",
            "fontFace": "Cascadia Mono",
            "fontSize": 12,
            "hidden": false,
            "historySize": 9001,
            "padding": "8, 8, 8, 8",
            "snapOnInput": true,
            "startingDirectory": "%USERPROFILE%",
            "useAcrylic": false
        }
    ],
    "schemes":
    [
        // A profile can override the following color scheme values:
        //   - "foreground"
        //   - "background"
        //   - "cursorColor"
        {
            "name": "Campbell",
            "foreground": "#CCCCCC",
            "background": "#0C0C0C",
            "cursorColor": "#FFFFFF",
            "black": "#0C0C0C",
            "red": "#C50F1F",
            "green": "#13A10E",
            "yellow": "#C19C00",
            "blue": "#0037DA",
            "purple": "#881798",
            "cyan": "#3A96DD",
            "white": "#CCCCCC",
            "brightBlack": "#767676",
            "brightRed": "#E74856",
            "brightGreen": "#16C60C",
            "brightYellow": "#F9F1A5",
            "brightBlue": "#3B78FF",
            "brightPurple": "#B4009E",
            "brightCyan": "#61D6D6",
            "brightWhite": "#F2F2F2"
        },
        {
            "name": "Campbell Powershell",
            "foreground": "#CCCCCC",
            "background": "#012456",
            "cursorColor": "#FFFFFF",
            "black": "#0C0C0C",
            "red": "#C50F1F",
            "green": "#13A10E",
            "yellow": "#C19C00",
            "blue": "#0037DA",
            "purple": "#881798",
            "cyan": "#3A96DD",
            "white": "#CCCCCC",
            "brightBlack": "#767676",
            "brightRed": "#E74856",
            "brightGreen": "#16C60C",
            "brightYellow": "#F9F1A5",
            "brightBlue": "#3B78FF",
            "brightPurple": "#B4009E",
            "brightCyan": "#61D6D6",
            "brightWhite": "#F2F2F2"
        },
        {
            "name": "Vintage",
            "foreground": "#C0C0C0",
            "background": "#000000",
            "cursorColor": "#FFFFFF",
            "black": "#000000",
            "red": "#800000",
            "green": "#008000",
            "yellow": "#808000",
            "blue": "#000080",
            "purple": "#800080",
            "cyan": "#008080",
            "white": "#C0C0C0",
            "brightBlack": "#808080",
            "brightRed": "#FF0000",
            "brightGreen": "#00FF00",
            "brightYellow": "#FFFF00",
            "brightBlue": "#0000FF",
            "brightPurple": "#FF00FF",
            "brightCyan": "#00FFFF",
            "brightWhite": "#FFFFFF"
        },
        {
            "name": "One Half Dark",
            "foreground": "#DCDFE4",
            "background": "#282C34",
            "cursorColor": "#FFFFFF",
            "black": "#282C34",
            "red": "#E06C75",
            "green": "#98C379",
            "yellow": "#E5C07B",
            "blue": "#61AFEF",
            "purple": "#C678DD",
            "cyan": "#56B6C2",
            "white": "#DCDFE4",
            "brightBlack": "#5A6374",
            "brightRed": "#E06C75",
            "brightGreen": "#98C379",
            "brightYellow": "#E5C07B",
            "brightBlue": "#61AFEF",
            "brightPurple": "#C678DD",
            "brightCyan": "#56B6C2",
            "brightWhite": "#DCDFE4"
        },
        {
            "name": "One Half Light",
            "foreground": "#383A42",
            "background": "#FAFAFA",
            "cursorColor": "#4F525D",
            "black": "#383A42",
            "red": "#E45649",
            "green": "#50A14F",
            "yellow": "#C18301",
            "blue": "#0184BC",
            "purple": "#A626A4",
            "cyan": "#0997B3",
            "white": "#FAFAFA",
            "brightBlack": "#4F525D",
            "brightRed": "#DF6C75",
            "brightGreen": "#98C379",
            "brightYellow": "#E4C07A",
            "brightBlue": "#61AFEF",
            "brightPurple": "#C577DD",
            "brightCyan": "#56B5C1",
            "brightWhite": "#FFFFFF"
        },
        {
            "name": "Solarized Dark",
            "foreground": "#839496",
            "background": "#002B36",
            "cursorColor": "#FFFFFF",
            "black": "#073642",
            "red": "#DC322F",
            "green": "#859900",
            "yellow": "#B58900",
            "blue": "#268BD2",
            "purple": "#D33682",
            "cyan": "#2AA198",
            "white": "#EEE8D5",
            "brightBlack": "#002B36",
            "brightRed": "#CB4B16",
            "brightGreen": "#586E75",
            "brightYellow": "#657B83",
            "brightBlue": "#839496",
            "brightPurple": "#6C71C4",
            "brightCyan": "#93A1A1",
            "brightWhite": "#FDF6E3"
        },
        {
            "name": "Solarized Light",
            "foreground": "#657B83",
            "background": "#FDF6E3",
            "cursorColor": "#002B36",
            "black": "#073642",
            "red": "#DC322F",
            "green": "#859900",
            "yellow": "#B58900",
            "blue": "#268BD2",
            "purple": "#D33682",
            "cyan": "#2AA198",
            "white": "#EEE8D5",
            "brightBlack": "#002B36",
            "brightRed": "#CB4B16",
            "brightGreen": "#586E75",
            "brightYellow": "#657B83",
            "brightBlue": "#839496",
            "brightPurple": "#6C71C4",
            "brightCyan": "#93A1A1",
            "brightWhite": "#FDF6E3"
        },
        {
            "name": "Tango Dark",
            "foreground": "#D3D7CF",
            "background": "#000000",
            "cursorColor": "#FFFFFF",
            "black": "#000000",
            "red": "#CC0000",
            "green": "#4E9A06",
            "yellow": "#C4A000",
            "blue": "#3465A4",
            "purple": "#75507B",
            "cyan": "#06989A",
            "white": "#D3D7CF",
            "brightBlack": "#555753",
            "brightRed": "#EF2929",
            "brightGreen": "#8AE234",
            "brightYellow": "#FCE94F",
            "brightBlue": "#729FCF",
            "brightPurple": "#AD7FA8",
            "brightCyan": "#34E2E2",
            "brightWhite": "#EEEEEC"
        },
        {
            "name": "Tango Light",
            "foreground": "#555753",
            "background": "#FFFFFF",
            "cursorColor": "#000000",
            "black": "#000000",
            "red": "#CC0000",
            "green": "#4E9A06",
            "yellow": "#C4A000",
            "blue": "#3465A4",
            "purple": "#75507B",
            "cyan": "#06989A",
            "white": "#D3D7CF",
            "brightBlack": "#555753",
            "brightRed": "#EF2929",
            "brightGreen": "#8AE234",
            "brightYellow": "#FCE94F",
            "brightBlue": "#729FCF",
            "brightPurple": "#AD7FA8",
            "brightCyan": "#34E2E2",
            "brightWhite": "#EEEEEC"
        }
    ],
    "keybindings":
    [
        // Application-level Keys
        { "command": "closeWindow", "keys": "alt+f4" },
        { "command": "toggleFullscreen", "keys": "alt+enter" },
        { "command": "toggleFullscreen", "keys": "f11" },
        { "command": "openNewTabDropdown", "keys": "ctrl+shift+space" },
        { "command": "openSettings", "keys": "ctrl+," },
        { "command": "find", "keys": "ctrl+shift+f" },

        // Tab Management
        // "command": "closeTab" is unbound by default.
        //   The closeTab command closes a tab without confirmation, even if it has multiple panes.
        { "command": "newTab", "keys": "ctrl+shift+t" },
        { "command": { "action": "newTab", "index": 0 }, "keys": "ctrl+shift+1" },
        { "command": { "action": "newTab", "index": 1 }, "keys": "ctrl+shift+2" },
        { "command": { "action": "newTab", "index": 2 }, "keys": "ctrl+shift+3" },
        { "command": { "action": "newTab", "index": 3 }, "keys": "ctrl+shift+4" },
        { "command": { "action": "newTab", "index": 4 }, "keys": "ctrl+shift+5" },
        { "command": { "action": "newTab", "index": 5 }, "keys": "ctrl+shift+6" },
        { "command": { "action": "newTab", "index": 6 }, "keys": "ctrl+shift+7" },
        { "command": { "action": "newTab", "index": 7 }, "keys": "ctrl+shift+8" },
        { "command": { "action": "newTab", "index": 8 }, "keys": "ctrl+shift+9" },
        { "command": "duplicateTab", "keys": "ctrl+shift+d" },
        { "command": "nextTab", "keys": "ctrl+tab" },
        { "command": "prevTab", "keys": "ctrl+shift+tab" },
        { "command": { "action": "switchToTab", "index": 0 }, "keys": "ctrl+alt+1" },
        { "command": { "action": "switchToTab", "index": 1 }, "keys": "ctrl+alt+2" },
        { "command": { "action": "switchToTab", "index": 2 }, "keys": "ctrl+alt+3" },
        { "command": { "action": "switchToTab", "index": 3 }, "keys": "ctrl+alt+4" },
        { "command": { "action": "switchToTab", "index": 4 }, "keys": "ctrl+alt+5" },
        { "command": { "action": "switchToTab", "index": 5 }, "keys": "ctrl+alt+6" },
        { "command": { "action": "switchToTab", "index": 6 }, "keys": "ctrl+alt+7" },
        { "command": { "action": "switchToTab", "index": 7 }, "keys": "ctrl+alt+8" },
        { "command": { "action": "switchToTab", "index": 8 }, "keys": "ctrl+alt+9" },

        // Pane Management
        { "command": "closePane", "keys": "ctrl+shift+w" },
        { "command": { "action": "splitPane", "split": "horizontal" }, "keys": "alt+shift+-" },
        { "command": { "action": "splitPane", "split": "vertical" }, "keys": "alt+shift+plus" },
        { "command": { "action": "resizePane", "direction": "down" }, "keys": "alt+shift+down" },
        { "command": { "action": "resizePane", "direction": "left" }, "keys": "alt+shift+left" },
        { "command": { "action": "resizePane", "direction": "right" }, "keys": "alt+shift+right" },
        { "command": { "action": "resizePane", "direction": "up" }, "keys": "alt+shift+up" },
        { "command": { "action": "moveFocus", "direction": "down" }, "keys": "alt+down" },
        { "command": { "action": "moveFocus", "direction": "left" }, "keys": "alt+left" },
        { "command": { "action": "moveFocus", "direction": "right" }, "keys": "alt+right" },
        { "command": { "action": "moveFocus", "direction": "up" }, "keys": "alt+up" },

        // Clipboard Integration
        { "command": { "action": "copy", "singleLine": false }, "keys": "ctrl+shift+c" },
        { "command": { "action": "copy", "singleLine": false }, "keys": "ctrl+insert" },
        { "command": "paste", "keys": "ctrl+shift+v" },
        { "command": "paste", "keys": "shift+insert" },

        // Scrollback
        { "command": "scrollDown", "keys": "ctrl+shift+down" },
        { "command": "scrollDownPage", "keys": "ctrl+shift+pgdn" },
        { "command": "scrollUp", "keys": "ctrl+shift+up" },
        { "command": "scrollUpPage", "keys": "ctrl+shift+pgup" },

        // Visual Adjustments
        { "command": { "action": "adjustFontSize", "delta": 1 }, "keys": "ctrl+=" },
        { " command": { "action": "adjustFontSize", "delta": -1 }, "keys": "ctrl+-" },
        { "command": "resetFontSize", "keys": "ctrl+0" }
    ]
}
Default Color Schemes
The windows terminal comes preloaded with 9 different color schemes, the details of the schemes can be found defaults.json.
- Campbell
- Campbell Powershell
- Vintage
- One Half Dark
- One Half Light
- Solarized Dark
- Solarized Light
- Tango Dark
- Tango Light
Applying Default Color Scheme to a Profile
In order to apply any color scheme to a selected profile, use the following JSON key-value pair: “colorScheme”: “[Name of the color profile]”. For example, if I want to apply the “Solarized Dark” scheme to my PowerShell profile. I will add the following key-value pair inside the PowerShell object inside the profile list. The changes are reflected as soon as you save the settings.json file.
"list": [
  {
    "guid": "{61c54bbd-c2c6-5271-96e7-009a87ff44bz}",
    "name": "Windows PowerShell",
    "commandline": "powershell.exe",
    "hidden": false,
    "colorScheme": "Solarized Dark"
  },

Creating a custom color scheme
If the user wants to create a custom color scheme, the best way to do it is to make a copy of any existing scheme from defaults.json and paste the same inside scheme array inside the settings.json file and rename it. After pasting, the user can change the hex code of any value to suit his needs and then use the scheme name in the profile of choice.
  "schemes": [
    {
      "name": "My Custom",
      "foreground": "#FFFFFF",
      "background": "#012456",
      "cursorColor": "#FFFF00",
      "black": "#0C0C0C",
      "red": "#C50F1F",
      "green": "#13A10E",
      "yellow": "#C19C00",
      "blue": "#0037DA",
      "purple": "#881798",
      "cyan": "#3A96DD",
      "white": "#CCCCCC",
      "brightBlack": "#767676",
      "brightRed": "#E74856",
      "brightGreen": "#16C60C",
      "brightYellow": "#F9F1A5",
      "brightBlue": "#3B78FF",
      "brightPurple": "#B4009E",
      "brightCyan": "#61D6D6",
      "brightWhite": "#F2F2F2"
    }
  ],

Using Open Source Free Themes
If you don’t want to create your own color schemes, then you can use the freely available Windows Terminal themes on GitHub [Link: https://atomcorp.github.io/themes/]. A huge list is available with the demo. You can copy the theme of your choice and paste the same inside your scheme array in the settings.json file and start using it with your respective profiles.
Here is the sample “Blue Matrix” themes from the link.
{
  "name": "Blue Matrix",
  "black": "#101116",
  "red": "#ff5680",
  "green": "#00ff9c",
  "yellow": "#fffc58",
  "blue": "#00b0ff",
  "purple": "#d57bff",
  "cyan": "#76c1ff",
  "white": "#c7c7c7",
  "brightBlack": "#686868",
  "brightRed": "#ff6e67",
  "brightGreen": "#5ffa68",
  "brightYellow": "#fffc67",
  "brightBlue": "#6871ff",
  "brightPurple": "#d682ec",
  "brightCyan": "#60fdff",
  "brightWhite": "#ffffff",
  "background": "#101116",
  "foreground": "#00a2ff"
}

Customizing Cursor Shape and Color
Windows Terminal also provides a way to customize the cursor shape, color, and height. The settings for cursor are applicable at the profile level. One thing to note is the cursor-height is applicable only when its shape is set to vintage.
There are a total of 5 cursor shape, they are bar, underscore, filledBox , emptyBox, and vintage. Each of them is displayed below.
Cursor Type: Bar and Color Red
{
    "guid": "{61c54bbd-c2c6-5271-96e7-009a87ff44ba}",
    "name": "Windows PowerShell",
    "commandline": "powershell.exe",
     "hidden": false,

    "cursorShape": "bar",
    "cursorColor": "#FF0000"
},Cursor Type: FilledBox and Color Red
"cursorShape": "underscore",
"cursorColor": "#FF0000"
Cursor Type: Underscore and Color Red
"cursorShape": "filledBox",
"cursorColor": "#FF0000"
Cursor Type: EmptyBox and Color Red
"cursorShape": "emptyBox",
"cursorColor": "#FF0000"
Cursor Type: Vintage, Color Red and Height 80
The vintage cursor type supports height parameter.
"cursorShape": "vintage",
"cursorColor": "#FF0000",
"cursorHeight": 70
Adding Background Image
A background image can be added at an individual profile level. A static or a GIF image can be added. To add a background image add the following JSON key-value pair at the profile level: “backgroundImage” : “image-path”.
Add a Static Background Image
{
    "guid": "{61c54bbd-c2c6-5271-96e7-009a87ff44ba}",
    "name": "Windows PowerShell",
    "commandline": "powershell.exe",
    "hidden": false,
    "backgroundImage": "C:\\Windows.jpg"
 },

Add a GIF Background Image
To add a GIF Image, provide the path of GIF image
{
    "guid": "{61c54bbd-c2c6-5271-96e7-009a87ff44ba}",
    "name": "Windows PowerShell",
    "commandline": "powershell.exe",
    "hidden": false,
    "backgroundImage": "C:\\matrix.gif"
},Supported Image properties
Background Image can be stretched, align, or have opacity values attached to them.
To stretch an image use the key-value pair “backgroundImageStretchMode”:”value”, where value can be any one of the following: none, fill, uniform, uniformToFill (default value)
To align an image use the key-value pair “backgroundImageAlignment”:”value”, where value can be any one of the following: left, top, right, bottom, topLeft, topRight, bottomLeft, bottomRight, center (default value)
Top apply opacity to an image use the key-value pair “backgroundImageOpacity”:value, where value can range from 0-1.0
I hope you found this post on how to customize Window Terminal Application helpful to you, thanks for visiting, Cheers!!!
[Further Readings: How to customize Windows Terminal Key Bindings | How to Install Windows Terminal in Windows 10 | Important Debugging Shortcuts of Visual Studio 2019 | How to publish a Blazor Server Application to IIS | Top 7 Visual Studio 2019 extensions for Web Projects | The difference in Blazor Server and WebAssembly Application | Exploring Blazor WebAssembly App Project Structure | Top 10 Productivity Tips and Tricks in Visual Studio 2019 | CRUD Operations in WPF using EntityFrameworkCore and SQLite | How to implement Dependency Injection in WPF | How to use External Tool in Visual Studio 2019 | Top Features of Visual Studio 2019 Community Edition ]