
If you’re having trouble using your mouse, you can change its polling rate with a few simple steps. First, find the DPI setting on your mouse. DPI stands for dots per inch, and a higher DPI means your cursor will move farther. Secondly, the polling rate refers to the frequency at which your computer responds to your mouse’s clicks. You can easily change this setting by pressing the button located below the mouse wheel. You can also use a software that lets you change the DPI value of your mouse.
Depending on your mouse model, you can adjust the polling rate in different ways. One way to change the polling rate is to disable the Task Scheduler, but this requires administrative rights. Once done, restart your computer and repeat the steps as needed. Another way to change the polling rate is to install an app called Mouse Rate Checker. This app is available in the Control Panel, in the Device Settings section.
How Do I Find My Mouse Polling Rate Windows 10?
One way to find out the polling rate of your mouse is to check its support for higher or lower frequencies. You can also adjust the polling rate using the keyboard buttons on your mouse. Most mice support a polling rate of 1,000 Hz or higher. You can also adjust the polling rate of your mouse in the control panel if you own one. However, be aware that adjusting the polling rate of a mouse can damage it.
You can change your mouse’s polling rate by pressing the numeric buttons on your keyboard. You can also change the polling rate by connecting it to the USB port. The mouse’s wheel will light up when you change the polling rate. If you have administrative access, you can change the polling rate of your mouse automatically using a TaskScheduler application. You can download TaskScheduler for this purpose.
Is 500Hz Polling Rate Good?
The polling rate of your system determines how responsive it is to mouse commands. A higher polling rate reduces latency while using more CPU resources. Higher polling rates can cause instability if there are not enough resources available. For gaming, 500Hz is a good option. It will keep your gaming experience smoother and save battery life. If you’re worried about latency, a higher polling rate may not be necessary.
In general, a higher polling rate is better for mouse performance. But it also means that the processor must inquire about the position of the mouse more often. As a result, higher polling rates tend to result in lower frame rates. But they’re worth it if you’re a gamer. A mouse with a higher polling rate also offers more precise tracking. The same goes for a game with a sensitive mouse sensor.
A mouse with a 500Hz polling rate should be able to detect and react to mouse movements. A mouse that polls 500 Hz will receive one update every two milliseconds, or 5 updates per second. This means that it will get more information about your mouse movement every time you click it. This will help the mouse respond faster and make gaming easier. But it will also require more CPU power, which is not a good idea for gaming.
Is 1000Hz Polling Rate Good For a Mouse?
If you play fast-paced games, a mouse with a high polling rate is essential for smooth performance. This speed is equivalent to reporting every second for one millisecond. For best performance, a mouse with a 1000Hz polling rate should have a refresh rate of at least 240 Hz. Nonetheless, if you’re not a competitive gamer, a mouse with a 500Hz polling rate is adequate for normal gaming.
However, a higher polling rate will improve your mouse’s usability, but it will also use more CPU resources. This is a problem for some people, so it’s best to stick with a lower polling rate if you’re not an advanced gamer. However, for most people, a higher polling rate is fine. Fortunately, modern hardware doesn’t suffer from the problems associated with high polling rates.
You can change the polling rate of a mouse by downloading certain software from the manufacturer. For example, Glorious’ gaming software includes software to customize the mouse. To change this feature, you’ll need to open the Glorious software and click on the ‘Mouse Parameter’ menu. You’ll see options for polling rate and DPI. You can adjust the polling rate according to your preference and preferences.
Is 125 Mouse Polling Rate Good?
What is 125 Mouse Polling Rate? It is the frequency at which your computer responds to mouse commands. The higher the polling rate, the less latency your computer will experience, but at the cost of using more CPU resources. However, if you’re working on a computer that’s not very powerful, you might want to stick to a mouse with a low polling rate.
To check the polling rate of your mouse, you can use a free online tool. The tool is available from Benq. To test it, plug in the mouse and press the numeric keys 4 and 5. The wheel should light up as a visual cue that the polling rate has been changed. To increase it, you can use the software to change the mouse’s polling rate to 125Hz.
Higher polling rate is another important factor for gaming. It reduces lag when moving your mouse. However, don’t confuse polling rate with DPI (DPI). While most mice come with default settings of 125Hz, you can also increase it to 500Hz or 1000Hz. A mouse’s polling rate is the rate at which it sends updates about its location and sensor data every two milliseconds.
Is DPI the Same As Polling Rate?
If you’ve ever used a mouse with a high DPI, you know that higher DPI means a smoother movement. The difference between the DPI and polling rate is the number of times your mouse sends a signal to your computer. High DPI will result in a smoother mouse movement, but it’s not always a good thing. Having too high DPI will cause your cursor to fly around the screen. The degree of DPI sensitivity depends on the type of game you’re playing. For instance, if you play a sniper rifle or FPS game, a high DPI will make aiming a bit easier.
Another important difference between the DPI and polling rate is the speed at which your mouse sends signals. Higher polling rates are great for performance, but they can cause control problems. The cursor will occasionally jump off screen with a slight flick. High polling rates can also cause lag, especially in low-end machines. For this reason, most mice do not allow you to change their polling rate. Windows, on the other hand, allows you to adjust sensitivity.
Is Higher Polling Rate Better?
Mouse manufacturers often tout a high polling rate to increase responsiveness and speed. The polling rate is the frequency with which the mouse reports its position to the computer. The higher the polling rate, the faster the mouse will respond to your movements. A mouse with a 500 Hz polling rate would report its position to the computer 500 times in a second. A mouse with a higher polling rate would have a faster response time, but it will also consume more CPU resources.
While high DPI and polling rate are desirable features, they are not essential in everyday use. Outside of gaming, the higher polling rate may introduce lag when used with low-end CPUs. And while most mice do not have DPI controls, Windows allows users to adjust pointer sensitivity. Some mice may exaggerate mouse movement to compensate for a fixed DPI. For gaming, the higher polling rate means greater responsiveness and a smoother experience.
Is 8000 Hz Polling Rate Good?
To use 8000 Hz polling rate, you need a high-end CPU and a fast display. This polling rate will help you decrease latency in games, but it will use more CPU resources. If you are not sure whether 8000 Hz polling rate is good for Windows 10 or not, read the rest of this article for more information. But first, let’s talk about what 8000 Hz polling rate is and why it is important.
An 8,000 Hz polling rate is a good thing if you’re playing fast games, and this mouse has this. However, it has a few flaws. One of them is the placement of the side buttons. Moreover, you’ll have to buy a mouse that’s compatible with the operating system. If you have Windows 10 installed on your PC, you’ll have to get a different mouse, because the 8000 Hz mouse will not work with Windows 10.
If you’re concerned about the stuttering, then 8000 Hz is not a good choice for your computer. In fact, you should avoid high polling rates unless you’re gaming with an ultra-fast mouse. However, if you want the highest quality of gaming, you should invest in a high polling rate mouse. This way, you won’t have to wait for your mouse to respond to the mouse inputs.
Learn More Here:
1.) Windows Help Center
2.) Windows – Wikipedia
3.) Windows Blog
4.) Windows Central
Do you want to know how to change mouse polling rate in Windows 11 & Windows 10? In this guide, we’ll show you the steps to complete this task. Today we are going to understand a little bit about a computer mouse. When you go out to buy a mouse, the two important things you should look out for are: the mouse polling rate and DPI. These two things contribute significantly to your user experience.
In this guide, We will also show you how to change the mouse polling rate easily.
What is Mouse Polling Rate?
A typical computer mouse slides on a surface and you see the pointer or cursor as we call it moving on the screen. Well, for this to happen, the mouse must constantly report its position to the system. It allows the system to correctly move the pointer where you want it to be.
So basically, the mouse polling rate is how many times your mouse communicates with your system to tell its location.
The polling rate is measured in Hertz(Hz). So basically, if a mouse has a polling rate of 125Hz then it communicates with the system 125 times per second. If it has a polling rate of 500Hz then it communicates with the system 500 times per second and so on.
In simple words, more polling rate means that your cursor will move much faster. However, you should not confuse it with DPI(dots per inch). DPI determines how sensitive your mouse is. So if your DPI is higher, the cursor will move much farther with less of a drag. You can check this in-depth article to know about how to check mouse dpi.
500Hz? 1000Hz? Which One is Better?
If you want to buy the best mouse, just look for gaming mouses as they are the gold standard. Now they offer 125Hz, 500HZ, and 1000Hz polling rates. You can change the mouse polling rates at any time. But you must be wondering, why is there a straight 500Hz bump in the polling rates for mice.
Ideally, more polling rate means better responsiveness, right? So does 500HZ to 1000Hz make a significant difference?
The thing is, you can just measure the performance of a product on just one parameter. There are a lot of other things involved. For a normal user, the effect of changing the polling rates is quite minimal. The polling rate brings differences when combined with factors like the response rate of the monitor, gaming experience of the user, and mouse skills of the user.
With a normal monitor, you will hardly notice any difference between 500Hz and 1000Hz polling rates. You see the difference is just 1 ms which is too small for the human eye to notice. Just understand this, if 500Hz is smooth, 1000Hz is a little smoother.
Along with that, you really need a powerful CPU in order to run a 1000Hz polling rate on your mouse. More polling rate means more CPU power is required. So if you have an average setup, even if you set the polling rate to 1000Hz, the CPU will downgrade it to 500Hz on occasion.
God bless the internet! You can find solutions to all the technical problems on the internet. Interestingly, there are a lot of websites on the internet that can test and tell you the mouse polling rate. One of the best sites is from Tec Agile and it lets you test your mouse polling rate effortlessly. So definitely give it a try.
How to Change Mouse Polling Rate on Windows 11/10?
Changing the mouse polling rate is a straightforward process actually. Here is what you need to do:
Note: This process applies to wired computer mice only.
Step 1: Unplug the mouse from your computer.
Step 2: If you wish to set the polling rate to 125Hz, hold the “NUM4+NUM5” keys together and plug the mouse into the USB port.
Step 3: If you want to set change the mouse polling rate to 500Hz, just hold the “NUM5” key and then plug the mouse into the USB port.
Step 4: Finally, if you wish to set the polling rate to 1000Hz, hold the “NUM4” key and plug the mouse into the USB port.
In all of the three steps above, you get the confirmation message when the wheels light up. Once they do, the polling rate will be set according to your wish.
One More Thing
You see the method above should work with a lot of computer mouses. However, some brands do not allow you to adjust the polling rate so do keep it in mind.
Also, the modern gaming mouse also comes with apps that give you more control over how customization of your mouse’s settings.
Razer is one such brand that allows you to configure a lot of mouse settings with a tool. It’s called the Razer Synapse 3. If you have a Razer mouse, You can download the tool and install it on your PC.
Once you install the app, follow these steps:
- Launch the app
- Click on the Mouse tab.
- Navigate to Performance.
- On the right side, you will see the option to change the mouse polling rate.
- Just use the drop-down menu to set different polling rates for your mouse.
Just like that, there are several other brands such as Logitech that also provide you with software to customize or change your mouse settings.
Frequently Asked Questions
Q. What is the ideal polling rate for games like Fortnite, Call of Duty, and other games?
Ideally, 1000Hz is good for games like Fortnite, Call of Duty, etc.
Q. What is the good DPI for a Mouse?
For normal users, 800DPI is quite good.
Q. How can I measure my mouse polling rate?
Go to this online polling rate calculator website such as tecagile, click on Start and move your cursor around, you will see the average polling rate
Q. Is 500Hz polling rate better than 1000Hz?
For most people, a polling rate of 500Hz provides a smooth and responsive mouse movement and is suitable for everyday use. A polling rate of 1000Hz is recommended for competitive gaming as it provides the most accurate and responsive mouse movement possible.
Closing Phrase
So that was all about how to change the mouse polling rate in Windows 11 & Windows 10. As said, the process is quite simple and for modern gaming mice, you can also use the software to do so. We hope this guide helps in finding the solution that you were looking for. In case of any difficulty, feel free to reach out to us.
A mouse is an integral device that gamers splurge on and for good reason. No matter what game you enjoy playing, the movement and accuracy of your mouse can be the difference between a win and a loss. When buying a mouse many people consider the polling rate which it supports.
If you are curious about the polling rate of a mouse, how to change it, and how important it is, we have you covered.
What is the polling rate of a mouse?
Polling rate is essentially the per second rate at which your mouse reports its position to the PC’s processor. Hertz (Hz) is the unit used to measure the mouse rate. So, if the mouse reports its position back to the processor 125 times per second or once every 8 milliseconds then the polling rate is 125Hz. The higher the polling rate the less is the lag between your mouse movement and the movement of the mouse cursor on the screen.
Is the mouse polling rate and DPI the same thing?
The polling rate of the mouse and the DPI rate are two different things. Dot Per Inch or DPI is the measurement of the sensitivity of the mouse. It measures how far the mouse cursor travels on the screen with every movement of the mouse. Higher DPI means that the mouse is more sensitive to the movements of the user. So, while DPI measures how well the mouse responds to movements, the polling rate measures how fast the cursor moves in response to the mouse’s movements.
How to check the mouse polling rate
Most gaming mice have the details of how high a polling rate it supports. However, even if your gaming mouse can go up to 1000Hz it may be set at a lower rate by default. There are a few ways by which you can check the polling rate of your mouse.
Option 1: Download software
You can choose to download and install software like Mouse Rate Checker to check the polling rate of your mouse. Many branded gaming mice have utility software that allows users to check the polling rate of the device. You simply have to download the software and follow the instructions to see what is the mouse rate.
Option 2: Check online
If you are not interested in downloading software to check the polling rate of your mouse, then there is another way to do it. You can use Benq’s online tool to check the mouse rate.
Once you go to the website all you need to do is click your mouse and move the cursor in the blank area of the page.

You will be shown the average rate of the mouse and on the right side of the screen, you will be able to see the current polling rate of your mouse.
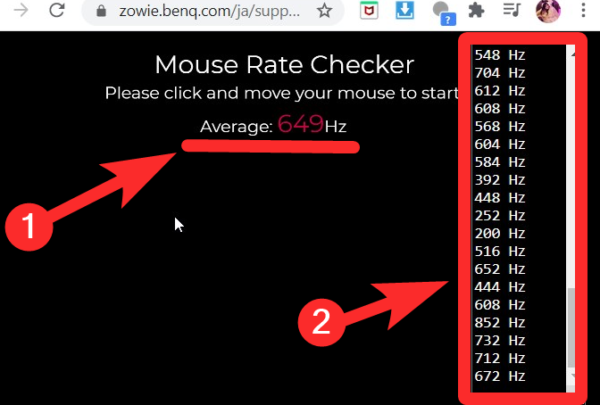
When you check the polling rate of your mouse you will see a slightly lower average polling rate than the rate at which the mouse is set.
Now that you know what the polling rate of your mouse is you may want to change it. How you change the polling rate of your mouse on Windows 10 depends on the kind of mouse you have. For most branded gaming mice there are a few ways by which the polling rate can be changed. If you do not have a branded gaming mouse there is still a way by which you may change the polling rate. Here is how:
Changing the polling rate on branded gaming mice
There are two ways by which you may be able to alter the polling rate of your gaming mouse.
Option 1
Some gaming mice, like the Zowie EC2-B – CS: GO Edition, come with buttons that allow users to change the report rate of the mouse. By pressing the button(s) users can increase or reduce the polling rate of their mouse.
Option 2
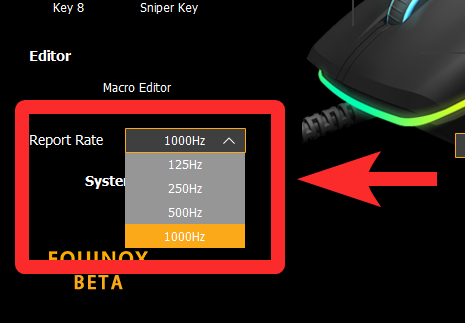
Branded gaming mice like Zowie and Razer come with companion apps. If your mouse does not come with the app then look for utility software for the device on the manufacturer’s website.
Once you find the driver you can download and install it. With the installed software you should be able to set different keys for different functions, change the DPI, and even change the report rate/polling rate.
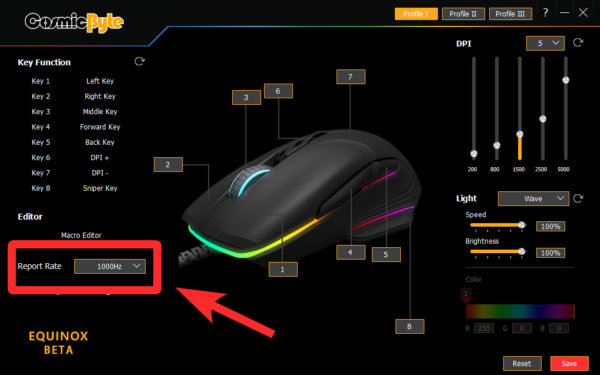
Select the polling rate you want for your mouse from there.
Changing the polling rate of other mice
If you do not have a branded gaming mouse you may still be able to change the polling rate. First, see if the manufacturer has mentioned the polling rate supported by your mouse. If your mouse can support higher polling rates then you can give this method a try.
You need to download mouse pollingrate win10 ver1909.rar or go to this drive and download the folder. Extract the files from the folder. Inside the folder, you will find a mouse rate checker app that you can use to check the polling rate before you try to change it.
You will find a text document named Readme which will have the step by step instructions on how to change the polling rate of your mouse. Have it open just to ensure that you do not mess up the steps.
Move the file ATSIV from the folder to your C drive. Next, open the command prompt as the administrator. Type in cd C:\ATSIV and press enter. Then type .\devcon.exe find *mouse* and press enter again. This will show you the name of your mouse ID. Copy the mouse ID, you will need it later.
Go to the ATSIV folder and edit the ATSIV.bat file. In the notepad, you will see a different mouse ID written there. You need to replace that with your mouse ID and save the note.
Now you need to select the ATSIV.bat file and run it as an administrator. Go back to the extracted folder and open the folder named sweetlow. In the folder, you will find the icon that says setup. Again run it as an administrator. A dialogue box will open up with the details of your mouse on it.
In the bottom of the dialogue box make sure the “filter on device” box is ticked. Next to it, you will find the “selected rate”. Click on the drop-down menu to change the polling rate of your mouse. Next press “install service” and finally click “restart”.
Your screen will flicker. You can now check your mouse rate and see if it has been changed.
Note: You will have to do this process every time you restart your device unless you use the Task Scheduler to schedule the task of automatically changing the polling rate.
This process of changing the polling rate of your mouse may not work if you do not have administrative access or if your mouse cannot support higher polling rates. Make sure to follow the steps carefully or you may end up with a broken Windows driver.
Does it help to change the polling rate of a mouse?
There is a lot of debate regarding the best mouse polling rate for gaming. Some gamers want to go all out with a 1000Hz polling rate and they do not believe that it impacts the CPU resources.
But others continue to stick to balancing high polling rate while opting for lower CPU resource consumption.
Others have tried to mathematically prove that a higher polling rate is advantageous.
Comparing the 125Hz to 1000Hz polling rate will always prove higher polling rate to be more practical and beneficial. However, the jury is still out on where 1000Hz is better than 500Hz. With 1000Hz the mouse reports back its position once every millisecond, while with 500Hz the report is every 2 milliseconds. This is in conjunction with the law of diminishing returns that can also be experienced when looking at the changes between monitor refresh rates above 144hz.
This Redditor felt that chasing a higher polling rate was not worth the money:
In conclusion:
If it feels right, or manageable, then stick to it. No point in fixing what isn’t broke.
What do you think about the polling rate of a mouse? Is higher really better? Let us know your thoughts in the comments.
RELATED:
- How To Set A Dynamic Wallpaper For Windows 10
- 3 Ways to Force Remove or Disable Microsoft Edge on Windows 10
- How to Use Android Apps on Your Windows 10 PC via Windows Phone App
- How to Remove ‘Share With Skype’ in Context Menu in Windows 10
Intro
Tested on Windows 10 x64 17763.195 build. Doesnt require test mode. My cheap oklick 125M works fine @ 1000hz but not regular one A4tech X-710bk  Capped at 500hz, fine by me
Why
Old mouse with no native 1000hz support within official drivers
Credits
Sweetlow http://www.overclock.net/forum/members/487209-sweetlow.html
original guide http://www.overclock.net/forum/375-mice/1589644-usb-mouse-hard-overclocking-2000-hz.html
Tools (included in this repo)
filter driver (use patch folder) http://www.overclock.net/forum/375-mice/1597441-digitally-signed-sweetlow-1000hz-mouse-driver-75.html#post27147889
atsiv to load driver https://www.google.com/search?q=atsiv+download&oq=atsiv
devcon to restart mouse https://docs.microsoft.com/en-us/windows-hardware/drivers/devtest/devcon
hidusbf to install non patched driver http://www.overclock.net/attachments/45829
Install
eXtract
Unzip files from MAIN folder to «C:\Program Files\atsiv»
Get mouse ID
So we can use it to restart mouse. Open Powershell with admin rights
cd "C:\Program Files\atsiv"
.\devcon.exe find *mouse*
My ID is VID_093A
Restore original driver & setup 1000hz
Run EXTRA\Setup.exe. Check filter on device + rates. Press Install, restart , close.
Install patch driver
We need to patch driver on every windows boot. Open task scheduler and import tasks (Actions -> Import) MouseOC_1.xml and MouseOC_2.xml
(C:\Program Files\atsiv\MouseOC_1.xml)
Edit second entry. Replace VID_093A with right one we found early
"C:\Program Files\atsiv\devcon.exe"
restart *VID_093A*
Restart PC or run this task with right click
Test
Run extra/mouserate.exe
Troubleshooting
Read original guide http://www.overclock.net/forum/375-mice/1589644-usb-mouse-hard-overclocking-2000-hz.html and use search here and there http://www.overclock.net/forum/375-mice/1597441-digitally-signed-sweetlow-1000hz-mouse-driver-78.html