
Defender Windows 11 is a native antivirus for the Windows 11 operating system. It provides a basic level of protection. How to launch Defender? How to extract a file from its quarantine? How to add files to Defender’s exceptions? How to disable it when needed? What to do if there are problems with its operation? Let’s explore all the critical issues in the standard Windows 11 antivirus work.

Contents
- Windows Defender — an inbuilt antivirus for Windows 11
- How to open Defender Windows 11
- How to run a Defender Windows 11 scan
- How to extract a file from Defender Windows 11 quarantine
- How to add files to Windows Defender exceptions in Windows 11
- Windows Defender deleted a file. How to restore it?
- How to disable Defender Windows 11
- How to reinstall Windows 11 Defender?
Windows Defender – an inbuilt antivirus for Windows 11
Windows Defender, aka Microsoft Defender, is a built-in antivirus for Windows 11 with a basic level of protection. It performs functions such as:
- Real-time protection,
- Antivirus scanning,
- Cloud protection,
- Anti-counterfeiting,
- Controlled folder access.
Microsoft Defender in Windows 10 has functionally and qualitatively improved over its implementation in previous versions of Windows. Windows 11 has also inherited improved. Recently, it has even shone in some antivirus rankings in respectable positions.
Still, Microsoft’s antivirus technology is far from perfect. And it will lose out to the quality technologies of core security software developers. The Defender has two main problems – a high error rate and the load on the system resources of weak computers.
However, it is an in-house antivirus solution that does not require any specific installation or the purchase of a license. It is not possible to download Microsoft Defender separately. It does not exist outside of Windows. It is a feature deeply integrated into the operating system.
How to open Defender Windows 11
To open Defender in Windows 11, you must launch the regular Windows Security program. Defender is built into this application and located in the Protection areas Viruses and Threats section.

How to run a Defender Windows 11 scan
Defender Windows 11 protects your computer in real-time. In other words, all the files we run, copy, and move, that programs use are checked by the antivirus automatically.
But we can still run antivirus scans to check different areas of the computer for threats. Windows 11 Defender has several types of scans. Under Defender in the Windows Security program, we are offered a quick scan – “Quick Scan“.

It is a scan of the system areas of Windows 11 where viruses can usually run.
For a more thorough scan, we need to use an in-depth scan. Click on “Scan Options“.

There are three types of scans offered here in addition to the quick scan:
- Full – scans all internal and external storage media and their contents;
- Custom – scans the contents of those folders that we specify;
- Microsoft Defender Antivirus – complete scanning in Windows pre-boot mode. An effective tool against viruses that knows how to prevent them from destroying in a running Windows environment.
Choose the type of scanning and click “Scan now”.

At the end of any antivirus scan type, if any threats are detected, we will see them in a report. There is a list of possible actions for each threat type. We can delete or quarantine the threat if it is a suspicious file. Or allow it if we know that the file is safe. Choose an action and click “Run Actions”.

How to extract a file from Defender Windows 11 quarantine
Defender Windows 11 quarantine files can fall into the quarantine based on the antivirus scanning results and real-time protection. In the latter case, we can see a system message about detected threats.
If Defender has made a mistake and blocked a safe file in quarantine, you can extract it from quarantine. To do this, in the Defender section of the “Windows Security ” program, click “Protection Log”.

You can set up a log of blocked threats with filters cleared so that you can see the fate of our file if it is not in quarantine but, for example, already deleted by the antivirus.

Search for the desired file. Click on it. Set the “Allow” action.

Further, it is desirable to put this file into Defender Windows 11 exceptions.
How to add files to Windows Defender exceptions in Windows 11
Defender Windows 11 exceptions is a Whitelist of the antivirus. You can add folders, files, file types or processes to it. After that, you will not check them for threats as part of the Defender scan. And these objects will not be triggered by real-time protection.
It is best to add all objects possibly considered a threat by the antivirus and all items released from quarantine to exceptions. To do this, under Defender in the program “Windows Security”, click “Manage Settings “.

In the “Exceptions” block, click “Add or remove exceptions“.

Click “Add Exception”, select the object and add it to the exceptions.

Windows Defender deleted a file. How to restore it?
It is not always possible to retrieve the desired file from Defender Windows 11 quarantine. Based on the scan results, the action to remove threats is by default. And the process can be launched simply by mistake. Deleting files from Defender quarantine can be configured in local Windows 11 group policies. Some cleaners can delete files from Defender quarantine.
You can find out about the fate of missing files deleted whether Defender Windows 11 has deleted them in its log. In the Defender section of the program “Windows Security”, click “Protection Log“. You can set filters to display deleted and purged items to see if the files we need are there.

How to disable Defender Windows 11
Defender Windows 11 is usually disabled when a foreign antivirus installation is installed on the operating system. It is mentioned in the Defender section of Windows Security.

Tip. If your computer slows down through Defender’s work, you can install an Antivirus that uses system resources more sparingly. These include NOD32, Panda Cloud Antivirus, and Bitdefender Antivirus. If you are an experienced user, you can disable the protector and do without Antivirus at all. You always need to periodically check your computer with portable antivirus utilities like Dr Web CureIt!
You can disable Defender Windows 11 by standard means of the operating system only in the part of real-time protection. And only for a short time, after which the defense will automatically turn on. To do this, click on the “Manage settings” in the Defender section of the program “Windows Security”. And turn off the real-time protection.

You can disable Defender Windows 11 only with external tools. And not all of them, claiming to be able to do so, are effective in practice. One of the efficient tools is the free utility Defender Control.
But we download this utility only after disabling the three components of Defender Windows 11 protection. Under Defender in the program “Windows Security”, click “Manage Settings”. We turn off real-time protection, cloud protection and anti-counterfeiting protection.

Next, launch Defender Control. And click “Turn off Windows Defender“.

If we eventually need to enable Defender Windows 11, perform the reverse action in the Defender Control utility – click “Enable Windows Defender“.

How to reinstall Windows 11 Defender?
It is not possible to reinstall Windows 11 Defender. It is a deeply integrated component that is part of the system. If there are problems in operation, you need to apply measures throughout Windows 11. It can be:
- Rollback to a Windows 11 restore point;
- Rolling back to a system backup;
- Restoring the integrity of system files;
- Reinstalling Windows 11.
Frequently Asked Questions
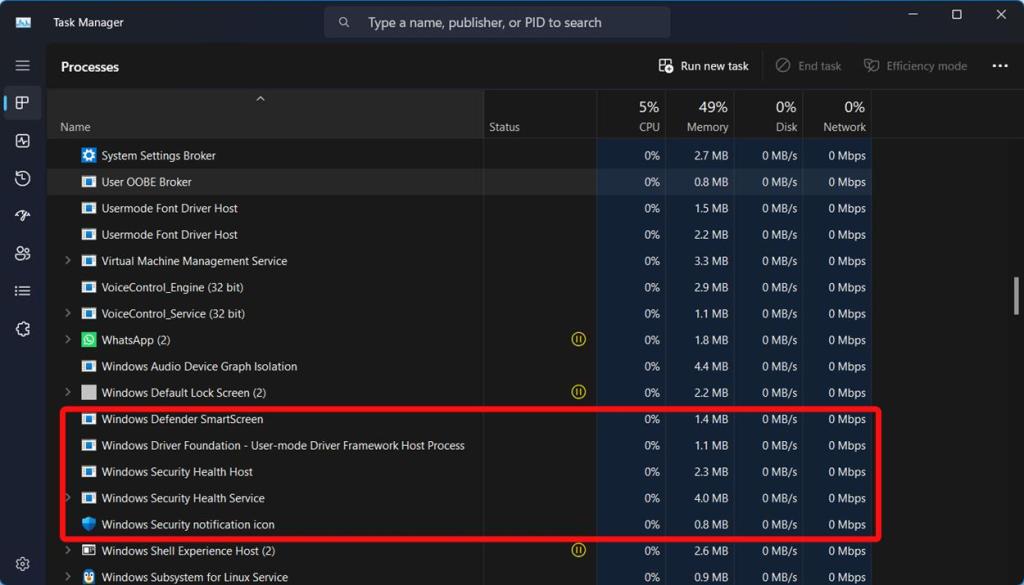
Microsoft has been shipping Windows Defender (now rebranded to Windows Security) on Windows PCs for a while now. The tool has quickly evolved into a definitive suite for basic virus protection on Windows machines. The internet is full of bad stuff, and you wouldn’t want your data to be hijacked. But if you’re left with no choice, here’s how to disable Microsoft Defender in Windows 11.
When Can You Disable Windows Defender?
Windows Security is good to have and we don’t recommend disabling it if everything on your PC works well. But sometimes users aren’t left with any choice but to eliminate programs that take up system resources and make their PC painfully slow.
Users with low-end hardware might find that Windows Defender takes up a chunk of their limited system resources. Whether you are trying to reduce system workload, speed up Windows 11, or just want to get rid of Microsoft’s security solution, here’s how to disable Defender in Windows 11.
There are three ways to disable Windows Defender (Windows Security) in Windows 11. While the easiest way is through Settings, it is a temporary measure, and Microsoft will automatically enable Windows Security after a reboot. If you wish to permanently disable Windows Security, check the instructions involving Group Policy Editor and Registry Editor.
Disable Defender via Windows 11 Security App (Temporary)
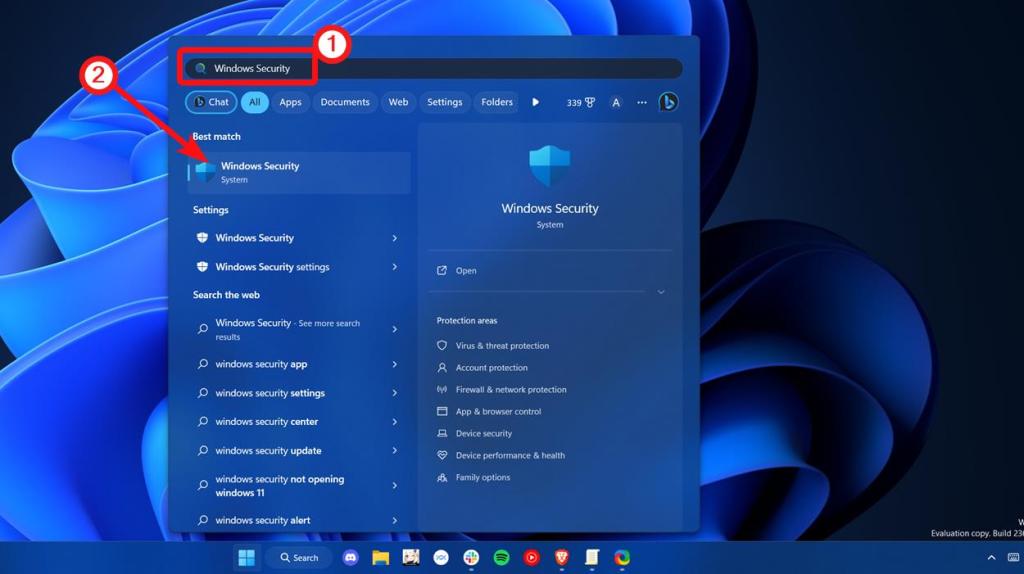
1. Open the Start menu and type Windows Security in the search bar.
2. Click the first search result and launch the Windows Security app.
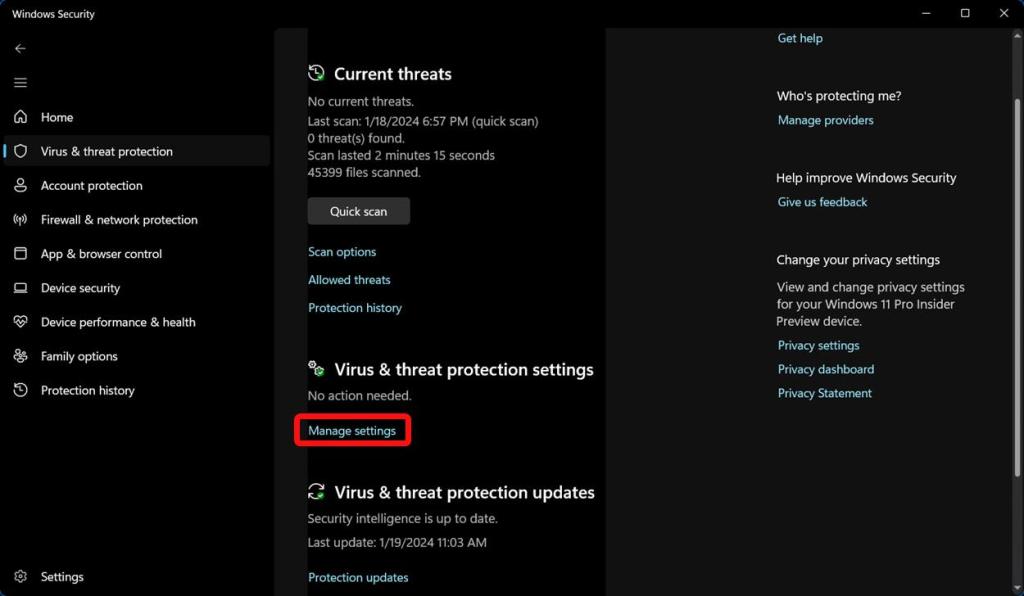
3. Once launched, click Virus and threat protection.

4. Next, click Manage settings in the right pane.
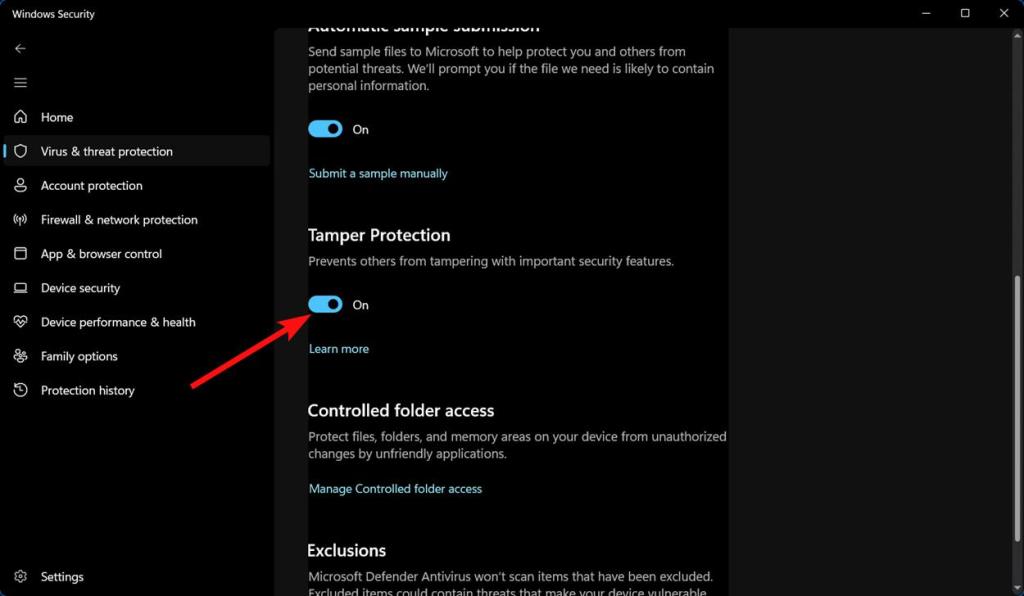
5. Turn off all the toggles on this settings page. This includes Realtime Protection, Cloud-delivered protection, Automatic Sample Submission, and Tamper Protection.
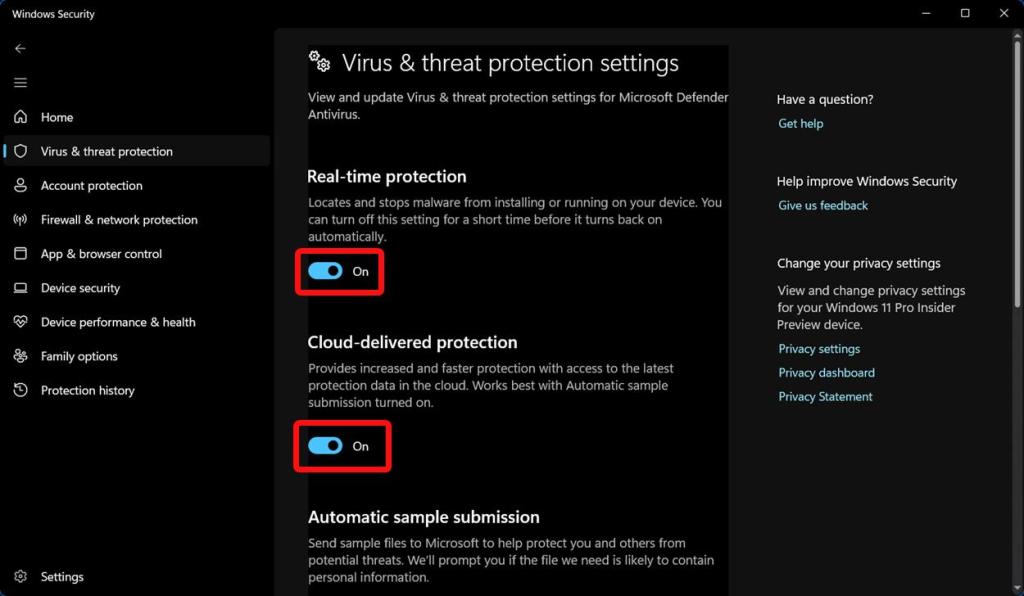
And voila! You have now temporarily disabled Windows Defender or Windows Security on your Windows 11 PC or laptop.
Disable Defender via Group Policy Editor (Permanent)
Repeating the same thing every time you boot into Windows could be tedious. Hence, you may use the Group Policy Editor to permanently disable Microsoft Defender on Windows 11.
The problem with Policy Editor is it isn’t available on Windows 11 Home, and if you are on a Home installation, check our linked guide to get Group Policy Editor on Windows 11 Home.
1. Before starting, you are required to disable “Tamper Protection” in the Windows Security app. To do the same, follow the steps outlined above to reach this toggle. To recall, you will find this toggle under Windows Security -> Virus & Threat Protection ->Manage settings.
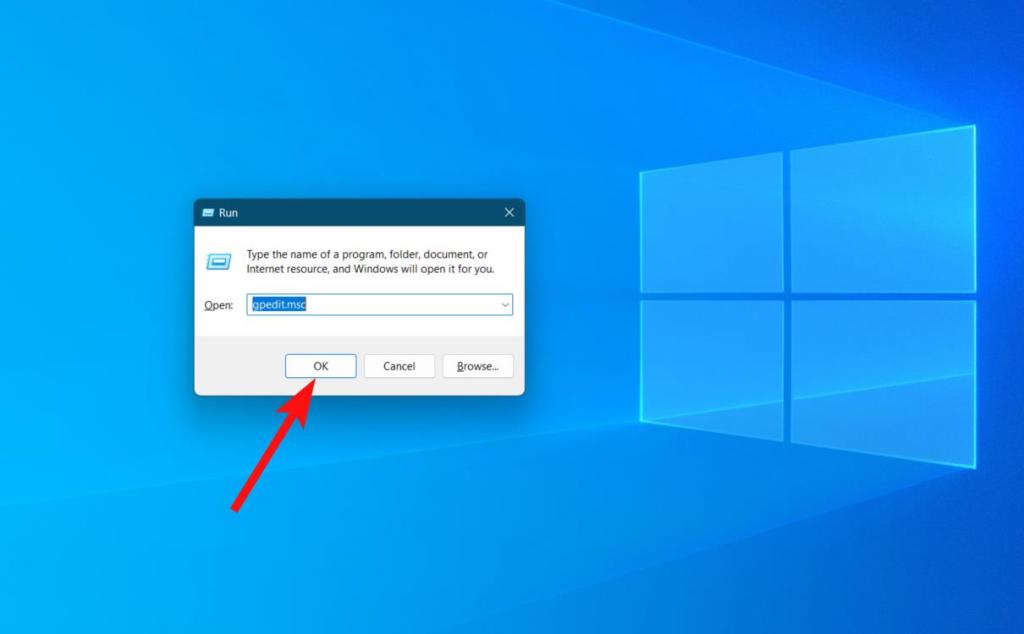
2. Now that you’ve disabled tamper protection, open Run using the Windows 11 keyboard shortcut “Win+R” and type “gpedit.msc” to open the Group Policy Editor.
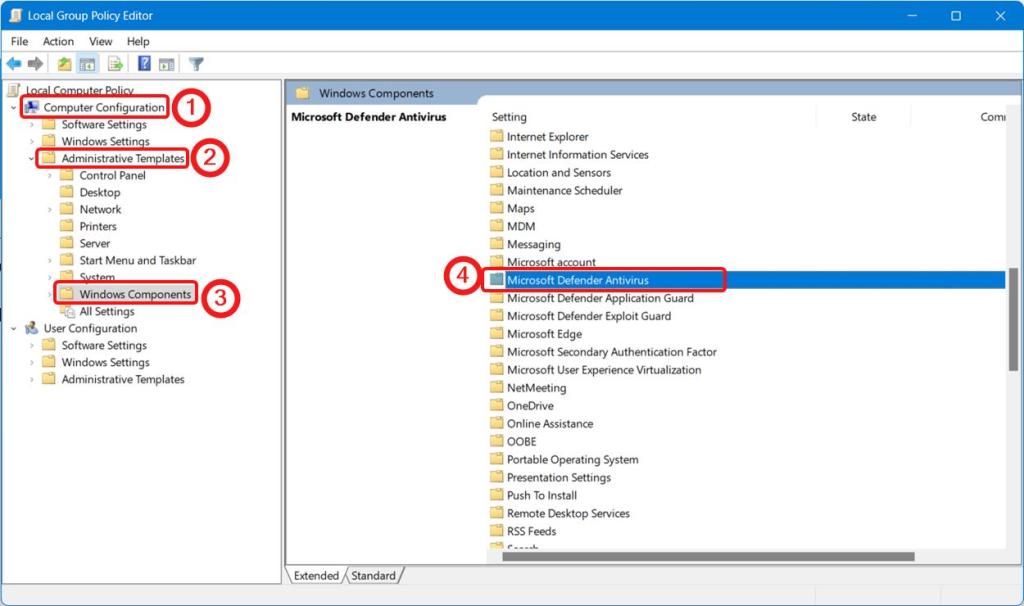
3. Navigate to Computer Configuration -> Administrative Templates -> Windows Components -> Microsoft Defender Antivirus.
4. Double-click on “Turn off Microsoft Defender Antivirus” in the right pane.

5. In the window that pops up, select “Enabled” and click “Apply” and “OK” to save the changes. Once done, restart your Windows 11 PC.
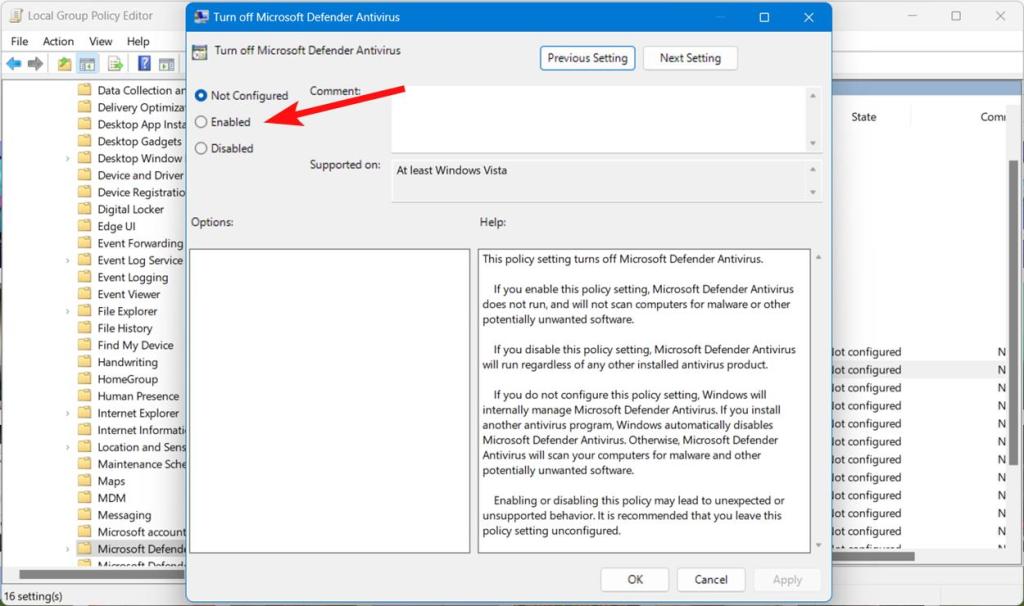
Windows Defender will no longer run after the system restart. To re-enable the Defender through Group Policy Editor, you should choose “Disabled” and hit OK.
Disable Defender using Registry Editor on Windows 11 (Permanent)
Another way of disabling Windows Defender is through the Registry Editor. Follow the steps below to get rid of Windows Defender on your Windows 11 machine.
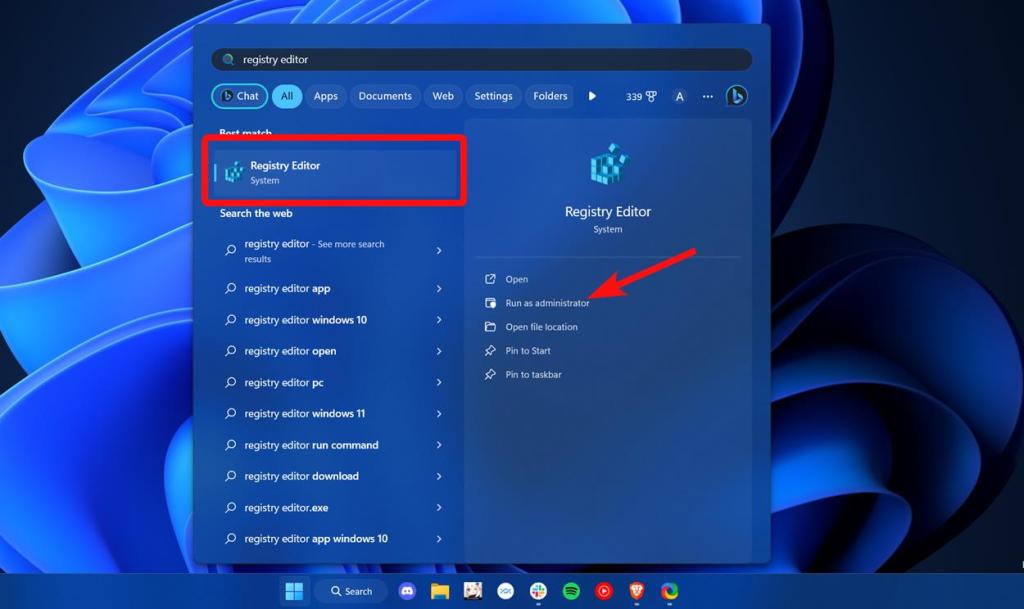
1. Press the Windows key once, type “Registry Editor”, and choose “Run as administrator” to open the program with elevated privileges.
2. Navigate to the following path in the Registry Editor:
HKEY_LOCAL_MACHINE\SOFTWARE\Policies\Microsoft\Windows Defender3. Right-click Windows Defender in the left sidebar, and click New -> DWORD (32-bit) Value. Name it DisableAntiSpyware.

4. Double-click “DisableAntiSpyware” and set its value data to 1. Once you are done, press OK.

5. Similarly, you should create new DWORD values for the following items in their respective locations.
[HKEY_LOCAL_MACHINE\SOFTWARE\Policies\Microsoft\Windows Defender]
"DisableAntiSpyware" dword:1
"DisableRealtimeMonitoring" dword:1
"DisableAntiVirus" dword:1
"DisableSpecialRunningModes" dword:1
"DisableRoutinelyTakingAction" dword:1
"ServiceKeepAlive" dword:0

[HKEY_LOCAL_MACHINE\SOFTWARE\Policies\Microsoft\Windows Defender\Real-Time Protection]
"DisableBehaviorMonitoring" dword:1
"DisableOnAccessProtection"dword:1
"DisableScanOnRealtimeEnable" dword:1
"DisableRealtimeMonitoring" dword:1

[HKEY_LOCAL_MACHINE\SOFTWARE\Policies\Microsoft\Windows Defender\Signature Updates]
"ForceUpdateFromMU"dword:0

[HKEY_LOCAL_MACHINE\SOFTWARE\Policies\Microsoft\Windows Defender\Spynet]
"DisableBlockAtFirstSeen" dword:1
6. In case you are wondering how you can create new folders within the Registry editor, all you have to do is right-click the parent “Windows Defender” directory and choose New -> Key.
7. You can then name the key based on the path given above. For example, if you named the folder Real-Time Protection, you should create the following DWORD values in the folder:
DisableBehaviorMonitoring,
DisableOnAccessProtection,
DisableScanOnRealtimeEnable, and
DisableRealtimeMonitoring
If you have a change of mind, here’s how to re-enable Microsoft Defender on your Windows 11 computer:
1. Open the “Windows Security” app from the Start Menu.
2. Go to the “Virus & Threat Protection” section.
3. Under the “Virus & threat protection settings” section, click on Manage settings.
4. Now, enable the “Real-time protection” toggle alongside other toggles on this page to get Windows Defender’s protection back on your Windows 11 PC.
So that’s how you can remove Windows Defender from Windows 11 for good. We won’t recommend you disable Defender unless you have other antivirus software or malware removal tools installed on your Windows 11 PC. In case you don’t have one, go through our linked guide and pick one that suits your needs. While you’re at it, you could consider debloating Windows 11 to improve performance.
Microsoft Defender Antivirus (Защитник) — это встроенный антивирус в Windows 10/11 и Windows Server, который включен и настроен по умолчанию. В этой статье мы рассмотрим, как полностью отключить Защитник в Windows 11 или временно (приостановить).
Приобрести оригинальные ключи активации Windows всегда можно у нас в каталоге:
Windows 11 — от 1690 ₽
Windows 10 — от 1490 ₽
В Windows 11 и 10 при установке стороннего антивируса встроенный стандартный Защитник Microsoft должен отключаться. В некоторых случаях это не происходит автоматически, и вам может потребоваться ручное отключение Microsoft Defender.
В некоторых случаях вам может понадобиться временно отключить защиту Microsoft Defender, не затрагивая важные системные службы. Например, при запуске или установке какого-то системного приложения или утилиты, блокируется Microsoft Defender. Чтобы запустить такое приложение, нужно остановить защиту Windows Defender в реальном времени.
Временная приостановка защиты Microsoft Defender в Windows 11 и 10
1. Перейдите в следующий раздел настроек Windows 11:
Параметры > Конфиденциальность и безопасность > Безопасность Windows > Открыть Службу безопасности Windows
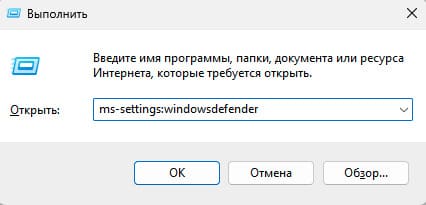
Или выполните команду быстрого доступа к настройкам ms-settings:windowsdefender.
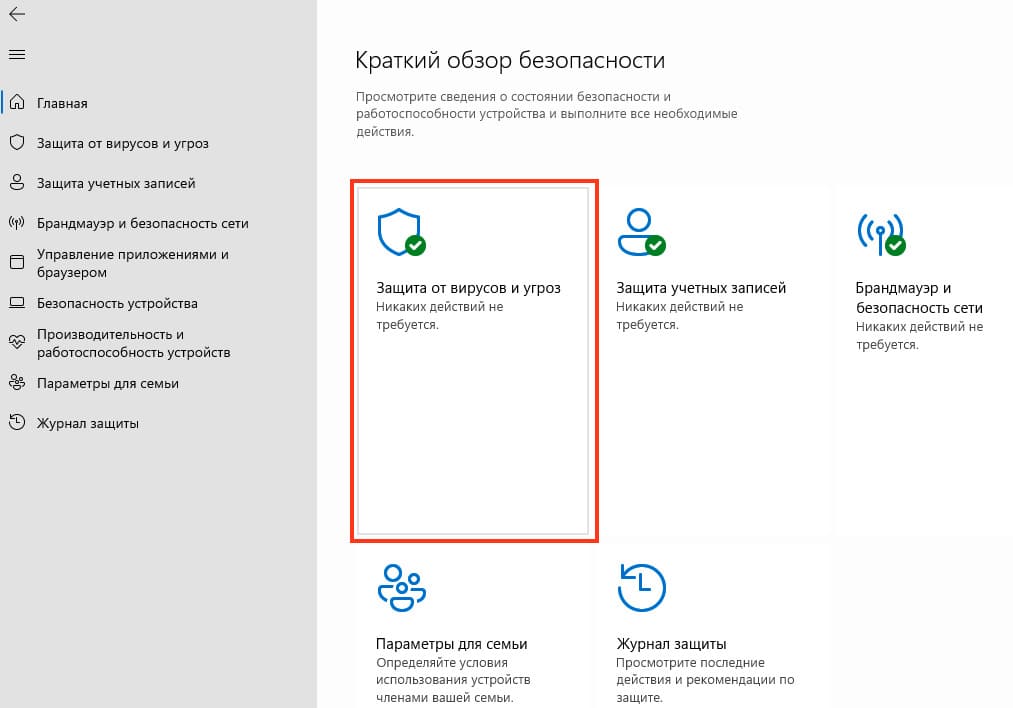
2. Откройте раздел Защита от вирусов и угроз
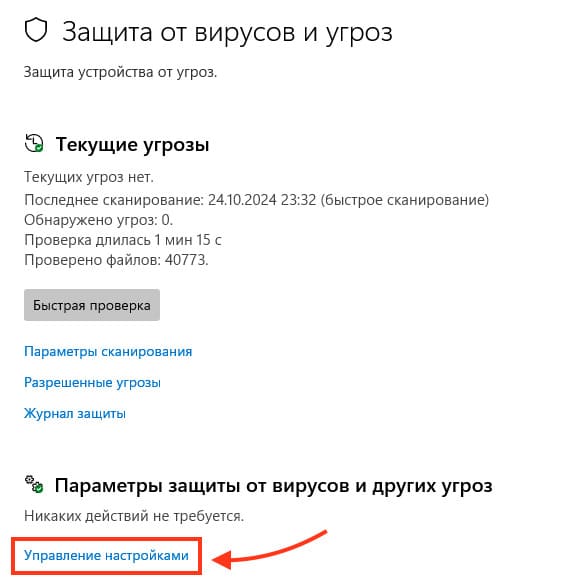
3. Нажмите на кнопку Управление настройками в разделе Параметры защиты от вирусов и угроз.
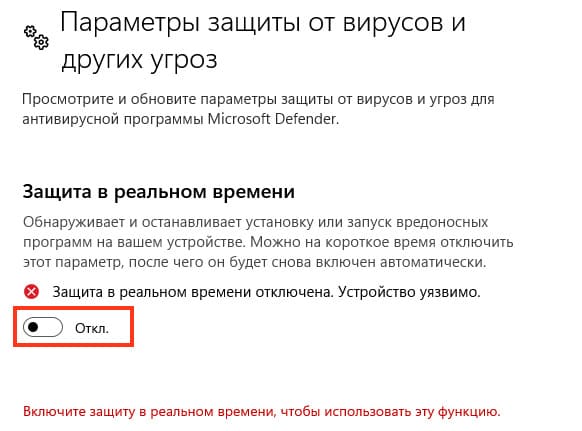
4. Переведите переключатель Защита в реальном времени в положение Выключено.
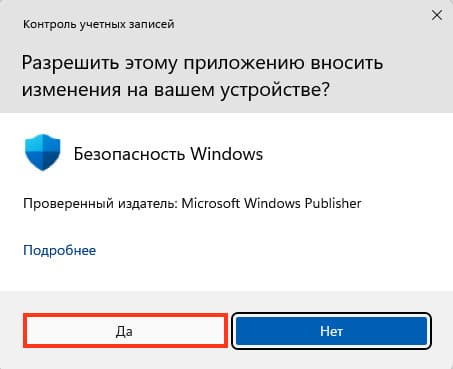
5. Подтвердите приостановку антивирусной защиты в окне с подтверждением повышения привилегий UAC.
Чтобы восстановить защиту компьютера Windows Defender, включите переключатель снова. Также защита в реальном времени Microsoft Defender будет включена автоматически после перезагрузки компьютера.
6. Еще отключить Windows Defender можно с помощью PowerShell команды, но перед этим нужно сначала отключить Защиту от подделок, которая находится там же где и Защита в реальном времени, только нужно промотать чуть ниже. Защита в реальном времени обеспечивает дополнительную защиту основных элементов безопасности Microsoft Defender. В частности, она блокирует несанкционированное изменение настроек антивируса, приостановку защиты в реальном времени, отключение облачной защиты.
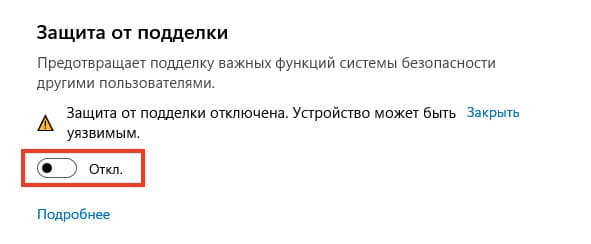
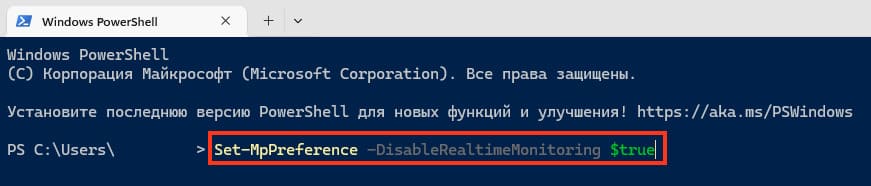
После отключения защиты от подделок, введите в PowerShell команду:
Set-MpPreference -DisableRealtimeMonitoring $true
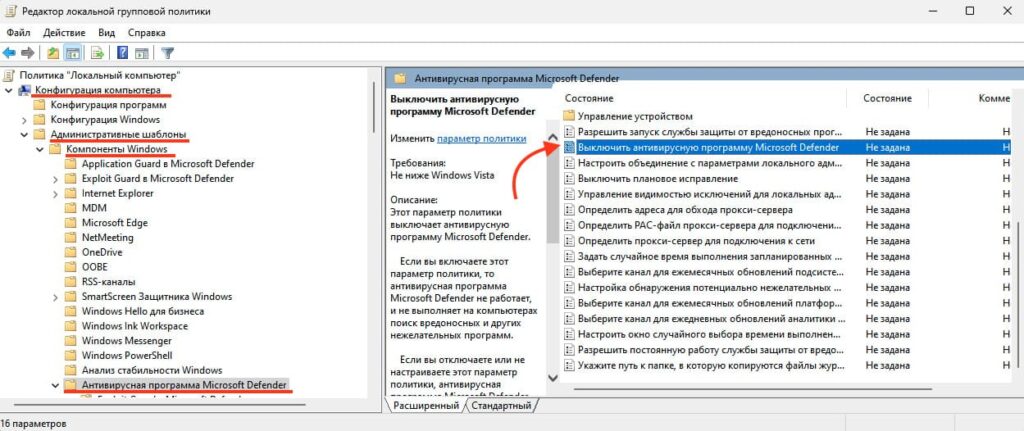
В ранних версиях Windows 10 и Windows Server 2016 можно было полностью отключить Windows Defender через параметр групповой политики «Выключить антивирусную программу Microsoft Defender» в разделе Конфигурация компьютера -> Административные шаблоны > Компоненты Windows > Windows Defender Antivirus в редакторе локальных групповых политик (gpedit.msc).

Также можно было использовать ключ реестра DisableAntiSpyware в ветке HKEY_LOCAL_MACHINE\SOFTWARE\Policies\Microsoft\Windows Defender, который соответствовал этому параметру политики:
New-ItemProperty -Path “HKLM:\SOFTWARE\Policies\Microsoft\Windows Defender” -Name DisableAntiSpyware -Value 1 -PropertyType DWORD -ForceДля отключения защиты в реальном времени использовалась политика Выключить антивирусную программу Microsoft Defender или ключ реестра DisableBehaviorMonitoring =1 в той же ветке реестра.
Однако, начиная с Windows 10 версии 1903 и в Windows 11, эти параметры групповых политик и ключи реестра больше не работают для отключения Microsoft Defender, так как его настройки защищены новой функцией Защитой от подделок (рассмотренной выше). Методы, которые использовались ранее для отключения Microsoft Defender Antivirus, теперь не действуют в этих версиях Windows.
Полное отключение Microsoft Defender через реестр и безопасный режим
Для полного отключения компонентов Windows Defender нужно загрузить ваш компьютер в безопасном режиме. Для этого:
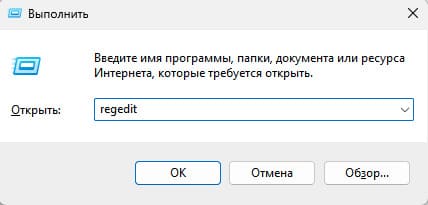
1. Запустите утилиту msconfig.
2. Перейдите на вкладку Загрузка, выберите опцию Безопасная загрузка -> Минимальная и перезагрузите компьютер.

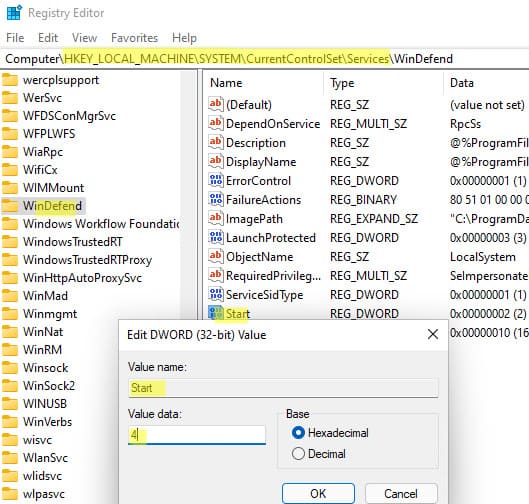
3. Откройте редактор реестра regedit.exe.
4. Перейдите в ветку HKEY_LOCAL_MACHINE\SYSTEM\CurrentControlSet\Services и отключите запуск следующих служб:
— Sense
— WdBoot
— WdFilter
— WdNisDrv
— WdNisSvc
— WinDefend
Для этого нужно изменить значение параметра Start на 4 для всех служб.
Или измените параметр Start для всех указанных служб с помощью скрипта PowerShell:
$regpath='HKLM:\SYSTEM\CurrentControlSet\Services'

Set-ItemProperty -Path ($regpath+"\WinDefend") -Name Start -Value 4

Set-ItemProperty -Path ($regpath+"\Sense") -Name Start -Value 4

Set-ItemProperty -Path ($regpath+"\WdFilter") -Name Start -Value 4

Set-ItemProperty -Path ($regpath+"\WdNisDrv") -Name Start -Value 4

Set-ItemProperty -Path ($regpath+"\WdNisSvc”) -Name Start -Value 4
Чтобы включить обратно Microsoft Defender в Windows, нужно установить следующие дефолтные значения параметра Start в ветке каждой службы:
— Sense — 3
— WdBoot — 0
— WdFilter — 0
— WdNisDrv — 3
— WdNisSvc — 3
— WinDefend — 2
5. Запустите msconfig и отключите безопасный режим, перезагрузите компьютер в обычном режиме.
Отключение заданий планировщика Windows Defender
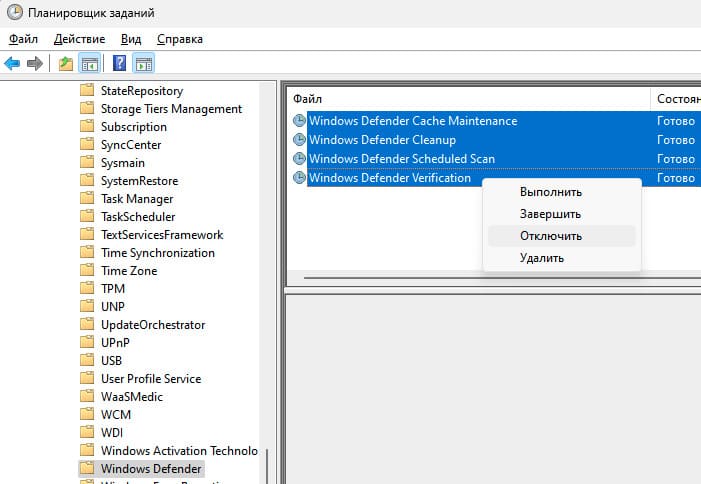
Откройте планировщик задач с помощью taskschd.msc или просто введите в поиске «Планировщик задач»
Отключите все четыре задания в разделе Microsoft > Windows > Windows Defender.
Можно отключить задания планировщика с помощью PowerShell:
Get-ScheduledTask “Windows Defender Cache Maintenance” | Disable-ScheduledTask

Get-ScheduledTask “Windows Defender Cleanup” | Disable-ScheduledTask

Get-ScheduledTask “Windows Defender Scheduled Scan” | Disable-ScheduledTask

Get-ScheduledTask “Windows Defender Verification” | Disable-ScheduledTask
Запустите приложение Безопасность Windows и убедитесь, что антивирус Microsoft Defender теперь отключен. Здесь должна появиться надпись: Защита в реальном времени отключена. Устройство уязвимо.

Следуя этой инструкции, вы сможете как временно, так и полностью отключить Microsoft Defender в Windows 11 и Windows 10.
Лицензионный ключ активации Windows 11 от
Windows Registry Editor Version 5.00

[HKEY_LOCAL_MACHINE\SYSTEM\CurrentControlSet\Services\SecurityHealthService]

"DependOnService"=hex(7):52,00,70,00,63,00,53,00,73,00,00,00,00,00

"Description"="@%systemroot%\\system32\\SecurityHealthAgent.dll,-1001"

"DisplayName"="@%systemroot%\\system32\\SecurityHealthAgent.dll,-1002"

"ErrorControl"=dword:00000001

"FailureActions"=hex:80,51,01,00,00,00,00,00,00,00,00,00,03,00,00,00,14,00,00,\

  00,01,00,00,00,60,ea,00,00,01,00,00,00,60,ea,00,00,00,00,00,00,00,00,00,00

"ImagePath"=hex(2):22,00,25,00,50,00,72,00,6f,00,67,00,72,00,61,00,6d,00,46,00,69,00,\

  6c,00,65,00,73,00,25,00,5c,00,57,00,69,00,6e,00,64,00,6f,00,77,00,73,00,20,\

  00,44,00,65,00,66,00,65,00,6e,00,64,00,65,00,72,00,5c,00,4d,00,73,00,4d,00,\

  70,00,45,00,6e,00,67,00,2e,00,65,00,78,00,65,00,22,00,00,00

"LaunchProtected"=dword:00000002

"ObjectName"="LocalSystem"

"RequiredPrivileges"=hex(7):53,00,65,00,49,00,6d,00,70,00,65,00,72,00,73,00,6f,\

  00,6e,00,61,00,74,00,65,00,50,00,72,00,69,00,76,00,69,00,6c,00,65,00,67,00,\

  65,00,00,00,53,00,65,00,42,00,61,00,63,00,6b,00,75,00,70,00,50,00,72,00,69,\

  00,76,00,69,00,6c,00,65,00,67,00,65,00,00,00,53,00,65,00,52,00,65,00,73,00,\

  74,00,6f,00,72,00,65,00,50,00,72,00,69,00,76,00,69,00,6c,00,65,00,67,00,65,\

  00,00,00,53,00,65,00,44,00,65,00,62,00,75,00,67,00,50,00,72,00,69,00,76,00,\

  69,00,6c,00,65,00,67,00,65,00,00,00,53,00,65,00,43,00,68,00,61,00,6e,00,67,\

  00,65,00,4e,00,6f,00,74,00,69,00,66,00,79,00,50,00,72,00,69,00,76,00,69,00,\

  6c,00,65,00,67,00,65,00,00,00,53,00,65,00,53,00,65,00,63,00,75,00,72,00,69,\

  00,74,00,79,00,50,00,72,00,69,00,76,00,69,00,6c,00,65,00,67,00,65,00,00,00,\

  53,00,65,00,41,00,73,00,73,00,69,00,67,00,6e,00,50,00,72,00,69,00,6d,00,61,\

  00,72,00,79,00,54,00,6f,00,6b,00,65,00,6e,00,50,00,72,00,69,00,76,00,69,00,\

  6c,00,65,00,67,00,65,00,00,00,53,00,65,00,54,00,63,00,62,00,50,00,72,00,69,\

  00,76,00,69,00,6c,00,65,00,67,00,65,00,00,00,53,00,65,00,53,00,79,00,73,00,\

  74,00,65,00,6d,00,45,00,6e,00,76,00,69,00,72,00,6f,00,6e,00,6d,00,65,00,6e,\

  00,74,00,50,00,72,00,69,00,76,00,69,00,6c,00,65,00,67,00,65,00,00,00,53,00,\

  65,00,53,00,68,00,75,00,74,00,64,00,6f,00,77,00,6e,00,50,00,72,00,69,00,76,\

  00,69,00,6c,00,65,00,67,00,65,00,00,00,00,00

"ServiceSidType"=dword:00000001

"Start"=dword:00000003

"Type"=dword:00000010

[HKEY_LOCAL_MACHINE\SYSTEM\CurrentControlSet\Services\SecurityHealthService\Security]

"Security"=hex:01,00,14,80,1c,01,00,00,28,01,00,00,14,00,00,00,30,00,00,00,02,\

  00,1c,00,01,00,00,00,02,80,14,00,ff,00,0f,00,01,01,00,00,00,00,00,01,00,00,\

  00,00,02,00,ec,00,08,00,00,00,00,00,18,00,9d,00,02,00,01,02,00,00,00,00,00,\

  05,20,00,00,00,21,02,00,00,00,00,14,00,9d,01,02,00,01,01,00,00,00,00,00,05,\

  12,00,00,00,00,00,18,00,9d,01,02,00,01,02,00,00,00,00,00,05,20,00,00,00,20,\

  02,00,00,00,00,14,00,9d,00,02,00,01,01,00,00,00,00,00,05,04,00,00,00,00,00,\

  14,00,9d,00,02,00,01,01,00,00,00,00,00,05,06,00,00,00,00,00,28,00,fd,01,02,\

  00,01,06,00,00,00,00,00,05,50,00,00,00,e5,fe,79,5f,a0,ae,0d,3b,22,fa,0a,c9,\

  01,5a,41,3a,e5,a6,4a,b7,00,00,28,00,ff,01,0f,00,01,06,00,00,00,00,00,05,50,\

  00,00,00,b5,89,fb,38,19,84,c2,cb,5c,6c,23,6d,57,00,77,6e,c0,02,64,87,00,00,\

  28,00,ff,01,0f,00,01,06,00,00,00,00,00,05,50,00,00,00,db,8c,74,0f,c2,72,73,\

  f3,2b,26,b9,44,77,1e,4f,02,76,63,b5,21,01,01,00,00,00,00,00,05,12,00,00,00,\

  01,01,00,00,00,00,00,05,12,00,00,00

[HKEY_LOCAL_MACHINE\SYSTEM\CurrentControlSet\Services\WinDefend]

"DependOnService"=hex(7):52,00,70,00,63,00,53,00,73,00,00,00,00,00

"Description"="@%ProgramFiles%\\Windows Defender\\MpAsDesc.dll,-240"

"DisplayName"="Microsoft Defender Antivirus Service"

"ErrorControl"=dword:00000001

"FailureActions"=hex:80,51,01,00,00,00,00,00,01,00,00,00,03,00,00,00,14,00,00,\

  00,01,00,00,00,e8,03,00,00,01,00,00,00,10,27,00,00,01,00,00,00,60,ea,00,00

"ImagePath"=hex(2):22,00,43,00,3a,00,5c,00,50,00,72,00,6f,00,67,00,72,00,61,00,\

  6d,00,44,00,61,00,74,00,61,00,5c,00,4d,00,69,00,63,00,72,00,6f,00,73,00,6f,\

  00,66,00,74,00,5c,00,57,00,69,00,6e,00,64,00,6f,00,77,00,73,00,20,00,44,00,\

  65,00,66,00,65,00,6e,00,64,00,65,00,72,00,5c,00,50,00,6c,00,61,00,74,00,66,\

  00,6f,00,72,00,6d,00,5c,00,34,00,2e,00,31,00,38,00,2e,00,32,00,32,00,30,00,\

  35,00,2e,00,37,00,2d,00,30,00,5c,00,4d,00,73,00,4d,00,70,00,45,00,6e,00,67,\

  00,2e,00,65,00,78,00,65,00,22,00,00,00

"LaunchProtected"=dword:00000003

"ObjectName"="LocalSystem"

"RequiredPrivileges"=hex(7):53,00,65,00,49,00,6d,00,70,00,65,00,72,00,73,00,6f,\

  00,6e,00,61,00,74,00,65,00,50,00,72,00,69,00,76,00,69,00,6c,00,65,00,67,00,\

  65,00,00,00,53,00,65,00,42,00,61,00,63,00,6b,00,75,00,70,00,50,00,72,00,69,\

  00,76,00,69,00,6c,00,65,00,67,00,65,00,00,00,53,00,65,00,52,00,65,00,73,00,\

  74,00,6f,00,72,00,65,00,50,00,72,00,69,00,76,00,69,00,6c,00,65,00,67,00,65,\

  00,00,00,53,00,65,00,44,00,65,00,62,00,75,00,67,00,50,00,72,00,69,00,76,00,\

  69,00,6c,00,65,00,67,00,65,00,00,00,53,00,65,00,43,00,68,00,61,00,6e,00,67,\

  00,65,00,4e,00,6f,00,74,00,69,00,66,00,79,00,50,00,72,00,69,00,76,00,69,00,\

  6c,00,65,00,67,00,65,00,00,00,53,00,65,00,4c,00,6f,00,61,00,64,00,44,00,72,\

  00,69,00,76,00,65,00,72,00,50,00,72,00,69,00,76,00,69,00,6c,00,65,00,67,00,\

  65,00,00,00,53,00,65,00,53,00,65,00,63,00,75,00,72,00,69,00,74,00,79,00,50,\

  00,72,00,69,00,76,00,69,00,6c,00,65,00,67,00,65,00,00,00,53,00,65,00,53,00,\

  68,00,75,00,74,00,64,00,6f,00,77,00,6e,00,50,00,72,00,69,00,76,00,69,00,6c,\

  00,65,00,67,00,65,00,00,00,53,00,65,00,49,00,6e,00,63,00,72,00,65,00,61,00,\

  73,00,65,00,51,00,75,00,6f,00,74,00,61,00,50,00,72,00,69,00,76,00,69,00,6c,\

  00,65,00,67,00,65,00,00,00,53,00,65,00,41,00,73,00,73,00,69,00,67,00,6e,00,\

  50,00,72,00,69,00,6d,00,61,00,72,00,79,00,54,00,6f,00,6b,00,65,00,6e,00,50,\

  00,72,00,69,00,76,00,69,00,6c,00,65,00,67,00,65,00,00,00,53,00,65,00,54,00,\

  63,00,62,00,50,00,72,00,69,00,76,00,69,00,6c,00,65,00,67,00,65,00,00,00,53,\

  00,65,00,49,00,6e,00,63,00,72,00,65,00,61,00,73,00,65,00,42,00,61,00,73,00,\

  65,00,50,00,72,00,69,00,6f,00,72,00,69,00,74,00,79,00,50,00,72,00,69,00,76,\

  00,69,00,6c,00,65,00,67,00,65,00,00,00,53,00,65,00,53,00,79,00,73,00,74,00,\

  65,00,6d,00,45,00,6e,00,76,00,69,00,72,00,6f,00,6e,00,6d,00,65,00,6e,00,74,\

  00,50,00,72,00,69,00,76,00,69,00,6c,00,65,00,67,00,65,00,00,00,53,00,65,00,\

  54,00,61,00,6b,00,65,00,4f,00,77,00,6e,00,65,00,72,00,73,00,68,00,69,00,70,\

  00,50,00,72,00,69,00,76,00,69,00,6c,00,65,00,67,00,65,00,00,00,00,00

"ServiceSidType"=dword:00000001

"Start"=dword:00000003

"Type"=dword:00000010

[HKEY_LOCAL_MACHINE\SYSTEM\CurrentControlSet\Services\WinDefend\Security]

"Security"=hex:01,00,14,80,cc,00,00,00,d8,00,00,00,14,00,00,00,30,00,00,00,02,\

  00,1c,00,01,00,00,00,02,80,14,00,ff,01,0f,00,01,01,00,00,00,00,00,01,00,00,\

  00,00,02,00,9c,00,06,00,00,00,00,00,18,00,9d,01,02,00,01,02,00,00,00,00,00,\

  05,20,00,00,00,21,02,00,00,00,00,14,00,9d,01,02,00,01,01,00,00,00,00,00,05,\

  12,00,00,00,00,00,18,00,9d,01,02,00,01,02,00,00,00,00,00,05,20,00,00,00,20,\

  02,00,00,00,00,14,00,9d,01,02,00,01,01,00,00,00,00,00,05,04,00,00,00,00,00,\

  14,00,9d,01,02,00,01,01,00,00,00,00,00,05,06,00,00,00,00,00,28,00,ff,01,0f,\

  00,01,06,00,00,00,00,00,05,50,00,00,00,bf,55,08,72,3b,e0,28,d0,89,79,4b,f8,\

  91,89,6e,7c,40,25,ec,f4,01,01,00,00,00,00,00,05,12,00,00,00,01,01,00,00,00,\

  00,00,05,12,00,00,00

;Remove Defender Policies

[-HKEY_LOCAL_MACHINE\SOFTWARE\Policies\Microsoft\Windows Defender]

[-HKEY_LOCAL_MACHINE\SOFTWARE\Policies\Microsoft\Windows Advanced Threat Protection]

[-HKEY_LOCAL_MACHINE\SOFTWARE\Policies\Microsoft\Windows Defender Security Center]