
Safe Mode is a simpler version of Windows that helps you sort out computer problems. It starts your computer with just the basics needed to run, which is great for fixing issues with software, drivers, viruses, or other glitches. Imagine it like stripping down a car to its frame to figure out what’s wrong. In this guide, we’ll show you how to jump into Safe Mode using just command lines through the Command Prompt in Windows 11 or 10.
Also see: Enter Safe Mode in Windows 11/10 when PC isn’t booting
What is Safe Mode in Windows?
Safe Mode is the bare-bones version of Windows, running only the must-have drivers and services. It’s perfect for diagnosing and fixing problems from software clashes, driver mishaps, to malware mess-ups. It’s your go-to tool for when your computer is acting up or when you need to get rid of troublesome software.
Windows has three Safe Mode flavors:
- Safe Mode: The standard mode with just the essential drivers and services.
- Safe Mode with Networking: Just like regular Safe Mode, but you can still get online. Handy for downloading updates or drivers.
- Safe Mode with Command Prompt: This is Safe Mode, but instead of the usual Windows look, you get a Command Prompt. Great for those who love typing commands to fix problems.
We’ll cover how to get into each of these Safe Modes using the Command Prompt in Windows 11/10.
Recommended resource: How to Startup Repair Windows 10/11 using Command Prompt
Steps to enter Safe Mode using Command Prompt
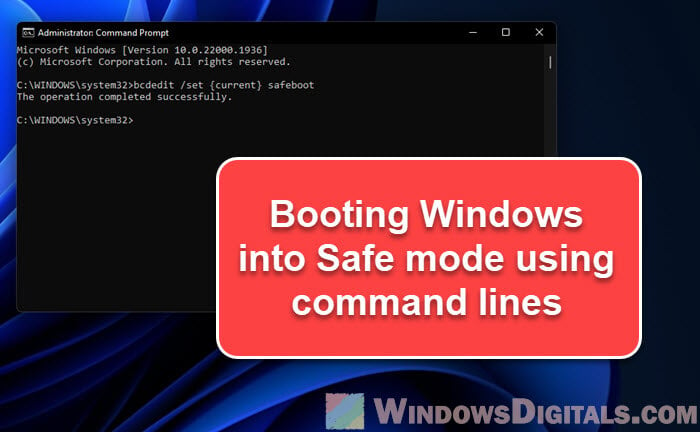
Step 1: Open Command Prompt as administrator
- Hit the Start button or press the Win key to bring up the Start menu.
- Search for “cmd” or “command prompt”.
- Right-click on Command Prompt in the search results and pick Run as administrator. If asked, click Yes to give it the thumbs up.

Step 2: Configure Windows to start in Safe Mode
To get into the Safe Mode you want, follow these steps:
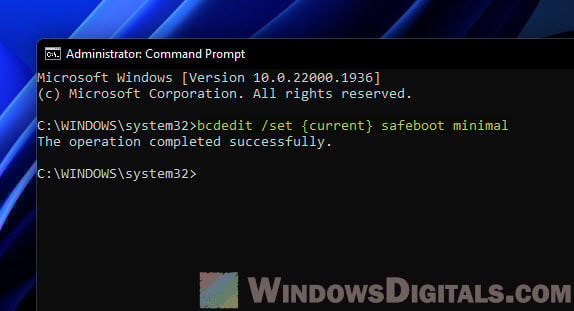
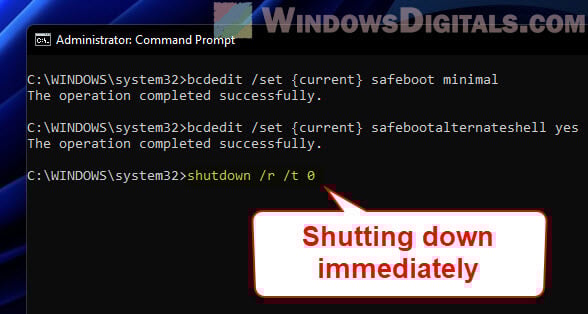
Safe Mode (Basic)
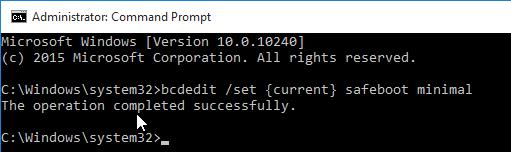
In the Command Prompt window, type this command and hit Enter to kick off Windows in basic Safe Mode:
bcdedit /set {current} safeboot minimal
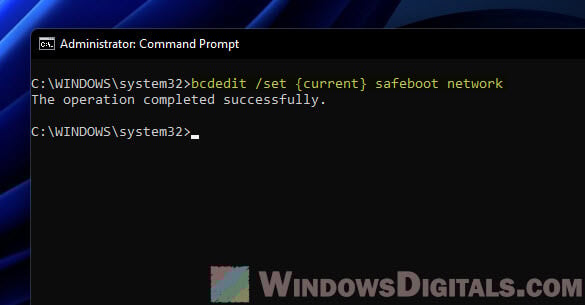
Safe Mode with Networking
Or, type this command and hit Enter for Safe Mode with network smarts, letting you go online:
bcdedit /set {current} safeboot network
Safe Mode with Command Prompt
For Safe Mode with Command Prompt, do this:
First, turn on basic Safe Mode with this command and pressing Enter:
bcdedit /set {current} safeboot minimal
Then, switch to command mode with this command and Enter:
bcdedit /set {current} safebootalternateshell yes
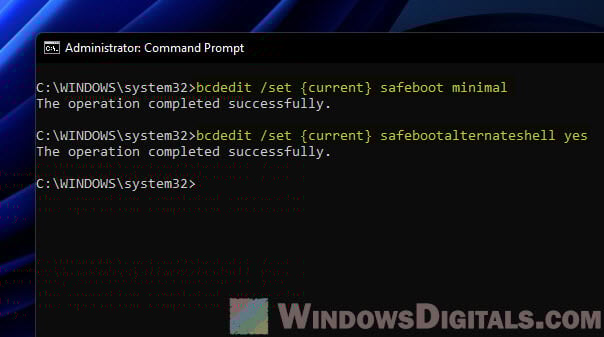
After these commands, you should get a message that you’re all set. Your computer is now ready to start in your chosen Safe Mode next time you restart it.
Linked issue: Windows 11 Keeps Booting in Safe Mode (Fix)
Step 3: Restart your computer
- Restart your computer with this command:
shutdown /r /t 0
- Now, your computer will restart and head straight into the Safe Mode you picked.
Exiting Safe Mode and returning to normal mode
If you’re done in Safe Mode and want to get back to regular Windows, follow these steps:
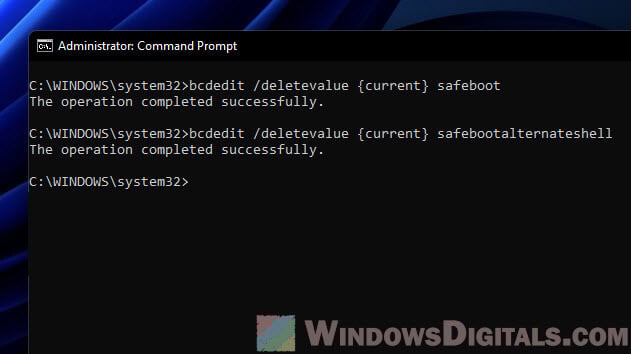
- Open Command Prompt in safe mode.
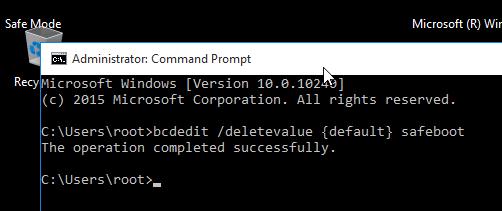
- Run this command and press Enter:
bcdedit /deletevalue {current} safeboot - If you were in Safe Mode with Command Prompt, turn off the command-only mode with this command:
bcdedit /deletevalue {current} safebootalternateshell - You’ll see a message that everything went smoothly. Your computer is now set to start normally next time you boot up.

- To restart and go back to normal Windows, type this and press Enter:
shutdown /r /t 0
- And that’s it, you’ll boot up as usual.
What we’ve learned
Using the Command Prompt to start Safe Mode gives you more power and options if you like using command-line tools. Here’s why you might want to use this approach to get into Safe Mode:
- It lets you easily choose between different Safe Mode options (like the basic one, one with networking, or one with Command Prompt). This is super useful when you need to figure out tricky problems that need checking in different settings.
- If you’re someone who knows their way around computers really well or if you’re an IT pro who often needs to start Safe Mode on lots of computers, or as part of fixing bigger issues, using Command Prompt can save you a lot of time. You can make scripts or set things up to happen automatically.
- Sometimes, you can’t use the usual way of doing things because of computer bugs, nasty viruses, or problems with drivers. In these situations, Command Prompt is a lifesaver because it doesn’t need the normal graphical stuff to work.
To wrap it up, although there are other ways to get into Safe Mode, going through the Command Prompt is a great choice for those who need that extra level of control and precision for solving complicated Windows problems.
Download Article
Plus, which type of safe mode to use to diagnose your computer problems
Download Article
If Windows 10 isn’t behaving properly, you can boot into Safe Mode to run scans, uninstall software, and access the Command Prompt. Whether you’re trying to get to the Command Prompt in Safe Mode or you want to learn how to boot into Safe Mode using CMD commands, we can help! This wikiHow article will teach you different ways to get to a safe Command Prompt window, and how to use Command Prompt to start Safe Mode.
What is the command prompt for Windows 10 Safe Mode?
Restart your computer and select Enable Safe Code with Command Prompt (f6) on the Startup Settings screen. Open the command prompt window, then enter the code bcdedit /set {default} safeboot minimal to reboot in Safe Mode.
-

Safe Mode is the standard diagnostic startup mode for Windows. When you boot into Safe Mode, only the basic device drivers will load—you won’t have internet access, and no third-party apps or drivers will launch at boot time. You can uninstall software, remove files, run your antivirus scanner, and perform tasks in the Command Prompt in regular Safe Mode.
-
This version of Safe Mode is the same as the original Safe Mode, except Windows will also load your network card drivers so you can connect to the internet.[1]
Use this version of Safe Mode if you want to download files, run updates, or do anything else that requires network access.Advertisement
-
All versions of Safe Mode have access to the Command Prompt, but this version will only give you the Command Prompt. You won’t have your typical Start menu or icons to click—just a simple admin-level Command Prompt window, making this mode useful only to IT professionals and system administrators.


Advertisement
-
This method is essentially a workaround to getting an administrator-level command prompt when you can’t boot into Windows. Even if your screen is blank or you can’t get to the login screen, you’ll be able to get a Command Prompt in Windows 10 thanks to the built-in recovery environment WinRE.
- You will still need your administrator password to sign in. If you don’t have the administrator password, you can still use this method to boot into Safe Mode.
- If you deleted the recovery partition, WinRE won’t work without a bootable Windows 10 DVD or flash drive, but we’ll get to that soon.
-
- Reboot your PC to the sign-in screen.
- Hold down the Shift key as you click the Power icon and choose Restart.
- Now skip to Step 4.
-
If you are unable to get to the sign-in screen, you can still get to a Command Prompt for troubleshooting using the power button your PC to enter a special diagnostic mode.[2]
Warning: this involves a lot of turning your PC off and back on again:- Start with your PC on.
- Hold down the power button on your computer for 10 seconds—your PC will turn off.
- Press the power button again to turn the PC back on.
- As soon as the computer turns back on (you’ll usually see the manufacturer’s logo), press and hold the power button for 10 seconds to turn it off again.
- Press the power button again to turn the PC back on.
- Again, as soon as the computer turns back on, press and hold the power button for 10 seconds to turn it off.
- Press the Power button again and allow your PC to boot into WinRE.
- If this doesn’t work, you may have deleted the recovery partition. You can boot your PC from a bootable Windows 10 DVD or USB drive. Once you boot from that media, continue to the next step.
-
This is a blue screen with several icons.
-
It’s at the bottom of the screen.
-
Choose this option if all you want is a Command Prompt. This option gives you a safe administrator prompt that you can use to diagnose problems with your PC. What it won’t give you is a Windows desktop or Start menu.
- If you’d rather start your PC in Safe Mode so you can use your typical menus and icons as well as have the option to launch the Command Prompt, choose Startup Settings, click Restart, and then press 4 or F4 to start Safe Mode (with no internet/network support) or 5 or F5 to start Safe Mode with Networking. You can launch the Command Prompt from either of these two modes.


Advertisement
-
If you want to access the Command Prompt while you’re in Safe Mode to run commands, it’s easy. To restart your computer in Safe Mode from the Windows desktop:[3]
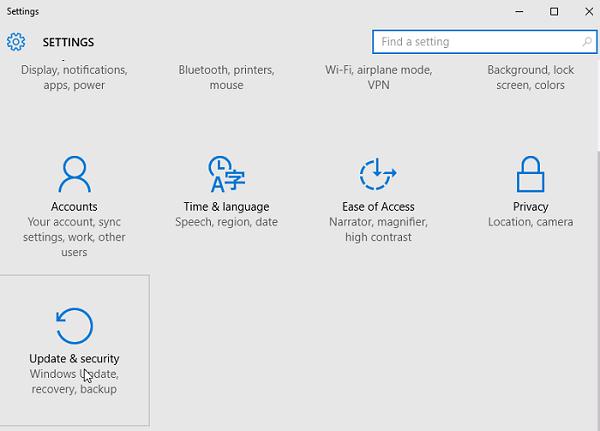
- Open the Start menu and click Settings.
- Click Update & Security.
- Click Recovery.
- Click Restart now under «Advanced startup.»
- When the computer reboots, click Troubleshoot and select Advanced options.
- Click Startup Settings.
- Click Restart.
- When the Safe Mode menu appears, press 5 or F5 to start Safe Mode with Networking, or press 4 or F4 to start Safe Mode without internet support.
-
A list of matching results will appear.
-
If you don’t need to perform administrative tasks, you can open a regular Command Prompt window just by left-clicking Command Prompt in the search results.


Advertisement
-
Getting into Safe Mode from the Command Prompt is a lot more complicated than any other way you could access Safe Mode. This is because you’ll need to run commands that edit your PC’s boot configuration, making it so your PC only boots in Safe Mode until you change it back. If possible, use the steps in the «Get a Command Prompt in Safe Mode» method to get to Safe Mode instead—if that doesn’t work, you can continue with this method.[4]
-
If you want to be able to reboot Windows into Safe Mode using the command line, you can do so by modifying the boot record, and then changing it back after you’re finished in Safe Mode. To get started:
- Press Windows key + S to activate the Search bar.
- Type cmd.
- Right-click Command Prompt and select Run as administrator.
-
You can start three types of safe mode from the command line—regular Safe Mode (with no network support), Safe Mode with Networking, and Safe Mode with Command Prompt.[5]
Type the command for the type of Safe Mode you want to use, and then press Enter. This will force the computer to reboot into that version of safe mode immediately after rebooting.- Safe Mode: bcdedit /set {current} safeboot minimal
- Safe Mode with Networking: bcdedit /set {current} safeboot network
-
Safe Mode with Command Prompt: Most people won’t need to use this, as you can access the Command Prompt from both other Safe Modes. But if you prefer just a Command Prompt window without icons or menus, you’ll need to enter two commands:
- Type bcdedit /set {current} safeboot minimal and press Enter.
- Type bcdedit /set {current} safebootalternateshell yes and press Enter.
-
If you’re unable to restart normally for any reason, you can restart from the command line by typing shutdown /r and pressing Enter. When the computer restarts, it’ll boot into Safe Mode.
-
Now that you’re in Safe Mode, you can perform diagnostics, remove viruses and malware, uninstall software and drivers, or any other business you need to attend to.
-
Before you get out of Safe Mode, you will need to undo the command you did earlier so Windows can boot normally. Just open Windows Search, type cmd, right-click Command Prompt, and then choose Run as administrator as you did earlier to get started.
-
When you type this command and press Enter, you’ll remove the «safeboot» value from the boot configuration, which allows Windows to boot normally next time: bcdedit /deletevalue {current} safeboot.[6]
-
This time, your Windows PC will reboot into your normal login screen and desktop.


Advertisement
Ask a Question
200 characters left
Include your email address to get a message when this question is answered.
Submit
Advertisement
Thanks for submitting a tip for review!
About This Article
Thanks to all authors for creating a page that has been read 113,392 times.
Is this article up to date?
Способы включения
Их шесть, они различаются по степени сложности. Рассмотрим их, начиная с самого простого и заканчивая самым сложным. Каждый из методов будет полезен для разных сценариев, а выбор зависит от того, на каком этапе загрузки возникает ошибка и есть ли у вас в целом доступ к Windows.
Способ первый: через параметры Windows
Когда полезен: этот метод требует, чтобы Windows запускалась хотя бы до рабочего стола. Подходит для диагностики, если система работает, но есть сбои.
Откройте меню «Пуск», перейдите в «Параметры», затем выберите раздел «Обновление и безопасность» (для Windows 10) или «Система» и затем «Восстановление» (для Windows 11).
Так это будет выглядеть в в Windows 10
В боковом меню найдите пункт «Восстановление» и в разделе «Особые варианты загрузки» нажмите «Перезагрузить сейчас»:
А так — Windows 11
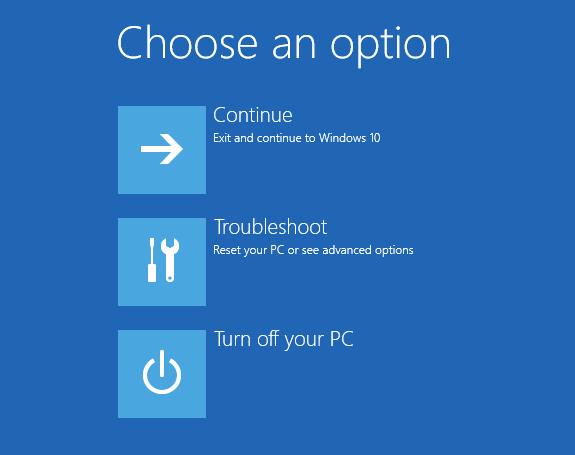
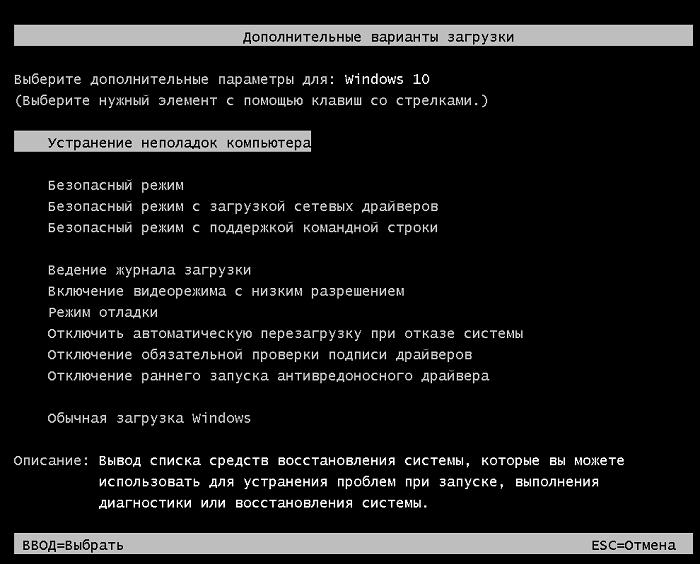
После перезагрузки компьютер предложит выбор действия. Пройдите по пути: «Диагностика» → «Дополнительные параметры» → «Параметры загрузки» и нажмите «Перезагрузить»:
Когда система перезапустится, нажмите клавишу 4 или F4 для входа в безопасный режим.
Windows 10 унаследовала все особенности системы загрузки у Windows 8, предоставляя такую же графическую среду для выполнения задач восстановления системы. Предполагается, что операции восстановления системы после сбоев будут преимущественно выполняться системой автоматического восстановления. В том случае, если Windows 10 не загружается корректно, запускается система автоматического восстановления, которая без участия пользователя пытается найти и исправить проблемы, мешающие нормальной загрузке системы. Однако это не означает, что в Windows 10 отсутствует безопасный режим (Safe mode), просто по умолчанию этот режим загрузки скрыт от пользователей.
В некоторых случаях необходимо запустить систему в безопасном режиме, например чтобы отладить или удалить службу, драйвер или приложение. Посмотрим как включить безопасный режим в Windows 10.
Windows 10 можно загрузить в безопасном режиме несколькими разными способами.
Содержание:
- Утилита MSConfig (Конфигурация системы)
- Сочетание Shift + Restart
- Запуск режим диагностики из интерфейса новой Панели управления
- Запуск безопасного режима из командой строки
- Возвращаем старое текстовое меню загрузки
- Запуск Safe Mode из режима восстановления
Утилита MSConfig (Конфигурация системы)
Самый простой способ загрузить Windows 10 в безопасном режиме, как и в предыдущих версиях Windows, воспользоваться утилитой msconfig.exe. Для этого:
- Нажмите сочетание клавиш Win+R и наберите msconfig
- В открывшемся окне перейдите на вкладку Boot
- В разделе Boot options поставьте флажок у пункта Safe boot

- Сохраните изменения (OK), согласитесь с предложением перезагрузить систему (Restart)
- После перезагрузки системы, Windows 10 загрузится в безопасном режиме (о чем свидетельствует надпись Safe Mode во всех углах экрана)
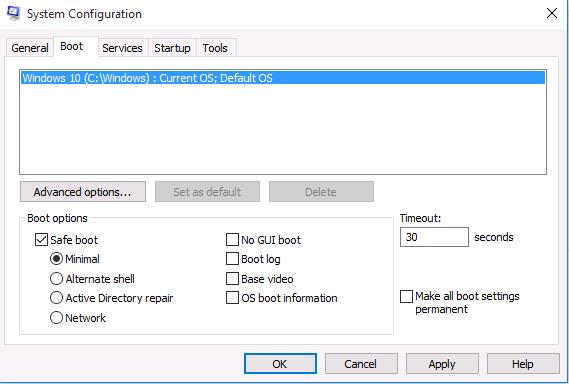

Совет. Отключить загрузку в безопасном режиме нужно также с помощью msconfig, сняв флажок у пункта Safe boot.
Сочетание Shift + Restart
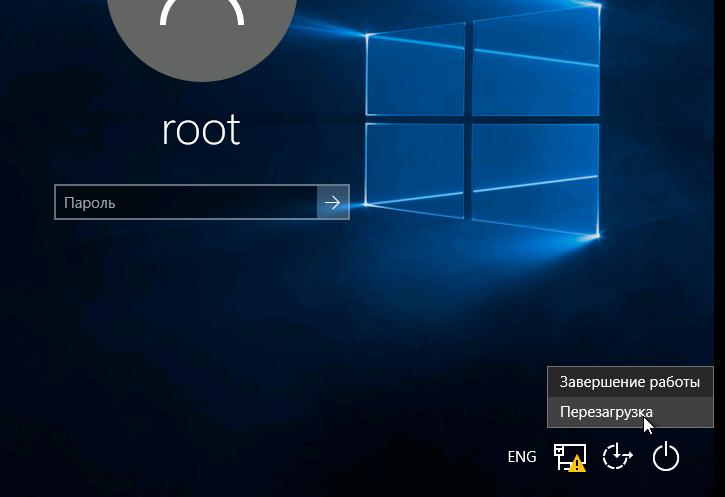
В стартовом меню нажмите кнопку Power и, зажав Shift на клавиатуре, выберите пункт перезагрузки системы (Restart)
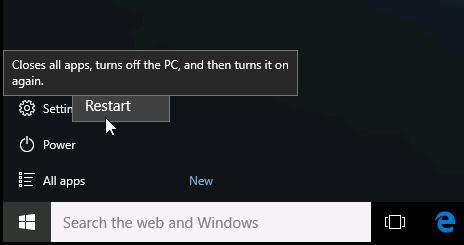
Примечание. Эту же комбинацию Shift+Перезагрузка можно использовать на экране входа в систему.
В появившемся диалоге последовательно выберите пункты Troubleshoot (Диагностика) -> Advanced options (Дополнительные параметры)-> Startup Settings (Параметры загрузки).
Перезагружаем компьютер, нажав кнопку Restart.
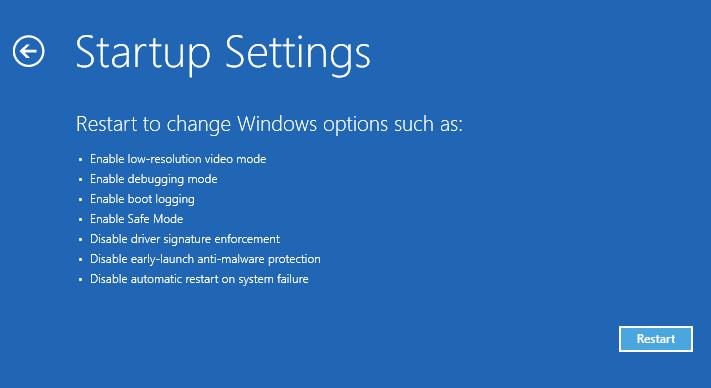
После перезагрузки появится окно с доступными опциями загрузки системы ( 9 вариантов, включая три вида безопасного режима). Для загрузки в безопасном режиме, нажмите клавишу F4 или 4 (или F5/F6 для загрузки в безопасном режиме с поддержкой сети или командной строки соответственно).
Запуск режим диагностики из интерфейса новой Панели управления
Для запуска новой современной Панели управления Windows 10, нажмите кнопку Start и выберите меню Settings. Затем перейдите в раздел Update & security.
Перейдите в раздел Recovery и в секции Advanced Startup нажмите Restart now.

Далее все аналогично предыдущему способу.
Запуск безопасного режима из командой строки
Возможно также настроить запуск Windows 10 в безопасном режиме и из командной строки. Для этого откройте командную строку (cmd) с правами администратора и выполните команду:
bcdedit /set {current} safeboot minimal
Затем перезагрузите компьютер командой:
Shutdown –f –r –t 0
Теперь Windows 10 всегда будет загружаться в безопасном режиме. Чтобы вернуть обычный режим загрузки:
bcdedit /deletevalue {default} safeboot
Возвращаем старое текстовое меню загрузки
В Windows 10/8 возможно вернуться к старому текстовому загрузчику Windows, поддерживающего клавишу F8 (Shift+F8) и возможность выбора параметров запуска системы.
Примечание. Скорость загрузки системы с таким загрузчиком будет ниже.
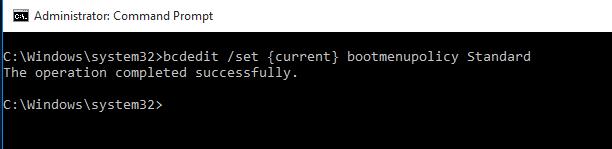
Чтобы вернуть тестовый загрузчик, выполните в командной строке с правами администратора:
bcdedit /set {default} bootmenupolicy legacy
Теперь при загрузке компьютера после стадии самотестирования (POST) , нужно несколько раз нажать клавишу F8. Должно появится старое-доброе текстовое меню с параметрами загрузки системы.
Чтобы отключить текстовый режим загрузчика, и вернуться к быстрой загрузке, выполните:
bcdedit /set {default} bootmenupolicy standard
Запуск Safe Mode из режима восстановления
Мало кто знает, что, чтобы включить безопасный режим и прочие параметры восстановления в Windows 10, достаточно 3 раза подряд прервать загрузку системы кнопкой отключения питания.
На 4 раз запустится среда восстановления системы (Recovery mode), из которой можно выбрать загрузку в безопасном режиме или другие варианты загрузки системы.
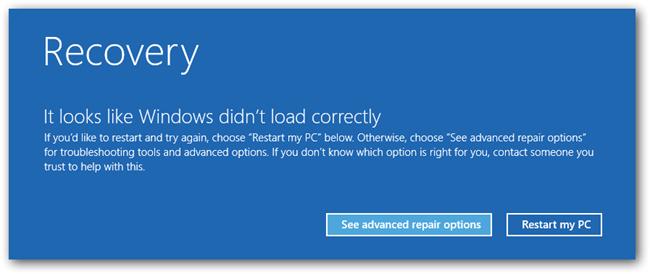
Выберите пункт See advanced repair options и следуйте инструкциям из второго пункта нашей статьи.
Как запустить компьютер в безопасном режиме
Обновлено:
Опубликовано:
Используемые термины: безопасный режим, Windows.
Данный режим загрузки компьютера позволяет решать проблемы с системой, так как в нем не запускается большинство компонентов, которые могут привести к этим проблемам. Вариант загрузки зависит от операционной системы Windows, установленной на компьютере.
Ваша операционная система — Windows 7
Инструкции по версиям:
А также:
Активация F8 через командную строку для Windows 11 / 10 / 8
Универсальный способ (для всех систем Windows)
Если безопасный режим не запускается
Windows 7 / Vista / XP
Во время загрузки компьютера (после начальной заставки и загрузки БИОС, но до заставки Windows) зажать клавишу F8;
Из предложенных вариантов выбрать Безопасный режим;

Выбрать операционную систему (данной опции может не быть). Если она у вас одна, просто нажать Enter:

Дождаться запуска безопасного режима.
Некоторые версии BIOS при нажатии F8 предлагают выбрать носитель, с которого загрузить систему. Если Вы поторопились с нажатием данной клавиши и выскочило окно выбора носителя, просто выбираем жесткий диск с системой и продолжаем нажимать F8.
Windows 11 / 10 / 8
Безопасный режим в Windows, начиная с версии 8 запускается через «Особые варианты загрузки». Как в предыдущих версиях, клавиша F8 больше не работает. Нам нужно выполнить 2 шага:
- Войти в меню выбора режима загрузки системы.
- Выбрать загрузку в безопасном режиме.
Оба шага в Windows 8-11 выполняются с незначительными отличиями.
Шаг 1.1. Если система загружается нормально
Если наша система может запуститься, необходимо ее перезагрузить с вызовом особых вариантов загрузки. Для этого либо отправьте компьютер в перезагрузку с зажатой клавишей Shift:
… либо выполните инструкцию ниже.
а) для Windows 10:
Нажимаем Пуск — Параметры:
Переходим в раздел Обновление и безопасность:
В разделе Восстановление кликаем по Перезагрузить сейчас:

Переходим к шагу 2.
б) для Windows 8:
Переводим курсор в правый нижний угол и поднимем его — Параметры — Изменение параметров компьютера — Обновление и восстановление — Восстановление — Перезагрузить сейчас.
Переходим к шагу 2.
Шаг 1.2. Если Windows не загружается
После нескольких неудачных попыток загрузить систему, мы увидим «Подготовка автоматического восстановления»:

* если этого не происходит, 2-3 раза прервите загрузку системы самостоятельно кнопкой Reset или зажав Power.
Затем «Диагностика компьютера»:
В открывшемся окне нажимаем по Дополнительные параметры:

Переходим к шагу 2.
Шаг 2. Выбираем загрузку безопасного режима
Вместо перезагрузки мы увидим окно «Выбор действия» — нажимаем по Поиск и устранение неисправностей (Windows 10):

или Диагностика (Windows 8):

Затем по Дополнительные параметры:
И Параметры загрузки:
В открывшемся окне просто нажимаем по кнопке Перезагрузить:
Компьютер перезагрузится и откроется окно «Параметры загрузки». Выбираем Включить безопасный режим (цифра 4):

Дополнительный способ — через командную строку (активация F8)
По сути, данный способ активирует классический способ захода в безопасный режим при помощи клавиши F8.
Кликаем правой кнопкой по Пуск и выбираем запуск командной строки или powershell от имени администратора:

В открывшемся окне вводим следующее.
В обычной командной строке:
bcdedit /set {default} bootmenupolicy legacy
В Powershell:
cmd /C «bcdedit /set {default} bootmenupolicy legacy»
Теперь в момент загрузки системы можно выводить дополнительное меню клавишей F8 с возможностью выбора безопасного режима, как в предыдущих версиях Windows.
Универсальный метод
Данный метод подойдет для любой системы семейства Windows. Его минус в необходимости нормальной загрузки системы.
Открываем «Конфигурацию системы» — для этого вводим команду msconfig:

В открывшемся окне переходим на вкладку Загрузка и ставим галочку Безопасный режим:
Перезагружаем компьютер — он будет всегда запускаться в безопасном режиме. Чтобы вернуть обычную загрузку, выполните обратные операции.
Если безопасный режим не работает
В случае повреждения реестра или части системы, которая отвечает за загрузку безопасного режима можно сделать следующее:
1. Скачиваем утилиту AVZ. Запускаем ее от имени администратора. Кликаем по Файл — Восстановление системы. В открывшемся окне выбираем 10. Восстановление настроек загрузки в SafeMode — кликаем по Выполнить отмеченные операции.
2. Можно восстановить реестр в полу ручном режиме. Для этого скачиваем архив RepairSafeBoot и распаковываем его. Внутри находим файл, соответствующий операционной системе и запускаем его. На запрос о слиянии реестра отвечаем утвердительно:

Перезагружаем компьютер и пробуем запустить безопасный режим.
3. Скачиваем утилиту SafeBootKeyRepair, запускаем и после завершения ее работы, перезагружаем компьютер. Пробуем зайти в безопасный режим.
4. Если наша система не грузится в обычном режиме, то предыдущие советы нам не помогут. В случае проблем при разгрузке любых режимов, создаем загрузочную флешку с Windows LiveCD, загружаем с нее компьютер и пробуем восстановить систему с использованием точек восстановления.