
Sometimes you start up your Windows 7 computer but you get the Windows error recovery screen saying the system failed to start and a hardware or software change might cause it. What should you do if you are bothered by this Windows error? Now, you can get solutions from this post written by MiniTool to get rid of the black screen error.
Although Microsoft has ended the support of Windows 7 since January 14, 2020, there are still many users running Windows 7 on their PCs since its ease of use and reliability.
But, Windows boot problems always occur no matter which operating system you are using (Windows 7, 8, or 10). During the startup of the Windows operating system, a blue screen or black screen appears along with an error message. Today, we will discuss a Windows 7 black screen error – Windows error recovery.
When booting up Windows 7, the Windows error recovery screen comes out of the blue and you see an error message “Windows failed to start. A recent hardware or software change might be the cause”, as shown below. Sometimes, you get another interface of Windows error recovery with different options.
The reasons behind this error are various, such as a recent hardware or software change, damaged system files, missing or corrupted Boot Configuration Data (BCD), compromised file system integrity, etc. When you come across the issue, how can you fix it?
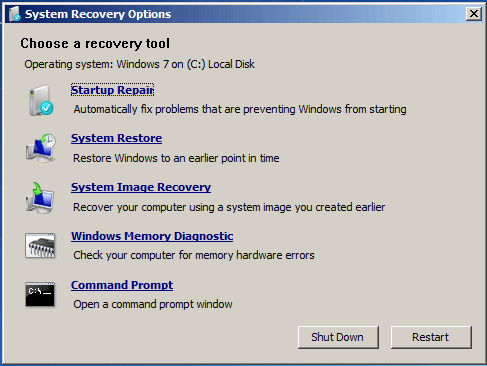
You can get some solutions from the screen: use an installation disc to repair your computer in WinRE, or perform Startup Repair and start Windows normally by using the arrow keys.
So, you can follow the suggestions of Windows. If these simple tips couldn’t help, some other solutions are described here.
Tip: If you are using Windows 10 but get a black screen, refer to this post – How Do I Solve Windows 10 Booting to a Black Screen with Ease.
How to Fix Windows Error Recovery Loop
Method 1: Choose Start Windows Normally
When seeing the Windows 7 error recovery interface, the first thing you can do is to use the arrow keys to choose Start Windows Normally. Sometimes this can let your Windows boot to the desktop normally. Just have a try. If this won’t help, try other ways.
Method 2: Remove Recently Added Hardware
On the Windows error recovery screen, you know a recent hardware change may be the reason behind the system error. The hardware change may generate Windows instability problems, making your laptop like HP, Dell, Toshiba, etc. fail to reboot.
In this case, we strongly recommend removing recently added hardware.
Tip: If a new internal device, for example, sound card, hard drive, or other was added to your computer before Windows error recovery started to happen, remove it before you continue.
The following are the instructions:
Step 1: Turn off your laptop, remove the battery and unplug the power cord.
Step 2: Disconnect all the newly added peripherals including a printer, webcam, zip drive, scanner, network cable, and other devices. Leave only the keyboard, monitor cable and mouse attached.
Step 3: Press and hold the power button for 5 seconds and release it.
Step 4: Put the battery back to the laptop and reconnect the power cord.
Step 5: Turn on the laptop and see if Windows error recovery still appears. If yes, go to the next solution to troubleshoot.
Method 3: Boot into Last Known Good Configuration
In Windows 7, there is a feature called Last Known Good Configuration, also known as LKGC. You can boot your PC to this mode if you are having trouble starting the system normally. Last Known Good Configure can load a previous configuration in Windows (including drivers, registry data, etc.) that was working properly.
Tip: On the Windows error recovery window, if you see this option – Last Known Good Configuration (advanced), just use the arrow keys to choose it. If it doesn’t appear there, you need to follow these steps below to boot into LKGC.
Step 1: Restart your computer.
Step 2: Repeatedly press the F8 key until you see the Advanced Boot Options window.
Step 3: Select Last Known Good Configuration (advanced) and press Enter.
After the process finishes, your PC will boot to the desktop properly. However, if Windows fails to start twice in a row, you need to move to the next solution.
Method 4: Perform Startup Repair
When experiencing Windows error recovery during the startup of Windows 7, one solution given by the black screen is to perform Startup Repair (also known as Automatic Repair in older versions of Windows). It can scan your system and attempt to fix damaged or missing system files.
In the error recovery screen, sometimes you may have two options and one of them is Launch Startup Repair (recommended), as shown in the following figure.
Just use the arrow keys to highlight this option and press Enter on your keyboard to run Startup Repair. But if you cannot see this option (just like the first picture), how can you do this job? An installation disc is helpful.
Step 1: Go to download an ISO file of Windows 7 online and then create an installation disc with a USB drive or DVD.
Step 2: Insert this disc and restart your computer. Note that you should change the BIOS settings so that the disc is the first boot order.
Step 3: Choose your language, keyboard, and time settings, click Next.
Step 4: In the pop-up window, click Repair your computer.
Step 5: Choose your system to repair.
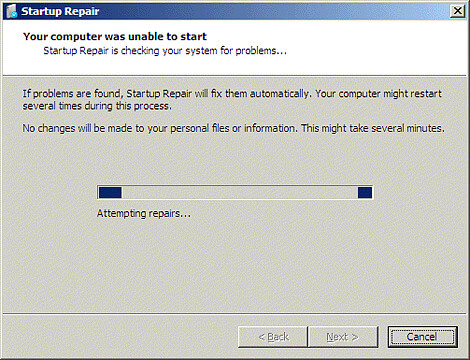
Step 6: You will get the following interface. Click Startup Repair to automatically fix problems that are stopping Windows from starting.
Then, the repair process starts. This may take 15 to 45 minutes to complete, so wait patiently. Also, it may require the system to restart.
If you get the error message saying “Startup Repair cannot repair this computer automatically”, you need to go to the next method to fix the Windows error recovery issue.
Method 5: Run System Restore to Fix Windows Error Recovery Safe Mode
If there is a restore point created by you on the computer, you can use it to take your PC back to the settings that previously worked.
When getting the Windows error recovery issue, you can directly choose Safe Mode, Safe Mode with Networking or Safe Mode with Command Prompt from the computer screen if you see these options. If you cannot see it, go to Safe Mode by following these steps.
Tip: Sometimes you cannot enter Safe Mode. In this case, refer to this post – Windows Safe Mode Not Working? How to Fix It Quickly to get solutions.
Step 1: Reboot your computer.
Step 2: Press F8 to enter the Advanced Boot Options window.
Step 3: Select Safe Mode with Command Prompt by using the arrow keys.
Step 4: After the Command Prompt opens, type rstrui and press Enter to open the System Restore window.
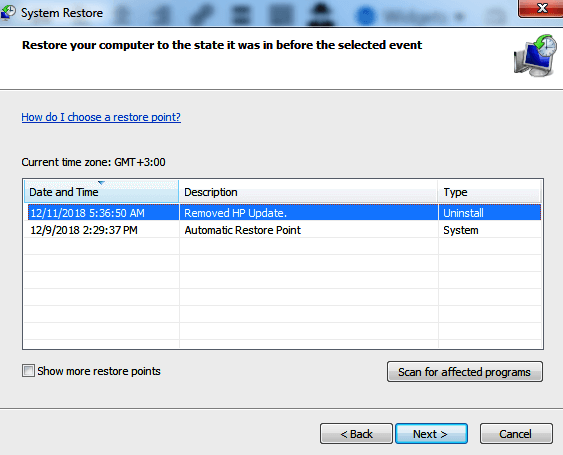
Step 5: Choose a restore point from the list and click Next.
Step 6: Click Finish and the restore process will start. After that, the Windows error recovery issue should be fixed.
Tip: In addition, you can use an installation disc to enter the System Recovery Options window rather than Safe Mode to perform a system restore. In that window, click System Restore to start the job.
Method 6: Rebuild BCD
Missing or corruption of BCD files can cause Windows error recovery Windows failed to start. To get rid of the error screen, you can use bootrec.exe to rebuild BCD in Command Prompt (CMD).
You can go to Safe Mode to open Command Prompt or use an installation disc to enter the CMD window. These two ways are described in the above contents. Then, in CMD, type these commands and press Enter after each command.
bootrec.exe /fixmbr
bootrec.exe /fixboot
bootrec.exe /rebuildbcd
Method 7: Run CHKDSK
If the file system gets corrupted, the Windows 7 error recovery issue may appear. So, you should perform a disk check using CHKDSK to fix file system errors and solve your problem/
Also, open Command Prompt, type chkdsk C: /f /x /r and press Enter. After the process is finished, restart your computer and see if Windows error recovery is disappeared.
Method 8: Reinstall Windows 7
If all of these solutions above fail to fix Windows error recovery and your Windows still fails to start, what should you do? The last resort is reinstalling the operating system.
Note: A clean install of Windows can erase your personal files, especially on the desktop and system partition. Thus, we strongly recommend backing up your vital data before reinstallation.
Back up Files
How can you back up files when Windows fails to boot? MiniTool ShadowMaker, a piece of professional PC backup software, is designed to back up your files via imaging and sync.
It allows you to create a bootable USB drive, boot the PC and perform the backup operation in WinPE when Windows cannot boot. Just get MiniTool ShadowMaker from the download button.
MiniTool ShadowMaker TrialClick to Download100%Clean & Safe
Step 1: On a normal PC, run MiniTool ShadowMaker and go to the Tools tab.
Step 2: Click Media Builder and follow the on-screen to finish the bootable drive creation.
Step 3: Insert the drive to your PC with Windows error recovery, reboot the PC from this drive and enter the MiniTool Recovery Environment.
Related articles:
- How to Build Boot CD/DVD Discs and Boot Flash Drive with Bootable Media Builder?
- How to Boot from Burned MiniTool Bootable CD/DVD Discs or USB Flash Drive?
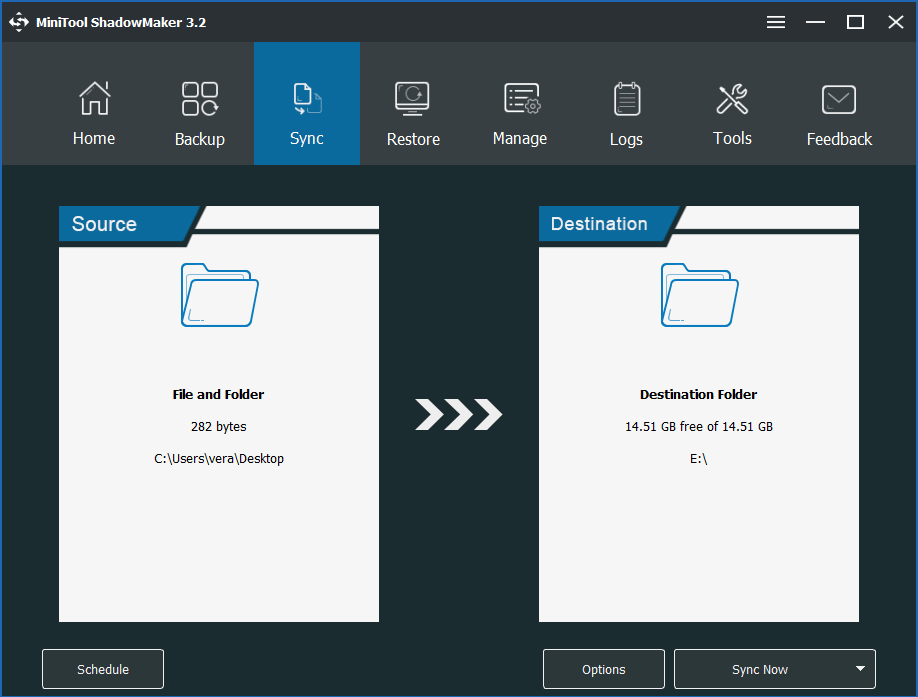
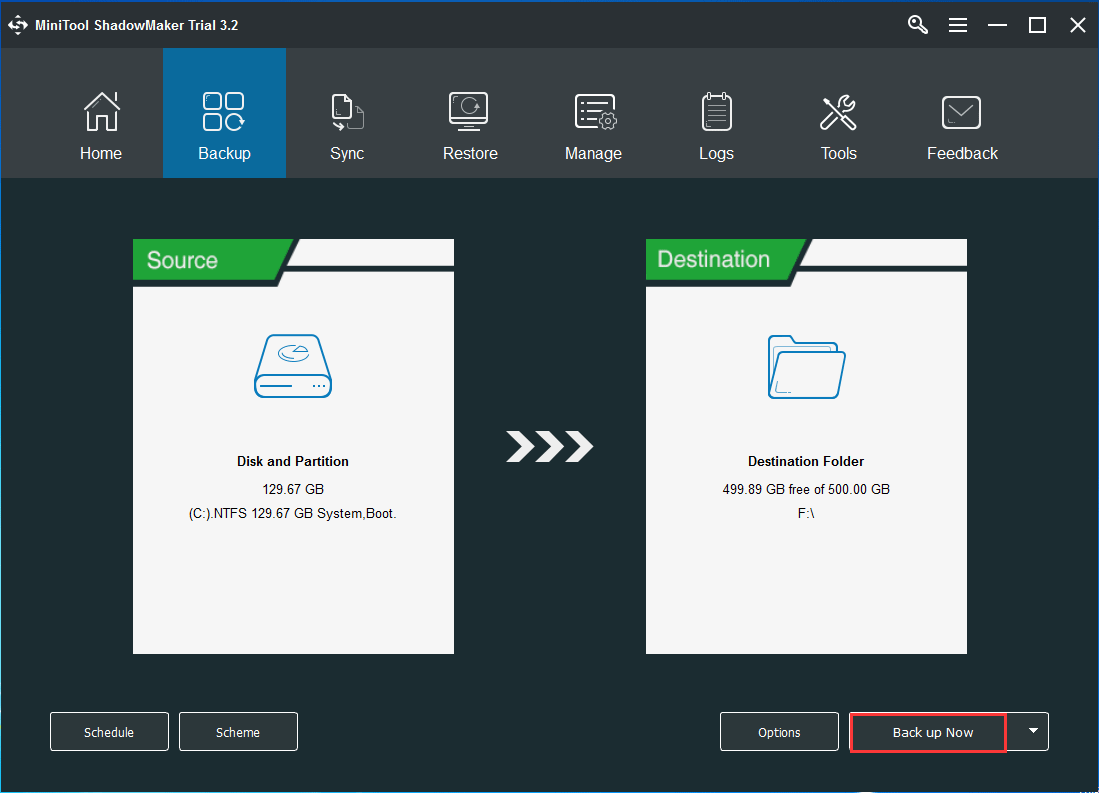
Step 4: Launch MiniTool ShadowMaker and go to the Backup or Sync tab.
Step 5: Choose files on the desktop as the backup source and select a destination.
Step 6: Click Back up Now or Sync Now to execute the backup task.
Clean Install
After finishing the backup, now you can follow the guide to perform a clean install of Windows 7 to fix Windows error recovery.
Step 1: Boot your computer from the installation disc that you have prepared.
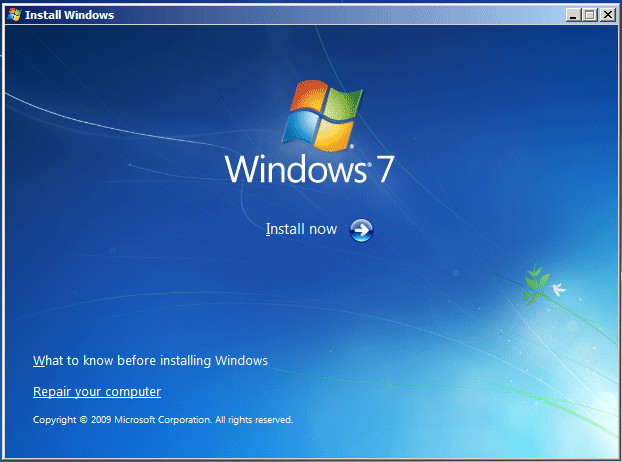
Step 2: After choosing the language, time and keyboard, click Install now to start the system reinstallation.
Step 3: Accept the license terms and choose Custom (advanced).
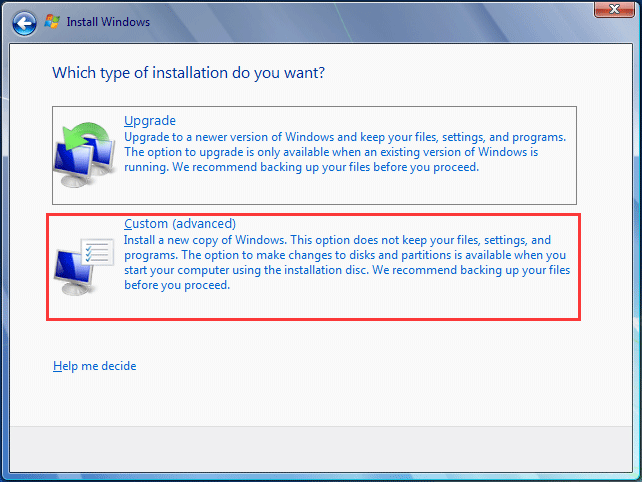
Step 4: Decide where to install Windows and then the setup tool will start installing Windows.
“Does Windows error recovery screen appear when booting up Windows 7? Here are all the possible solutions to this problem. Just share them to let more persons know.”Click to tweet
Tip: Some of you may be bothered by Windows error recovery keyboard not working. These methods above won’t help and you need to search for this topic on the Internet (especially some forums) to find solutions. Here, we won’t show you something.
Suggestion: Back up Windows Operating System
Now, you should have resolved the Windows error recovery issue that happens in Windows 7 PCs. To restore your PC to a normal state instead of spending much time fixing the problem when it appears next, creating a system image is recommendable.
To do this work, MiniTool ShadowMaker can be also helpful. It can be used to back up Windows operating system, files & folders, disks and partitions in Windows 7/8/10. By default, system backup is selected.
MiniTool ShadowMaker TrialClick to Download100%Clean & Safe
Step 1: Launch MiniTool ShadowMaker.
Step 2: Go to the Backup page, system-related partitions are selected and you can go to Destination to choose a destination.
Step 3: Execute this backup task by clicking Back up Now.
Bottom Line
Are you bothered by Windows error recovery while you start up your Windows 7? Now, try these solutions mentioned above and you can easily get out of the trouble. Also, a suggestion is introduced.
Besides, if you have any methods to fix the Windows 7 error recovery issue, you can tell us by leaving a comment below or contacting [email protected]. Also, any questions during using MiniTool Software are also appreciated.
Windows Error Recovery FAQ
How do I fix Windows Error Recovery?
- Choose Start Windows Normally
- Remove recently added hardware
- Boot into Last Known Good Configuration
- Run Startup Repair
- Rebuild BCD
- Run CHKDSK
- Reinstall Windows
What happens when Windows 10 Startup Repair fails?
When Windows Startup Repair fails, your issue cannot be fixed and you need to try other solutions to resolve your system problems. Or you can try to fix the Windows Automatic Repair not working issue by following solutions in this post – How To Fix “Windows Automatic Repair Not Working” [SOLVED].
How do I get rid of startup repair loop?
- Rebuild BCD
- Run CHKDSK
- Perform a system restore
- Delete the problematic file
- Disable Automatic Startup Repair
- Restore Windows Registry
- Check device partition and osdevice partition
- Reset this PC
What causes automatic repair loop?
The main reason for the automatic repair loop is the corrupted or damaged Windows ISO files. In addition, malfunctioning hard drives, complex malicious rootkits, and missing registry keys can cause the issue.
Readers help support Windows Report. We may get a commission if you buy through our links.
Read our disclosure page to find out how can you help Windows Report sustain the editorial team. Read more
If you’re wondering how to fix Windows error recovery, you’re in the right place. Obviously, you are not alone. In fact, many users reported similar issues. The good news is that they also managed to solve these problems.
Let’s quickly review some of the most common issues related to Windows Recovery mode:
- Windows error recovery loop Windows 7 – If Windows 7 failed to start it’s likely you encounter the recovery Windows error on a Dell laptop, HP laptop, and so on.
- Laptop recovery problem – Speaking about portable PCs, more often than not, you’ll get the recovery screen on laptops.
- Windows error recovery on startup
- Obviously, the issue can impact all versions of the OS and a particularly common scenario takes the form of Windows error recovery in Windows 10.
- Windows error recovery keyboard not working
Don’t worry, we’ll show you exactly what to do when your PC says recovery. But first let’s see what we’re dealing with and what is it that triggers such errors, to begin with.
What is error recovery in computer?
Running apps might seem like a straightforward action, but it’s in fact a complex process involving syntax verification, compiling, and parsing operations that your computer constantly runs in the background.
The Windows error recovery is usually caused by problems such as corrupt system files, a hardware change, or a compromised Boot Configuration Data (BCD). The good news is that all of these are easy to resolve.
In fact, some of the situations generating this error have more than one solution meaning there is a huge chance of cracking the matter.
We’ll show how to fix Windows error recovery without CD or with a CD. There are various methods available, so you’ll be able to find the right Windows error recovery Windows 7 solution or Windows 10 fix effortlessly.
How do I fix Windows 10/7 recovery error?
➡️ If possible, make sure that the computer is connected to a reliable internet network as you execute these steps.
➡️ We will be using an HP laptop for demonstrative purposes, but the operations can be applied as such on any other brand (Dell, etc.)
1. Remove recently added hardware
- Turn off your laptop and remove the AC adapter and its battery.
- Disconnect the newly added device. You may have to reopen the laptop to access whatever hardware you had installed (if it was an internal addition).
- Return the battery.
- Turn on the laptop the usual way.
- The laptop may successfully boot to the desktop and the Windows error recovery message will not be redisplayed.
- You can now try to reconnect the device and wait for Windows to recognize it (for external hardware like a USB webcam).
- For hardware that is installed on the motherboard, the best approach is to ensure that you are installing a compatible device and to introduce the right drivers immediately.
Adding hardware, for example, a new RAM module can sometimes originate Windows instability problems. This triggers the Windows error recovery loop, making your laptop fail to reboot.
Use these steps to rectify whatever issues arose as a result of installing new hardware.
Tip
If you are adding more than one device, it’s advisable to connect one at a time and keep restarting the computer with each addition until you locate the device causing the error.
2. Run Windows Start Repair
- Let the laptop timer countdown run to zero once the error message appears or just press Enter while the launch start repair option is selected.
- The startup repair interface opens and starts scanning your laptop for problems.

- Implement the suggestions made by the startup repair wizard to rectify the pending faults.
- The laptop should soon restart and boot into your normal desktop.
You can now attempt to repair a faulty Windows startup process by mending the relevant files.
3. Boot into LKGC (Last Known Good Configuration)
- Restart your laptop.
- Press F8 repeatedly until the advanced boot options appear.
- Choose LKGC (last known good configuration -advanced) then press Enter.
Booting into the last known good configuration is easy and could solve the problem without much fuss.
- Fix: An Error Occurred While Loading a Higher Quality Version of This Video
- iTunesMobileDevice.dll is Missing From Your Computer [Solved]
- SYNSOACC.DLL Could Not Be Located: How to Fix in Cubase
- Fix: Omen Gaming Hub Undervolting Not Working
- How to Fix Errors Related to the LibGLESv2.dll File
4. Restore your laptop with System Restore
- Turn off the laptop and then, press its power button to turn it back on.
- Now, start pressing the F8 key repeatedly until a startup screen appears.
- Highlight the safe mode option using the up/down arrow keys and press Enter.
- Select an administrator user account when the Windows login screen displays and enter your password (if any).
- When the desktop appears, press the windows button on the menu then click inside the search bar.
- Type cmd then press Enter.
- In the Command prompt window, type rstrui then press Enter again.
- The Restore System screen opens.
- Click Next, then choose the last restore point that worked (from the displayed options) then click next.

- Now click Finish and wait for the checkup and restart process to complete. Again be patient.
Restoring the laptop takes it back to the settings that previously worked. You can execute the system restore directly from the startup repair window if that option pops us.
Here is how to initialize restore if the option wasn’t provided and fix the Windows error recovery via Command prompt.
Besides the Windows error recovery loop, this method should also help if your computer is stuck in a restart loop, so make sure you check it out.
5. Recover the Laptop
Recovering a laptop is equivalent to resetting the computer its factory configuration.
- Windows 7
- Turn off the laptop.
- Turn it on and press the F11 key repeatedly until the Recovery Manager (Windows 7) opens.
- Click System recovery under the I need help immediately tab.
- Select your preferred backup option when the system recovery asks for your backup preferences.
- Click OK when and if a warning displays.
- Click Finish to reboot the laptop as soon as the recovery is complete.
- Now go over the typical Windows setup until the laptop finishes the fresh reconfiguration.
- Restart your computer to ensure everything sails smoothly again.
You may have to reinstall some or all of your previous software including the antiviruses and business programs (if any) plus any backup files.
- Windows 10
- Turn off the laptop.
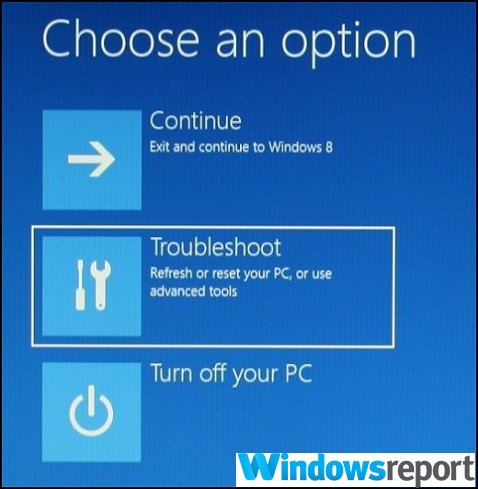
- Turn it on and press the F11 key repeatedly until the Choose an option window is displayed.
- Click Troubleshoot under the Choose an option tab.
- Next, click Recovery manager on the Troubleshoot tab.
- Finally, click System recovery under Help to finally progress to recovery.
- Windows 8
- Turn off the laptop.
- Turn it on and press the F11 key repeatedly until the Choose your keyboard layout window is displayed when the laptop restarts.
- In the new windows, click Troubleshoot.

- Click Recovery manager on the troubleshooting window.
- Select Windows 8 to open the all-important recovery manager.
- Now, click System recovery for the laptop to be reset to its original factory setup.
- Another option would be to click the minimized image recovery in order to restore only your windows 8 operating system, and drivers, and select Software.
Use the HP Recovery disc to run the recovery
- Turn on the laptop and then insert your first HP recovery CD/DVD into the drive.
- Turn off the computer.
- Now turn it on.
- Press the escape key continuously until a window’s startup menu or the select boot device window opens.
- If you get the select boot device menu, click the correct CD/DVD drive then press enter.
- Else press F9 to access the boot menu/ device option then choose the right CD/DVD drive and press enter.
- If the window requesting you to run recovery from the hard disk appears, choose the Run program from disc option and click next.
- Select Recovery discs created from your computer/ Recovery discs received from HP support option appropriately.
- Select Factory reset/ Reset the computer by erasing the entire drive and restoring to the factory setup depending on what’s shown on the screen.
- Select a suitable backup option or otherwise.
- Click OK to hide the warning that appears.
- Follow the steps and insert the next recovery disc when prompted.
- Click Finish/Next as prompted when the recovery ends.
- The laptop may turn off or restart automatically. If it is turned off, wait about 5 seconds before turning it back on.
Boot from a USB recovery drive
- Turn on the laptop and insert the recovery USB flash disk into the USB port.
- Now turn off the laptop and turn it back on.
- Press the ESC key continuously until a window’s startup menu or the select boot device window opens.
- The selections you need to make vary slightly depending on the type of menu that displays on your screen:
- For select boot device menu, select the correct USB storage drive then press Enter.
- For the startup menu, press F9 to access the boot menu/ device option. Again select the right USB storage drive and press enter.
- The rest of the steps are as I explained above for CD/DVD.
- Remember to remove the USB drive before restarting the laptop.
6. Perform Startup Repair with a Windows installation disc
- Restart the computer and press F9 (repeatedly) until you see the message Press any key to boot from CD or DVD on the screen.
- Select your preferred language, time plus currency, and a favored keyboard/input method, and then click next.
- Choose Repair your computer.
- In the next system recovery options window, choose the drive where your Windows installation is and click next.
- Click Startup repair in the next dialog.
- Select System restore and follow the steps until the computer is repaired.
We already showed you how to fix Windows error recovery without CD. However, all methods may fail if there is a critical error with your Windows installation.
In such an instance, you need to repair the original Windows installation using the disk. Finally, should everything else fail, you may need to reinstall a fresh copy of Windows.
Madalina Dinita
Networking & Security Specialist
Madalina has been a Windows fan ever since she got her hands on her first Windows XP computer.
She is interested in all things technology, especially emerging technologies — AI and DNA computing in particular.
Prior to joining the WindowsReport team, she worked in the corporate world for a number of years.
Error Recovery is a common Windows error that occurs when booting Windows 7 through Windows 11. The user is dealt an error message about Windows failing to boot, with several standard recovery options to choose from to fix and start their computer.

Let’s explore the Windows Recovery feature, the main causes of the error, and how you can fix it with Windows repair tools.
What is Windows Recovery?
Windows recovery is an in-built operating system feature to help you troubleshoot and repair issues that may prevent Windows from starting or functioning properly.
There are different ways to access Windows recovery, depending on your version of Windows. You may be forced to choose an option during Windows Error Recovery.

On Windows 10, the option to help you repair corrupt Windows system files was introduced. It will look to access an installation disk or drive for fresh versions of these files. Other options to repair Windows without boot media include:
- System Restore – Revert to a previous stable version of your system.
- System Image Recovery – Use a saved system image to go back to a previous state.
- Command Prompt – Use the command prompt to apply fixes.
- Uninstall Updates – Remove corrupt Windows updates that may cause Error Recovery.
You can also:
- Start Windows as Normal
- Boot in Safe Mode
If the underlying problem isn’t fixed and you attempt to boot as normal, your system can get stuck in a recovery loop.
In Safe Mode, third-party tools like Fortect can also diagnose and repair damaged Windows files in order to solve Windows Error Recovery without making significant changes to your system or losing data.
6 Causes of Windows Error Recovery
There are many reasons why Windows Error Recovery can occur, but they mostly fall under:
- Missing or damaged Windows system files
- Hardware issues
- Software issues
- Corrupt Windows Registry
- Corrupt Boot Configuration Data (BCD)
- Viruses and Malware
Depending on the cause, you may need to replace or remove hardware, reinstall or remove software, or repair the Windows system. Let’s take a closer look at the causes and why they disrupt Windows’ ability to boot properly.
1. Hardware issues
Most computer hardware needs to function correctly for Windows to boot. The most common hardware issues are old failing hardware that needs to be replaced or new hardware that is incompatible or installed incorrectly.
2. Software issues
It is rarer for software to cause Windows Error Recovery, but it’s not unheard of. It can happen if the software was interrupted and failed to install properly, was poorly programmed, or contains malware.
3. Missing or damaged Windows system files
One of the most common causes is within the operating system itself. When Windows starts up, it loads a number of system files and drivers that are necessary for the computer to function properly.
If any of these files are missing or corrupted, Windows may fail to start or exhibit other unexpected behavior.
4. Corrupt Windows Registry
When a computer starts up, the Windows boot loader reads configuration information from the registry to determine which drivers and services to load, as well as how to configure hardware devices and system settings.
If the registry is corrupt or damaged, the boot loader may not be able to read the necessary information, causing the boot process to fail.
5. Corrupt Boot Configuration Data (BCD)
Similarly, BCD contains boot-related configuration settings and options that are also vital to starting Windows. If BCD is missing or corrupt, Windows can fail to boot completely because the boot loader will not be able to read the necessary configuration information.
6. Viruses and malware
If your PC is infected with viruses or malware, this can damage all areas of the Windows system and cause Windows Error Recovery. Sometimes, even if you manage to remove the threat, the damage is already done, and Windows must be repaired.
How do I get out of the recovery loop?
Windows provides several options to get out of a recovery loop itself. The options available to you will depend on your version of Windows and whether you have recovery media, such as a bootable copy of Windows on a disc or removable drive.
1. Startup Repair
Startup Repair works by scanning the system for common startup problems and attempting to repair them automatically. It can fix issues related to the Boot Configuration Data and other Windows system files.
To access Startup Repair, you must boot your computer from a Windows installation media or recovery drive. Then, you can choose the option to repair your computer and select Startup Repair. The tool will then scan the system for problems and attempt to repair them automatically.
2. Remove or replace malfunctioning hardware
If Windows Error Recovery is happening because of hardware, consider whether you have recently installed a new component, or an aging component might be failing. Removing or replacing these can fix the problem instantly.
Remember, not all hardware is compatible with your version of Windows or other components.
3. System Restore
The System Restore option allows you to revert your computer to a previous state when it was working properly and could boot. This fixes issues related to software, drivers, system files, and the registry that can cause boot problems.
For this to work, you will need to have previously configured System Restore and have a restore point to revert back to.
To create a restore point, click the start menu, search Restore, and click Create a restore point.
During a Windows Error Recovery loop, select the System Restore option and choose a restore point before the problem occurred.
4. System Image Recovery
A system image is a like-for-like copy of your PC, including the operating system, applications, settings, and all your files from when the image was generated.
Unlike system restore, you do not keep your files or any other current aspect when reverting to an image. However, you are more likely to fix the boot error. This is also a good way to move your Windows system over to a new hard drive.
Like System Restore, making a system image is a precautionary measure and not something you can create once the system is damaged.
Click the Start menu, search Backup, and select Backup settings. You can then select your desired drive to backup and the external drive to send it to.
During Windows Error Recovery, make sure this drive is connected and choose it during the System Image Recovery option.
5. Uninstall updates
Uninstalling Windows updates could fix a Windows recovery loop if the updates caused the problem in the first place.
While they are designed to improve the functionality, performance, and security of the operating system, installation can fail and cause problems.
Furthermore, an update may not be compatible with the hardware or software on your computer, leading to boot problems.
You will find the Uninstall Updates option under Advanced Options during recovery. Here you can choose between the latest Quality update or the latest Feature update.
Quality updates are more regular and less likely to trigger problems, while a Feature update provides significant changes to the operating system. If these go wrong, it’s more likely to stop your PC from starting.
6. Use Command Prompt
The Command Prompt applet gives you access to vital repair tools when your system won’t boot, and other options aren’t working. Clicking this option will open a window to enter direct commands. For Windows Error recovery loops, the following can help:
Run System File Checker (SFC) scan: The SFC scan can check for and repair corrupted system files that may be causing the boot problem. To run an SFC scan from the Command Prompt, type sfc /scannow and press Enter.
Run Check Disk (CHKDSK) scan: The CHKDSK scan can check for and repair file system errors on the hard drive, which can also cause boot problems. To run a CHKDSK scan from the Command Prompt, type chkdsk C: /f /r and press Enter. This will start the scan and repair process on the C drive.
Rebuild BCD: If the BCD is damaged or missing, it can cause boot problems. To rebuild the BCD from the Command Prompt, type bootrec /rebuildbcd and press Enter. This will scan for Windows installations and rebuild the BCD.
7. Boot in Safe Mode
Booting in Safe Mode may be able to give you access to Windows with only vital drivers and services running. This lets you fix some errors manually before trying to boot as normal.
You might choose to remove recent software installations or driver updates, scan for malware, or fix disk errors. With networking enabled, you can also access the internet to find fixes.
Safe Mode will also let you safely access the device manager to check for obvious hardware problems.
Using Fortect to get out of a recovery loop
Fortect is an excellent tool for fixing Windows without losing data or making big changes to your system. During Windows Error Recovery, simply boot in Safe Mode and then launch Fortect when Windows loads.
- Download and install Fortect then follow these steps:
Firstly, perform a system scan, which will analyze your PC and find all the issues wrong with Windows. This includes malware, broken registry entries, missing DLLs and other Windows system files, and even malfunctioning software.
Many of these issues can cause the operating system to stop booting as normal, so going through the repair process can quickly fix things.
Fortect will replace and repair corrupt system files from its vast database without needing bootable recovery media. So, if you’ve lost your Windows disc or drive, Fortect is a viable solution.
Windows Error Recovery is the operating system’s way of resolving issues that prevent your computer from starting up correctly. However, if the issue persists after attempting the available recovery options, using software like Fortect can be more effective.
/Knowledgebase /Windows Error Recovery. Windows failed to start: Fix for Windows Vista, 7, 8, 8.1
Get the fix to “Error: Windows failed to start” boot error for Windows Vista, Windows 7, Windows 8 and Windows 8.1 operating systems.
About the “Windows failed to start” error
The following information on this error has been compiled by NeoSmart Technologies, based on the information gathered and reported by our global network of engineers, developers, and technicians or partner organizations.
Description and Symptoms
The error messages, alerts, warnings, and symptoms below are tied to this error.
Symptom 1: Error: Windows failed to start error screen on startup
The “Windows failed to start” screen appears on Windows 8 and Windows 8.1 systems only and it’s identified by a specific error code.
These errors can also happen on Windows Vista and Windows 7 systems as well.
Causes of this Error
The most common causes of this error are:
Cause 1: BCD is missing or corrupt
One of the most common causes of this error is the BCD that became missing or corrupt. That could happen because of disk write errors, power outages, boot sector viruses, or errors made while configuring the BCD manually.
Cause 2: File system integrity compromised
For the same reasons, the file system itself may become corrupt or damaged. That happens even more often if one turns off a PC while it is in the middle of writing crucial data to the boot sector.
Cause 3: System files are damaged
The system files may also become corrupt or damaged for the same reasons.
Fixing “Windows failed to start” on Windows
Windows Setup CD/DVD Required!
Some of the solutions below require the use of the Microsoft Windows setup CD or DVD. If your PC did not come with a Windows installation disc or if you no longer have your Windows setup media, you can use Easy Recovery Essentials for Windows instead. EasyRE will automatically find and fix many problems, and can also be used to solve this problem with the directions below.
Fix #1: Use Easy Recovery Essentials
Easy Recovery Essentials is guaranteed to fix the “Windows Error Recovery. Windows failed to start” error automatically using its built-in Automated Repair option. EasyRE is currently available for Windows XP, Vista, 7, 8, Windows 10, and Windows 11 and can be downloaded and created on any PC.
- Download Easy Recovery Essentials. Make sure to note your Windows version (XP, Vista, 7, 8, 10, or Windows 11) before you download EasyRE. This guide can help you identify what version of Windows you have installed.
- Burn the image. Follow these instructions on how to burn the bootable ISO image very carefully, as making a bootable CD can be tricky! Alternatively, these instructions explain how to create a bootable EasyRE recovery USB stick/drive.
- Boot up your PC from the Easy Recovery Essentials CD or USB you created.
- Once EasyRE is running, choose the “Automated Repair” option and click Continue.

Choose “Automated Repair” in Easy Recovery Essentials
- After EasyRE scans your computer’s drives, identify and select the drive letter for your Windows installation from the list, and then click on the Automated Repair button to begin.
Choose the drive associated with the Windows installation you’re trying to repair.
- Easy Recovery Essentials will start analyzing the selected drive for problems. EasyRE will test for and attempt to automatically correct errors with the disk, partition, bootsector, filesystem, bootloader, and registry. No intervention is required, as EasyRE’s repair is fully automated:
Easy Recovery Essentials searches for errors and makes corrections to the selected Windows installation.
- Once the process is complete, EasyRE will report its findings. Click on the Restart button to reboot your PC and test the changes.
- The “Windows Error Recovery. Windows failed to start” error should now be fixed as your PC begins to load:


You can download Easy Recovery Essentials from here.
Fix #2: Boot into Last Known Good Configuration
Here are the steps to boot into the Last Known Good Configuration option:
- Restart your computer
- Press F8 repeatedly until you see the list of boot options
- Choose Last Known Good Configuration (Advanced)
- Press Enter and wait to boot

Last known good configuration screen
Fix #3: Run System Restore from Windows installation disc
This method will only work if you have the installation disc and System Restore enabled on your Windows copy. Here are the steps to access System Restore:
- Insert the Windows install disc
- Press a key when “Press any key to boot from CD or DVD” message appears on your screen
- Click on Repair your computer after selecting a language, time and keyboard method
- Select the drive where you installed Windows (usually
C:\) and click Next - Select System Restore from the System Recovery Options window
- Follow the System Restore wizard instructions to select a restore point
- Restore your PC by clicking Finish
Fix #4: Run chkdsk
Alternatively, you can run the chkdsk process. Here are the steps:
- Insert your CD; restart your computer
- Boot into the CD by pressing any key when the “Press any key to boot from CD” message appears on your computer
- Press R to open the Recovery Console at the Options menu
- Type in your Administrator password
- Hit Enter
- In Command Prompt, type the following command:
chkdsk C: /f /x /r
Press Enter
- After
chkdskprocess is completed, restart your computer

chkdsk utility results screen
Fix #5: Rebuild the master boot sector
Using Bootrec.exe you can rebuild the master boot sector (BCD). This is a tool built in the Windows Recovery Environment (Windows RE) that can repair boot configuration data.
BCD stands for Boot Configuration Data, contains boot configurations options and controls how your Windows is started.
- Insert your Windows install disc
- Press any key at the “Press any key to boot from CD or DVD” message
- Choose Repair your computer after you select the language, time and keyboard method
- Select your Windows installation drive (usually
C:\) and click Next - Select Command Prompt at System Recovery Options
- Write the following command and press Enter afterwards:
bootrec /FixMbr
bootrec /FixBoot
bootrec /ScanOs
bootrec /rebuildBcd

bootrec utility results screen
More Information
Linked Entries
- chkdsk
- bootrec
- Fix MBR
- Advanced Options menu in Windows
Support Links
- Easy Recovery Essentials for Windows – our repair and recovery disk.
It’s an easy-to-use and automated diagnostics disk. It’s available for Windows 8, Windows 7 and Windows Vista. It’s also available for Windows XP and Windows Server.
Read more at Windows Recovery Disks.
- The NeoSmart Support Forums, member-to-member technical support and troubleshooting.
- Get a discounted price on replacement setup and installation discs: Windows Vista, Windows 7, Windows 8.
Applicable Systems
This Windows-related knowledgebase article applies to the following operating systems:
- Windows Vista (all editions)
- Windows 7 (all editions)
- Windows 8 (all editions)
- Windows 8.1 (all editions)
Propose an edit
Related Articles
-
Fatal: INT18: Boot failure fix
-
BootGuard 2TB Data Protection
-
Setup was unable to create a new system partition: Fix for Windows
-
IRQL NOT LESS OR EQUAL – Fix for Windows 10, 11, XP, Vista, 7, 8
-
KERNEL SECURITY CHECK ERROR – Fix for Windows XP, Vista, 7, 8, 8.1, 10
-
0x00000109 – Fix for Windows Vista, 7, 8, 10