
Одна из распространённых ошибок в Windows 11/10 и предыдущих версиях системы — синий экран с кодом 0x00000116, соответствующим VIDEO_TDR_FAILURE, часто с указанием на такие файлы как atikmpag.sys, nvlddmkm.sys или igdkmd64.sys.
В этой инструкции подробно о том, чем вызвана указанная ошибка и как её можно исправить.
Причины ошибки и основные способы исправления
Ошибки с кодом 0x00000116 имеют отношение к сбоям типа VIDEO_TDR_FAILURE драйверов видеокарты, в случае atikmpag.sys речь идёт о видеокартах AMD Radeon, nvlddmkm.sys — NVIDIA GeForce, igdkmd64.sys — графика Intel.
Синий экран (и, в некоторых случаях — перезагрузка компьютера) появляется после сбоя драйвера видеокарты и безуспешной попытки восстановить его работу за установленный промежуток времени TDR (Timeout Detection and Recovery).
Базовые способы решить проблему, если вы с ней столкнулись:
- Вручную скачать с соответствующих официальных сайтов и переустановить драйверы видеокарты, при наличии дискретного и интегрированного видео — для обеих видеокарт. Учитывайте, что нажатие «Обновить драйвер» в диспетчере устройств здесь бесполезно, как и информация о том, что «Наиболее подходящие драйверы уже установлены» там же.
- Если ошибка появилась как раз после недавнего обновления драйверов видеокарты, откатить их: используя опцию отката в диспетчере устройств при её наличии (правый клик по кнопке «Пуск» — «Диспетчер устройств» — открыть свойства видеокарты, вкладка «Драйвер»), либо вручную удалив текущую версию (в диспетчере устройств путем удаления устройства и установки соответствующей отметки, либо в DDU) и установив предыдущую.

- Если проблема появилась недавно, при этом какие-либо обновления ОС или драйверов не выполнялись, может помочь использование точек восстановления системы.
- Отключить любой разгон видеокарты, если вы ранее его включали.
- Скачать и установить драйверы чипсета (и остальные драйверы из раздела «чипсет») с сайта производителя материнской платы или ноутбука, при наличии — выполнить обновление БИОС. Windows 11 и 10 обычно сама устанавливает указанные драйверы, но в некоторых случаях драйверы от производителя могут работать стабильнее, а от указанных драйверов зависит работа и остальных устройств.

Учитывайте, если ошибка возникает при использовании только одной конкретной программы или игры, причины следует искать в них: возможно, следует поэкспериментировать с настройками графики, возможно (в случае не вполне лицензионного софта), поискать другой источник той же игры или программы.
Дополнительные способы
Если приведённые выше методы не привели к желаемому результату, можно попробовать изменить время TDR в реестре, иногда это может сработать (рекомендую создать точку восстановления системы перед выполнением изменений):
- Нажмите правой кнопкой мыши по кнопке «Пуск», выберите пункт «Выполнить» (или просто нажмите клавиши Win+R на клавиатуре), введите regedit и нажмите Enter.
- Перейдите к разделу реестра
HKEY_LOCAL_MACHINE\SYSTEM\CurrentControlSet\Control\GraphicsDrivers
- Дважды нажмите по параметру TdrDelay (если он отсутствует, создайте новый параметр DWORD с этим именем) и установите значение 8 для него (значение представляет собой время ожидания в секундах до восстановления работы видеодрайвера, по умолчанию — 2, для попытки исправления ошибки обычно рекомендуют 8, но можно использовать и иные значения). Тем же способом увеличьте значение TdrDdiDelay до 8 (по умолчанию — 5).

- Закройте редактор реестра и перезагрузите ваш ПК или ноутбук.

После этого понаблюдайте, появляется ли ошибка VIDEO_TDR_FAILURE снова.
В случае, если указанные изменения также не сработали, можно попробовать:
- Для видеокарт NVIDIA — зайти в «Панель управления NVIDIA», перейти в «Параметры 3D» — «Управление параметрами 3D» и выставить режим максимальной производительности в параметрах электропитания.

- Если на ноутбуке или ПК используются профили электропитания с пониженным электропотреблением, проверить работы со схемами «Максимальная производительность» и «Сбалансированная».
- В некоторых случаях причиной сбоя могут оказаться изношенный блок питания ПК или зарядное устройство ноутбука. В последнем случае причиной также может оказаться дешевое неоригинальное зарядное устройство.
- Проверьте температуры видеокарты, например, в AIDA64 — постоянный перегрев также может приводить к указанному сбою. Если причина в этом, займитесь обслуживанием системы охлаждения видеокарты.
- Наличие вредоносного ПО, активно использующего ресурсы видеокарты (например, майнеров), также может привести к рассматриваемой ошибке. Здесь может помочь MinerSearch.
- При появлении ошибки только в браузере, может помочь отключение аппаратного ускорения графики в нём.
- В случае, если ошибка постоянно появляется после завершения работы, гибернации или спящего режима, но исчезает после перезагрузки компьютера, попробуйте отключить быстрый запуск Windows.

И ещё один возможный и нежелательный вариант причины — аппаратные проблемы видеокарты, а в случае интегрированного видео — ошибки оперативной памяти. Эти факторы также могут привести к регулярным сбоям VIDEO_TDR_FAILURE (0x00000116).
Дополнительные материалы на тему ошибки:
- Видеодрайвер перестал отвечать и был восстановлен — как исправить?
- Обнаружено превышение времени ожидания ответа драйвера AMD
- Информация по ошибке на сайте Майкрософт , включая параметры для анализа в WinDbg.
- Как установить драйверы NVIDIA в Windows 10 (подойдет и для Windows 11)
There’s nothing worse than getting ready to play a video game with your friends only to get interrupted by a Blue Screen of Death (BSOD) message that takes over your computer, shuts down everything, and prevents you from doing anything except restart.
BSOD errors vary and they indicate the exact issue that’s causing your computer to shut itself off and prevent hardware corruption and major data loss. The problem is that error codes can be difficult to decipher without technical knowledge.
For example, VIDEO TDR FAILURE is a BSOD stop code that can occur on computers with NVIDIA graphics cards. Your entire screen turns blue, shows the Your PC ran into a problem and needs to restart message, and indicates nvlddmkm.sys as the problematic file. nvlddmkm.sys is a driver, and its full name is NVIDIA Windows Kernel Mode Driver.
Before finding a workaround for the VIDEO TDR FAILURE error, it’s a good idea to create a system restore point. If anything happens and you need to undo all changes, you can easily roll back Windows 10 to a checkpoint and start troubleshooting from ground up.
1. nvlddmkm.sys failed? Start Windows 10 in Safe Mode
If you’re having a hard time using your computer because the system immediately crashes, shows the blue screen and enters a reboot loop, you can start Windows 10 in Safe Mode:
- Turn your PC on and off three times to trigger the Windows 10 troubleshooting mode
- Go to Troubleshoot > Advanced options > Startup Settings
- Click Restart and wait a bit
- Press F5 to enable Safe Mode with Networking
- After Windows boots, check if you still get the nvlddmkm error. If you still do, follow the steps above to reach the Safe Mode options and opt for F4 to enable Safe Mode without networking features
2. Run a clean boot
If Safe Mode turned out to be the key in stabilizing your operating system and preventing it from showing BSOD errors, you can clean-boot Windows 10 to disable the startup and services which may be malfunctioning and causing the VIDEO TDR FAILURE error.
- Follow the steps in Solution 1 to start Windows 10 in Safe Mode
- Click the Start button, search for System Configuration, and launch this app
- In the General tab, choose the Selective startup option
- Disable Load system services and Load startup items
- Click Apply and go to the Startup section
- Click Open Task Manager
- Choose an application with the Enabled status and click Disable. Make this happen for all apps with the Enabled status
- Reboot your PC and inspect results
3. Check for system updates
If you haven’t used Windows Update for a long time, you might have missed on critical updates designed to fix system errors. Since it’s such an important OS component, Windows Update should run in the background and prompt you whenever there’s a pending update. But, if automatic system updates were disabled on your device, they should be manually launched.
- Press the Win key, type Check for updates, and hit Enter
- Click Check for updates and wait
- If Windows finds anything, click Download
- Patiently wait until the new system updates are downloaded and installed
- Restart your computer
4. Disable overclocking software
People use memory overclocking tools to improve their gaming experience. However, if the computer is not accompanied with a cooler that’s powerful enough to sustain the extra heat, Windows will eventually shut itself off and show a blue screen message like VIDEO TDR FAILURE to prevent HDD corruption and data loss.
Unless you know exactly what you’re doing, you should disable any overclocking software tools, such as MSI Afterburner, CPU-Z or GPU-Z, and reset the computer’s clock settings to default. If you configured overclocking in BIOS, check out the next solution on this list.
5. Reset BIOS to default
The computer’s BIOS contains a wide range of customization settings designed to improve your system performance. Unfortunately, this plan could easily backfire if you or someone else with access to your computer has aimlessly changed BIOS settings, such as overclocking and caching.
It could even lead to blue screen errors like nvlddmkm.sys. The easiest way to solve this problem is by resetting BIOS to default.
- Turn on your PC
- Before Windows boot, quickly press the key shown on the screen to access BIOS setup
- Access the advanced BIOS section
- Find and enable the option that resets BIOS configuration data to default
- Save the current settings and exit
6. Update BIOS
If you haven’t updated BIOS for a long time or have never done this, you should get on it right away. You just need a USB flash drive and an Internet connection.
- Connect a USB flash drive to your PC
- Boot your system and press the key shown on the screen to enter BIOS setup
- In the main BIOS section, you can find out the BIOS manufacturer, version, and date of installation
- Using this information, start Windows on the malfunctioning PC or use another computer with Internet access, open a web browser, and visit the BIOS manufacturer’s website
- Locate and download the latest BIOS version that’s compatible with your operating system
- Unzip the downloaded file to the USB flash drive
- Return to the BIOS menu, create a backup of the current BIOS version for safekeeping, and save the backup to the USB flash drive
- Run the system firmware update and make sure to not shut down or restart the PC during this time
7. Restore the nvlddmkm.sys file
NVIDIA has a backup of the nvlddmkm.sys file somewhere on your computer, so all you have to do is find it, copy it, and overwrite the corrupt nvlddmkm.sys file.
- Open Windows Explorer by pressing Win key + E
- In the address bar, type
%SystemRoot%\System32\Drivers - Locate the nvlddmkm.sys file and rename it to nvlddmkm.sys.old
- In the Windows Explorer navigation pane, click This PC
- Click inside the Search This PC field and search for nvlddmkm.sy_
- Copy the nvlddmkm.sy_ file
- Press Win key + R, type cmd, and press Enter to open Command Prompt
- Run
chdir desktop - Then, run
expand -r nvlddmkm.sy_ nvlddmkm.sys - Exit Command Prompt
- Go to your desktop and copy the nvlddmkm.sys file
- Return to
%SystemRoot%\System32\Driversand paste the file - Restart your computer and check for BSOD errors
8. Clear system cookies and temp files
Windows saves cookies and temporary files, which should get deleted regularly to clear the system cache and make room for new data. If it doesn’t happen, this could lead to system stability issues and Blue Screen of Death errors like VIDEO TDR FAILURE.
To fix this problem, you just have to clear the system cookies and temporary files using specialized tools like CCleaner. Or, if you don’t want to install any third-party applications, you can turn to the built-in Disk Cleanup utility.
How to use Disk Cleanup:
- Click the Start button, search for Disk Cleanup, and open this app
- Pick the drive where Windows is installed (usually C:) and click OK
- Select the following files to delete:
- Downloaded Program Files
- Temporary Internet files
- Temporary files
- Click OK and Delete Files to confirm
9. Reinstall the graphics adapter
Your graphics display might not have been properly installed on your computer. However, you can easily fix this from Device Manager.
- Right-click the Start button and select Device Manager
- Expand the Display adapters category
- Right-click your display adapter and select Uninstall device
- Restart your PC. Windows will automatically install the missing adapters
10. Update the GPU drivers
Outdated graphics drivers could cause video card issues, gaming problems, and even blue screen errors like nvlddmkm.sys. But you can update the obsolete GPU driver with minimum effort.
- Open Device Manager, right-click your display adapter, and select Update driver
- Click Search automatically for drivers
- If you get the The best drivers for your device are already installed message, click Search for updated drivers on Windows Update. However, if you have already checked your system for updates, there’s no need to do it again
- Restart your computer if the driver was successfully updated
Unfortunately, Windows often fails to find newer drivers in its database or by using the Windows Update component. In that case, you can double-click the GPU adapter in Device Manager, switch to the Driver tab, and find out the driver manufacturer, version, and date of installation. Using this information, visit the website’s manufacturer to download and install the latest driver.
However, if you find this process difficult or don’t want to risk downloading an unsupported driver, you can turn to a driver updater that automatically detects all obsolete drivers on your PC and offers to install the latest versions right away. And you won’t risk getting incompatible drivers either.
11. Roll back unsupported GPU drivers
Speaking of incompatible GPU drivers, many PC users download them from unknown sources without actually knowing whether or not they work on their computers.
If you’re one of these users, you should immediately roll back the unsupported display driver to restore the stability of your computer, eliminate recurring system crashes, and proceed with a correct driver update.
- Go to Device Manager and double-click the GPU adapter
- Switch to the Driver section
- Click Roll Back Driver and follow the on-screen instructions. If the button’s greyed out, it means that no previous driver version is saved on your PC, so you can skip this entire solution
12. Run the Hardware and Devices troubleshooter
Windows 10 has internal troubleshooters for fixing common problems happening to various PC components, including hardware and devices. Normally, you should be able to locate it in Troubleshoot settings. However, if the Hardware and Devices troubleshooter is missing from that section, here’s how you can run it right away:
- Press the Win key + R and run
msdt.exe -id DeviceDiagnostic - Click Next and wait until the troubleshooter scans your PC
- If it finds any workarounds, click Apply this fix
- Reboot your PC when it finishes and check for BSOD errors
13. Disable hardware acceleration
Numerous software applications use hardware acceleration to improve your experience, whether we’re talking about gaming, web browsing, streaming, or something else. If you noticed that your computer shows the BSOD error after launching a particular application, inspect the program’s settings and look for a hardware acceleration option to turn it off. Here are some suggestions.
How to disable hardware acceleration in Google Chrome:
- In Chrome, open the More menu and go to Settings
- Select Advanced > System (or go to
chrome://settings/system) - Disable Use hardware acceleration when available
- Restart Chrome
How to disable hardware acceleration in Mozilla Firefox:
- In Firefox, open the ≡ menu and go to Options (or visit
about:preferences) - In General, locate the Performance section
- Disable Use recommended performance settings
- Also disable Use hardware acceleration when available
- Restart Firefox
How to disable hardware acceleration in Microsoft Edge:
- In Edge, open the More menu and select Settings
- Go to System (or visit
edge://settings/system) - Disable Use hardware acceleration when available
- Restart Edge
14. Analyze the crash dumps
If you’re the type of user who doesn’t shy away from the computer’s technical aspects, you can analyze the crash dumps left behind by the VIDEO TDR FAILURE error, in order to find out the exact driver that’s giving you trouble. Event Viewer is a great assistant for this role.
How to use Event Viewer:
- Restart your PC after a system crash
- Immediately press the Win key, search for Event Viewer, and open this app
- In the navigation pane on the left side, go to Windows Logs > System
- Select the first entry that says Error
- Inspect the information from the General and Details tab
You can use this data to perform a Google search or get in touch with the Microsoft support team. However, if you find Event Viewer to be intimidating, we suggest using BlueScreenView instead. It has the same role but it’s wrapped in a simpler interface and has more intuitive options for analyzing minidump files.
15. Use Display Driver Uninstaller
Display Driver Uninstaller (DDU) is an awesome application that can reset your GPU software and drivers. If display driver nvlddmkm stopped responding on your Windows 10 PC, you can use DDU to safely troubleshoot the BSOD error.
- Make sure to create a system restore point if you haven’t so far
- Download Display Driver Uninstaller from the official website
- Unzip the downloaded archive and open the DDU file
- Start Windows 10 in Safe Mode with Networking (see Solution 1 from this list)
- Open Display Driver Uninstaller.exe
- When prompted with the configuration window, leave everything as is and click OK to continue
- Select GPU and NVIDIA from the two menus on the right side
- Then, click Clean and restart
16. Remove and reseat the GPU card
It’s possible that your graphics card needs to be reattached to your computer unit. If it’s not properly connected, this could trigger Blue Screen of Death errors like the VIDEO TDR FAILURE stop code.
Shut down your desktop, unplug all cables, remove the computer chassis, and carefully detach the GPU card. Then, put it back in the same slot firmly but without using force. Turn on your computer and see if anything changed.
17. Try the GPU card on another computer
If your graphics card is malfunctioning and needs to be replaced, then all your efforts at attempting to resolve the blue screen problem at the software level will have been in vain.
A simple way to test this is by removing the GPU card from your computer and inserting it into another PC, preferably with a clean Windows installation. If the system starts glitching, it should be pretty clear that you need to replace your hardware. Check out the best GPU cards for gaming.
18. Check system memory
System memory issues can affect the entire computer, leading to blue screen errors like nvlddmkm.sys. You can easily run a check-up by turning to Windows Memory Diagnostic, a tool that comes bundled with Windows 10.
How to use Windows Memory Diagnostic:
- Save your current work and close all programs
- Press Win key + R, type
mdsched.exe, and hit the Enter key - Click Restart now and check for problems
Your operating system will reboot and start running memory tests. It runs a standard test by default. However, if you have a bit of time on your hands, we suggest switching to the Extended test in order to obtain more accurate information about any potential RAM issues.
Press F1 to open the options section, select Extended, and press F10 to apply this setting. The entire memory test can take a long time, so you can leave your PC unattended since your intervention will not be required. Once the test is complete, Windows 10 boots as usual and shows the test results in the notifications center.
19. Use Startup Repair
If Windows 10 is experiencing boot problems, this can lead to all sorts of computer issues, including BSOD errors with the VIDEO TDR FAILURE stop code. But you can fix startup issues by running the Startup Repair tool from the Advanced Startup menu. Before doing so, you need an empty USB flash drive and Internet access to set up a system installation disk.
How to create a Windows 10 installation media disk:
- Plug a USB flash drive into the PC and make sure to save any important files saved there since the drive will be formatted
- Download Media Creation Tool from the official website
- Open Media Creation Tool and follow the steps to create a Windows 10 installation media disk on the USB flash drive
How to run Startup Repair:
- Make sure the USB flash drive with the Windows 10 installation media is plugged into the PC
- Click the Start button and open the menu with the power options
- While holding down the Shift key, click Restart to boot Windows 10 to the troubleshoot menu
- Go to Troubleshoot > Advanced options > Startup Repair
- Select your administrator account and enter your password to continue
- Follow the given instructions to complete the startup repair sequence
20. Fix HDD issues
Your hard drive may have corrupt files or bad sectors which prevent Windows from operating normally, But you can fix HDD issues without having to use a third-party software application, thanks to CHKDSK (Check Disk).
- Press Win key + R, type CMD, and press Ctrl + Shift + Enter to open Command Prompt with administrator rights
- If your OS is installed on the C: drive, run
chkdsk c: /f /r. Else, replacec:with the correct partition letter- If you don’t know Windows’ whereabouts, choose a drive letter when entering the run command (e.g.
run d:) and view its containing folders (run dir). Keep listing folders for multiple drive letters until you see the Windows directory
- If you don’t know Windows’ whereabouts, choose a drive letter when entering the run command (e.g.
- When asked to confirm scheduling CHKDSK during the next system reboot, type y and press Enter
- Restart your computer and wait for CHKDSK to do its job
21. Repair corrupt system files
Not only hard disk problems but also damaged, modified, or missing OS files can cause blue screen errors on your computer. To restore system files on Windows 10, you can run DISM (Deployment Image Servicing and Management) and SFC (System File Checker).
- Start Windows 10 in Safe Mode with Networking (see Solution 1)
- Click the Start button, type cmd, and open Command Prompt
- Run
DISM.exe /Online /Cleanup-image /RestoreHealth. However, if the Windows Update component is broken, this command won’t work. Instead, you can create a Windows 10 installation media disk (see Solution 19) and set it as the repair source:DISM.exe /Online /Cleanup-Image /RestoreHealth /Source:C:\RepairSource\Windows(replaceC:\RepairSource\Windowswith the full path to your Windows 10 installation media disk) - After DISM does its job, run SFC (
sfc /scannow). If SFC is successful, it shows the Windows Resource Protection did not find any integrity violations message
22. Disable Fast Startup
Fast Startup is a Windows component that boots your operating system faster by pre-loading drivers. Unfortunately, it’s known to cause serious PC problems. If drivers are not properly shut down and restarted, it could trigger blue screen errors like nvlddmkm.sys.
To solve this problem, you can disable Fast Startup:
- Press the Win key, search for Control Panel, and open this app
- Double-click Power Options
- Click Choose what the power buttons do
- Click Change settings that are currently unavailable (admin rights are required)
- Disable Turn on fast startup and click Save changes
- Restart your computer
23. Disable the PCI Express power option
Many users reported that turning off the PCI Express power option helped fix the VIDEO TDR FAILURE error on their computer. Here’s what you need to do:
- Click the Start button, type edit power plan, and press Enter
- Click Change advanced power settings
- Expand the PCI Express group
- Set Link State Power Management to Off
- Click Apply
- Restart your computer
24. Run a malware scan
Malware infections can be severe enough to corrupt critical system files and prevent you from running system tools like Task Manager or Command Prompt. If you suspect that your computer was recently infected with a virus, you should run a scan to eliminate any threats and regain the control of your PC.
How to run a malware scan with Windows Defender:
- Press the Windows key, type Windows Security, and launch this tool
- Select Virus & threat protection
- Click Scan options
- Choose Quick scan and press Scan now
- If the computer search reveals nothing, select Windows Defender Offline scan and click Scan now
- Allow Windows Defender to remove or quarantine any threats. If you think it has wrongfully detected safe files as malware, make sure to add them to the whitelist in order to exclude the items from future scans
25. Fix the system registry
Missing, modified, corrupt, or incorrect registry settings can be devastating for your operating system and can even trigger blue screen errors like nvlddmkm.sys. But you can restore the original registry configuration from Command Prompt before system boot.
- Click the Start button and open the power menu
- Hold down the Shift key and click Restart to reboot Windows in Advanced Startup mode
- Select Troubleshoot > Advanced options > Command Prompt
- Pick your admin account and enter your password
- Run these commands (press Enter after each line):
-
cd %SystemRoot%System32\config
-
ren %SystemRoot%System32\config\DEFAULT DEFAULT.old
-
ren %SystemRoot%System32\config\SAM SAM.old
-
ren %SystemRoot%System32\config\SECURITY SECURITY.old
-
ren %SystemRoot%System32\config\SOFTWARE SOFTWARE.old
-
ren %SystemRoot%System32\config\SYSTEM SYSTEM.old
-
copy %SystemRoot%System32\config\RegBack\DEFAULT %SystemRoot%System32\config\
-
copy %SystemRoot%System32\config\RegBack\DEFAULT %SystemRoot%System32\config\
-
copy %SystemRoot%System32\config\RegBack\SAM %SystemRoot%System32\config\
-
copy %SystemRoot%System32\config\RegBack\SECURITY %SystemRoot%System32\config\
-
copy %SystemRoot%System32\config\RegBack\SYSTEM %SystemRoot%System32\config\
-
copy %SystemRoot%System32\config\RegBack\SOFTWARE %SystemRoot%System32\config\
-
- Start Windows as usual
26. Unplug external devices
If you have recently attached new hardware components into your desktop or laptop, such as a webcam, a USB flash drive, a microphone, headphones, or a wireless network adapter, it’s possible that the device is experiencing compatibility issues with your Windows 10 PC, triggering the VIDEO TDR FAILURE stop code as a result.
You can easily test this by unplugging all external devices from your PC, except for your keyboard and mouse, in order to inspect results. If the keyboard and mouse are also brand new, try replacing them if you have others.
27. Use System Restore
System Restore allows you to revert Windows 10 to a checkpoint that was recorded before you started experiencing blue screen errors. However, it means that System Restore must be enabled on your computer and at least one restore point must have been created prior to the BSOD event.
Even if you didn’t manually set up a restore point, it’s possible that some of your applications did, such as driver updaters, so it doesn’t hurt to at least check.
How to use System Restore:
- Sign in to Windows 10 using an administrator account
- Press the Win key, type Control Panel, and launch this app
- Go to Recovery
- Click Open System Restore
- Select a restore point or click Show more restore points to evaluate more options. You can also click Scan for affected programs to find out which applications you will have to reinstall after restore
- Click Next and follow the instructions. Your PC will reboot
28. Reset Windows 10
If everything failed up until this point, you should prepare Windows 10 for factory reset in order to uninstall all programs and restore system settings to default. The good news is that your personal files will be left untouched.
But make sure to write down all applications you will have to install, save program preferences, and get hold of serial keys required for reactivation. Then, proceed to the following steps:
- Right-click the Start button and go to Settings
- Select Update & Security
- Choose Recovery and click Get started
- Click Keep my files and follow the remaining instructions
Stop code VIDEO TDR FAILURE (nvlddmkm.sys) can be fixed on Windows 10
To recap, VIDEO TDR FAILURE is a BSOD error that indicates a problem with your video settings. If it’s accompanied by the nvlddmkm.sys file, it means that you can troubleshoot the file errors to get rid of system crashes.
To fix this problem, you can start Windows 10 in Safe Mode, run a clean system boot, check for system updates, disable overclocking software, reset and update BIOS, restore the nvlddmkm.sys file, clear system cookies and temp files, reinstall the graphics adapter, as well as update or roll back GPU drivers.
It’s also a good idea to run the Hardware and Devices troubleshooter, disable hardware acceleration, analyze crash dumps, use Display Driver Uninstaller, remove and reseat the GPU card, try the GPU card on another computer, check system memory, use Startup Repair, or fix HDD issues and corrupt system files.
In addition, you can disable Fast Startup and the PCI Express power option, run a computer malware scan, fix the system registry, unplug external devices, and use System Restore to roll back Windows 10 to a previous checkpoint. If all these solutions fail, you can go to the last resort, which means resetting Windows 10 to factory settings.
How did you manage to fix the nvlddmkm.sys file and VIDEO TDR FAILURE stop code? Tell us all about it in the comments section below.

It’s extremely frustrating when you’re in the middle of a critical task and your computer greets you with the Blue Screen of Death (BSOD) in Windows 10. Windows technical forums are filled with stories of users who have reported facing the BSOD numerous times, even after installing the most recent Windows 10 update.
Though the BSOD can arise due to multiple reasons, what’s most concerning is that once your computer starts facing it, you can also see very peculiar errors arising in other programs. The Video TDR Failure error, for instance, is one of the several post-BSOD issues that users face. It occurs whenever one tries to play a video file, a game, or do anything else that involves video output on the computer.
If you’re facing the “Windows video TDR failure” error, though your system will restart frequently after timely halts, the problem won’t completely disappear without a fool-proof solution. And while there are several fixes available, depending on the brand of your graphic card, the solutions will vary.
First things first – What is the TDR error in Windows?
TDR is a Windows feature that refers to “Timeout, Detection, and Recovery.” It comes into action when a computer’s graphics card stops responding and all operations on the system come to a halt. When such an occurrence happens, the user usually sees a blue screen and the TDR functionality resets the system graphics card to return to a functional desktop. Sometimes, the blue screen remains persistent until the driver’s malfunction in the graphics card is completely fixed.
Why does video TDR failure error occur?
Irrespective of your graphics card (NVIDIA, Intel, or AMD), there is always a chance that one might encounter video TDR failure in Windows 10. This error can be caused by a variety of factors like:
- Problems with the graphics card or other computer components
- Outdated graphics card drivers
- Far too many applications active in the background
- Over-clocked computer components
- Issues with component compatibility
- Overheating of the system
Remember that these are just the most likely causes of the issue. Microsoft is yet to formally address TDR failure or give a permanent solution.
Now that we’ve seen the causes of Windows video TDR failure, let’s move on to discover its solutions.
Easy ways to fix video TDR failure on Windows 10
TDR failure can cause your computer to reboot indefinitely. This can prevent you from accessing your data, and troubleshooting can become tedious if your computer is stuck in the boot loop. Hence, you must start resolving the issue right away.
1. Update or reinstall graphics card drivers
The first thing to do is to address driver issues. Many users say that the error is resolved by upgrading or reinstalling their drivers, particularly the graphics driver. Please follow these steps on your Windows 10 computer:
- Launch the “Run” dialog by using the Windows + R key combination. You can also open it by typing ‘Run’ in the Search box near the Start menu. Once the Run dialog opens, type devmgmt.msc in the text box.
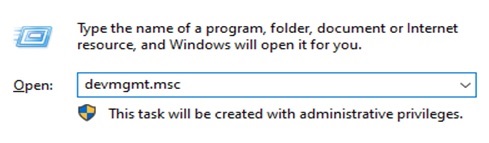
- The Device Manager will be launched as a result of this. Navigate to Display adaptors and expand it by clicking the arrow next to it.
- Update your graphics card driver by right-clicking on it and selecting Update driver.
After this restart the system and check if the problem still persists. If it does, the next step is to reinstall the driver from the official website of the graphics card.
2. Make adjustments to your power management settings
It’s likely that your power settings are hindering the way your PC or laptop handles graphics. Try disabling PCI Express to repair video TDR failure. Follow these steps:
- Open the Control Panel and view the contents of the page category-wise (Use the “View by” drop-down at the top-right corner for this).
- To access your computer’s power options, go to Hardware and Sound > Power Options.
- Next to the plan you’re using, click Change plan settings. Then click on the Advanced power settings link.
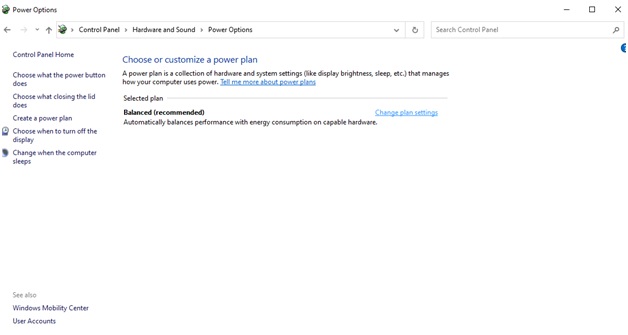
- Expand the PCI Express option to the Link State Power Management option and set it to Off.
- To save your changes, click Apply.
Restart your computer to see if the problem still persists.
3. Clean computer components
One of the possible causes of a video TDR failure is overheating of the computer. This is caused by dirt and debris accumulation on your computer’s components. You must pay close attention to all the components when physically cleaning your computer. Your cooling fans, RAM sticks, graphics card, and processor are the areas where you should give maximum attention.
Although after using these fixes, you shouldn’t face video TDR failure on windows 10 anymore, still, it the error persists, you should know that you’ll likely need to format your computer’s hard drive and install a fresh copy of Windows 10 to overcome the error. Before you format your hard drive, ensure taking a complete backup of all critical data.
Once you’ve completed the format, try playing the video you were originally trying to watch when you first faced the TDR failure error. Most likely, you won’t be able to play it because it would have become corrupted. To fix it, use reliable video repair solution, Stellar Repair for Video.
Sure-shot video TDR failure fix
Stellar Repair for Video is a specialized tool that will help you recover your computer’s lost and deleted video data. It’s a solution that can repair video data from any camera and formats, such as MP4, MOV, AVI, MKV, AVCHD, etc. It offers a comprehensive video file recovery solution for both Windows and Mac users. It can repair several videos simultaneously at the same time and save the corrected files to the appropriate location.
Here’s how you can use this software:
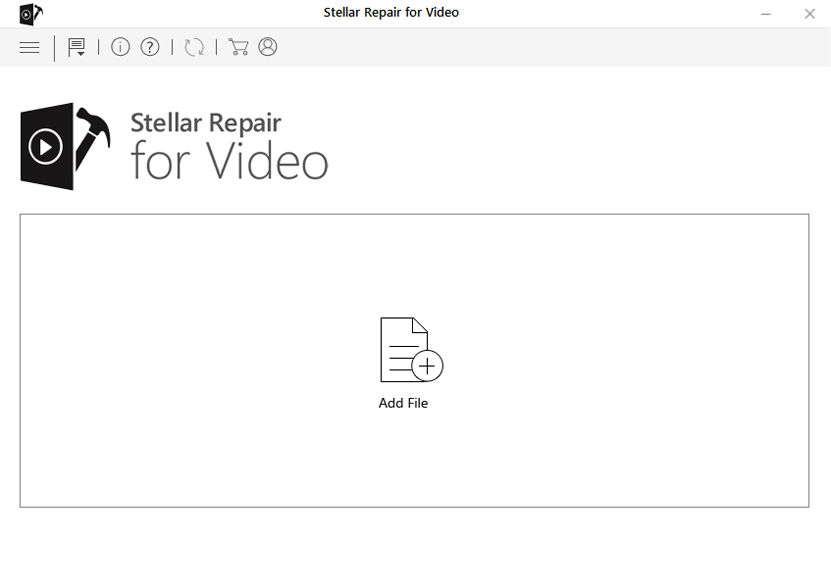
- Download and install Stellar Repair for Video. Launch the software after installation completes.
- From the home screen, click on Add File to add the video files to be repaired. Click on ‘Repair’ to kick-start the process.
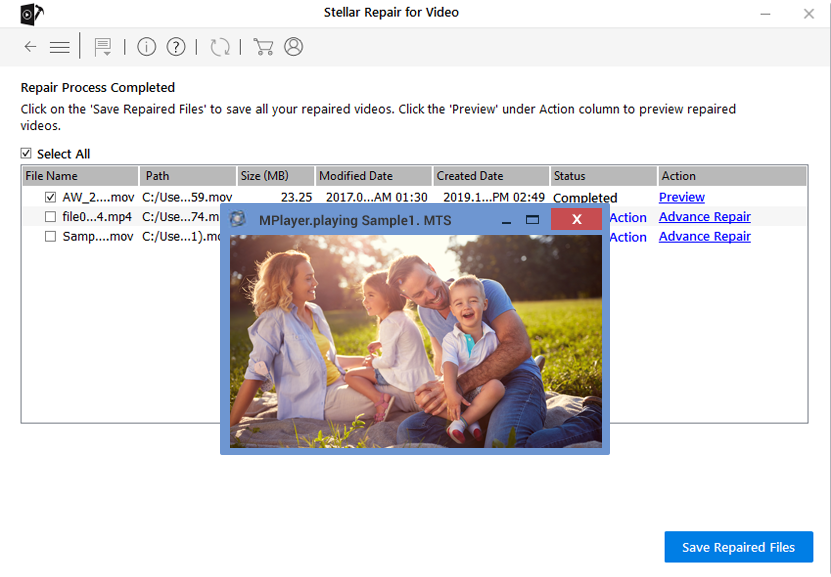
- A progress bar will help you track the progress of the repair process.
- Once the repair completes, you’ll be able to preview repaired files before saving them to your Windows 10 computer.
After repairing the videos in this way, we’re certain that you won’t face the video TDR failure error anymore.
Conclusion
Video TDR failure can arise due to outdated graphics card drivers, overheating of the computer, or incorrect power settings. Though manual fixes can help you resolve it, if nothing works, formatting your PC and reinstalling Windows 10 will definitely fix the error. If you’ve lost video data due to the error, you can use Stellar Repair for Video to restore the video to its original playing condition.
Was this article helpful?
YES0
NO
Сегодня многие из нас столкнулись с ошибкой ведущей к появлению синего экрана смерти на ОС Windows, с ошибкой VIDEO-TDR-FAILURE (nvlddmkm.sys). Большинство использует графические драйверы NVIDIA и столкнулись с этой проблемой после обновления ОС Windows.
от Anatoliy | Обновнено 07.06.2024 | от Anatoliy
В настоящее время многие из нас столкнулись с ошибкой ведущей к появлению синего экрана смерти на ОС Windows 10, с ошибкой VIDEO-TDR-FAILURE (nvlddmkm.sys), где TDR обозначает компоненты Timeout, Detection и Recovery в Windows. Эта ошибка VIDEO-TDR-FAILURE (nvlddmkm.sys) всегда связана с видеокартой NVIDIA. Она характерена для некоторых компьютеров, которые были обновлены до Windows 10 или установили новый драйвер. 2.Причинами могут быть конфликты драйверов, неправильные тайминги или напряжение памяти, перегрев, поврежденный установленный драйвер или неисправная видеокарта. Первое, что мы советуем сделать, — перезагрузить компьютер. Но если это не помогло, попробуйте следующие действия.
Решение первое: Обновить драйверы видеокарты
Как правило, мы не всегда знаем, является ли драйвер последним или с ним что-то не так. В этом случае для лучшего решения проблемы может понадобиться утилита. Например, Driver Booster — это лучший набор инструментов в управлении компьютерными драйверами с помощью простого процесса, он может легко определить и исправить драйвера более 6 500 000 устройств, таких как драйверы NVIDIA, драйверы Realtek, драйверы Intel для ПК и драйверы Microsoft Windows и т.д.
С Driver Booster все проблемы с драйверами, включая синий экран смерти, будут решены за несколько шагов.
1) Запустите Driver Booster, и программа автоматически начнет сканирование драйверов.

2) Проверьте устаревшие или повреждённые драйверы и восстановите их одним щелчком мыши. Если вы не хотите обновлять все драйверы, вы также можете вручную выбрать обновление по одному.

3) Помимо обновления драйверов, Driver Booster также может создавать резервные копии файлов драйверов, чтобы вы могли переустановить текущий драйвер, если вам не нравится новый.

Решение второе: Обновить ОС Windows до последней версии
Иногда старые версии Windows вызывают BSOD (синий экран смерти) nvlddmkm.sys. Поэтому лучше всего проверить, используете ли вы последнюю версию Windows 10.
1. Нажмите клавишу Windows или щелкните на значке Windows, чтобы вызвать меню «Пуск».
2. Нажмите на значок шестеренки слева, чтобы открыть настройки Windows.
3. Перейдите в пункт «Обновление и безопасность».
4. Слева выберите вкладку Обновление Windows и выберите Дополнительные параметры. Здесь вы можете настроить автоматическое обновление компьютера.
Решение 3: Полностью удалите и установите заново драйверы видеокарты NVIDIA
1. Загрузитесь в безопасный режим и перейдите в Диспетчер устройств (Win+R и введите «devmgmt.msc»).
Примечание: если вы хотите переустанавливать или удалять графические драйверы Nvidia с вашего компьютера, вот 5 альтернативных способов решения проблемы.
2. Найдите свой графический драйвер NVIDIA и удалите его с компьютера, затем перезагрузите ПК (пожалуйста, убедитесь, что вы отметили опцию «Удалить программное обеспечение драйвера для этого устройства«).
3. После удаления, вам необходимо скачать и установить драйверы видеокарты NVIDIA с официального сайта NVIDIA. Пожалуйста, обратите внимание на правильную версию и ее совместимость с вашим ПК.
4. Убедитесь, что вы успешно установили драйвер видеокарты, и перезагрузите компьютер, чтобы изменения вступили в силу. Все эти шаги выполнены, и ваш компьютер может быть восстановлен после синего экрана смерти. Но если это не так, пожалуйста, продолжите нижеприведенные шаги инструкции.
5. После перезагрузки компьютера откройте Локальный диск: (C), а затем найдите в System32Drivers файл с именем nvlddmkm.sys. Щелкните правой кнопкой мыши, чтобы переименовать его в nvlddmkm.sys.old.
6. Затем перейдите в каталог NVIDIA (обычно в C: Nvidia или C:drvvganVidia) и найдите файл nvlddmkm.sy_. (Просто введите имя файла в строку поиска). Скопируйте этот файл и вставьте его в на Рабочий стол.
7. Нажмите Win+X на клавиатуре, выберите опцию Command Prompt (Admin), затем введите expand.exe nvlddmkm.sy_ nvlddmkm.sys и нажмите Enter.
8. Снова перейдите на диск C: и скопируйте только что созданный файл nvlddmkm.sys.
9. Затем вставьте в папку C: WindowsSystem32Drivers и снова перезагрузите компьютер.
Теперь проблема синего экрана решена, осталось обратить внимание на правильную версию используемого драйвера и убедиться, что он обновлен, чтобы избежать проблем в будущем.
вам также может понравиться:Как исправить ошибку Kmode Exception Not Handled в Windows 10
-
Home
-
News
- How to Fix the VIDEO_TDR_FAILURE Error on Windows 10?
By Stella | Follow |
Last Updated
Windows Blue Screen of Death is a common error and the error messages are various. In this post, MiniTool Software will focus on the VIDEO_TDR_FAILURE Error on Windows 10 and show some effective solutions. If you are facing this problem, read it to solve it.
What Is VIDEO_TDR_FAILURE?
Oftentimes, some users reflect that after they upgrade to the latest Windows 10 version or update the graphics driver, the computer boots into the blue screen of death (BSOD). Usually, the blue screen comes with an error message as VIDEO_TDR_FAILURE.
The following is an example:
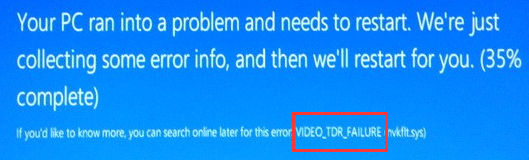
When you receive this VIDEO_TDR_FAILURE error message, it means that a dysfunctional graphics card or graphics card driver has faulty. It can be caused by atikmpag.sys, nvlddmkm.sys or igdkmd64.sys files. Usually, you can see the target fault driver in the brackets behind the error message of VIDEO_TDR_FAILURE, for example, VIDEO_TDR_FAILURE(atikmpag.sys).
On the other hand, this issue can also happen after the computer unexpected reboot.
The Reasons for VIDEO TDR FAILURE Windows 10
Many situations can cause this Windows 10 stop error VIDEO_TDR_FAILURE. We list some main reasons as follows:
The display driver is outdated.
Too many programs are running in the background.
Hardware issues like over-clocked components, incorrect component compatibility & settings, insufficient system cooling, insufficient system power, and defective parts can also cause this issue.
When you boot into VIDEO_TDR_FAILURE BSOD, you can just restart the computer to see whether the device can boot normally. If not, you can try the following solutions.
Reinstall or Update the Default Graphics Drivers
Since you can’t boot the computer successfully, you need to enter the safe mode to do this work.
After access safe mode, you can follow these steps to update the drivers:
1. Open Device Manager.
2. Unfold the Display adapter section.
3. Right-click the display device.
4. Choose Uninstall.
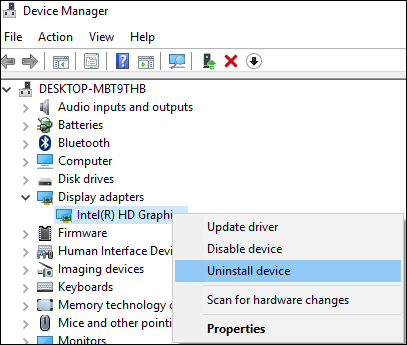
5. Check Delete the driver software for this device if you see the following window.
6. Press Uninstall.
At last, you can restart your computer to see whether it can boot normally. If the computer can boot successfully, you can go to the Device Manager and use the Scan for hardware changes option to update the driver to the newest version.
Besides this way, you can also go to the manufacturers’ official site to download and install the latest driver version manually.
Change the Graphics Settings for Intel HD Graphics
If you are using Intel Graphics, you can also change the graphics settings for Intel HD graphics to try fixing VIDEO TDR FAILURE on Windows 10.
First, you need to download and install the Intel Driver Update Utility from its official site. Then, you can launch it and use it to see whether there is any new available graphics driver to update. If there is, update it by following the guide.
Then, you can change the graphics settings for Intel HD graphics:
- Right-click the Windows desktop and select Graphics Properties.
- Select 3D from the control panel.
Now, you can do these things:
- Select Enable under the Application Optimal
- Select Use Application settings under Anti-Aliasing.
- Turn off Conservative Morphological Anti-Aliasing.
- Click on Balance mode in general settings.
After doing these things, you can return to the Graphics Control panel and then do these things:
- Select Video settings.
- Select the Application Settings under Standard Color Correction.
- Click the Application Settings under the Input range.
- Click Save profile and Apply.
We hope this method is helpful to fix VIDEO_TDR_FAILURE Error on Windows 10.
About The Author
Position: Columnist
Stella has been working in MiniTool Software as an English Editor for more than 8 years. Her articles mainly cover the fields of data recovery including storage media data recovery, phone data recovery, and photo recovery, videos download, partition management, and video & audio format conversions.