
Fortunately, all the right solutions to overcome this error are discussed here!
The Vcruntime140.dllerror usually occurs when you try to open any application on your system. But instead of opening, the app throws an error that reads – “The code execution cannot proceed because VCRUNTIME140.dll was not found.”
What is VCRUNTIME140 DLL?
VCRUNTIME140.DLL is linked up with DLL (Dynamic Link Library), which contains files, codes, and data that many programs can use simultaneously. The DLL codes promote code reuse, code modularization, and efficient memory usage enabling the OS and programs to load and run faster and consume less disk space.
VCRUNTIME140.DLL is a runtime library of Microsoft Visual Studio that runs the programs or software developed in this Studio. The DLL file allows the smooth functioning and working of the apps developed under this Studio. However, when the DLL files are lost /damaged, or the system can’t locate the code in the DLL file to execute the app, you may face VCRUNTIME140.DLL Not Found error.
Many users have reported that when they tried accessing applications, such as Origin, CreativeCloud, and VMware Workstation, they first encountered MSVCP140.dll is missing error message. On closing this prompted error box, when they again attempted to access these apps, they received VCRUNTIME140.dll is missing error message.
What damage VCRUNTIME140 DLL error can cause to your system?
The VCRUNTIME140. DLL Not Found error can result in the app malfunctioning, app crashing, and other problems. It means you won’t be able to access your apps and their data. Hence, solving it becomes quite crucial. Here, we discuss some workarounds that you can try to solve the error. Additionally, to recover your app data, you can use professional data recovery software.
You can try the following DIY (Do-it-yourself) methods to fix this DLL error on your Windows 11 system.
#1 Repair Microsoft Visual C++ Redistributable Installation Files
One of the most recommended solutions to fix this error is repairing Microsoft Visual C++ Redistributable files. This package helps multiple Windows apps run smoothly. Follow the below steps to repair it.
- Press the Windows button on your keyboard to access the Start menu and there, click Settings. (You can also press Windows + I to access Settings).
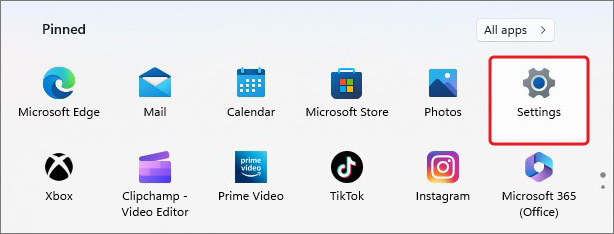
- In the Settings window, select Apps.
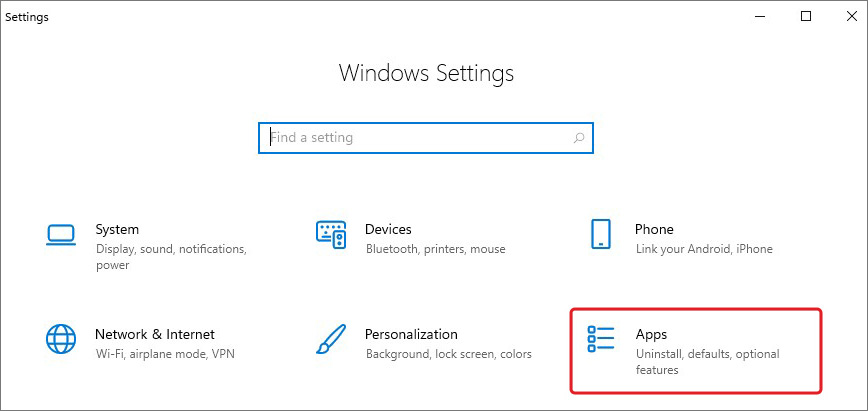
- Next, go to Apps & features > Microsoft Visual C++ > Modify.
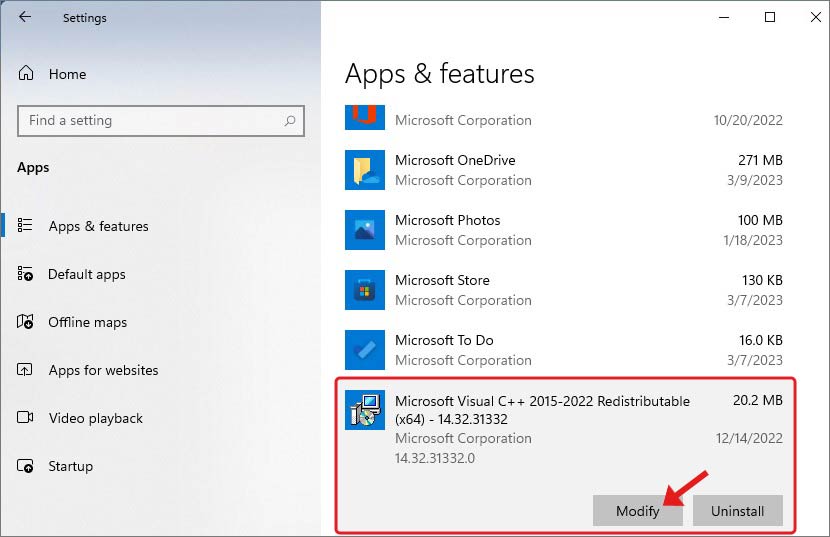
- Click Yes, if prompted. Click Repair on the next prompt.
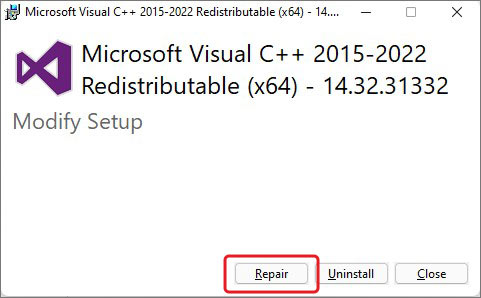
Let the process complete. Once done, reboot your system and check if the issue is resolved now.
#2 Uninstall Visual C++ Redistributable
If repairing the Microsoft Visual C++ Redistributable doesn’t work, try uninstalling it to solve the error with the following steps:
- Open Settings and follow Apps > Apps & features > Microsoft Visual C++ Redistributable.
- Select it and click Uninstall to proceed.
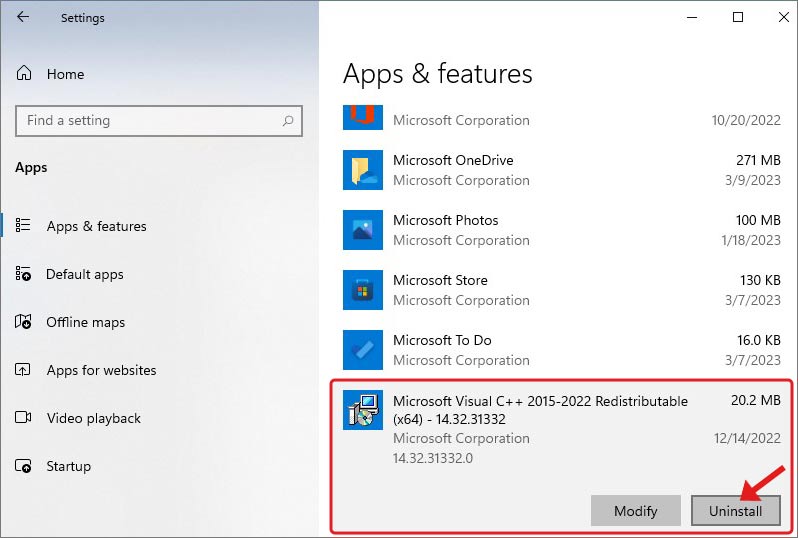
- Again, click Uninstall to confirm your action.
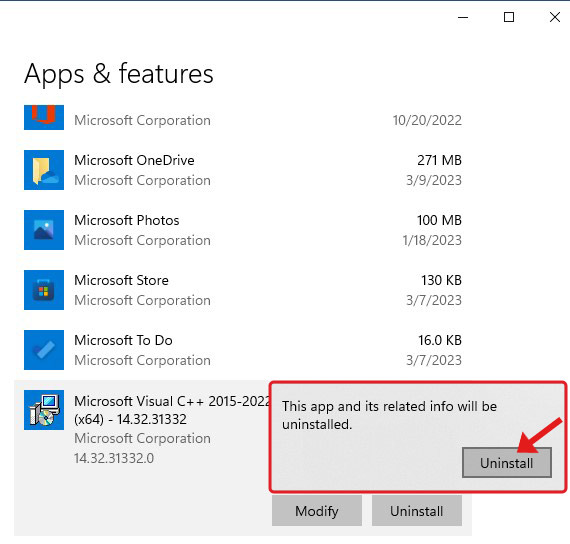
- Wait until the process is complete. Restart the system and check if everything’s working fine.
#3 Reinstall Microsoft Visual C++ Redistributable
Once you’re done uninstalling the Microsoft Visual C++ Redistributable package from your system, reinstall it afresh with the following steps:
- Go to Microsoft’s official site and download Microsoft Visual C++ 2015 Redistributable complete package.
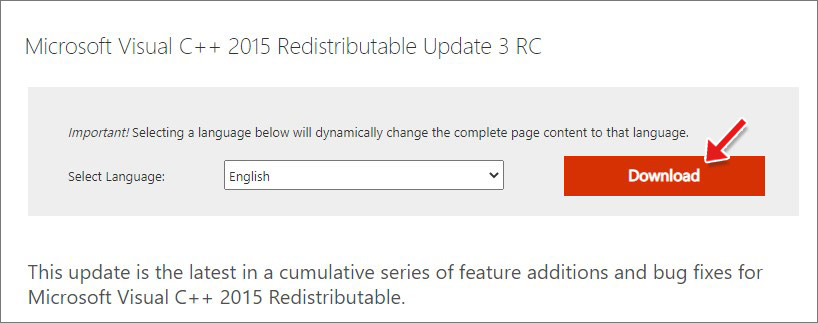
- Make sure you download the right file size as per your system and click Next.
- Open the downloaded file, check the box against ‘I agree to the license terms and conditions, and click Install.
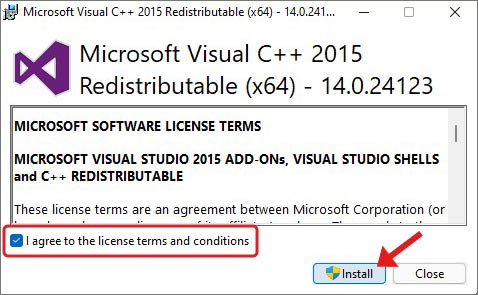
Let it install and when done, reboot your system. Finally, check if the error is fixed.
#4 Re-Register the DLL file
Registering a DLL refers to adding information to a central directory (Registry) for Windows to use. But if you encounter the vcruntime140.dll error while accessing the application, there might be some issues with the file. Hence, try re-registering it to fix the error with the following steps:
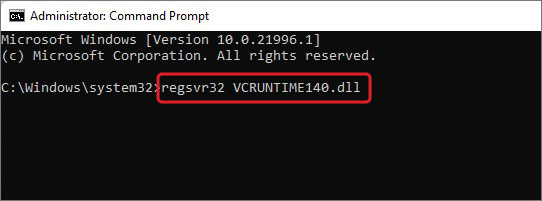
- Press Windows + S to open Search, type cmd and run the command prompt as administrator.
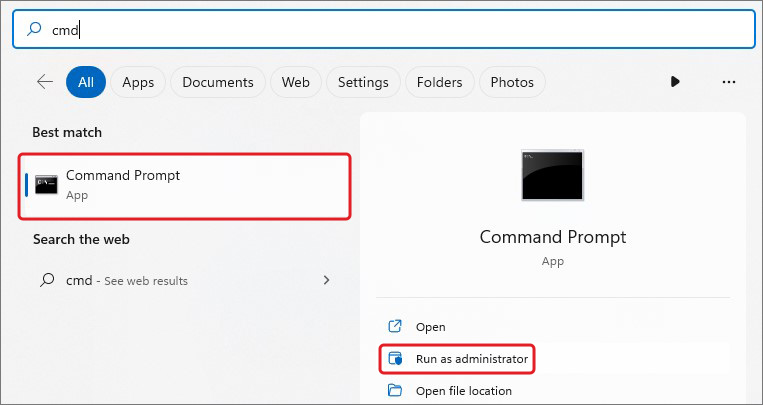
- Type regsvr32 VCRUNTIME140.dll and hit Enter.
Wait for a while and then reboot your system.
#5 Run SFC and DISM Scans
DLL files are specific to Windows programs. They don’t work with other OS. And, when DLL files go missing, damaged, or corrupted, you may encounter a vcruntime error on your system. You can run the System File Checker and DISM utility to solve this issue. Follow the below steps:
- Open Command Prompt and run it as administrator.
- Type DISM /Online /Cleanup-Image /RestoreHealth and hit Enter.
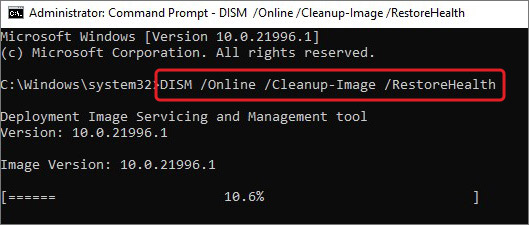
- Wait until the process is finished. Next, type sfc/scannow and press Enter.
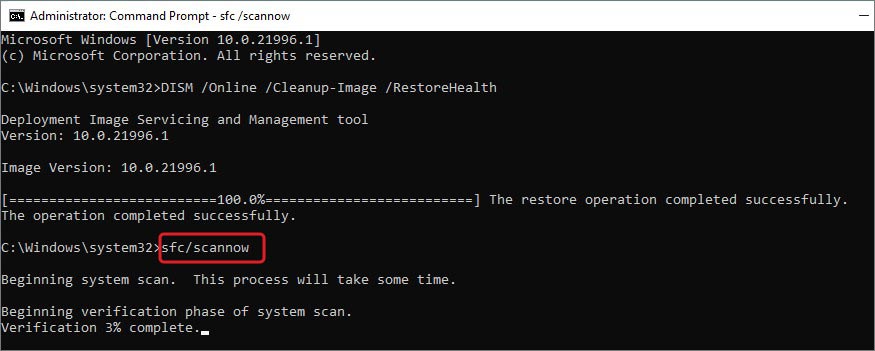
- Let the command do its work, when done, close the cmd window and reboot your system.
#6 Uninstall Recent Windows Update
If you get this error after installing a Windows update, the update might be buggy. You can uninstall it and see if things work out.
- Go to Settings and follow Update & Security > Windows Update > Update history.
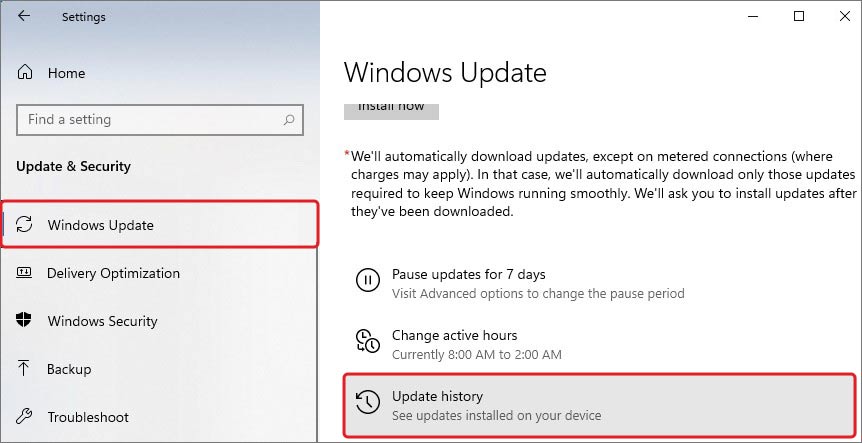
- Next, on the Update history window, click Uninstall updates.
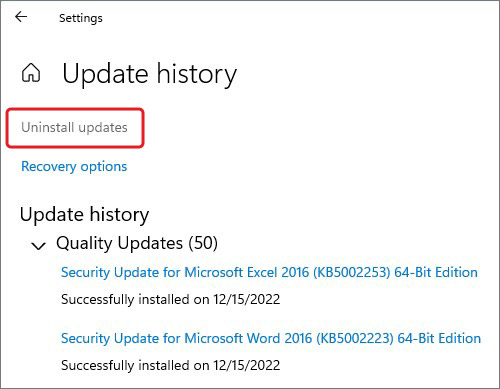
- Afterward, select the buggy update you installed recently and click Uninstall.
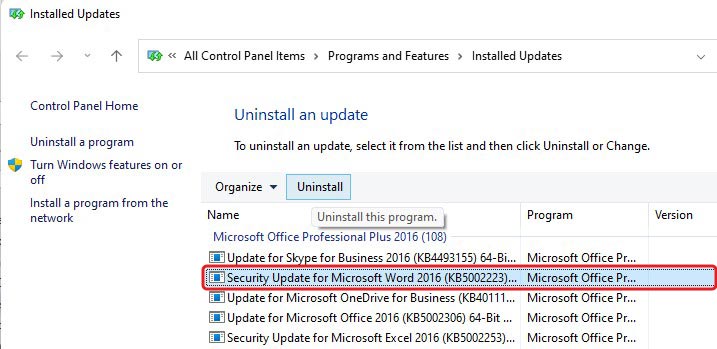
Finally, restart your system and see if the issue is resolved.
#7 Reinstall Troublesome Application
It is also possible that your application is not installed properly. There might be some broken app installation files on your system, causing the app to malfunction and throw errors. In addition, if you’re using an outdated version of applications, it may not work as expected. Hence, try reinstalling the app with which you’re facing problems. Follow the given steps:
- Press Windows + I to access Settings and go to Apps > Apps & features.
- There, select the application you want to remove and click Uninstall > Uninstall.
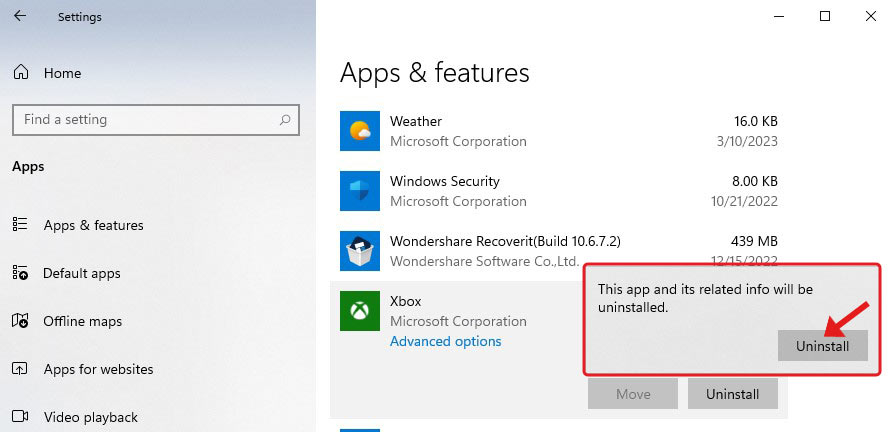
Once uninstalled, go to the official site of the application you want to install and reinstall the latest compatible version of it.
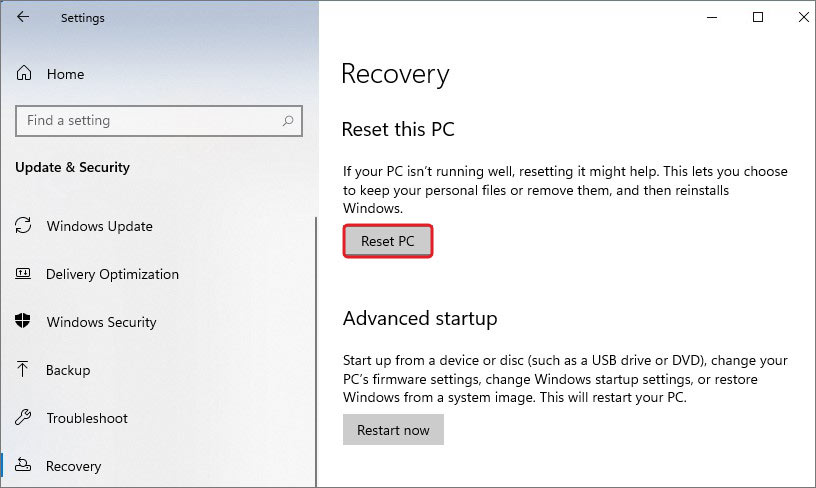
#8 Reset Windows
Lastly, if nothing works out in your favor and you still face the error, resetting Windows 11 will help you fix it. Resetting Windows will bring the system to factory settings and all the changes related to the device manager, apps, files, and others will be removed. Hence, backup your system data and programs or restore them with a dedicated data recovery software, such as Stellar Data Recovery Professional. You can use this tool to restore data from formatted, corrupted, or even crashed systems.
Once you’re done with backup or restoring data, proceed with resetting Windows with the following steps:
- Access Settings and then go to Update & Security > Recovery > Reset PC.
- On the next prompt, click Remove everything to let the process work efficiently.
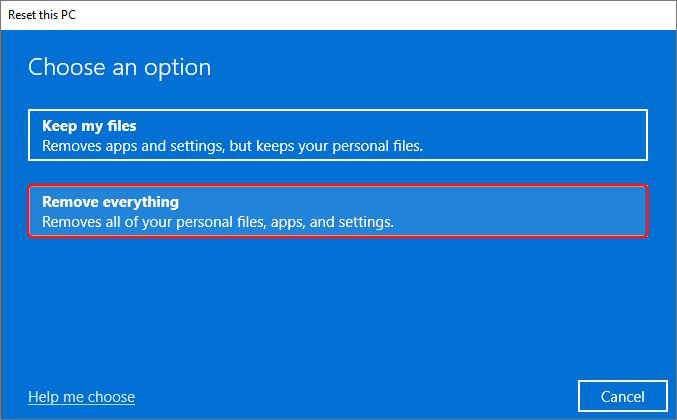
- Afterward, select Local install and proceed.
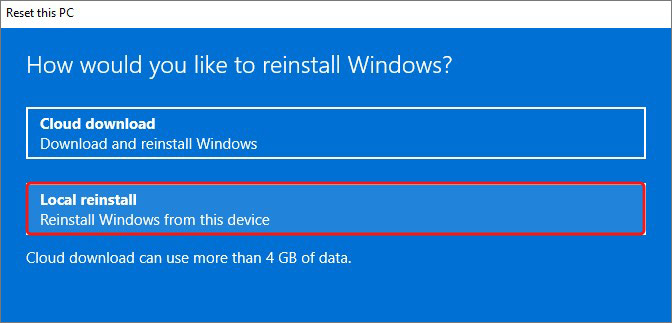
- See the current settings and if you’re okay, click Next. Else, you can click Change Settings and proceed with selecting the options you want.
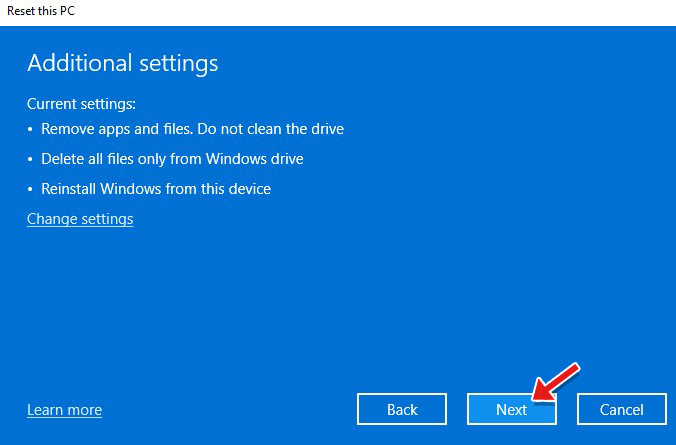
- Confirm your choice and proceed to complete the process.
- Once done, restart the system.
You should be able to fix the Vcruntime140.dll with the troubleshooting methods discussed in this blog. Out of all the methods, be careful when you use the Command Prompt utility and reset Windows. If not done correctly, you may end up causing havoc on your system and losing your data. Hence, either back up your system (if possible) or use professional data recovery software to recover all the essential files, folders, and more.
FAQ
How do I download and install VCRUNTIME140 DLL?
You can download the VCRUNTIME.DLL file to the default Windows folder by visiting the DLL file site. Follow CLIENT > Type VCRUNTIME140.dll > Search for DLL file > Install.
Is DLL the same as EXE?
DLL and EXE, both contain executable codes. However, they both operate differently from each other. Where EXE creates its own thread and reserves resources for the same, the DLL file is an in-process server. You can’t run a DLL file on its own.
How can I fix a DLL error?
DLL errors are usually corrected by repairing the User32.dll file or by reinstalling the app/program, driver, or hardware component that’s causing the error..
Where are DLL files located?
The DLL files are located in the Windows default folder. C:\WINDOWS\SYSTEM32. The path for this folder under 64-bit windows is C:\WINDOWS\SYSWOW64.
Was this article helpful?
YES0
NO
If you are missing DLL files, then this is your worst nightmare coming true. This error message appears out of nowhere and can put a complete stop to your work. The program can’t start because VCRUNTIME140.dll is missing from your computer. Try reinstalling the program to fix this problem error message is regrettably quite common among Windows users. As many applications rely on Microsoft Visual Studio runtime library, seeing this error can be frustrating as the said apps would no longer function. Thus, we will guide you how to fix VCRUNTIME140.dll missing or not found error on Windows 11.

Table of Contents
How to Fix VCRUNTIME140.dll is Missing or Not Found Error on Windows 11
You may think that VCRUNTIME140.dll not found error is malware that prevents you from accessing a specific program. But, this is not true. VCRUNTIME140.dll is a Microsoft runtime library that aids to access and execute programs created with Microsoft Visual Studio. DLL files contain the codes that programs need to run properly. To access these codes, MS Visual Studio 2015-2019 based applications require the runtime directory. Following are some common reasons behind VCRUNTIME140.DLL is missing error:
- Corrupt Programs or applications
- Files that may have been mistakenly removed.
- Malware and viruses in the system
- Vulnerabilities introduced by Windows updates.
Note: Error loading vcruntime140_1.dll. The specified module could not be found and error 80090016 has also been reported by several users. This usually occurs when 2019 update and Visual C++ 2015 is installed on your computer. This leads to incompatibility issues.
Method 1: Repair Microsoft Visual C++ 2015-2019 Redistributable (x64 and x86 Both)
Follow the given steps to fix VCRUNTIME140.dll missing or not found error on Windows 11 by repairing Microsoft Visual C++ 2015-2019 redistributable:
1. Press Windows + X keys simultaneously to open Quick Link Menu.
2. Click on Apps and Features from the given menu.
3. In the Apps & features window, type Visual C++ in the App list search box.
4. Click on the three vertical dots corresponding to Microsoft Visual C ++ 2015-2019 Redistributable (x64).
5. Then, click on Modify, as depicted below.

6. In the Microsoft Visual C ++ 2015-2019 Redistributable (x64) Wizard, click on the Repair button.

7. After you see Setup Successful message, click on Close, as shown.

8. Repeat Steps 4-8 for Microsoft Visual C ++ 2015-2019 Redistributable (x86) as well.
9. Restart your Windows 11 PC.
Method 2: Reinstall Microsoft Visual C++ 2015-2019 Redistributable (x64 and x86 Both)
If repairing the said apps doesn’t help fix the problem, the try to fix VCRUNTIME140.dll is missing error in Windows 11 by reinstalling Microsoft Visual C++ 2015-2019 redistributable.
1. Launch Apps & Features & search for Visual C++ by following Steps 1-3 of Method 1.
2. Click on the three vertical dots pertaining to Microsoft Visual C ++ 2015-2019 Redistributable (x64).
3. Then, click on Uninstall, as depicted below.

4. Click on Uninstall in the confirmation pop-up.

5. Let the uninstallation process finish. Then, repeat steps 3-4 for Microsoft Visual C ++ 2015-2019 Redistributable (x86) too.
6. Restart your Windows 11 PC.
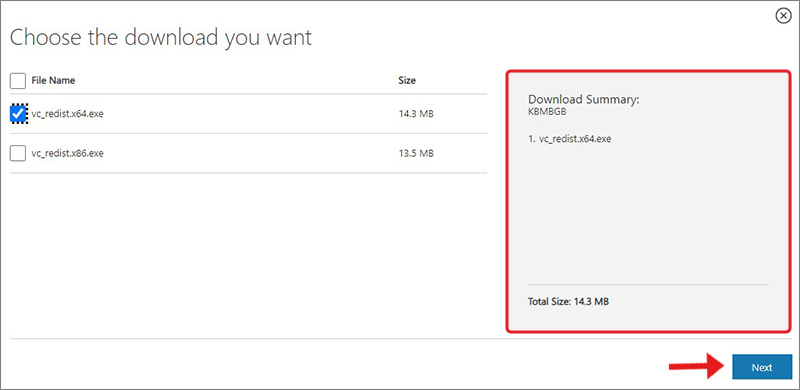
7. Open a web browser and go to the Microsoft Download Center.
8. Click on Download after selecting the language of your preference. e.g. English.

9. Check the boxes marked vc_redist.x64.exe and vc_redist.x86.exe and click on Next, as illustrated below.

Wait for the download process to be completed.
10. Open File Explorer and go to the location where the files are downloaded, e.g. Downloads.
11. Install both downloaded .exe files by double-clicking on them.
Also Read: How to Update Apps on Windows 11
Method 3: Run DISM and SFC Scans
To fix VCRUNTIME140.dll is missing or not found error in Windows 11, run Deployment Image Servicing and Management as well as System File Checker tools to fix & rule out issues related to corrupt files in the system.
Note: Your computer must be connected to the internet to execute these commands properly.
1. Search for Command Prompt in search bar and click on Run as administrator, as shown.

2. Type the following commands and press the Enter key after each command.
Dism /Online /Cleanup-Image /CheckHealth
Dism /Online /Cleanup-Image /ScanHealth
DISM /Online /Cleanup-Image /RestoreHealth

3. After the DISM process is completed, type SFC /scannow & hit Enter.

4. Once the Verification 100% complete message is displayed, restart your computer.
Method 4: Reinstall Affected Application
If only a particular program is affected by this error then, you need to reinstall that program. As programs have their own copy of VCRUNTIME140.dll files, reinstalling such apps may solve this problem.
1. Launch Apps & Features via Quick Link menu, as earlier.
2. Scroll through the list of installed apps and click on the three dots icon for the app that you want to uninstall.
Note: We have shown BlueStacks 5 as an example in this method.
3. Click on Uninstall, as shown.

4. Follow the on-screen instructions, if any, to uninstall the app.
5. Re-download the uninstalled app from its official website. For example, click on Download BlueStacks on Bluestacks download page.

6. Repeat the same for all apps facing VCRUNTIME140.dll is missing error.
Also Read: Fix Apps Can’t Open in Windows 11
Method 5: Restore .DLL Files from Antivirus Quarantine Zone
In case, the said files were misconstrued as malware and deleted or disabled by the antivirus program installed on your computer, the same can be retrieved. Follow the given steps to fix VCRUNTIME140.dll is missing error in Windows 11 by restoring .dll files from Quarantine zone of Antivirus program.
Note: We have shown Bitdefender app as an example in this method. Your antivirus program may or may not provide this feature. Also, steps may vary depending upon the antivirus software installed on your Windows PC.
1. Click on the Search icon, type Bitfender and click on Open.

2. Go to the Protection section of your antivirus, then click on Antivirus as shown highlighted.

3. Select the Settings menu and click on the Manage quarantine option for Quarantined threats.

4. Check the box for the .dll file, if present, and click on the Restore button.

Also Read: How to Restore Missing Recycle Bin Icon in Windows 11
Method 6: Manually Download .DLL Files
You can download and install missing DLL files manually to resolve this issue.
1. Navigate to dll-files.com from your Web Browser.
2. Search for VCRUNTIME140 in the search bar.

3. Select the VCRUNTIME140.dll option.

4. Scroll down to the download section and click on Download with respect to the desired Version.

5. After downloading process is finished, extract the downloaded zip file by double-clicking on it.
6. Copy the .dll file along with the readme text file by selecting it and pressing Ctrl + C keys.
7. Paste files in the Directory where you were facing the error by pressing Ctrl + V keys.
Also Read: How to Block Windows 11 Update Using GPO
Method 7: Update Windows
To fix VCRUNTIME140.dll is missing error in Windows 11, update your Windows operating system by following these steps:
1. Press Windows + I keys simultaneously to open Windows Settings.
2. Click on Windows Update in the left pane.
3. Then, click on Check for updates button.
4A. If there is any update available, click on Download & install option. Restart your PC.

4B. If this option is not visible, then your Windows 11 PC is already running on the latest available updates.
Method 8: Perform System Restore
If all else fails, fix VCRUNTIME140.dll missing or not found error in Windows 11 by performing system restore.
1. Click on the Search icon and type control Panel, then click on Open.

2. Set View by: > Large icons, and then click on Recovery.

3. Click on Open System Restore option.

4. Click on Next > in the System Restore window twice.

5. From the list, select the latest Automatic Restore Point to restore your computer to the point when you were not facing the issue. Click on the Next > button.

Note: You can click on Scan for affected programs to see the list of applications that will be affected by restoring the computer to the previously set restore point. Click on Close to close the newly opened window.

6. Finally, click on Finish.

Recommended:
- What is Windows 11 SE?
- How to Fix Windows 11 Update Stuck
- How to Fix Windows 11 Taskbar Not Working
- How to Fix Microsoft Store Not Opening on Windows 11
We hope you found this article helpful on how to fix VCRUNTIME140.dll is missing or not found error on Windows 11. You can send your suggestions and queries in the comment section below.
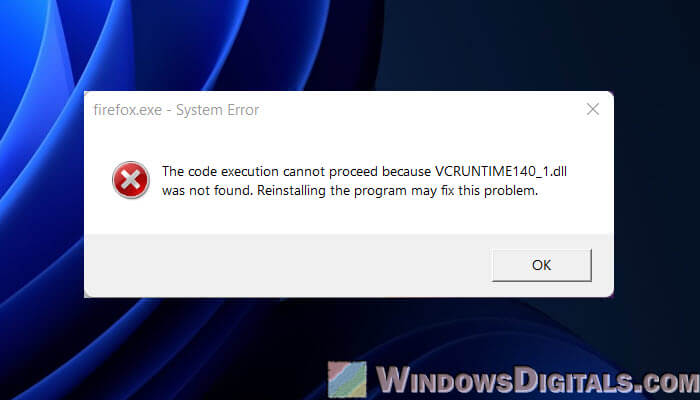
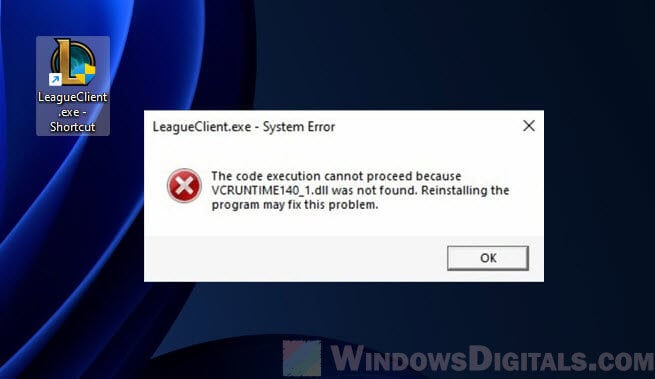
The “VCRUNTIME140_1.dll Not Found” error pops up quite a bit for users using Windows 11 and 10, especially when they’re trying to start up apps like Firefox, Microsoft Office 2016 or 2019, or even games like League of Legends. This VCRUNTIME140_1.dll file is very important for programs made with Visual Studio. If you’re seeing this error, it basically means your computer can’t find this file, and so the software you’re trying to open just won’t start. We’re going to walk through how to fix this problem.
Also see: Microsoft Visual C++ Runtime Library Error Windows 11/10
What is VCRUNTIME140_1.dll?
The VCRUNTIME140_1.dll is a type of file called a DLL (Dynamic Link Libraries). It’s tied to Microsoft Visual C++ Redistributable for Visual Studio 2015, 2017, and 2019. These libraries are what let apps made with Visual C++ run.
When an app needs VCRUNTIME140_1.dll, Windows will look in its own folders to find it. If it can’t or if the file’s broken, you’ll see the “VCRUNTIME140_1.dll was not found” error. This can cause the app (or game) to not start or crash midway. It can show different error messages like:
- “VCRUNTIME140_1.dll is missing”
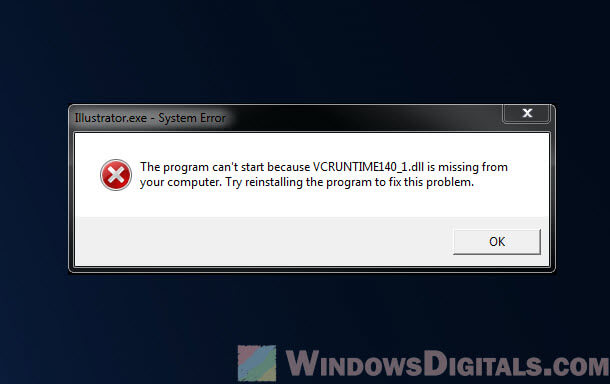
- “The program can’t start because VCRUNTIME140_1.dll is missing from your computer.”
- “The code execution cannot proceed because VCRUNTIME140_1.dll was not found. Reinstalling the program may fix this problem.”
Useful tip: How to Know Which Process is Using a File in Windows 11
Common times you might see the “VCRUNTIME140_1.dll Not Found” error
This error usually means you can’t open the affected app. It can happen with different software, like Firefox, Microsoft Office 2016, and even some games like League of Legends. How this error messes things up can depend on the software. The following are some examples:
- Firefox: If the DLL file is missing, the browser won’t open at all, and you’ll see the error message saying VCRUNTIME140_1.dll is missing.
- Microsoft Office 2016 or 2019: Without the DLL file, apps like Word, Excel, and PowerPoint might not work.
- League of Legends and other games: Games that require the DLL file will not launch and show you the “VCRUNTIME140_1.dll was not found” error if it can’t find the file. Usually, just reinstalling the game won’t fix it.
Related issue: “File not found or no read permission” in Windows 11
How to reinstall Visual C++ Redistributable Packages
A good way to fix this is by reinstalling the Visual C++ Redistributable packages again. You can download the latest versions (2015, 2017, 2019, and 2022) directly from the Microsoft’s website.
- Head over to the Microsoft Visual C++ Redistributable download page.
- There, you’ll see a bunch of links for different versions. Pick the right one for your computer:
- Got an ARM64 system? Choose the ARM64 version.
- On a 32-bit system? Get the x86 version.
- Running a 64-bit system? You’ll want the x64 version. This package has what you need for both ARM64 and x64 systems, so it’s a good pick if you’re on an ARM64 device.
Learn more: How to Know If Windows 11/10 is 64-bit, 32-bit or ARM
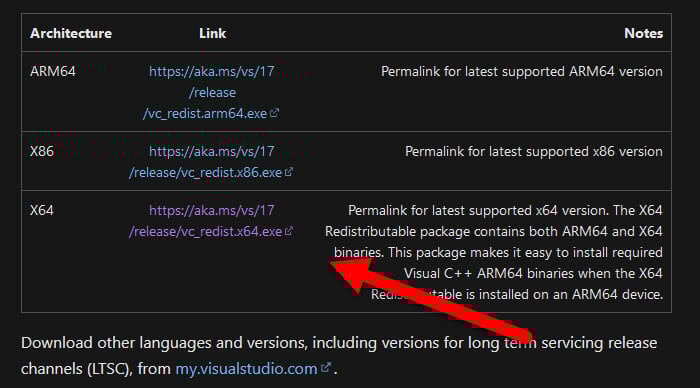
Note: If you’re using Windows 11, it’s all X64 architecture, so pick the X64 version. On Windows 10, you can see your system type by right-clicking “This PC” and hitting “Properties”. You’ll find your system type under “System”.
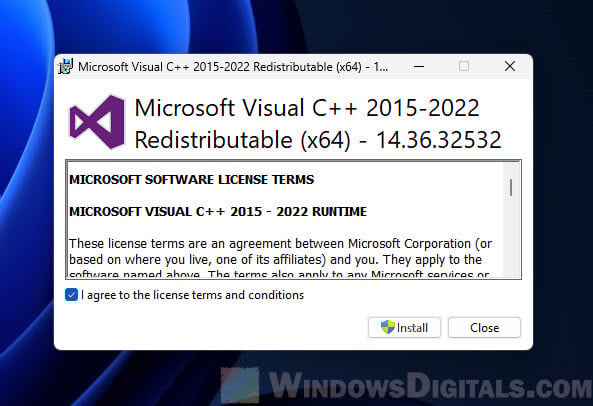
- After clicking the right link, the download will start up by itself. Once it’s done, open the .exe file and follow the steps to put the package in place.
By reinstalling these packages on your computer, you’re making sure you have the latest C++ libraries, which means better security, reliability, and how well things run. This can also help bring back the missing VCRUNTIME140_1.dll file and fix whatever issues that were caused by the file being missing.
Copying the VCRUNTIME140_1.dll file yourself
If reinstalling the Visual C++ Redistributable Packages doesn’t help, or if running the SFC tool doesn’t do the trick, you might want to try copying the “vcruntime140_1.dll” file manually yourself. The following will show you how to do it using Firefox as an example:
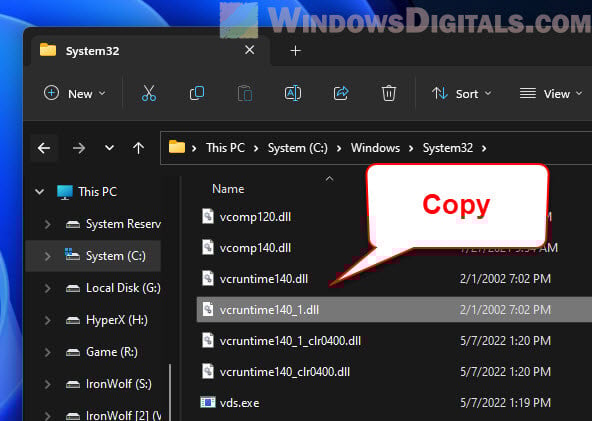
- Press Windows + E to open File Explorer.
- Go to where an app that has the VCRUNTIME140_1.dll is. For example,
C:\Program Files (x86)\Microsoft\EdgeCore\114.0.1823.58. You might also find it inC:\Windows\System32.
- Find the “vcruntime140_1.dll” file, right-click it, and pick “Copy”.
- Go to the folder for the app that’s not working. For our example, this is the Firefox folder at
C:\Program Files\Mozilla Firefox. Right-click in the folder and choose “Paste”.
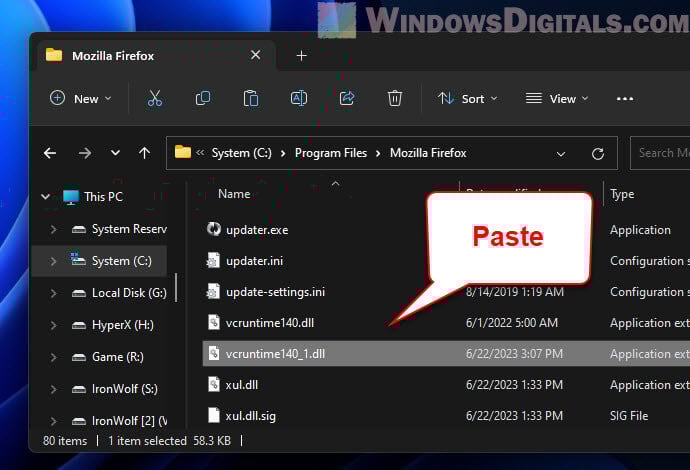
This method puts the “vcruntime140_1.dll” file where it’s needed, hopefully fixing the app. After doing this, try opening the app again to see if it works.
Note: The directory we mentioned is just an example. Where you find the “vcruntime140_1.dll” file can vary based on what’s on your PC and what apps you have installed.
Using System File Checker (SFC)
You can also try to run the System File Checker (SFC) tool and see if it can fix the “VCRUNTIME140_1.dll Not Found” error. This tool checks your system files for problems and fixes them automatically. Follow the steps below to do so:
- Press Win + X and choose “Command Prompt (Admin)” or “Windows PowerShell (Admin)”.
- Type
sfc /scannowand press Enter. SFC will check all system files and replace bad ones with good copies from a backup folder.
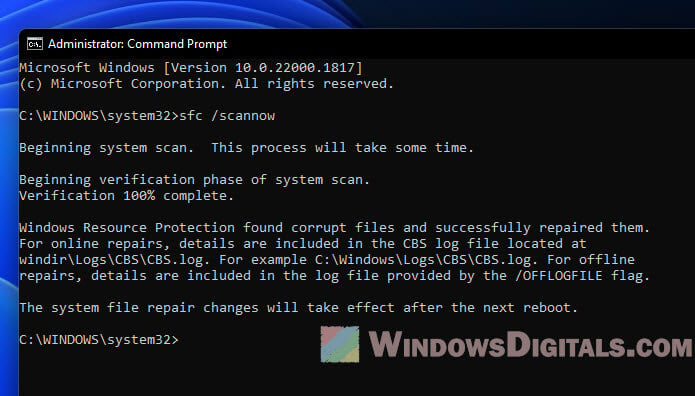
This might take a while, so don’t turn off your computer while it’s working. When it’s done, restart your computer and see if the problem is still there.
Where to find the VCRUNTIME140_1.dll file
If you want to check if the VCRUNTIME140_1.dll file is on your computer, you can search for it. Press Windows + S, type “VCRUNTIME140_1.dll”, and hit Enter. If it’s there, it’ll show up in the search.
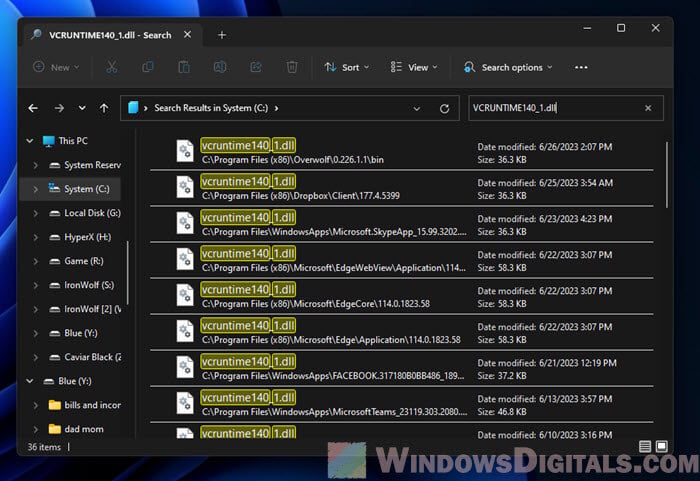
Usually, if you’ve installed the Visual C++ Redistributable Packages correctly, you’ll find the VCRUNTIME140_1.dll file in the C:\windows\System32 folder. But, it could also be in the folder of the app or game that needs it. The place to look can vary depending on your computer and what you’ve installed. Make sure to check both the System32 folder and the folder for the app or game that’s having problem.
What have we learned?
When the VCRUNTIME140_1.dll go missing or get messed up, apps can stop working, kind of like trying to read a book with pages missing. The VCRUNTIME140_1.dll file is really important for any app that relies on it.
It’s in fact pretty common to run into problems with missing DLL files. If you’re trying to manually download the DLL files from the internet, just be careful not to get them from shady websites. Try to stick to the official sources when downloading any DLL files. Scan the DLL files before you use them.

Если на вашем компьютере с операционной системой Windows 11 возникает ошибка в связи с испорченным или отсутствующим файлом vcruntime_140.dll, такую ситуацию можно исправить посредством ручной установки DLL.
Что это за файл?
Сначала разберемся, что это за файл и для чего он нужен. Системный компонент является частью библиотеки Microsoft Visual C++ 2015 Redistributable Package, которая используется для корректной работы программного обеспечения, написанного с использованием языка программирования C++.
Инструкция по установке
Итак, что же делать, если возникает ошибка и приложение не устанавливается? Разберемся на примере пошаговой инструкции:
- Скачайте файл, воспользовавшись кнопкой в конце странички. Поместите DLL в системный каталог, учитывая архитектуру Windows 11.
Для ОС с архитектурой: x86 (32 Bit): C:\Windows\System32
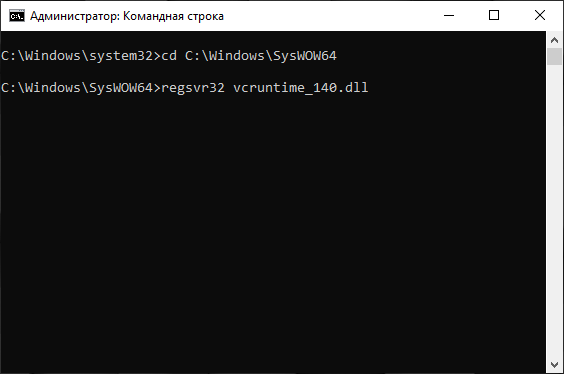
Для ОС с архитектурой: x64 (64 Bit): C:\Windows\SysWOW64

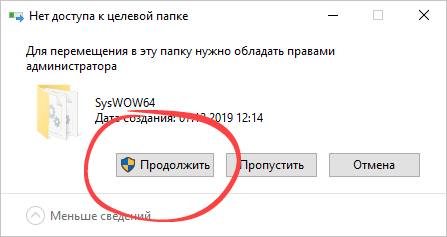
- Подтвердите доступ к полномочиям администратора. Для этого достаточно кликнуть по кнопке, обозначенной на скриншоте ниже.
- Дальше переходим к запуску командной строки.
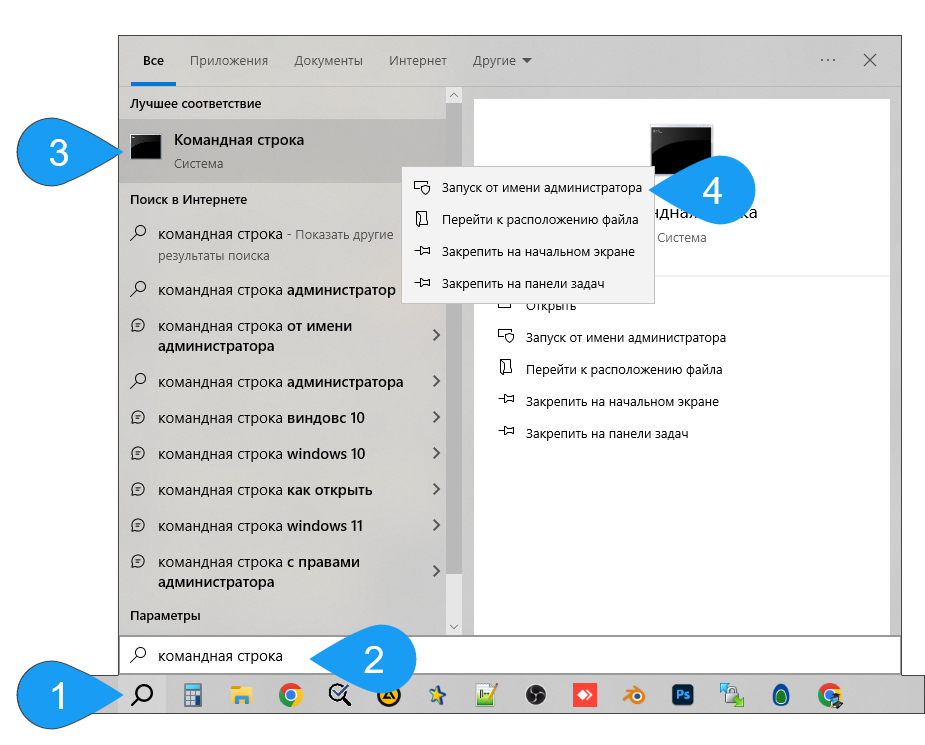
- Меняем каталог на тот, в который шагом ранее поместили DLL. Затем прописываем:
regsvr32 vcruntime_140.dllи жмем кнопку ввода.
Точно такая же ситуация может происходить из-за испорченных или отсутствующих файлов: msvcp100.dll, ntdll.dll, ucrtbase.dll, xinput1_3.dll, kernelbase.dll и т. д.
Скачать
Теперь вы можете переходить к практике и реализовывать инструкцию, прикрепленную выше.
| Обновлено и актуально: | 2025 год |
| Разработчик: | Microsoft |
| Операционная система: | Windows XP, 7, 8/8.1, 10, 11 |
| Разрядность: | x86, x64 (32, 64 Bit) |
| Лицензия: | Бесплатно |
Скачать vcruntime_140.dll