Opencl.dll — ещё один файл, который часто вызывает ошибки как при входе в Windows 11 и Windows 10, 8.1 и 7, так и при запуске игр или программ, такие как «Не удается продолжить выполнение кода, поскольку система не обнаружила opencl.dll», «Запуск программы не возможен, так как на компьютере отсутствует opencl.dll», «Системная ошибка» при запуске amdrsserv.exe и другие.
В этой инструкции подробно о том, как скачать и установить opencl.dll x64 и 32-бит и исправить рассматриваемые ошибки в Windows.
Как исправить системные ошибки, вызванные отсутствием opencl.dll

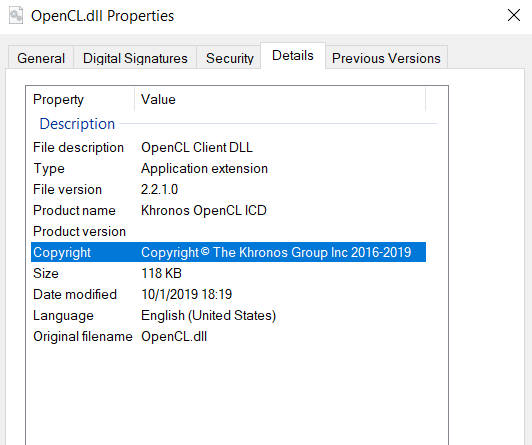
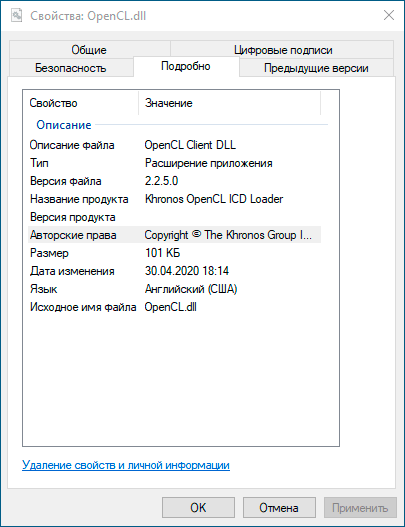
Opencl.dll — одна из библиотек DLL, используемых в программах, использующих технологии OpenCL (Open Computing Language) для просчета графики или других операций с использованием GPU (видеокарты). Технология поддерживается NVIDIA, Intel и AMD.
Скачивать этот файл отдельно со стороннего сайта и пробовать его зарегистрировать в Windows вручную можно, но не является лучшим методом. В случае видеокарт AMD ранее был доступен отдельный OpenCL Driver, но сегодня для систем Windows 11, 10, 8.1 или Windows 7 он не актуален.
Файл opencl.dll присутствует в комплекте драйверов для всех современных дискретных и интегрированных видеокарт: NVIDIA GeForce, AMD Radeon и Intel HD Graphics. Поэтому лучшее и наиболее часто работающее решение — установка этих драйверов:
- Внимание: «обновление» драйвера кнопкой «Обновить» в диспетчере устройств — это не то, что требуется: так мы получим не все файлы и более того, этот метод иногда и вовсе не производит обновления.
- Если вы, еще до того, как нашли это руководство откуда-то скачали и поместили вручную файлы opencl.dll в папки C:\Windows\System32 и C:\Windows\SysWOW64, лучше их оттуда убрать, они могут помешать следующим шагам.
- Скачайте последний драйвер для вашей видеокарты с официального сайта NVIDIA, AMD или Intel. Внимание: если у вас есть и интегрированная и дискретная видеокарта, например, AMD и Intel, загрузите оба драйвера. Особенно это важно для драйверов AMD, без сопутствующей установки драйвера от Intel (при наличии и этого GPU), ошибки amdrsserv.exe могут продолжать появляться.
- Будет полезным (но обычно не обязательно), если перед запуском установщиков вы удалите текущие драйверы: для некоторых это возможно сделать в Панель управления — Программы и компоненты, для некоторых — с помощью бесплатной утилиты Display Driver Uninstaller (DDU).
- Установите загруженный драйвер или драйверы (при наличии нескольких GPU). В случае если установщик в параметрах предлагает выполнить «чистую установку» (например, NVIDIA), выполните именно её.
- На всякий случай перезагрузите компьютер.
- Если описанное не помогло, а у вас установлена видеокарта AMD, попробуйте скачать и выполнить bat-файл (от имени администратора) с этой страницы — он автоматически найдёт на компьютере необходимые библиотеки и зарегистрирует их в системе.
После выполнения указанных действий файлы opencl.dll должны автоматически оказаться в папке C:\Windows\System32, а в Windows x64 — еще и в C:\Windows\SysWOW64, а ошибки «Не удается продолжить выполнение кода, поскольку система не обнаружила opencl.dll», «Системная ошибка amdrsserv.exe» (напрямую связанная с драйверами AMD, которые при появлении этой ошибки следует переустановить вручную) и подобные не должны вас больше побеспокоить.
На сайте также присутствует отдельный материал об исправлении ошибок AMDRSServ.exe, возможно, в нём вы сможете найти дополнительную полезную информацию.
Если эта статья — не первая, которую вы находите на тему ошибок opencl.dll, вы вероятнее встречали рекомендацию скачать этот файл, скопировать в ранее упоминавшиеся папки и выполнить команду regsvr32.exe opencl.dll (или иные варианты этой команды). Простое копирование файла иногда может исправить ошибку. А проблема с этим методом в том, что зарегистрировать (установить) эту DLL таким методом не получится.
Вы получите сообщение о том, что «Точка входа DllRegisterServer» не найдена, иначе говоря, файл не поддерживает механизм регистрации с помощью regsvr32.dll. Отдельно следует отметить, что в папках System32 и SysWOW64 должны быть разные файлы opencl.dll — для x64 и x86, а обычно предлагается один, что может приводить к ошибкам.
Как итог — чаще всего из-за незнания подобных нюансов ручные манипуляции оказываются безуспешными (но иногда срабатывают, хотя шаг с regsvr32 и лишний). Однако, бывает иная ситуация: в системе присутствует и всегда был в наличии оригинальный opencl.dll (был установлен с драйверами), но сообщения об ошибках продолжают появляться. В этой ситуации можно рекомендовать выполнить проверку целостности системных файлов (инструкция для Windows 10, но подойдет и для предыдущих систем) — это может сработать.
Надеюсь, инструкция сработала для вашего случая. На всякий случай учитывайте: если проблема появилась после каких-то недавних действий с компьютером, вполне возможно, что вам помогут точки восстановления системы.
Most applications make use of what we call Dynamic Link Library files to carry out specific tasks. A DLL file is a library made up of a set of code or instructions for carrying out a particular operation or the guidelines necessary to initiate a known activity.
OpenCL is an abbreviation for the Open Compute Library. It forms part of the APIs (Application Programming Interfaces) that can function with CPUs or GPUs. There could be more than one file titled “Opencl.dll” from different programs or interfaces.
As far as we know, the chances are that there is one from AMD, NVIDIA, or even Intel. The cards from the listed manufacturers obviously need to use such a file for various reasons.
Possible causes of Opencl.dll errors and similar problems
There might be other reasons the problems affecting the stated file come up, but we just do not know much about them. Thus, you should have figured out by now that this list is not an exhaustive one:
- Activities involving or operations carried out by viruses and malware
- Bugs within the affected program itself or those that have always existed in the Windows operating system
- Invalidation or corruption of registry keys or entries
- Removal of the affected file by the user or programs
- Improper shutdown of Windows, and so on.
Common error messages and notifications involving the Opencl.dll file
We have gone through several user reports and visited many forums to get as much information as possible about the problem. We finally have a compilation of the issues that involve the Opencl.dll file. Here are some of the messages Windows displays to indicate that there is a problem:
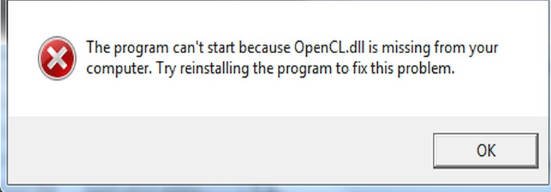
- Opencl.dll is not found
- Cannot start Windows 10 Operating System. A required component is missing: Opencl.dll…
- This application failed to start because Opencl.dll was not found. Re-installing the application may fix this problem
- Opencl.dll not found
- The file Opencl.dll is missing
- Opencl.dll Access Violation
- Cannot register Opencl.dll
- [insert path here]\Opencl.dll is either not designed to run on Windows or it contains an error. Try installing the program again using the original installation media
- Error loading [insert path here]\Opencl.dll. The specified module could not be found
Now we would provide answers to questions like:
- What if Opencl.dll missing from your computer?
- What if Opencl.dll cannot be found? And many more.
Reliable reports have indicated that Windows 10 is the most popular version of Microsoft operating system running on PCs. However, inconsistencies or bugs from the updates that the operating system maker provides for this iteration of Windows result in various problems. For example, the myriad of issues that have something to do with the Opencl.dll file.
What are the events that occur in the build-up to the problem?
A good number of people who upgraded to a higher version of Windows also form a significant part of the users who are struggling with the problem. We can hypothesize that the issue came up for these individuals because Microsoft upgrades the video drivers and uninstalls the Opencl.dll file for their GPU cards (usually one from AMD or NVIDIA) in the process.
The installer that works to upgrade the graphics card is also another program capable of getting involved to cause the problem (especially for computers with an NVIDIA card). When it installs the latest updates for the GPU, the installer sometimes overwrites the already existing Opencl.dll from Windows, and we do not need to tell you what happens next.
In extreme scenarios, the Windows Update program is the one responsible for breaking the file. This installer has the power to overwrite the existing Opencl.dll file with its version, and this action often results in problems for the user.
Is your computer running slow or suffering system glitches? If so, it may need maintenance. Try running a dedicated PC optimization tool to check the health of your PC and apply the necessary fixes.
Consequences of the problem’s occurrence
In the vast majority of scenarios (defined by issues involving DLL files), when you experience the problem described by any of the error messages above, you will be unable to launch the affected program. In extreme cases, the issue might prevent the Windows operating system from functioning as it should. Users dealing with a corrupted Opencl.dll file might also find their PC rebooting in regular intervals.
Its origin and home
Opencl.dll missing, Opencl.dll not found, and similar notifications have appeared on the Windows operating system versions as far back as Windows 7. Unsurprisingly, the OS developers failed to prevent the issue from carrying itself over to Windows 8 (which was ridden with enough unique problems of its own), and subsequently, it ended up on Windows 8.1.
Finally, Windows 10, even with all the improvements and modifications it came with, is not resistant to bugs involving DLL files, as we have come to observe the Opencl.dll problem on it.
If you came here to find out how to fix Opencl.dll missing in Windows 10, then you are on the right track. If you have a similar kind of problem and you are running a different version of Windows, then you should know that there is a place for you too.
How to fix Opencl.dll missing, Opencl.dll not found, and similar problems on Windows 10, Windows 8.1, and Windows 7?
It is time for you to understand that because there are multiple strains of the issue, only a diverse stream of solutions would prove useful in tackling the problem for everyone. All the fixes below should work for the problem, but their usefulness or effectiveness might vary depending on what particular form of the issue we created them to address in the first place.
You might not need to attempt or go through all of them. We recommend that you start with the first one on the list and move on when necessary to other fixes until you end up on the one that works best for you.
-
Update your graphics card drivers:
We earlier established that Opencl.dll files have something to do with your GPU (Graphics Processing Unit). If there are problems with these files, then the issues involving your graphics card are one of the first things you must consider.
Drivers define the entirety of the operations or interactions between the hardware components available on a computer and the software running on it. You can solve the vast major of driver problems by simply upgrading your drivers to the latest versions available.
Best method:
The first method of updating drivers, which we propose that you use, is the automatic approach. Here, you must download and run Auslogics Driver Updater. This excellent program will help you carry out all the procedures, which you otherwise would have had to execute yourself had you gone with the manual method.
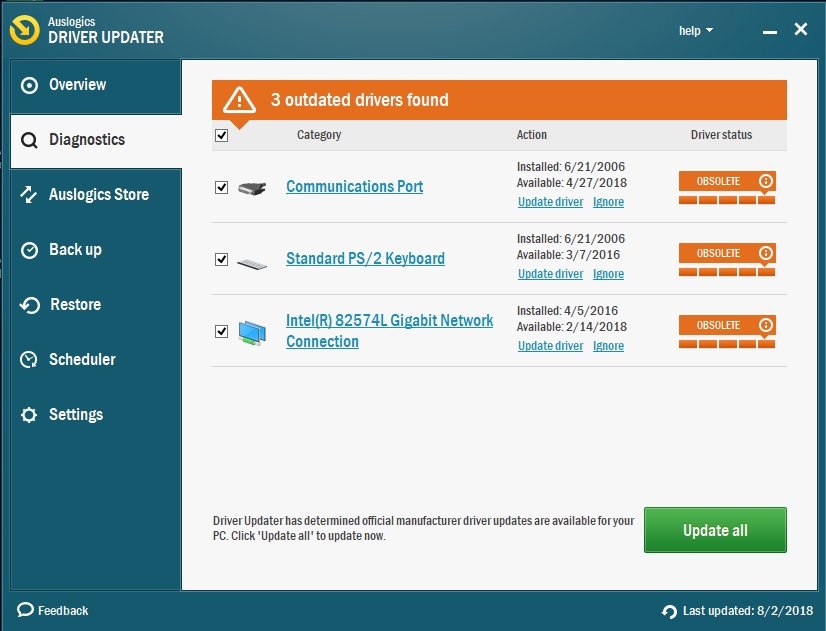
The recommended app works by executing a scan to identify the driver problems (missing, corrupted, and outdated driver software) and shows you a report on the issues it found. Then you will continue the process by using the option to update the drivers (usually in the form of a button you have to click on) to their latest manufacturer-recommended versions.
The automatic approach, which we just described, like most automatic methods of carrying out an operation, is significantly better than its manual equivalent in almost every performance metric or reliability scale. In fact, it is the safest, fastest, and the most efficient way of getting the job done.
Alternative way:
Now it is time we moved on to give the details for the manual method. Here, to summarize it all, you will have to perform almost every task that the program executed. In other words, you will have to identify the drivers that you need to update, you need to search for and find their replacements, and finally, you have to download and install the software you find.
Since your graphics card drivers are the ones most likely to be involved, the identification part of the process should be relatively easy for you to carry out. Follow these instructions:
- Open Device Manager (the program that helps you manage operations involving drivers and their activities). If you are running Windows 10 or Windows 8.1, you can do this by right-clicking on the Windows Start icon always present on your desktop screen to see a list of programs and options and then selecting Device Manager from them.
If you are running Windows 7, then you have to go about things differently. Run the Run app first by pressing the Windows button on your keyboard, then tapping the letter R key. After the small program window appears, you must input the following code into the text box present and hit the Enter key to force its execution: devmgmt.msc
A Device Manager window should come up now
- After the program window launches, you will see a list comprising of all the drivers available on your PC in groups. Go through the items there and locate Display Adapters, which you must click on to expand its menu, and see the drivers for your Graphics Processing Units.
For example, if your computer’s processor is an Intel card, then you should see Intel HD graphics (followed by a number stating its version). If you have a dedicated graphics card manufactured by NVIDIA, then you should find another driver with its brand name and model
- We expect you to start your work on one card. Double-click on its name to open its Properties menu. After the required comes up, navigate to the driver tab. There, you must click on the Update driver button you see.
You will get 2 options. If you go with the first one, then Windows will do what is stated in the description of the procedure. If you go with the second option (we actually recommend this one if you already have the driver file or know where it is located on your computer), then you might complete the process faster
- If you tried both options and none of them was about to give you the result you were expecting, then you would have to find the driver yourself through other means. Open the Properties window of the driver again and go to the Driver tab. There, you must copy the necessary information or description for the driver. You have to write them down somewhere you can access easily
- Open your web browser. Input the details that describe the driver into the address bar or text box present to search on Google. If you are lucky, you will see relevant results for your driver on the first page returned. If things go differently for you, you might end up having to deep dig into Google search page results or input queries for the item you are looking for on numerous websites
Your graphics card manufacturer webpage is also an excellent page to look for your stuff. Your PC’s manufacturer website would probably contain some valuable information too even if it lacks the driver software you need
- Download and save the driver in a directory you can easily access on your PC. After the download is complete, you have to click or double-click on the saved file to open an run it
Whatever happens, ensure that you download only the correct driver for your PC. If you get the wrong software and try to use it, you might end up with more problems than what you have currently.
It is also crucial that you get the files from reputable websites or trusted sources. You surely do not want to infect your system with viruses or malware
- Follow the instructions that come on the screen as they will guide you through the driver installation process and ensure that the entire operation proves successful. Now you must do the same for the other driver listed under Display Adapters.
At the end of it all, regardless of the method you went with, after you finish updating the necessary drivers, you must reboot your PC to let the new changes take effect. The recommended app should probably inform you about this or Windows might tell you to do it. We are just reminding you here in case the notification fails to appear.
Your computer should reboot, and Windows should settle down as usual, and the new drivers will become active. Finally, you must attempt to reproduce the problem, error message or notification involving Opencl.dll and see if you are successful at it.
We expect that your problems would have disappeared by now because this fix was the solution to the problem for the majority of the users who struggled with the issue in view and hence, the reason we spend so much time and effort on it. We will now move on to other fixes in fewer details as you too should if your problem persists.
-
Try out some troubleshooting operations:
Troubleshooting is all about identifying the source of a problem. Here, we are going to proffer some procedures you must carry out to solve the issue when unpredictable or random factors—the ones we might fail to take into account in other fixes— are involved.
- First, try to recall if you deleted any file recently. We recommend that you launch your Recycle Bin and go through its content. There is always the possibility that you got rid of some essential data unintentionally and such events give rise to problems described by notifications such as Missing Opencl.dll or Opencl.dll not found.
If you find the necessary file in your Recycle Bin, then you must restore it back to its resting place. You must restart your computer after you do so.
- Second, we also advise that you do a scan for viruses and malware. DLL files are integral components in most cases. Therefore, if your system is struggling to locate Opencl.dll or saying that its data is missing, there is a good chance a malicious program is at work.
Some classes of viruses or malware are capable of preventing Windows from detecting a file. Others are notorious for generating the error message disturbing you. Thus, the recommended scan is very much in order here.
We expect that you are running a good antivirus program to protect your PC from threats. Do a scan with it. Ensure that the app does a full scan and goes through every directory on your computer’s disk to be sure. It might take some time, but this operation is worthy of everything it demands.
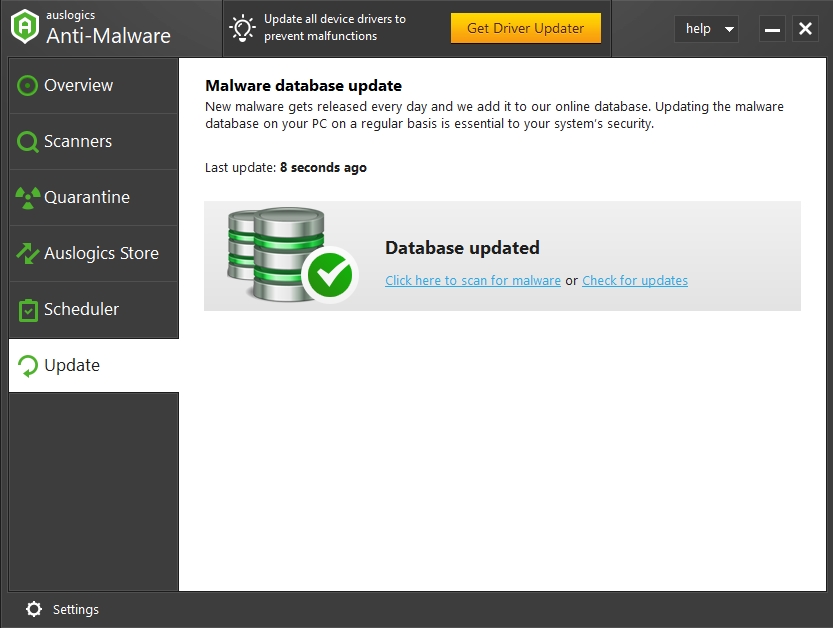
If you are unsure of the effectiveness of the checks your antivirus carried out or you simply feel like trying something different out, then we recommend that you download and run Auslogics Anti-Malware. This app does an excellent job in its own way to help you identify and get rid of the threats your main security program might have missed.
In the war against viruses, Trojans, spyware, and so on, a helping hand is always a good thing because it is difficult to win the battles against these dangerous items all the time. With the help of the recommended app, you get to create an extra layer of protection, which significantly improves your security setup to the highest levels possible.
If you identify any malicious item, you could use the quarantine option to create a temporary storage location, or you could get rid of it immediately (especially if you are paranoid). You must restart your system and see if the changes brought about by the elimination of problem-causing programs are enough to get rid of the issues affecting the Opencl.dll file.
-
Use Windows image file:
You can only use this fix if you have the ISO image you used for the installation of Windows before the occurrence of this error. If you do not possess this item or you lost it some time ago, there is no problem at all. You can always download it from the Microsoft page.
Note that the operations involved in this procedure are complex in terms of their execution and ability, so we recommend that you go on only if you know what you are doing. You are free to skip this particular fix for this reason and come back to it as a last resort if nothing else works for you because by then, you probably would not care about the complexity or risks involved.
Follow these instructions:
- First, you have to mount the ISO image. Open an elevated Command Prompt window. If your system is running Windows 10 or Windows 8.1, you can launch the required program from the Power User menu because it is one of the items on the list there.
You can open the menu by right-clicking on the Windows Start icon always visible on your desktop screen. You would also get the same result with this method: Press (and hold) the Windows button on your keyboard, then tap the letter X key. Regardless of the way you went with, you must select Command Prompt (Admin) to round it all off.
If you are using Windows 7, then things are a little bit more complicated. Press the Windows button on your keyboard or click on the Start icon on your desktop screen. Input the following keyword into the text box present to perform a quick search for it (you are free to start typing even when there is no visible text field): cmd
Right-click on the result (usually Command Prompt), and select Run as administrator from the short menu list that appears
- After the program window comes up, you must input the following code to create a temporary directory to mount the Windows image file: mkdir C:\WIM
Press the Enter key once you have finished typing to run the command immediately
- Now it is time you inputted this command to mount the WIM file: Dism /Mount-Wim /WimFile:D:\sources\install.wim /index:1 /MountDir:C:\WIM /ReadOnly
Press the Enter key as usual at the end to force its execution
- You also have to run a DISM operation. Hit the Enter key to force Windows to execute it after you finish typing this code: Dism /Online /Cleanup-Image /RestoreHealth /Source:C:\WIM\Windows /LimitAccess
- Now you have completed the primary operations. You need to unmount the image you used earlier and delete the folder you created. These are the final commands you need to run (press the Enter key after you finish inputting each one):
- Dism /Unmount-Wim /MountDir:C:\WIM /Discard
- rmdir C:\WIM
- Exit the Command Prompt app and close other program windows that are running currently. It is time you restarted your computer to round the procedure off and let the new changes become effective.
As usual, after PC boots up and Windows becomes stable, you must check if your problems that have something to do with Opencl.dll files are no more.
-
Copy the missing file:
If by now you still have not managed to resolve your issues involving Opencl.dll files, then it is time you consider a more laidback approach to the problem. The description of the subject or the notification you stated that some DLL files are missing, right? We would be surprised if the thought of replacing the data is yet to cross your mind.
To be fair, the proposed operation is far from the noble solution we proffer to problems involving a missing DLL file. On the internet, you will probably find a good number of sites offering DLL files for users to download and replace their missing components. There are numerous reasons you must avoid carrying out such an act though.
Arguments against the act:
Most of those websites hosting those files are hardly reputable ones. Some of them might even ask you to make a payment before you can download the file. Do not be deceived. Moreover, DLL files are critical components which if you are to get all you must fetch from safe sources. Items sourced from dubious places are far more likely to be infected with viruses or malware.
Nevertheless, besides the risk of you causing further harm to your computer by infecting it with malicious items, there are others things you have to consider to understand that downloading DLL files online is not a reasonable option or choice you should make.
The DLL files on those sites are often outdated ones, so they might not even work on your system, so all your effort, time, and money (if you paid for it) would be a waste. The uploaders of those items usually upload them from their computers. Most times, they either forget to update them, or they just do not care since they have little incentive to improve their work.
The reason you might do it:
We could go on and on and continue to state other reasons why you should not get DLL files from the web, but we believe by now you should already understand what we are on about here. If you are still struggling to see our point, then you probably never will.
If you are to make use of any file at all, we recommend that the item be the one you know very well. You could copy the needed data from another PC (which should be you trust well enough). Follow these instructions:
- Find a PC similar enough to yours in terms of its specifications, software, and so on. By this, we mean that your hardware components do not differ too much from those available on the other computer, both systems should be running the same version of Windows, and other little things along these lines
- Open the File Explorer program on the reference PC. Its icon is usually on the desktop screen, so you can click on it to launch it. You could also open the required app by pressing (and holding) the Windows button on your keyboard, then tapping the letter E key
- After the program window opens, click on My PC or click on This PC (depending on which one you see). Now you must navigate through the following items: C:\Windows\System32
In your current destination, you should see the missing file (Opencl.dll). Right-click on it and select Copy from the short menu list that appears. If you are running a 64-bit version of Windows, then you would have to perform the same operation on the directory you arrive at after navigating through the following items: C:\Windows\SysWOW64
- You will need to save the items you obtained from the other PC on an external device (preferably a flash drive) to get them on your PC. Go into the directory you want to place them and right-click on an empty space or point void of objects and select Paste from the short menu list to drop the file
- Now it is time you moved the files to your PC. Open the File Explorer program on your system. We have provided instructions on doing this in the second step of this fix. Navigate to the directories where the missing files should have been. Before you paste the data you obtained, we recommend that you create a backup of the original items there (if they exist) in case things go wrong
An alternative way of doing the same thing:
- Note we have seen some reliable reports which confirm that some users were able to go around the problem by using files they obtained from the directory you arrive at after you navigate through the following items: C:\Program Files\NVIDIA Corporation\OpenCL\
- You would have to locate the OpenCL64.dll file in the stated directory, right-click on it and select copy from the short menu list that appears. You would also go to another location and paste the file you got there. These are the items you have to navigate through: C:\WINDOWS\System32
- Remember to change the name of the file from OpenCL64.dll to Opencl.dll before pasting it
- After you have completed the pasting operations (or finished overwriting the old files), you will have to register the new ones. Continue with the steps below
- Open an elevated Command Prompt window. We provided instructions on doing this already in the first step of the previous (second) fix. After the Administrator: Command Prompt window comes up, you must input the following command and hit the Enter key at once to force its execution: regsvr32 Opencl.dll
Even without a restart of your PC, we believe that your problem is no more by now. Try to recreate the error and see how things go. Try to open the app or carry out the operation you could not complete due to the appearance of the message or notification indicating that there is a problem involving the Opencl.dll file. We hope things are in order now.
-
Download and run the latest OpenCL runtime packages:
If the Opencl.dll not found, corrupt Opencl.dll and similar problems you are experiencing have something to do with your CPU, then you might get your breakthrough after you download and run the latest OpenCL runtime packages. We have some instructions you can follow if your computer has a processor made by Intel. Go through these steps:
- Open your web browser. Input the following keywords into the address bar or text box present to perform a search: OpenCL runtime package
- After your browser presents the result page, you must click on the first link you see. You will end up on the Intel download page for the needed files. Select the download option that corresponds to your computer type and other relevant details
- Follow the instructions on the page to download the files. After your browser finishes downloading the setup, click or double-click on it to open and run it (its executable file usually with a .exe extension). Some guidelines should appear on your screen to guide you through the process. Follow every step carefully and choose the necessary variables or options to ensure that this operation is successful
- After Windows completes the installation of the packages, we expect that the issue in view would have stopped bothering you. Otherwise, you must restart your PC, wait for your computer to come on and let Windows become stable, then check again to see if your problems still exist.
-
Uninstall your graphics card drivers:
If you upgraded to the newest drivers but the issues involving Opencl.dll persist, then your computer was probably expecting something different from the latest software. Therefore, there is a good chance that restoration of the old driver or system files is the solution you need.
Users with NVIDIA cards can remove their driver and try to install it through the NVIDIA package installer or GeForce experience (clean install required).
You can quickly remove and restore your drivers through some options available in the Device Manager program you worked on earlier. Here are the instructions you need:
- Open Device Manager. We provided instructions on doing this on any operating system earlier. We would now proffer a slightly different method (as an extra one) for users running Windows 8.1 or the latest version of Windows (Windows 10).
Press (and hold) the Windows button on your keyboard, then tap the letter X to see the list of programs and options contained in the power user menu. Select Device Manager
- After Windows launches the program window, you will see the list of items you are familiar with already. As usual, you must locate Display Adapters and click on it to expand its menu. Windows should now show the drivers for your GPU cards
- Remember that you are going to uninstall them this time. Right-click on any one of them and select Uninstall from the short menu that comes up. You should see a dialog box requesting confirmation for your action, so you will have to click on the Uninstall or Yes button to confirm and move on
If you did not see the Uninstall option after you right-clicked on the driver, then you would have to go into its Properties menu to perform the uninstallation operation. Click or double-click on the driver. Its Properties window should appear now. Navigate to the Driver tab. There, you should see the Uninstall button, which you must click on to remove the driver
- Windows should now remove the selected driver software. Perform the same operation on the other driver you saw in the Display Adapters menu list to uninstall it. Once you have uninstalled all the drivers for your GPU components, then it is time you brought them back
- Some users might prefer to go about it this way: Click on the Scan for hardware changes. Windows should perform checks on your system now. It will automatically detect that some drivers went missing, so it will install the required software
You could also skip the first approach and directly move on to restart your system. We would prefer you do things this way to be fair. Your PC should reboot, and Windows will detect that you lack some drivers after it settles down. It will install all the necessary stuff automatically here too.
Finally, you get to check and confirm if this operation has had any effect on the problems associated with the Opencl.dll file. Try to open the program that failed to launch correctly due to the issue and see if things go differently this time. Move on to other fixes if you find out that nothing changed
On the other hand, if at the end of it all, you discovered that the driver operation you carried out not long ago fixed your problem, then you can start worrying about making the solution a permanent one. Unfortunately, your system will not retain its current state for long. Windows eventually will try to update the drivers automatically because it has been programmed to do so.
We recommend that you search for, download and run a specific tool that Microsoft once provided for users to employ to block driver updates or to stop Windows from updating itself. If that program does it work correctly, then you will have the closest thing to a guarantee that your current driver versions will remain intact as the leading software on your computer.
-
Disable your dedicated graphics card:
How we arrived at this fix:
AMD and NVIDIA are probably the most popular GPU manufacturers, so it was easy for us to infer that you have a chip produced by either of these firms. We understand that most users need dedicated cards to help their computer handle tasks or operations the integrated graphics card will struggle even to attempt.
However, after we went through several reports describing the vast majority of events involving problems with the Opencl.dll file, we noticed something interesting. Almost all of the issues (since they are driver-related) were centered on the faults of a single driver, and it was the one for the dedicated graphics card virtually every single time.
Similarly, we deduced that if we could somehow stop the dedicated graphics card from functioning, then the problems we are facing might stop bothering us. Well, we were proven right. Suffice to say that the removal of your dedicated GPU might be the fix that has eluded you for so long until now.
Reasons for and against its use:
Nevertheless, we understand that what we are proposing might not be an ideal act for some individuals, especially those who are very reliant on the abilities of their dedicated card. We are talking about gamers (those who play demanding or graphics-intensive titles, at least), video editors, and so on.
If you do not belong to the class of people involved in the activities above, then you should consider disabling your dedicated graphics card. After all, the problem has defied you for so long already and with no end in sight, why not try out something that could work?
We already established something related to the fact your integrated Graphics Processing Unit might fail to meet the requirement of the latest games, but at least you will get to perform every known essential task on your PC without the disturbance from messages like Opencl.dll missing (or Opencl.dll not found and similar descriptions) stopping you. Your choice is everything here—it all depends on you.
All the ways you could do it:
- If you decide to go on, then you have to choose how you want to go about disabling the dedicated driver card. For example, you could uninstall its driver (using the instructions we provided earlier) to obtain the effect you desire.
However, the first method we proposed might not be ideal in the sense that you would have to perform the same operation to disable the driver each time you restart your PC. Recall that Windows automatically detects when drivers are missing after a reboot. It installs them without asking questions.
- Here is another way: if your driver manufacturer provided an app for you to use to control the settings for your card, you could go open that app and go through its settings until you see the option for disabling the driver. Take advantage of it.
- Finally, there is one last alternative way of doing the same thing. You could disable your dedicated graphics card’s driver by doing some work on your BIOS (Basic Input/Output System) to alter specific settings. However, we doubt you would prefer this approach due to the complexity of the operations involved. We know it to be an advanced technique after all.
-
Carry out scans using the SFC and DISM tool:
The SFC (an acronym for System File Checker) tool works by scanning your system for and repairing corrupted files. Users often employ this relatively popular utility to check for corruption and errors.
In stark contrast to the popularity of the SFC utility, very few people know about the DISM (Deployment Image Servicing and Management) which repairs Windows images, and this operation is actually the one that enables the System File Checker tool to do its work correctly.
Follow these instructions to carry out operations using both tools to fix the problem affecting the Opencl.dll files:
- Mount Windows 10 ISO image. We showed you how to go about this earlier in the steps for one of the previous fixes. So no extra words here
- Open an elevated Command Prompt program window. Nothing to see here too as the instructions for this act are in the steps we provided earlier
- Input the following lines of code (one after the other) and hit the Enter key (after you type in each one):
- Dism /Online /Cleanup-Image /RestoreHealth /Source:esd:F:\sources\install.esd\1\Windows\WinSxS\wow64_microsoft-windows-r..xwddmdriver-wow64-c_31bf3856ad364e35_10.0.10586.0_none_3dae054b56911c22\
- sfc /scannow
- These operations might take a while, so we advise that you remain patient. Restart your system after you see a message indicating that Windows has completed the final act.
After your PC reboots and stability comes to Windows, you will have to verify or find out if your problems are still active. Launch the program you tried to open when you got confronted by the error message or notification stating that your Opencl.dll file is corrupted, missing, or a similar description. Observe the state of things now.
-
Download and install all the available Windows updates:
Some reports confirm that when the bugs (in Windows) are confronted by the inconsistencies in the operations (some of which are carried out by the drivers of your dedicated graphics card), they give rise to the problem that affects the Opencl.dll file. Now think about what would happen if just the bugs got eliminated? If you thought the issues would be no more, then you guessed correctly.
Well, in theory at least, Microsoft provides Windows updates to get rid of bugs, eliminate vulnerabilities or shortcomings in its OS to improve security (usually in the form of patches), introduces new features and capabilities to increase the productivity of users, and so on. Only one of these goals from the host of purposes we listed is of concern to us though. For this reason and some others, keeping your system is always a good thing.
Therefore, it is easy to imply that there is a good chance that Microsoft has resolved the bugs that lead to your problem in some updates. If you have not updated your system in a while, then your PC might be suffering due to your inaction.
We understand that most users with computers running Windows 8.1 or Windows 7 usually have fewer incentives to update their OS due to the high flexibility Microsoft allows to them. In this case, an excessive number of choices or options might prove to be a bad thing.
On the other hand, it is a bit strange to find users running the latest version of the OS (Windows 10) who have not updated their devices in a while. After all, Microsoft intentionally took away the choice that users go with to stop their computers from updating themselves.
If you are running the stated iteration of Windows and your PC is lacking updates, then something is not right. Or maybe, all is well. Perhaps, you did something to stop the updates from coming. Then again, there is always the chance that Windows might miss an update or 2, but such events happen very rarely.
It is better late than never though. Regardless of what version of Windows you are using currently, you can always check for updates manually and install what you find. Follow these instructions:
If you are running Windows 10, here are the instructions you need:
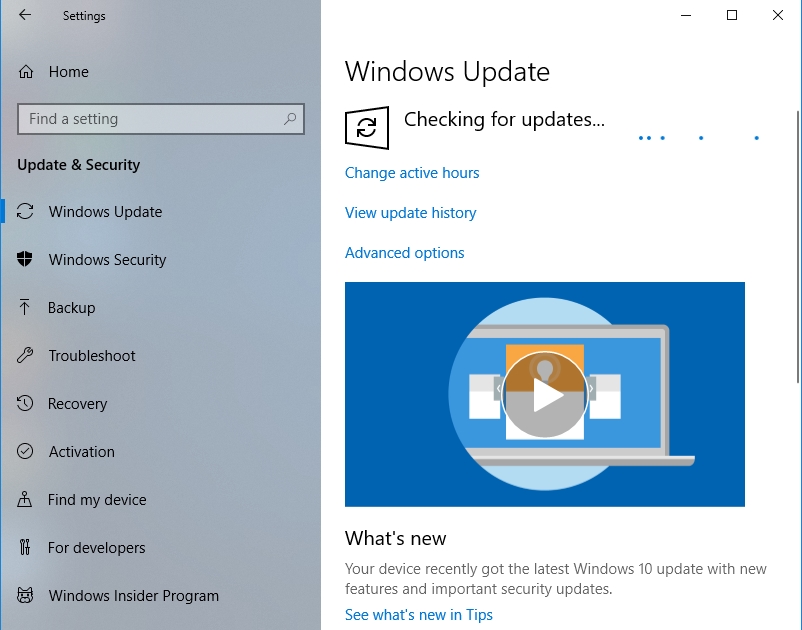
- Press the Windows button on your keyboard or click on the Windows Start icon always visible on your desktop screen. Select Settings from the programs or apps that appear
- After Windows launches the required program window, click on Update and Security to open its menu. Under the Windows Update menu, you should see information about the last time Windows checked for updates
- Well, it is time you clicked on the Check for updates button. Windows will now contact Microsoft servers to see if there are any updates that your PC is lacking. This part of the operation should not take long (especially if you have a good internet connection)

If you are running Windows 8.1 or Windows 7, then these are the instructions you need to check for updates:
- First, you need to open the Control Panel program. There are many ways of doing this, but we have to propose a method that will work on the two iterations of Windows involved, and we have just the one.
Open the Run app by pressing the Window button on your keyboard, then tapping the letter R key. After the small program window appears, you must input the following code and tap the Enter key to force its execution immediately once it is there: control
- After the Control Panel window comes up now, click on Windows Update to enter its menu. You can also click on the Check for update link if it is available there already. If you cannot find this option, then you must perform a quick search for this keyword in the text box present: update
Click on any reasonable result on the list and continue with the instructions below
- We expect that you are in the Windows Update menu now. Click on the Check for update or Check now button. Windows will soon contact the necessary sources to find out if there is something new for you
After Windows completes its search for updates, then you should see information about what it discovered. For example, if there nothing for you to download and install, you will see a message stating that you have all the latest updates or Windows is up to date.
If there is something your PC lacks, you will see the specific update, its name, and other information about it. You must download and install the update or any other upgrade that is missing from your system. After all, you do not know which particular one contains the fix for your problem, so it is best you went with all of them.
After a successful installation of the updates, Windows should prompt you to do one last thing (this should happen, in theory at least). In a similar way to end of other procedures, a restart of your computer is always necessary to let the new changes become active.
After your device comes on and Windows boots up (although this time it might require more time than you are used to), you will finally get to know if this regular operation was the fix to your issues involving the Opencl.dll file.
-
Reinstall the affected program:
If you are getting the Opencl.dll missing, corrupted or not found message each time you try to open a particular application (and just that one), then your best bet to resolving the issue requires you to re-install the app. It makes sense when you consider the fact that some DLL files are associated with some specific programs which need them to work correctly.
To be fair, in some error messages or notifications, you will see some advice requesting that you reinstall the app to fix the problem. That should count for something at least. Nevertheless, you should know that the information is no guarantee that a reinstallation of the affected program is the appropriate fix. You are always welcome to try though since there is no harm involved.
First, you have to uninstall the app. If you are running Windows 10 like the vast majority of users, these are the instructions you need to go through to remove an application:
- Open the Settings app. We showed you how to do this before in previous fixes. You can always try out this method that differs from the others we provided: Press (and hold) the Windows button on your keyboard, then tap the letter I key
- After Windows launches the needed program window, you have to click on System, which is one of the items on the Settings menu
- On the left pane, you will see a list of options from which you must select Apps and Features. Windows should now show the list of programs currently installed on your device
- Go through them, locate the program affected by the Opencl.dll file problem, and click on it to highlight it. An Uninstall button should now appear. Click on it
- A small dialog box requesting confirmation for your action will come up. Click on the Uninstall button there to confirm and move on with the procedure. Windows should now get rid of the chosen program
If you have a device running Windows 8.1 or Windows 7 instead, here are the instructions you need:
- Open the Run app. We have provided instructions on doing this enough times already. After the small program window appears, you must input the following code into the text box present and hit the Enter key to run it at once: appwiz.cpl
- The action you just carried out should force Windows to open the Programs and Features menu directly in a Control Panel program window for you. There, you will see your currently installed applications
- Go through them, identify the app troubled by the Opencl.dll problem, and right-click on it to see a short menu list. Select Uninstall to remove the program
- A small dialog box seeking confirmation should show up as usual. Click on the Yes or Uninstall button there to continue with the operation. Windows will now remove the selected program from your PC. Some instructions might appear to walk you through the process. Follow them to ensure that this operation ends up being successful.
Now having removed the affected app, you must restart your computer because sometimes Windows needs a reboot to get rid of some unwanted files or components of the deleted program. After your computer comes on, and the OS settles down, you are free to re-install the app. This time, we recommend that you download and install the latest version of the program (if newer releases are available).
If you are yet to resolve the problem, you need not worry. You should know that there are still some fixes (in fewer details) waiting for you try them out:
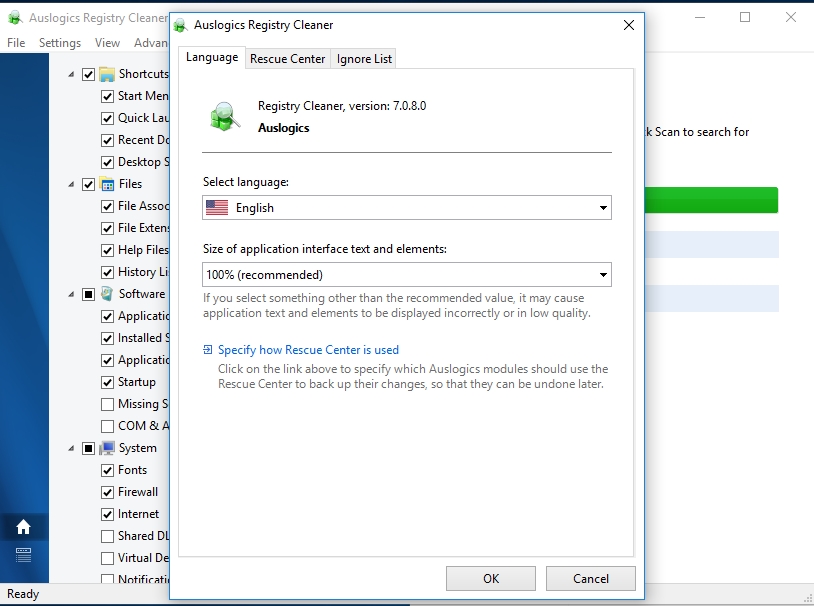
- Repair Corrupt Registry Entries: You will need Auslogics Registry Cleaner for this job. It is a FREE app, mind you.

- Use System Restore: If you believe that you altered something recently on your computer that led to the problem but you cannot recall what you did or if you actually do remember, but you do not know how to reverse it, then this is your best bet in getting rid of your problems.
- Repair Windows 10, use an in-place upgrade or do a clean install of the Windows OS: These fixes are very disruptive procedures, so we left them as the last solutions on the list. We are very confident about their effectiveness though (they are easily the most effective procedures on the list), and this statement should reinforce our claim regards them: If they fail to solve your problem, then nothing else will.
By now, it is reasonable to assume that you have already managed to resolve the issue involving the Opencl.dll file on Windows 10, Windows 8.1 or Windows 7. Considering the number of fixes and the information we provided through this lengthy guide, we can safely claim that your problems never stood a chance.
DLL files are extremely important in Windows as they are files that contain data and sets of functions that other programs in Windows use. Sometimes, you can come across a DLL file error, which happens when the DLL file is corrupted or missing.
One of the DLL errors that you may end up facing is the opencl.dll missing error. In this article, I have discussed what you can do in order to troubleshoot this error.
Also read: Sysmenu.Dll Error Windows 10! How To Fix?
We have shown a VIDEO walk through at the end of the post for easy solution.
There can be various reasons related to cause this error for you. Here are some of the known causes that can do this to you:
- Corrupted System File: Corrupted system files are known to trigger various errors on Windows 10. The applications, not opening can also be related to it.
- Faulty Graphics Drivers: Faulty graphics drivers are known to cause plenty of errors and bugs, including this one.
- Outdated Windows: Keeping the Windows updated is paramount in preventing bugs and errors.
- Unnecessary applications and services: Application and services that are unnecessary may conflict with each other and cause this error.
How To Fix OpenCl.dll Missing Error?
Now that you know the possible causes of this error, it is time to troubleshoot it. Here I have discussed the troubleshooting procedure that you can follow in order to fix this issue. Remember to read the instructions carefully to avoid making any mistakes.
Solution 1: Restore To A Previous System Point
If system restore is enabled on your PC and you have saved a previous restore point before this error appeared, then you can restore to it. By restoring to a previous system point, you should be able to get rid of this error. To restore to a previous system point, follow the steps given below:
- Type Create a restore point in the start menu and select the top result. The System Properties will open on your screen.
- In the System Protection tab, select the System Restore option.
- Click on the restore point made before this error appeared and follow the on-screen information to restore your PC to that state.
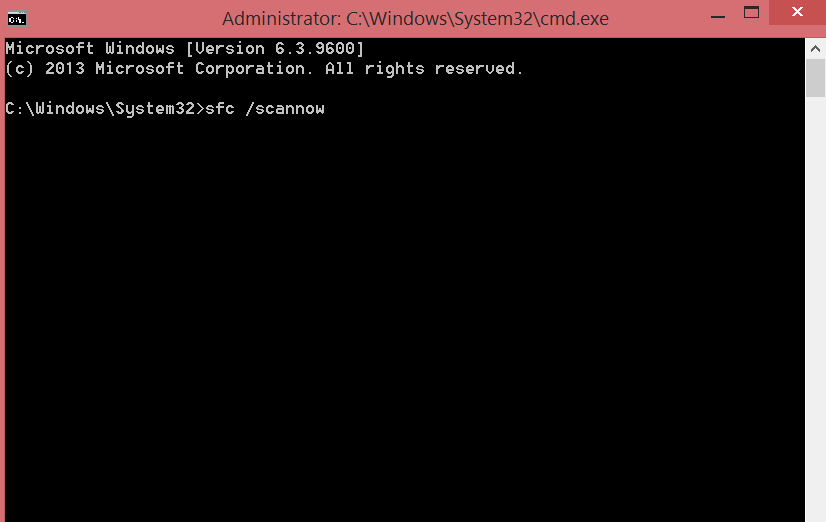
Solution 2: Run SFC And DISM Scans
Corrupted system files can also be the cause of this error. If this is the case, then you can try running the System File Checker scan and DISM scan. The SFC checks for corrupted system files and fixes them while the DISM scan will repair the Windows image. To run the SFC scan and DISM scan, follow the steps given below:
- Open the Run utility again.
- Type cmd and press Ctrl + Shift + Enter to open an elevated Command Prompt.
- Type the following command and press Enter:
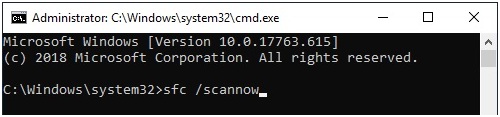
sfc /scannow
- Wait for the scan to finish as it will take around 20-30 minutes. Do not close the Command Prompt prematurely.
- Restart the computer.
- Now, open the elevated command prompt again.
- Type the following commands and press Enter after finishing each one:
a) Dism /Online /Cleanup-Image /CheckHealth
b) Dism /Online /Cleanup-Image /ScanHealth
c) Dism /Online /Cleanup-Image /RestoreHealth - Wait for the commands to finish running and then restart the computer.
Solution 3: Update Windows
Outdated operating systems are known to conflict with newer apps and games. If you are using outdated Windows, you should update it to the latest version. Windows update fixes bugs, adds security patches, and provides newer features. To update your Windows 10, follow the steps given below:
- Type Check for updates in the Start menu and select the top result.
- Click on the Check for updates option and wait for Windows 10 to finish checking.
- If any update is available, Windows should start downloading it automatically. After the download is complete, install it and restart your PC.
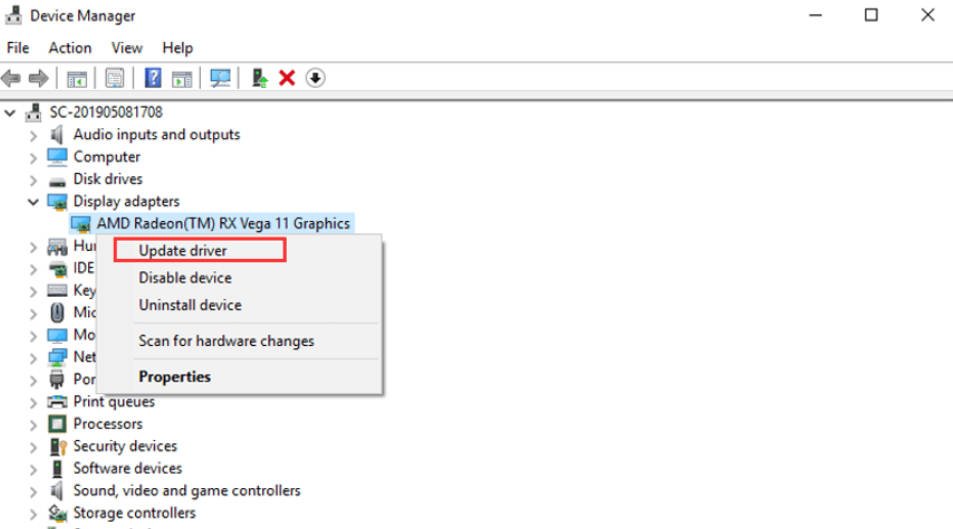
Solution 4: Troubleshoot Graphics Drivers
This error is known to occur because of corrupted graphics drivers. You can troubleshoot the graphics drivers by following the steps given below:
- Press the Windows + R keys to open the Run utility.
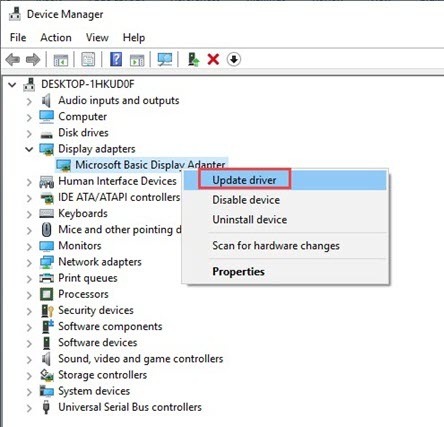
- Type devmgmt.msc and press Enter to open the Device Manager.
- Expand the Display adapters section.
- Right-click on the graphics drivers driver.
- Select the Update driver option from the right-click context menu.
- Click on the Search automatically for drivers option and follow the instructions on your screen to finish the process.
- After the update is complete, restart the computer.
Check whether the error remains. If yes, then try uninstalling and reinstalling the graphics drivers. To uninstall the audio drivers, follow the steps given below:
- Open the Device Manager again.
- Right-click on the graphics driver and select the Uninstall device option.
- Follow the instructions on your screen to finish uninstalling.
- Finally, restart your PC.
Solution 5: Restore Mfc100u.dll From The Recycle Bin
This error is triggered when the DLL file goes missing. The DLL file can go missing if it was deleted. If you have deleted the DLL file mistakenly, there is always a chance that the file is still in the Recycle bin. The chances may be slim, but it is better to check this possibility anyway. If the DLL file is in the Recycle bin, you can simply restore it.
To restore the DLL file in the Recycle bin, follow the steps given below:
- Open the Recycle bin and check if the Mfc100u.dll file is there or not.
- If the DLL file is present in the Recycle bin, right-click on it.
- Select the restore option to restore the DLL file.
After you have restored the DLL file, check whether you can start the application or not.
Solution 6: Download OpenCL Runtime Package
You can always install the OpenCL runtime package from Intel’s website to fix this issue on your PC. To install the OpenCL runtime package in your Windows 10, follow the steps given below:
- Visit this webpage.
- Download the OpenCL runtime driver for Windows.
- After you have downloaded the runtime tool, run it. Follow the on-screen installation instructions to complete the process.
Solution 7: Run An Antivirus Scan
Viruses and malware are known to delete DLL files. If your PC is infected by virus or malware, it won’t matter if you install the DLL file again. First, you need to clear the virus or malware from your PC and then install the DLL file. To clear malware, you can use the power Malwarebytes.
But if you don’t want to use any 3rd party software, you can run the Windows Defender Offline Scan. To run the offline scan, follow the steps given below:
- Type Windows Security in the search bar and select the top result.
- Click on the Virus and threat protection option.
- Select the Scan options in the Current threats section.
- Check the Microsoft Defender Offline scan circle and click on the Scan now option.
It will take around 15 minutes for the scan to finish. Don’t turn off the computer while the scan is happening. After the scan finishes, your computer will restart automatically.
Solution 8: Reinstall The Application
If your computer isn’t infected with malware or viruses and if installing the redistributable didn’t work, it means that the application of the game is also corrupted. In this scenario, you need to reinstall the application that is triggering this error. Before you reinstall the application, it needs to be uninstalled. To uninstall the application, follow the steps given below:
- Press the Windows + R keys to open the Run utility.
- Type appwiz.cpl and press Enter to open the Program and Features panel.
- Locate the application among the other listed apps and right-click on it.
- Select the Uninstall option and follow the on-screen instructions to finish the process.
After the application is uninstalled, reinstall the application.
Wrapping Up
So, there you have it. Now you know what to do when OpenCL.dll missing is missing. The above solutions should help you fix this issue. If you have any other questions, ask them in the comment section below.
Fix corrupt Opencl.dll in Windows 10: A new problem seems to occur after updating Windows 10 to the latest build, users are reporting that opencl.dll becomes corrupt. The problem seems to be only affecting the users who have NVIDIA Graphic Card and whenever the user installs or updates NVIDIA drivers for the graphic card, the installer automatically overwrites the existing opencl.dll file in Windows 10 with its own version and hence this corrupts the Opencl.dll file.
The main issue because of the corrupt opencl.dll file is that your PC will reboot randomly sometimes after 2 minutes of use or sometimes after 3 hours of continuous use. User’s can verify that the opencl.dll file is corrupt by running SFC scan as it notifies the user of this corruption but sfc won’t be able to repair this file. So without wasting any time let’s see how to actually Fix corrupt Opencl.dll in Windows 10 with the below-listed steps.
Table of Contents
Make sure to create a restore point just in case something goes wrong.
Method 1: Run DISM (Deployment Image Servicing and Management)
1. Press Windows Key + X then select Command Prompt (Admin).
2. Try these command sin sequence:
Dism /Online /Cleanup-Image /StartComponentCleanup
Dism /Online /Cleanup-Image /RestoreHealth

3. If the above command doesn’t work then try on the below:
Dism /Image:C:\offline /Cleanup-Image /RestoreHealth /Source:c:\test\mount\windows
Dism /Online /Cleanup-Image /RestoreHealth /Source:c:\test\mount\windows /LimitAccess
Note: Replace the C:\RepairSource\Windows with the location of your repair source (Windows Installation or Recovery Disc).
4. Don’t run SFC /scannow in order to verify the integrity of system run DISM command:
Dism /Online /Cleanup-Image /CheckHealth
5. Reboot your PC to save changes.
6. If you’re still facing the issue then you need to use techbench iso in order to fix the issue.
7. First, create a folder on the desktop with the name mount.
8. Copy install.win from the download ISO to the mount folder.
9. Run the following command in cmd:
Dism /mount-wim /wimFile:%USERPROFILE%\Desktop\install.wim /index:1 /MountDir:%USERPROFILE%\Desktop\mount
Dism /Online /Cleanup-Image /CheckHealth
Dism /Online /Cleanup-Image /RestoreHealth /Source:%USERPROFILE%\Desktop\mount\windows /LimitAccess
Dism /unmount-wim /Mountdir:%USERPROFILE%\Desktop\mount /discard
10. Reboot your PC and this should Fix corrupt Opencl.dll in Windows 10 but if you’re still stuck then continue.
Method 2: Run Automatic/Startup Repair
1. Insert the Windows 10 bootable installation DVD and restart your PC.
2. When prompted to Press any key to boot from CD or DVD, press any key to continue.

3. Select your language preferences and click Next. Click Repair your computer in the bottom-left.

4. On choose an option screen, click Troubleshoot.

5. On the Troubleshoot screen, click the Advanced option.

6. On the Advanced options screen, click Automatic Repair or Startup Repair.

7. Wait till the Windows Automatic/Startup Repairs complete.
8. Restart and you have successfully Fix corrupt Opencl.dll in Windows 10, if not, continue.
Also, read How to fix Automatic Repair couldn’t repair your PC.
Method 3: Try Running SFCFix Tool
SFCFix will scan your PC for corrupted system files and will restore/repair these files which System File Checker failed to do so.
1. Download SFCFix Tool from here.
2. Press Windows Key + X then select Command Prompt (Admin).
3. Type the following command into cmd and hit enter: SFC /SCANNOW
4. As soon as the SFC scan has begun, launch the SFCFix.exe.

Once SFCFix has run its course it will open a notepad file with information about all the corrupt/missing system files that SFCFix found and whether or not it was successfully repaired.
Method 4: Manually replace the Opencl.dll corrupted system file
1. Navigate to the below folder on the computer that is working correctly:
C:\Windows\WinSxS
Note: In order to make sure the opencl.dll file is in good condition and is not corrupt, run the sfc command.
2. Once inside the WinSxS folder search for the opencl.dll file.

3. You will find the file in the folder which will have its initial value as:
wow64_microsoft-windows-r..xwddmdriver-wow64……
4. Copy the file from there to your USB or external drive.
5. Now go back to the PC where opencl.dll is corrupted.
6. Press Windows Key + X then select Command Prompt (Admin).
7. Type the following command and hit Enter:
takeown /f Path_And_File_Name
For example: In our case, this command will look something like this:
takeown /f C:\Windows\WinSxS\wow64_microsoft-windows-r..xwddmdriver-wow64-c_31bf3856ad364e35_10.0.14393.0_none_de9cd86dc2ec8d58\opencl.dll

8. Again type the following command and hit Enter:
icacls Path_And_File_Name /GRANT ADMINISTRATORS:F
Note: Make sure to replace Path_And_File_Name with you own, for example:
icacls C:\Windows\WinSxS\wow64_microsoft-windows-r..xwddmdriver-wow64-c_31bf3856ad364e35_10.0.14393.0_none_de9cd86dc2ec8d58\opencl.dll /GRANT ADMINISTRATORS:F

9. Now type the last command to copy the file from your USB drive to the Windows folder:
Copy Source_File Destination
For example: Copy G:\opencl.dll C:\Windows\WinSxS\wow64_microsoft-windows-r..xwddmdriver-wow64-c_31bf3856ad364e35_10.0.14393.0_none_de9cd86dc2ec8d58\opencl.dll
10. Reboot your PC to save changes.
11. Run Scan health command from DISM.
This method should definitely Fix corrupt Opencl.dll in Windows 10 but don’t run SFC as it will again create the problem instead use the DISM CheckHealth command to scan your files.
Method 5: Repair Install Windows 10
This method is the last resort because if nothing works out then this method will surely repair all problems with your PC. Repair Install just uses an in-place upgrade to repair issues with the system without deleting user data present on the system. So follow this article to see How to Repair Install Windows 10 Easily.
Recommended for you:
- Fix Restart your computer to install important updates loop
- How to fix Logonui.exe system error on boot
- Troubleshoot Can’t Start Peer Name Resolution Protocol Service
- Fix Windows was unable to complete the format
That’s it you have successfully Fix corrupt Opencl.dll in Windows 10 but if you still have any questions regarding this guide then feel free to ask them in the comment’s section.
The Opencl.dll file is missing in Windows 10 – How do I fix it?
When you run a game or program in Windows 10, you may encounter the error “Opencl.dll missing, damaged or found”. Since the Opencl.dll file is related to graphics processing, you may find the error every time you update drivers like Nvidia or AMD. This is because the graphics card manufacturer’s driver installer automatically overwrites an existing opencl.dll file with its own. The error may occur when the opencl.dll is missing or damaged in Windows 10/7. I do not recommend downloading the Opencl.dll file from third parties, as it may be more of a virus. This is a guide on how to fix an error when the Opencl.dll file is missing, not found, or damaged. I will start with easier tasks, ending with radical methods.
1. Checking for a damaged Opencl.dll file
All versions of Windows have a built-in tool for checking and recovering system files. Run a command prompt as administrator and type the commands below, waiting for the process to end after each.
sfc /scannow
DISM /ONLINE /CLEANUP-IMAGE /RESTOREHEALTH
2. Restore from image
If the above method did not help, we will restore from the ISO image. Microsoft ships its own SysWOW64\opencl.dll via the WinSxS hard link, but NVIDIA drivers can overwrite this file. Follow the three steps below:
Mount the ISO image onto a USB flash drive or virtual drive from Windows 10.
Dism /Online /Cleanup-Image /RestoreHealth /Source:esd:D:sourcesinstall.esd1WindowsWinSxSwow64_microsoft-windows-r..xwddmdriver-wow64-c_31bf3856ad364e35_10.0.10586.0_none_3dae054b56911c22.
3. Video card driver
You need to uninstall the video card drivers and install the latest version by downloading it from the video card manufacturer’s website. Use the manual how to completely uninstall Nvidia, AMD, Intel graphics card drivers. After uninstalling the driver, go to the manufacturer’s website and download the latest version.
4. Where to download Opencl.dll and where to throw it?
Do not download Opencl.dll from third party sources. You can take it from a second computer or laptop, it will be safer. You can ask your friend to throw it, provided that he has a computer in a safe state and you are sure about it. The Opencl.dll file is in two ways:
C:\Windows\System32
C:\Windows\SysWOW64