
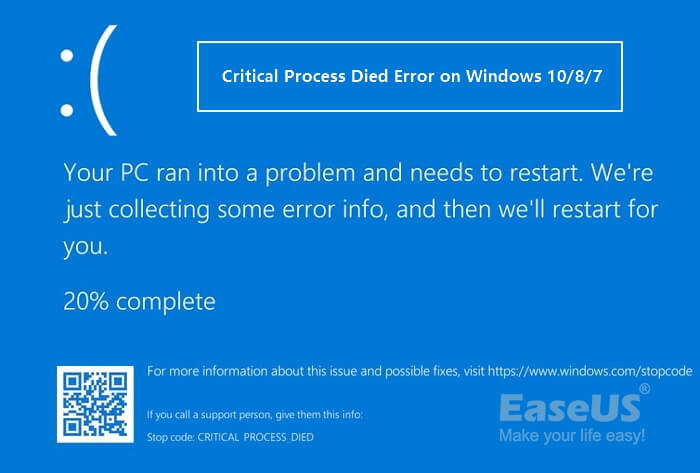
Одна из распространенных ошибок на компьютерах и ноутбуках с Windows 10 — синий экран с сообщением «На вашем ПК возникла проблема, и его необходимо перезагрузить» с кодом остановки (ошибки) CRITICAL PROCESS DIED — после ошибки, обычно происходит автоматическая перезагрузка компьютера, а затем, в зависимости от конкретных обстоятельств — либо снова появление того же окна с ошибкой или обычная работа системы до повторного возникновения ошибки.
В этой инструкции — подробно о том, что может являться причиной появления проблемы и как исправить ошибку CRITICAL PROCESS DIED в Windows 10 (также ошибка может отображаться как CRITICAL_PROCESS_DIED на синем экране в версиях Windows 10 до 1703).
Причины ошибки
В большинстве случаев причиной ошибки CRITICAL PROCESS DIED бывают драйверы устройств — в случаях, когда Windows 10 использует драйверы из Центра обновлений, а требуются оригинальные драйверы производителя, а также другие неправильно работающие драйверы.
Случаются и другие варианты — например, с синим экраном CRITICAL_PROCESS_DIED можно столкнуться после работы программ для очистки от ненужных файлов и реестра Windows, при наличии вредоносных программ на компьютере и в случае повреждения системных файлов ОС.
Как исправить ошибку CRITICAL_PROCESS_DIED
В случае, если вы получаете сообщение об ошибке сразу при включении компьютера или входе в Windows 10, для начала зайдите в безопасный режим. Сделать это можно различными способами, в том числе, когда система не загружается, подробно об этом в инструкции Безопасный режим Windows 10. Также использование чистой загрузки Windows 10 может временно помочь избавиться от ошибки CRITICAL PROCESS DIED и выполнить действия для полного ее устранения.

Способы исправления, если удается войти в Windows 10 в обычном или безопасном режиме
В первую очередь рассмотрим способы, которые могут помочь в ситуации, когда вход в Windows возможен. Начать рекомендую с просмотра сохраненных дампов памяти, которые создаются системой автоматически при критических сбоях (к сожалению, не всегда, иногда автоматическое создание дампов памяти отключено. См. Как включить создание дампов памяти при сбоях).
Для анализа удобно использовать бесплатную программу BlueScreenView, доступную для загрузки на странице разработчика https://www.nirsoft.net/utils/blue_screen_view.html (ссылки на загрузки находятся внизу страницы).
В очень упрощенном варианте для начинающих пользователей анализ может выглядеть следующим образом:
- Запустите программу BlueScreenView
- Просмотрите файлы .sys (обычно нужны именно они, хотя в списке часть могут присутствовать hal.dll и ntoskrnl.exe), которые отобразятся в верхней части таблицы в нижней панели программы с не пустым вторым столбцом «Address In Stack».

- Используя поиск в Интернете, выясните, что это за файл .sys и какой драйвер он представляет.

Примечание: также можно попробовать использовать бесплатную программу WhoCrashed, которая может сообщить точное наименование драйвера, вызвавшего ошибку.
Если шаги 1-3 удались, то далее останется лишь решить проблему с идентифицированным драйвером, обычно это один из следующих вариантов:
- Загрузить файл драйвера с официального сайта производителя ноутбука или материнской платы (для ПК) и установить его.
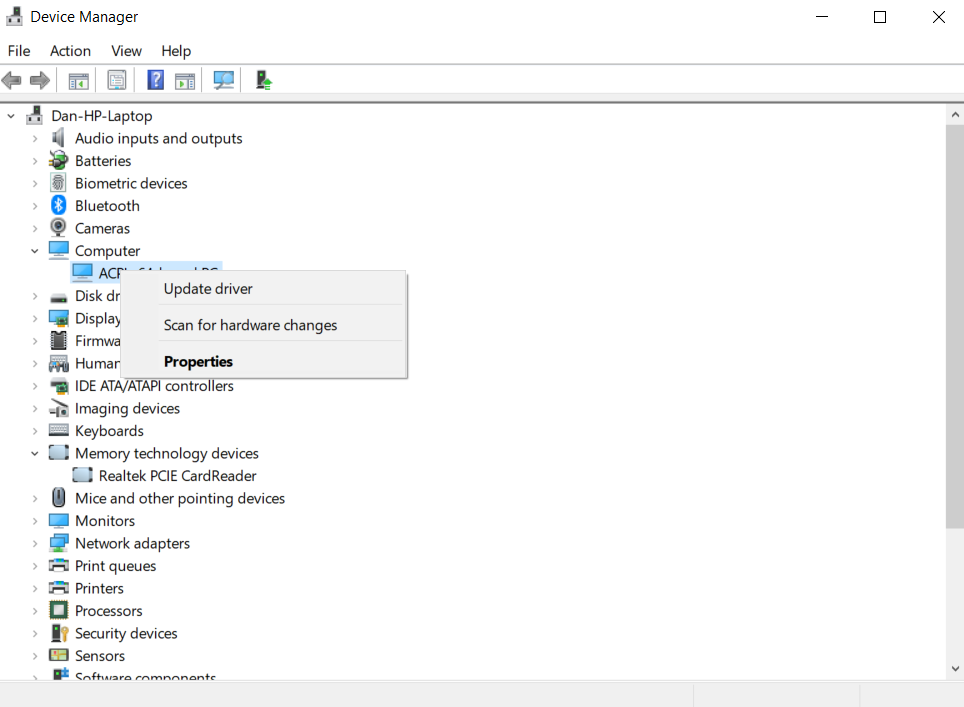
- Откатить драйвер, если он недавно обновлялся (в диспетчере устройств правый клик по устройству — «Свойства» — вкладка «Драйвер» — кнопка «Откатить»).
- Отключить устройство в диспетчере устройств, если оно не является критичным для работы.
Дополнительные методы исправления, которые могут помочь в данном сценарии:
- Ручная установка всех официальных драйверов (важно: некоторые пользователи ошибочно считают, что если диспетчер устройств сообщает, что драйвер не нуждается в обновлении и «устройство работает нормально», то все в порядке. Это часто не так. Официальные драйверы берем с сайта производителя вашего оборудования: например, аудио драйверы Realtek скачиваем не с Realtek, а сайта производителя материнской платы для вашей модели или с сайта производителя ноутбука, если у вас ноутбук).
- Использование точек восстановления, если они есть в наличии и если недавно ошибка не давала о себе знать. См. точки восстановления Windows 10.
- Проверка компьютера на наличие вредоносных программ (даже если у вас есть хороший антивирус), например, с помощью AdwCleaner или других средств удаления вредоносных программ.
- Выполните проверку целостности системных файлов Windows 10.
Как исправить ошибку CRITICAL PROCESS DIED, если Windows 10 не запускается
Более сложный вариант — когда синий экран с ошибкой появляется еще до входа в Windows 10 без возможности запустить особые варианты загрузки и безопасный режим (если такая возможность есть, то можно использовать предыдущие методы решения в безопасном режиме).
Примечание: если после нескольких неудачных загрузок у вас открывается меню среды восстановления, то создавать загрузочную флешку или диск, как описано далее, не нужно. Вы можете использовать средства восстановления из этого меню, в том числе — сброс системы в разделе «Дополнительные параметры».
Здесь потребуется создать загрузочную флешку с Windows 10 (или диск восстановления) на другом компьютере (разрядность системы на накопителе должна совпадать с разрядность установленной системы на проблемном компьютере) и загрузиться с нее, например, используя Boot Menu. Далее порядок действий будет следующим (пример для загрузки с установочной флешки):
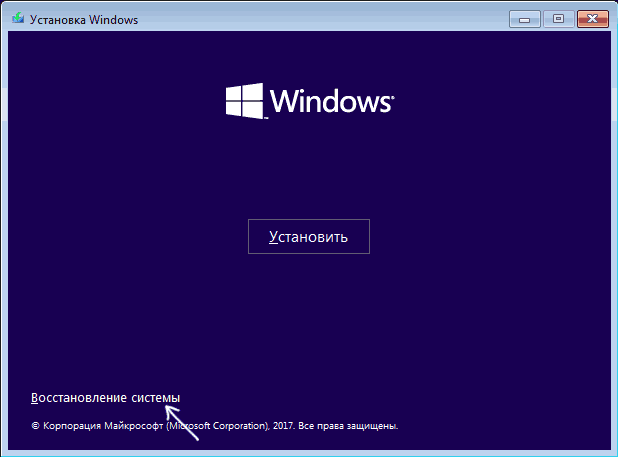
- На первом экране программы установки нажмите «Далее», а на втором, внизу слева — «Восстановление системы».

- В появившемся меню «Выбор действия» зайдите в «Поиск и устранение неисправностей» (может называться «Дополнительные параметры»).

- При наличии, попробуйте использовать точки восстановления системы (пункт «Восстановление системы»).
- При их отсутствии, попробуйте открыть командную строку и выполнить проверку целостности системных файлов с помощью sfc /scannow (как это сделать из среды восстановления, подробно в статье Как проверить целостность системных файлов Windows 10).

Дополнительные варианты решения проблемы
Если к текущему моменту никакие способы не помогают исправить ошибку, среди остающихся вариантов:
- Выполнить сброс Windows 10 (можно с сохранением данных). Если ошибка появляется после входа в систему, то сброс можно выполнить, нажав по кнопке питания, изображенной на экране блокировки, затем, удерживая Shift — Перезагрузка. Откроется меню среды восстановления, выберите «Поиск и устранение неисправностей» — «Вернуть компьютер в исходное состояние». Дополнительные варианты — Как сбросить Windows 10 или автоматическая переустановка ОС.
- Если проблема возникла после использования программ для очистки реестра или подобных, попробуйте восстановить реестр Windows 10.
При отсутствии решения могу рекомендовать лишь попробовать вспомнить, что предшествовало появлению ошибки, выявить закономерности и попробовать как-то отменить действия, которые привели к проблеме, а если это невозможно — выполнить установку системы повторно. Тут может помочь инструкция Установка Windows 10 с флешки.
Все способы:
- Устраняем ошибку «CRITICAL PROCESS DIED» в Windows 8
- Шаг 1: Загрузка Windows в безопасном режиме
- Шаг 2: Использование SFC
- Шаг 3: Использование точки восстановления
- Шаг 4: Обновление конфигурации устройств
- Шаг 5: Замена модулей оперативной памяти
- Шаг 6: Переустановка Виндовс
- Вопросы и ответы: 5
Потирая ладони в предвкушении плодотворной работы или увлекательного досуга вы включаете свой компьютер. И замираете от разочарования — на мониторе так называемый «синий экран смерти» и название ошибки «CRITICAL PROCESS DIED». Если дословно перевести с английского: «критический процесс умер». Неужели компьютер пора нести в ремонт? Но не торопитесь, отчаиваться не стоит, безвыходных ситуаций не бывает. Будем разбираться.
Устраняем ошибку «CRITICAL PROCESS DIED» в Windows 8
Ошибка «CRITICAL PROCESS DIED» нередкое явление в операционной системе Виндовс 8 и может быть вызвана целым рядом следующих причин:
- Аппаратная неисправность жесткого диска или планок оперативной памяти;
- Драйверы устройств, установленных в системе, устарели или работают некорректно;
- Повреждение реестра и файловой системы;
- Произошло заражение компьютерным вирусом;
- После инсталляции нового оборудования возник конфликт их драйверов.
Для исправления ошибки «CRITICAL PROCESS DIED» попробуем провести мероприятия в логической последовательности действий по реанимации системы.
Шаг 1: Загрузка Windows в безопасном режиме
Для поиска вирусов, обновления драйверов устройств и восстановления системы необходимо загрузить Виндовс в безопасном режиме, иначе никакие операции по устранению ошибки будут невозможны.
Для входа в безопасный режим при загрузке Windows пользуемся комбинацией клавиш «Shift+F8». После перезагрузки необходимо запустить любое антивирусное ПО.
Шаг 2: Использование SFC
В Виндовс 8 присутствует встроенный инструмент для проверки и восстановления целостности системных файлов. Утилита SFC выполнит сканирование жесткого диска, и проверит неизменность компонентов.
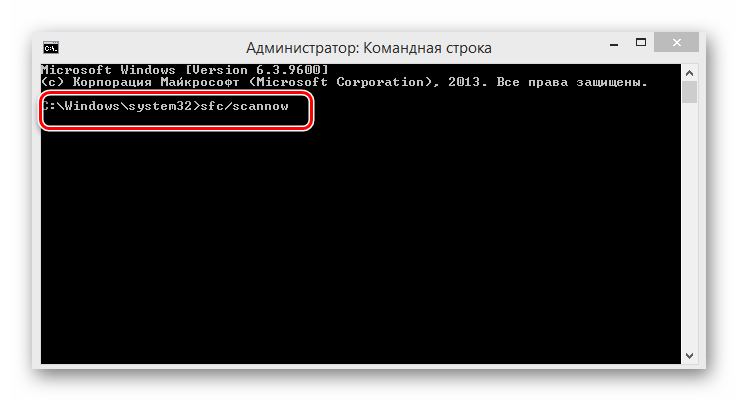
- На клавиатуре нажимаем сочетание клавиш Win + X, в открывшемся меню выбираем «Командная строка(администратор)».
- В командной строке вводим
sfc/scannowи подтверждаем запуск проверки клавишей «Enter».
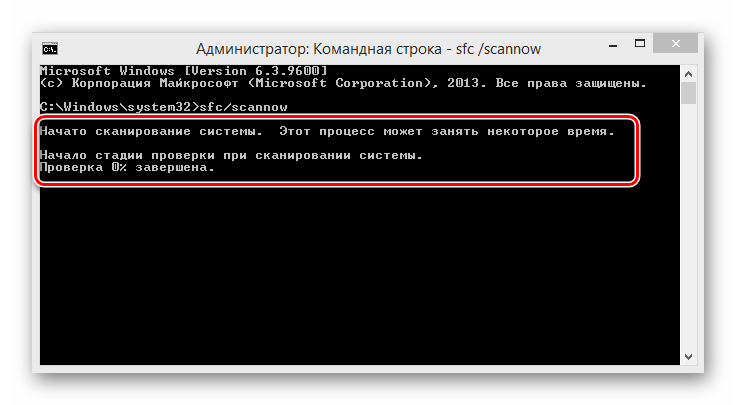
- SFC начинает сканирование системы, которое может продлиться 10-20 минут.

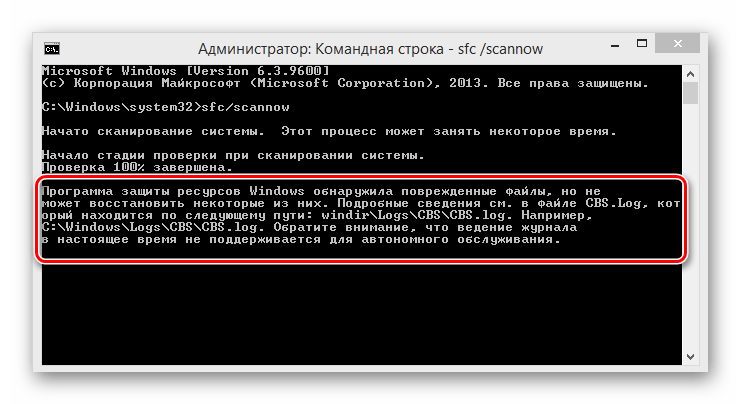
- Смотрим результаты проверки ресурсов Виндовс, перезагружаем компьютер, если ошибка не исчезла, пробуем другой способ.

Шаг 3: Использование точки восстановления
Можно попытаться загрузить последнюю работоспособную версию системы из точки восстановления, если, конечно, такая была создана автоматически или самим пользователем.
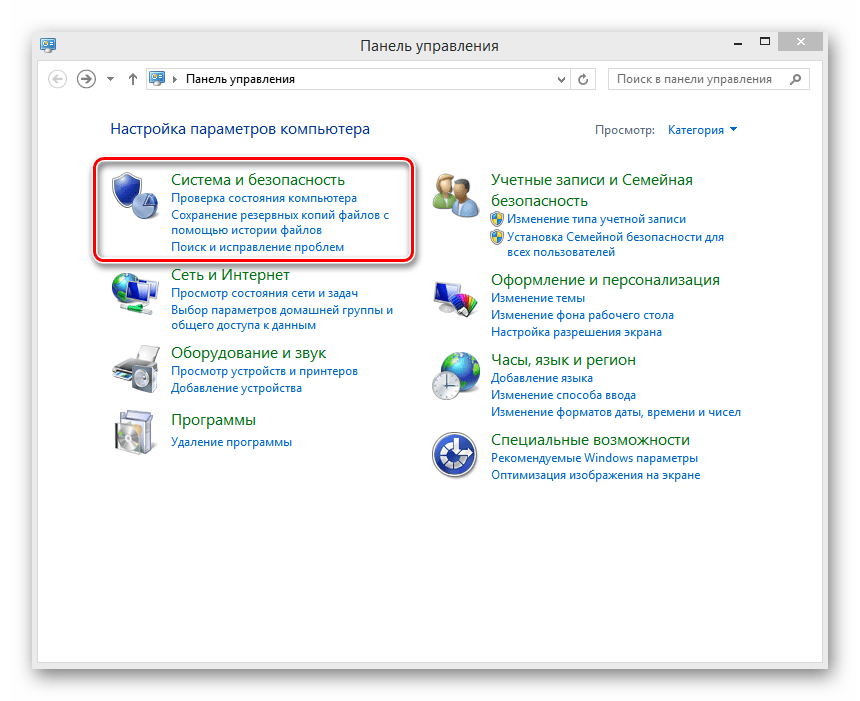
- Нажимаем уже знакомое нам сочетание клавиш Win + X, в меню выбираем «Панель управления».
- Далее переходим в раздел «Система и безопасность».

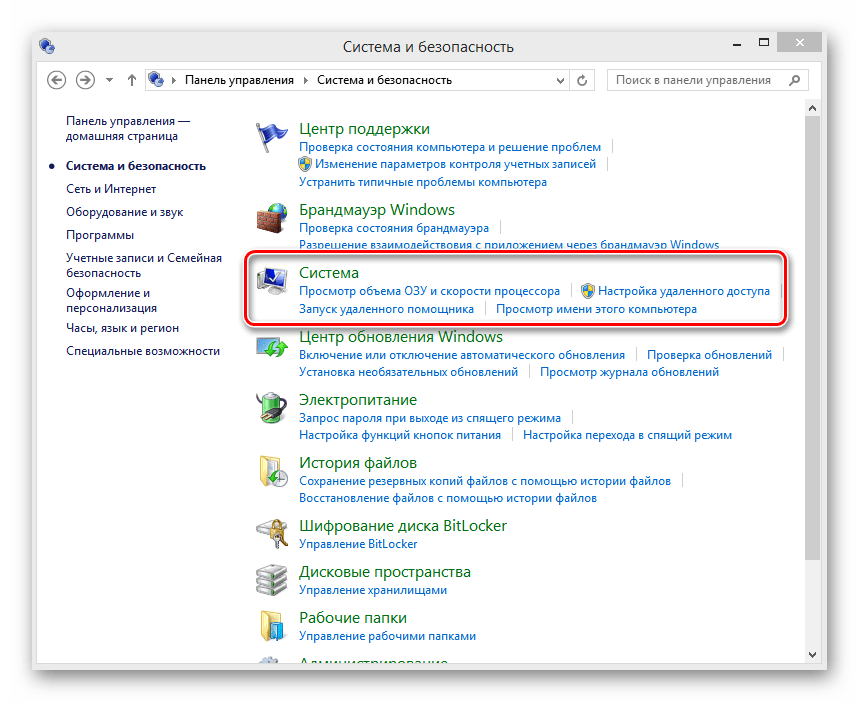
- Затем кликаем ЛКМ по блоку «Система».

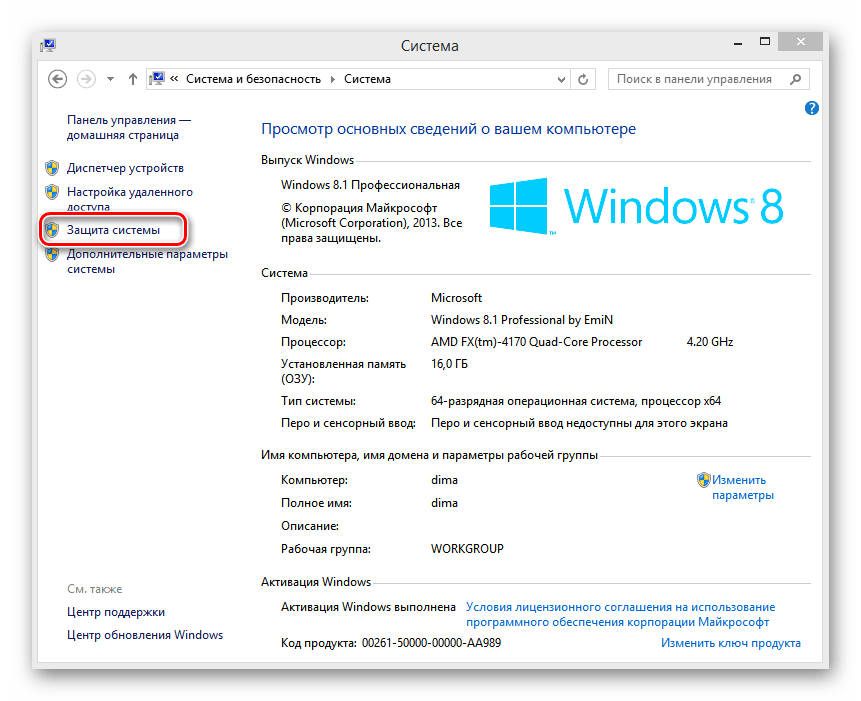
- В следующем окне нам нужен пункт «Защита системы».

- В разделе «Восстановление системы» решаем «Восстановить».

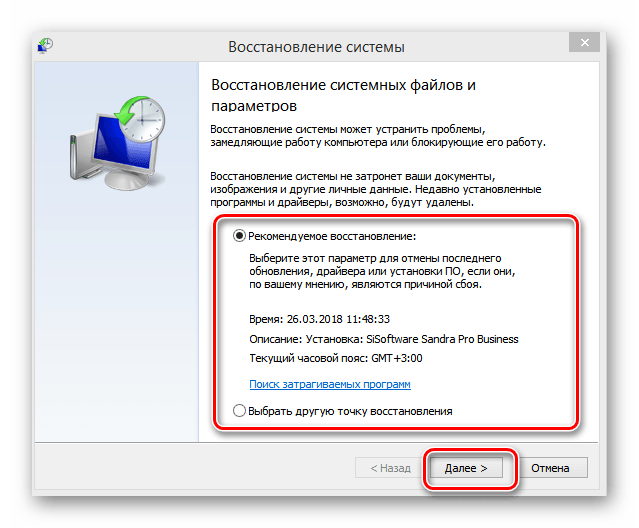
- Определяемся, на какую точку мы делаем откат системы, и хорошо подумав, подтверждаем свои действия кнопкой «Далее».

- По окончании процесса система вернется к выбранной работоспособной редакции.

Шаг 4: Обновление конфигурации устройств
При подключении новых устройств и обновлении их управляющих файлов часто возникают неисправности программной части.Тщательно изучаем состояние устройств, инсталлированных в систему.
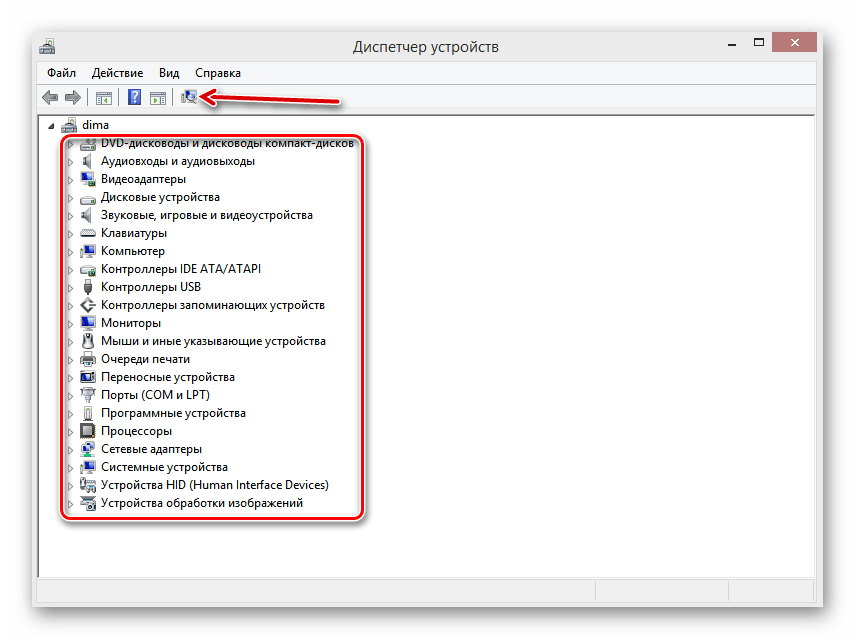
- Последовательно нажимаем Win + X и «Диспетчер устройств».
- В появившемся окне смотрим, чтобы в списке установленного оборудования отсутствовали желтые восклицательные знаки. При их наличии нажимаем иконку «Обновить конфигурацию оборудования».

- Восклицательные знаки исчезли? Значит все устройства работают корректно.
Шаг 5: Замена модулей оперативной памяти
Проблема может заключаться в неисправности аппаратной части компьютера. При наличии нескольких планок RAM можно попробовать поменять их местами, убирать каждую из них, проверяя загрузку Windows. При обнаружении неисправного «железа» его нужно заменить на новое.
Читайте также: Как проверить оперативную память на работоспособность
Шаг 6: Переустановка Виндовс
Если никакой из вышеперечисленных методов не помог, то остается только отформатировать системный раздел винчестера и переустановить Windows. Это крайняя мера, но иногда приходится жертвовать ценными данными.
Последовательно пройдя все шесть шагов по устранению ошибки «CRITICAL PROCESS DIED», мы на 99,9% добьёмся исправления некорректной работы ПК. Теперь можно опять наслаждаться плодами технического прогресса.
Наша группа в TelegramПолезные советы и помощь
Ошибка CRITICAL_PROCESS_DIED представляет из себя синий экран смерти или же BSoD. Проявлять себя эта проблема может как на Windows 8, так и на Windows 10.
Причины появления CRITICAL_PROCESS_DIED
Как ясно из самого названия, один из многих процессов необходимый для запуска операционной системы оборвался, что и привело к синему экрану смерти. На это существует куча причин. Вот их небольшой список:
- Поврежденные драйвера устройства.
- Поврежденный реестр Windows.
- Поврежденная файловая система.
- Проблемы с оперативной памятью.
- Проблемы с жестким диском или SSD.
- Возможность проникновения различных вирусов на компьютер.
Скорее всего, что-то из этого списка и послужило катализатором для появления CRITICAL_PROCESS_DIED. Теперь давайте перейдем к методам решения этой проблемы.
Решения для ошибки CRITICAL_PROCESS_DIED

Метод №1 Исправление/обновление драйверов устройства
Для того чтобы выполнить обновление различных драйверов нам понадобится зайти в систему. Обычным способом этого добиться нельзя, так что будет использовать «Безопасный режим». Это гарантирует, что никакие лишние утилиты не будут запущены вместе с системой. Для того чтобы войти в этот режим сделайте следующее:
- Выполните перезагрузку ПК и нажмите Shift+F8 во время загрузки материнской карты. Убедитесь, что вы сделали это до появления логотипа Windows.
- Вам откроются «Продвинутые опции по восстановлению».
- Далее нажмите на «Устранение проблем» -> «Продвинутые опции» -> «Настройки запуска Windows».
- Теперь просто включите «Безопасный режим» и перезагрузите ваш компьютер. При перезагрузке, вы с вероятностью в 99% не увидите BSoD CRITICAL_PROCESS_DIED.
Как только вы оказались в «Безопасном режиме», нужно проверить устройства на наличие ошибок или конфликтов. Выполнить вы можете это через «Диспетчер устройств». Добраться до диспетчера можно через свойства вашего «Компьютера».
Любое устройство с которым есть какие-либо проблемы в «Диспетчере устройств» помечаются желтым восклицательным знаком. При нахождении такового, нажмите на нем правой кнопкой мыши и выберите «Обновить».
Если же с драйвера достаточно новые, то попробуйте выполнить переподключение устройства. Теперь нажмите на кнопку «Действия» в верхней панели и выберите «Сканировать на наличие изменений». После этого произойдет переустановка драйверов, что может решить проблему.
После этого перезагрузите ваш ПК и посмотрите, изменилось ли что.
Метод №2 Сканирование и исправление поврежденной файловой системы
Утилита по проверке файловой системы довольно полезная вещь, которая идет уже сразу с операционной системой Windows.Она просканирует поврежденные участки файловой системы и восстановит их если найдет. Для того чтобы воспользоваться этой утилитой сделайте следующее:
- Нажмите комбинацию клавиш Win+X или правой кнопкой мыши по кнопке «Пуск». Выберите «Командная строка(администратор)».
- В открывшейся «Командной строке» впишете команду sfc /scannow и нажмите Enter.
- Весь этот процесс сканирования и прочего может занять минут 15-20.
- По окончании операции, вы увидите список найденных проблем в файловой системе и исправлены ли они.
После этого перезагрузите ваш компьютер. Ошибка CRITICAL_PROCESS_DIED должна была исчезнуть, если проблема заключалась в файловой системе.
Метод №4 Точки восстановления
Использование точек восстановления в таких ситуациях времена неизбежно. Данный метод возможен только при заранее созданной точки восстановления в которой ваш компьютер находился в стабильном состоянии.
«Восстановление системы» находится в Панели управления Windows.
Метод №5 Обновить или переустановить Windows
Если ничего из вышеописанного вам не помогло в решении проблемы, то можно попробовать Обновить или переустановить Windows.
Обновление Windows оставит ваши персональные данные нетронутыми, однако базовая система будет переустановлена.
Переустановка Windows сотрет все данные которые находятся на разделе /С (у большинства пользователей). Так что не забудьте выполнить копирование важных вам файлом перед этим. Переустановка практически наверняка исправит синий экран смерти CRITICAL_PROCESS_DIED.
Для обновления ПК просто проведите мышкой по правому краю экрана и нажмите «Настройки» -> «Изменить настройки ПК» -> «Обновление и восстановление» -> «Восстановление». Далее нажмите на «Обновить ваш ПК без потери файлов».
The dreaded «blue screen of death,» infamously known as BSOD, can wreck your day. There are more than 500 BSOD error codes, but the Critical Process Died Stop Code gets the most attention.
In fairness, BSODs are much less common in Windows 10 than in previous versions of the OS, but they are still annoying when they happen. Losing the stuff you were working on is the least of your worries.
So, how do you fix this unforeseen, «critical process died» error in Windows 10? Keep reading, and we’ll explain everything.
What Is the «Critical Process Died» Stop Code?
A critical process unexpectedly stopping is responsible for the majority of BSODs. You’ll know if you’re a victim because you’ll see error code 0x000000EF on the blue crash screen.
At its most basic level, the cause is simple—a background process that Windows relies on has become corrupted. It could have either stopped entirely, or its data has been incorrectly modified.
Digging deeper, it becomes much harder to pinpoint the precise issue. Everything from iffy drivers to memory errors could be the culprit. Worse still, there are near-endless scenarios in which the BSOD could arise. Perhaps it only happens when you’re gaming, when you log into your machine, when you open a certain app, or when you wake your machine from sleep.
How to Fix the «Critical Process Died» Stop Code
The diversity of possible causes means there are several BSOD troubleshooting steps you need to work through. Let’s take a closer look at how you can fix the Critical Process Died stop code in Windows 10.
1. Restart Your PC
It’s a cliche at this point, but a simple restart can fix surprisingly many problems with your PC. In fact, this holds true for almost all tech devices, including your smartphones.
A reboot clears your memory or resources, resets your system settings, and clears your caches and other temporary files. Since the “critical process died” error comes up because of something going wrong with the process, a reboot can be handy.
So restart your PC and see if it fixes the error.
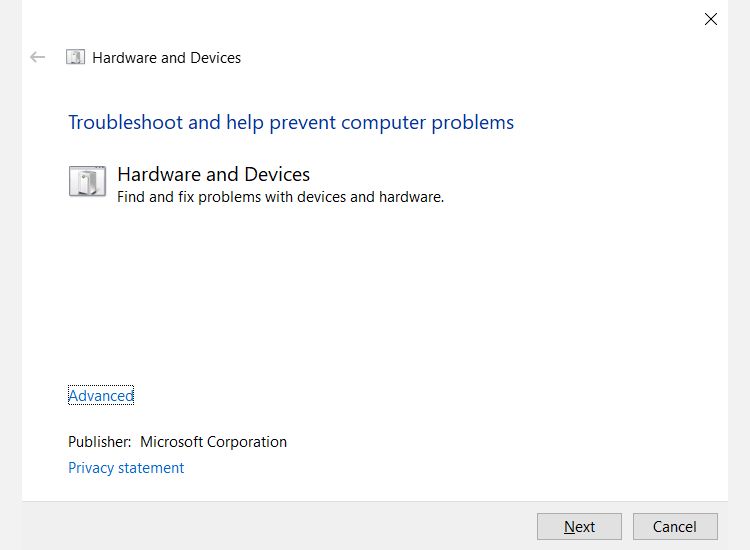
2. Run the Hardware and Device Troubleshooting Tool
Before we move on to the more complicated solutions, let’s begin with the easiest one.
Windows now includes a broad range of specialized troubleshooting tools. One of them is specifically designed for hardware and device issues.
Unfortunately, it is no longer visible in the Settings menu. Instead, you will need to fire it up from the command line. Thankfully, it is easy to do; open Command Prompt, type msdt.exe -id DeviceDiagnostic, and press Enter.
On the window that pops up, hit Next, and your system will spend a few minutes scan for problems. It will report back with its findings.
3. Run the Deployment Imaging and Servicing Management Tool
If you’re still encountering errors, it’s time to move on to the Deployment Imaging and Servicing Management (DISM) tool. It will repair a corrupt system image.
The tool has three switches:
- /ScanHealth,
- /CheckHealth
- /RestoreHealth
We are only interested in the last one. To use DISM, open Command Prompt as an administrator using the steps described previously. When the app is open, type DISM /Online /Cleanup-Image /RestoreHealth and hit Enter.
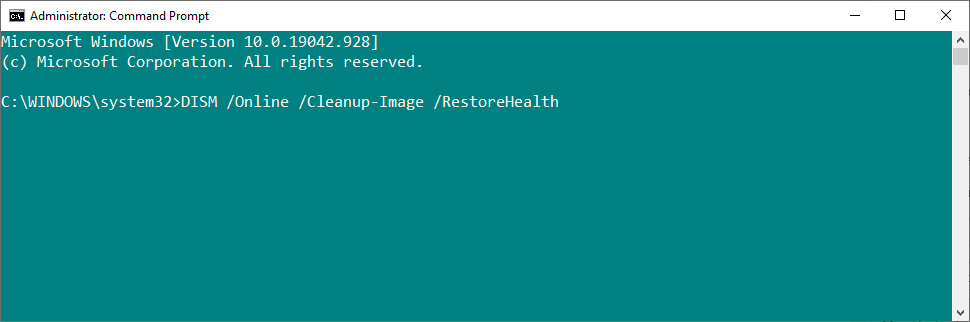
The process typically takes between 10 minutes and half an hour. Do not be alarmed if the progress bar pauses at 20 percent for several minutes; it is expected behavior.
After the scan has finished, restart your machine. The «critical process died» error should’ve gotten resolved.
4. Run the System File Checker
The next step is to run the System File Checker tool. It’s a well-known utility that can cure a wide variety of Windows-based aliments by repaired corrupted or incorrectly modified system files.
In truth, it’s not always useful; people run it out of habit more than out of necessity. However, in the case of the 0x000000EF error code, it’s a critical troubleshooting step.
To run the checker, you will need to fire up Command Prompt as an admin. The easiest way is to run a search for cmd, right-click on the result, and select Run as administrator.
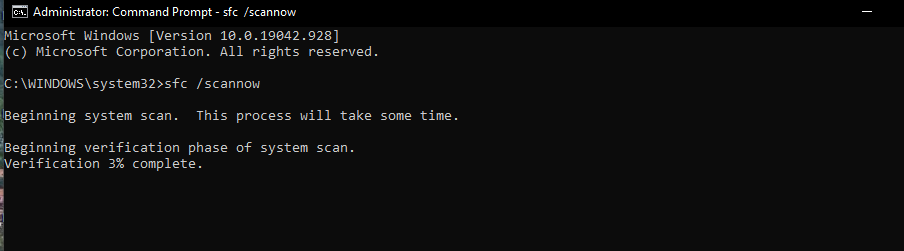
Once Command Prompt is open, type sfc /scannow and hit Enter. The process might take a while to complete.
When it’s finished, you’ll see an on-screen list of any problems and the steps that the scan took to remedy them.
Make sure you restart your computer before continuing to work.
This also helps fix the Bad System Config Info error.
5. Run an Antivirus Scan
The stop code could be caused by malware on your system. Malware can alter system files and processes and make them unusable.
You can use either Windows Defender or one of the best third-party antivirus suites for Windows of your choice. Just make sure you run a deep, full-system scan.
6. Update Your Drivers
Bad drivers are one of the most common causes of the stop code. Therefore, it’s sensible to check that none of them require updates.
To check the status of your drivers, right-click on the Start tile, select Device Manager, and scan through the list to see whether any devices have a yellow exclamation point alongside them.
If you find an exclamation point, right-click on the device in question and choose Update Driver Software from the context menu.
7. Uninstall Recent Windows Updates
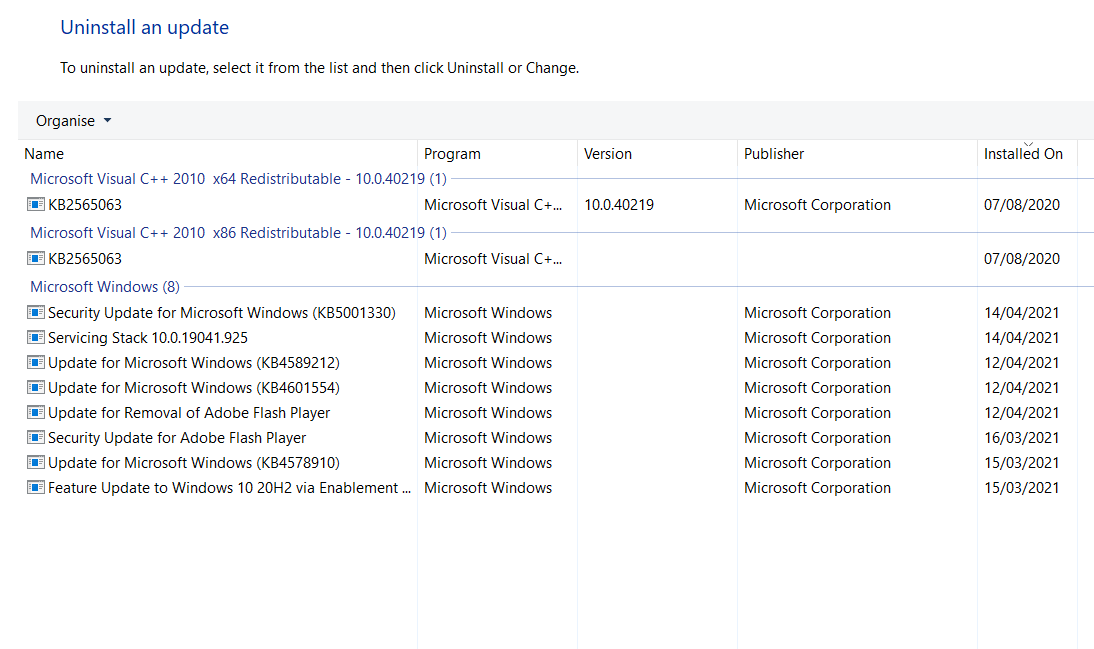
If your problem has only just started, a recent Windows update could be to blame. Thankfully, it’s easy to uninstall recent updates, so you can see if your issue goes away.
To uninstall an update, open the Settings app and go to Update & Security > Windows Update > Update History > Uninstall Updates. Highlight the update you want to remove from your system, then hit the Uninstall button at the top of the window.
8. Perform a Clean Boot
A clean boot is a start-up mode that uses the bare minimum number of drivers, processes, and programs. Once your computer is running, you can start to load the missing processes in a bid to isolate the problem.
To clean boot your computer, follow the step-by-step instructions below:
- Type System Configuration in the Start menu search bar and select the Best Match
- Click on the Services tab
- Unmark the checkbox next to Hide all Microsoft Services
- Click on the Disable All button
- Select the Startup tab
- Click on Open Task Manager
- In the new window, click on the Startup tab again
- Disable all the items in the list
- Restart your computer
9. Restore Your System
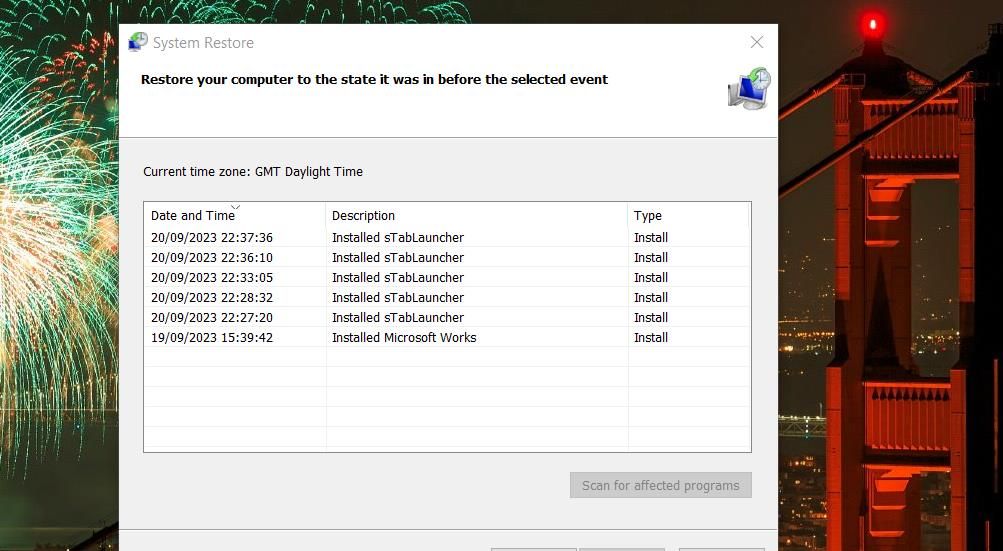
You can try to roll back your computer to a previous state using the System Restore tool. This option is only a possibility if you have enabled the creation of restore points before your stop code problems started.
To use the System Restore tool, type «restore» into the Start menu search bar and select Create a restore point. In the resulting menu, click System Restore to open the utility. Follow the on-screen instructions to choose a restore point and move your system back to that prior state.
10. Update the BIOS
As a final throw of the dice, you can try to update your computer’s BIOS.
Unfortunately, there is no standardized method to do so; it depends on your computer manufacturer. Refer to the company’s support literature for guidance.
Fixing the Critical Process Died Error on Windows
If none of the above tips fix your problem, is it time to throw your computer against the nearest wall and head to the shops?
Actually, there’s one throw of the dice remaining. The last recourse is to reset Windows or reinstall a fresh copy of Windows. Now, if that fails, it definitely means you have a hardware issue on your hands; in that case, heading to the local tech shop would be a good idea.
Updated on Apr 28, 2025
On this page, you will learn:
- 1. What is Critical Process Died error
- 2. How does Critical Process Died error occur
- 3. How to fix blue Critical Process Died on Windows 10/8/7
Quick Guide to Fix Critical Process Died Error on Windows 10/8/7
- Step 1. Reboot PC into Safe Mode or use Clean Boot.
- Step 2. Fix file system error using EaseUS partition manager tool.
- Step 3. Update the disk driver.
- Step 4. Run antivirus.
- More details…
«Help! A Critical Process Died error pops up while I was gaming on my PC. Hey guys, do you have any clues about what is Critical Process Died error with error code — 0x000000EF or blue screen?
I received such an error code with a blue screen while I was playing a game on my computer, I was totally out of my mind. Can anyone of you offer me a solution to this problem? It would be highly appreciated if you do know how to fix this error.»
If you encounter a blue screen of Critical Process died error on your computer suddenly, don’t worry. Check and follow the fixes to get rid of the critical process died issue immediately:
| Workable Solutions | Step-by-step Troubleshooting |
|---|---|
| Fix 1. Reboot PC into Safe Mode | Restart Windows 10, press Shift + F8 to bring up the recovery mode…Full steps |
| Fix 2. Perform a Clean Boot | Type msconfig in the Search box and hit enter to open System Configuration…Full steps |
| Fix 3. Run CHKDSK to Fix File System | Open Command Prompt and Type chkdsk e: /f /r /x and hit Enter…Full steps |
| More Fixes | Run EaseUS Partition Master > Right-click disk and select «Check File System»…Full steps |
Overview of Critical Process Died
In this part, you will learn:①. What is «Critical Process Died»? ②. How does Critical Process Died error happen?
What Is Critical Process Died Error?
The Critical Process Died error indicates a critical system process that died with error code — 0x000000EF. When a critical system process fails to run, the operating system won’t boot up. It will pop up with a Critical Process Died Stop Error 0x000000EF, or Blue Screen displayed on your Windows computer.
Why Does Critical Process Died Error Happen?
The Critical Process Died issue is basically caused when a critical component of Windows detects that data has been modified when it should not have been. The error also happens when the process which was needed to run the Windows operating system such as Windows 10/8/7 ended abruptly for some reason.
It could be a bad driver, a corrupted file system error, a memory error, etc. Mostly, this error occurs suddenly when users are working on their PCs.
When Will This Error Occur?
Accordingly, the Critical Process Died error often occurs casually. It may happen in the following cases:
- Critical Process Died after Windows Update
- Critical Process Died when Wake PC from Sleep
- Critical Process Died after Login
- Critical Process Died while Gaming
- Critical Process Died on Startup
- Critical Process Died with Windows 10 Reboot Loop
So how to find a solution for Critical Process Died error in Windows 10/8/7 will be a vital question for those users who are having such a problem on their computers. Here the following, EaseUS will provide you with practical solutions for fixing Windows 10/8/7 Critical Process Died error with 0x000000EF code.
How to Fix Critical Process Died Error on Windows 10/8/7 — 10 Ways
If you are having a blue screen with «Your PC ran into a problem and needs to restart. We’re just collecting some error info, and then we’ll restart for you.» error message on your PC, relax.
In this part, you will learn practical fixes to resolve Critical Process Died error on your Windows 10/8/7 computers. Pick up one of the listed solutions here to get rid of this issue on your PC now:
- #1. Reboot PC into Safe Mode
- #2. Use Clean Boot
- #3. Run CHKDSK to Fix File System
- #4. Use File System Error Checker — EaseUS Partition Master
- #5. Run SFC Command
- #6. Use DISM Command
- #7. Update Disk Driver
- #8. Run Antivirus Software
- #9. Uninstall Recent Windows Update
- #10. Perform System Restore
Solution 1. Reboot PC into Safe Mode
Here we’ll take Windows 10 as an example to show you how to reboot PC into Safe Mode, which is a quick way of turning on Windows, prevent you from getting Critical Process Died error.
To thoroughly fix this the Critical Process Died error, you should also boot up PC first. Here are the steps to get started:
Step 1. Restart Windows 10, press Shift + F8 to bring up the recovery mode.
Step 2. Go to Advanced Boot Options and set boot mode as Safe Mode.

Or you can restart PC several times > Enter Troubleshoot > Advanced Options > Startup Settings > Restart > Enable Safe Mode.
Step 3. Save the changes and then startup Windows PC.
Solution 2. Perform a Clean Boot
After you boot up PC from Safe Mode, you can then continue to configure a Clean Boot in System Configuration.
Here are the steps:
Step 1.Type msconfig in the Search box and hit enter to open System Configuration.
Step 2. Go to the General tab, check the two boxes under the Selective startup section:
- «Load system services»
- «Use original boot configurations»
Step 3. Click «OK» to confirm.
Step 4. Go to the Services tab, check «Hide all Microsoft services» and click «Disable all».
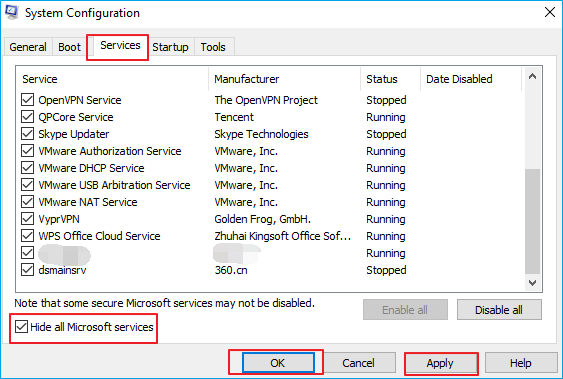
Step 5. Click «OK» and «Apply» to save all the changes. Then restart the PC.
Solution 3. Run CHKDSK to Fix File System Error
When the system hard drive contains file system error, the computer may come into Critical Proceed Died error while booting up PC. To fix this issue, you can first boot PC into safe mode, and then follow the steps below to run CHKDSK command:
Step 1.Type cmd in the Search box and right-click Command Prompt, select «Run as Administrator».
Step 2.Type diskpart and hit Enter to bring up DiskPart window.
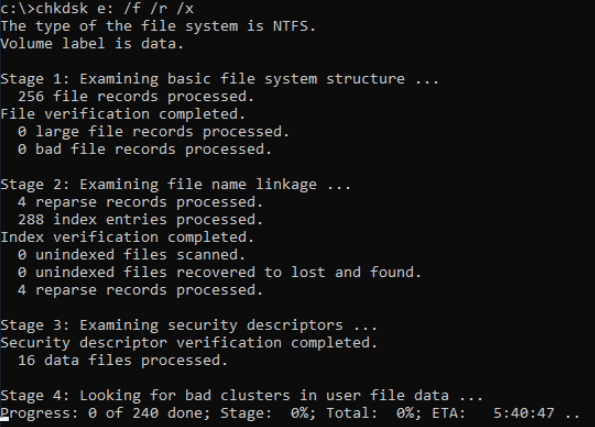
Step 3. Type chkdsk e: /f /r /x and hit Enter. (Replace e: with the drive letter of your system drive or disk.)
Solution 4. Use File System Error Checker — EaseUS Partition Master
For an easier solution to fix file system error that cause Critical Process Died issue on Windows PC, you may turn to EaseUS Partition Master Free for help. It works professionally in checking and fix system file errors with simple clicks.
Here the following, you can try it to check and fix errors under Windows 10/8/7 now:
Step 1. Right-click the target partition that may have a problem.
Step 2. Choose «Check» > «Check File System».
Step 3. In the Check File System window, check the «Try to fix errors if found» option by clicking the «Start» button.
Step 4. Please wait patiently. After the process, you can click the «Finish» button to exit the window.
Solution 5. Run SFC Command
When the system file contains some error, you may also run into Critical Process Died issue on your computer. To fix this issue, you can also run the SFC command for help.
Here are the steps:
Step 1.Type cmd in the search box, right-click command prompt and select «Run As Administrator».
Step 2. At the command prompt, type sfc /scannow and hit Enter.
The SFC utility will run for a while and if any corruption or error is discovered, replace them on reboot.
Solution 6. Use DISM Command
Besides SFC command, the DISM command is more advanced in fixing disk errors. It can check and restore your system health.
See how to run DISM command to fix Critical Process Died error on Windows PC:
Step 1. Open Command Prompt as Administrator.
Step 2. Type the following command and hit Enter each time to check the system health:
dism /online /cleanup-image /scanhealth
dism /online /cleanup-image /checkhealth
dism /online /cleanup-image /restorehealth
Step 3.Type DISM /Online /Cleanup-Image /RestoreHealthand hit Enter.
After this, exit Command Prompt and restart PC to keep all the changes. If you successfully boot up PC, you’ve successfully got rid of this error from your computer.
Solution 7. Update Disk Driver
Sometimes, when the system disk driver is outdated, you may also meet the Windows boot-up issue, such as the Critical Process Died error. You can try to update the disk driver to get rid of this issue with the steps here:
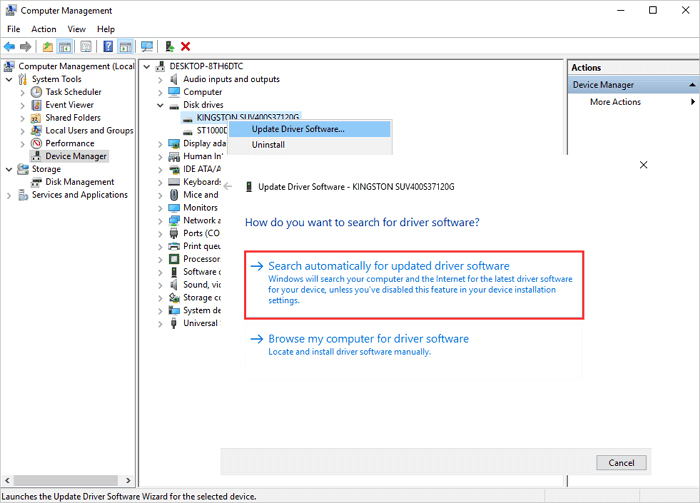
Step 1. Right-click This PC, click «Manage». Go to Device Manager.
Step 2. Double-click to expand Disk driver. Right-click your disk driver and choose «Update Driver Software».
Step 3. In the pop-up window, choose «Search automatically for updated driver software».
Then, wait for the computer to search and install the latest driver software.
Solution 8. Run Antivirus Software
As you may know that sometimes viruses or malware may cause system boot issues and even OS crash errors on Windows 10/8/7. Therefore, a regular way to fix this issue is to run antivirus software for help.
Or you can use Windows’ built-in antivirus too — Windows defender for help:
Step 1. Go to Start > Type Windows Defender and click to open Windows Defender Security Center.
Step 2. Click the Shield icon on the left pane, click «Advanced scan».
Step 3. Check «Full scan» and click «Scan now» to run antivirus.
Note that the steps may vary if you are using a different Windows OS version. But most operations are similar.
Solution 9. Uninstall Recent Windows Update
Sometimes, Windows users especially the latest Windows 10 users may encounter with Critical Process Died error on their computers. And the best way out is to uninstall the recent Windows update.
Here are the steps for you to go:
Step 1. Go to Settings > Update & Security > Windows Update.
Step 2. Click «View update history» under Windows Update.
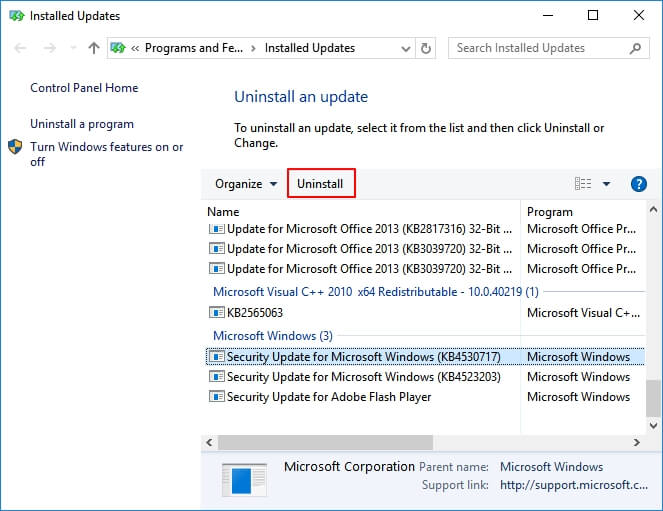
Step 3. Click «Uninstall updates».
Step 4. Select the update(s) that you want to uninstall and click «Uninstall».
Then all you need is to follow the on-screen guidelines to complete the process. After this, you can then restart PC to see if the error has been removed.
Solution 10. Perform System Restore
If you run into any complex system error, you may always escape by performing a system restore. Here are the steps to run system restore, bringing your computer back to a previous health state:
Note that if you have created some new data on your computer, remember to back up them to an external hard drive in advance.
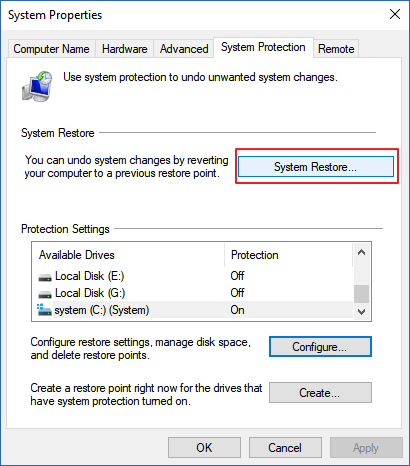
Step 1. Type create a restore point in Windows Search box and click the top result to open «System Properties».
Step 2. Click the System Restore button to bring up all the restore points that you’ve created.
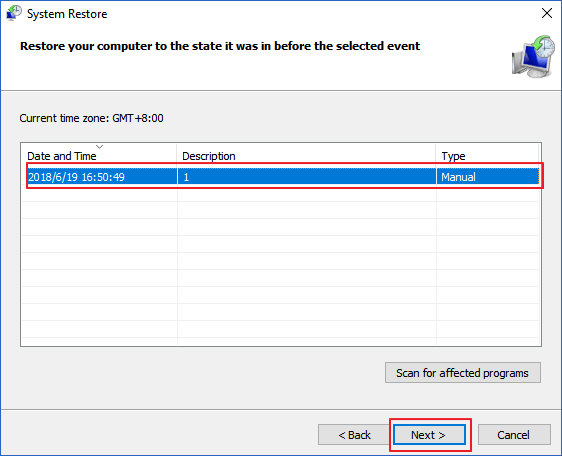
Step 3. Click «Next» and select the restore point that you want to use and restore on your PC.
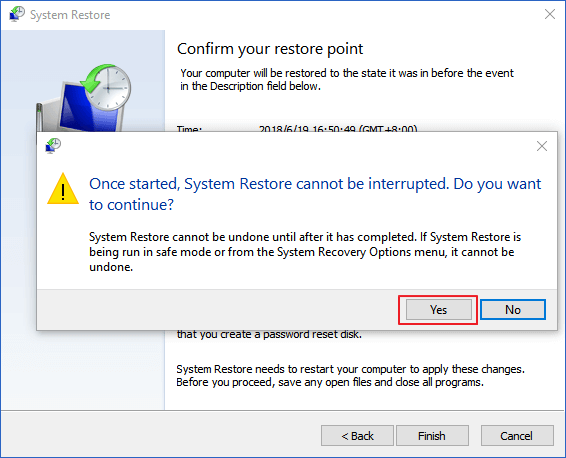
Step 4. Click «Finish» to confirm your restore point and click «Yes» to execute the System Restore on your PC.
Conclusion
On this page, we explained what is Critical Process Died error on Windows PC, and the causes of this issue. Note that as this error comes out randomly, we highly suggest you create a system backup in advance.
You may refer to: How to Create Windows 10 Backup System Image for a guide.
Among the 10 fixes that we listed on this page, we suggest you boot up PC into safe mode first. Then run EaseUS Partition Master to fix the internal file system error on your computer drive.
If you are experienced in computer management, CHKDSK, SFC, DISM commands are also able to help you out of the Critical Process Died error.