
Все способы:
- Способ 1: Отключение контроля учетных записей
- Способ 2: Запуск скрипта VBS
- Способ 3: Использование BAT-файла
- Способ 4: Удаление папки инструментария управления Windows
- Способ 5: Предоставление доступа к файлам
- Действия при проблемах с обновлением Windows 7
- Вопросы и ответы: 1
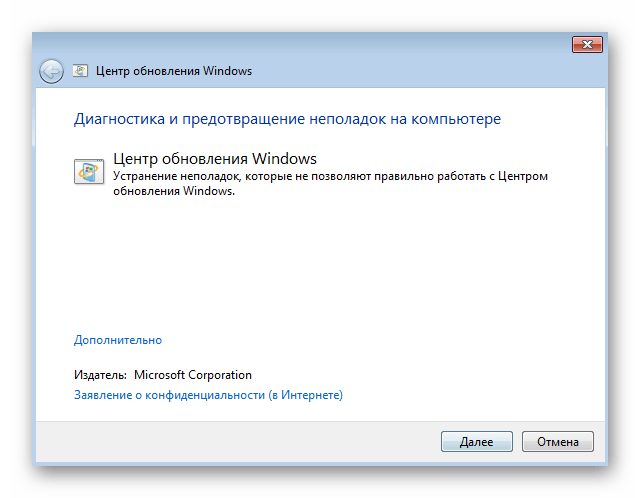
Способ 1: Отключение контроля учетных записей
Самый легкий метод решения ошибки с кодом 0x80041003 в Windows 7, который часто оказывается эффективным, — отключение контроля учетных записей, что делается очень просто:
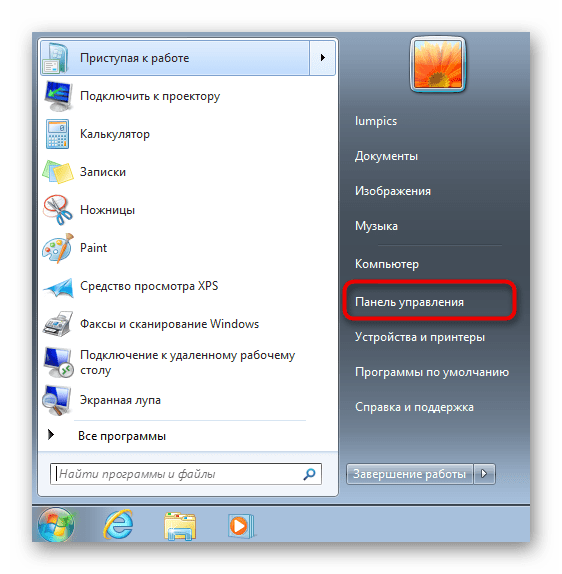
- Откройте «Пуск» и вызовите в приложение «Панель управления».
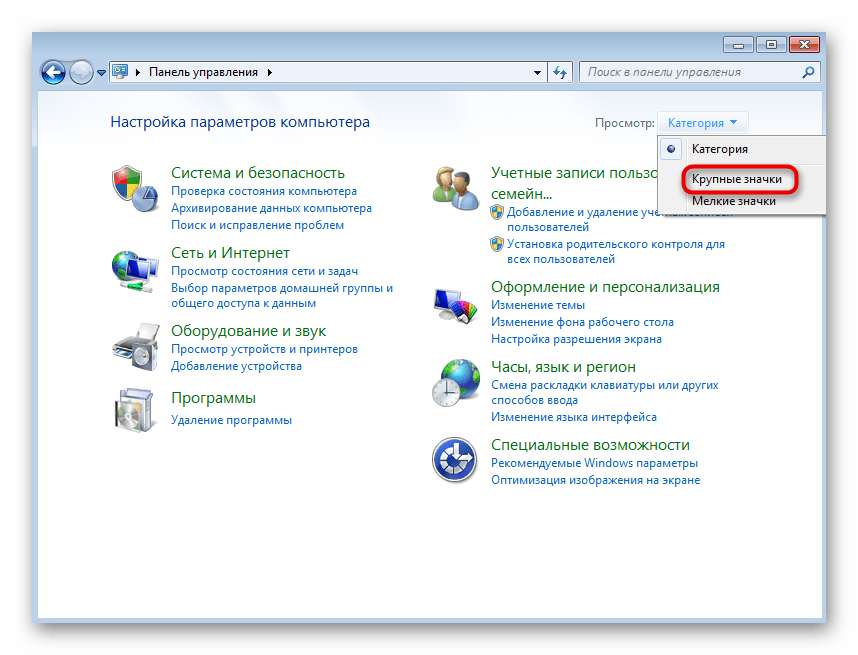
- Если у вас настроен просмотр по категориям, лучше измените его на «Крупные значки», чтобы проще ориентироваться в присутствующих параметрах.
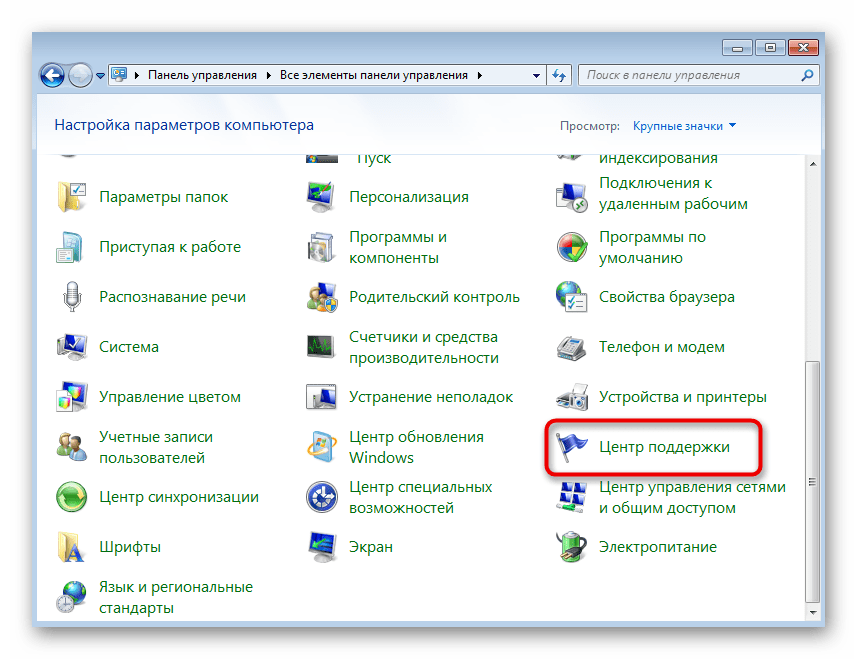
- Найдите «Центр поддержки» и нажмите по этой строке.
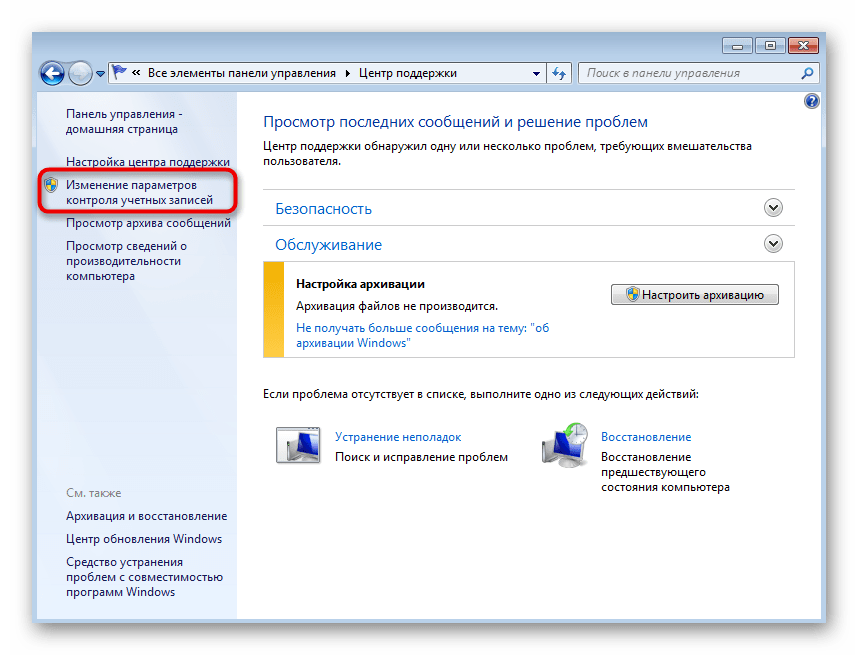
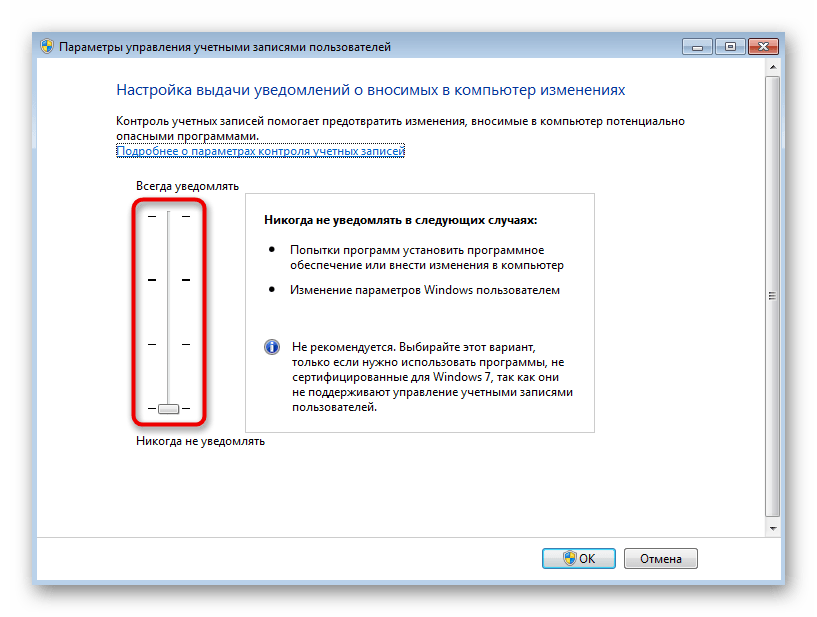
- Далее перейдите в «Изменение параметров контроля учетных записей».
- Передвиньте ползунок вниз, чтобы он остался в значении «Никогда не уведомлять». После этого отправьте ПК на перезагрузку и проверьте, была ли устранена проблема.
Способ 2: Запуск скрипта VBS
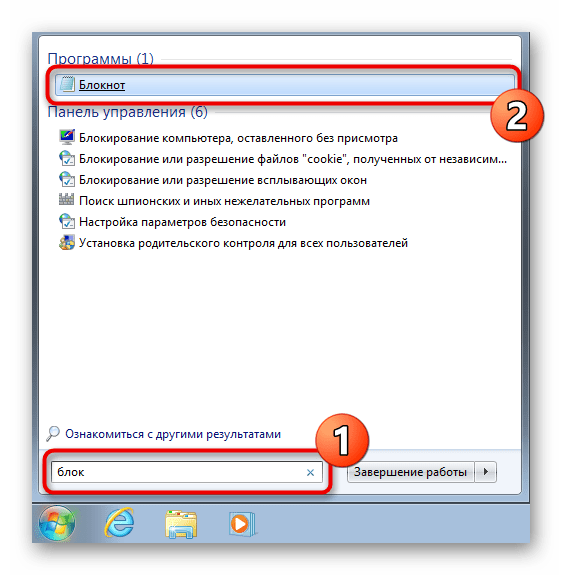
Одна из официальных рекомендаций от Microsoft — использование универсального скрипта VBS, который удаляет файлы, влияющие на появление ошибки с кодом 0x80041003. Его не нужно прописывать вручную, поскольку скрипт уже готов. Вам остается только создать файл с ним для дальнейшего запуска.
- Откройте приложение «Блокнот» удобным для вас методом.
- Скопируйте и вставьте туда код ниже.
strComputer = "."Set objWMIService = GetObject("winmgmts:" _
& "{impersonationLevel=impersonate}!\\" _
& strComputer & "\root\subscription")
Set obj1 = objWMIService.Get("__EventFilter.Name='BVTFilter'")
set obj2set = obj1.Associators_("__FilterToConsumerBinding")
set obj3set = obj1.References_("__FilterToConsumerBinding")
For each obj2 in obj2set
WScript.echo "Deleting the object"
WScript.echo obj2.GetObjectText_
obj2.Delete_
next
For each obj3 in obj3set
WScript.echo "Deleting the object"
WScript.echo obj3.GetObjectText_
obj3.Delete_
next
WScript.echo "Deleting the object"
WScript.echo obj1.GetObjectText_
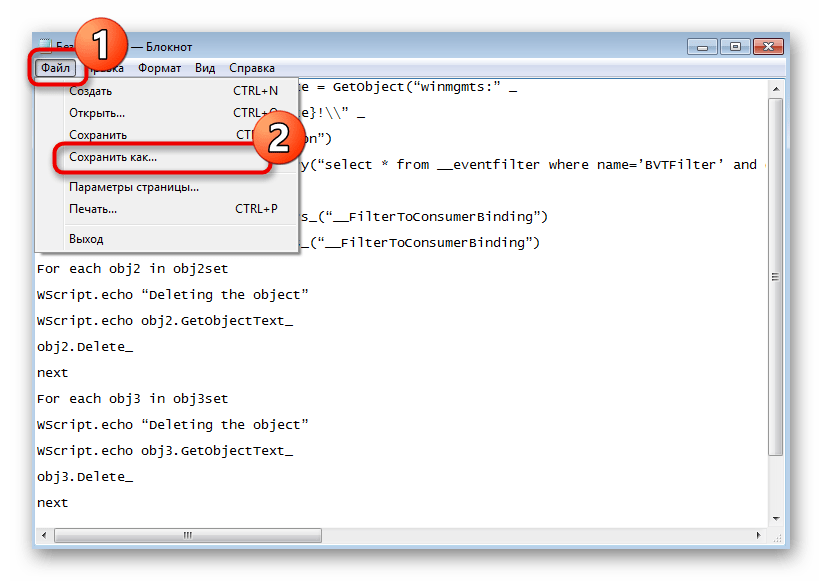
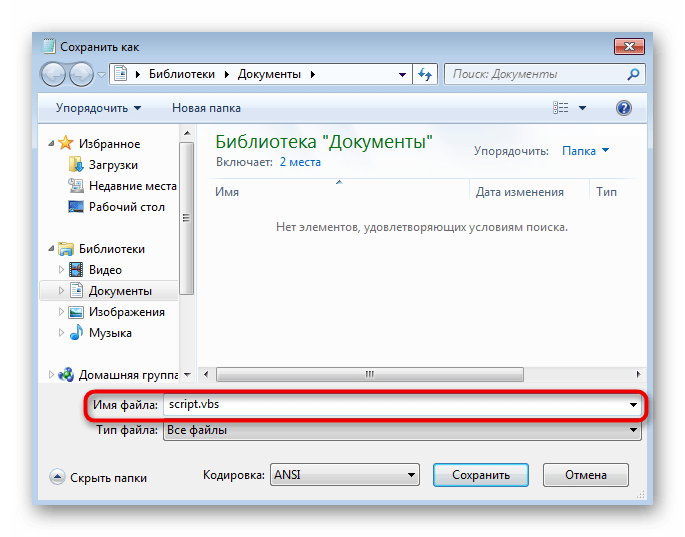
obj1.Delete_ - Разверните список «Файл» и щелкните по пункту «Сохранить как».
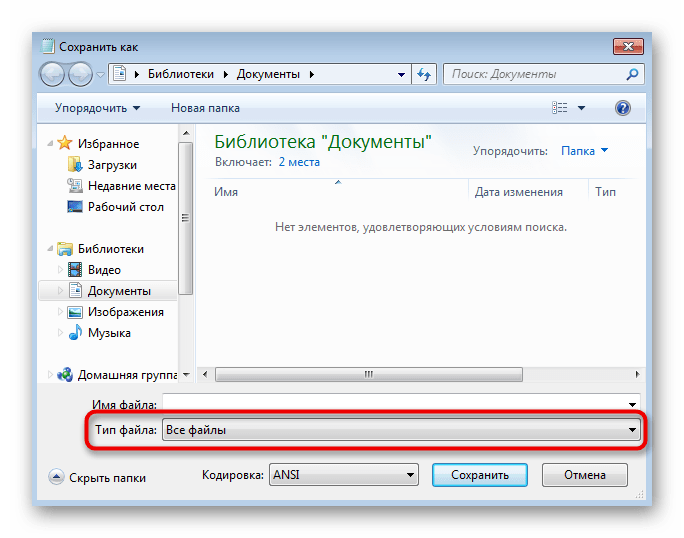
- В поле «Тип файла» присвойте значение «Все файлы».
- Задайте файлу любое имя на латинице, но в конце обязательно допишите «.vbs», обозначив тем самым его формат.
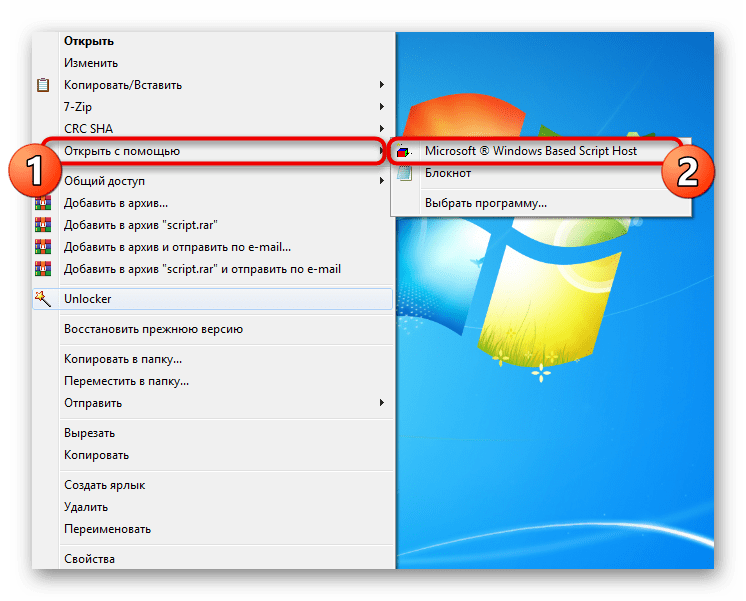
- После сохранения файла перейдите к нему, вызовите контекстное меню нажатием правой кнопкой мыши, в нем наведите курсор на пункт «Открыть с помощью» и выберите вариант «Microsoft Windows Based Script Host».
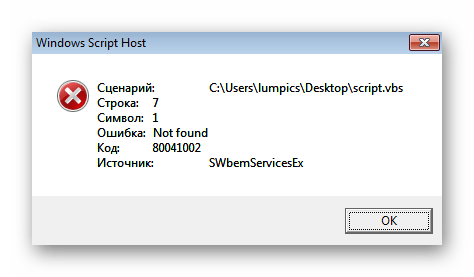
- Отобразится уведомление о том, что файлы были удалены, а если же появилась ошибка «Not found», значит, указанные объекты отсутствуют в операционной системе и следует сначала проверить появление ошибки, а в случае ее появления использовать следующие методы.

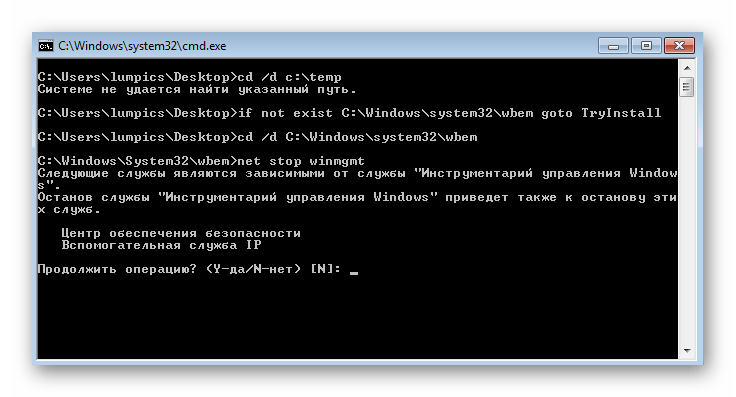
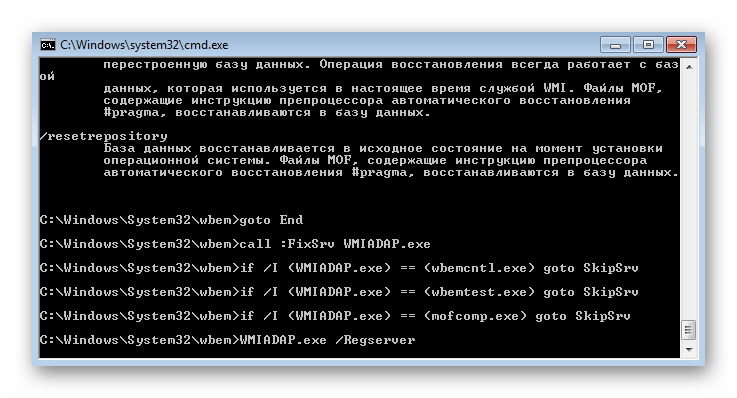
Способ 3: Использование BAT-файла
Предыдущий скрипт применяется для удаления проблемных файлов на компьютере, которые при перезагрузке операционной системы создаются заново, что и решает возникшую проблему. Следующий вариант — использование BAT-файла, запускающего средство исправления ошибок и проверяющего, где в ОС возникли неполадки.
- Для его создания снова запустите приложение «Блокнот».
- Вставьте в документ следующий код, в котором содержатся все необходимые для выполнения команды.
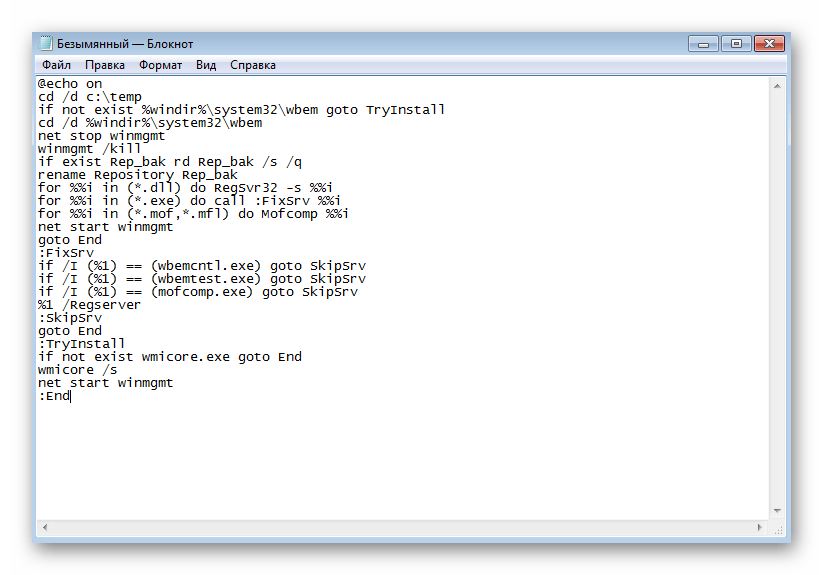
@echo on

cd /d c:\temp

if not exist %windir%\system32\wbem goto TryInstall

cd /d %windir%\system32\wbem

net stop winmgmt

winmgmt /kill

if exist Rep_bak rd Rep_bak /s /q

rename Repository Rep_bak

for %%i in (*.dll) do RegSvr32 -s %%i

for %%i in (*.exe) do call :FixSrv %%i

for %%i in (*.mof,*.mfl) do Mofcomp %%i

net start winmgmt

goto End

:FixSrv

if /I (%1) == (wbemcntl.exe) goto SkipSrv

if /I (%1) == (wbemtest.exe) goto SkipSrv

if /I (%1) == (mofcomp.exe) goto SkipSrv

%1 /Regserver

:SkipSrv

goto End

:TryInstall

if not exist wmicore.exe goto End

wmicore /s

net start winmgmt
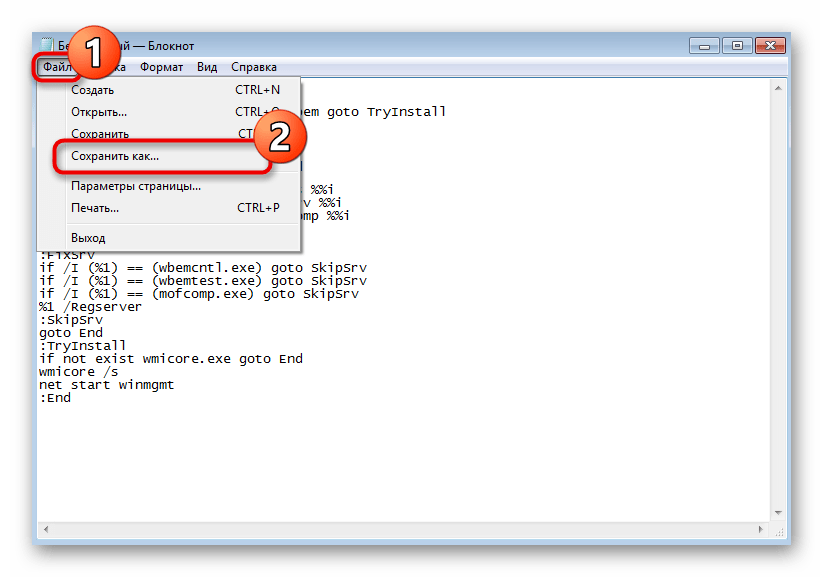
:End - Откройте «Файл» и сохраните документ.
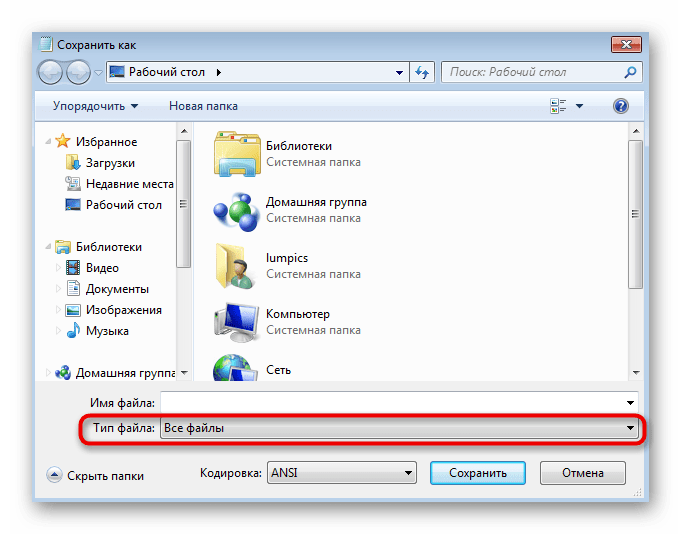
- В появившемся окне выберите в качестве типа файла «Все файлы».
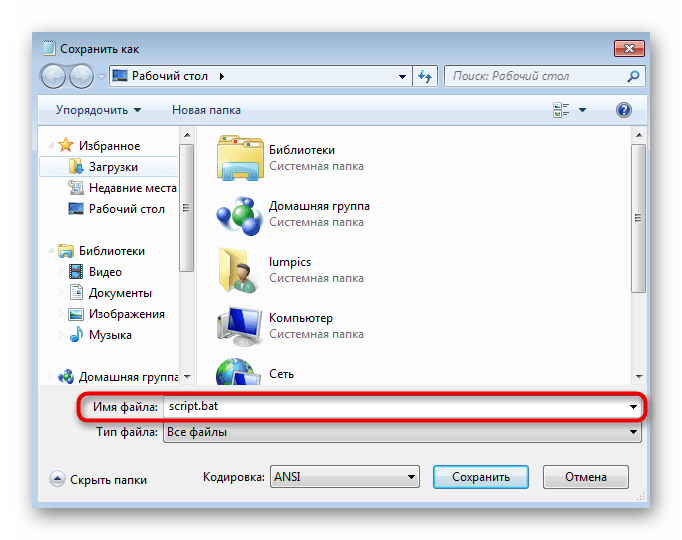
- Введите любое название и в конце добавьте «.bat».
- Перейдите к расположению этого файла и дважды кликните по нему для запуска. Отобразится окно «Командной строки», где подтвердите продолжение операции и ожидайте окончания выполнения BAT-файла.
- Во время этого в консоли появится еще несколько строк, а затем всплывет уведомление, после которого можно отправить ПК на перезагрузку.
Способ 4: Удаление папки инструментария управления Windows
Появление ошибки с кодом 0x80041003 часто провоцируют проблемы в работе компонента «Инструментарий управления Windows». В Виндовс 7 есть папка, где находятся временные файлы, необходимые во время действия этого инструментария. Если их удалить, при следующем старте сеанса они будут созданы в чистом виде, что и поможет избавиться от проблемы.
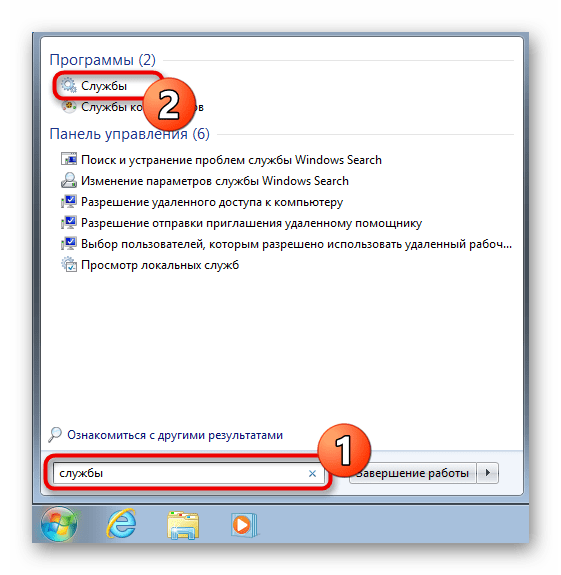
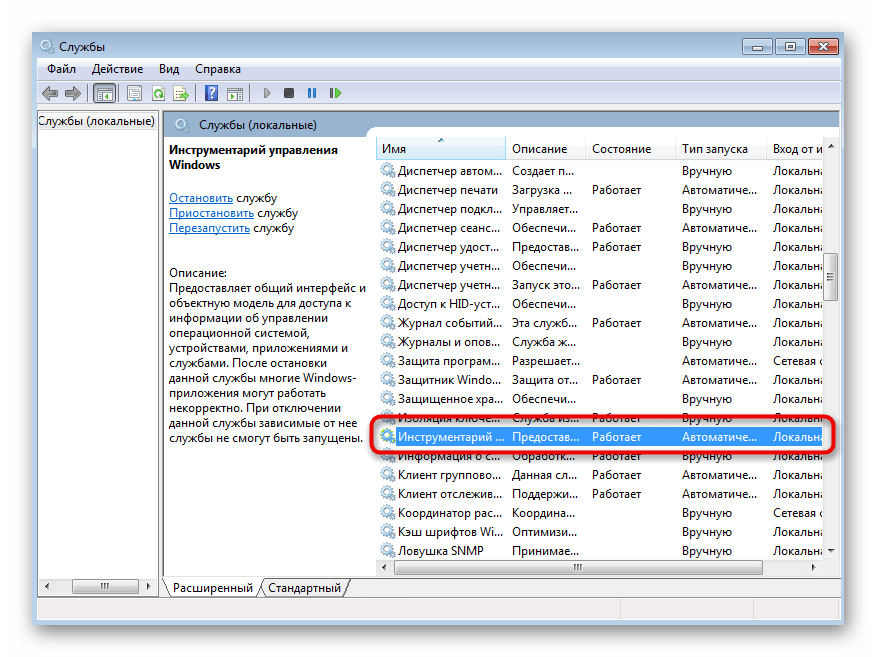
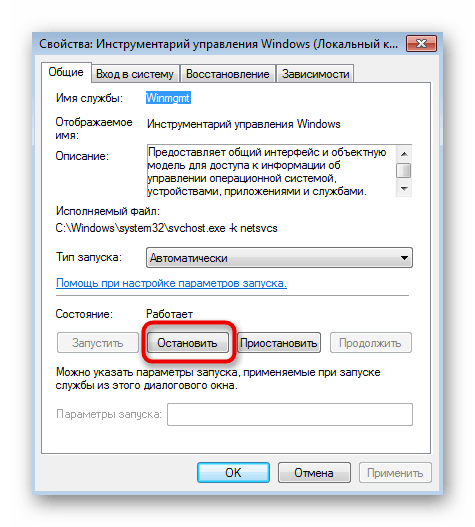
- Директорию не получится удалить, если служба компонента сейчас работает с находящимися там файлами, поэтому ее придется отключить. Откройте приложение «Службы», отыскав его через меню «Пуск».
- В списке найдите «Инструментарий управления Windows» и дважды кликните по этой строке для открытия окна со свойствами.
- Нажмите на «Остановить» и подождите несколько секунд, пока служба будет остановлена.
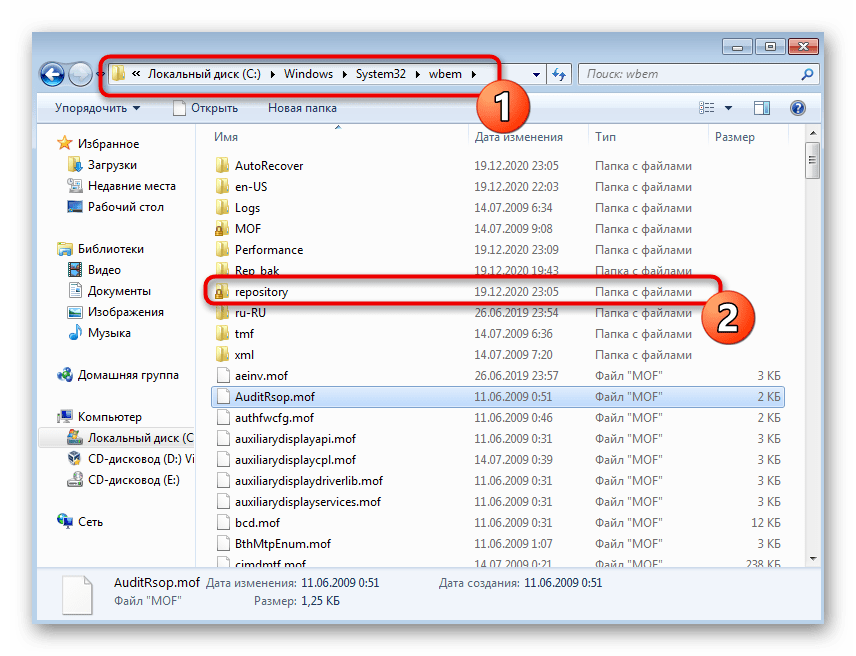
- Через «Проводник» перейдите по пути
C:\Windows\System32\wbemи найдите там папку «Repository». Желательно скопировать ее в другое место как резервную копию, чтобы в случае возникновения неожиданных проблем восстановить ее. - Затем щелкните по ней правой кнопкой мыши и удалите.
- Перезагрузите компьютер и проверьте, была ли исправлена рассматриваемая ошибка.

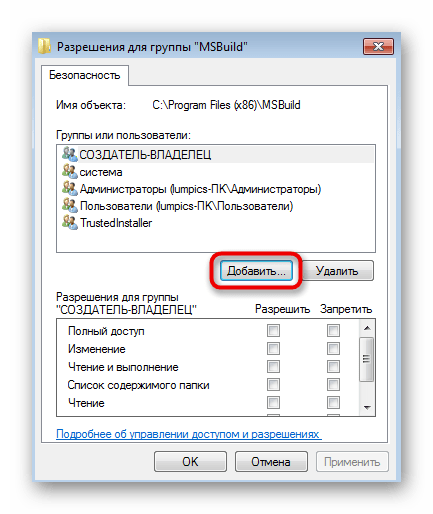
Способ 5: Предоставление доступа к файлам
Завершающий способ позволит избавиться от ошибки в том случае, если она появляется при обращении только к конкретным файлам и это видно при отслеживании действий в «Журнале событий». Тогда для проблемной директории нужно предоставить полный доступ.
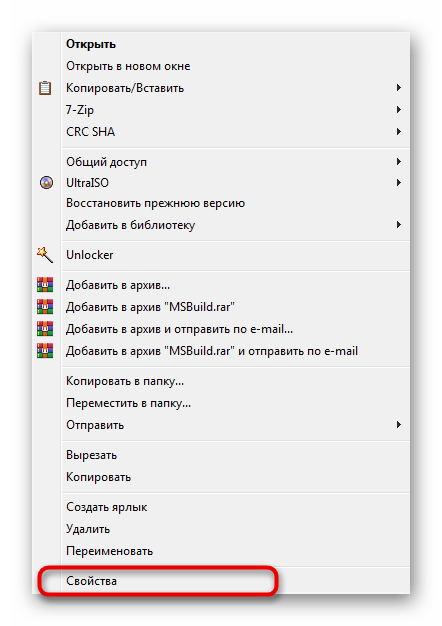
- Найдите корневой каталог запускаемого файла и нажмите по нему ПКМ. В контекстном меню выберите пункт «Свойства».
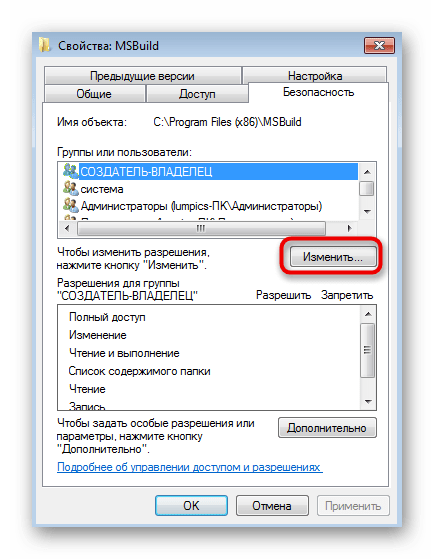
- Откройте вкладку «Безопасность» и кликните на «Изменить».
- Приступите к добавлению нового пользователя, если необходимый отсутствует в списке.
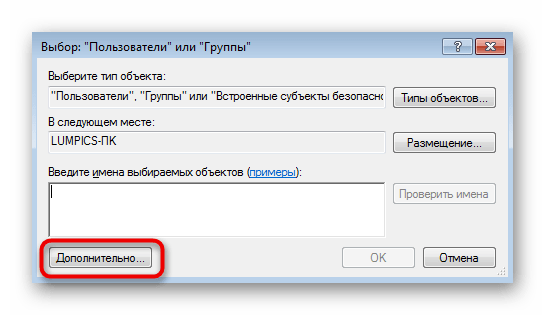
- Введите его имя в отведенном для этого поле, а если оно неизвестно, кликните по кнопке «Дополнительно».
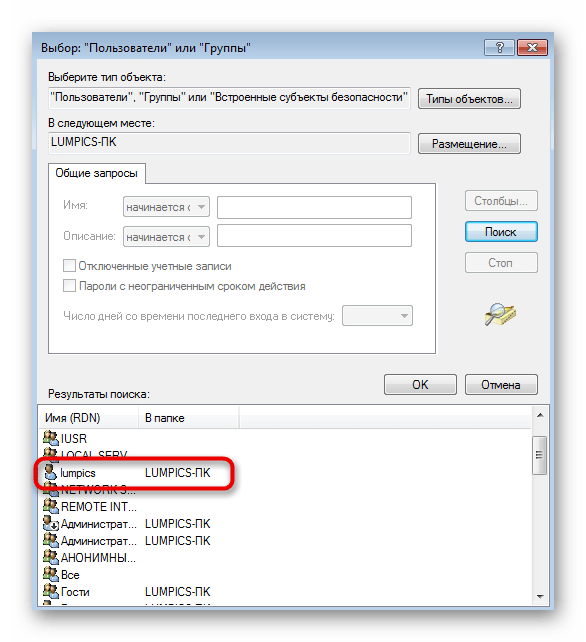
- Начните поиск пользователей в текущем расположении.
- Среди результатов найдите требуемую учетную запись и добавьте ее.
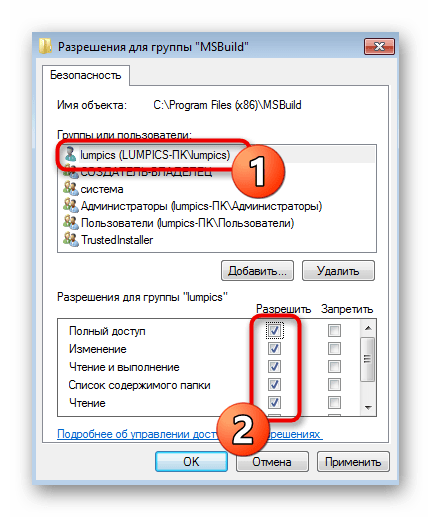
- Вернитесь к предыдущему окну и убедитесь, что имя правильно отображается в блоке.
- В окне «Разрешения для группы» выделите только что добавленного юзера и предоставьте ему полный доступ.


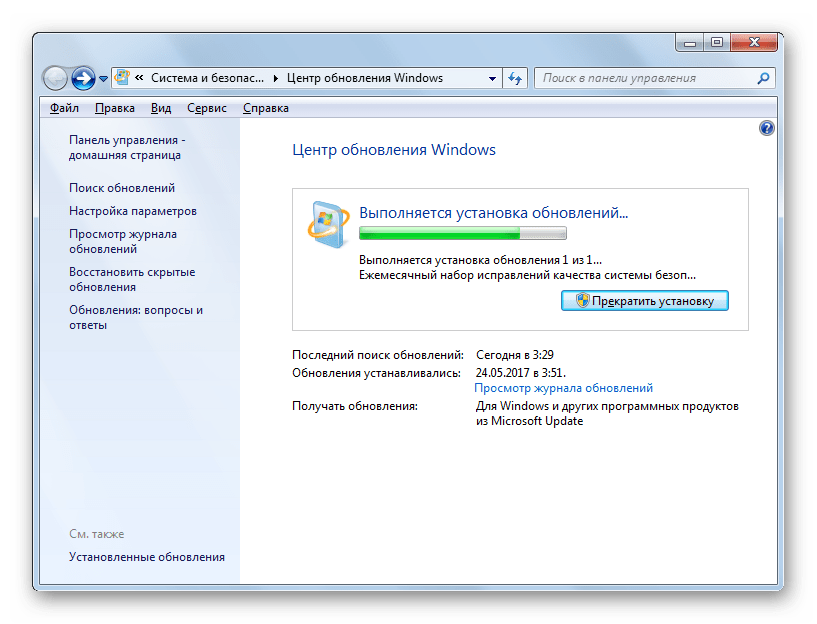
Действия при проблемах с обновлением Windows 7
Редко ошибка 0x80041003 появляется при попытке инсталляции очередного обновления в операционную систему. Принцип ее исправления совершенно другой и рассмотренные выше способы вряд ли принесут результат. Вам понадобится обратиться к другой статье на нашем сайте, где описаны основные инструкции, позволяющие исправить неполадки с инсталляцией апдейтов в Windows 7.
Подробнее: Решение проблем с установкой обновления Windows 7
Иногда это касается только одного обновления при его установке через встроенное в ОС средство. Вместо этого его можно попробовать добавить вручную и проверить, не появится ли ошибка в этот раз. Данной теме у нас тоже посвящено руководство, позволяющее разобраться в алгоритме ручной инсталляции апдейтов.
Подробнее: Ручная установка обновлений в Windows 7
Наша группа в TelegramПолезные советы и помощь
Updated May 2025: Stop error messages and fix your computer problem with this tool. Get it now at this link
- Download and install the software.
- It will scan your computer for problems.
- The tool will then fix the issues that were found.
Some users are reporting error 0x80041003 in Event Viewer. If you have the same problem this is the place for you.
0x80041003 is an event 10 error in Event Viewer. According to Event Viewer, this is Windows Management Instrumentation (WMI). This error informs you that events cannot be sent through this filter until the problem is resolved.
This error can occur for a variety of reasons. In general, error 0x80041003 is not dangerous and you can leave it alone. If your computer is experiencing certain issues as a result of this error, for example: For example, if Windows freezes, you can try the following fixes.
Disable User Account Control
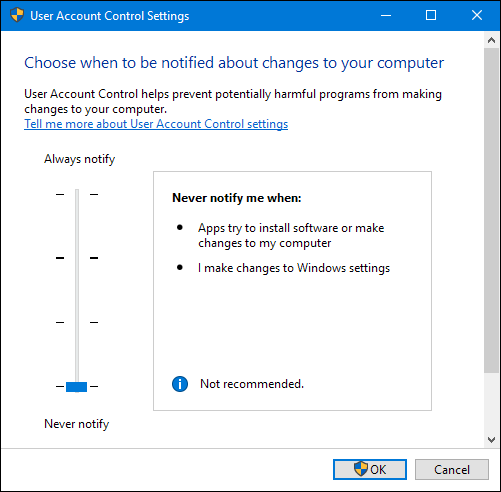
User Account Control is a Windows security feature that prevents users from changing settings that require administrator rights. While this feature can be useful, many users tend to disable it as it can become quite annoying over time. While this feature is annoying, it can sometimes confuse Windows and cause errors and other errors to appear. To prevent this error from occurring, you must turn off User Account Control. To do this, proceed as follows:
Press Windows Key + S and sign in to your user account. Select User Account Control from the menu. Alternatively, you can simply open the Start menu and search for custom commands.
The User Account Control Settings window will open. Move your cursor all the way down to Never notify and click OK to save your changes.
After disabling User Account Control, the issue should be completely resolved. Disabling this option may have a minor impact on your security, but don’t worry.
Run VBScript

Create a simple text document on your desktop.
Open your document and paste the following script:
strComputer = “.” Set objWMIService = GetObject (“winmgmts:” _
Updated: May 2025
We highly recommend that you use this tool for your error. Furthermore, this tool detects and removes common computer errors, protects you from loss of files, malware, and hardware failures, and optimizes your device for maximum performance. This software will help you fix your PC problems and prevent others from happening again:
- Step 1 : Install PC Repair & Optimizer Tool (Windows 11, 10, 8, 7, XP, Vista).
- Step 2 : Click Start Scan to find out what issues are causing PC problems.
- Step 3 : Click on Repair All to correct all issues.
& “{ImitationLevel = Imitation}! \” _
& strComputer & “\ root \ Subscription”)
Set obj1 = objWMIService.ExecQuery (“Select * from __eventfilter, where name =” BVTFilter “and query =” SELECT * FROM __InstanceModificationEvent INSIDE 60 WHERE TargetInstance ISA “” Win32_Processor “” And “TargetInstance.Lo
For each object in obj1
set obj2set = obj1elem.Associators _ (“__ FilterToConsumerBinding”)
set obj3set = obj1elem.References _ (“__ FilterToConsumerBinding”)
For each obj2 in obj2set
WScript.echo “delete object”
WScript.echo obj2.GetObjectText_
obj2.Delete_
following
For each obj3 in obj3set
WScript.echo “delete object”
WScript.echo obj3.GetObjectText_
obj3.Delete_
following
WScript.echo “delete object”
WScript.echo obj1elem.GetObjectText_
obj1elem.Delete_
After running the script, errors related to this event in event ID 10 should no longer occur. This will not delete any of the existing entries in the event log. They must be manually removed from the application event log.
Conclusion
Error code 0x80041003 is usually not dangerous. However, if your computer restarts or freezes due to this error, you can try one of our solutions.
RECOMMENATION: Click here for help with Windows errors.
-
Home
-
News
- WMI Repository Verification Failed with 0x80041003 or 0x80070005
By Aurelie | Follow |
Last Updated
Do you receive WMI repository verification failed after running winmgmt /verifyrepository in Command Prompt? If you have the same issue, have a look at the solutions mentioned in this post on MiniTool Website and your worries will be gone.
WMI Repository Verification Failed 0x80070005/0x80041003
Windows Management Instrumentation is a set of specifications that allows you to manage different Windows environments including Remote Systems. At times, you might have some issues with WMI and receive errors like WMI repository verification failed 0x80041003 or 0x80070005. The detailed error message is listed as follows:
WMI repository verification failed
Error code: 0x80041003, 0x80070005
Facility: WMI
Description: Access is denied.
The error suggests that the account you are using to access the WMI Namespace doesn’t have the WMI-level security permissions. To fix WMI repository reset failed on Windows 10/11, we will show you 2 ways step by step for you.
Tips:
During the troubleshooting process, you cannot be too careful because it is easy to make mistakes. Any small mistakes during the operation might lead to great data losses. Therefore, you had better back up your important data with a reliable backup software – MiniTool ShadowMaker as a precaution.
MiniTool ShadowMaker TrialClick to Download100%Clean & Safe
How to Fix WMI Repository Verification Failed on Windows 10/11?
Fix 1: Reset WBEM Repository
Resetting the WBEM Repository seems a good choice to fix WMI repository verification failed. Here’s how to do it:
Step 1. Press Win + S to evoke the search bar.
Step 2. Type cmd to locate Command Prompt and right-click on it to choose Run as administrator.
Step 3. Type the following command and hit Enter.
net stop winmgmt
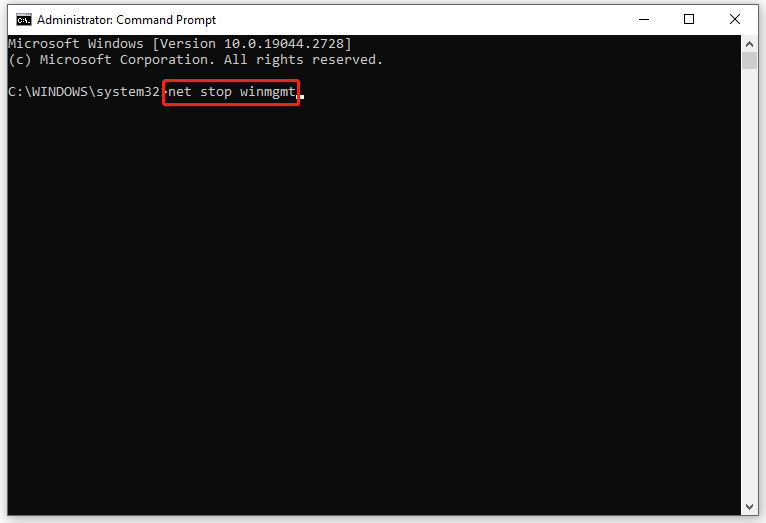
Step 4. After the command is executed successfully, run this command:
C:\Windows\System32\wbem\Repository*
Step 5. After the process is done, type exit and hit Enter to quit Command Prompt.
Fix 2: Rebuild the WMI Values
WMI repository verification failed will crop up when you don’t have permission to perform an operation in WMI. To address this issue, you can try rebuilding WMI values and then checking the WMI permissions.
Move 1: Rebuild the WMI Values
Step 1. Open your Notepad. Copy and paste the following content into it.
@echo on
cd /d c:\temp
if not exist %windir%\system32\wbem goto TryInstall
cd /d %windir%\system32\wbem
net stop winmgmt
winmgmt /kill
if exist Rep_bak rd Rep_bak /s /q
rename Repository Rep_bak
for %%i in (*.dll) do RegSvr32 -s %%i
for %%i in (*.exe) do call :FixSrv %%i
for %%i in (*.mof,*.mfl) do Mofcomp %%i
net start winmgmt
goto End

:FixSrv
if /I (%1) == (wbemcntl.exe) goto SkipSrv
if /I (%1) == (wbemtest.exe) goto SkipSrv
if /I (%1) == (mofcomp.exe) goto SkipSrv
%1 /Regserver
:SkipSrv
goto End
:TryInstall
if not exist wmicore.exe goto End
wmicore /s
net start winmgmt
:End
Step 2. Save this file and name it as WMI.bat.
Step 3. Right-click on WMI.bat and select Run as administrator. This operation will rebuild the WMI values.
Move 2: Check the WMI Permissions
Step 1. Open File Explorer > right-click on This PC > select Manage in the drop-down menu.
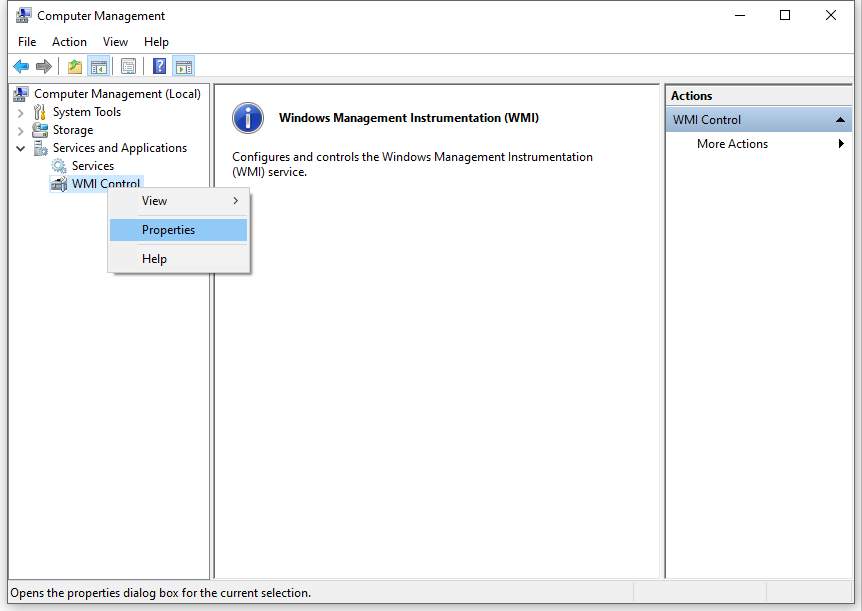
Step 2. Double-click on Computer Management (Local) on the left side > expand Services and Applications > right-click on WMI Control and choose Properties.
Step 3. Under the Security tab, expand Root > SECURITY and hit the Security button.
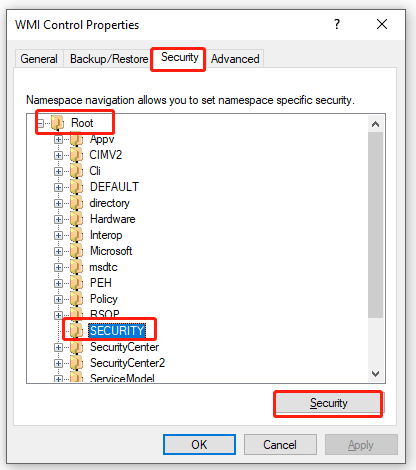
Step 4. Click on Authenticated Users, enable these permissions:
- Execute Methods
- Provider Write
- Enable Account
Step 5. Hit OK and then reboot your computer.
About The Author
Position: Columnist
Aurelie is a passionate soul who always enjoys researching & writing articles and solutions to help others. Her posts mainly cover topics related to games, data backup & recovery, file sync and so on. Apart from writing, her primary interests include reading novels and poems, travelling and listening to country music.
The 0x80041003 error is a common Windows Management Instrumentation (WMI) issue that can cause significant disruption to system management tasks. This comprehensive guide will walk you through understanding, diagnosing, and resolving this error, as well as preventing its recurrence in the future.
I. Introduction
What is the 0x80041003 Error?
The 0x80041003 error is a Windows Management Instrumentation (WMI) error code that signifies “Access Denied.” This error typically occurs when a user account or process attempts to perform a WMI operation without the necessary permissions. It’s important to note that this error is different from other common Windows errors like 0x0000000a, which is often associated with hardware or driver issues.

Common Symptoms and Impacts
When encountering the 0x80041003 error, users may experience:
- Failure of system management scripts or tools
- Inability to retrieve system information
- Event Viewer logs showing WMI-related errors
- Disruption of remote management capabilities
Brief Overview of Windows Management Instrumentation (WMI)
WMI is a core Windows infrastructure for management data and operations. It provides a unified interface for accessing management information across devices and applications in enterprise environments. Understanding WMI is crucial for effectively diagnosing and resolving the 0x80041003 error.
II. Common Causes of 0x80041003 Error
Several factors can contribute to the occurrence of the 0x80041003 error:
A. Insufficient Permissions
The most common cause is that the user account or process lacks the necessary permissions to perform WMI operations. This is similar to the 0x80004004 error, which also often relates to access or permission issues.
B. User Account Control (UAC) Settings
Overly restrictive UAC settings can prevent legitimate WMI operations, triggering the error.
C. Corrupted WMI Repository
A damaged or corrupted WMI repository can lead to various WMI errors, including 0x80041003. This is somewhat similar to how corrupted system files can lead to errors like 0x80004002.
D. Service Account Permission Issues
For remote WMI operations, the service account may lack the required permissions to connect and execute commands.
E. Namespace Access Restrictions
Attempting to access a WMI namespace without proper authorization can result in this error.
III. Diagnosing the 0x80041003 Error
Before attempting to fix the error, it’s important to properly diagnose the issue:
A. Checking Event Viewer Logs
- Open Event Viewer (eventvwr.msc)
- Navigate to Windows Logs > System
- Look for events with source “WMI” and event ID related to 0x80041003
B. Using WBEMTEST Utility
- Run WBEMTEST from the command prompt
- Connect to the WMI namespace (e.g., root\cimv2)
- Execute a simple query to test connectivity and permissions
C. Verifying Service Status
Ensure that the following services are running:
- Windows Management Instrumentation
- Remote Procedure Call (RPC)
- DCOM Server Process Launcher
IV. How to Fix the 0x80041003 Error
Method 1: Adjust WMI Permissions

- Open Computer Management (compmgmt.msc)
- Navigate to Services and Applications > WMI Control
- Right-click WMI Control and select Properties
- Go to the Security tab
- Select the appropriate namespace (usually root\cimv2)
- Click Security, then add or modify permissions for the required user or group
- Ensure “Execute Methods” and “Enable Account” permissions are granted
Method 2: Disable or Modify User Account Control

- Press Windows Key + S and search for “Change User Account Control settings“
- Lower the UAC slider to “Never notify” (Note: This may reduce system security)
- Click OK and restart your computer
Method 3: Rebuild the WMI Repository
- Open Command Prompt as Administrator
- Stop the WMI service:
net stop winmgmt - Rename the repository folder:
cd /d %windir%\system32\wbem ren repository repository.old - Restart the WMI service:
net start winmgmt - Recompile the MOF files:
winmgmt /resetrepository
If you encounter issues with disk space during this process, you may need to address storage concerns. The 0x80070070 error guide provides useful information on managing disk space issues.
Method 4: Run VBScript to Remove Problematic Filters
- Create a new text file and paste the following VBScript:
strComputer = "."
Set objWMIService = GetObject("winmgmts:" & "{impersonationLevel=impersonate}!\\" & strComputer & "\root\subscription")Set obj1 = objWMIService.ExecQuery("select * from __eventfilter where name='BVTFilter' and query='SELECT * FROM __InstanceModificationEvent WITHIN 60 WHERE TargetInstance ISA ""Win32_Processor"" AND TargetInstance.LoadPercentage > 99'")
For Each obj1elem in obj1
set obj2set = obj1elem.Associators_("__FilterToConsumerBinding")
set obj3set = obj1elem.References_("__FilterToConsumerBinding")
For each obj2 in obj2set
WScript.echo "Deleting the object"
WScript.echo obj2.GetObjectText_
obj2.Delete_
next
For each obj3 in obj3set
WScript.echo "Deleting the object"
WScript.echo obj3.GetObjectText_
obj3.Delete_
next
WScript.echo "Deleting the object"
WScript.echo obj1elem.GetObjectText_
obj1elem.Delete_
Next
- Save the file with a .vbs extension (e.g., fix_wmi.vbs)
- Run the script as Administrator
Method 5: Use Microsoft’s Automated Fix IT Tool
- Visit the Microsoft Support website
- Search for and download the Fix IT tool for WMI issues
- Run the tool and follow the on-screen instructions
If you encounter any update-related issues while trying to download or run the Fix IT tool, you might find the guide on 0x80240439 error helpful, as it deals with Windows Update problems.
V. Advanced Troubleshooting Techniques
For persistent issues, consider these advanced techniques:
A. Modifying Registry Settings
Caution: Editing the registry can be risky. Always back up the registry before making changes.
- Open Registry Editor (regedit.exe)
- Navigate to HKEY_LOCAL_MACHINE\SOFTWARE\Microsoft\WBEM
- Check for and modify permissions on the WMI key
B. Using PowerShell to Diagnose and Fix WMI Issues
PowerShell provides powerful cmdlets for WMI management:
# Test WMI
Test-WSMan# Get WMI object
Get-WmiObject -Class Win32_ComputerSystem
# Restart WMI service
Restart-Service Winmgmt -Force
C. Reinstalling WMI
In extreme cases, you may need to reinstall WMI:
- Uninstall WMI:
mofcomp %windir%\system32\wbem\uninstall.mof - Reinstall WMI:
mofcomp %windir%\system32\wbem\cimwin32.mof
VI. Preventing Future 0x80041003 Errors
To minimize the risk of encountering this error in the future:
A. Regular System Maintenance
- Run Windows Update regularly
- Perform disk cleanup and defragmentation
- Use reliable antivirus software
B. Keeping Windows Updated
Ensure your system has the latest security patches and updates installed.
C. Monitoring WMI Health
Regularly check WMI health using built-in tools or third-party software.
D. Best Practices for WMI Permissions
- Follow the principle of least privilege
- Regularly audit and review WMI permissions
- Use group policies to manage WMI settings across multiple systems
VII. Conclusion
The 0x80041003 error, while frustrating, can be resolved through careful diagnosis and application of the appropriate fix. By understanding the causes and following the steps outlined in this guide, you can effectively troubleshoot and prevent this WMI error, ensuring smooth operation of your Windows systems.
VIII. FAQs about 0x80041003 Error
Q: Can third-party software cause the 0x80041003 error? A: Yes, some third-party security software or system optimization tools can interfere with WMI operations and potentially cause this error.
Q: What does the 0x80041003 error mean? A: This error code indicates an “Access Denied” issue in Windows Management Instrumentation (WMI), typically due to insufficient permissions.
Q: Can disabling UAC permanently fix the 0x80041003 error? A: While disabling UAC may resolve the error, it’s not recommended as a permanent solution due to security implications. It’s better to address the root cause of the permission issue.
Q: How often should I rebuild the WMI repository? A: Rebuilding the WMI repository should only be done when troubleshooting specific WMI issues. It’s not a routine maintenance task.
Q: Will reinstalling Windows fix the 0x80041003 error? A: Reinstalling Windows is a drastic measure and should be considered only as a last resort after trying all other troubleshooting methods.
-
-
#2
Hello and Welcome !
You have mentioned an Event viewer error and also BSOD. Regarding the WMI there are few things that you could do to fix it. The error 0x80041003 it happen when the user does not have permission to perform the operation in WMI. This could happen when you query certain classes as a low-rights user, but most often happens when you attempt to invoke methods or change WMI instances as a low rights user. The namespace you are connecting to is encrypted, and the user is attempting to connect with an unencrypted connection.
Follow these steps:
Code:
@echo on
cd /d c:\temp
if not exist %windir%\system32\wbem goto TryInstall
cd /d %windir%\system32\wbem
net stop winmgmt
winmgmt /kill
if exist Rep_bak rd Rep_bak /s /q
rename Repository Rep_bak
for %%i in (*.dll) do RegSvr32 -s %%i
for %%i in (*.exe) do call :FixSrv %%i
for %%i in (*.mof,*.mfl) do Mofcomp %%i
net start winmgmt
goto End
:FixSrv
if /I (%1) == (wbemcntl.exe) goto SkipSrv
if /I (%1) == (wbemtest.exe) goto SkipSrv
if /I (%1) == (mofcomp.exe) goto SkipSrv
%1 /Regserver
:SkipSrv
goto End
:TryInstall
if not exist wmicore.exe goto End
wmicore /s
net start winmgmt
:EndCopy these to a Notepad and save it as WMI.bat then Right Click and run as administrator. This will rebuild the WMI values.
1, Right-click your Computer icon on the desktop, and then click Manage from the shortcut menu. The Computer Management panel launches.
2, Double- click Computer Management (Local) from the left pane to expand (if necessary), click Services and Applications to expand (if necessary), click WMI Control to select it, right-click WMI Control, and then click Properties from the shortcut menu. The WMI Control Properties dialog box appears.
3, Under the Security tab click the Root folder from the Namespace navigation allows you to set namespace specific security box, and then click the Security button. The Security for Root dialog box appears.
4, Ensure that the logged in user is listed and the Allow option is enable for all available permissions. Also
5, Click Apply (if available), and then OK to close the Security for Root dialog box. The WMI Control Properties dialog box reappears.
6, Click Apply (if available), and then OK to close the WMI Control Properties dialog box.
Close the Computer Management panel and reboot the System once.
For BSOD Help Link Removed
Good Luck,
Captain