
Клавиатура от Apple была приобретена для использования с хакинтошем, но с OS X в тот момент не срослось и основной системой для меня осталась Windows. Но не все так просто, как оказалось, работа под Windows собпряжена с несколькими проблемами:
1) Для вызова клавиш F2-F12, требется зажатие модификатора (Fn).
2) Раскладка на клавиатуре не совпадает с системной (коды клавиш используются стандартные).
3) Некоторые клавиши в принципе не работали (например, PrintScreen).
Установка Boot Camp решала первую проблему и даже клавиша выброса диска заработала, но появились неприятные фризы при старте системы и проблему раскладки она не решала. После недолгих копаний, был найден ключ реестра, отвечающий за работу функциональных клавиш и программа, позволяющая редактировать раскладки.
Результатом этого стал данный установщик, в котором содержится:
- Драйвер от Apple из дистрибутива Mac OS X Leopard 10.5.4
- Файл реестра, изменяющий параметр, ответсвенный за клавиши F2-F12
- Установщики раскладок клавиатуры (для русского и английского языков)
Набор проверен на 32-битных версиях Windows Vista и Windows 7, в принципе, и под Windows XP тоже должно работать.
Раскладки добавляются автоматически, чтобы полностью заменить стандартные:
1) Укажите одну из новых раскладок, в качестве языка ввода по-умолчанию:
2) Перенесите новые раскладки вверх списка:
3) Нажмите «Применить» и удалить стандартные раскладки.
Также вы можете скачать раскладки отдельно (для 32 и 64-разрядных ОС): Русская, Английская
UPDATE:
Последняя версия драйвера из Boot Camp 5.0:
yadi.sk/d/TcAobagLM58Bf
В этом случае вам будет необходимо вручную установить раскладки клавиатуры и внести следующие изменения в ветке HKEY_LOCAL_MACHINE\SYSTEM\CurrentControlSet\services\KeyMagic\:
1. Для возвращения привычного поведения клавишам F1-F12 измените значение OSXFnBehavior на 00.
2. Чтобы сместить Print Screen на законное место (F13): «Keymap»=hex:68,46,69,47,6a,48
В качестве бонуса: можно увеличить ток на встроенном USB-хабе до 500 мА:
На свой страх и риск
Windows Registry Editor Version 5.00
; Изменяем название хаба в диспетчере устройств
[HKEY_LOCAL_MACHINE\SYSTEM\CurrentControlSet\Enum\USB\VID_05AC&PID_1006\000000000000]
«DeviceDesc»=«Apple Keyboard Hub»
; Увеличиваем ток на хабе до 500 мА
[HKEY_LOCAL_MACHINE\SYSTEM\CurrentControlSet\Enum\USB\VID_05AC&PID_1006\000000000000\Device Parameters]
«ForcePortPower»=dword:000001f4
В этой инструкции мы познакомимся со всеми нюансами подключения и работы контроллеров компании из Купертино к компьютерам под управлением Windows.
Будет ли работать?
Независимо от того, являетесь ли вы поклонником продукции Apple или все же предпочитаете Windows ПК, спорить с тем, что клавиатура американской компании является одной из самых удобных с точки зрения набора текста, вряд ли стоит. Magic Trackpad и Magic Mouse, по сути, являются весьма специфическими манипуляторами, обеспечивающими действительно комфортную и производительную работу. Подчеркивать все достоинства и недостатки каждого – не вижу смысла, а лучше сразу перейти к делу.
Вы решили подключить один из аксессуаров (Apple Keyboard, Magic Mouse или Magic Trackpad) к компьютеру, не имеющему ничего общего с компанией Apple. Главный вопрос – будет ли работать такая связка или оборудование окажется неопознанным?
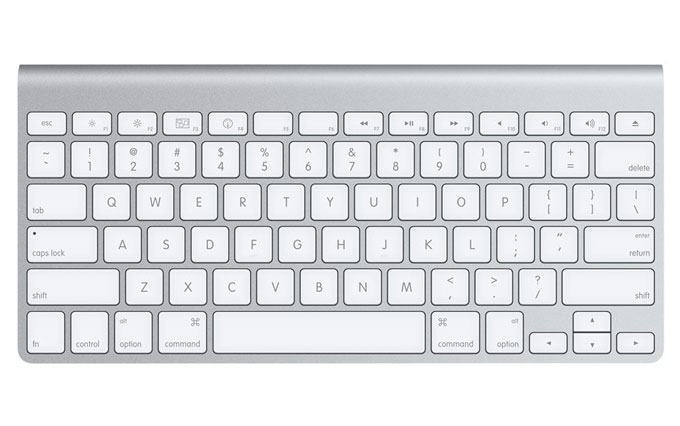
Apple Keyboard проводная
Подключение проводной клавиатуры от Apple – самый простой и безболезненный вариант использования контроллеров от Apple на Windows-машинах. Без лишней подготовки смело вставляйте ее в USB-порт и после автоматической установки драйверов она готова к бою.

Что работает нативно. Сразу после подключения в вашем распоряжении полностью рабочая буквенно-цифровая часть клавиатуры с привычной для Windows разметкой, но отличной от разметки самой клавиатуры.
Что не работает, но требует дополнительной настройки. Подключение по USB и установка стандартных драйверов Windows не решат проблемы с работой функциональных клавиш. Регулировать уровень громкости и переключать воспроизводимые композиции можно лишь при установке дополнительных драйверов, о которых я расскажу немного ниже. Разумеется, «странные иконки» на клавишах F3 и F4 – удел работающих с Mac.
Apple Keyboard беспроводная
Первая и главная проблема PC на базе Windows, как правило, закономерное отсутствие встроенного Bluetooth-адаптера. Если наличие такового в вашем ПК не предусмотрено – смело отправляйтесь в ближайший магазин и приготовьтесь расстаться с небольшой суммой в районе 10-20 долларов.
Теоретически, для подключения периферии Apple подойдет любой Bluetooth-адаптер, но может и потребоваться подбор конкретной модели.
Список совместимых в большинстве случаев Bluetooth-адаптеров (идеальные компаньоны для знакомых с Hackintosh):
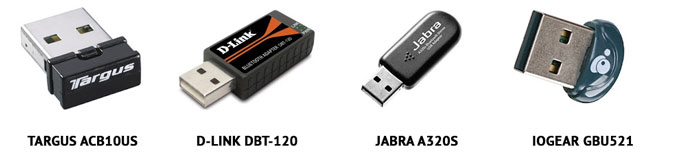
Ситуация по части работоспособности полностью аналогична таковой и при подключении проводной USB-клавиатуры Apple. Для полного функционирования всех клавиш потребуется установка дополнительных драйверов.
Apple Magic Mouse
После анонса обновленной мыши Magic Mouse, манипулятор от Apple был назван одним из самых удивительных в среде компьютерной периферии. Несмотря на то, что продукт является полностью совместимым в первую очередь с компьютерами Apple, использовать мышь владельцам PC ничто не помешает.
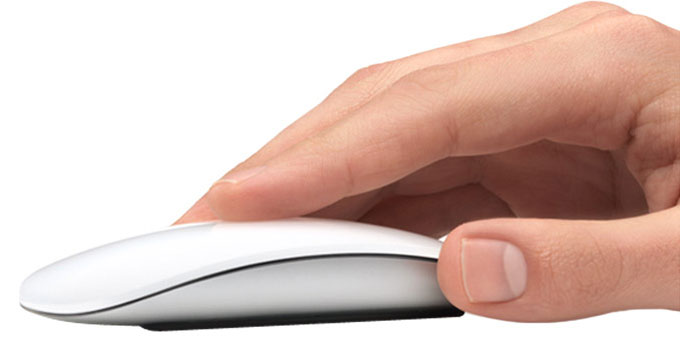
Что работает нативно. В случае удачного сопряжения компьютерная мышь Magic Mouse определится Windows и пользователь получит возможность работы с ней как и с традиционной мышкой, но с одной клавишей. Перемещение курсора и одинарный тап тоже попадут в ваше распоряжение.
Что не работает сразу, но требует дополнительной настройки. Увы, сопряжение с Bluetooth-адаптером и установка штатных драйверов Windows, не позволит вам использовать Magic Mouse на полную. Для поддержки жестов, скроллинга и кликов потребуется установка дополнительного драйвера.
Apple Magic Trackpad
Оснастить любой компьютер внушительной по размеру тач-областью, подобно той, что устанавливают в ноутбуки, стало реальностью после выхода на рынок продуктаApple Magic Trackpad. Владельцы Mac используют Magic Trackpad уже почти 5 лет. Не стоит думать, что и владельцы Windows-совместимых машин остались за бортом.
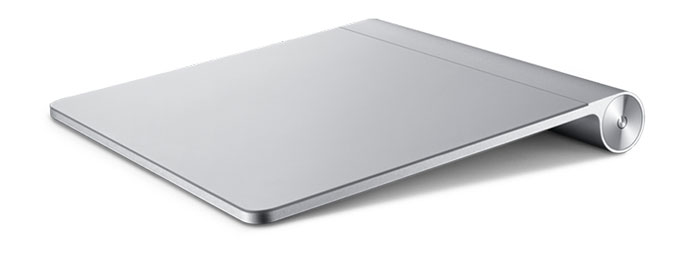
Что работает нативно или будет работать после установки дополнительных драйверов. Тапание, перетягивание, имитация левой/правой клавиш мыши, прокрутка (горизонтальная и вертикальная), имитация правой кнопки нажатиям двумя пальцами. Полный список поддерживаемых жестов в среде Windows вы можете увидеть на соответствующей странице поддержки Apple. Увы, он значительно урезан по сравнению с Mac и вылечить это невозможно.
Если ни один из вышеописанных пунктов вас не пугает и вы по-прежнему готовы к приобретению манипуляторов от Apple, приготовьтесь к установке дополнительных драйверов и небольшой головной боли.
Как их подружить: его величество, Bootcamp
Как видно из описания всех четырех продуктов, они дружелюбны с Windows-машинами весьма относительно. Но помирить продукты конкурентных платформ можно с помощью установки дополнительного пакета драйверов Bootcamp. Именно установка дополнительных заплаток значительно расширит функциональность клавиатуры, мыши или трекпада. Увы, для поддержки всех заявленных жестов и функциональных клавиш без исключения есть единственный выход – переход в ряды маководов.
Установка Bootcamp
По сути, Bootcamp – это набор программного обеспечения для Windows, при условии запуска операционной системы на Mac. Но никто не запрещал установить требуемые драйвера на полностью Mac-независимой машине.
Одним из самых надежных вариантов установки Bootcamp на Windows-совместимых ПК является последовательная установка пакет, начиная с версии Bootcamp 3.0. Увы, найти его можно лишь в интернет-архивах сайтов и на торрент-трекерах (с официального сайта поддержки Apple удалила этот пакет).
Примечание 1: Несмотря на полный переход продукции Apple на 64-разрядную ОС, самая простая установка драйверов из пакета Bootcamp предусмотрена при использовании 32-битной версии Windows (в процессе попытки установить Bootcamp 3.0 на Windows X64 вы можете столкнуться с конфликтом совместимости). Решить проблему можно с помощью последовательной установки драйверов из смонтированного образа, а также воспользовавшись примечанием 2.
-
1. Скачайте Bootcamp 3.0 (пользуйтесь поиском, либо предложенной ссылкой).
2. Смонтируйте образ диска и запустите файл Setup.
3. Дождавшись окончания установки, перезагрузите компьютер.
4. Поверх установленного Bootcamp 3.0 установите версию 3.1 (32-bit, 64-bit).
5. После окончания установки вновь перезагрузите компьютер.
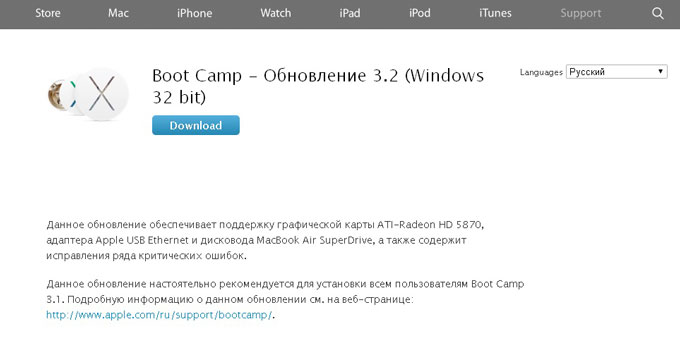
6. Заключительный этап обновления Bootcamp – накатка версии 3.2. Загрузите и установите (32-bit, 64-bit).
7. Перезагрузите компьютер.
Примечание 2: установка может проводиться и без этапов 1-5, но их соблюдение гарантирует более стабильный результат работы периферийных устройств Apple. Для пропуска этапов 1-5 установите драйвер AppleWT, AppleMultiTP.
После окончания установки, USB-клавиатура Apple получит поддержку функциональных клавиш (громкость, яркость (при использовании ноутбука), переключение композиций, открытие крышки DVD-привода – закрывать не умеет в силу аппаратных особенностей дисковода).
Для подключения беспроводных Apple Wireless Keyboard, Magic Mouse и Magic Trackpad потребуется сопряжение по Bluetooth и дополнительная установка драйверов в том случае, если после вышеперечисленных действий «чуда так и не произошло».
-
1. Откройте настройки Bluetooth и выберите пункт Добавить устройство.
2. Включите Magic Trackpad, Magic Mouse или Apple Wireless Keyboard.
3. Система тут же обнаружит соответствующее устройство. Добавьте его.
4. Настройка завершена.
Magic Tools
Отдельного внимания заслуживает утилита, способствующая максимизации доступных функций для пользователей Windows, использующих Magic Trackpad или Magic Mouse. Называется она Trackpadmagic. Загрузив ее с официального сайта и установив на Windows, вы получите отдельную панель управления для Magic Mouse или Apple Magic Trackpad (в зависимости от используемого аксессуара). По заверению разработчика, она не требует установки Bootcamp, но в процессе установке не всегда подхватывает необходимые драйвера и все зависит исключительно от конкретного ПК.

Увы, утилита представлена триал-версией, работающей на протяжение 28 дней. Для получения лицензии потребуется связаться с разработчиками и за символическую плату получить полный ключ доступа.
Подводя итоги
В плане использования манипуляторов Apple для управления компьютерами под управлением Windows, самым целесообразным вариантом является Apple Keyboard (проводная и беспроводная версии). Что же касается работы с Magic Mouse и Magic Trackpad, то вы действительно получите стабильную работу, но весь функционал, заложенный компанией, доступен так и не будет. Альтернативным продуктом Magic Trackpad для пользователей Windows может стать решение от Logitech, а количество представленных беспроводных мышей уж точно сможет удовлетворить любые вкусы.
Но, если сильно хочется почувствовать себя укротителем Apple, описанное выше решение поможет в этом.
(19 голосов, общий рейтинг: 4.37 из 5)
iPhones.ru
В этой инструкции мы познакомимся со всеми нюансами подключения и работы контроллеров компании из Купертино к компьютерам под управлением Windows. Будет ли работать? Независимо от того, являетесь ли вы поклонником продукции Apple или все же предпочитаете Windows ПК, спорить с тем, что клавиатура американской компании является одной из самых удобных с точки зрения набора текста,…
-
Home
-
News
- How to Use an Apple Magic Keyboard on Windows?
By Stella | Follow |
Last Updated
Can I use a Mac keyboard on a PC? Of course, yes and it is quite easy. MiniTool Software writes this post to help you connect an Apple Magic Keyboard on Windows and introduce how to use a Magic keyboard with Windows.
Can I Use a Mac Keyboard on a Windows PC?
If you have an Apple Magic keyboard at hand but your computer is running Windows, do you know how to use the keyboard on Windows? Or perhaps, you install Windows 10/11 on your Mac using Boot Camp, and you need to use your Mac Keyboard with Windows.
Well then, the first question you want to should be: does a Mac keyboard work with a PC? Or can I use a Mac keyboard on a PC?
A Magic keyboard is completely compatible with Windows. You don’t even need to make changes. However, some Windows keys are not on a Mac keyboard. You can use the Mac equivalents of Windows keys or the on-screen keyboard to make up for this defect.
In the following part, we will show you how to use an Apple keyboard on Windows.
How to Use a Magic Keyboard on Windows?
Move 1: Connect Your Apple Keyboard to Your Windows Computer
If you install Windows on a Mac computer, the keyboard connection should be created. You can use the keyboard immediately.
If it is the first time to use a Magic keyboard on a Windows computer, you need to first connect it to your device. If it is a wireless keyboard, you can follow these steps to do the job:
Step 1: Insert batteries into the keyboard and press the switch button to turn it on. So, it can be discovered by your Windows computer.
Step 2: Turn on Bluetooth on your Windows computer.
- On Windows 10, you need to go to Start > Settings > Devices > Bluetooth & other devices to switch the button to ON for Bluetooth.
- On Windows 11, you need to go to Start > Settings > Bluetooth & devices to turn Bluetooth on.
Step 3: Add the wireless Mac keyboard.
- On Windows 10, you need to click Add Bluetooth or other devices > Bluetooth and select the target keyboard to establish the connection.
- On Windows 11, you need to click Add device > Bluetooth and select the target keyboard to establish the connection.
After these steps, your Apple Magic keyboard will be connected to Windows. You can use the keyboard as a Windows keyboard.
Move 2: How to Use a Magic Keyboard on Mac?
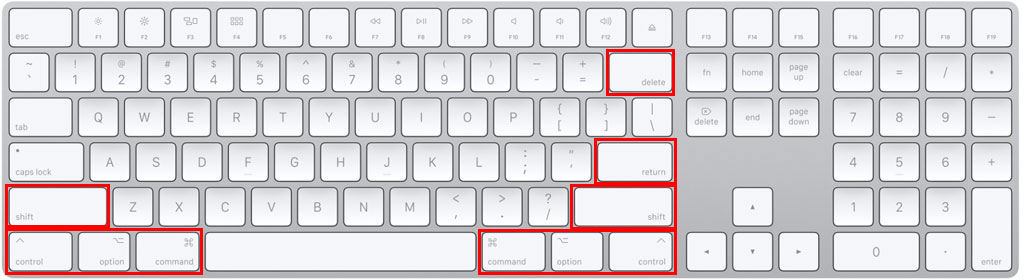
Most keys on an Apple keyboard work the same way as the keys on a Windows keyboard. However, you will say that some Windows keys cannot be found on the Mac keyboard. Don’t worry. There are Mac equivalents of Windows keys:
- The Windows key is the Command key on a Mac keyboard.
- The Alt key is the Option key on a Mac keyboard.
- The Backspace key is the Delete key on a Mac keyboard.
- The Enter key is the Return key on a Mac keyboard.

Image souce: Apple
Besides, if you can’t find the following keys on an Apple keyboard, you can use the Windows on-screen keyboard:
- Pause/Break
- Insert
- Forward Delete
- Home
- End
- Page Up
- Page Down
- Number Lock
- Scroll Lock
Bottom Line
Want to use a Magic keyboard on Windows but don’t know how? This post is helpful for you. After connecting the Apple keyboard to Windows, you can just use it as a Windows keyboard, but only you need to know the Mac equivalents of Windows keys. Also, the Windows on-screen keyboard can help you.
When you delete some files by mistake, you can use a professional data recovery software like MiniTool Power Data Recovery to get them back.
MiniTool Power Data Recovery TrialClick to Download100%Clean & Safe
If you have other issues that need to be solved, you can let us know in the comments. You can also share your suggestions here.
About The Author
Position: Columnist
Stella has been working in MiniTool Software as an English Editor for more than 8 years. Her articles mainly cover the fields of data recovery including storage media data recovery, phone data recovery, and photo recovery, videos download, partition management, and video & audio format conversions.
If you’ve recently added a
Windows PC to your collection, or
installed Windows on your Mac, then you may notice that the standard Apple keyboard is a little different to those usually supplied with PCs. In this article we help you understand the differences so you can use your Mac keyboard with Windows.
For the reverse situation, read
How to use a Windows keyboard with a Mac. Also read:
Where is the Command key?
Will the keyboard work with my PC?
Whether you’re using a PC or a Mac with Windows installed, the Apple keyboards should all work perfectly. The various models, such as the
Magic Keyboard, either connect through Bluetooth or via a USB cable, so there shouldn’t be any need for installing drivers.
Of course, there are a few keys that are not the same, so we’ll look at that below.
What keys are different or missing?
For the most part the layouts for PC and Mac keyboards are identical, but there are a few key (pardon the pun) differences.
The first and most obvious is that a Mac keyboard doesn’t have a Windows key. More accurately, it doesn’t have a key with the Windows symbol on it, but the one marked command or cmd acts as one when you press it.
Alt and Alt GR are slightly different in that the Apple variant just has two Alt keys. To use one as Alt GR you need to hold down the control or ctrl key at the same time.
It’s a similar situation for Delete and Backspace, with Macs only having a Delete button on the smaller keyboards, although this does act like a Backspace as it deletes the character to the left of the cursor. To get the Windows version of Delete, press and hold the control or ctrl key and press D or hold the fn (function) key down while pressing Delete.
You won’t find a Print Scr button on a Mac keyboard, so if you want to
capture what’s on your display then you’ll need to use the Windows Snipping Tool. To find this, open the Windows Start Menu and type snipping tool, then select it from the results that appear. For more details on how to use it, read Microsoft’s
Use Snipping Tool to capture screenshots guide.
The one main omission is the Menu or Applications key on Windows that allows you to launch contextual windows (basically the same as right-clicking the mouse). Mac keyboards don’t have these and there’s currently no shortcut combination to activate it.
There are a few other features that are absent, including Insert, Page Up, Page Down, Number Lock and others, but these can be achieved through the onscreen keyboard present in Windows.
To find this go to the Start Menu and navigate to Settings > Ease of Access > Keyboard and enable the toggle for Use the On-Screen Keyboard.
This can then be minimised so you can bring it up whenever you need those special commands.
To find a full breakdown of the various shortcuts available on the keyboard, you can also download the
Microsoft Keyboard Layout Creator app. This free software gives you the ability to remap keys so they produce the characters you choose.
Launch the app, then click File > Load Existing Keyboard and find your particular model. You can then click on the tickboxes to the left of the keyboard and see what combinations you need to use for all the extended characters.
If you want to change a key then choose the relevant tickbox (in other words, if you want the character to appear when you press Shift then make sure you have that box selected), click on the virtual key and enter the symbol that you want it to use instead.
Microsoft has included a detailed help section, so be sure to take a look at it if you want to get the most from the app.
Before you decide to migrate from Apple to Microsoft, be sure to read our
Mac vs PC comparison feature as we suspect you might find that the grass is greener on the fruitier side.
Did you know that you can use an Apple keyboard with a Windows PC? It might seem like putting a round peg in a square hole, but that’s right, you can. Just because Apple peripherals are built for Apple devices doesn’t mean they aren’t compatible with Windows devices.
Whether it’s a USB keyboard, a Mac keyboard, or a wireless model, you can connect it with your Windows PC and work on whatever you have in mind.
In this article, we’ll show you how to use an Apple keyboard with a Windows PC.
Although Apple has produced various keyboard models over the years, USB models seem to have hit the sweet spot among users. They come with a sleek aluminum chassis and flat keys that sit much closer to the tabletop than traditional keyboards.
USB keyboards have a cult following among computer users because they don’t need to be recharged. Instead, they are powered directly by your machine, so all you need to do is connect the keyboard and start typing.
If you have an Apple USB keyboard, here’s how to use it with a Windows PC:
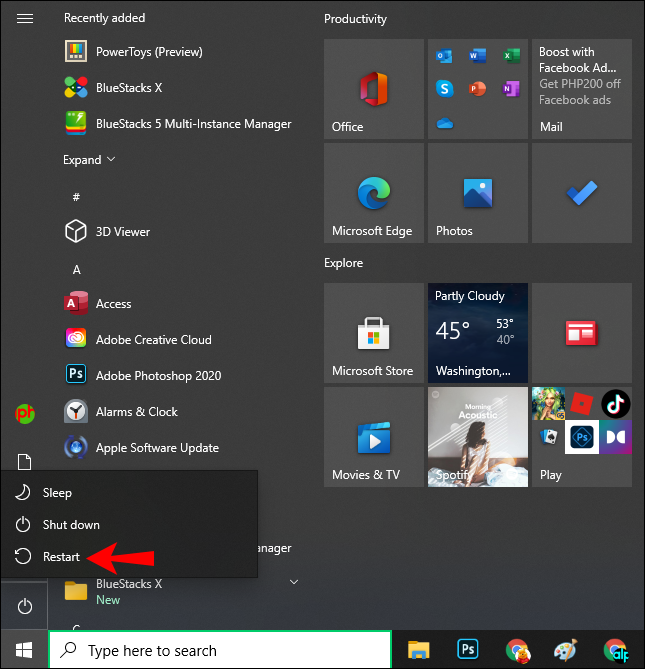
- Start or reboot your PC.

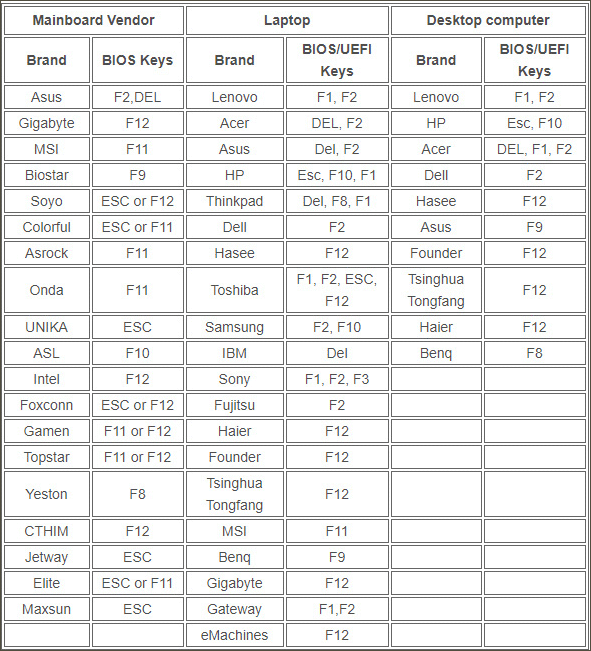
- Before your machine has completed the startup process, you need to enter the BIOS setup because you’re about to install a new hardware component. To do so, press F1, F2, or any other key as specified by your machine’s manufacturer.

- When the BIOS software window opens, look for a setting called “USB keyboard Support” and enable it.

- At this point, close the BIOS setup and follow the on-screen instructions to save the changes. Your computer will then reboot to effect the changes.
- Connect the keyboard to one of your PC’s USB ports. Your PC should recognize the keyboard right away.

How to Use an Apple Wireless (Bluetooth) Keyboard With a Windows PC?
Apple has also produced a series of wireless keyboard models that reduce clutter on your desk while still delivering quality service for hours on end.
If you want to use the Apple Magic keyboard with your Windows PC, make sure the keyboard is fully charged. If you’ve got one of the older models that use batteries, be sure to get some fresh batteries beforehand.
Here’s how to connect the keyboard to your PC:
- Turn of the keyboard.
- Power on your Windows PC and enter “Bluetooth Devices” into the search bar (located in the bottom left corner).
- Click on “Bluetooth and other devices settings.”
- When the Bluetooth settings window opens, click on “Add Bluetooth or other device.”
- At this point, turn on the Apple wireless keyboard. Windows will then run an automatic scan and detect the keyboard as one of the available Bluetooth devices.
- Click on the keyboard.
- Click on “Next.”
- Enter the code generated by your Windows PC on your keyboard and hit “Enter.” Windows will then establish a connection with the keyboard and install a driver.
- Close the Bluetooth settings window. You can now start using your Apple keyboard with your machine.
How to Remap Keys on Your Apple Keyboard for Use With a Windows PC
Although PC and Apple keyboards are identical for the most part, some keys/key combinations aren’t.
For example, Apple keyboards don’t have a Windows key. Instead, they’ve got a Command key that serves the same purpose.
It’s a similar situation for “Enter.” Windows keyboards come with two Enter keys, one on the alphabet section and the other on the number pad. On an Apple keyboard, the big key on the number pad is still labeled “Enter,” but the key on the alphabet section is labeled “Return.”
These differences can slow you down and inadvertently introduce typos into your workflow. So, how can you solve the problem?
For starters, you could use the Windows on-screen keyboard whenever you aren’t sure what keys or key combinations to press on your Apple keyboard. To do so, navigate to Settings > Ease of Access > Keyboard, and then toggle the slider button next to “Use the On-Screen Keyboard.”
However, the on-screen keyboard can be an inconvenient element on your screen. You may not like the idea of venturing into Settings to bring the keyboard up whenever you need it but there are few other alternatives.
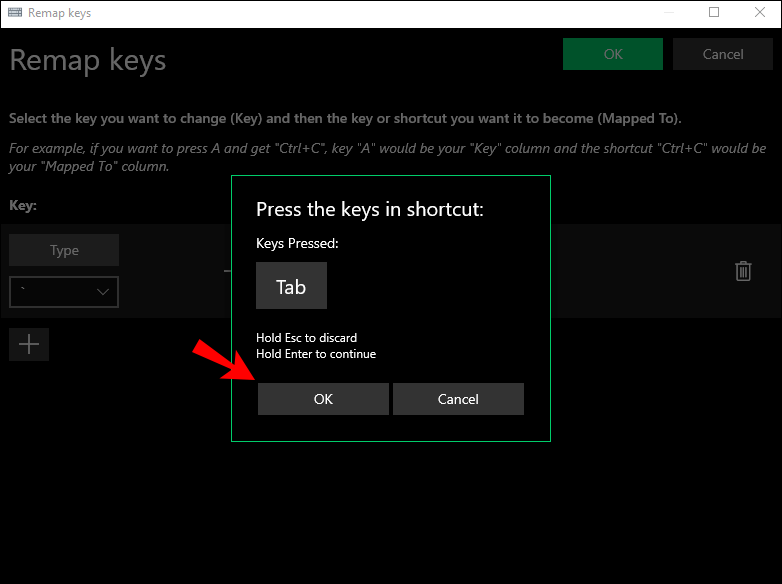
You can also remap keys on the Apple keyboard and make it work just like a Windows keyboard. Remapping gives you the chance to tweak the keys on the Apple keyboard and produce the Windows characters you want. But to achieve this, you need a Microsoft PowerToy app called Keyboard Manager.
With Keyboard Manager, you can customize the Apple keyboard and increase your productivity. You can even create your own shortcuts.
Here’s how to go about it:
- Download Keyboard Manager from Microsoft’s official website.
- Follow the on-screen prompts to install the app on your system.

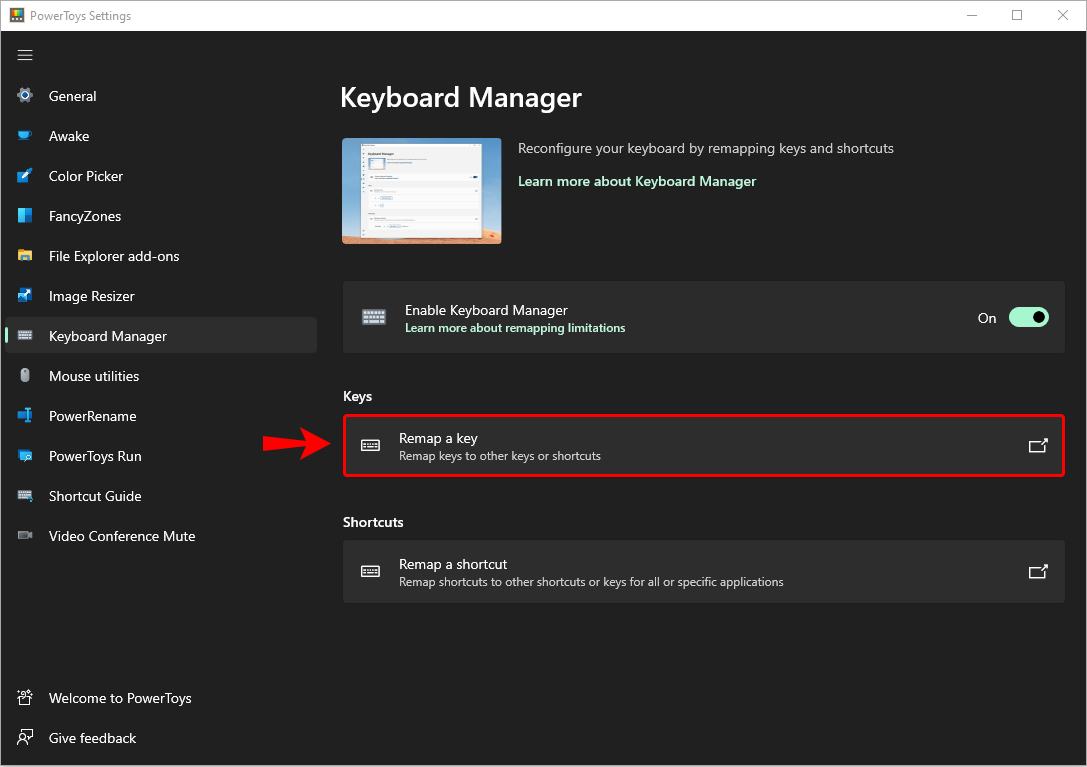
- Once the app has installed successfully, open it and click on “Remap a key.”

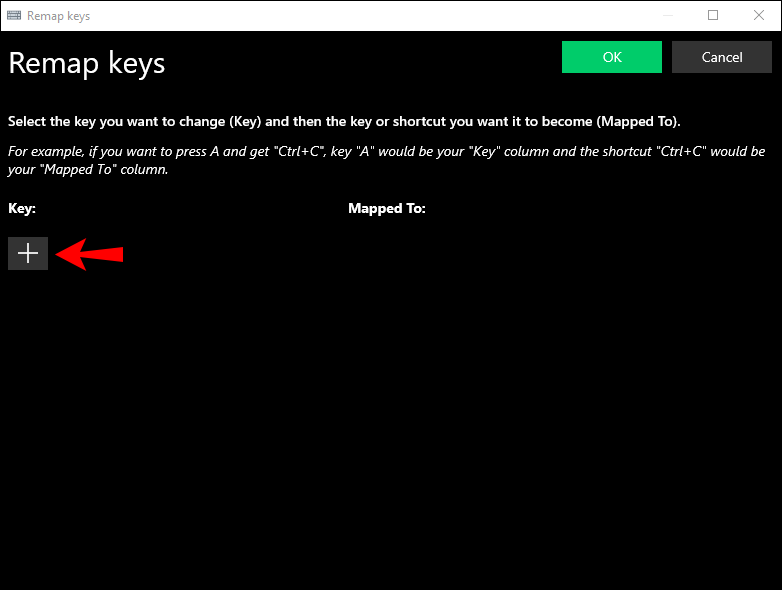
- Click on “+” to introduce a new key mapping.

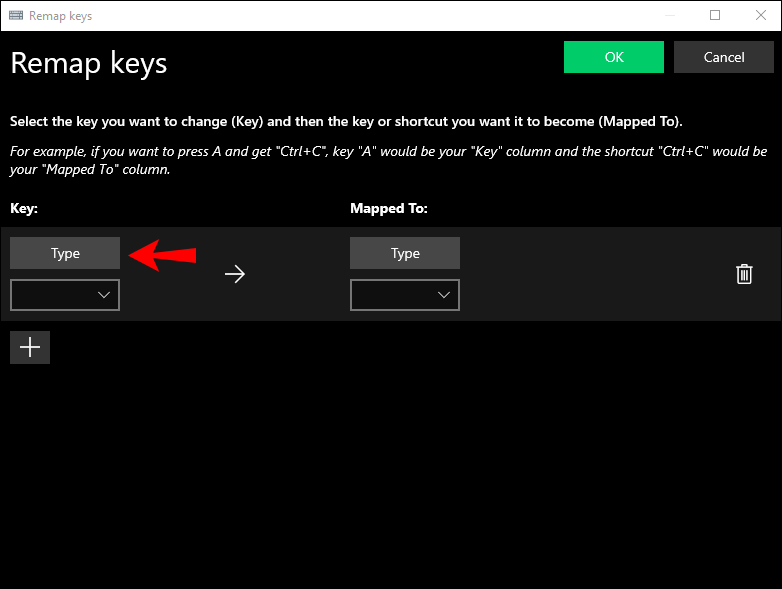
- Click on “Type” and then proceed to tap the key you’d like to modify.

- Click on “Ok.”
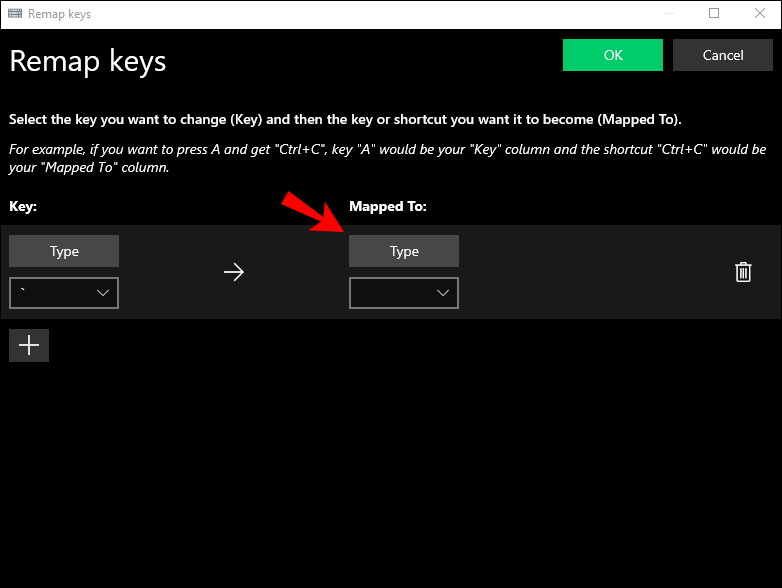
- Again, click on “Type” under “Mapped,” but this time tap the key you’d like to introduce.

- Click on “Ok.”

- Save your new settings.


Additional FAQs
Can I Take a Screenshot on a Windows PC Using an Apple Keyboard?
Sadly, Apple keyboards don’t have the Print Screen key, so you can’t take screenshots.
But you can still take screenshots using Snipping Tool, a Windows built-in tool available in the Start menu.
Keep Working
Just because you don’t have a Windows keyboard doesn’t mean your workflow should be disrupted. You can easily connect an Apple keyboard to your PC and even modify some keys to produce the characters you want.
An Apple keyboard and Windows and Microsoft may be a marriage of convenience but one that’s necessary for certain situations.
Have you tried using an Apple keyboard with your PC? How did it go?
Let us know in the comments section below.