
Знаете ли вы, что в Windows 10 есть встроенное приложение, которое поможет вам правильно распределить свое время и управиться со всеми обязательствами.
Это приложение «Календарь». Оно бесплатное и уже предустановлено в Windows 10, так что ничего скачивать не нужно. Найдите его в списке приложений и откройте.
Приложение доступно в автономном режиме, так что вы можете увидеть текущее расписание даже без подключения к Интернету. В отличие от онлайн-календарей, которые вам приходится проверять в браузере, приложение «Календарь» не требует авторизации при каждом заходе.
Дадим два совета по использованию приложения.
Просматривайте несколько календарей в одном месте:
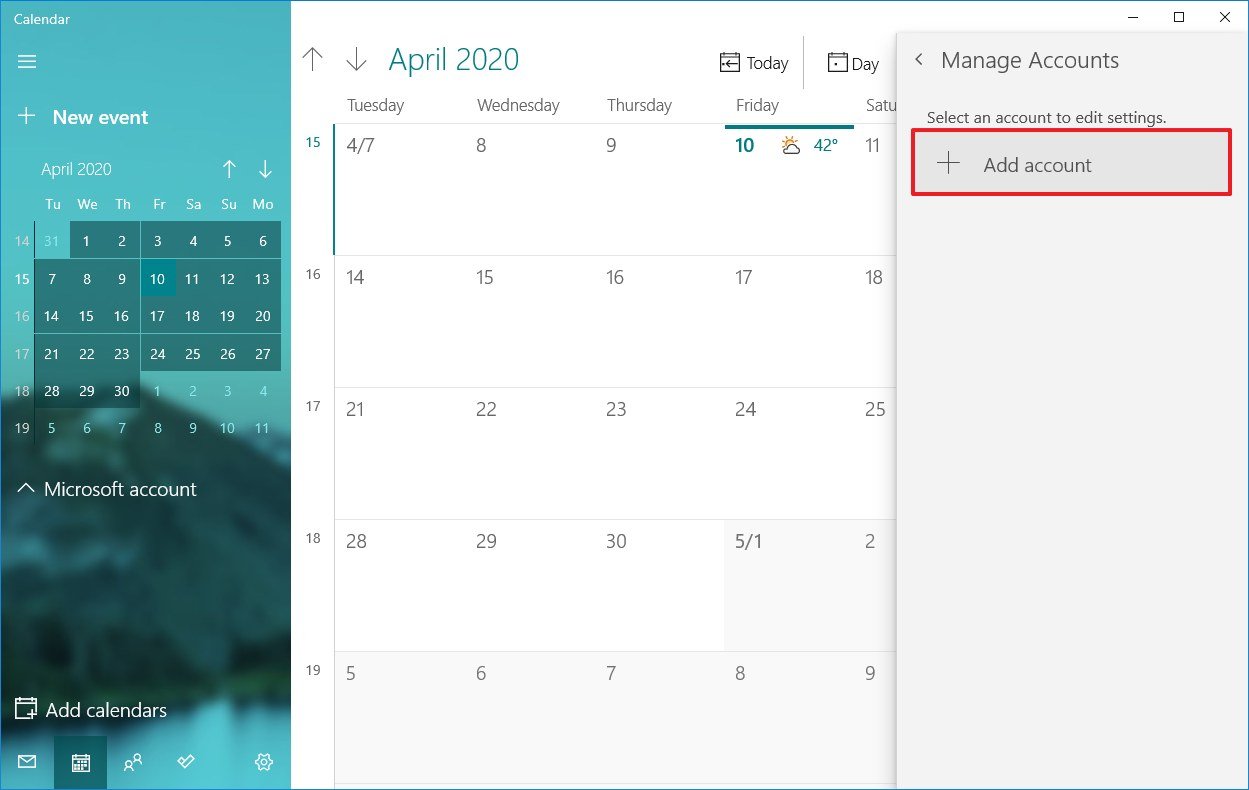
Чтобы лучше управлять своим временем и ничего не пропустить в течение дня, соберите все календари вместе, включая Outlook.com, Gmail, Yahoo, рабочий, учебный и другие аккаунты. Для этого в приложении «Календарь» зайдите в Параметры > Управление учетными записями > Добавить учетную запись.
Просматривайте сегодняшнее расписание за один клик:
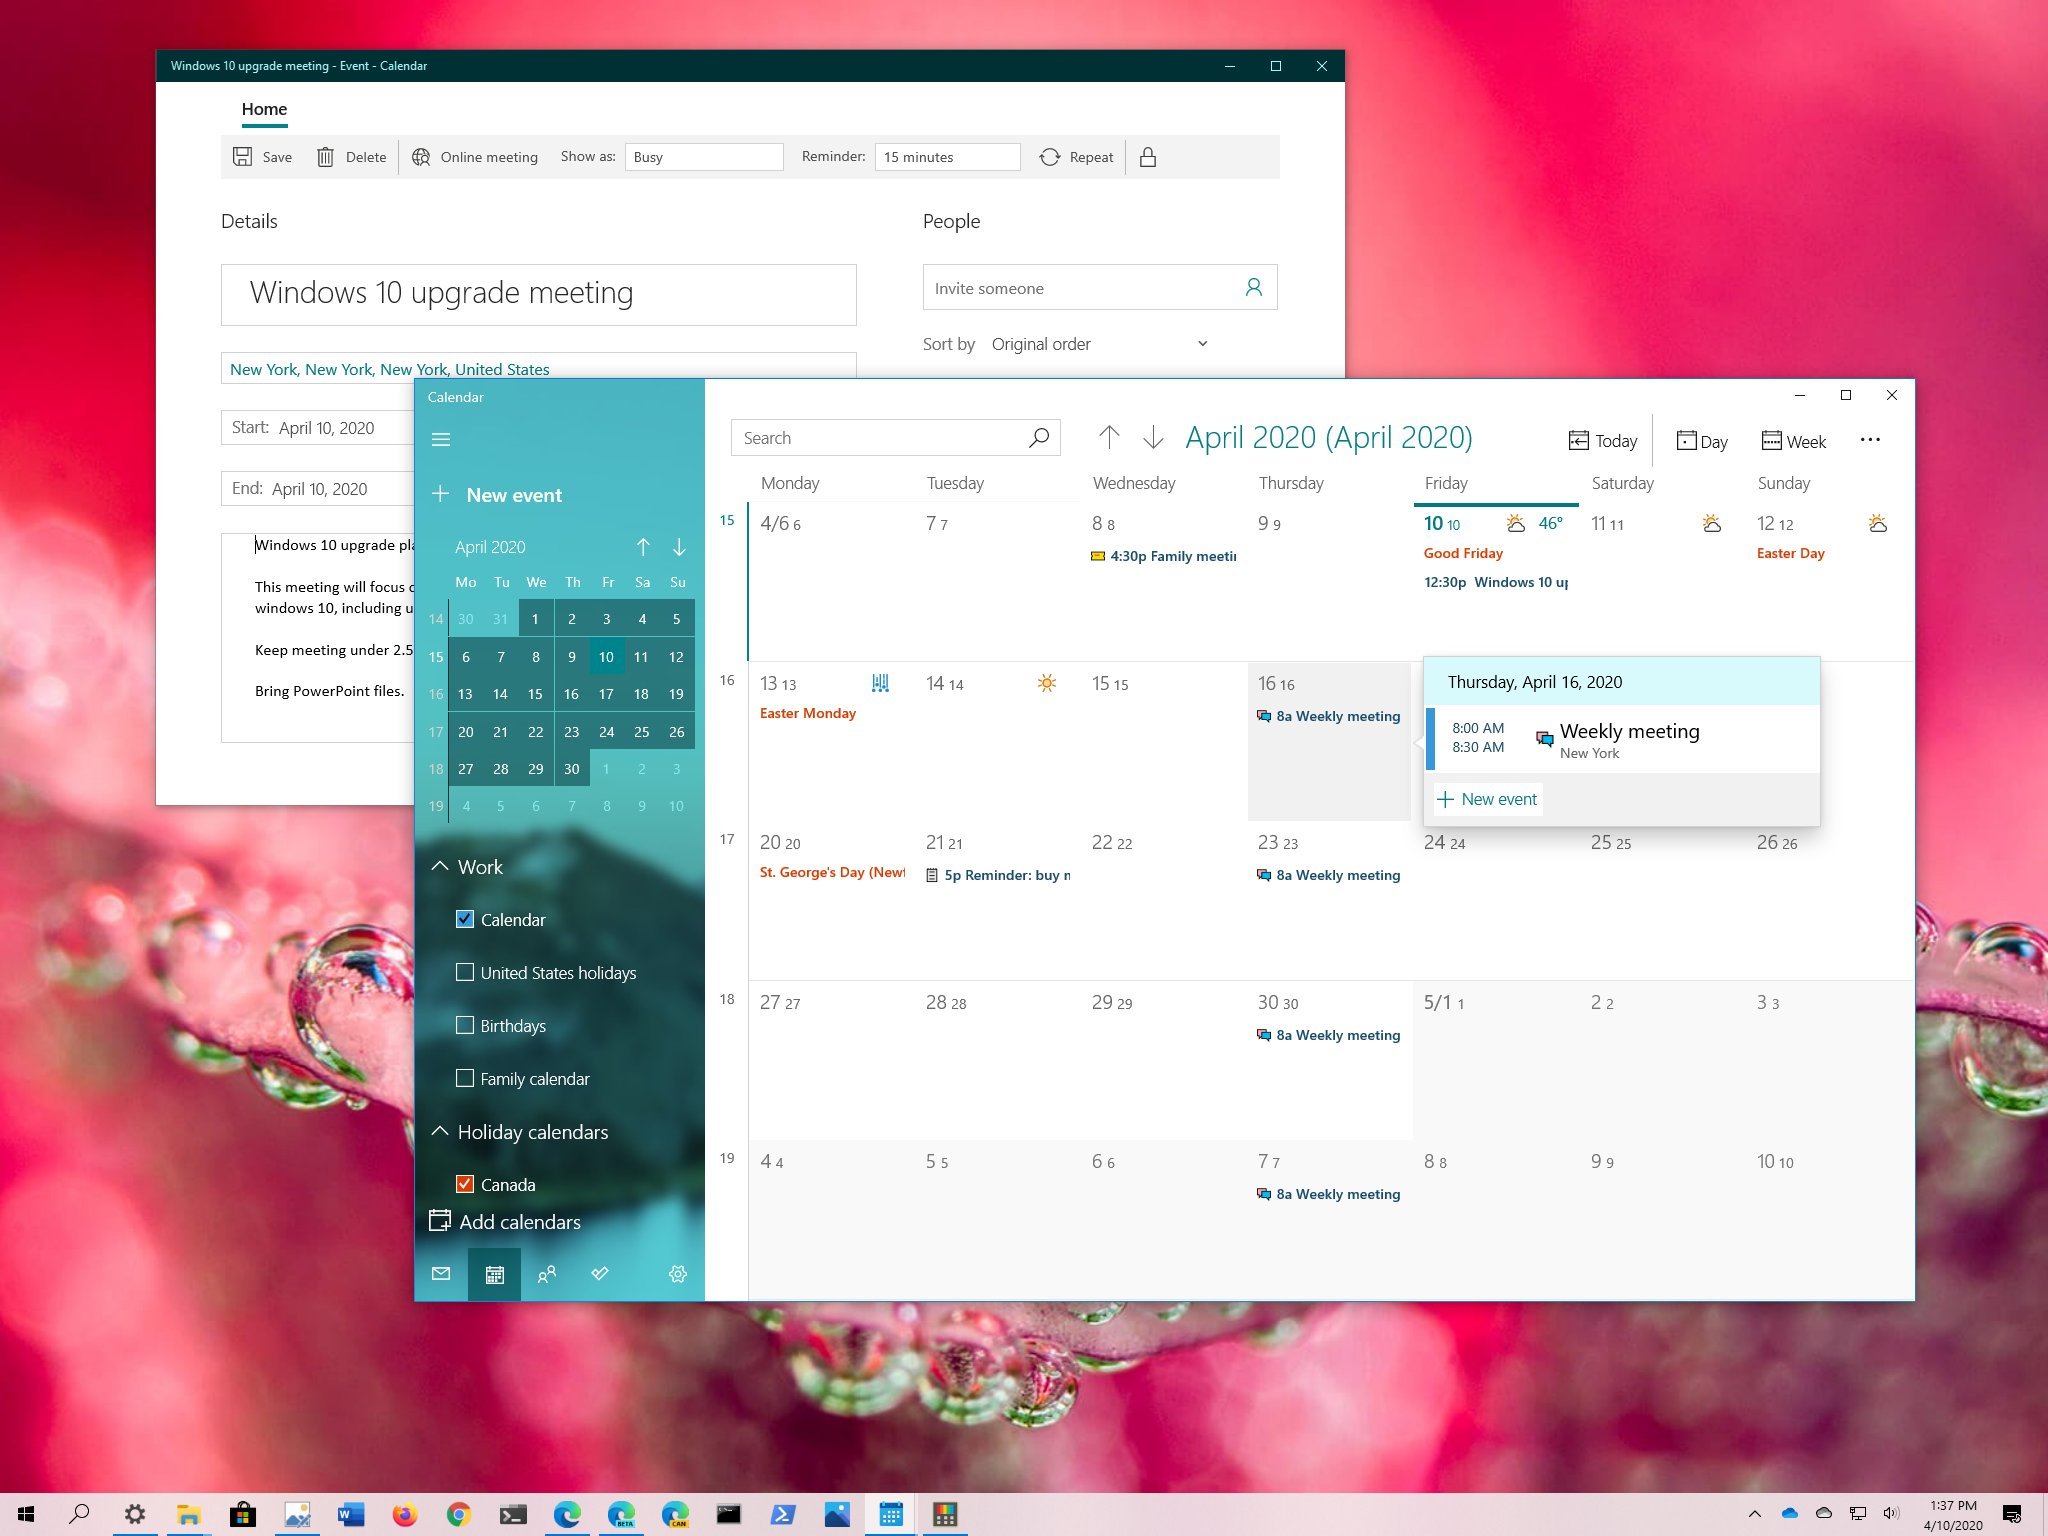
Хотите вспомнить, что там запланировано сегодня? Приложение «Календарь» интегрировано в календарь на панели задач Windows 10, так что вы легко можете увидеть ближайшие встречи. Просто кликните на дате и времени и увидите расписание.
Эта статья предназначена для людей, использующих программы чтения с экрана, такие экранный диктор Windows, JAWS или NVDA, с инструментами или компонентами Windows и продуктами Microsoft 365. Эта статья входит в набор содержимого Помощь и обучение по специальным возможностям, где содержатся дополнительные сведения о специальных возможностях в наших приложениях. Чтобы получить справку общего характера, посетите службу поддержки Майкрософт.
Используйте Календарь для Windows 10 клавиатуры и средства чтения с экрана для выполнения основных основных задач. Мы проверили эту функцию с использованием экранного диктора, JAWS и NVDA, но она может работать и с другими средствами чтения с экрана, если они соответствуют общепринятым стандартам и методам для специальных возможностей. Вы узнаете, как открывать и редактировать события календаря, присоединяться к собраниям по сети и т. д.
Примечания:
-
Новые возможности Microsoft 365 становятся доступны подписчикам Microsoft 365 по мере выхода, поэтому в вашем приложении эти возможности пока могут отсутствовать. Чтобы узнать о том, как можно быстрее получать новые возможности, станьте участником программы предварительной оценки Office.
-
Дополнительные сведения о средствах чтения с экрана см. в статье О работе средств чтения с экрана в Microsoft 365.
В этом разделе
-
Настройка представления календаря
-
Открытие, чтение и изменение событий в календаре
-
Присоединение к Microsoft Teams из календаря
-
Печать календаря
Настройка представления календаря
Для просмотра календаря можно выбрать один из четырех вариантов : «День», «Неделя«, «Месяц» или «Год «. Значение по умолчанию — Month.
-
Нажимайте клавишу F6, экранный диктор JAWS вы услышите сообщение «Перейти, сегодня, кнопка». При использовании NVDA вы услышите сообщение «Перейти к группировке, кнопка «Сегодня»».
-
Нажимайте клавишу TAB, пока не услышите нужный вариант, а затем нажмите клавишу ВВОД. Если вы не услышите нужный вариант, он будет скрыт в меню «Показать «. Нажимайте клавишу TAB, пока не услышите фразу «Показать, кнопка, свернуто», и нажмите клавишу ВВОД, чтобы открыть меню. Затем нажимайте клавишу СТРЕЛКА ВНИЗ, пока не услышите нужный пункт меню, и нажмите клавишу ВВОД, чтобы выбрать его.
Открытие, чтение и изменение событий в календаре
Вы можете быстро читать и изменять сведения о событиях.
Примечание: Редактировать можно только те события, которые вы создали. Например, нельзя изменять приглашения на собрания, полученные от другого пользователя.
-
В основной области содержимого нажимайте клавишу TAB или SHIFT+TAB, пока не услышите событие, которое нужно открыть.
-
Чтобы просмотреть событие более подробно, нажмите клавишу ВВОД. Откроется область сведений о событии.
-
Нажмите клавишу TAB или SHIFT+TAB, чтобы перейти к сведениям о событии. Если вы владеете событием, при необходимости можно изменить содержимое текстовых полей событий с помощью клавиатуры.
-
Нажмите клавиши CTRL+S, чтобы сохранить изменения. Если вы редактируете собрание, сохранение также отправляет обновленное приглашение всем приглашенным.
Присоединение Microsoft Teams собрания из Календарь
Примечание: Чтобы присоединиться к Microsoft Teams, как описано ниже, убедитесь, что на компьютере установлено приложениеMicrosoft Teams, приложение запущено и вы вошли вMicrosoft Teams с помощью рабочей или учебной учетной записи. Чтобы присоединиться к собранию безMicrosoft Teams приложения и рабочей или учебной учетной записи, перейдите к собранию в качестве гостя.
-
Откройте сведения о событии собрания в Календарь.
-
Нажмите клавишу ALT, чтобы переместить фокус на ленту. Прозвучит фраза «Лента», а затем —вкладка «Главная».
-
Один раз нажмите клавишу СТРЕЛКА ВНИЗ, чтобы переместить фокус на параметры ленты, нажимайте клавишу СТРЕЛКА ВПРАВО, пока не услышите сообщение «Присоединиться к сети, кнопка», а затем нажмите клавишу ВВОД.
-
Откроется Microsoft Teams сведений о собрании. При экранный диктор вы услышите: «Пустой документ, флажок камеры снят». С помощью JAWS и NVDA вы услышите название собрания, а затем «Microsoft Teams «, а затем «Выберите видео и звук». Если откроется окно браузера и вы услышите фразу «Присоединиться к беседе», нажимайте клавишу TAB, пока не услышите фразу «Открыть Teams, работа или учебное заведение, уже есть», и нажмите клавишу ВВОД. Откроется Microsoft Teams сведений о собрании.
-
Для просмотра сведений о собрании используйте клавишу TAB или SHIFT+TAB. При необходимости измените параметры видео и звука. Нажимайте клавишу TAB, пока не услышите сообщение «Присоединиться сейчас», а затем нажмите клавишу ВВОД. ОткроетсяMicrosoft Teams, и фокус переместит фокус на кнопку микрофона . Теперь вы подключены к собранию.
Совет: Чтобы перемещаться между кнопками в окне собрания, такими как отключение звука, включение звука и завершение звонка, нажимайте клавишу TAB, пока не услышите нужный вариант. Чтобы нажать кнопку, нажмите клавишу ВВОД. Дополнительные инструкции см. в статье «Использование средства чтения с экрана для присоединения к собранию в Microsoft Teams».
Присоединение к собранию в качестве гостя
Вы можете присоединиться к Microsoft Teams в качестве гостя. Это означает, что вам не нужно входить с помощью рабочей или учебной учетной записи. Вам также не нужно устанавливать Microsoft Teams, но вы можете присоединиться к собранию с помощью браузера.
-
Откройте сведения о событии собрания в Календарь.
-
Нажмите клавишу ALT, чтобы переместить фокус на ленту. Прозвучит фраза «Лента», а затем —вкладка «Главная».
-
Один раз нажмите клавишу СТРЕЛКА ВНИЗ, чтобы переместить фокус на параметры ленты, нажимайте клавишу СТРЕЛКА ВПРАВО, пока не услышите сообщение «Присоединиться к сети, кнопка», а затем нажмите клавишу ВВОД.
-
Откроется окно браузера, и вы услышите сообщение «Присоединиться к беседе». Нажимайте клавишу TAB, пока не услышите сообщение «Продолжить в этом браузере», а затем нажмите клавишу ВВОД.
-
Если вы услышите уведомление с просьбой разрешитьMicrosoft Teams использовать микрофон и камеру, нажимайте клавишу TAB, пока не услышите фразу «Разрешить, кнопка», а затем нажмите клавишу ВВОД.
-
Откроется окно сведений о собрании, и фокус переместится на кнопку «Присоединиться сейчас «. Один раз нажмите клавиши SHIFT+TAB, чтобы перейти к полю «Имя», и введите свое имя, которое должно отображаться на собрании.
-
Если вы хотите включить или отключить микрофон или камеру, нажимайте клавишу TAB, пока не услышите нужный параметр, а затем нажмите клавишу ВВОД, чтобы изменить параметр.
-
Нажимайте клавиши SHIFT+TAB, пока не услышите фразу «Присоединиться к собранию, кнопка», и нажмите клавишу ВВОД.
-
Если организатор собрания настроит зал ожидания для гостей, вы услышите сообщение «Мы сообщите участникам собрания, что вы ожидаете». Дождитесь, пока вас не допустит из «зал ожидания». При подключении к собранию вы услышите сообщение экранный диктор: «Элементы управления звонками, собрание сейчас». При использовании JAWS вы услышите фразу «Элементы управления собранием», а затем название собрания. При использовании NVDA вы услышите сообщение «Подключено», а затем уведомление о том, что вы присоединились к вызову.
Совет: Чтобы перемещаться между кнопками в окне собрания, такими как отключение звука, включение звука и завершение звонка, нажимайте клавишу TAB, пока не услышите нужный вариант. Чтобы нажать кнопку, нажмите клавишу ВВОД.
Печать календаря
Печать выбранного дня, недели или календарного месяца в Календарь.
-
В основной области содержимого нажимайте клавишу F6, пока экранный диктор JAWS вы услышите сообщение «Перейти, сегодня, кнопка». При использовании NVDA вы услышите сообщение «Перейти к группировке, кнопка «Сегодня»».
-
Нажимайте клавишу TAB, пока не услышите сообщение «Показать, кнопка, свернуто», и нажмите клавишу ВВОД.
-
Нажимайте клавишу СТРЕЛКА ВНИЗ, пока не услышите сообщение «Печать, кнопка», и нажмите клавишу ВВОД. Откроется диалоговое окно «Представление печати».
-
Чтобы выбрать представление календаря для печати, нажимайте клавишу TAB, пока не услышите экранный диктор выбранное представление календаря, а затем » Поле со списком, только для чтения». При использовании JAWS и NVDA вы услышите сообщение «Поле со списком», за которым следует выбранное представление календаря. Затем нажимайте клавишу СТРЕЛКА ВВЕРХ или СТРЕЛКА ВНИЗ, пока не услышите нужное представление календаря.
-
Чтобы выбрать даты начала представления, нажимайте клавишу TAB, пока не услышите фразу «От», а затем дату по умолчанию, а затем нажмите клавиши ALT+СТРЕЛКА ВНИЗ, чтобы открыть средство выбора даты. В средстве выбора даты нажимайте клавишу TAB, пока не услышите текущую дату, а затем с помощью клавиш со стрелками переместите фокус на нужное значение и нажмите клавишу ВВОД, чтобы выбрать ее.
-
Чтобы открыть окно Календарь печати, нажимайте клавишу TAB, пока не услышите сообщение «Предварительный просмотр», а затем нажмите клавишу ВВОД.
-
Нажмите клавишу TAB, чтобы просмотреть параметры печати. По завершении нажимайте клавишу TAB, пока не услышите сообщение «Печать, кнопка», а затем нажмите клавишу ВВОД. Календарь будет распечатан.
Дополнительные сведения
Планирование событий в календаре с помощью средства чтения с экрана
Чтение и ответ на приглашение на собрание в календаре с помощью средства чтения с экрана
Поддержка специальных возможностей в Microsoft Teams
Сочетания клавиш в календаре
Настройка устройства для поддержки специальных возможностей в Microsoft 365
Просмотр и навигация по календарю с помощью средства чтения с экрана
Техническая поддержка пользователей с ограниченными возможностями
Корпорация Майкрософт стремится к тому, чтобы все наши клиенты получали наилучшие продукты и обслуживание. Если у вас ограниченные возможности или вас интересуют вопросы, связанные со специальными возможностями, обратитесь в службу Microsoft Disability Answer Desk для получения технической поддержки. Специалисты Microsoft Disability Answer Desk знакомы со многими популярными специальными возможностями и могут оказывать поддержку на английском, испанском, французском языках, а также на американском жестовом языке. Перейдите на сайт Microsoft Disability Answer Desk, чтобы узнать контактные сведения для вашего региона.
Если вы представитель государственного учреждения или коммерческой организации, обратитесь в службу Disability Answer Desk для предприятий.
Планирование встреч в Windows 10, но без Outlook? Без проблем: операционная система предлагает встроенное приложение «Календарь», с помощью которого можно удобно организовать все личные и рабочие задачи. Это не пустые слова: по вашему запросу голосовой ассистент Cortana перенесет ваши задачи в «Календарь», так что даже не придется делать это вручную. Однако для этого необходимо активировать помощник Cortana.
Если вам необходимо отслеживать множество встреч, то в них можно довольно быстро запутаться. Для этого в новейшей версии приложения «Календарь» компания Microsoft представила цветные отметки для быстрого распределения записей по категориям. С их помощью можно легко отметить, к примеру, даты посещения какого-либо клуба зеленым цветом, семейные события — синим, а важные деловые встречи — красным. Многие пользователи радуются такой возможности: по данным Microsoft, это — самая популярная опция приложения.
Функция, которая в данный момент отсутствует в русифицированной версии приложения «Календарь», но должна появиться в ближайшее время — это автоматически создаваемые календари для особых событий. К ним относятся спортивные мероприятия, телепередачи и т. д. В перспективе, после указания даты деловой встречи, приложение предложит забронировать столик в ресторане недалеко от места, где вы находитесь. Данные для подобного запроса предоставляет поисковая система Bing.
Первый запуск «Календаря»
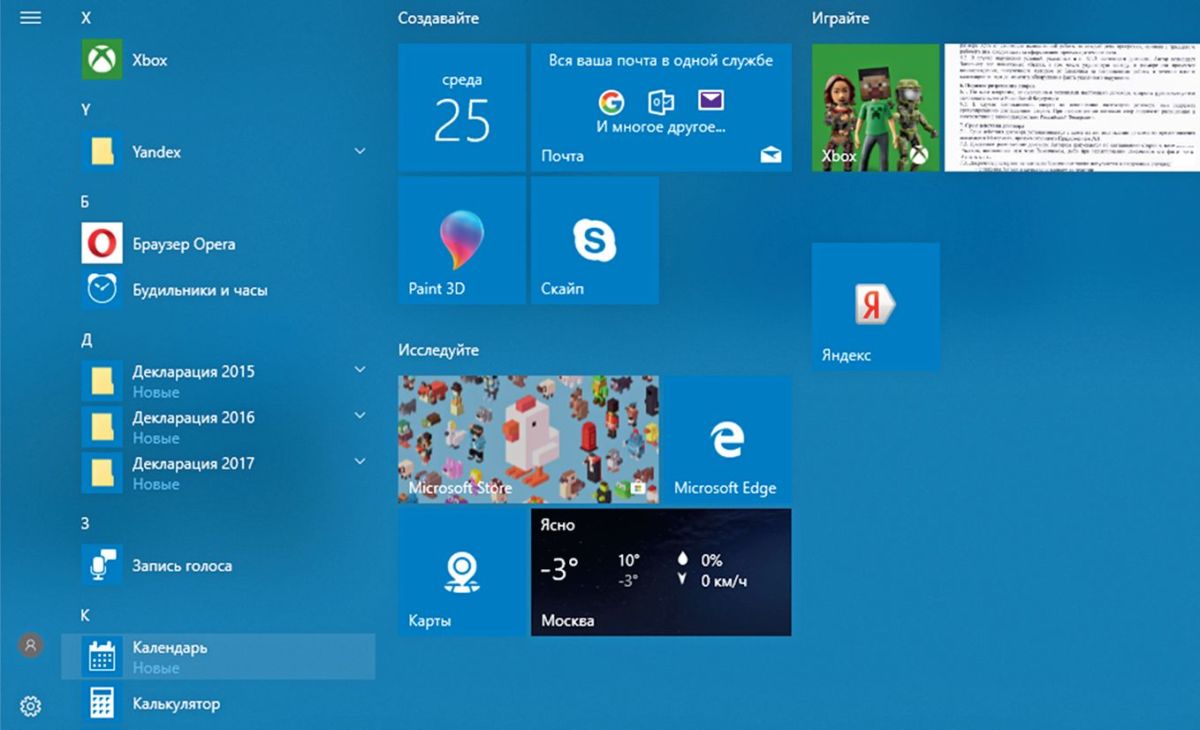
Откройте приложение в Windows 10 либо щелчком мыши по соответствующей плитке, либо с помощью команды «Пуск | Все приложения | Календарь» в меню «Пуск». И если вы уже настроили свою учетную запись Windows, она будет автоматически добавлена в «Календарь».
Открыть страницу «Календаря»
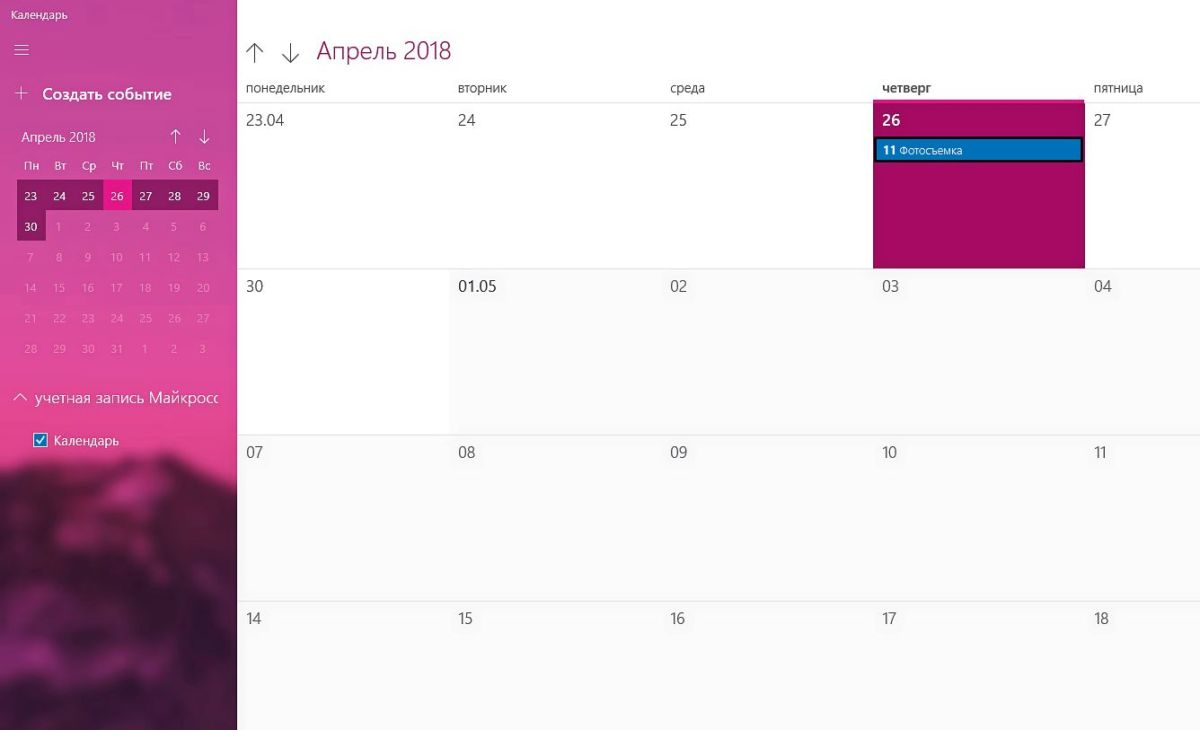
Как только на экране появляется страница календаря с обзором месяца, можно начинать планирование. Используйте вкладки «День», «Неделя», «Месяц» или «Год» в правом верхнем углу строки меню. Укажите новое событие, щелкнув левой кнопкой, например, по ячейке определенного дня.
Создать новую встречу
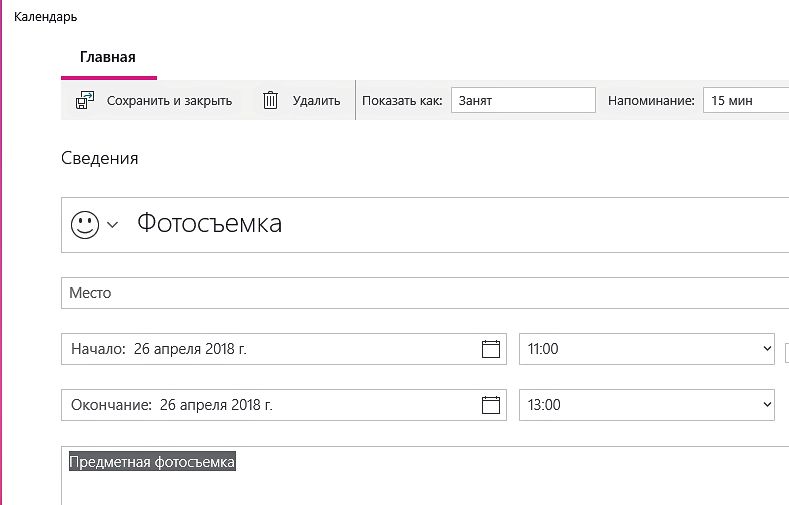
Выберите название для нового события и укажите время. Затем щелкните по «Сведения». В разделе «Показать как» укажите, как приложению «Календарь» необходимо отметить задачу: например, «Занят» или «Нет на месте».
Добавление учетных записей
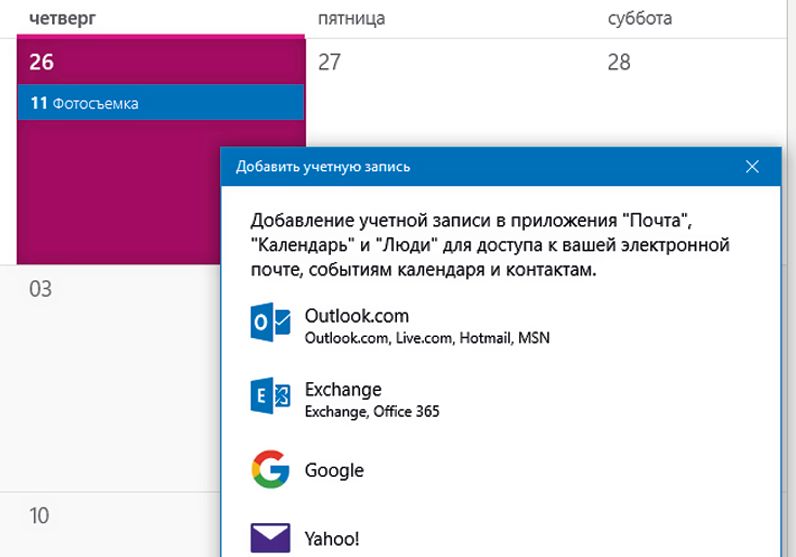
Вы хотите добавить учетную запись в приложение «Календарь»? Тогда нажмите на символ шестеренки в левом нижнем углу окна, чтобы открыть окно «Настройки». Посредством одной из команд «Управление учетными записями | Добавить учетную запись» выберите предварительно настроенную учетную запись либо добавьте новую, нажав «Расширенные настройки».
Добавление дополнительных календарей
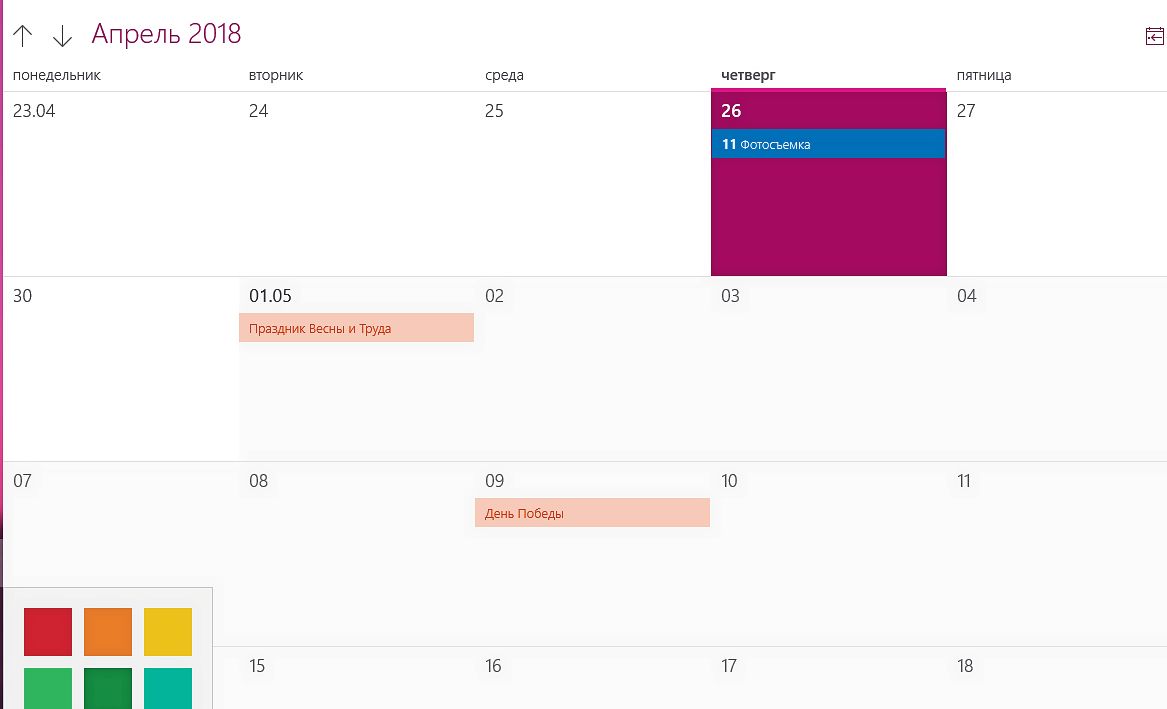
Теперь все учетные записи и календари отображаются друг под другом. Windows 10 может переносить события из других календарей в приложение «Календарь». Цветовую маркировку вы можете изменять по своему усмотрению посредством щелчка правой кнопкой мыши по соответствующему календарю. Данная функция здесь реализована, на наш взгляд, более чем удобно и просто.
Автоматическое обновление календарей
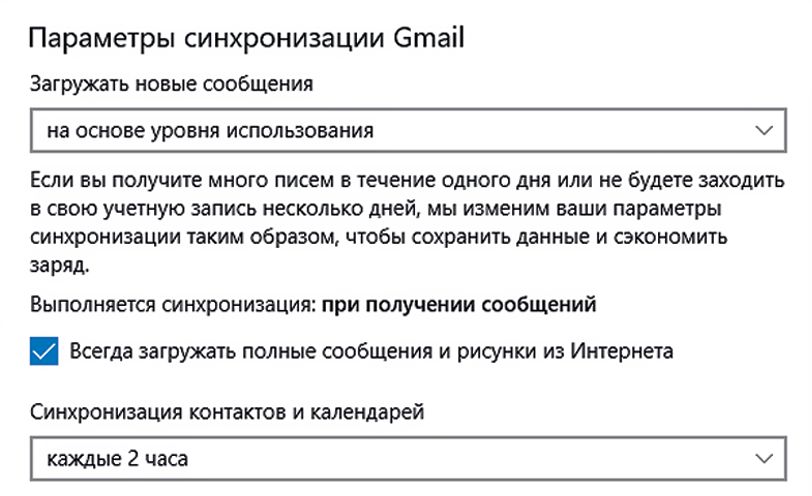
Кликнув по «Управление учетными записями» в разделе «Настройки» и выбрав соответствующую учетную запись, можно изменить «Параметры синхронизации». Например, вы можете «приказать» Windows 10 обновлять ваши контакты и данные календаря через каждые два часа или полностью загружать сообщения, включая вложенные изображения.
Читайте также:
- Как управлять компьютером удаленно
- Как обнаружить и исправить неполадки в работе Windows 10
Фото: rawpixel/pexels.com
Редактор направлений «Мобильные устройства» и «Техника для дома»
(Image credit: Windows Central)
On Windows 10, Calendar is a built-in app designed to help you manage your schedule, including meetings, reminders, appointments, and other events.
Although you may be able to find many alternative tools, the Calendar app includes all the essential features that you need to organize and stay on top of all your events. It’s also compatible with most third-party calendar services. And unlike other online solutions, the app works offline, so you don’t have to sign in every time you want to check your schedule, which makes it an excellent solution for anyone who needs to work from home or manage personal events.
In this Windows 10 guide, we walk you through everything you need to know to start using the Calendar app to manage meetings, reminders, appointments, and other events.
- How to add an account on Calendar
- How to customize and share calendars on Calendar
- How to add calendar events on Calendar
- How to add popular calendars on Calendar
- How to sync events on Calendar
- How to personalize your experience on Calendar
- How to change settings on Calendar
- How to change weather settings on Calendar
Office 365 gives you full access to all the apps and perks, such as 1TB OneDrive storage and Skype minutes. You can also install Word, Excel, PowerPoint, Outlook, and other apps on up to five devices, and depending on the subscription, you can share the account with up to five people.
How to add an account on Calendar
The Calendar app for Windows 10 allows you to bring and organize calendar events from many third-party services, including Outlook.com, Microsoft 365, Google, Yahoo, and Apple iCloud.
To add a new account to manage your calendar events on Windows 10, use these steps:
- Open Calendar.
- Click on the Settings (gear) button in the bottom-left corner.
- Click on Manage Accounts in the top-right corner.

- Click the Add account button.Quick tip: If you already use the Mail app, the accounts will show up on this list.
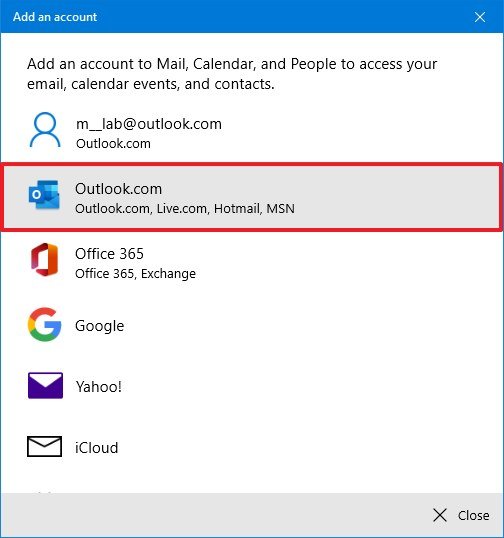
- Select the service that you use for calendar events. For example, Outlook.com, but you can choose from a number of services, including:
- Outlook.com.
- Microsoft 365 (Office 365).
- Google (Gmail).
- Yahoo.
- iCloud.
- (Optional) Click the Advanced setup option to add other internet mail services using POP or IMAP.
- Continue with the on-screen directions to finish adding the account using the account credentials.
Once you complete these steps, the events from the service you configured should start syncing on the device. You can add as many accounts as you need. If you have another personal or work account, just repeat the same steps outlined above.
Change calendar account name
When setting up a new account, the Calendar app uses the name of service as the name for the account. If you want to better identify the accounts, you can change the name to something more descriptive. For example, you can use something like «Work» or «Personal,» or you can use the email address.
All the latest news, reviews, and guides for Windows and Xbox diehards.
To change the calendar account name, use these steps:
- Open Calendar.
- Click on the Settings (gear) button in the bottom-left corner.
- Click on Manage Accounts in the top-right corner.
- Click the account you want to add a different name.
- Confirm the new name.Quick tip: If you made a mistake, you could also delete the account from the same page.
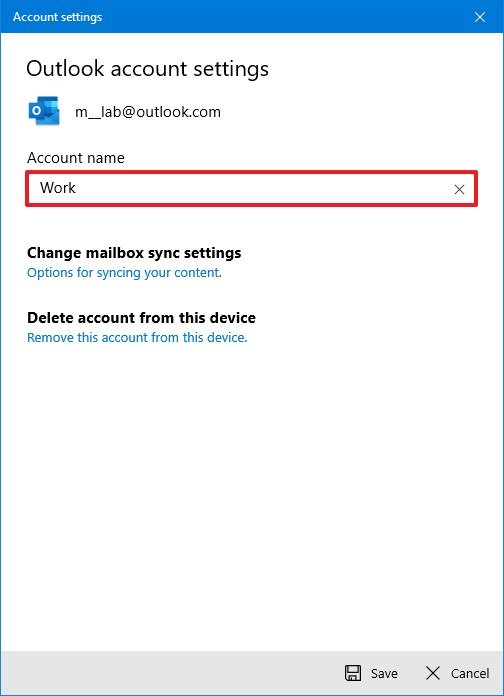
- Click the Save button.
Once you complete the steps, the account will be easier to identify from the left side navigation pane.
After adding a new account, you have various option to customize and share each calendar.
Customize calendar
To change the color and visibility of a calendar, use these steps:
- Open Calendar.
- Under the desired account, right-click the calendar and select a new color.
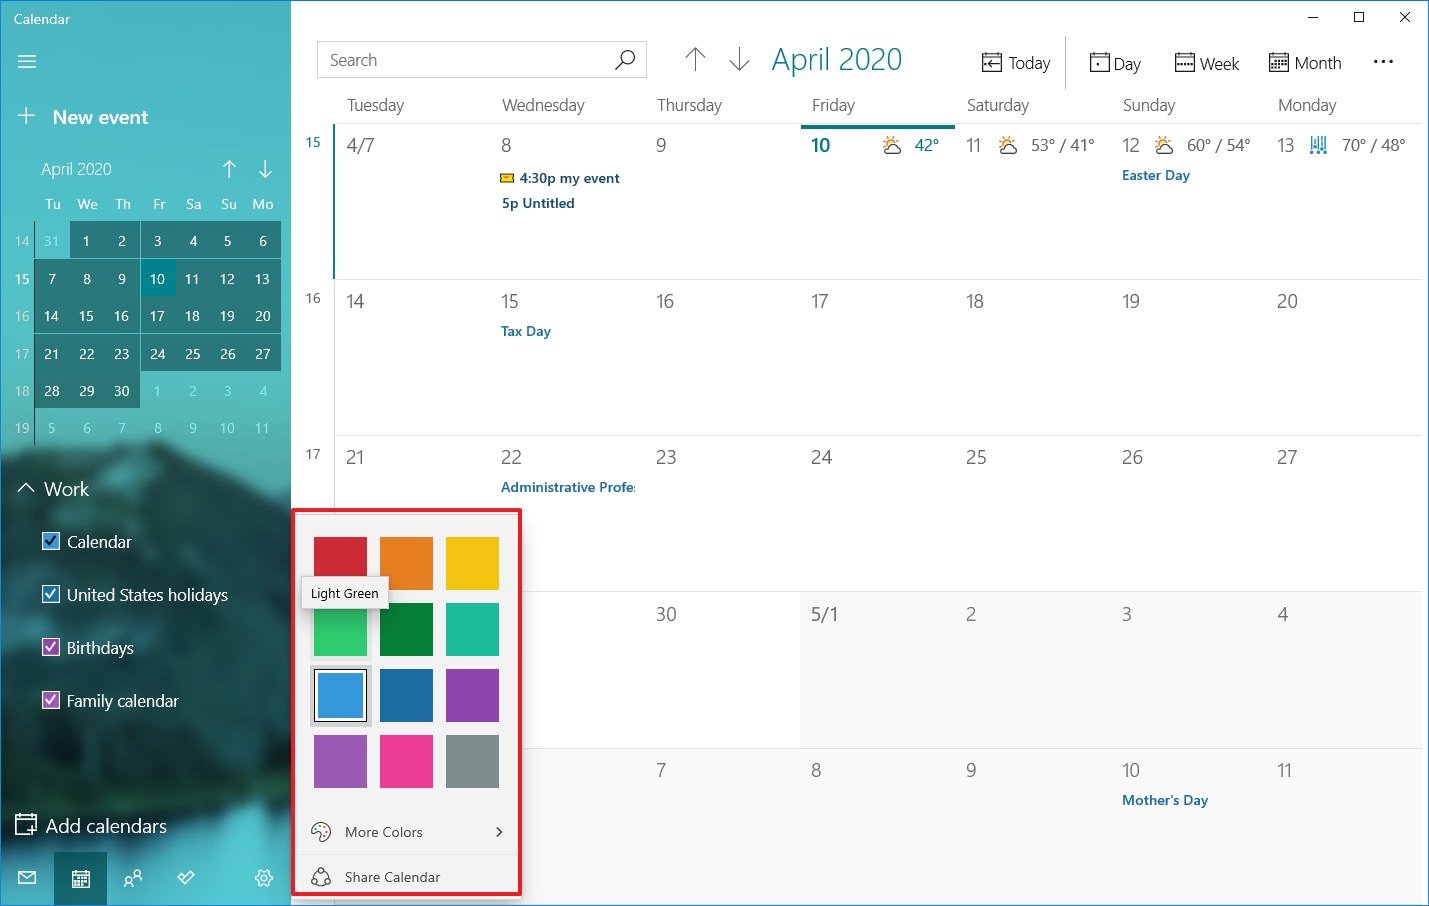
- (Optional) Click the More colors option and create a new color.
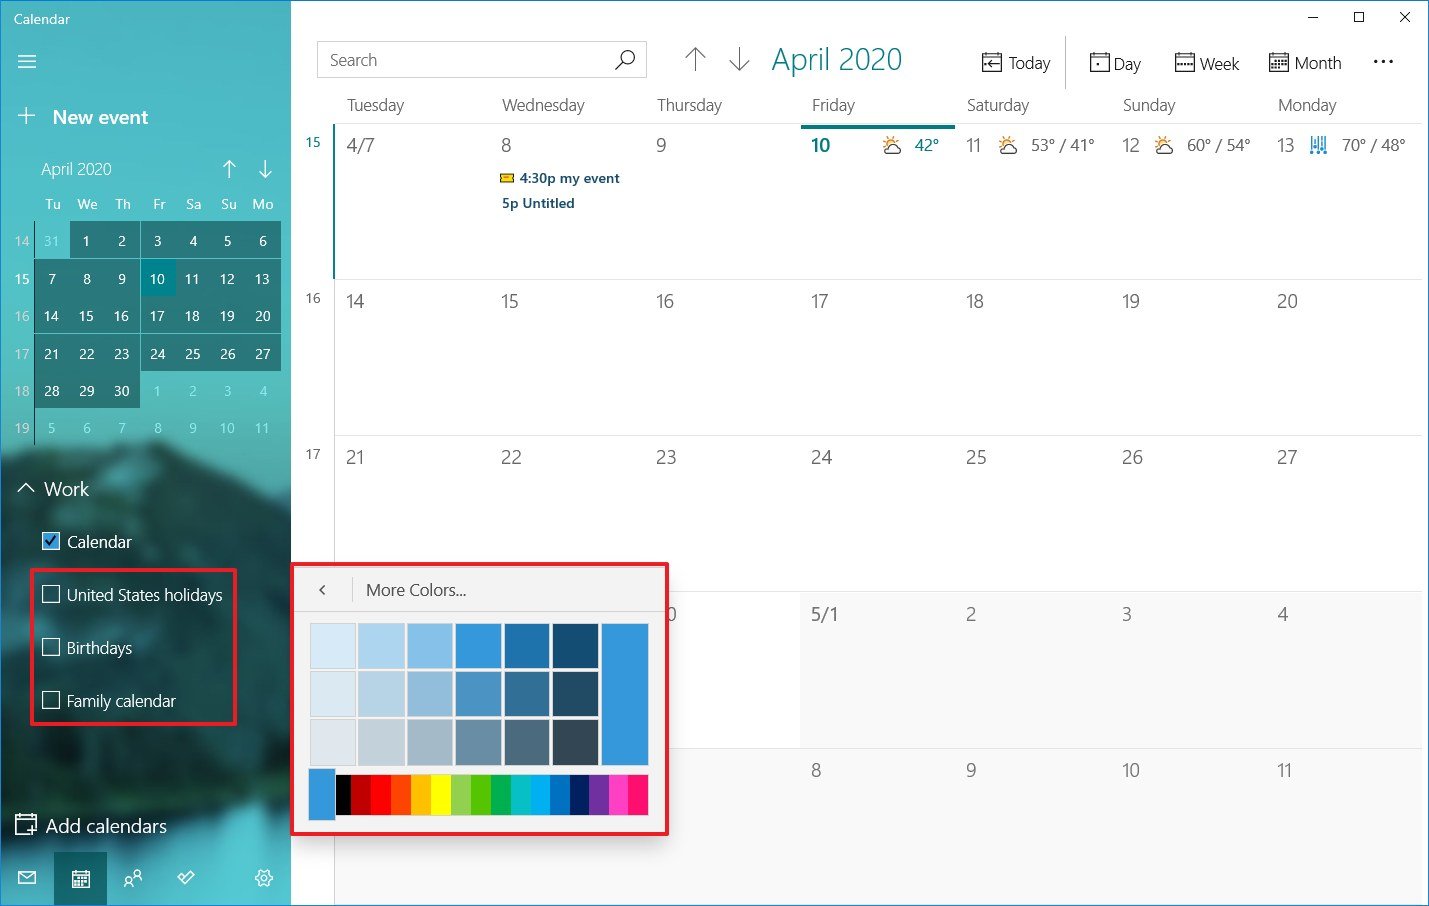
- (Optional) Clear the checkbox if you don’t want a calendar to appear in this app.
After you complete these steps, events in the calendar will appear using the color scheme that you selected.
To share a calendar with other people, use these steps:
- Open Calendar.
- Under the desired account, right-click the calendar and select the Share calendar option.
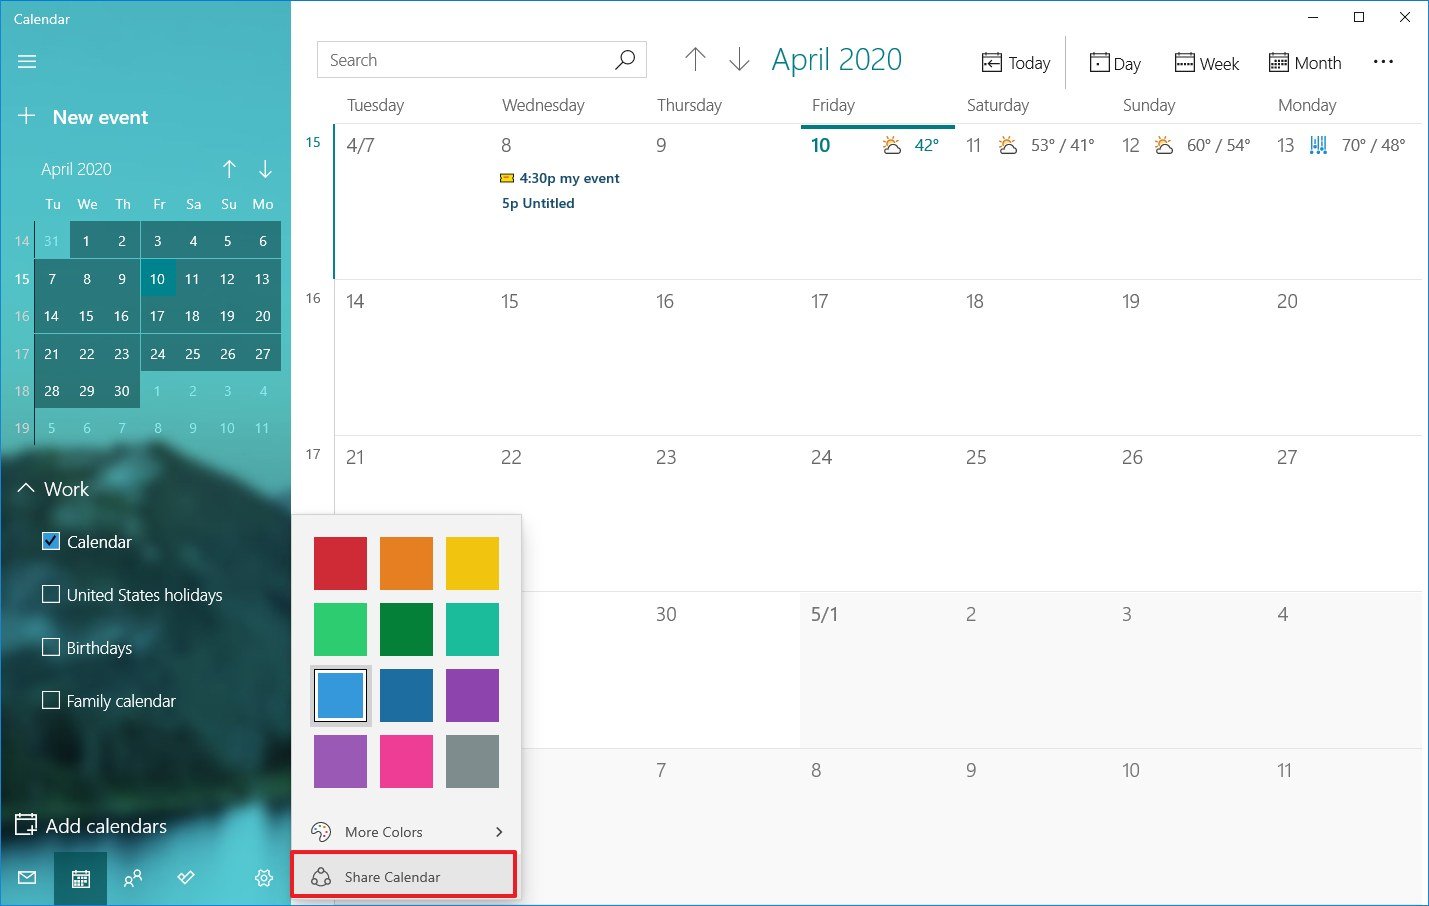
- Confirm the email address of the person you want to share the calendar with and press Enter.
- Use the drop-down menu to decide if the person will have view or edit permissions.

- Click the Share button.
Once you complete the steps, the people you invited will have access to the calendar events.
If you want to stop sharing a calendar, simply click the trash button next to the calendar you’re currently sharing from the «Share this calendar» page.
Change calendar views
The Calendar app is set to display the current month of events, but depending on your lifestyle and work schedule, you have different views that you can access using the toolbar at the top of the app.
For instance, you can change views to show a single day, week, month, or year. If you hover over the Day and Week options, you’ll notice a drop-down menu to use the multi-day view or switch to view only your workweek.
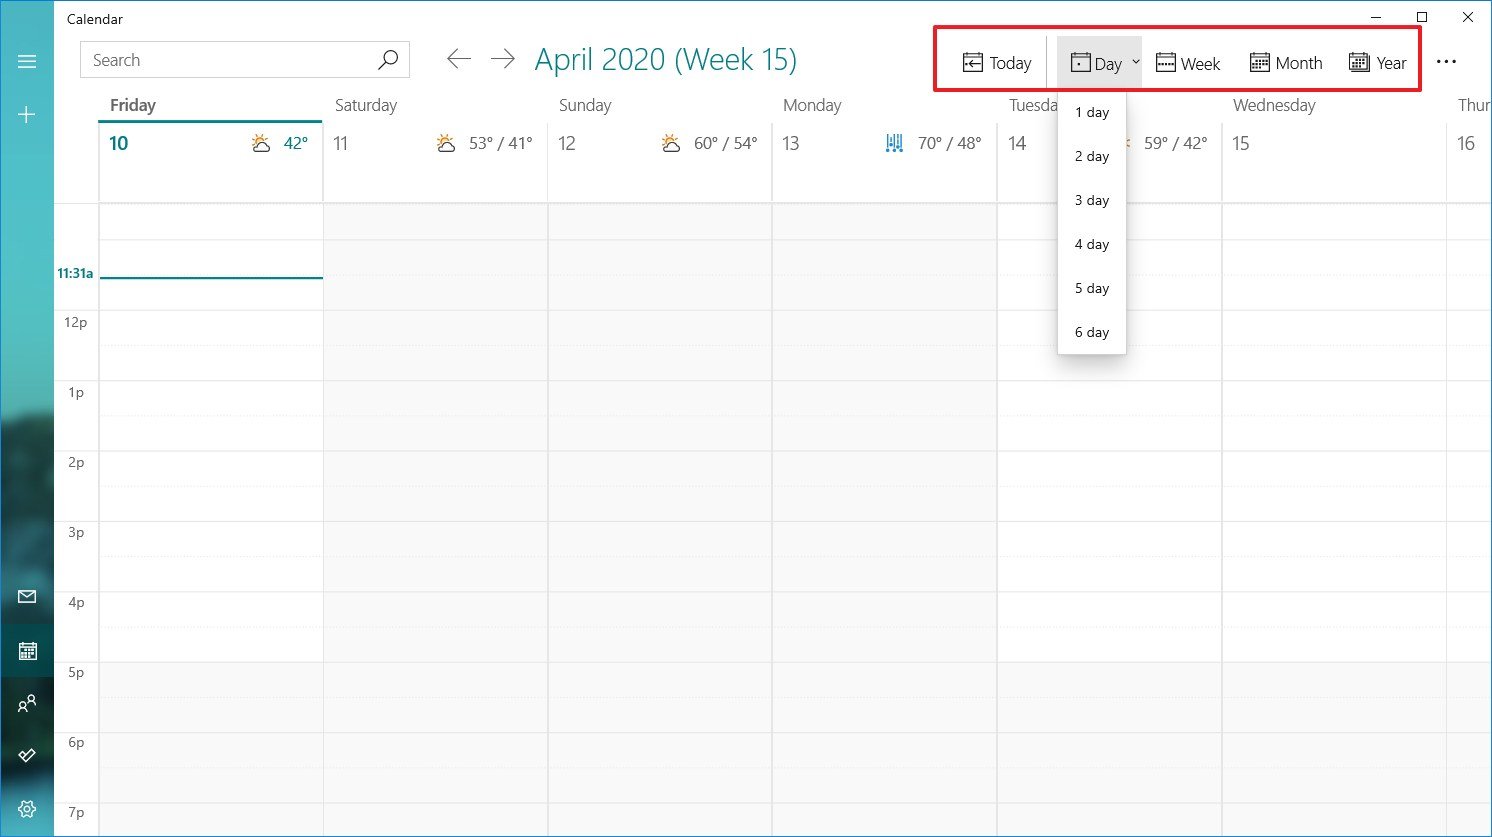
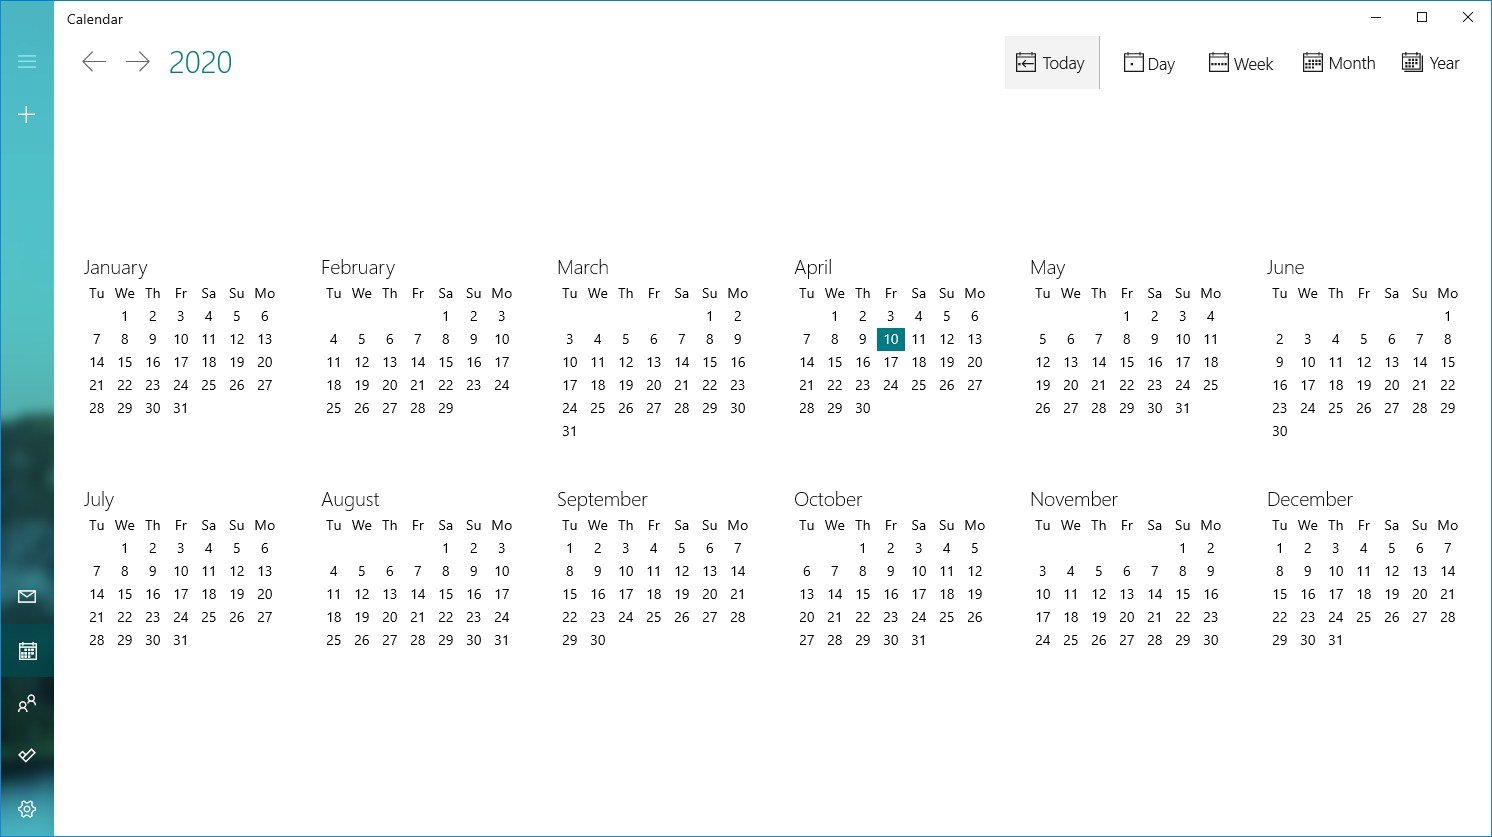
Although you won’t likely use the Year option frequently, it’s a good option that you can use to quickly jump to a specific day or month.
In addition, on the top left side, you’ll find a search box that you can use to find events in your calendars, and the arrow buttons are handy to navigate days, weeks, months, or years depending on the current view.
Finally, if you ever find yourself lost in the app, you can click the Today button to jump right into the current day.
How to add calendar events on Calendar
There are at least two ways to add new events to a calendar. You can do this within the app or using the date-and-time flyout menu available through the taskbar.
Create a detailed event using the app
To create a new calendar event within the app, use these steps:
- Open Calendar.
- Click the New event button in the top-left corner.Quick tip: Within the app, you can also use the Ctrl + N keyboard shortcut to create a new event.

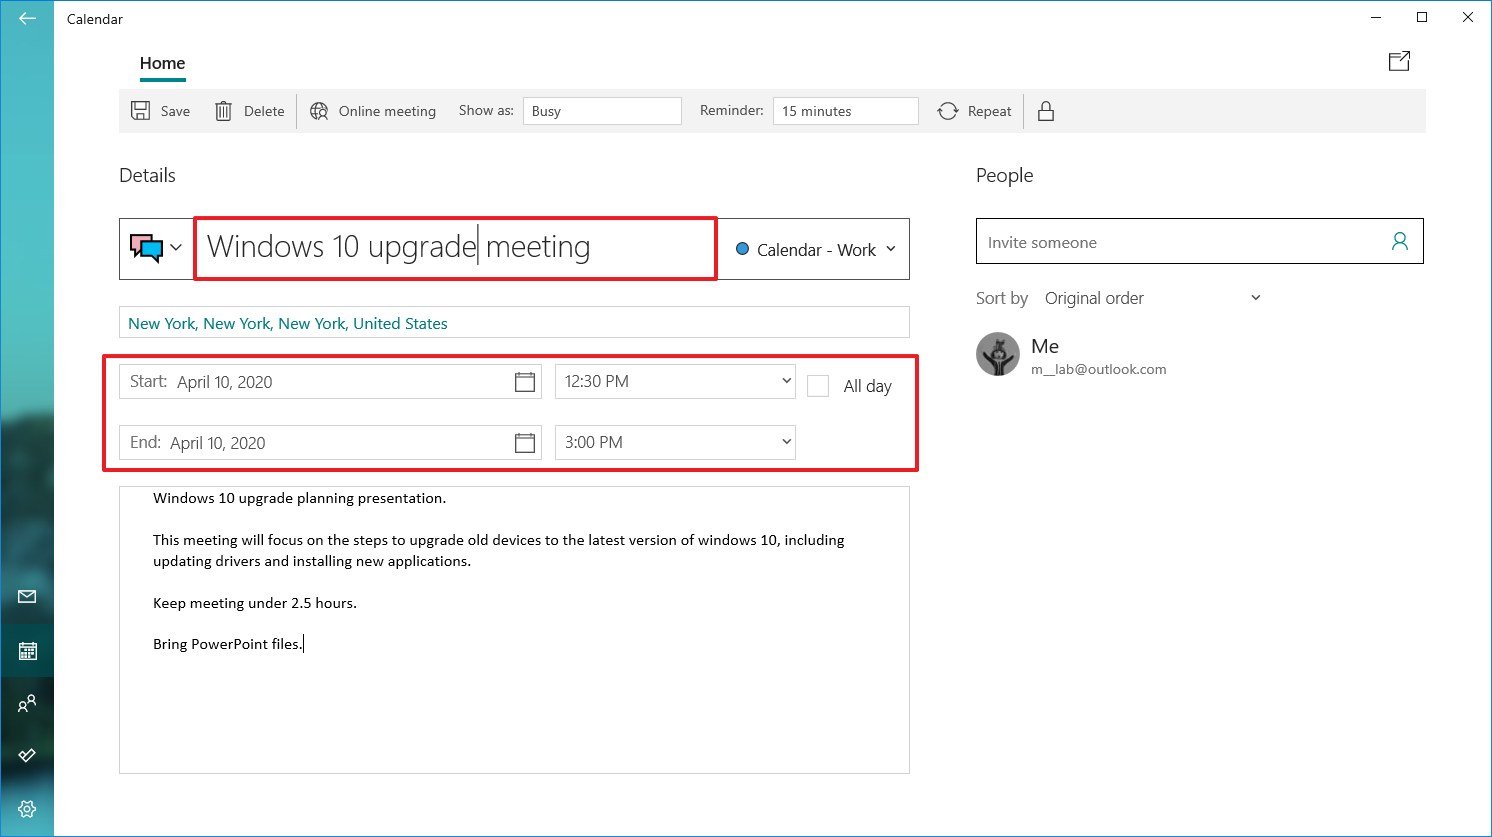
- Under the «Details» section, specify a descriptive title for the event.
- (Optional) Click the drop-down menu on the left and select a related icon to make it even easier to find the event.
- (Optional) Use the Calendar drop-down menu and select the account to which you want to save the event.
- Specify the physical location where the event will take place.
- Use the Start option to specify a start date.
- Use the drop-down menu on the left to select a start time.
- Use the End option to specify the end date.
- Use the drop-down menu on the left to choose an end time.
- (Optional) Check the All day option if the event uses the entire day.
- In the bottom section, add all the details about the event.
- (Optional) Use the Show as drop-down menu to select a visual cue, including:
- Free.
- Working elsewhere.
- Tentative.
- Busy.
- Out of office.
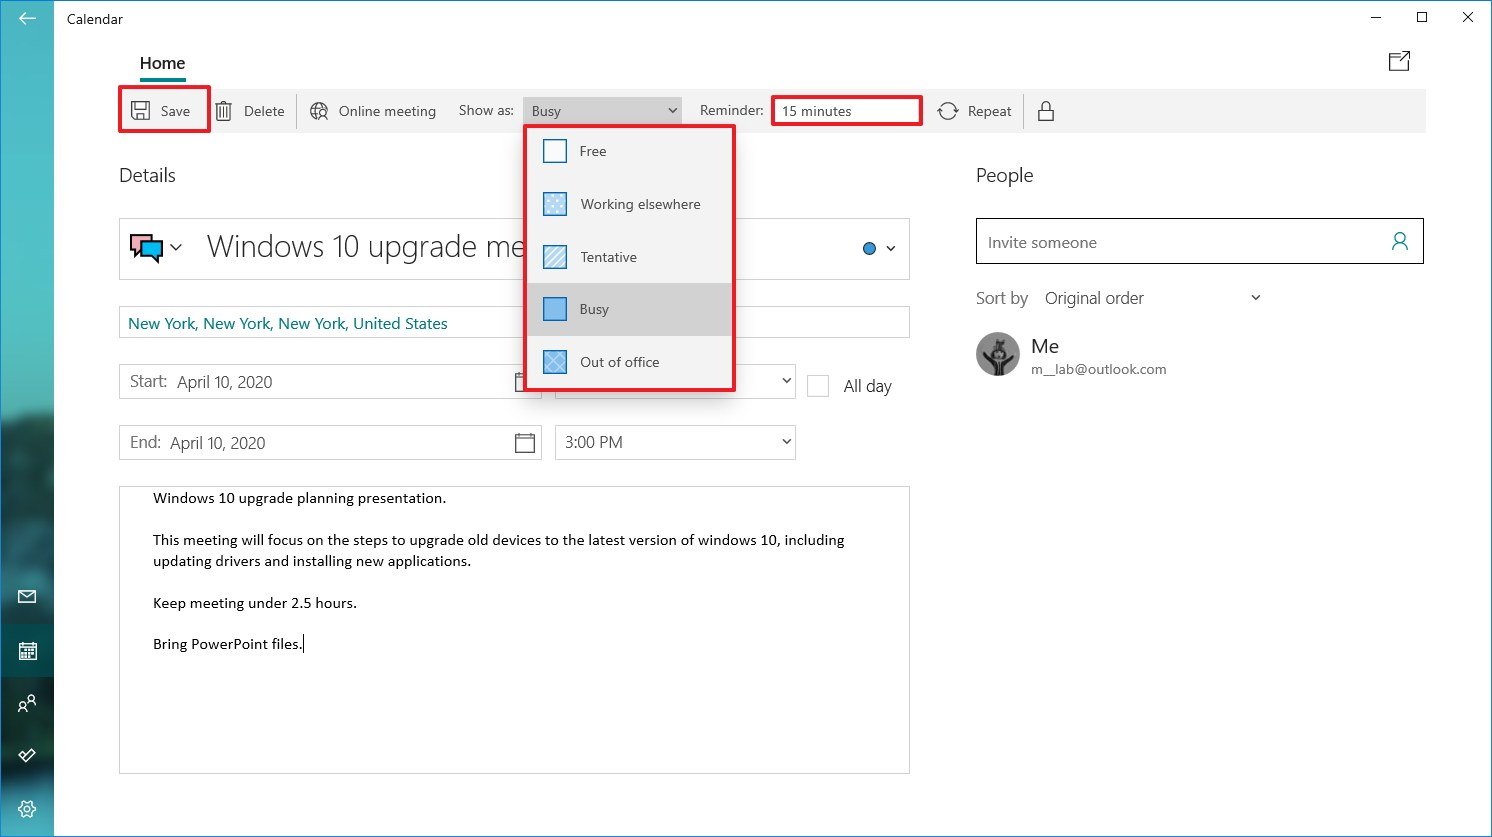
- Use the Reminder drop-down menu to select how long before you should receive an alert about the event. (You can use None to disable the option or select any time between 0 minutes to 1 week before the event.)
- Click the Save button in the top-left.
Once you complete the steps, the event will be saved in the account you specified.
You can use the steps below to schedule a repeating or group event using the Calendar app.
Create a repeating event using the app
To create a repeat calendar event, use these steps:
- Open Calendar.
- Click the New event button in the top-left corner.
- Click the Repeat button in top-right corner.
- Under the «Repeat» section, use the Start option to specify the start date of the event.
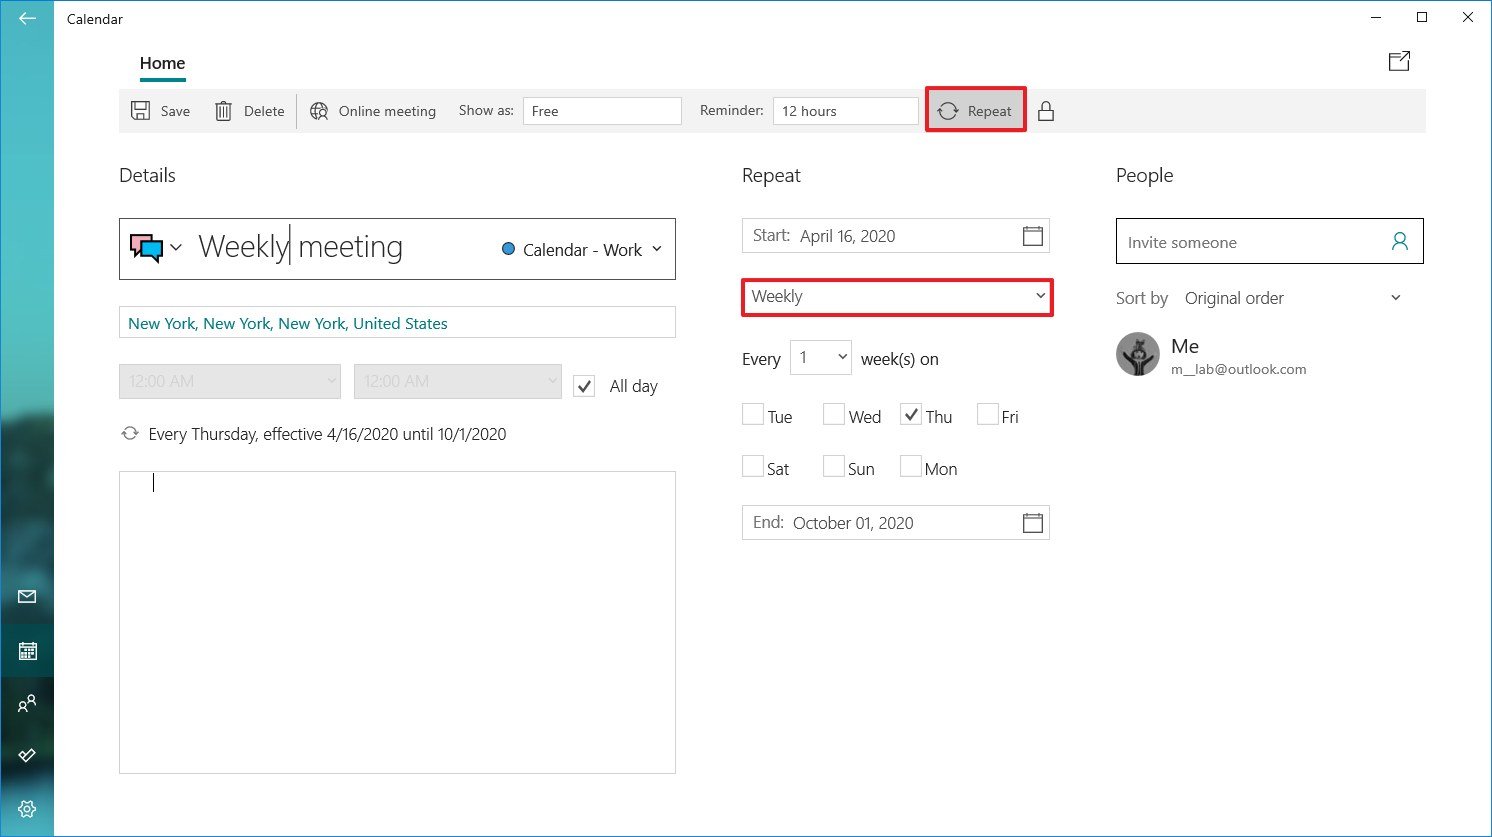
- Use the date drop-down menu to select how to often to repeat the event, including:
- Daily.
- Weekly.
- Monthly.
- Yearly.
- If you select the Weekly option, you’ll also need to specify how many weeks the event should repeat and on what day of the week.Quick tip: We’re using «Weekly» as an example, but if you select another option the settings will be different.
- Use the End option to specify the date when the event should stop repeating.
- Under the «Details» section, specify a descriptive title for the event.
- (Optional) Use the Calendar drop-down menu and select the account you want to save the event.
- Specify the physical location where the event will take place.
- Use the time drop-down menus to select the start and end times for the event.
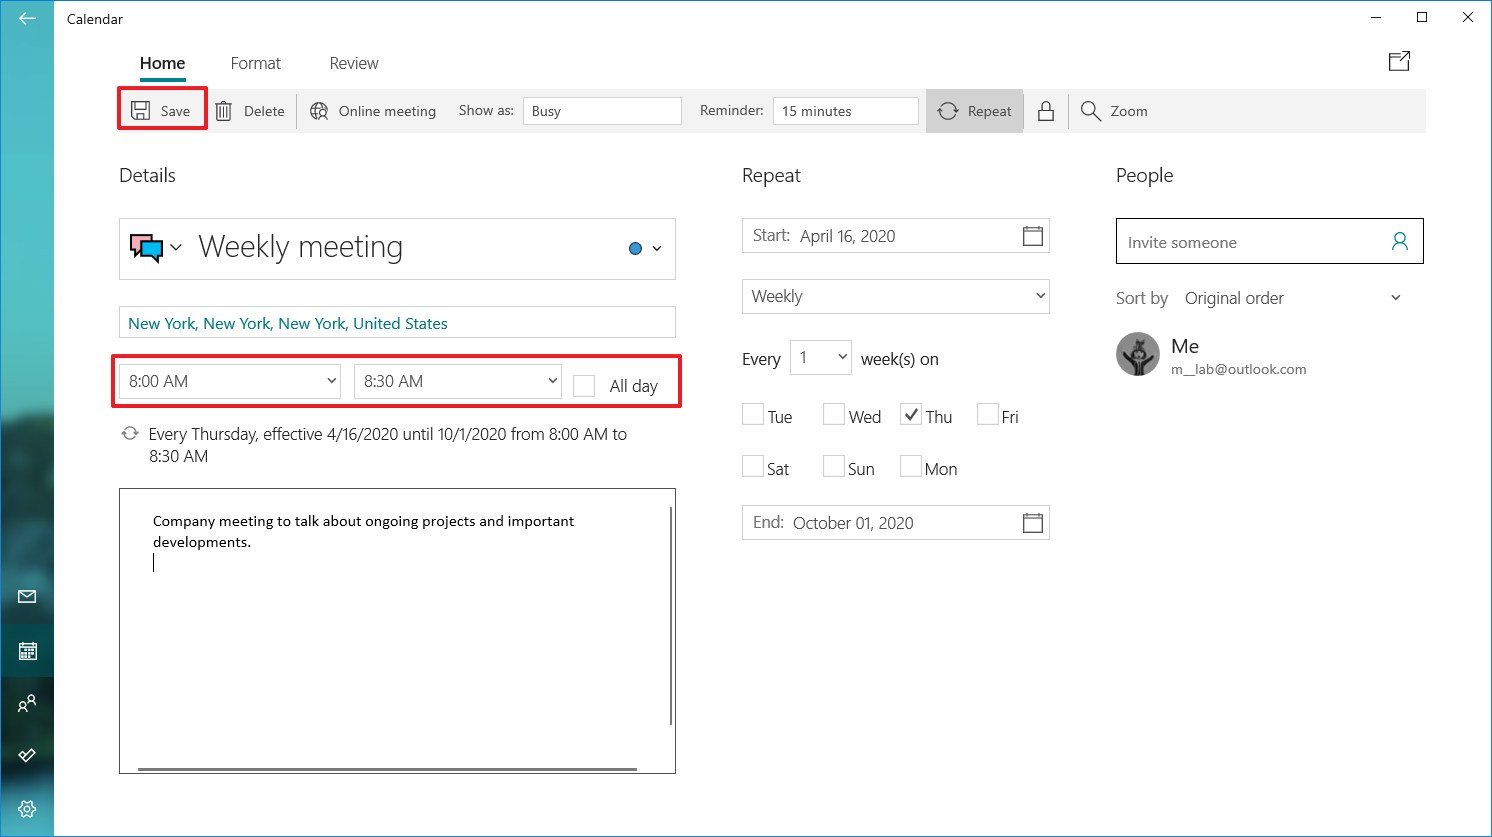
- In the bottom section, add all the details about the event.
- Use the Reminder drop-down menu to select how long before you should receive an alert about the event.
- Click the Save button in the top-left.
After you complete these steps, the event will keep repeating, depending on the schedule you specified.
Create a group event using app
If you need to schedule a meeting or organize an event, you can set up a calendar event and invite people no matter the email addresses they have.
To set up a group calendar event, use these steps:
- Open Calendar.
- Click the New event button in the top-left corner.
- Under the «People» section, confirm the email address of the person you want to invite to the calendar event and press Enter.
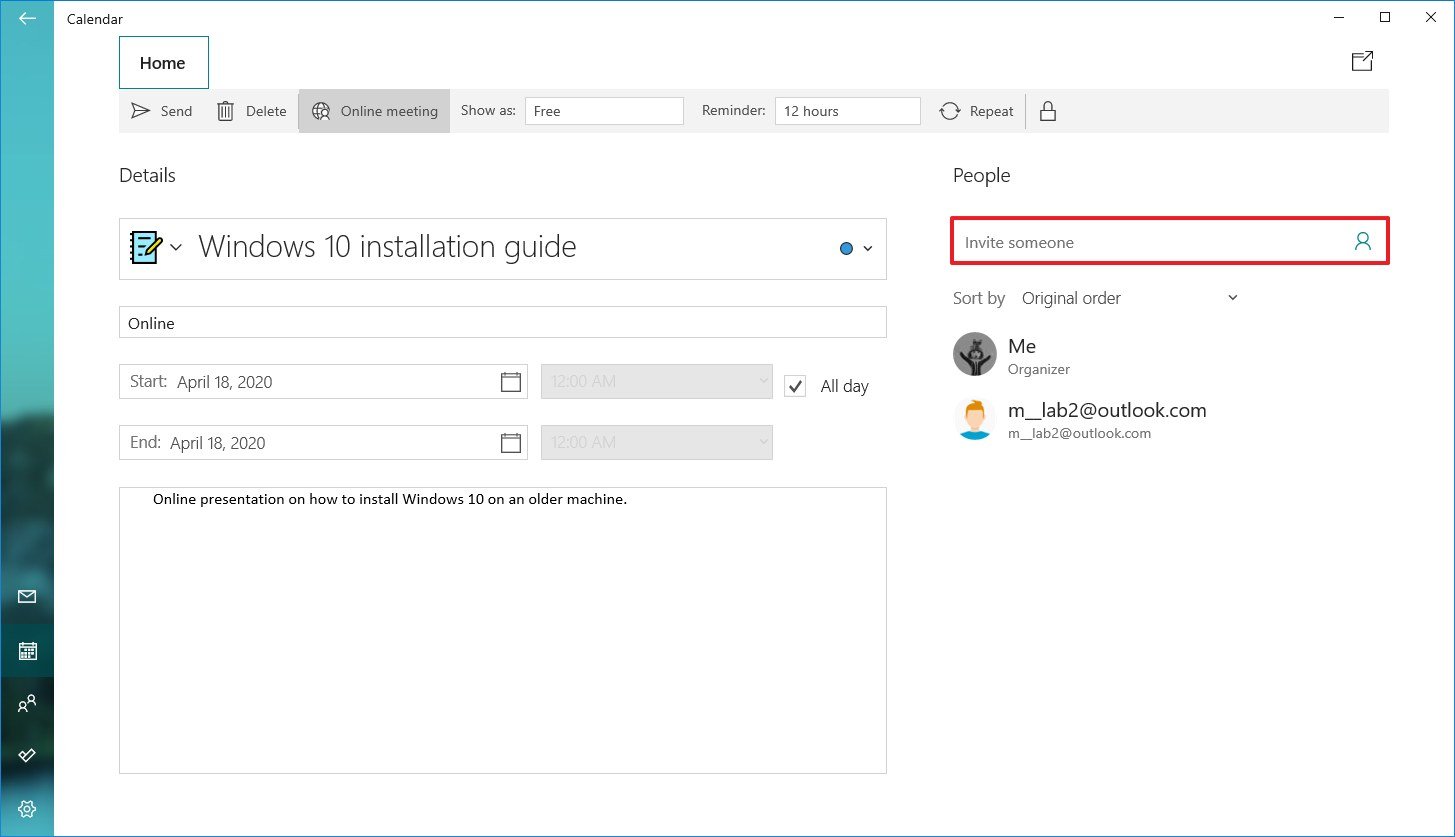
- Repeat step No. 3 to add more people to the event.
- Under the «Details» section, specify a descriptive title for the event.
- (Optional) Use the Calendar drop-down menu and select the account you want to save the event.
- Specify the physical location where the event will take place.
- Specify the start and end dates for the calendar event.
- Specify the start and end times for the event.
- In the bottom section, add all the details about the event.
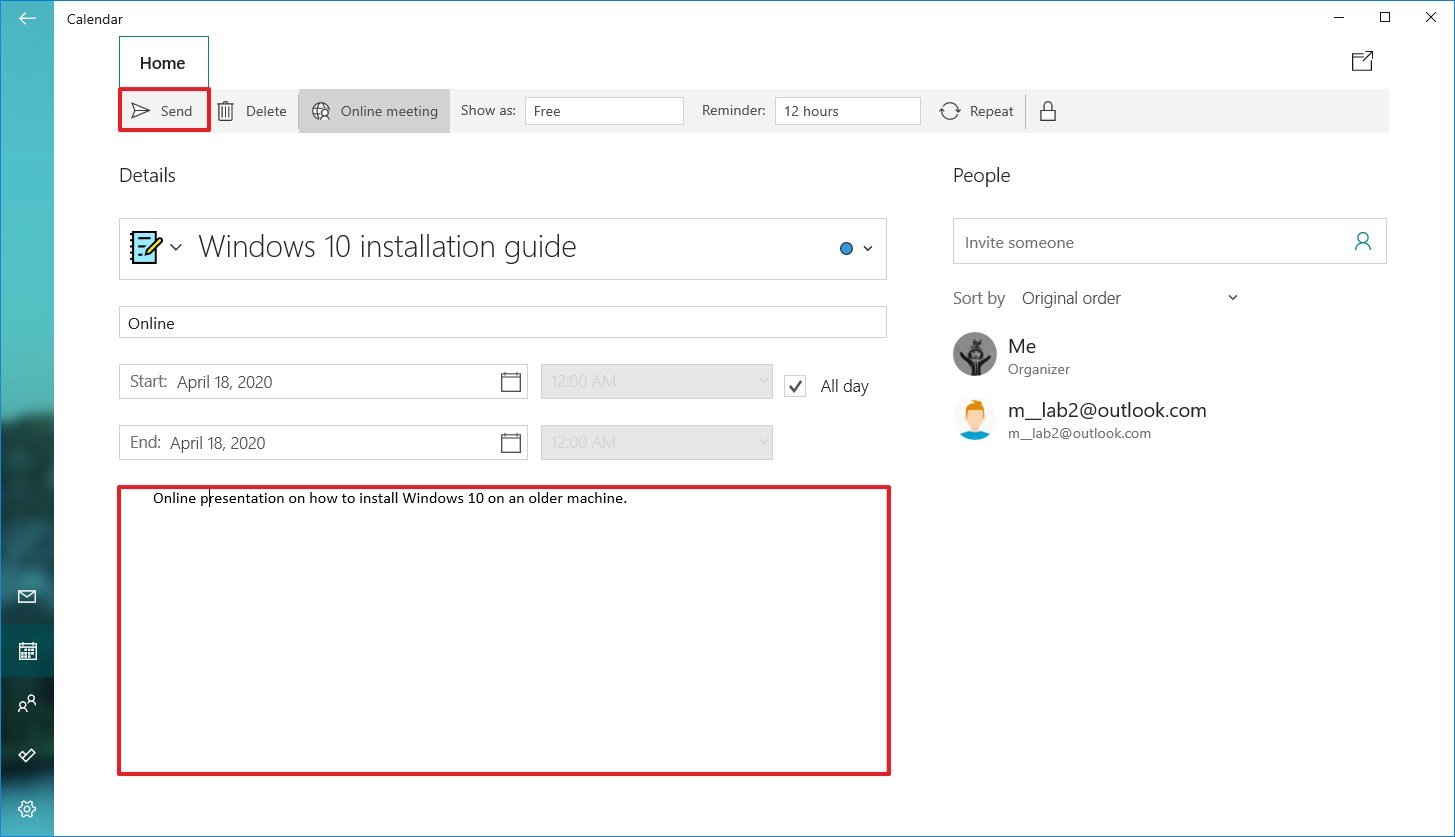
- Use the Reminder drop-down menu to select how long before you should receive an alert about the event.
- Click the Send button.
Once you complete these steps, the event will appear in your calendar, as well as in those of the people to which you sent the invitation. In addition, they’ll also receive an email notification, which they can RSVP or decline.
Create a quick event using app
If you need to create a calendar event with minimal information, you don’t need to go through many steps. To create a calendar event quickly, use these steps:
- Open Calendar.
- Click a date in the calendar to bring up event creator popup.
- Specify a descriptive title for the event.
- Clear the All day option.
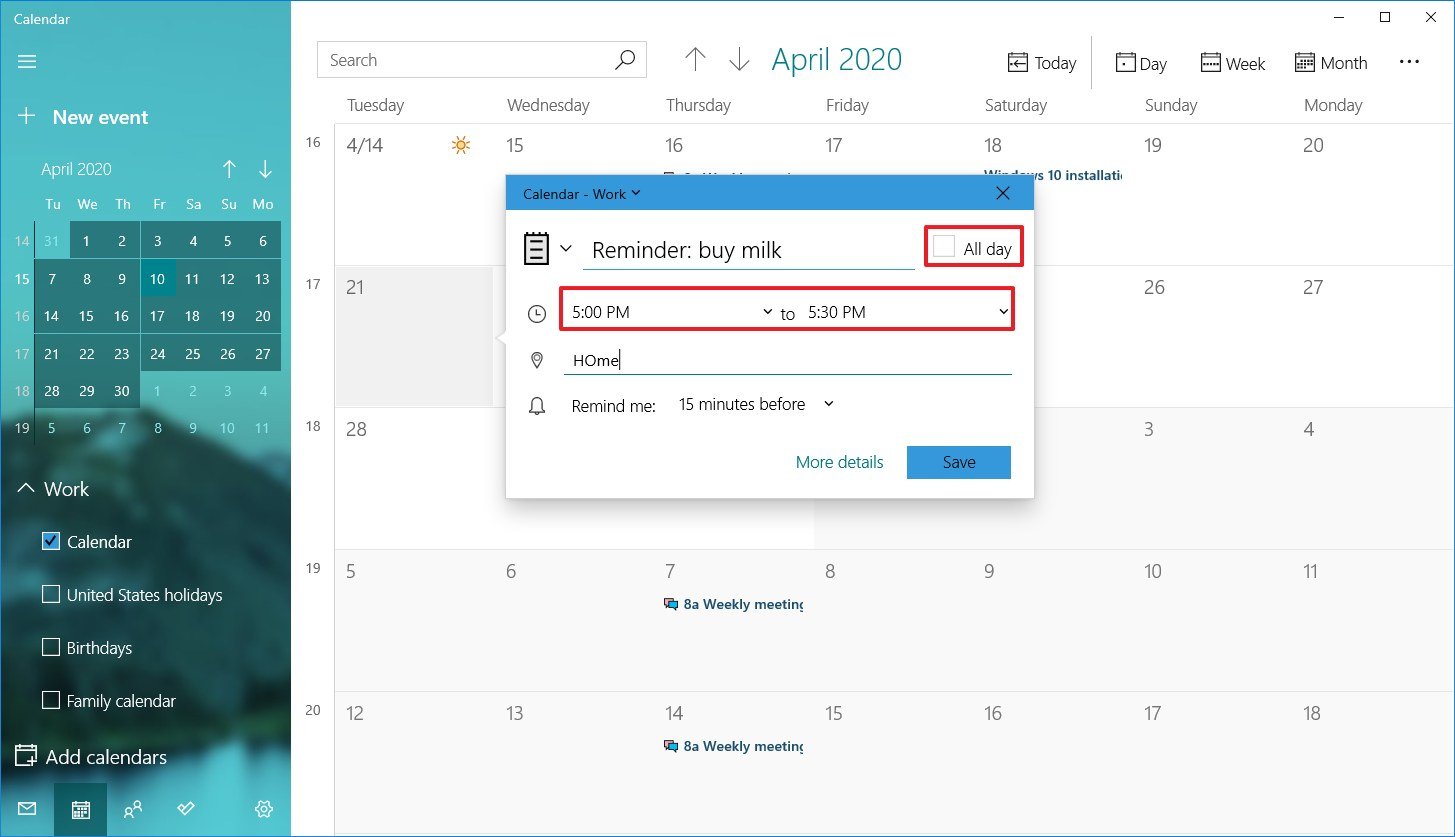
- Select a start and end time
- (Optional) Specify the physical location where the event will take place.
- Use the «Remind me» drop-down menu to select how long before you should receive an alert about the event.
- Click the Save button.
After you complete the steps, the new event will appear in the calendar you specified. You can always select the day, and clicking the event will open a page to edit, cancel, or delete the event.
Create an event using taskbar
To create a calendar event or reminder from the taskbar, use these steps:
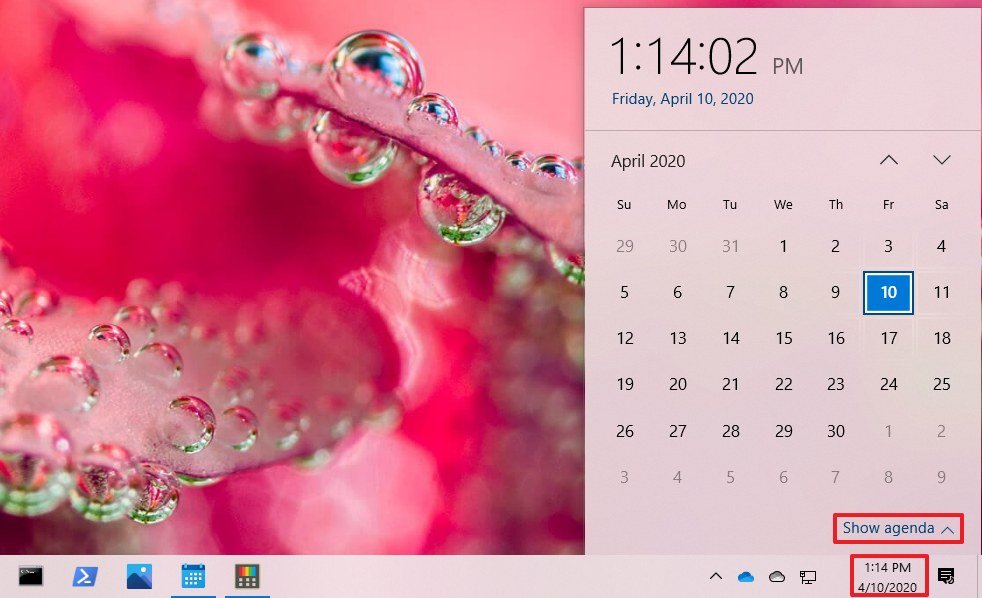
- Click the time and date button in the taskbar.
- Select the date to schedule the new event from the calendar.
- Click the Show agenda option in the bottom-right corner.
- Under the «Today» section, start typing the event or reminder in the text box.
- Click the drop-down menu on the right to select the calendar to save the new event.
- Specify the start and end time of the event.
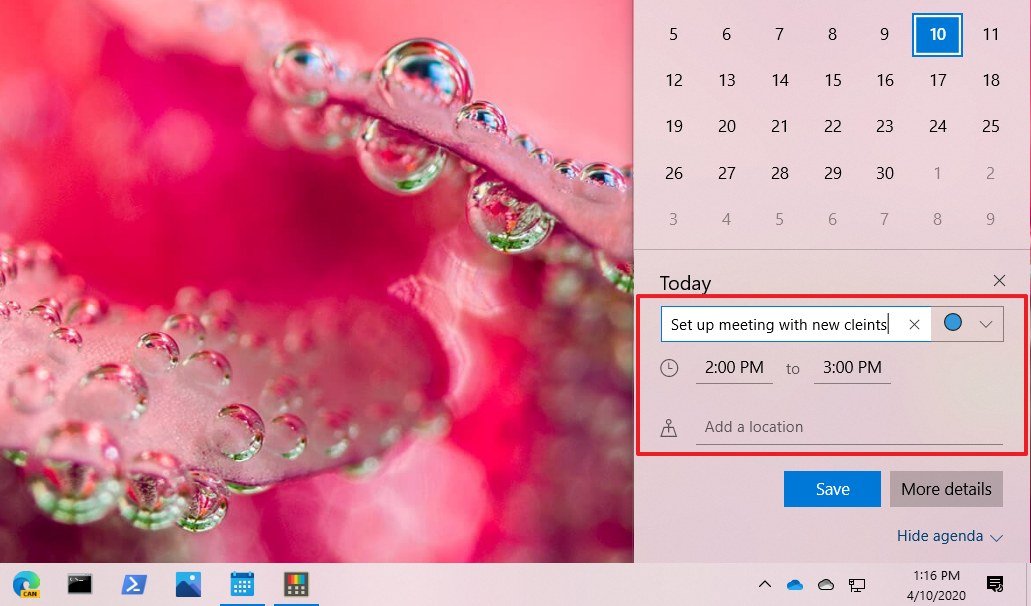
- Specify the location (if applicable).
- (Optional) Click the More details button to open the event using the Calendar app, which allows you to access more options and continue composing the event on a bigger canvas.
- Click the Save button.
Once you complete the steps, the event or reminder will be added to your calendar. If you want to check upcoming events or reminders for a specific day, you can do this by selecting the day from the schedule inside the time and date flyout, or by using the Calendar app.
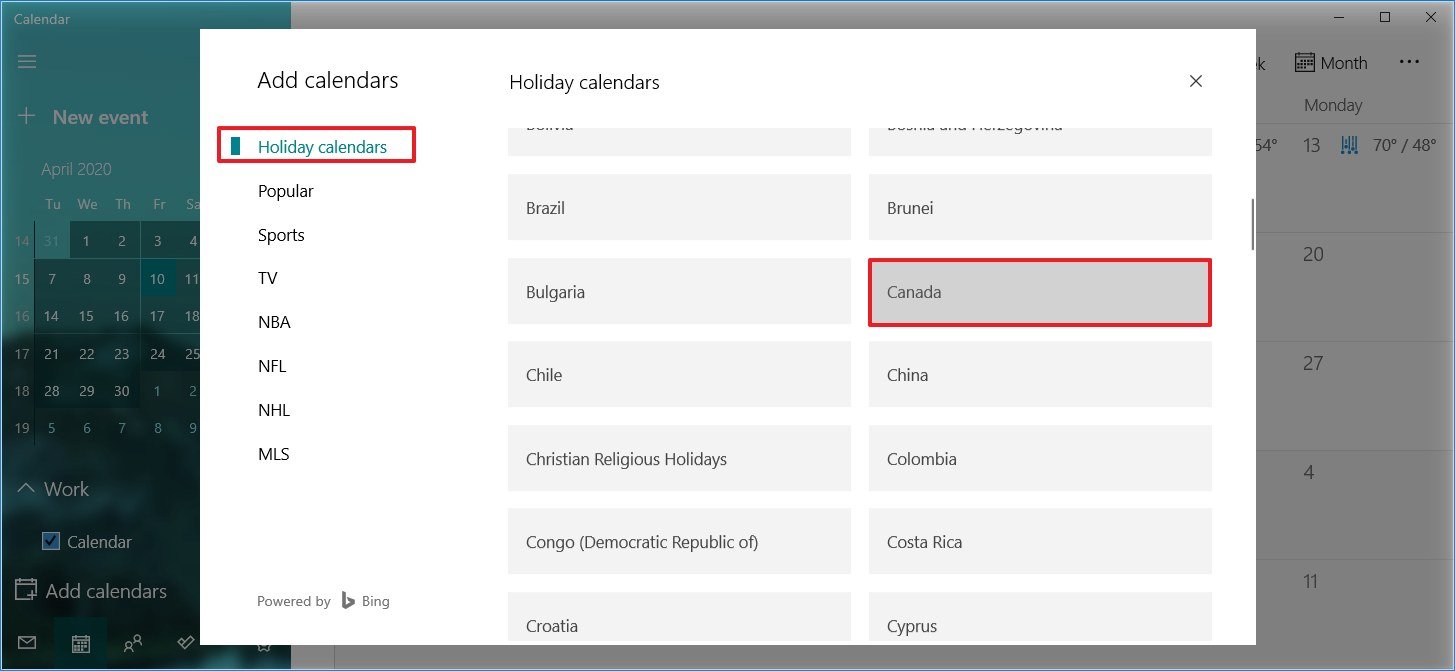
How to add popular calendars on Calendar
The app also allows you to add a bunch of popular calendars to your work or personal calendar to make sure appointments will not conflict with certain holidays, sports games, or TV shows, which you can also use as reminders.
To add popular calendars to the Calendar app, use these steps:
- Open Calendar.
- Click the Add calendars button in the bottom-left corner.
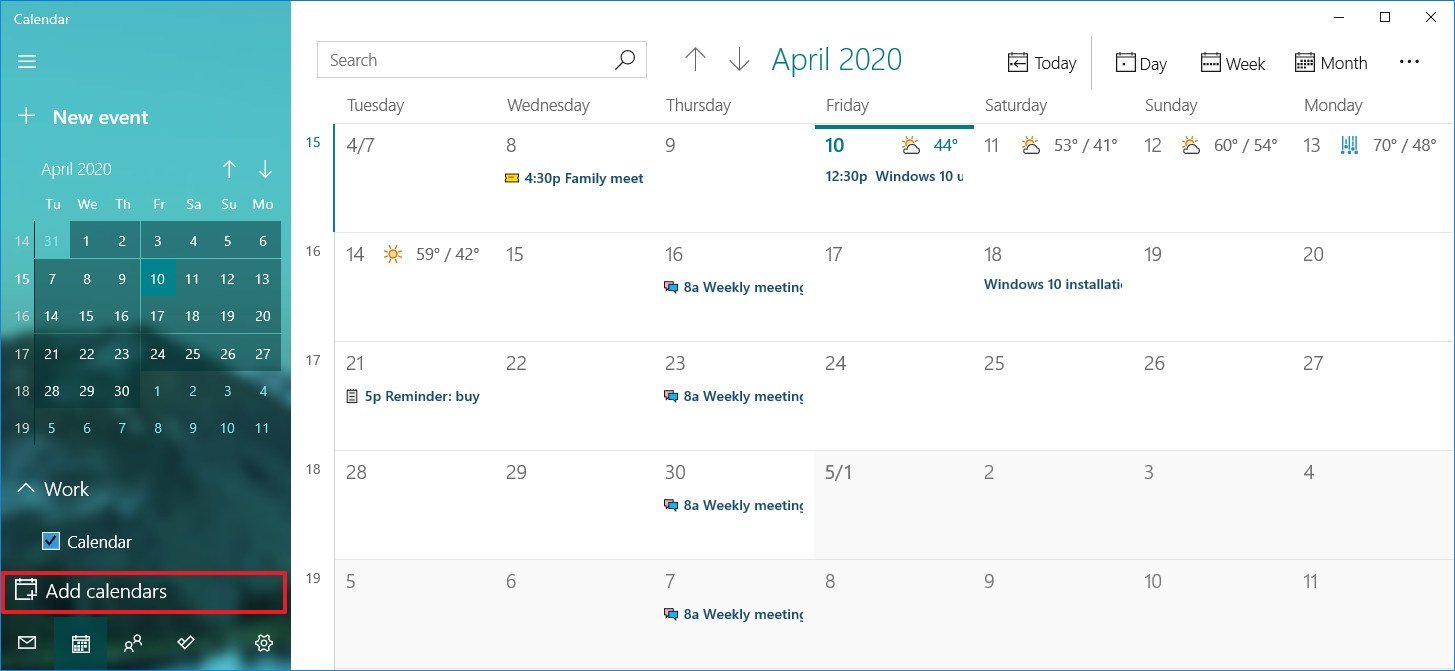
- Select the calendar category. For example, Holiday calendars, Popular, Sports, or TV.
- If you selected the Holiday calendars category, you need to select your region’s calendar to add it.
- If you selected the TV category, choose the time zone, channel, and show you want to add to the calendar.
- If you selected the Sports category, choose the sport, tournament, and the team schedule you want to add to the calendar.
After you complete these steps, the events should populate in your calendar.
How to sync events on Calendar
If you added a new event from your account using the web version of the service or on another computer, and it does not appear in your calendar, you may need to sync the settings manually.
To sync events to the Calendar app, use these steps:
- Open Calendar.
- Click the menu (three-dotted) button in the top-right side.
- Click the Sync option.
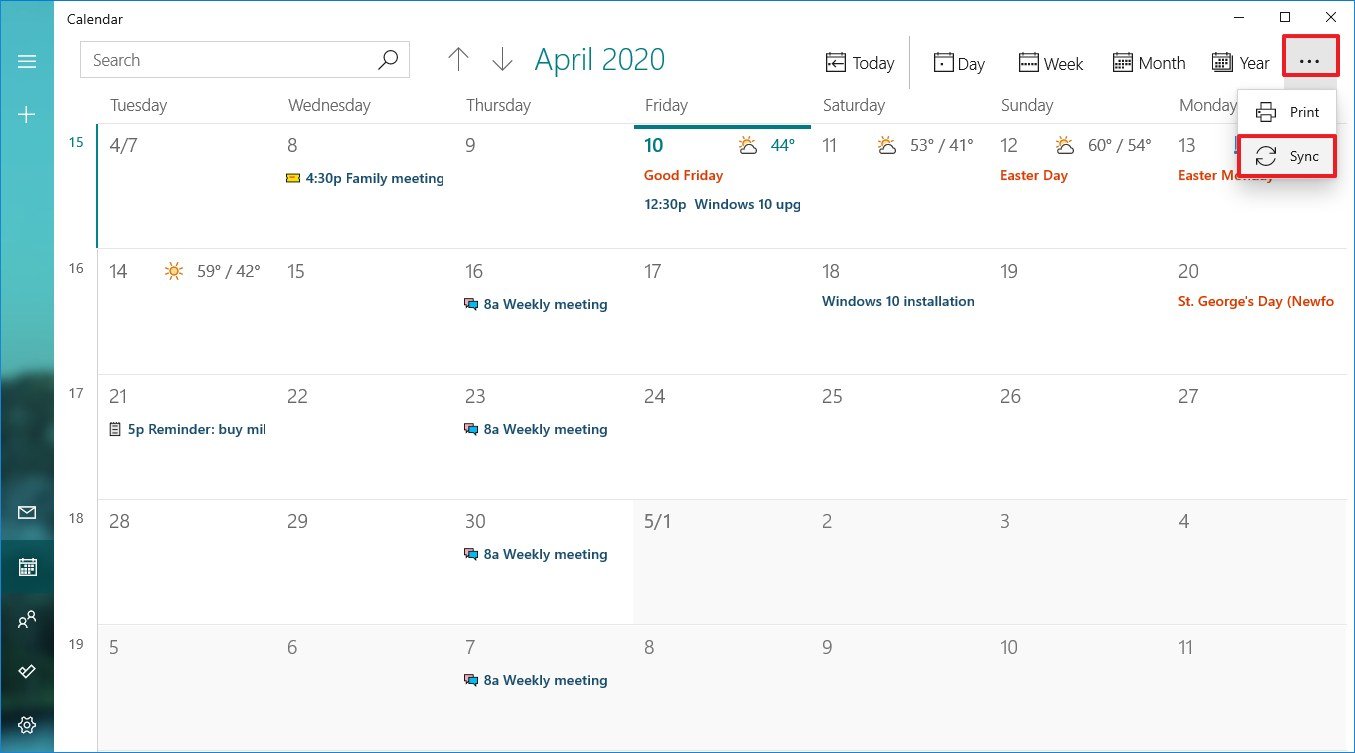
Once you complete the steps, the events should sync to and from the cloud, and they should synchronize across devices.
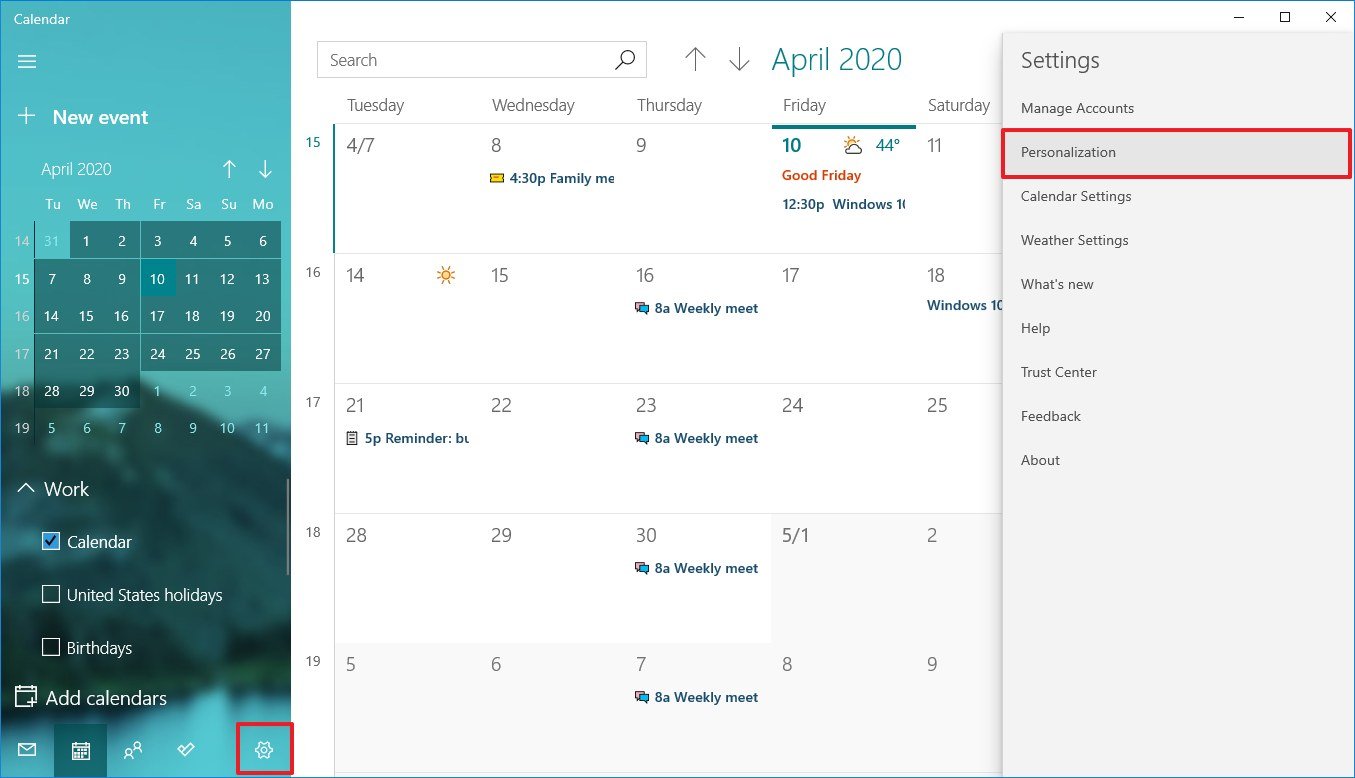
How to personalize your experience on Calendar
If you work from home, or you spend a lot of time setting reminders and scheduling events, the same look and feel can get boring quickly. However, you can customize the Calendar app to make it more personal by changing the color scheme, using a dark mode, and even selecting a custom background image.
To customize the Calendar app, use these steps:
- Open Calendar.
- Click the Settings (gear) button in the bottom-left side.
- Click on Personalization.
- Under the «Colors» section, select the color scheme you want to use.
- Select the between the Light or Dark mode, or select the Use my Windows mode option.
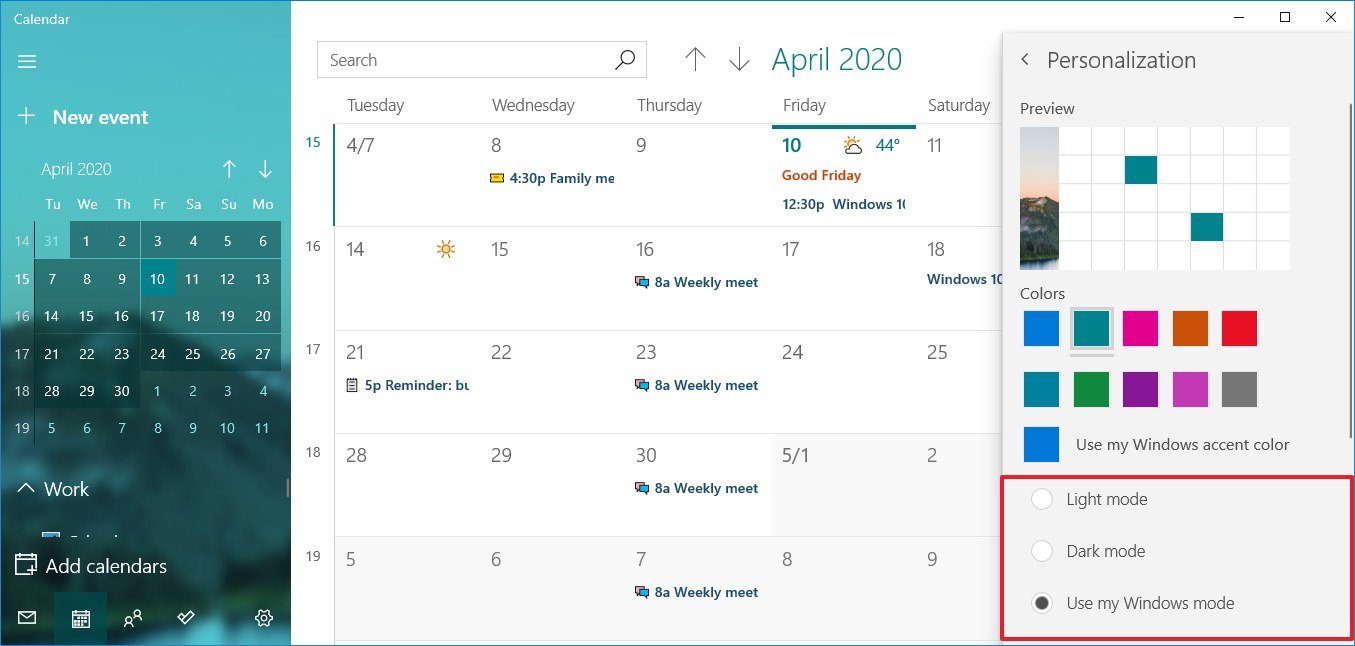
- Under the «Background» section, select a background for the app.
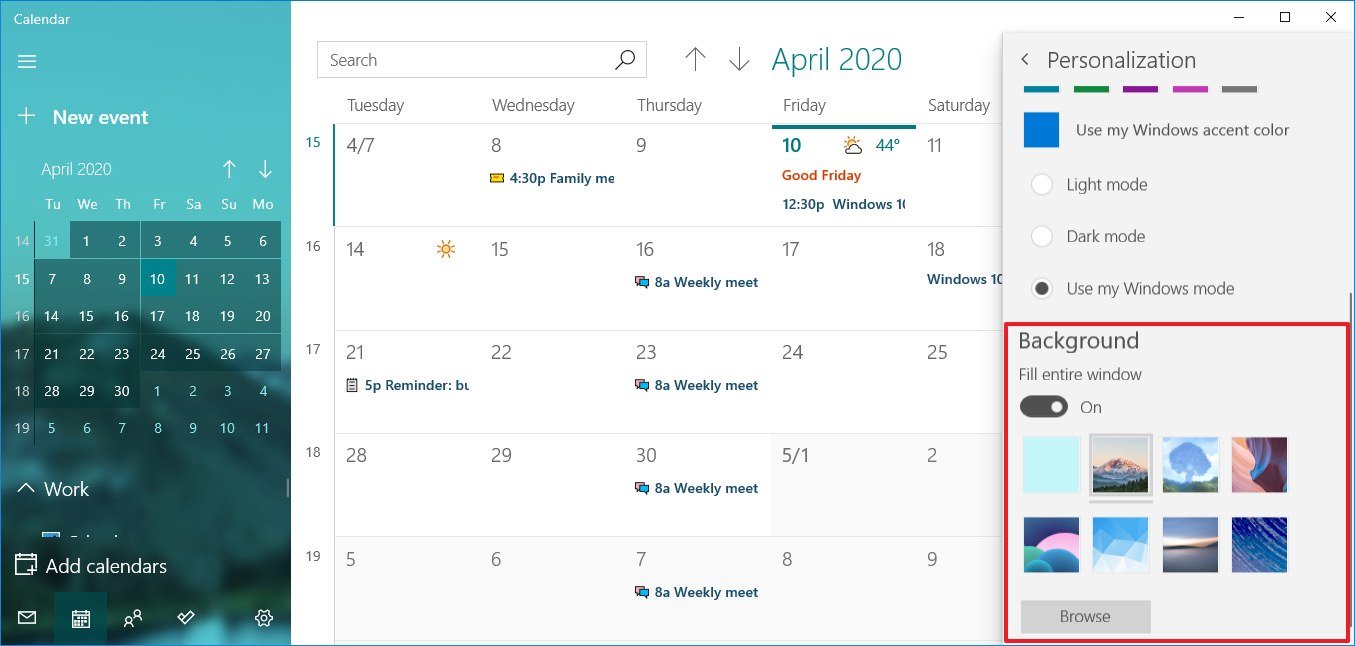
- (Optional) Click the Browse button.
- Select a custom image.
- Click the Open button.
After completing the steps, the Calendar app should be a little more pleasant to use.
How to change settings on Calendar
In the Calendar app, you can also customize various parameters to adjust the experience. For instance, you can set which day should be the first day of the week, what days of the week you go to work, working hours and more.
To customize the Calendar settings, use these steps:
- Open Calendar.
- Click the Settings (gear) button in the bottom-left side.
- Click on Calendar Settings.

- Under the «Week» section, use the drop-down menu to select your first day of the week.
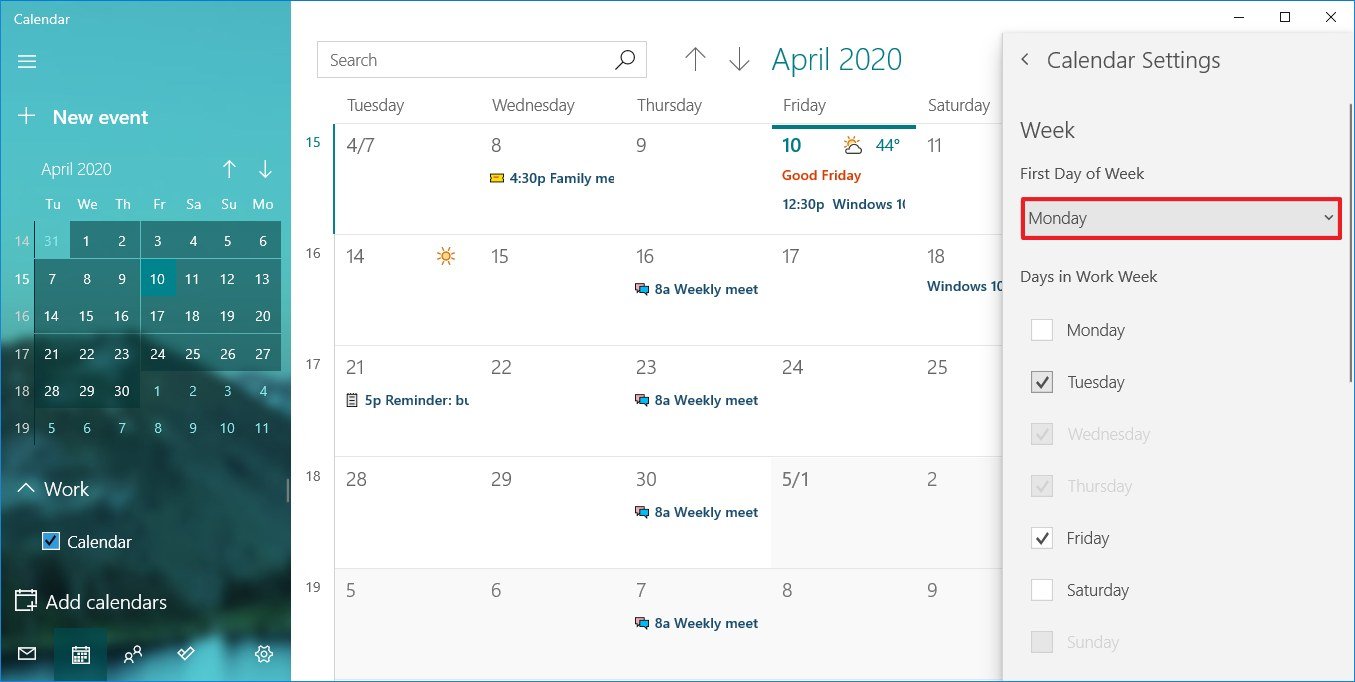
- (Optional) Use the Days in Work Week option to select the days in your workweek.
- Under the «Working hours» section, specify the start and end of your working hours.
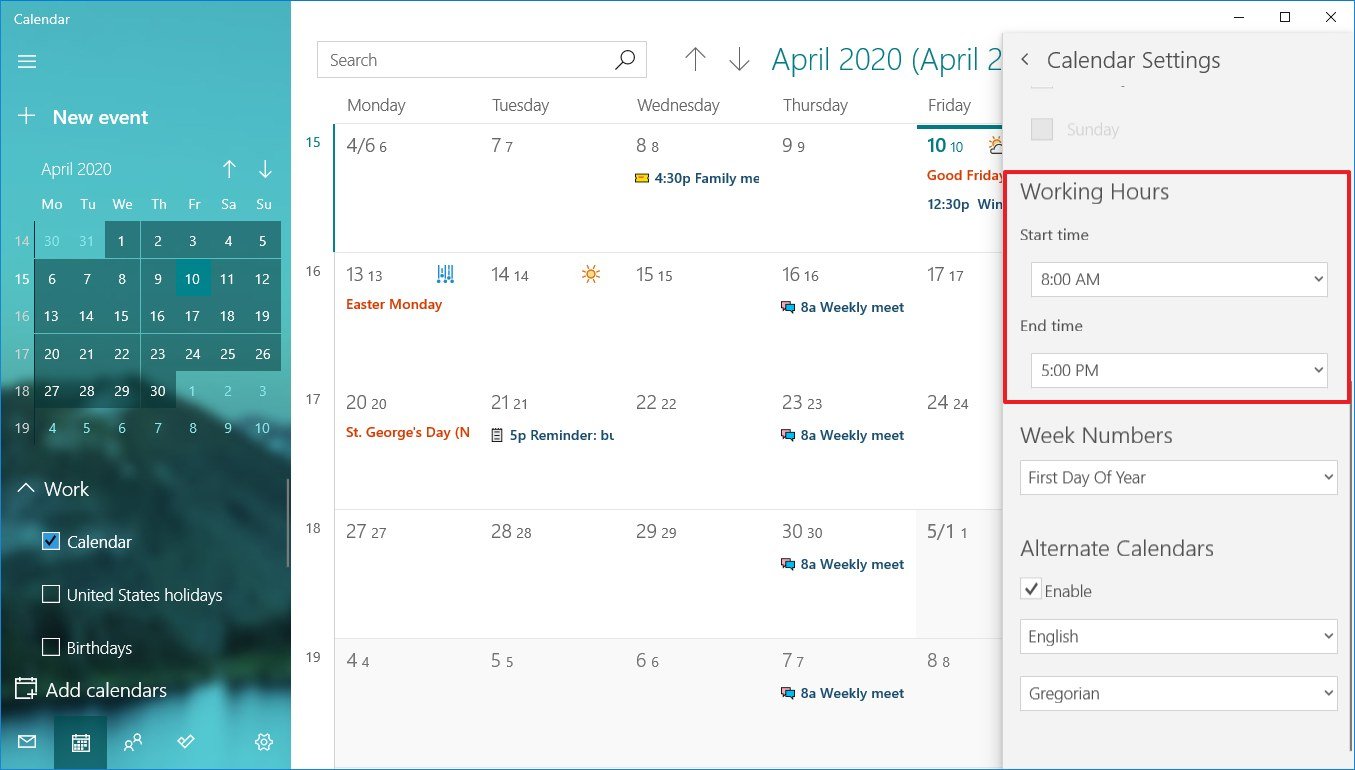
- (Optional) Under the «Week Numbers» section, select how you want to show the week numbers in the calendar, including:
- Off.
- First Day of Year.
- First Full Week.
- First Four-Day Week.
Quick note: When you enable this option, the week numbers will appear on the left side.
- (Optional) Under the «Alternate Calendars» section, check the Enable option.
- Select the alternate calendar, including:
- English.
- Japanese.
- Chinese.
- Arabic.
- Persian.
- Thai.
- Korean.
- Hebrew.
- Hindi.
- Select the calendar type. For example, for English, options include:
- Gregorian.
- Hijri
- Umm al-Qura.
- Hebrew Lunar.
- Saka Era.
Once you complete the steps, the Calendar app will be customized to suit your preferences.
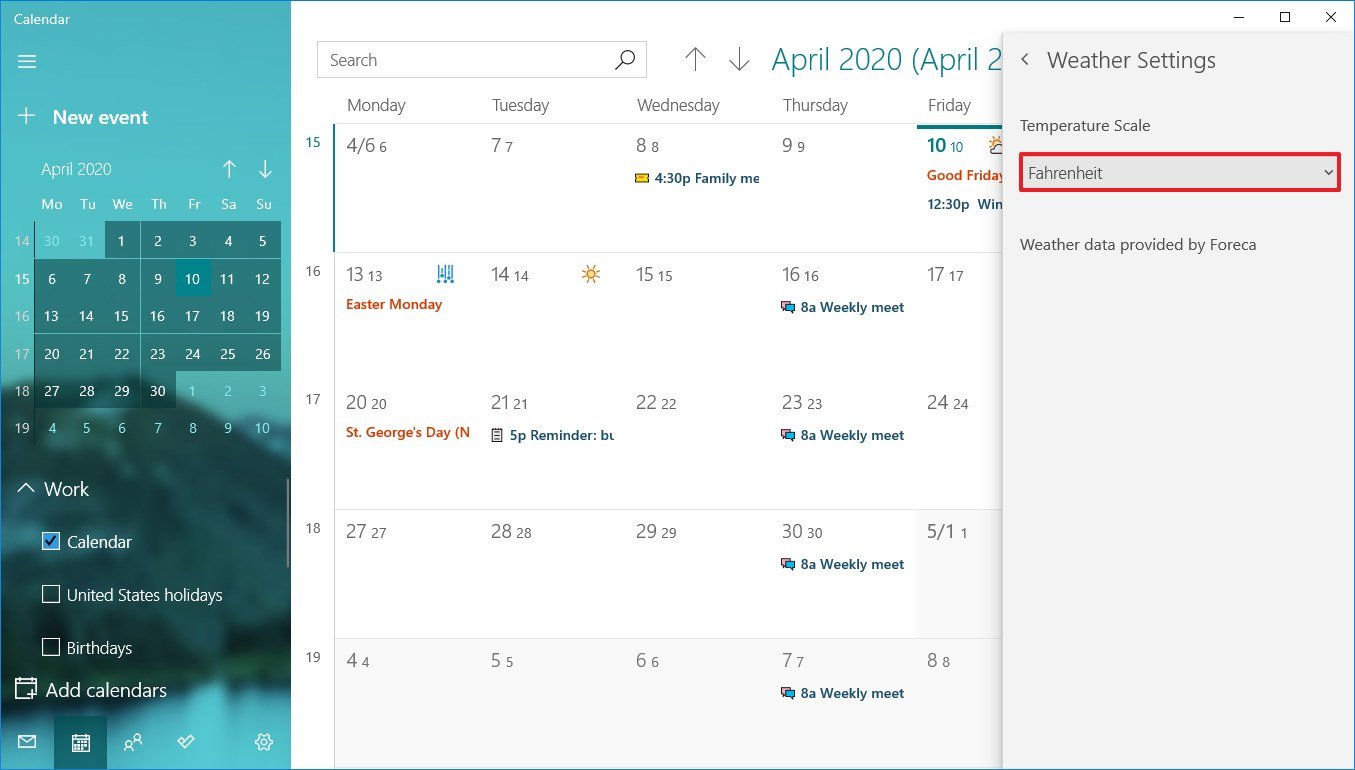
How to change weather settings on Calendar
The Calendar app also shows the weather forecast in the calendars to make it easier to plan events. If you feel more comfortable using a different scale unit for temperature, the app allows you to change the weather settings to use Celsius or Fahrenheit.
To change the weather settings on Calendar, use these steps:
- Open Calendar.
- Click the Settings (gear) button in the bottom-left side.
- Click on Weather Settings.
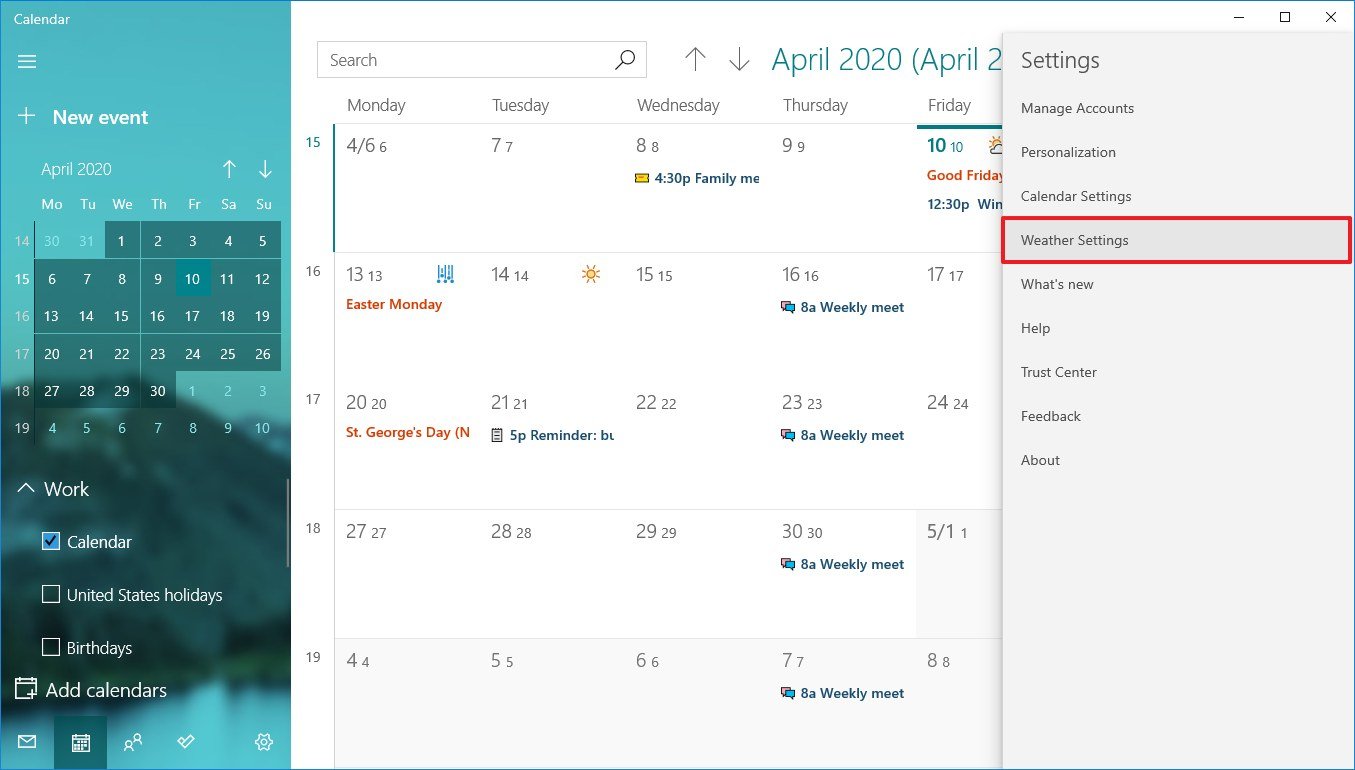
- Use the «Temperature Scale» drop-down menu and select between Celsius or Fahrenheit.
After you complete the steps, the weather will appear with the temperature scale that you specified.
If you’re working from home, in addition to using the Calendar app, you can stay even more productive using an Office 365 (Microsoft 365) subscription, which gives you access to the most popular office applications, including Word, Excel, PowerPoint, Outlook, and much more. Also, using a subscription you’ll receive features at no extra cost, and you’ll get many other benefits, such as sharing the apps with other users and 1TB of OneDrive storage.
Office 365 gives you full access to many apps and perks, such as 1TB OneDrive storage and Skype minutes. You can also install Word, Excel, PowerPoint, Outlook, and other apps on up to five devices, and depending on the subscription, you can share the account with up to five people.
Mauro Huculak has been a Windows How-To Expert contributor for WindowsCentral.com for nearly a decade and has over 15 years of experience writing comprehensive guides. He also has an IT background and has achieved different professional certifications from Microsoft, Cisco, VMware, and CompTIA. He has been recognized as a Microsoft MVP for many years.
Каждый пользователь ПК, даже тот, который только вчера приобрел себе компьютер, скорее всего, уже знает о том, то у него есть Календарь в Windows 10, но к величайшему сожалению, он им не пользуется. Конечно, есть исключения и пользователи используют данное системное приложение, но только по прямому назначению — как календарь. Вот только, данное ПО имеет более обширные границы, чем многие могут даже себе представить и именно по этому, мы решили затронуть данную тему и рассказать вам о том, о чем вам больше не кто не расскажет.
Чтоб вы понимали, что именно мы попытаемся вам донести ниже, сразу поясним… Мы будем использовать не «скрытые» функции ПО, а общедоступные, но при всем при этом, вам не нужно будет подключаться к интернет соединению. Кроме того, вы будите иметь возможность не забывать о важных встречах и событиях, которые занесли в свой Календарь.
Как использовать Календарь в Windows 10?
Для того, чтоб сохранить информацию о: встрече, дне рождении или ином событии, необходимо: выполнить открытие Календаря → выбрать соответствующую дату → произвести ввод информации и времени.
После проделанной выше операции, остается только дождаться даты, чтоб сработало напоминание, которое предварительно сообщит вам о том, что приближается день «Х».
Вот только не редки ситуации, что вы помните, что в какой-то из дней у вас намечена встреча или иное событие, ноне можете вспомнить когда именно, а дата требует корректировки… В таком случае, не нужно пытаться в ручную искать конкретную дату, так как это слишком долго и может отнять кучу свободного времени… Следует воспользоваться Поиском в Календаре и выглядеть это будет следующим образом: открываем приложение «Календарь» → выполняем клик в область поиска приложения «Календарь» → прописываем слово или несколько букв по которым поиск сможет отыскать вашу заметку в «Календаре» → выбираем из предоставленных поисковых результатов именно то, который максимально соответствует вашему поисковому запросу.


Таким образом, можно с полной уверенностью заявить о том, что использовать Календарь в Windows 10 стало намного практичнее, чем это было ранее, тем более, в кажущимся простым приложении, появились весьма полезные функции с которым уж точно мало какая из аналогичных программ может по соперничать.
P.S. При необходимости, можно в приложении «Календарь» воспользоваться синхронизацией и собрать все заметки на компьютере из такого ПО, как: Outlook, Gmail, Yahoo и даже, из рабочего аккаунта.