
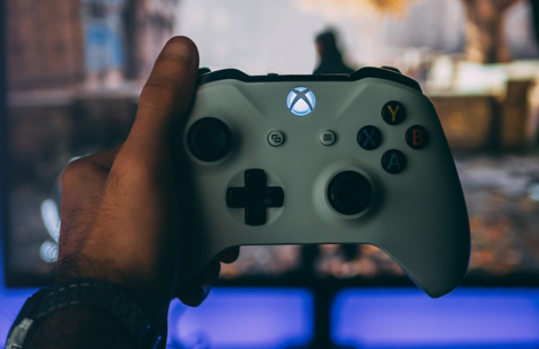
If you have a Bluetooth wireless controller, such as a PS5 (DualSense), PS4 (DualShock 4), or Xbox controller, you can connect it to your PC and set it up as a wireless mouse, keyboard, or both combined on a Windows 11 PC. There are a few software options that can help achieve this. We recommend using the Steam client, which has a feature that allows you to configure your controller as a mouse and/or keyboard in Windows 11.
This is achievable by binding/mapping buttons on the controller to keyboard keys or mouse clicks and setting the analog as a joystick mouse or mouse scroll, all based on your preference. You can bind any button on your controller to any mouse click, keyboard key, or any Windows action you want. In this guide, we will show you how to set up and configure your wireless controller as a wireless mouse and keyboard in Windows 11 using Steam.
Also see: Play PC Game with PS5, PS4 or Xbox Controller in Windows 11
How to use PS5, PS4 or Xbox Controller as Mouse and Keyboard on Windows 11
To summarize, you need to first pair your wireless controller to your Windows PC. Then, you need to download and install the Steam client and configure your wireless controller as a mouse and keyboard via Steam. Follow the steps below to do so.
1. Connect your wireless controller to Windows 11 PC
First, connect and pair your wireless controller to your PC via Bluetooth on Windows 11. To connect a Bluetooth controller to your Windows PC, your PC must have a built-in Bluetooth adapter or an external USB Bluetooth receiver.
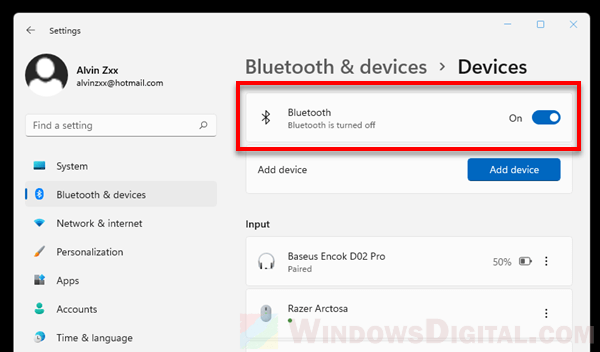
Press Win + i keys to open Settings on Windows 11. Select Bluetooth & devices on the left pane. Click on Devices. Make sure Bluetooth is turned On.
To put your PS4 or PS5 controller into pairing mode, press and hold both the Share and PlayStation buttons until the light bar flashes.
To put a Xbox controller into pairing mode, press and hold the Guide button and the Pairing button for three seconds until the Guide button flashes.
Related issue: Bluetooth Not Detecting Devices in Windows 11
On your Windows PC, as soon as you put your controller into pairing mode, Windows should be able to detect it and prompt a notification asking if you want to pair the “Wireless Controller”.
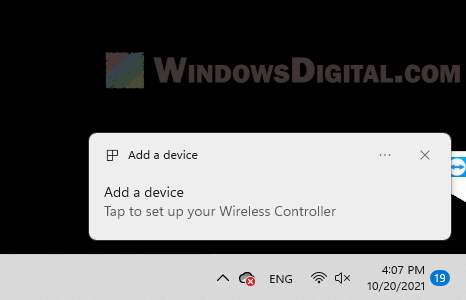
Click Allow to allow Windows to pair your wireless controller.

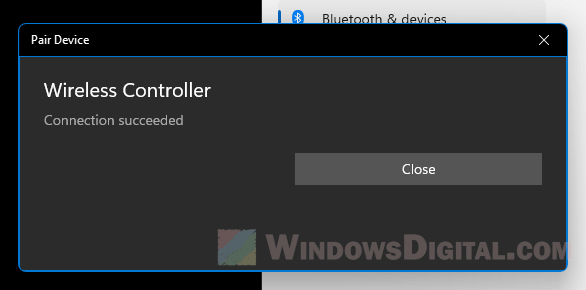
If the pairing is successful, Windows will show a message that says “Connection succeeded”.
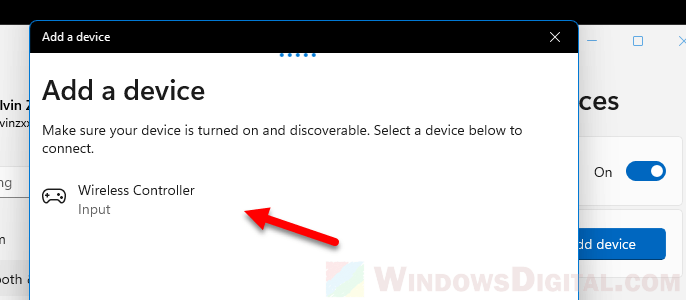
If no notification shows up, go to Settings > Bluetooth & devices > Devices > Add device > Bluetooth, to manually add your wireless controller (make sure your controller is in pairing mode so that Windows can detect it).
2. Download and Install Steam client
Next, download and install Steam client on your PC. You can download Steam client from Steam’s official website as shown below.
https://store.steampowered.com/about/
Once installed, open Steam and run it as administrator. Then, sign in to your Steam account. If you do not have a Steam account yet, click create a new account to create one.
Related resource: How to use PS5 DualSense Controller on Xbox Game Pass PC
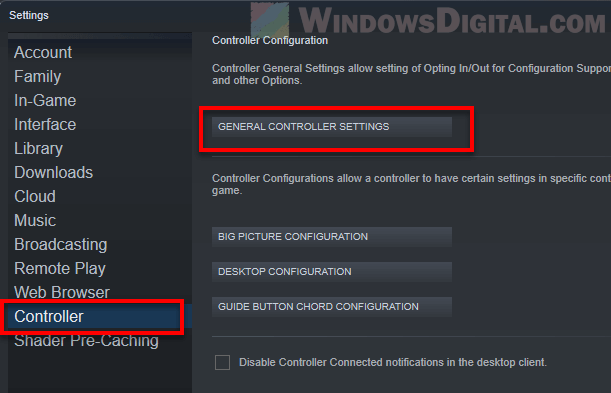
3. Configure your controller as mouse and keyboard on Steam
Once you’re signed into Steam, in the Steam client window, click on Steam at the top left corner of the window, and then select Settings.
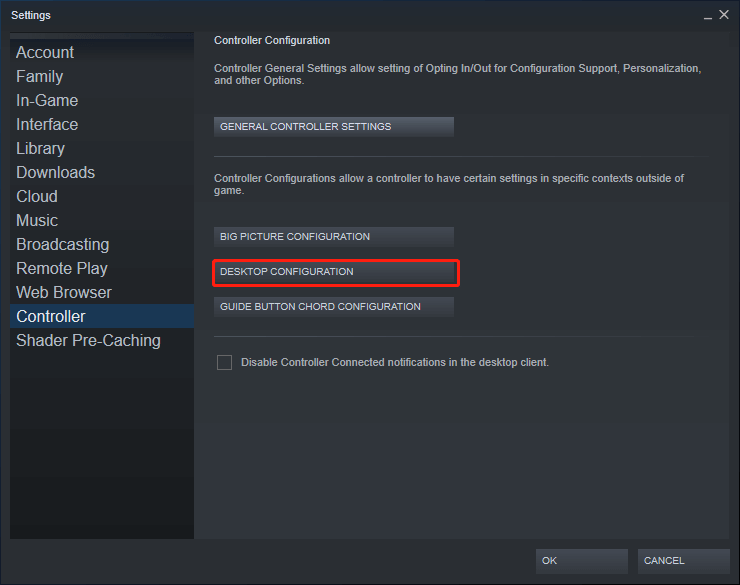
In the Settings window, click on Controller on the left pane. First, you will need to enable the configuration support for your wireless controller. Click on General Controller Settings.
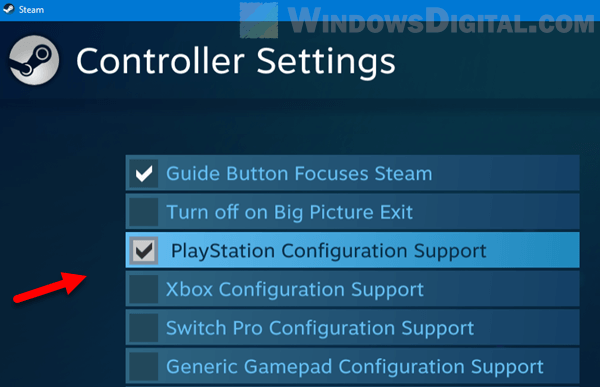
Then, enable the configuration support for your controller. For example, to enable PlayStation controller, select the PlayStation Configuration Support checkbox. Close the window.
Back to the Settings window, click on Desktop Configuration.
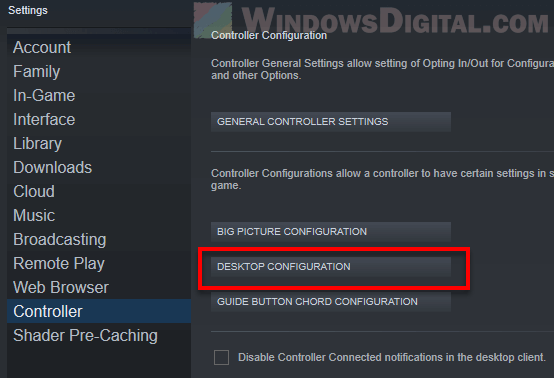
From here, you can configure and map any buttons on your controller to a mouse or keyboard action.
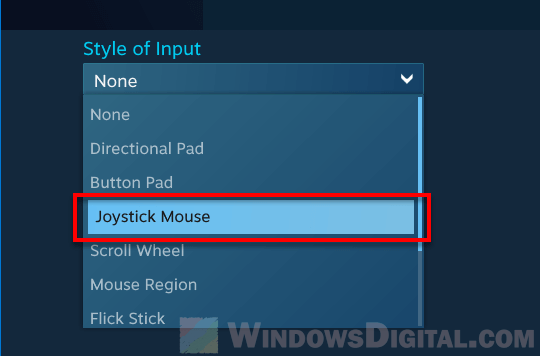
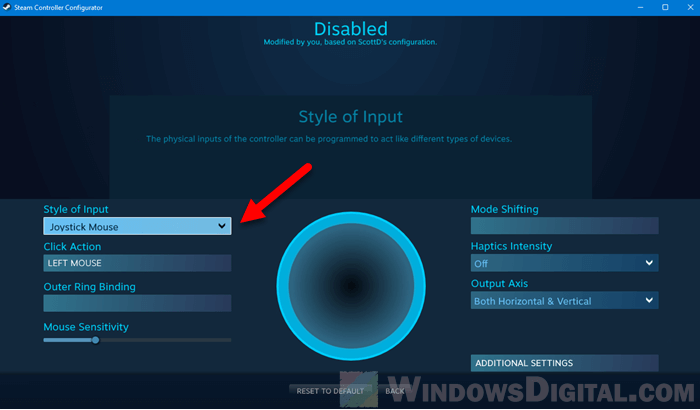
For example, to set the analog stick as joystick mouse, click on the analog stick. Under Style of Input, select Joystick Mouse.
Optionally, you can configure other settings such as Mouse sensitivity (how fast mouse cursor moves on screen as you move your analog stick), analog click action, haptics intensity, mode shifting and output axis. For additional advanced settings, click on Additional Settings.
Click Back once you’ve done configuring the analog stick.
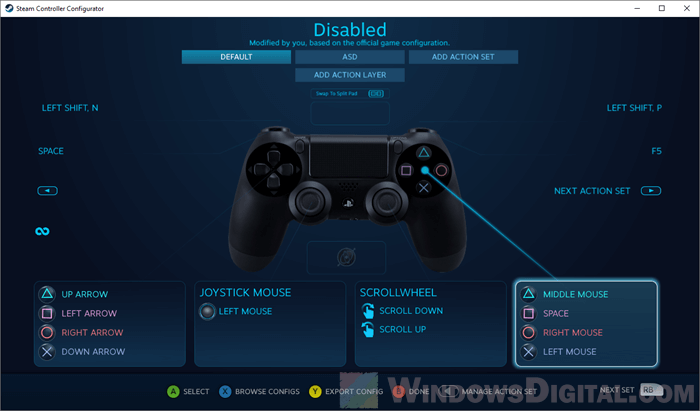
To map a controller’s button to a keyboard key or mouse click, click on the button pad. Under Style of Input, select Button Pad.
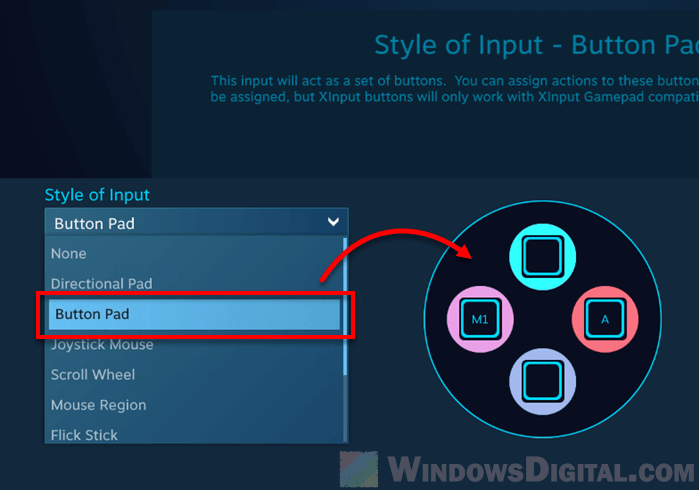
Next, click on the button that you want to bind an action to, and then click on the mouse or keyboard action you want to bind the button to.

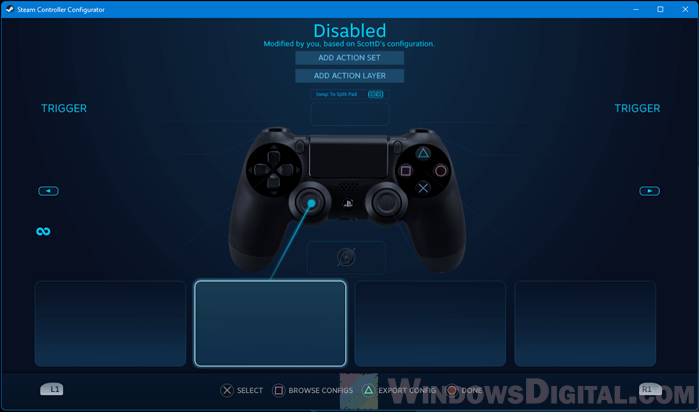
For example, as shown in the screenshot below, I’ve mapped the Square button on a PS4 controller to mouse left click action, and the Circle button to A keyboard key.
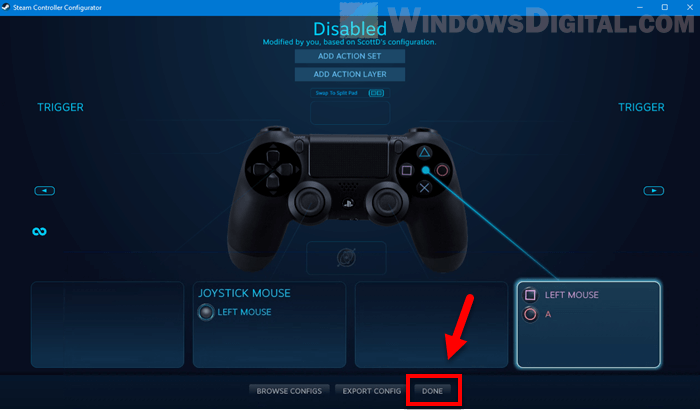
Click Done to save the changes after you’ve done configuring your controllers.
You can configure your controller’s buttons and analog sticks to any mouse or keyboard action you want. Simply select a button, then choose a style of input, and finally choose a key you want to bind the button to.
Tip: You can set one of your analog stick to mouse scroll wheel by selecting the analog stick and then select Scroll Wheel for the style of input.
The screenshot below shows how I setup my DualShock 4 wireless controller as my mouse and keyboard so that I can sit back and still be able to interact with my PC with just my controller.
Not enough buttons on Controller for more keyboard keys?
As buttons on a controller are limited, you can bind them to only a few keyboard keys. If you want to be able to press all keyboard keys wirelessly with your controller, you can try to use an on-screen keyboard instead.
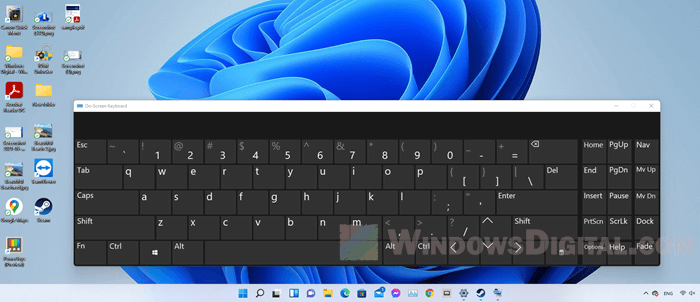
In Windows 11, there is a built-in app called On-Screen Keyboard which does just that. It will show a virtual keyboard on your screen which you can click on using your mouse cursor.
Simply search for “on-screen keyboard” on the Start menu and open the app to try it.
This article described by MiniTool official web page mainly teaches you how to use game controllers as computer mouse and keyboard, including Microsoft Xbox, Sony PlayStation, DualShock, Nintendo Switch, Wii U, etc.
With the development of television and the 4K technology application, many game players choose to play PC games on their large 4K TV. In such a situation, if they turn their game controller (Xbox Series X|S, Xbox One, Xbox 360, PS5, PS4, PS3, DS4, Switch, Wii U, etc.) into a computer mouse while playing on TV, they can enjoy their gaming more.
Then, how to use game controller as mouse and keyboard? In general, you should rely on third-party services like Steam, Controller Companion, Gopher360, and InputMapper.
#1 How to Use Steam Controller as Mouse?
Steam’s built-in Big Picture Mode is designed to play PC games on the TV screen. It gives you an interface that you can navigate with a controller, gamepad, or game stick. If you have installed Steam on your gaming computer, you already have this feature.
Steam enables some shortcuts known as “Chords” – combinations of buttons on your gamepad that map to certain functions on your PC.
Use Xbox One Controller as Mouse
Let’s take Xbox One controller for example. If you have an Xbox 1 controller connected, you can press and hold the Xbox button while moving the right stick to move the mouse pointer; hold the Xbox button and press the right trigger to click; hold the Xbox button and press the left trigger to right-click.
If you want to use controller as mouse for more than a few random clicks, you may need to enable full controller support on the desktop. To achieve that, follow the below steps.
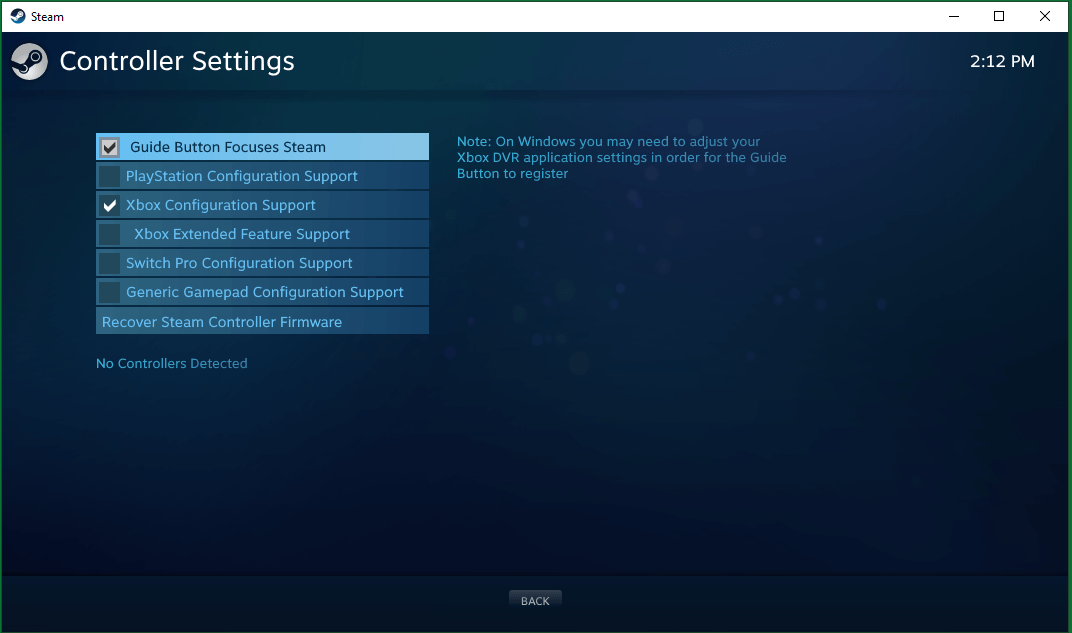
- In Steam, go to Settings > Controller > General Controller Settings.
- Choose your controller configuration support option, PlayStation, Xbox, Switch Pro, or Generic.
- Now, you should be able to move your mouse with the right stick on your controller.
Back to the Controller page of Steam Settings, you can click the DESKTOP CONFIGURATION button to personalize which buttons emulate which keyboard keys.
Disadvantages of using Steam Controller as Mouse
If you launch a game from Steam, the client will disable the gamepad-as-mouse feature automatically while you are in the game. Thus, the game will treat your controller as a mouse with all its default keybindings. Yet, if you launch a game from outside Steam, your controller will still be recognized as a mouse and your controls will not work properly.
To fix this issue, you can add those non-Steam games to your Steam library. When Steam detects them and the overlay works properly, it will disable the mouse feature.
#2 How to Use Controller as Mouse by Controller Companion or InputMapper?
Another software that enables you to use controller as mouse and keyboard is Controller Companion, which is a charged program that can be purchased and installed from Steam. Relying on this program, you can move your mouse via the left stick on your controller: click on targets using the A button while pressing the left stick.
Moreover, you can get a handy virtual keyboard to type quick bits of text. More importantly, Controller Companion will disable itself automatically when it detects a full-screen app running. That is to say, Controller Companion can switch between mouse emulation and in-game controls automatically and seamlessly.
Tip: If Controller Companion fails to switch between mouse emulation and in-game controls, you can manually do that by pressing both the Start and Back buttons.
However, Controller Companion does not support Sony’s DualShock (DS) controllers for the latter do not interact with Windows in quite the same way as Xbox controllers. Yet, it provides a button to set up Xbox Controller Emulator that should work in conjunction with DualShock gamepads.
If you plan to use PS4 controller as mouse, you need to rely on InputMapper or DS4Windows. Just download and install it on your PC. Start InputMapper. When you connect a DualShock controller, a popup will appear asking for configuration. You can create a profile that maps the controller to its Xbox 360 equivalents (so it works in games that do not support PS controllers), or as a mouse and keyboard (where the DualShock’s touchpad moves the cursor and tapping it clicks the mouse). You can specialize the button mapping and many other adjustments within the main interface of InputMapper.
#3 How to Use a Controller as a Mouse with Gopher360?
Although being a little old and outdated, Gopher360 for Xbox and other game controllers is still a good choice to use controller as mouse. To use this tool, go to its release page, copy it to your computer, and double-click on it to open.
Gopher360 is a command window with controls the mouse emulation on your gamepad. The following are the input types and key bindings of Gopher360.
A: Left Mouse-Click.
X: Right Mouse-click.
Y: Hide terminal.
B: Enter.
D-pad: Arrow keys.
Right Analog: Scroll up/down.
Right Analog Click: F2.
Left Analog: Mouse.
Left Analog Click: Middle mouse click.
Back: Browser refresh
Start: Left Windows Key
Start + Back: Toggle. Useful for when you launch emulators or open Steam Big Picture mode. Press again to re-enable.
Start + DPad Up: Toggle gopher vibration setting.
LBumper: Browser previous
RBumper: Browser next
LBumber + RBummper: Cycle speed (x3)
LTrigger: Space
RTrigger: Backspace
You can also adjust the sensitivity and customize the button layout via Gopher360’s config file stored in the same location as the program.
However, Gopher360 does not support Sony’s DualShock controllers for the same reason mentioned in the above second part. Also, you can replace Gopher360 with InputMapper if you are using a DualShock controller.
Other Programs to Emulate Game Controller as Mouse
In addition to the tools mentioned above, there are many other apps that can also stimulate your controller as a desktop mouse.
- JoyToKey
- reWASD
- Xpadder
- AntiMicro
- Keysticks
You may also like:
- [Solved] How to Download TikTok Video Without Filter?
- 5 Best Keyboards for Video Editing for Mac/Windows in 2023!
- 30 vs 60 FPS Video Recording: Which Is Better & How to Record?
- 5 Best Keyboards for Video Editing for Mac/Windows in 2023!
- [2 Ways] How to Circle Crop Photo by Office Apps (Word)?
If you’re a console gamer looking to play PC games with a controller, you’re in luck! Your gaming controller should pair effortlessly with your Windows 11 PC. Learn how to play PC games with a controller and customize your controller to game your way.
How to connect your controller to your PC
Connecting a gaming controller to your Windows 11 computer couldn’t be easier. Whether your controller supports Bluetooth or not, we have you covered.
Connect a wired controller
If you’re using a wired controller, simply plug it into your PC via USB. Your PC should recognize your wired device right away and prompt you if an additional driver download is needed.
Connect a wireless controller
Many newer gaming controllers can be connected via Bluetooth. To connect this type of controller, follow these easy steps:
- Enter Bluetooth into your Windows search bar and make sure Bluetooth discovery is enabled.
- Turn on your controller.
- Press and hold the Sync button on the top until the Guide button flashes.
- In the Bluetooth menu on your PC, select Add device and your computer will start looking for your controller.
- When it’s found, you can choose your controller from the results and then select Done to complete the setup.
If your controller is a little older, you may need a wireless adaptor, which you’ll insert into an available port on your PC. If the adapter features a sync button, press that before turning on and syncing your controller. From there, you should be able to add this device from your Bluetooth menu.
What games can I play on Windows 11?
Windows 11 is the ultimate operating system for PC gaming and audio immersion. With options like PC Game Pass, which is available for a small monthly fee, you can play a suite of high-quality games on your PC directly through your Microsoft account. Choose from indie games, franchise favorites, and big-name blockbusters!
How to customize your game controller
If you need to customize your game controller for your Windows 11 PC, you can launch Game Controller settings:
- Select Windows + Q on your PC’s keyboard.
- Enter USB game controllers in the search box and choose the controller you want.
From here, you can access your controller’s settings and customize it to your own preferences. This includes assigning buttons, swapping triggers, and choosing the strength of haptics. If you’re gaming with an Xbox controller, you can also use the Xbox Accessories app to adjust these settings as well as create and edit controller profiles.
Frequently asked questions
Why isn’t the Xbox Game Bar working when I use my controller on my PC?
If your Xbox Game Bar isn’t working on your Windows 11 PC, try the following:
- Check your Game Bar settings. Select the start button on your controller, then choose Settings. Navigate to Gaming > Xbox Game Bar, then enable Record game clips, screenshots, and broadcast using Game Bar.
- During the game, select the keyboard shortcut Windows logo key + G to open the Game Bar. Select Enable gaming features for this app to record gameplay to use gaming features including broadcasting or capturing.
To learn more, visit the Xbox support page.
Frequently asked questions
Why isn’t the Xbox Game Bar working when I use my controller on my PC?
If your Xbox Game Bar isn’t working on your Windows 11 PC, try the following:
- Check your Game Bar settings. Select the start button on your controller, then choose Settings. Navigate to Gaming > Xbox Game Bar, then enable Record game clips, screenshots, and broadcast using Game Bar.
- During the game, select the keyboard shortcut Windows logo key + G to open the Game Bar. Select Enable gaming features for this app to record gameplay to use gaming features including broadcasting or capturing.
Can I use my Xbox controller on my PC?
Yes! Many popular PC games can be played with an Xbox controller instead of your usual computer hardware. Connect your controller to your Windows 11 computer via Bluetooth or a USB cable.
How do I turn off my Xbox controller when it’s connected to my PC?
Try one of the following to turn off your Xbox controller:
- Press and hold the Xbox button located on top of the controller.
- Turn off the Bluetooth connection.
- Unplug the USB cable.
Gone are the days of trying to coordinate your keyboard and mouse to complete quests and pick up loot. Instead, grab your favorite controller and play on your PC with ease. To see more ways to get your gaming on in Windows 11, visit Windows Learning Center.
Для работы проектов iXBT.com нужны файлы cookie и сервисы аналитики.
Продолжая посещать сайты проектов вы соглашаетесь с нашей
Политикой в отношении файлов cookie
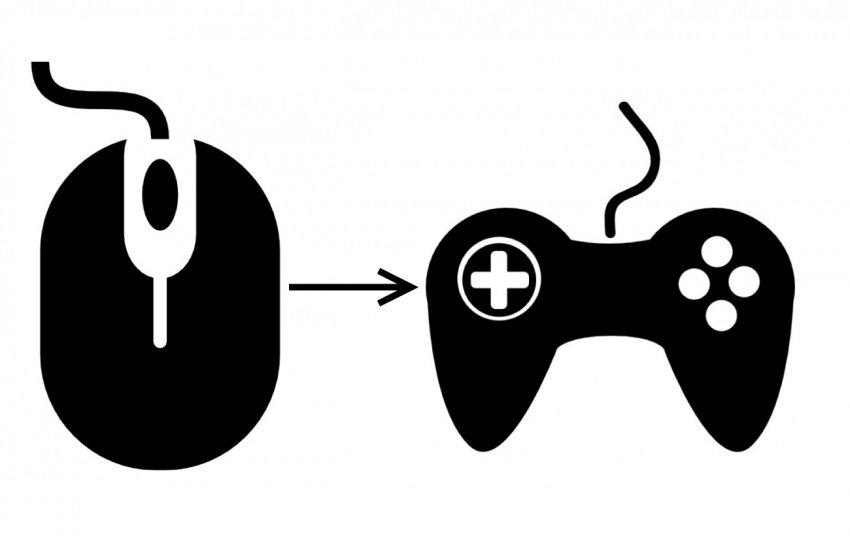
Проводные мышки, будучи ранее приоритетными в использовании, уступают беспроводным решениям всё чаще, и преимущества работы с ними равноценны недостаткам. Одни без батарейки не работают, но иногда заряжаются через Micro-USB, у других перетирается провод. По чувствительности и скорости отклика дорогие беспроводные грызуны мало уступают проводным, и работаю почти с любой поверхности без привязки к длине шнура. Но представь ситуацию — мышка сломалась, села батарейка или кабель завязался в форму кукиша да приказал долго жить. А перед тобой лежит геймпад. «Вот было бы классно использовать его вместо мышки» — думаешь ты… Но не бойся! Я покажу тебе, как заменить грызуна игровым контроллером прямо сейчас!
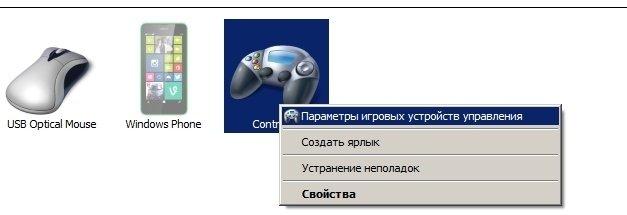
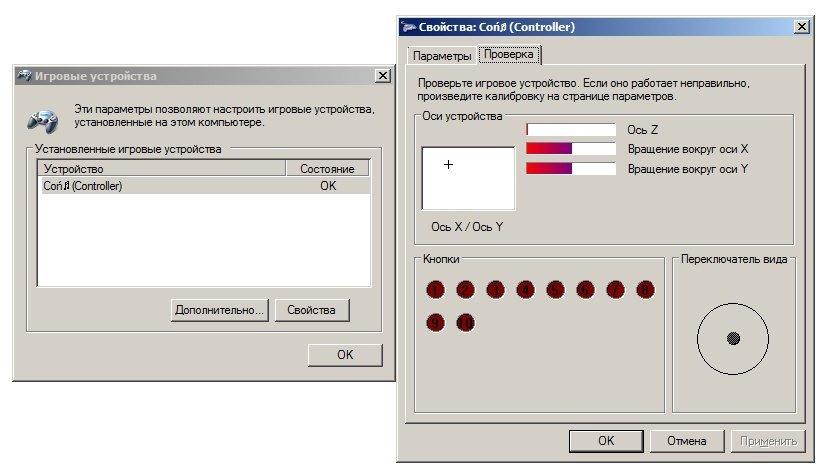
1. Проверка связи. Прежде чем начать работу с устройством, необходимо проверить, насколько оно вообще хорошо работает в паре с ПК. Для этого подключаем геймпад к компьютеру (для примера возьму свой GameSir G3s), заходим в «Устройства и принтеры» и смотрим на доступные варианты. Если среди них есть геймпад, причём с правильной иконкой — всё в шоколаде. На всякий случай можно и нужно проверить раскладку кнопок через правый клик и «Параметры игровых устройств управления».
2. Как только этап проверок будет завершён, можно будет приниматься непосредственно за приложения. Да, ПК родными методами не умеет в геймпад так, как нужно. И в связи с этим есть две новости, хорошая и плохая. Хорошая — приложений достаточно, они бесплатны и просты в использовании. Плохая — у большинства есть возможность гибкой настройки. Каким боком эта новость плохая? Никаким, просто две хорошие новости подряд это, как по мне, перебор!
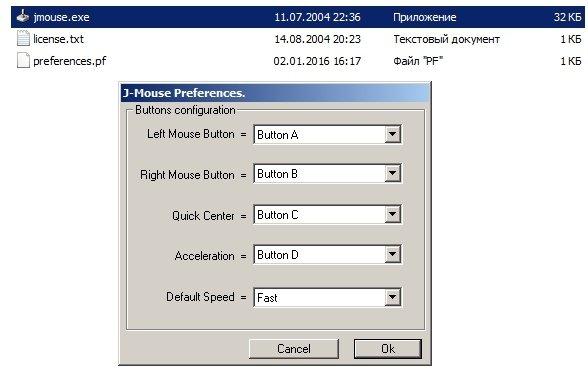
3. Выбор самого приложения. Мною лично были проверены три штуки. Первое, J-Mouse, является самым крошечным. Фактически, это утилита, а не полноценная программа. Настроек у неё почти нет, параметра чувствительности всего три, плюс возможность ускорения, а кнопки необходимо выяснять экспериментальным путем. Зато её даже устанавливать не нужно, и при большом желании этот крошечный комочек кода можно было прямо в свистульку G3s запихнуть. Идеальный вариант для аварийный ситуаций.
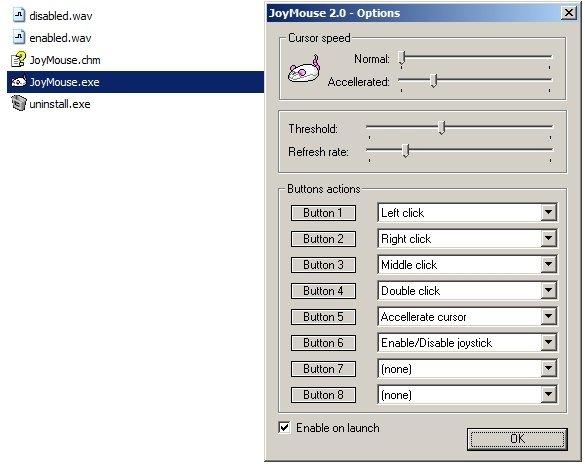
Следующим идёт JoyMouse. Как по мне, оптимальный вариант программы, сбалансированная в плане настроек и функций. После установки она появляется в трее, имеет целых четыре ползунка чувствительности, один из которых отвечает за ускоренный режим. Отдельно меня порадовало то, что ползунки нормального и ускоренного режимов не зависят друг от друга, и можно выставить по стандарту, скажем, быструю скорость, и лишь после нажатия на, скажем, триггер, замедлить курсор для более точных действий. Кнопок для настройки, кстати, восемь штук, и после нажатия на геймпаде они подсвечиваются. Одно окошко, быстрое включение/выключение и простота в использовании — преимущества JoyMouse.
Последним является приложение Joy2Mouse 3. Да, третья версия. Где первые две — не спрашивай, лучше у дяди Гугла поинтересуйся. J2M 3 является самой сложной программой из всех, представленных выше. У неё целых три вкладки, битком набитых настройками, и, признаться, выглядит это как месиво, что мне не очень по душе. Тем не менее, уже с самого начала приложение настроено достаточно хорошо, присутствует базовая акселерация после секунды движения в одном направлении, а после где-то получасовой настройки игровой контроллер буквально и фигурально сможет выполнять почти все функции геймерского грызуна и частично даже клавиатуры, включая масштабирование, пропуск строки, двойное нажатие одной кнопкой, а также — я не шучу — работу в Интернете… и даже работу с WinAmp! Можно использовать геймпад как пульт управления плеером! Но, опять же, нужно морочиться.

Мой персональный выбор — JoyMouse, безупречно балансирующая между простотой и возможностями. J-Mouse является самым аварийным вариантом, а Joy2Mouse 3 — самым сложным и массивным. Есть ещё варианты? Оставляй их в комментариях. Не стесняйся, я не кусаюсь.
Сейчас на главной
Новости
Публикации

Keychron B6 Pro — клавиатура, которая непременно найдёт своего покупателя, более того, есть ряд пользователей, специально ищущих данный тип. А всё дело в том, что это ножничная…

DEXP Mini Entry — мини-ПК на очень популярной платформе, которая встречается в устройствах от 8 до 30 тыс. рублей, а именно, Intel N100. Компьютеров и ноутбуков на этих процессорах у…

Натяжной
потолок — это красиво, стильно и практично. Он не боится влаги, не трескается,
легко скрывает неровности и долго сохраняет свой вид. Но рано или поздно возникает
вопрос: а как…

Когда вы видите на стройке или дорожных работах желтый отечественный бульдозер, и он не сказать что выглядит очень современно, то скорее всего перед Вами гусеничный трактор ЧТЗ серии Т-1ХХ….

Ещё один производитель, о котором давно уже не было слышно — это Nf Audio, который почему-то трансформировался в Nf Acous. Сегодня мы рассмотрим их самую передовую разработку в лице…

Смартфон
давно стал чем-то большим, чем просто звонки и фото. Он будит по утрам,
подсказывает маршрут, распознаёт лицо, предлагает нужные слова ещё до того, как
вы о них подумаете. Но мало кто…