
-
Home
-
News
- Full Guide – Format SD Card to Ext4/3/2 on Windows 10/11
Full Guide – Format SD Card to Ext4/3/2 on Windows 10/11
By Yamila | Follow |
Last Updated
Sometimes, you may want to format SD card to Ext4/3/2 on Windows PCs. Do you know how to format SD card to Ext4 on Windows? In this post, Partition Magic provides a step-by-step guide to help you format an SD card. You can take a look.
If you get a new SD card and want to format SD card to Ext4/3/2 in Windows 10/11, refer to the guide below.
About Ext4/3/2
Ext2, Ext3, and Ext4 are all extended file systems commonly used for the Linux operating system. You can learn more about them from the following content.
Ext2
Ext2, standing for the second extended file system, is the first commercial file system for Linux that was originally introduced in 1993. It’s designed to overcome limitations on the previous Ext file system. The Ext2 file system ranges from 2TB to 32TB and the maximum size of a single file it supports can be up to 2TB.
Since Ext2 lacks a journaling feature, it’s recommended for flash drives, such as SD cards and USB flash drives.
Ext3
Ext3, or the third extended file system, is a journaled file system that was introduced in 2001 as an improved version of Ext2. Like Ext2, it can also handle a single file with a maximum size of 2TB.
The prominent advantage of Ext3 is journaling, which can help track the changes to the file system. With this feature, Ext3 is more reliable and easier to recover data after an unclean shutdown.
Ext4
Ext4 refers to the fourth extended file system released in 2008. It’s the successor to Ext3 and is now the latest version of the EXT file system. It’s also a journaling file system for Linux and offers backward compatibility with Ext2 and Ext3.
Different from the older EXT file systems, Ext4 supports larger file size and partition size, up to 16TB and 1EB respectively.
In some cases, you may need to format SD card to the EXT file system on Windows. However, you may receive the “The file system is incompatible” issue when you try using Diskpart or other Windows built-in utilities to perform the format. In this case, you may ask how to format SD card to Ext4 in Windows 10/11.
Well, to format SD card to Ext4 on Windows successfully, we’d like to recommend you use MiniTool Partition Wizard. It’s a comprehensive partition manager that enables you to partition/clone a hard drive, format SD card FAT32/NTFS/Ext4/Ext3/Ext2, convert MBR to GPT and vice versa, migrate Windows 10 to SSD/HDD, and more.
Here’s a detailed guide on how to format SD card to Ext4 in Windows 10/11.
Note:
The formatting will erase all data on the SD card. So, you’d better back up SD card before the process to avoid data loss.
Step 1: Connect the SD card to your Windows PC. Make sure your PC is well-running.
Step 2: Download and install MiniTool Partition Wizard on your PC. Then launch it to enter the main interface.
MiniTool Partition Wizard FreeClick to Download100%Clean & Safe
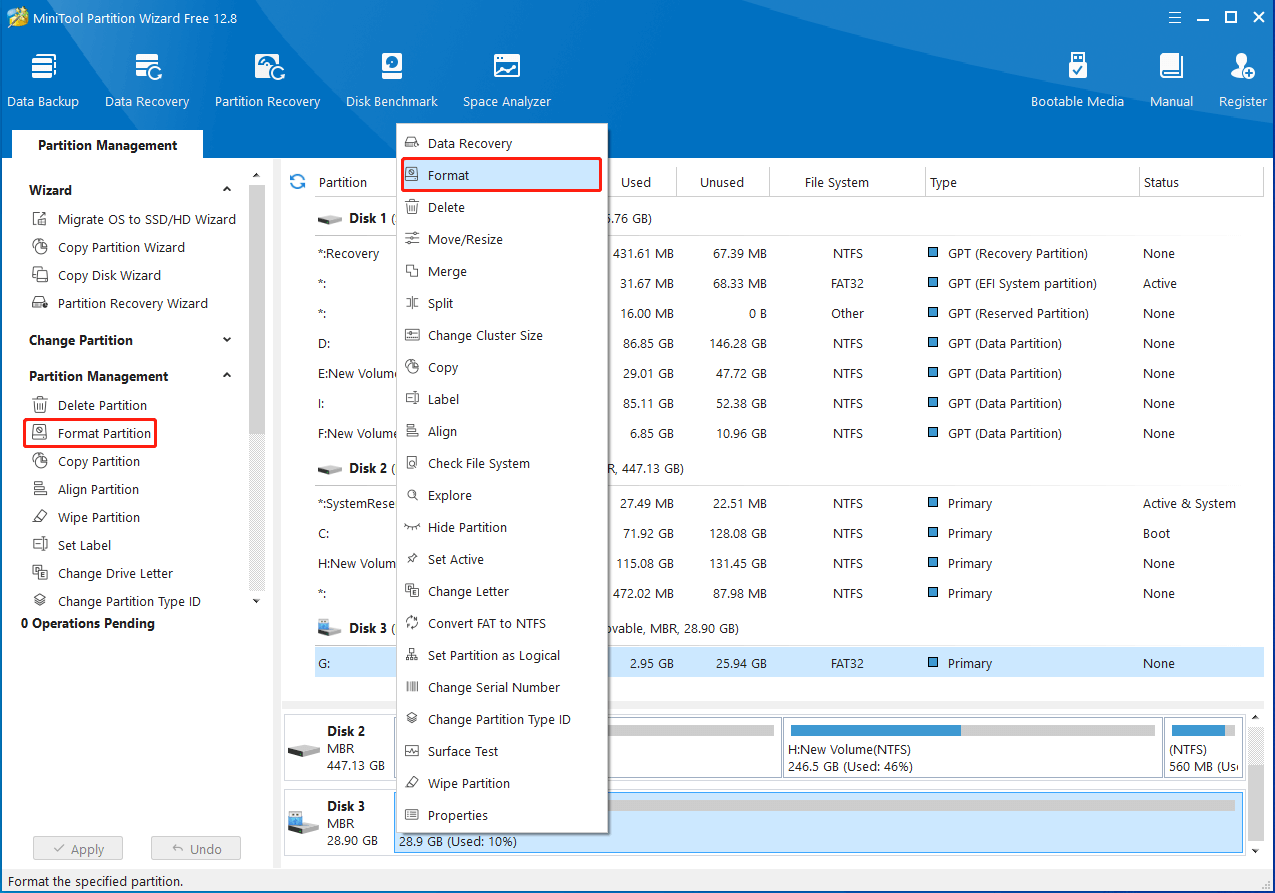
Step 3: Right-click the partition on the SD card and select Format from the context menu. Also, you can highlight the target partition and select Format Partition from the left action panel.
Step 4: In the pop-up window, choose Ext4, Ext3, or Ext2 from the File System drop-down menu. Then click OK.
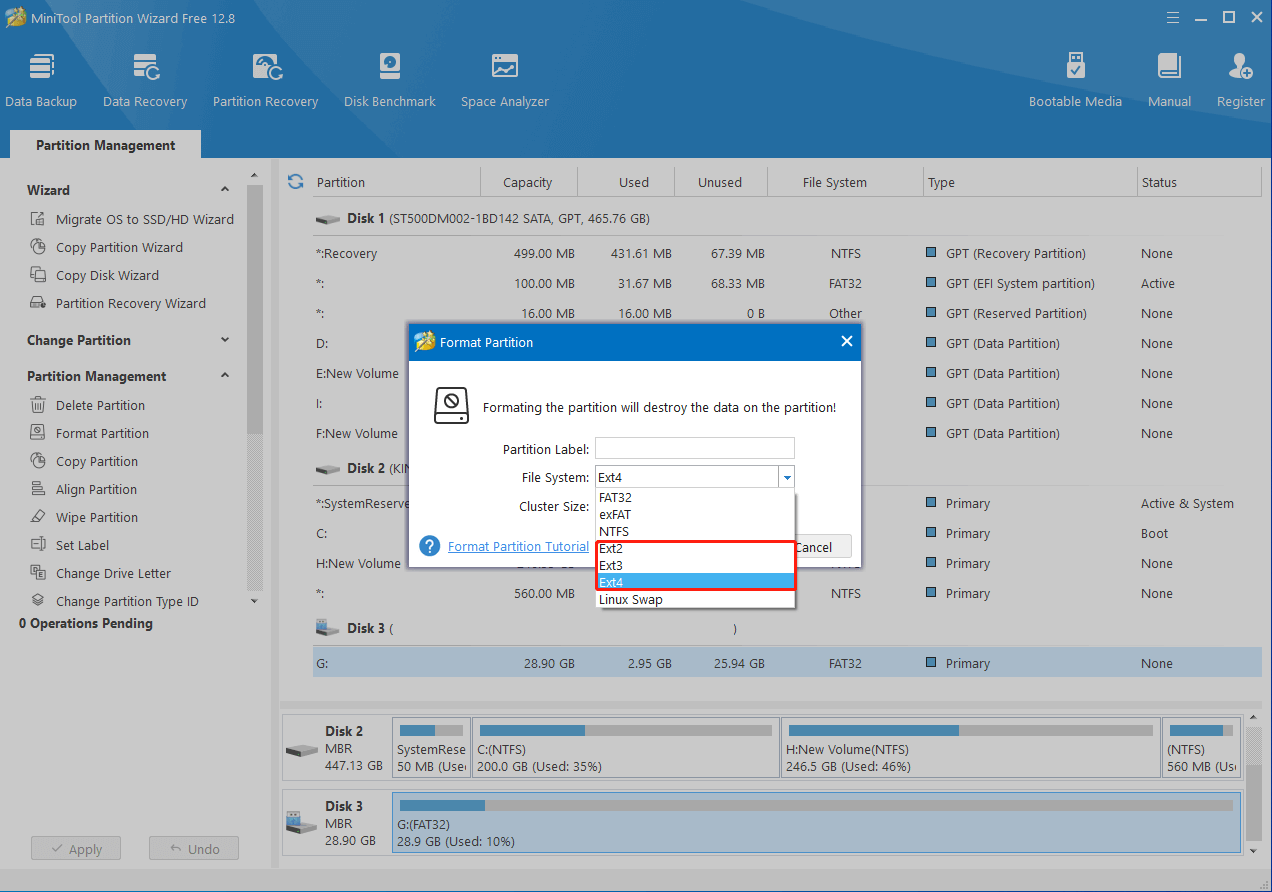
Step 5: After that, click Apply to save the pending operation.
To Sum Up
How to format SD card to Ext4 on Windows? This post reveals the answer to you. Hope you can successfully format SD card to the preferred file system by following the given guide.
About The Author
Position: Columnist
Yamila is a fan of computer science. She can solve many common issues for computer users by writing articles with simple and clear words. The very aspect that she is good at is partition management including create partition, format partition, copy disk and so on.
When she is free, she enjoys reading, doing some excerpts, listening to music and playing games.
This article mainly talks about how to format / reformat USB flash drive to FAT32, exFAT, NTFS or EXT4 file system in Windows 11/10/8/7/XP. Formatting a USB drive can repair corrupt partition as well as change file system format, thus we may need to format USB flash drives from time to time. In this guide, you can find multiple methods to format USB disks and you can choose one based on actual situation and needs.
About formatting USB flash drives
Formatting a USB drive, volume or hard drive is one common operation to all computer users. Many users count on formatting to fix errors on storage devices, free up disk space, or change file system formats. understand the ins and outs of formatting? Let’s take a close look at it now.
What formatting a USB disk can do for you?
In many cases we format a drive in order to prepare it to be used by operating systems or erase all data. In fact, some underlying benefits of formatting a USB flash drive are ignored. This section sums up what formatting can do for you.
- Wipe data rapidly. The quick formatting is the best way to wipe data from storage media with ease and speed. Since it causes data loss, be sure files are backed up before formatting. If you want to permanently erase data from USB drives (make USB data recovery impossible), you can refer to the guide: How to completely wipe a USB flash drive?.
- First time use. Will you format the USB flash drive you’ve recently purchased? The answer should might be Yes. You can perform a full format on the flash drive, which helps check USB drive health by scanning whether there are bad sectors on the USB drive.
- Change file system formats. Formatting process creates a file system to organize data, and it also can change file system format when necessary. USB drive can be reformatted to FAT32, exFAT, NTFS, EXT4, etc., so that it can be used on different system platforms.
- Remove virus or malware. If your USB flash drive is infected with virus or malware, you can format the disk to totally get rid of threats.
- Repair corrupted partitions. Many users take formatting as the last resort to errors they encounter. For example, when a disk becomes inaccessible and reports error message like «The file or directory is corrupted and unreadable», you may want to format it to repair the corrupt volume.
Quick format VS. full format (low level format)
If you format a volume in Windows, you can see the «Quick Format» option is selected by default. Have you ever wondered the differences whether it is selected? Normally, the formatting is called a full format or low level format if the «Quick Format» is not selected. What are the differences between quick format and full format? Which one should you use to format / reformat a USB drive?
What is a quick format? The obvious feature is quick. The formatting does not check bad sectors for selected drive, but it deletes the journaling part of file systems. The journaling records what files are stored and where they are located. The quick format simply removes journal and lays a new and blank file system. It does not really recreate the file system and does not completely delete file data. Thus if there are not files that stored on the disk to overwrite lost data, you can recover files with a free file recovery program. If you want to permanently wipe data, this is not the correct choice.
What happens during a full format? The full format runs an additional step that scans bad sectors, which takes much longer than a quick format. It completely wipes the drive being formatted, and thus lost files are no longer recoverable by any means. Also, it scans and tries to fix bad sectors during formatting. A sector which is not writable, inaccessible, or damaged is called a bad sector. Causes of bad sectors are many, such as failed flash memory transistors, aging, quality, failed heads, etc. If the full format finds bad sectors, it’ll try to fix them. If the process completes successfully, the damaged USB drive gets repaired.
A quick format does not permanently destroy data, and files can be unformatted by data recovery software. If you attempt to re-use the drive which does not contain any bad sectors or physical damages, a quick format is adequate. If you are not sure about the bad sector thing, or plan to sell or give it away, then perform a full format to fix errors as well as wipe data.
File system types on USB drives
Since formatting can create and change file system formats, you need to choose a file system type for the USB flash drive to be formatted. There are a number of file systems types such as NTFS, exFAT, FAT16, FAT32, EXT4, EXT3, EXT2, etc. File system provides solutions for operating system to organize and manage data, and different systems adopt separate file system formats. File system plays key part in translating data stored on physical storage devices to operating system. Without a proper file system, OS cannot read data off a device media. Thus, you should choose a proper file system format while formatting a USB drive, SSD, hard drive, or SD card, so that operating system can read or write data correctly.
Nowadays, many users own more than one computer which may runs different systems such as Windows, Linux, or Mac OS. Thus, it is necessary to make sure the external drive can be used under different systems. To do that, you may have to reformat the USB drive to required file system type.
The following content talks about several methods to format a USB disk to FAT32, exFAT, NTFS, EXT2, EXT3, or EXT4 in Windows 10 without purchasing any software.
How to format/reformat a USB flash drive to FAT32, exFAT, or NTFS? (4 Methods)
If you format a USB disk or memory card whose capacity is smaller than 32 GB in Windows 11/10/8/7, you may take notice of the file system options which usually is FAT32 by default. However, you can also reformat your USB flash drive or SD card to exFAT, NTFS, EXT2, EXT3 or EXT4 in Windows. Methods to format USB flash drives can be many, this section choose the most common ways.
Notes:
- Formatting wipes data, always be sure to back up your data before starting the formatting process and remember to choose a file system format that suits your needs.
- If you want to repair inaccessible drive via formatting, you should recover data from the corrupted USB drive first. If you receive error message «Windows was unable to complete the format», that means the USB drive is physically damaged and it can’t be repaired by formatting.
Method 1. Format a USB flash drive to FAT32 in Windows File Explorer
This is the easiest way to format a USB flash drive to FAT32, exFAT or NTFS. Go ahead and plug your USB disk to a PC which is running Windows so that it can be recognized by system.
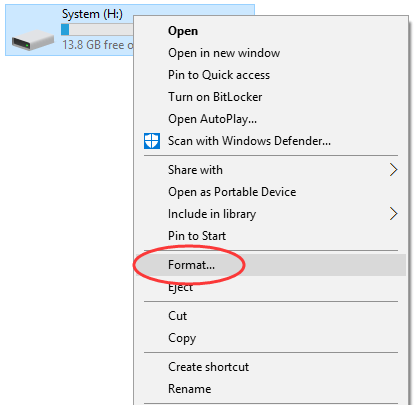
Step 1. Open File Explorer to find the USB drive, right-click on it and select «Format». This will open a dialog box showing formatting options.
Step 2. Set formatting parameters.
Here you can choose desired file system formats from NTFS, exFAT, and FAT32 in File system drop-down list. The FAT32 won’t be available if the USB drive is larger than 32GB. In that case, you can refer to Method 4 to format USB to FAT32; the value of Allocation Unite Size can remain changed; if you want to rename the USB flash drive, then enter the name in the «Volume label» column; the «Quick Format» option is selected by default, but you can unselect to perform a full formatting.
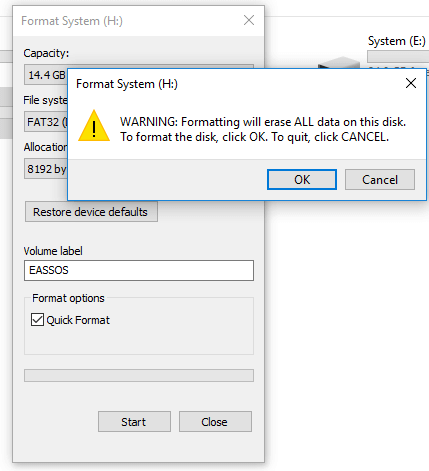
Step 3. Format the USB drive. Once all options are set correctly and important files have been backed up, you can click «Start» button to initiate formatting process.
Step 4. Click «OK» button to give confirmation to the action when system prompts the process will delete all data on the drive.
Step 5. A message box will pop up once the formatting completes. Click «OK» button.
Method 2. Format a USB stick as FAT32 in Disk Management
Disk Management is a system utility built in Windows Vista /7/8/10/11, and it is able to complete basic operations to manage disks and partitions. In this section, we’ll format a USB stick in Disk Management.
Step 1. Open Disk Management. If your computer is running Windows 10, you can open Disk Management by right-clicking the Start button and selecting «Disk Management» option. To access Disk Management in Windows Vista or Windows 7, please follow: Right-click «Computer» icon from desktop and select «Manage» from the context menu; then you can choose «Disk Management» from the Computer Management window.
Step 2. Find the USB drive you want to format and right-click it to choose «Format» option.
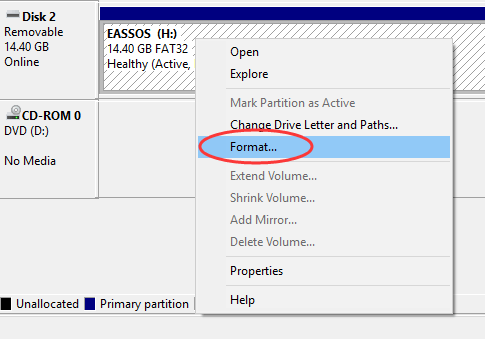
Step 3. A message box will pop up to ask confirm for the formatting action, as all data on the partition will be lost. Click «Yes» to continue.
Step 4. Configure formatting options and click «OK». In this dialogue box, you can modify Volume label, choose file system format from FAT32, NTFS and exFAT, and set allocation unit size, etc. If you don’t know how to set these options, you can just follow the default settings.
Step 5. Click «OK» button to continue when asked «Formatting this volume will erase all data on it. Back up any data you want to keep before formatting. Do you want to continue?»
Method 3. Format a USB drive using Command Prompt
Do you know how to format a USB drive using DiskPart in Command Prompt? DiskPart is a powerful command line utility and it is able to create, delete, and format partitions. Let’s have a close look at how to format a USB drive in Command Prompt.
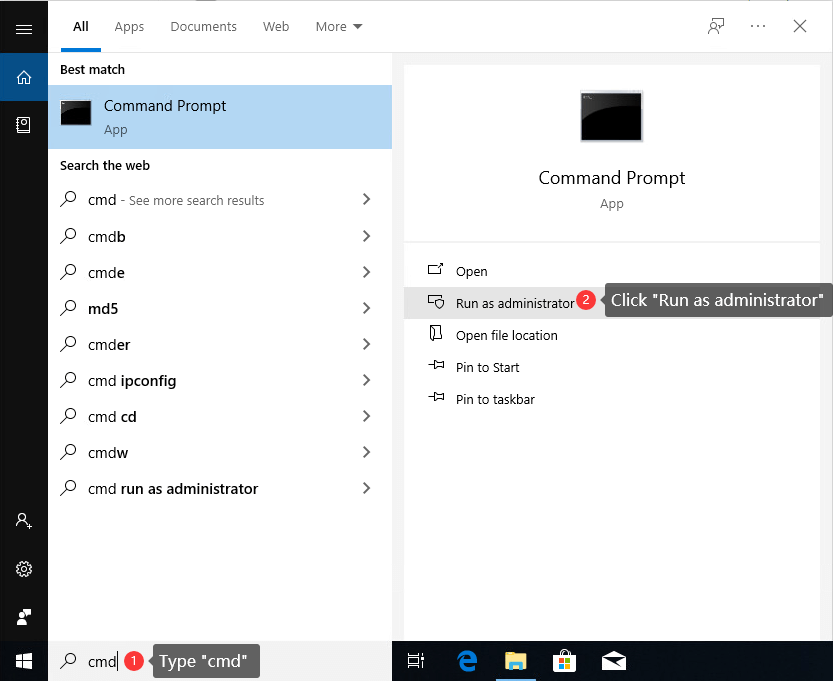
Step 1. Click the searching box next to the Start menu, and type cmd to find out command prompt. Then click «Run as administrator». For Windows 7 users, click «Start» button and enter cmd in searching box; then you can right-click cmd.exe in search result and choose «Run as administrator». If UAC (User Account Control) asks confirmation, click «Yes» to continue.
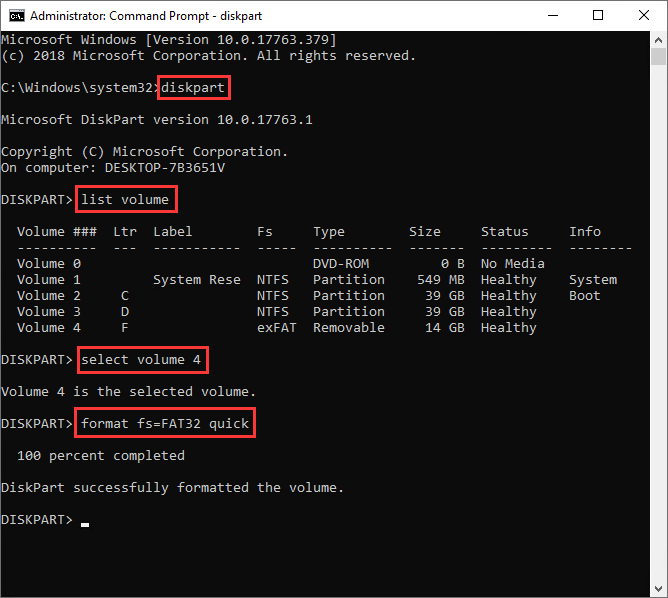
Step 2. Once the Command Prompt opens up, type command diskpart in it and press Enter key.
Step 3. Type command list volume and press Enter to view all partitions on your computer, including the volume on the USB drive you want to format.
Step 4. Type command select volume # (replace # with the volume number of your USB drive), and press Enter. This command is used to select the partition on your USB drive you want to format. In this case, select volume 4 should be entered. Please make sure you select the correct partition, or you could destroy data.
Step 5. Type format fs=FAT32 quick and press Enter. If you want to format a USB drive to exFAT or NTFS, replace «FAT32» with either of the two format.
Method 4. Format a 64GB, 128GB or larger USB flash drive to FAT32 using DiskGenius Free
When the USB flash drive is larger than 32 GB, for example, 64 GB, and you are attempting to format it as FAT32 file system in Windows Disk Management or File Explorer, the option FAT32 is not available. If you try diskpart in Command Prompt or PowerShell, the formatting will end up with an error «the volume it too big for FAT32». So, formatting a large USB drive or SD card as FAT32 file system, a third-party disk formatting tool will be needed. DiskGenius Free Edition is free disk partitioning and disk cloning software. With DiskGenius Free Edition, you can easily format a 64GB, 128GB or even larger drive as FAT32 file system. Also, it can create or format a partition with EXT4, EXT3, and EXT2 file system. Following steps shows how to format a large partition as FAT32 file system using DiskGenius Free Edition in Windows 10.
Step 1. Free download, install and open DiskGenius Free Edition on your computer. Then connect the USB drive to computer, and you can find the USB drive in DiskGenius.
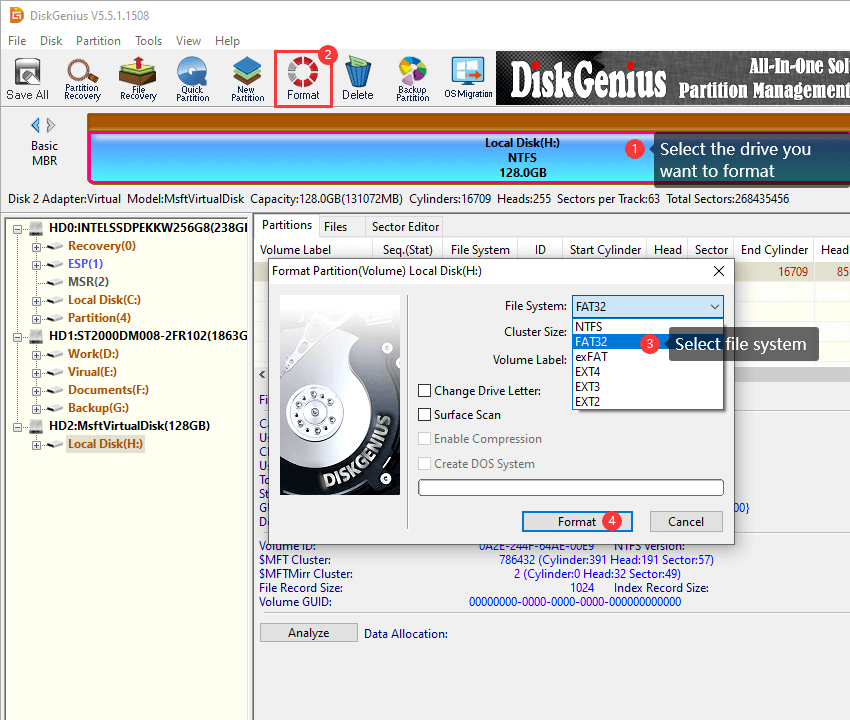
Step 2. Select the USB drive you want to format, and click «Format» button to open the formatting window. Then select FAT32 file system from the dropdown list and click «Format» button.
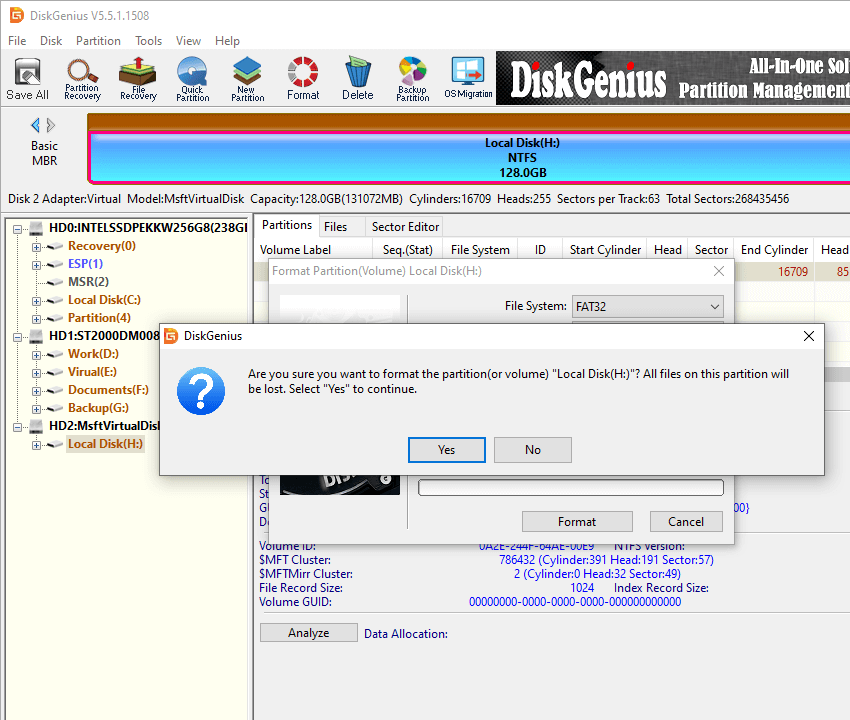
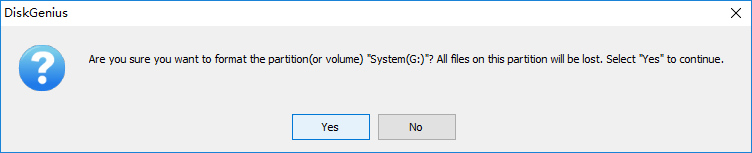
Step 3. A warning message pops up to ask confirmation. The Formatting process will delete everything from the USB drive. If you’ve backed up important data, click «Yes» to proceed.
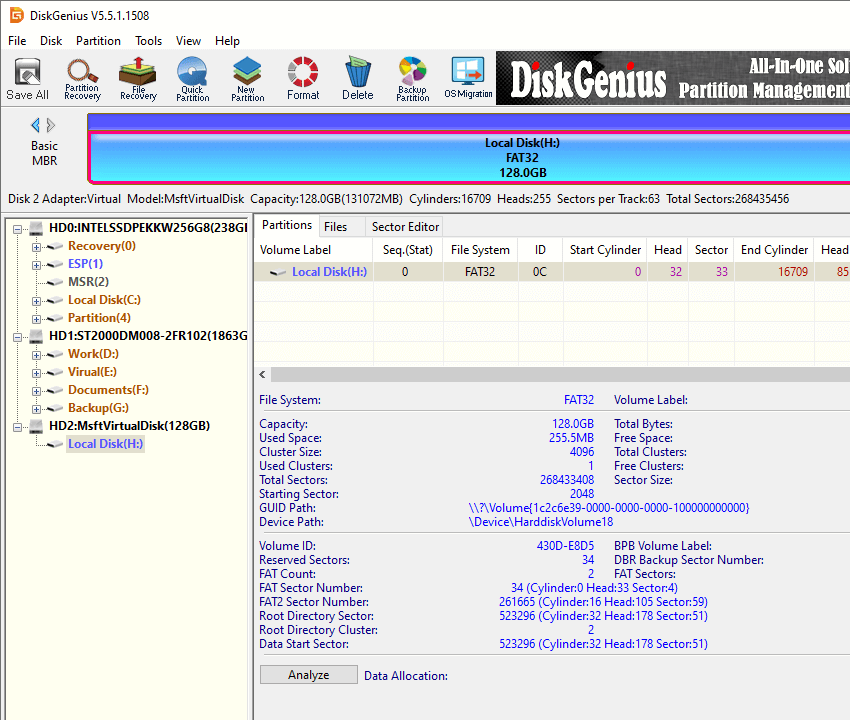
Step 4. See the 128GB partition is formatted as FAT32 successfully now, and you can access in Windows File Explorer.
Here is the video guide on formatting a USB drive as FAT32 when the drive is bigger than 32 GB.
How to format a USB stick to EXT4, EXT3 or EXT2 in Windows 10/11? (FREE)
EXT2, EXT3 and EXT4 are all file systems created for Linux and they are not natively supported by Windows operating system. Thus Windows cannot directly format a partition to EXT4, EXT3 or EXT2 format. How to format a USB stick or SD card to Linux EXT4/3/2 in Windows 10? We’d like to recommend DiskGenius Free to complete the task. DiskGenius is a free Windows partition manager program, and it allows users to access EXT4/3/2 partition data without installing any additional drivers. Also, it’s able to create or format a partition to EXT4 in Windows 10/11 easily. Plug your USB stick or SD card to Windows computer, download DiskGenius Free Edition and you can follow steps here to format your USB drive to Linux partitions.
Step 1. Install and launch DiskGenius Free Edition and you can see all disks and partitions on your computer.
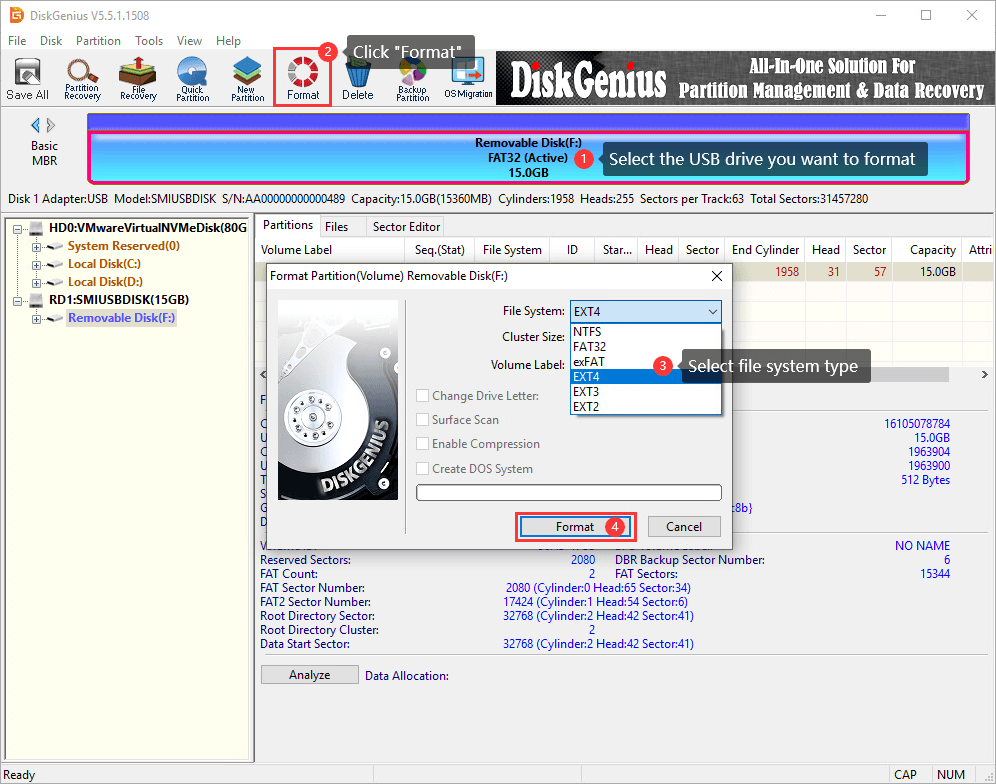
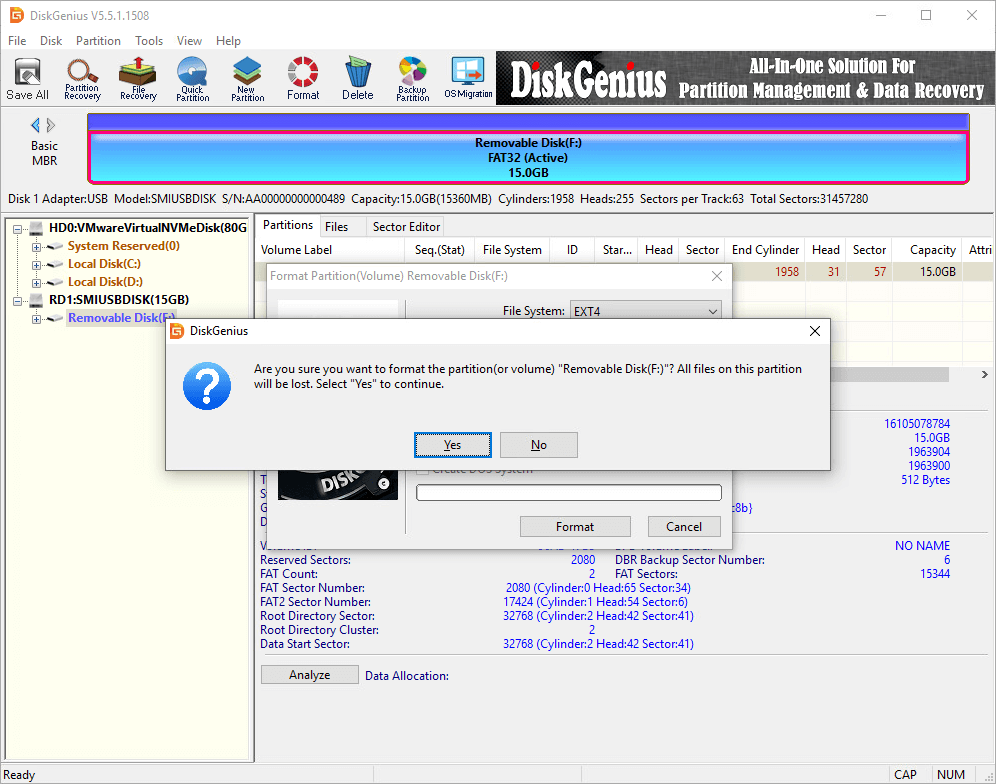
Step 2. Select the USB stick or SD card you want to format and click «Format» button from the toolbars. The formatting partition window will open up.
Step 3. Click the dropdown list beside File System and you can choose EXT4, EXT3 or EXT2 file system based on your requirement. Then click «Format» button.
Step 4. DiskGenius will prompt the formatting process erases all data in the partition. If you have backed up data in the USB disk, click «Yes» to continue formatting.
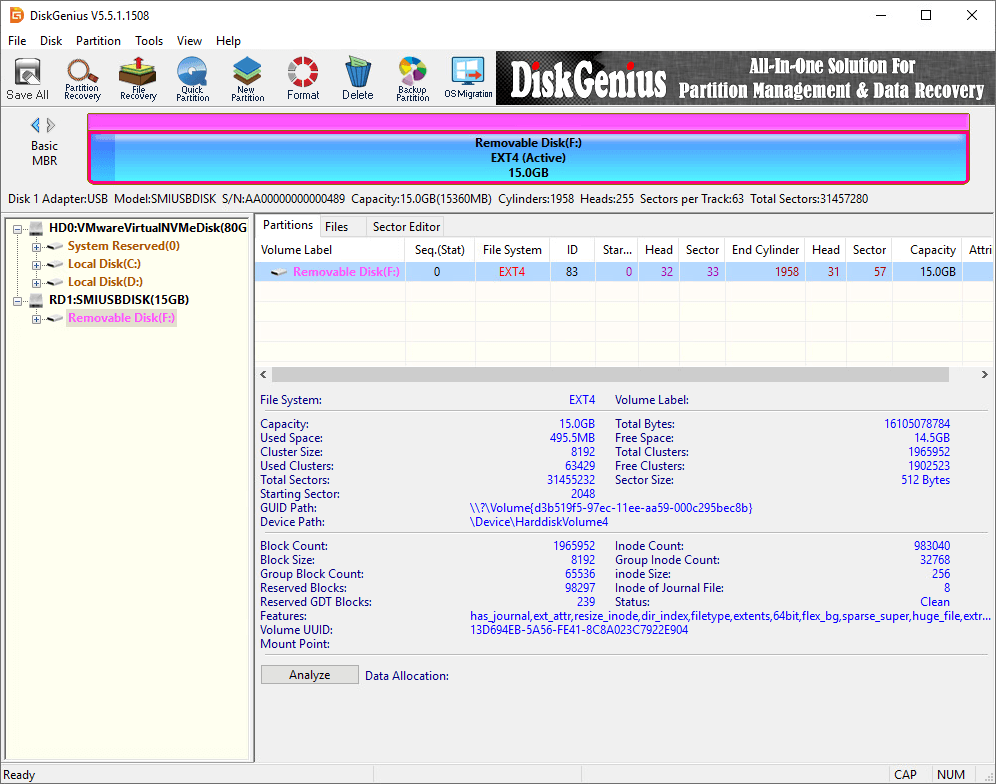
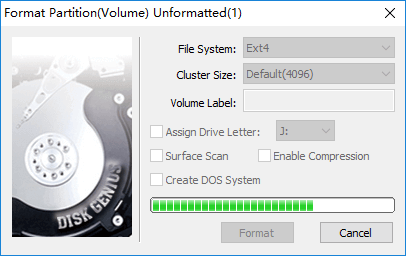
Step 5. Wait for a couple of seconds, and the formatting will complete. The follow picture shows the USB stick has been formatted to EXT4 file system.
How to unformat USB flash drives (Recover data from USB flash drives)?
It has been mentioned a few times in previous content that formatting process wipes all data in the partition to be formatted or reformatted. Thus, you should make sure files in that drive have been well backed up or there is not important data in it at all; otherwise you’ll definitely lose all files. Is it possible to unformat a USB drive or hard drive? The answer is YES and it is easy to unformat and recover lost files if you use an effective tool. If you are among those who format a wrong USB drive and lose data or get a USB flash drive that needs to be formatted, you can try the solution below to recover data from formatted hard drives, SD cards, or USB drives easily.
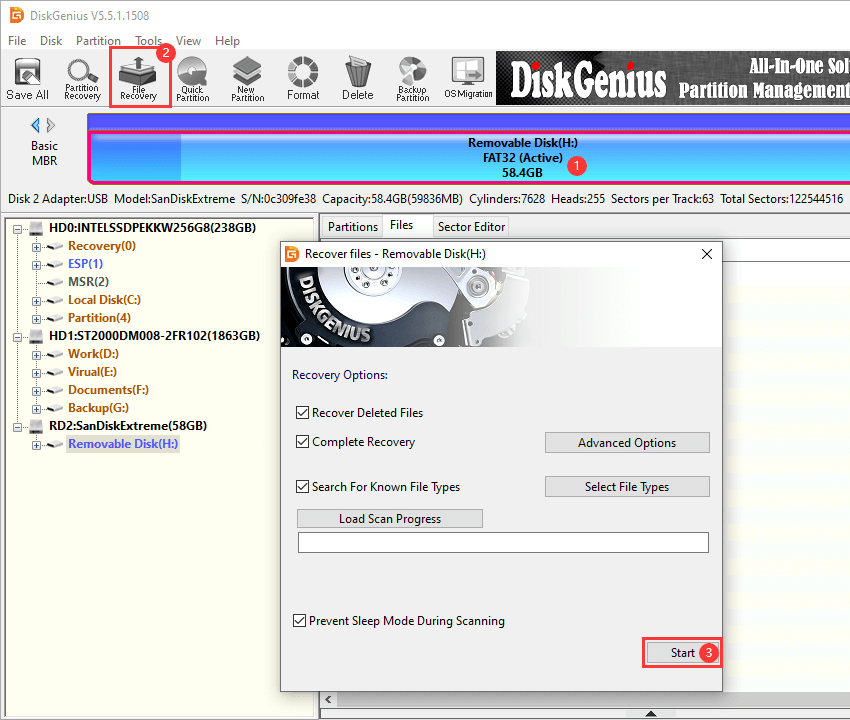
Step 1. Launch DiskGenius again, select the USB drive you want to recover data, and click «File Recovery» button.
Step 2. On the Recover Files windows select «Complete Recovery» mode and then click «Start» button to initial the scanning process.
DiskGenius is scanning the USB drive and has found many lost files.
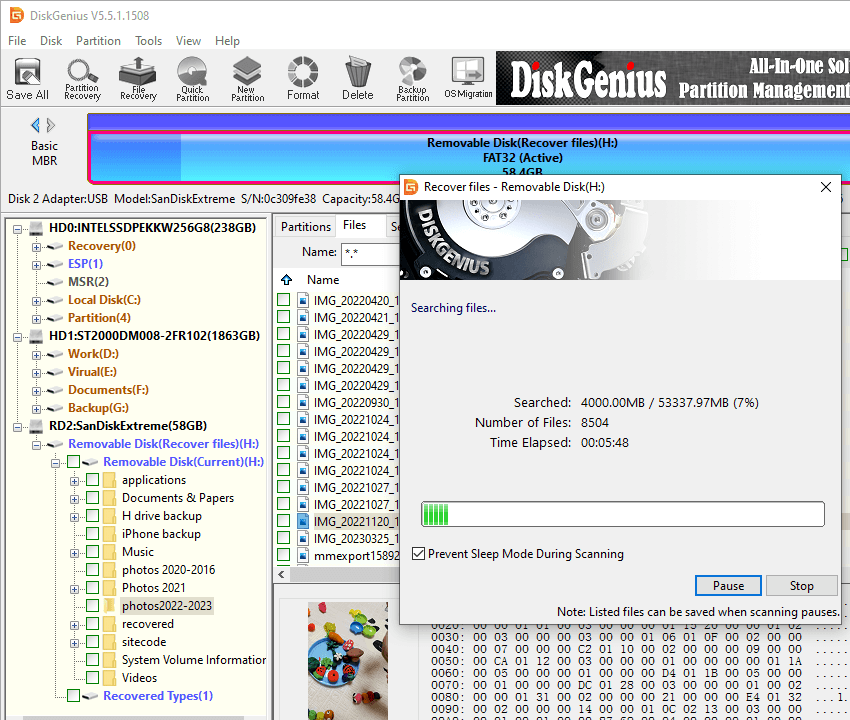
Step 3. Scanning a formatted drive may take long time if the partition is very large, but you can preview files during or after the scanning to judge whether files are recoverable.
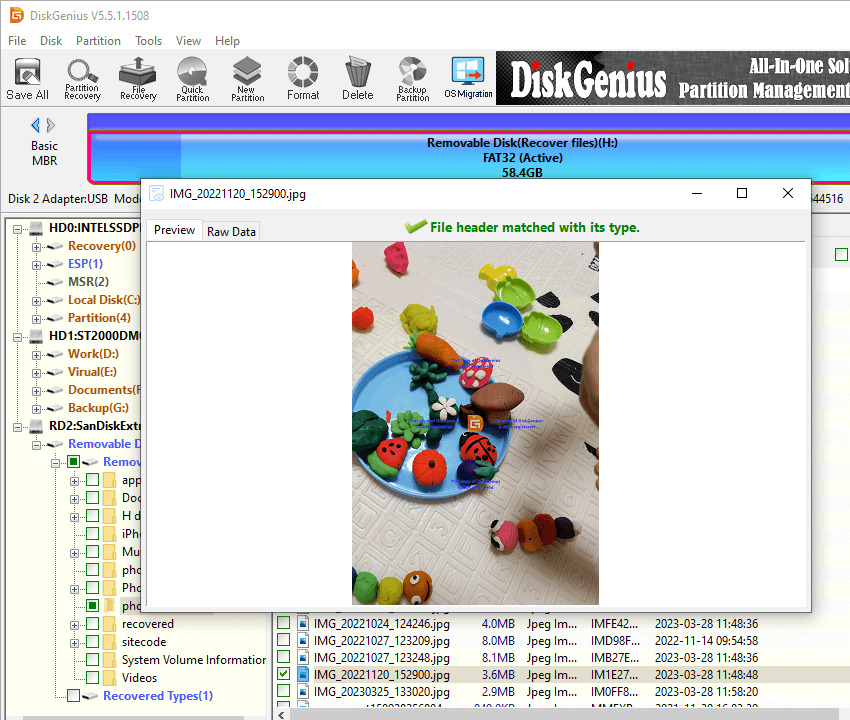
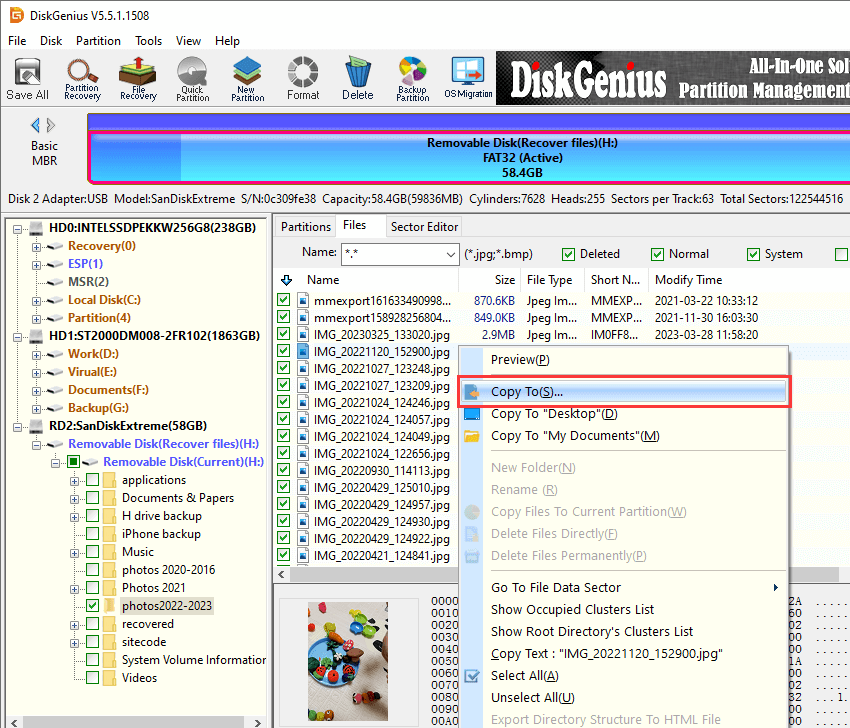
Step 4. Once scanning pauses or stops, you can save recovered data to a specified location. Select files you want to recover and right-click them to choose «Copy To». Then you can set a location to store files and get them successfully recovered.
Conclusion
By following instructions given above, you can format a USB flash drive as FAT32, Ext4, exFAT, NTFS, etc. easily whatever the size of the USB drive. Just remember to back up any important data before starting the formatting process, as it deletes all existing content on the drive.
Formatting USB FAQs
1. How to format disk write protected USB?
Formatting process will write a new file system on the USB, thus, to format a disk write-protected USB drive, you need to remove the write protection, otherwise the formatting won’t complete. The fix the write protecting issue on USB drives, you can refer to solutions here: How to fix «The disk is write protected» error on USB drives?
2. Does reformatting a USB drive wipe it?
Reformatting a USB drive deleted all the existing data on it. Formatting erases the file system and any stored data, so it’s crucial to back up important files before formatting. However, a quick formatting does not permanently erase data, if you want to make USB data recovery impossible, you can either perform a full format (low level format) or use DiskGenius Free Edition to wipe USB drive data.
3. How do you format a USB for Windows installation?
To format a USB drive for Windows installation, you need to make the USB drive bootable. When installing Windows, you can use the USB drive to boot your computer, and then use tools stored on the USB drive to partition the hard drive or SSD, and then start installing Windows. To create a bootable USB drive, you can try tools like Media Creation Tool, DiskGenius Free, Rufus, etc.
4. Should a flash drive be formatted NTFS or FAT32?
The choice between NTFS and FAT32 is totally up to your needs. FAT32 is originally designed for removable disks like USB flash drives and memory cards, and yet it does not support individual files larger than 4GB. Thus, if you want to store large files on the flash drive, you can format it to NTFS or exFAT.
5. Do USB flash drives need to be formatted?
USB flash drives don’t necessarily need to be formatted unless there are specific requirements in the file system. Formatting is usually done to quickly delete all data, change file system type, or fix corrupted drives.
6. How do I format a damaged USB flash drive?
Formatting a damaged USB flash drive can be attempted through the following steps:
Step 1. Recover files from the damaged USB drive using recovery software like DiskGenius.
Step 2. Check recovered files to make sure they are recovered correctly.
Step 3. Format the damaged USB drive in File Explorer: right-click the USB drive > click «Format» > select a file system and unselect «Quick Format» > click «Start».
7. How do I format a flash drive on a Mac?
To format a flash drive on a Mac OS 10+, try following steps:
Step 1. Go to Applications > Utilities > Disk Utility.
Step 2. Locate and select the USB flash drive you want to format from the list on the left, then click «Erase» at the top.
Step 3. Select a file system for the USB drive, for example, exFAT, APFS based on you needs. Then type a name for the drive.
Step 4. Click «Erase».
Contents:
EXT4, EXT3 and EXT2 file system
What is file system?
File system is the method by which files are named and placed logically to store, retrieve and update data and also used to manage space on available storage devices. Without file system, files stored on a device would be one large body of data, as data does not know where to stop or when to begin. Information stored on device media is split into two pieces, which are usually called metadata and user data. The structure and logic rule used by system to manage data is called a file system.
There are many different types of files system, and each has its own structure and logic rules, speed, size, etc. File system is widely used on various storages devices such as hard drive, flash memory, virtual disk, etc. As a Windows user, you must be family with FAT32, exFAT and NTFS. In this section, we’ll talk about file systems Ext2, Ext3 and Ext4, which belong to Linux operating system.
Ext2 (Second Extended File System)
Ext2 file system was first introduced by Remy Card in 1993 and it was the first default file system in several Linux distro. This file system was developed for the purpose of overcoming limitations on previous Ext file system. Ext2 does not support journaling feature, thus it is recommended to be used on flash drives or SD cards which do not need the overhead of journaling. The maximum individual file size it can be 16GB-2TB.
Ext3 (Second Extended File System)
- Ext3 file system was introduced by Stephen Tweedie in 2001 and it is available starting from Kernel 2.4.15.
- Journaling feature is available in Ex3.
- Maximum individual file size is 15GB -2TB
- Provide solution to convert Ext2 to Ext3 file system directly without backing up / restoring data.
Ext4 (Second Extended File System)
- Ext4 file system was introduced in 2008, starting from Linux Kernel 2.6.19.
- Provide option to disable journaling feature.
- Backward compatibility is supported. You can mount Ext3 file system as Ext4 without upgrading it.
- The maximum individual file size 16GB – 16TB.
- Some new features are included such as multiblock allocation, fast fsck, journal checksum, etc.
It is easy to format a partition to ext4, ext3 or ext2 with the help of DiskGenius Free, and the formatting speed is fast. Please note formatting wipes all data from the volume, and you should make sure important files have been backed up. Let’s see have a look at the formatting steps.
Step 1. Install and launch DiskGenius from computer and you can see all partitions on the disk.
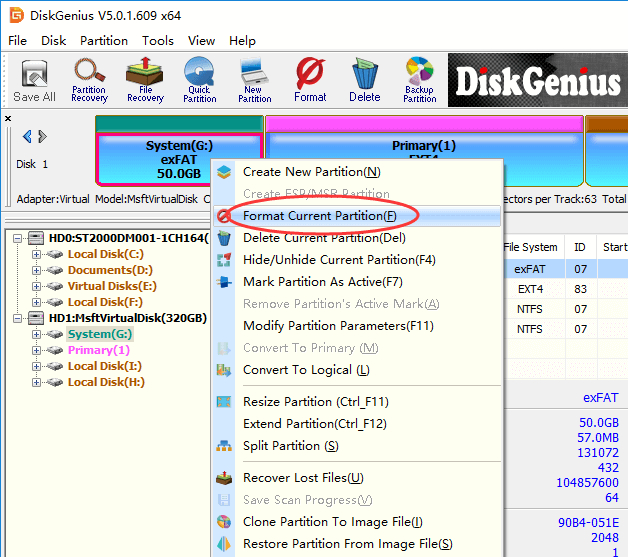
Step 2. Select the partition you want to format and click «Format» button from toolbar. Also, you can right-click on the partition to be formatted, and choose Format Current Partition, as below:
Step 3. Choose file system type you need from the Format Partition window and click Format button. To format ext4, you should choose Ext4 from the drop-down list.
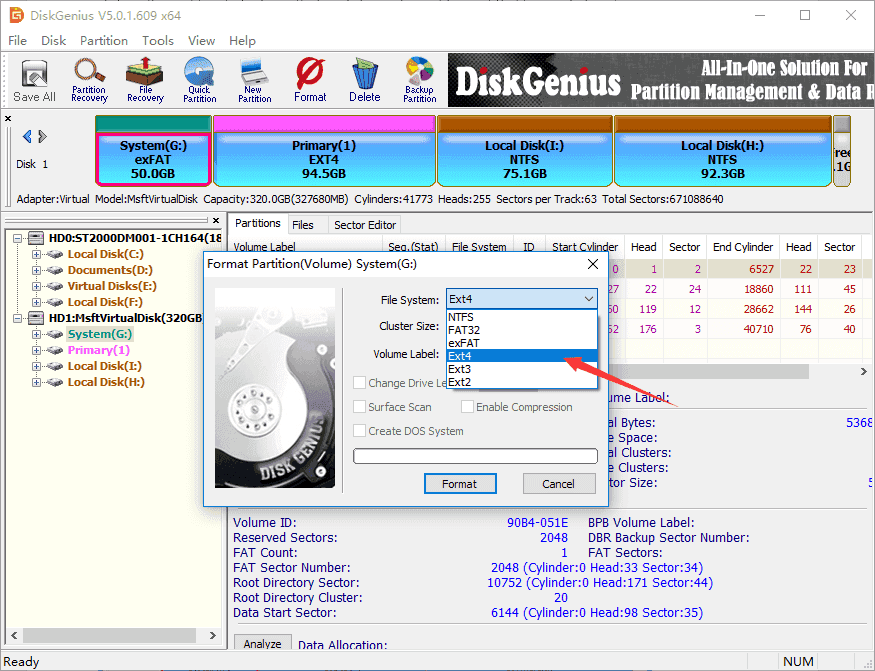
Step 4. Click Yes to continue. Wait for several seconds and the formatting will complete.
The video guide to format Ext4 in Windows
Note: Since V4.9.5.508 PartitionGuru changed name to DiskGenius.
How to create EXT4/3/2 Linux partition in Windows 10?
Windows uses NTFS, FAT32 or exFAT file system and Linux uses extended file system like ext3, ext4. Windows does not support to read, write or access Linux file system without the help of third-party partition tools. As we all known, Windows users cannot create partitions with these file systems easily in Disk Management. How to create an Ext4/3/2 Linux partition under Windows?
Here, we recommend a free partition tool – DiskGenius Free to fulfill the task. DiskGenius can be used under any Windows platform, and it provides a bunch of useful features like data recovery, disk & partition management, data backup, repair bad sectors, edit hex data, etc. The recently released version adds support to create, format, read or access ext4 / ext3/ ext2. So, we can use this partition tool to create an ext4 /3/2 partition in Windows.
Step 1. Right-click on free / unallocated disk space and select Create New Partition from context menu, as follows. Alternatively, you can select free disk space and click New Partition button.

Note: If there is not free disk space on your drive, you can use DiskGenius shrink one partition to free some disk space. Also, you can just delete a partition whose files have all been backed up.
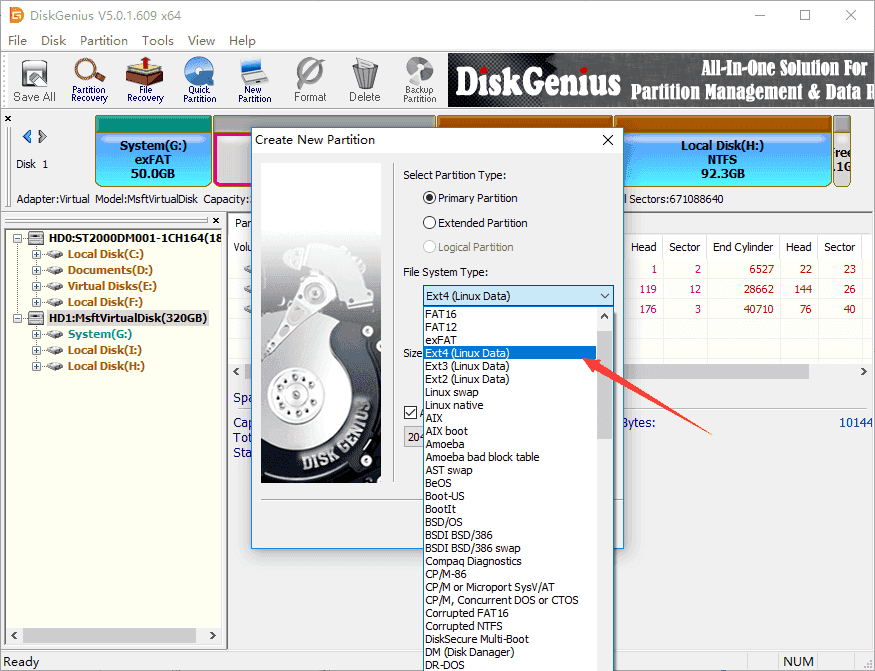
Step 2. The «Create New Partition» box comes up, and you can select file system type now. To create ext4 partition, you should select Ext4 (Linux Data). Then click OK button.
Step 3. Click Save All button on the upper-left panel to save the new partition to partition table.
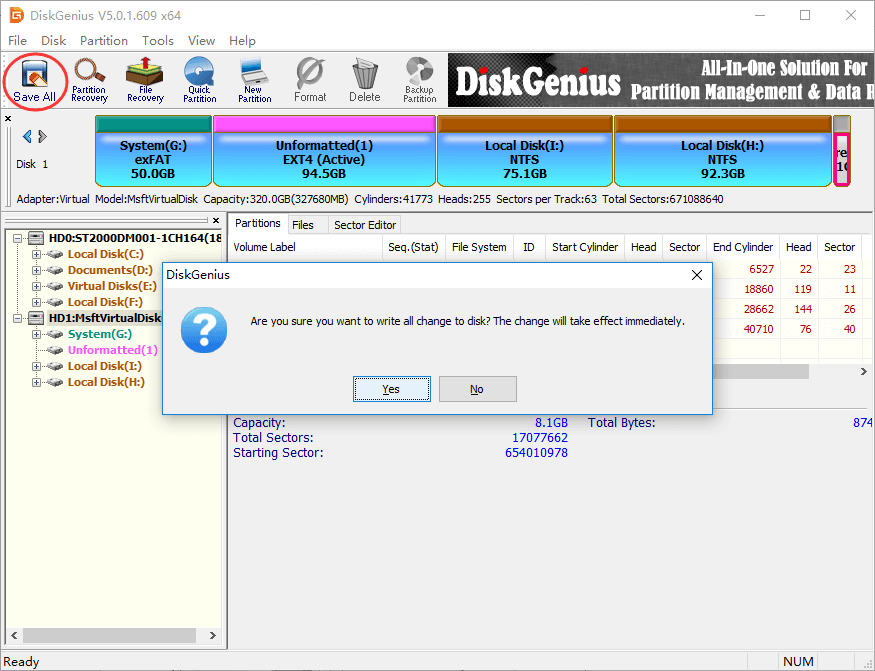
Step 4. DiskGenius asks whether to format the partition after it is saved to partition table. Click Yes and the partition will be formatted quickly.
Conclusion
DiskGenius makes it very easy to format partition to EXT4, EXT3 or EXT2 file system in Windows. Besides, it provides many other functions to help you manage and access EXT4 Linux partition in Windows 10, for instance, save data to ext4 partition, delete data from Linux partition, clone EXT4 partition to image, resize Linux partition without losing data, etc. If you need to format EXT4 in Windows, free download DiskGenius and try it now.
I have an SD card with ext4 for SteamOS and EmuDeck. I want to add files from my Windows 11 to the SD card. But the ext4 I found only supports reading and not writing. And NTFS format can’t support EmuDeck. How should I write to a USB drive formatted as ext4 in Windows 11?
Best Answered by
Cici· Answered on Mar 29, 2025
EXT4 is a proprietary file system for Linux, and Windows cannot directly read or detect partitions or devices in EXT4 format. This is because the EXT format is entered into a log file system that Windows has not yet fully implemented. If you want to write to an EXT4 partition or drive on Windows, you can only convert a USB or SD card to NTFS or FAT format.
If you only want to view the EXT4 file format, there are two ways to do this under Windows.
1. Use Linux VM under Windows.
2. On Windows with the help of a professional disk management tool: EaseUS Partition Master.
The first method is more complicated. The third-party tool is a much faster and simpler way.
EaseUS Partition Master Free has strong compatibility with file systems on Mac, Windows, and Linux. You can view EXT4 drives on it and convert EXT4 to NTFS or FAT format and vice versa.
If you want to know how to view EXT4 partitions and drives on Windows, follow these steps:
Step 1. Launch EaseUS Partition Master and locate the EXT4 partition.
Step 2. Right-click on the target partition and select «Properties.»
Step 3. Expand the folder in the left pane to check the contents of the EXT4 partition.
If you want to continue using the drive in this format on Windows, you need to convert EXT4 to a format supported by Windows, such as NTFS, FAT, exFAT, etc. EaseUS Partition Master also supports this quick operation.
Step 1. Select the target partition and click «Format.»
Step 2. Set the target file system as FAT, NTFS, or exFAT and click «OK.»
Step 3. Click «Yes,» and then execute the task.
If you still want to learn more about accessing EXT4 format on Windows, click the link below for a more comprehensive study.
Extended Reading: How to Access Linux EXT4 Partition and Data on Windows
Форматирование флешки в ext4 под Windows. Сделаем на Astra Linux под VirtualBox
t.me/freebsd2022 (https://t.me/freebsd2022)Для будущих задач с Keenetic нам нужно отформатировать флешку в EXT4. Штатно Win10 это не умеет. Есть бесплатное ПО типа Paragon Partition Manager или AOMEI Partition Assistant Standard Edition. Однако многие советуют форматировать из Линукс.
У нас есть ВМ под VirtualBox с Астра Линукс, сделаем там. Разделы на флешке проверяем с помощью ПО IM-Magic Partition Resizer Free (ранее его уже использовали):
Сначала нужно подключить флешку с любым разделом (ntfs, fat32 etc) в VirtualBox, до включения ВМ:
Далее на ВМ с Астра Линукс проверяем, что флешка видна, но не примонтирована:
admin-astra@astralinux17:~$ sudo lsusb
Bus 001 Device 002: ID 8564:1000 Transcend Information, Inc. JetFlash
Bus 001 Device 001: ID 1d6b:0002 Linux Foundation 2.0 root hub
Bus 002 Device 002: ID 80ee:0021 VirtualBox USB Tablet
Bus 002 Device 001: ID 1d6b:0001 Linux Foundation 1.1 root hub
admin-astra@astralinux17:~$ sudo lsblk
NAME MAJ:MIN RM SIZE RO TYPE MOUNTPOINT
sda 8:0 0 50G 0 disk
├─sda1 8:1 0 487M 0 part /boot
├─sda2 8:2 0 1K 0 part
└─sda5 8:5 0 49,5G 0 part
├─astralinux17—vg-root 253:0 0 48,6G 0 lvm /
└─astralinux17—vg-swap_1 253:1 0 980M 0 lvm [SWAP]
sdb 8:16 1 14,6G 0 disk
└─sdb1 8:17 1 14,6G 0 part
sr0 11:0 1 1024M 0 rom
admin-astra@astralinux17:~$ sudo df -h
Файловая система Размер Использовано Дост Использовано% Cмонтировано в
udev 1,9G 0 1,9G 0% /dev
tmpfs 394M 5,6M 389M 2% /run
/dev/mapper/astralinux17—vg-root 48G 27G 19G 59% /
tmpfs 2,0G 0 2,0G 0% /dev/shm
tmpfs 5,0M 0 5,0M 0% /run/lock
tmpfs 2,0G 0 2,0G 0% /sys/fs/cgroup
/dev/sda1 472M 71M 377M 16% /boot
tmpfs 394M 0 394M 0% /run/user/1000
Форматируем существующий раздел под EXT4:
admin-astra@astralinux17:~$ sudo mkfs.ext4 /dev/sdb1
mke2fs 1.44.5 (15-Dec-2018)
/dev/sdb1 contains a ntfs file system
Proceed anyway? (y,N) y
Creating filesystem with 3827168 4k blocks and 958464 inodes
Filesystem UUID: 486bca5c-c44e-4613-8672-8e9e99eef5b9
Superblock backups stored on blocks:
32768, 98304, 163840, 229376, 294912, 819200, 884736, 1605632, 2654208
Allocating group tables: done
Writing inode tables: done
Creating journal (16384 blocks): done
Writing superblocks and filesystem accounting information: done
После это проверяем и монтируем флешку в Астру:
admin-astra@astralinux17:~$ ls -al /media/usb
итого 8
drwxr-xr-x 2 root root 4096 сен 6 15:59 .
drwxr-xr-x 4 root root 4096 сен 6 15:59 ..
admin-astra@astralinux17:~$ sudo mount /dev/sdb1 /media/usb/
admin-astra@astralinux17:~$ ls -al /media/usb
итого 24
drwxr-xr-x 3 root root 4096 сен 11 23:02 .
drwxr-xr-x 4 root root 4096 сен 6 15:59 ..
drwx—— 2 root root 16384 сен 11 23:02 lost+found
Готово!