
Applies ToWindows 11 Windows 10
This article helps with using Microsoft Japanese Input Method Editor (IME) including IME settings, features, and keyboard shortcuts.
Tip: This article uses links that open IME settings in the Settings app directly. To manually access IME settings in the Settings app, see Microsoft IME settings in this article.
User interface
The Prediction candidate window offers typeahead candidates.
General operations
|
At this state |
Press this key |
To do this |
|---|---|---|
|
Before focus enters the candidate window |
Tab |
Enter the prediction candidate window. |
|
Shift + Tab |
Enter the prediction candidate window. |
|
|
Down arrow |
Enter the prediction candidate window. |
|
|
Up arrow |
Enter the prediction candidate window. |
|
|
With focus inside the candidate window |
Tab |
Move the selection down. |
|
Shift + Tab |
Move the selection up. |
|
|
Down arrow |
Move the selection down. |
|
|
Up arrow |
Move the selection up. |
|
|
Number |
Select the corresponding candidate. |
|
|
Enter |
Select the focused candidate. |
Other features
-
Suggested candidates can be customized under Microsoft IME settings > General > Predictive Input.
-
Use input history.
-
Use system dictionary.
-
Use suggestion services — when this option is enabled, anything that is written is encrypted and sent to Microsoft to get text suggestions from Bing.
-
-
Select the cross icon or press Ctrl + Delete to remove the selected candidate.
Note: Some candidates can’t be removed, for example, dates.
-
To search the selected candidate on the internet, select the magnifier icon or press Ctrl + B.
The Conversion candidate window offers candidates whose reading matches what is typed.
General operations
|
At this state |
Press this key |
To do this |
|---|---|---|
|
Before focus enters the candidate window |
Space |
1st press: Convert what you type. 2nd press: Open the conversion candidate window. |
|
Shift + Space |
1st press: Convert what you type. 2nd press: Open the conversion candidate window. |
|
|
With focus inside the candidate window |
Space |
Move the selection down. |
|
Shift + Space |
Move the selection up (Microsoft IME template) / down (ATOK template). |
|
|
Down arrow |
Move the selection down (Microsoft IME template) / Select the focused candidate (ATOK template). |
|
|
Up arrow |
Move the selection up. |
|
|
Tab |
Expand to table view. |
|
|
Number |
Select the corresponding candidate. |
|
|
Enter |
Select the focused candidate. |
Other features
-
IME can improve input accuracy based on what is typed. This feature can be switched On and Off with the Improve input accuracy based on what I type on this PC setting in Microsoft IME settings > Learning and Dictionary.
-
A new word can be manually added to the IME dictionary using one of the following methods:
-
Open the user dictionary tool in Microsoft IME settings > Learning and Dictionary.
-
Right-click on the IME options icon in the system tray area of the taskbar and then select Add Word.
-
-
System dictionaries can be switched On and Off at System dictionaries in Microsoft IME settings > Learning and Dictionary.
Keyboard shortcuts
IME offers keys or combinations of keys to use IME functions.
|
Press this key |
To do this |
|---|---|
|
Hankaku/Zenkaku |
Turn on / off Japanese input. |
|
Eisu (Caps lock) |
Toggle between Hiragana and Alphanumeric mode. |
|
Hiragana |
Enter Hiragana mode. |
|
Alt + Hiragana |
Switch between Kana input and Romaji input. Prerequisite: Turn on the Switch Kana/Romaji input with Alt + Katakana Hiragana Romaji key setting in Microsoft IME settings > General. |
|
Shift + Hiragana |
Enter Katakana mode. |
|
Convert |
Reconversion. |
|
Ctrl + Convert |
Open IME context menu (right-click menu). |
|
NonConvert |
Toggle among Hiragana, Full-width Katakana, and Half-width Katakana. |
|
Shift + NonConvert |
Toggle between Half-width Alphanumeric and Full-width Alphanumeric mode. |
|
ImeOn (あ key) *1 |
Enter Hiragana mode. |
|
Alt + ImeOn (あ key) *1 |
Switch between Kana input and Romaji input. Prerequisite: Turn on the Switch Kana/Romaji input with Alt + Katakana Hiragana Romaji key setting in Microsoft IME settings > General. |
|
Ctrl + ImeOn (あ key) *1 |
Reconversion. |
|
Shift + ImeOn (あ key) *1 |
Enter Full-width Katakana mode. |
|
ImeOff (A key) *1 |
Enter Half-width Alphanumeric mode. |
|
Ctrl + ImeOff (A key) *1 |
Toggle among Hiragana, Full-width Katakana, and Half-width Katakana. |
|
Shift + ImeOff (A key) *1 |
Toggle among un-capitalized, all-capitalized, and first-character-capitalized full-width alphanumeric characters. |
*1: The ImeOn (あ) key and ImeOff (A) key are available on specific Japanese hardware keyboards.
For more information for developers, refer to the article Keyboard Japan — ImeOn / ImeOff Implementation.
|
Press this key |
To do this |
|---|---|
|
Hankaku/Zenkaku |
Turn on / off Japanese input. |
|
Eisu (Caps lock) |
Toggle between Hiragana and Alphanumeric mode. |
|
Hiragana |
Toggle between Hiragana and Alphanumeric mode. |
|
Alt + Hiragana |
Toggle between Kana input and Romaji input. Prerequisite: Turn on the Switch Kana/Romaji input with Alt + Katakana Hiragana Romaji key setting in Microsoft IME settings > General. |
|
Shift + Hiragana |
Enter Katakana mode. |
|
Convert |
Turn on / off Japanese input. |
|
Shift + Convert |
Reconversion. |
|
NonConvert |
Toggle between Hiragana and Half-width Alphanumeric mode. |
|
Ctrl + NonConvert |
Toggle among Hiragana, Full-width Katakana, and Half-width Katakana. |
|
Shift + NonConvert |
Toggle between Hiragana, Full-width Alphanumeric, and Half-width Alphanumeric mode. |
|
ImeOn (あ key) *1 |
Enter Hiragana mode. |
|
Alt + ImeOn (あ key) *1 |
Switch between Kana input and Romaji input. Prerequisite: Turn on the Switch Kana/Romaji input with Alt + Katakana Hiragana Romaji key setting in Microsoft IME settings > General. |
|
Ctrl + ImeOn (あ key) *1 |
Reconversion. |
|
Shift + ImeOn (あ key) *1 |
Enter Full-width Katakana mode. |
|
ImeOff (A key) *1 |
Enter Half-width Alphanumeric mode. |
|
Ctrl + ImeOff (A key) *1 |
Toggle among Hiragana, Full-width Katakana, and Half-width Katakana. |
|
Shift + ImeOff (A key) *1 |
Toggle among un-capitalized, all-capitalized, and first-character-capitalized full-width alphanumeric characters. |
*1: The ImeOn (あ) key and the ImeOff (A) key are available on specific Japanese hardware keyboards.
For more information for developers, refer to the article Keyboard Japan — ImeOn / ImeOff Implementation.
|
Press this key |
To do this |
|---|---|
|
Ctrl + Delete |
Remove the selected candidate from the prediction candidate window. |
|
Ctrl + B |
Search the selected candidate in the prediction candidate window. |
|
Tab |
Expand / collapse the table view in the conversion candidate window. |
|
Windows logo key + period (.) |
Open Emoji picker. |
|
Ctrl + Shift + F10 |
Turn on / off IME private mode. |
|
F6 |
Convert input string to Hiragana. |
|
F7 |
Convert input string to Full-width Katakana. |
|
F8 |
Convert input string to Half-width Katakana. |
|
F9 |
Convert input string to Full-width Alphanumeric. |
|
F10 |
Convert input string to Half-width Alphanumeric. |
Key customization
With IME, a specific key function can be changed in Microsoft IME settings > Key and touch customization.
-
Key template: Key template is a set of key configurations. IME offers the following templates:
-
Microsoft IME.
-
ATOK.
For more information, see the keyboard shortcuts section in this article.
-
-
Key assignment: If you want to customize a specific key function within the selected template, you can customize several keys at Key assignment.
Microsoft IME settings
The following methods can be used to open Microsoft IME settings:
Right-click on the IME options icon in the system tray area of the taskbar and then select Settings.
Navigate to Microsoft IME settings in the Settings app:
-
In the Time & language > Language & region window, under the Language section, select the ellipses next to Japanese and then select Language options.
-
In the Time & language > Language & region > Options window, under the Keyboards section, select the ellipses next to Microsoft IME and then select Keyboard options.
Use the following Microsoft IME shortcut to directly open the Microsoft IME settings in the Settings app:
Open Microsoft IME
Compatibility
Microsoft Japanese IME is available in currently supported versions of Windows. If any issues are encountered with the current version of IME, IME supports a compatibility setting that allows using the previous version of IME instead. The previous version of IME can be enabled by turning on in Microsoft IME settings > General > Use previous version of Microsoft IME. IME continues to be improved, so consider filing feedback to help us deliver a great input experience to you.
How can I give feedback?
If you encounter any problems or have suggestions regarding Microsoft IME, give us feedback through the Feedback Hub. Select one of the following options to open the Feedback Hub:
-
Right-click the IME options icon in the system tray area of the taskbar and then select Send Feedback.
Your feedback goes directly to our engineers working to improve IME. For more on steps for providing feedback, refer to the article Send feedback with the feedback hub app.
Need more help?
Want more options?
Explore subscription benefits, browse training courses, learn how to secure your device, and more.
-
Home
-
Partition Magic
- How to Install and Use Japanese Keyboard on Windows 11/10
By Sherry |
Last Updated
Have you upgraded your Windows 10 to Windows 11? Are you wondering how to install Japanese keyboard on Windows 11 or Windows 10? Don’t worry if you have no idea. You can find a detailed guide in this post from the MiniTool Partition Wizard.
Windows 11 is a new operating system provided by Microsoft. As the successor of Windows 10, Windows 11 comes with many new features and a fresh outlook. The good news is that Windows 11 is free to upgrade.
Whether you are using Windows 10 or Windows 11, if you want to use Japanese keyboard, this post can help.
How to Install Japanese Keyboard on Windows 11
Windows 11 supports a huge number of languages. If you need to type with a second language, you just need to go to Windows Settings to install it. Now, let’s see how to install Japanese keyboard on Windows 11.
Step 1: Press Win + I to open Windows Settings quickly.
Step 2: In the left pane, select Time & language.
Step 3: In the right pane, choose Language & region.
Step 4: Click the Add a language button for the Preferred languages setting.
Step 5: In the pop-up window, search for Japanese and select it. Then click Next. On the next page, configure the optional language features and click Install.
Tip: If you want to set Japanese as the system language, you should check Set as my Windows display language here. For more details, you can refer to this post: How to Change the Default System Language in Windows 11?
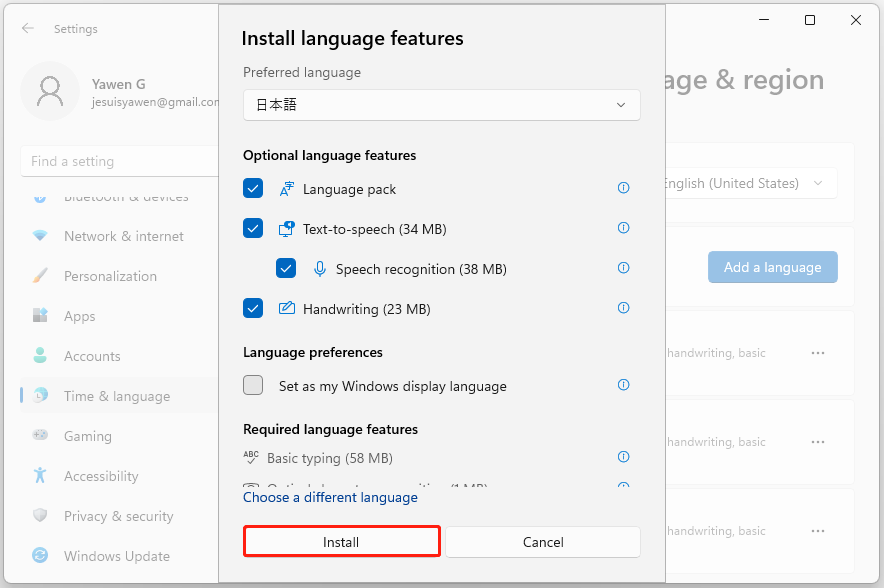
The installation might take a few minutes. Please wait patiently. Once it the Japanese is installed, you can use the Japanese keyboard.
How to Get Japanese Keyboard on Windows 10
As for how to install Japanese keyboard on Windows 10, you can follow the steps below.
Step 1: Go to Settings > Time & Language > Language.
Step 2: Click the Add a preferred language.
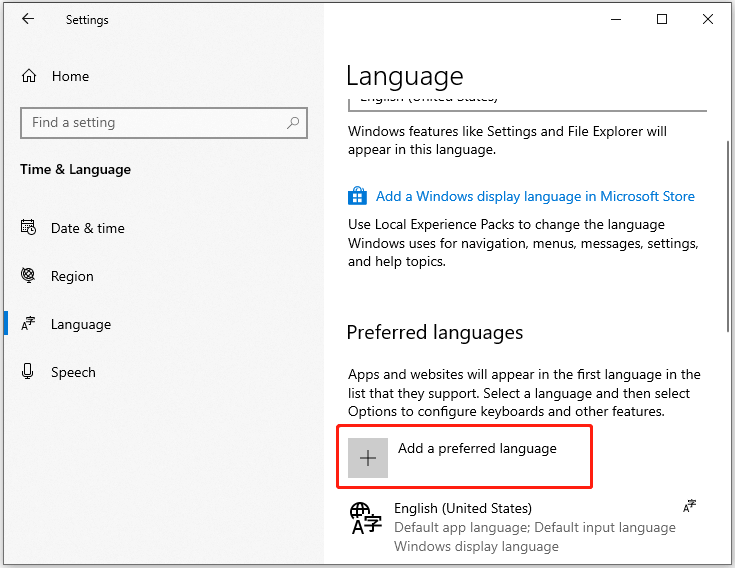
Step 3: Select Japanese and click Next, then configure the optional language features and click Install.
When Japanese is installed successfully, you can move to the next part to see how to use Japanese keyboard.
How to Use Japanese Keyboard
On Windows 10 and 11, you can switch the installed keyboard languages by pressing Win + Space. Just press the keyboard shortcut and select Japanese. Then you can start to use it.
Alternatively, you can click the language icon on the taskbar to change the keyboard language to Japanese.
Now, you might see the alphabet A next to the Japanese input icon, which indicates you are still typing in English. Click the A icon and it will change to Japanese.
If you want to change the Japanese keyboard to different variants, you can right-click the A icon and choose the one you prefer. To use the Japanese keyboard, you can choose the Hiragana option.
Now, you can type Japanese with the English keyboard.
Further Tip: Use a Physical Japanese Keyboard
In addition to installing Japanese keyboard on Windows 10/11, you can also use a physical Japanese keyboard to meet your demands. Just connect the keyboard to your computer and go to Settings > Time & Language. Then select Japanese and click Options > Change hardware keyboard layout to add your keyboard.
About The Author
Position: Columnist
Sherry has been a staff editor of MiniTool for a year. She has received rigorous training about computer and digital data in company. Her articles focus on solutions to various problems that many Windows users might encounter and she is excellent at disk partitioning. She has a wide range of hobbies, including listening to music, playing video games, roller skating, reading, and so on. By the way, she is patient and serious.
Video Tutorial:
Introduction
Are you struggling to understand and communicate in Japanese on your Windows 10 computer? Don’t worry, we’ve got you covered! In this blog post, we will guide you step-by-step on how to download and install the Japanese Language Pack for Windows 10. Whether you want to learn the language, communicate with Japanese friends or colleagues, or simply explore the rich culture of Japan, having the Japanese Language Pack installed on your computer is essential. So let’s dive in and get started!
There are several reasons why you might want to download and install the Japanese Language Pack for Windows 10:
- You are learning the Japanese language and want to practice reading and writing in Japanese on your computer.
- You frequently communicate with Japanese friends, colleagues, or clients and want to be able to type in Japanese and understand Japanese content.
- You are interested in Japanese culture, entertainment, or media and want to be able to access Japanese websites, read Japanese books or manga, or watch Japanese videos or anime.
- You plan to visit Japan and want to familiarize yourself with the language and characters before your trip.
Method 1: Downloading the Japanese Language Pack via Windows Settings
Follow these steps to download and install the Japanese Language Pack using the Windows Settings:
- Open the Windows Settings by clicking on the Start Menu and selecting the “Settings” gear icon.
- In the Settings window, click on “Time & Language.”
- Select “Language” from the left sidebar.
- Under “Preferred languages,” click on “Add a language.”
- Scroll down and find “Japanese (Japan)” in the list of languages. Click on it to select it.
- Click on “Next” to start the installation process.
- Windows will download and install the Japanese Language Pack. This may take some time depending on your internet connection speed.
- Once the installation is complete, Japanese will be added as one of the preferred languages on your computer.
- You can now switch between languages by clicking on the language icon in the bottom right corner of the taskbar and selecting “Japanese.”
Pros:
– Easy and convenient method.
– No additional software required.
Cons:
– Requires an active internet connection.
– The installation process may take some time.
Method 2: Downloading the Japanese Language Pack via Microsoft Store
Follow these steps to download and install the Japanese Language Pack using the Microsoft Store:
- Click on the Start Menu and open the Microsoft Store.
- In the Microsoft Store, search for “Japanese Language Pack” in the search bar.
- Click on the Japanese Language Pack from the search results.
- Click on the “Get” or “Install” button to start the installation process.
- Windows will download and install the Japanese Language Pack. This may take some time depending on your internet connection speed.
- Once the installation is complete, Japanese will be added as one of the preferred languages on your computer.
- You can now switch between languages by clicking on the language icon in the bottom right corner of the taskbar and selecting “Japanese.”
Pros:
– Easy access through the Microsoft Store.
– No additional software required.
Cons:
– Requires an active internet connection.
– The installation process may take some time.
Method 3: Downloading the Japanese Language Pack via Language Pack ISO
Follow these steps to download and install the Japanese Language Pack using a language pack ISO:
- Visit the Microsoft Language Pack ISO page on the official Microsoft website.
- Scroll down and find the “Japanese Language Pack” from the list of available language packs.
- Click on the “Download” button to start downloading the language pack ISO file.
- Once the download is complete, mount the ISO file by double-clicking on it.
- Open the mounted ISO file and run the setup program.
- Follow the on-screen instructions to install the Japanese Language Pack.
- Once the installation is complete, Japanese will be added as one of the preferred languages on your computer.
- You can now switch between languages by clicking on the language icon in the bottom right corner of the taskbar and selecting “Japanese.”
Pros:
– Can be downloaded offline.
– No active internet connection required during installation.
Cons:
– Requires additional steps to mount and run the ISO file.
– The installation process may take some time.
Method 4: Using Windows Update to Download the Japanese Language Pack
To download and install the Japanese Language Pack using Windows Update, follow these steps:
- Open the Windows Settings by clicking on the Start Menu and selecting the “Settings” gear icon.
- In the Settings window, click on “Update & Security.”
- Select “Windows Update” from the left sidebar.
- Click on the “Check for updates” button.
- If there are updates available, Windows will automatically download and install them, including the Japanese Language Pack if it is available.
- Once the installation is complete, Japanese will be added as one of the preferred languages on your computer.
- You can now switch between languages by clicking on the language icon in the bottom right corner of the taskbar and selecting “Japanese.”
Pros:
– Automatically checks for updates and installs the language pack if available.
– No additional steps required.
Cons:
– Requires an active internet connection.
– The installation process may take some time.
What to Do If You Can’t Download the Japanese Language Pack for Windows 10
If you encounter any issues or are unable to download and install the Japanese Language Pack using the methods mentioned above, here are some possible solutions:
- Check your internet connection: Ensure that you have a stable and reliable internet connection. A slow or intermittent connection may cause the download to fail or take longer than expected.
- Restart your computer: Sometimes, a simple restart can resolve temporary issues and glitches. Restart your computer and try downloading the language pack again.
- Check for updates: Make sure that your Windows 10 operating system is up to date. Go to Windows Settings > Update & Security > Windows Update and click on “Check for updates.”
- Try a different method: If one method doesn’t work, try using an alternative method mentioned above to download and install the Japanese Language Pack.
- Contact Microsoft Support: If none of the above solutions work, reach out to Microsoft Support for further assistance. They can help troubleshoot the issue and provide personalized solutions.
Bonus Tips
Here are some bonus tips to enhance your Japanese language experience on Windows 10:
- Install a Japanese input method: In addition to installing the Japanese Language Pack, consider installing a Japanese input method for typing in Japanese. This will enable you to easily switch between English and Japanese keyboards.
- Use Japanese language resources: Explore Japanese language learning resources, websites, and applications to practice reading, writing, and speaking in Japanese. There are many online resources available for free or at a nominal cost.
- Immerse yourself in Japanese media: Watch Japanese movies, dramas, anime, and listen to Japanese music to familiarize yourself with the language, pronunciation, and cultural nuances. This can greatly enhance your language learning journey.
5 FAQs About Downloading the Japanese Language Pack for Windows 10
Q1: How much disk space is required to install the Japanese Language Pack?
A: The disk space required for the Japanese Language Pack installation may vary depending on the version of Windows 10 and the specific language pack version. However, it is generally recommended to have at least 4-6 GB of free disk space available.
Q2: Can I uninstall the Japanese Language Pack if I no longer need it?
A: Yes, you can uninstall the Japanese Language Pack if you no longer need it. To uninstall the language pack, go to Windows Settings > Time & Language > Language, select “Japanese (Japan)” from the list of preferred languages, and click on the “Remove” button.
Q3: Can I switch between multiple languages on my computer?
A: Yes, Windows 10 allows you to switch between multiple languages. Once you have installed the Japanese Language Pack, you can easily switch between languages by clicking on the language icon in the bottom right corner of the taskbar and selecting the desired language.
Q4: Will installing the Japanese Language Pack change the language of my operating system?
A: Installing the Japanese Language Pack will not change the language of your operating system. It will simply add Japanese as one of the preferred languages on your computer, allowing you to type and view content in Japanese.
Q5: Can I use the Japanese Language Pack on all versions of Windows 10?
A: The availability of the Japanese Language Pack may vary depending on the version of Windows 10. However, the language pack is generally available for most versions of Windows 10, including Home, Pro, and Enterprise editions.
Final Thoughts
Downloading and installing the Japanese Language Pack for Windows 10 is a valuable step towards improving your Japanese language skills, communication, and understanding of Japanese culture. Whether you are learning the language or simply want to explore the world of Japan, having the ability to type and interact in Japanese on your computer can open up a whole new world of opportunities. Follow the methods mentioned in this blog post and explore the bonus tips to enhance your Japanese language experience on Windows 10. Happy learning and exploring!
{“@context”:”https://schema.org”,”@type”:”FAQPage”,”mainEntity”:[{“@type”:”Question”,”name”:”Q1: How much disk space is required to install the Japanese Language Pack?”,”acceptedAnswer”:{“@type”:”Answer”,”text”:”A: The disk space required for the Japanese Language Pack installation may vary depending on the version of Windows 10 and the specific language pack version. However, it is generally recommended to have at least 4-6 GB of free disk space available.”}},{“@type”:”Question”,”name”:”Q2: Can I uninstall the Japanese Language Pack if I no longer need it?”,”acceptedAnswer”:{“@type”:”Answer”,”text”:”A: Yes, you can uninstall the Japanese Language Pack if you no longer need it. To uninstall the language pack, go to Windows Settings > Time & Language > Language, select “Japanese (Japan)” from the list of preferred languages, and click on the “Remove” button.”}},{“@type”:”Question”,”name”:”Q3: Can I switch between multiple languages on my computer?”,”acceptedAnswer”:{“@type”:”Answer”,”text”:”A: Yes, Windows 10 allows you to switch between multiple languages. Once you have installed the Japanese Language Pack, you can easily switch between languages by clicking on the language icon in the bottom right corner of the taskbar and selecting the desired language.”}},{“@type”:”Question”,”name”:”Q4: Will installing the Japanese Language Pack change the language of my operating system?”,”acceptedAnswer”:{“@type”:”Answer”,”text”:”A: Installing the Japanese Language Pack will not change the language of your operating system. It will simply add Japanese as one of the preferred languages on your computer, allowing you to type and view content in Japanese.”}},{“@type”:”Question”,”name”:”Q5: Can I use the Japanese Language Pack on all versions of Windows 10?”,”acceptedAnswer”:{“@type”:”Answer”,”text”:”A: The availability of the Japanese Language Pack may vary depending on the version of Windows 10. However, the language pack is generally available for most versions of Windows 10, including Home, Pro, and Enterprise editions.”}}]}
If you’re wondering how to change the language on your PC, read on for instructions on how to change the Japanese locale in Windows 10. If you want to play Japanese games on your PC, you’ll need to switch the system locale to Japan, since many games don’t display the text in Japanese unless the game’s language is set to Japanese. To change the system locale, you need to log in as an administrator.
Start by going to Start > Control Panel. Click on Regional and Language Options. Double-click on the Regional and Language Options icon. Choose the Administrative language settings. Then, click on Change system locale. You may be prompted to enter your administrator password. Once you’ve made the change, restart your computer. Your changes should take effect soon. If you’re not sure how to change the locale, refer to your Windows documentation.
How Do I Enable Japanese Locale in Windows 10?
To enable Japanese localization on your computer, open Control Panel and click the Regional and Language Options icon. Then, click the language that you prefer. Choose Japanese in the drop-down list. Then, click OK. Then, click OK again. The Japanese Locale will now be set. Now, you should be able to see the Japanese text on your PC. In this article, we will show you how to enable Japanese Locale in Windows 10.
Changing your keyboard layout is as easy as setting up the Japanese input language. To switch from English to Japanese, open the keyboard and click the “A” icon. You should now see the Hiragana character on the keyboard. This is an important step, as typing in Japanese is not easy. Once you’re done, restart your computer. After the restart, you’ll be able to type in Japanese.
To change the system locale of your PC, go to Control Panel. Then, find the Language for non-Unicode programs. Look for the drop-down list under “Change system locale.” You should find the Language of Non-Unicode Programs” and click on it. Then, click on “Change system locale” and select Japanese. After you click the “Change” button, you’ll be able to see the language that Windows uses.
How Do I Change My System Locale in Windows 10?
To change the system locale, open the Control Panel and click on the Language, Region, and time settings. You will then see the Language drop-down menu. Click the Change system locale option and select the Japanese language. This setting will also change the language of programs that don’t support Unicode. After selecting the Japanese language, click OK to save the changes. You can then restart your computer to make the changes take effect.
In the lower right corner of the desktop, click the Language icon and then select “Change system locale.” You will then see the Japanese keyboard. To select it, click the Japanese IME icon that has a stylized “J” in a circle. To type in Japanese, click the “a” icon, which will display Romaji or kana. If you are not logged in as an administrator, click the Windows Update button.
The system locale is an important setting that affects the way your computer interprets non-Unicode text. It can cause problems with non-Unicode applications, like browsers, and even files. In such cases, you should check the BETA option to use Unicode UTF-8 for worldwide language support. Once you’ve done this, the Japanese language will be supported by Windows 10.
How Do I Change My Windows Language to Japanese?
If you have recently moved to Japan and want to learn Japanese, you can change your Windows language to Japanese. Japanese is supported by Windows 10, but it doesn’t come with instructions for setting up the Japanese input method. As a result, users assume that they can use Japanese input in the same way they would any other language. The fact is, though, that switching your Windows language to Japanese might not be as straightforward as it looks.
To change the language of Windows, go to your system’s settings and find the “Language” setting. Click on this link and choose “Japanese” as the language. If you select “Japanese”, you will have to log out of your current account and sign in as the user you’ve changed your language to. After this, your PC will display everything in Japanese. To switch back to English, simply log out and sign in again.
How Do I Change My Locale to Japan?
How do I change the language on Windows 10? The system locale allows non-Unicode programs to use the language that the user has selected. By default, the operating system sets the locale to the default en-US locale, so Japanese text in a game will not appear. To change the system locale, start by logging in to your computer as an administrator. Note that changing the system locale will not affect the language that appears on menus or dialog boxes, nor will it affect programs that use Unicode.
In addition to Windows’ system locale, the Japanese keyboard layout can be set in the start menu. In addition, you can also change the language of Windows programs using the Shift-JIS keyboard shortcut. Switching the locale does not harm your PC, but you may experience a few inconveniences. The Japanese keyboard layout will change, but the start menu will still be displayed in English. Although this can be frustrating, many programs are now Unicode-aware and will continue to work properly.
How Do I Run a Japanese Locale?
If you have a game that is in Japanese, you might be wondering how to run it on Windows 10. First, you need to install the Japanese language. This will install the corresponding system locale (also known as the non-Unicode program configuration) on your system. Once installed, you should be able to change the system locale to Japanese (Japan). Once this is complete, restart your system. The game should now run without any problems. If not, you may break your system.
Once the installer has completed, a dialog box should appear asking you if you want to run the program in a different locale. Type Japan in the search box to find it. Uncheck the box to save space. The installer will take a few seconds to install. Once installed, the Japanese locale is enabled on your system. If you don’t want to use this language on Windows 10, you can use a program that is available in Japanese.
What is Japanese Locale?
You may be wondering “What is Japanese Locale Windows 10?” If so, you may want to download the application. It is a free download that lets you play games in a specific language. However, there are some disadvantages to using this program. Using it will cause your games to have text errors, or they might even crash. It is not recommended for playing Visual Novels. You can find a free version of this program at the Microsoft Download Center.
If you’re not familiar with the process, you can change your system’s locale to Japanese using the Region and Language Options icon in the Control Panel. After choosing the locale, click on the “Change region and language settings” tab. Select “Japanese.”
Is Changing System Locale Safe?
If you want to change the language on your computer, you can do this easily. Open the Regional and Language Options (RLO) in the Control Panel and double-click on the Regional and Language Options icon. Once you are in the Regional and Language Options pane, click on the Administrative tab, then click on Change system locale. Then, choose the new language in the drop-down menu and click Change. After doing this, restart your computer.
It’s not a bad idea to change your system locale. If you’re switching from one language to another, you’ll be able to access the same program as long as you change your system locale. To do this, first log into Windows as the user who needs to change the system locale. After this, click the Change language button on the System Settings menu. Once you click the Change language button, the new language will be displayed on your PC.
You can also change the language on your computer by modifying the language settings in the Control Panel. If you’re not using Unicode, it’s worth checking if the language you’re using is supported by the system. By default, the operating system will translate all the text on your computer as UTF-8, but you can change the language settings to your preferences. It’s a good idea to check this before you change it because the result might not be what you expected.
Learn More Here:
1.) Windows Help Center
2.) Windows – Wikipedia
3.) Windows Blog
4.) Windows Central