
Привет, друзья. Недавно на сайте была опубликована статья о двух программках Air Live Drive и Air Explorer, реализующих в среде Windows доступ к различным облачным сервисам по типу локальных дисков. Эти программы предлагают большой перечень готовых настроек подключения популярных облаков. Но в бесплатных редакциях они ограничены возможностью подключения к системе не более 3-х хранилищ с одним аккаунтом. Некоторых из вас смутили такие ограничения, и в этой статье я решил осветить процедуру совершенно бесплатного подключения облаков в среду Windows в качестве сетевых дисков по протоколу WebDav. Ну и заодно поговорим о специфике подключения по WebDav.
WebDav – это набор расширений и дополнений к протоколу HTTP, который позволяет управлять файлами на удалённых серверах. Облако – это и есть этот самый удалённый сервер. Преимущество подключения облака по WebDav заключается в том, что все наши данные будут нам доступны в среде Windows без их скачивания на жёсткий компьютера, как это реализуют официальные программы-клиенты облаков. Только при запуске и редактировании файлов облачного хранилища, подключённого по WebDav, эти файлы будут скачиваться в системный кэш, а потом выгружаться из него назад в облако. С хранящимися в облаке файлами можем удалённо проводить любые управленческие операции – копирование, перемещение, переименование, удаление – с использованием проводника Windows или любого установленного файлового менеджера.
Кроме того, что подключение по WebDav не захламляет место на локальном компьютере, оно имеет ещё одно преимущество перед официальным клиентским софтом облаков – отсутствие лишних фоновых процессов для обеспечения функционирования клиента и синхронизации данных. Что немаловажно для слабых устройств.
В чём подключение по WebDav уступает официальному клиентскому софту облачных сервисов?
Во-первых, в скорости доступа к данным. Управление будет осуществляться по типу удалённого доступа, и, естественно, операции не будут проводиться так быстро, как в условиях работы с жёстким диском компьютера.
Во-вторых, мы не получим удобной возможности расшаривания ссылок на файлы – в контекстном меню в проводнике или файловом менеджере, как это реализует официальный клиентский софт. Чтобы сделать файл общедоступным и получить его ссылку, нам нужно будет отправиться в веб-интерфейс облака.
В-третьих, не все облачные хранилища предусматривают подключение по WebDav. В их числе, кстати, популярные сервисы Google Диск и Облако Mail.Ru. В таком случае можно либо прибегнуть к помощи сервисов, которые решают эту проблему и реализуют доступ к облаку по WebDav, как, например, сервис DAV-pocket service, либо использовать программы с готовыми пресетами настроек нужных хранилищ. Об одной из таких программ будем говорить ниже.
Как в среде Windows подключить облачный диск по WebDav?
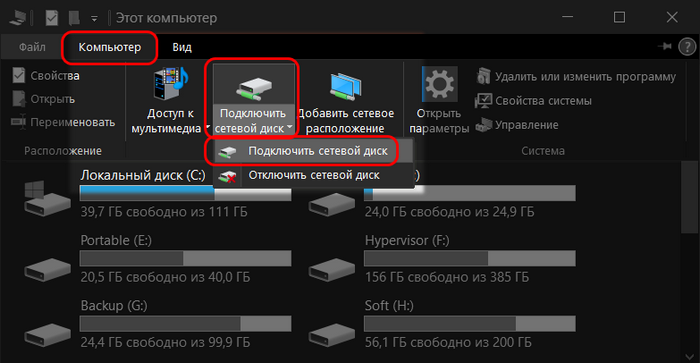
Подключить облачное хранилище по WebDav можно с использованием штатных средств Windows. В проводнике Windows 8.1 и 10 кликаем вкладку «Компьютер». В проводнике Windows 7 жмём клавишу Alt, выбираем «Сервис». Жмём «Подключить сетевой диск».
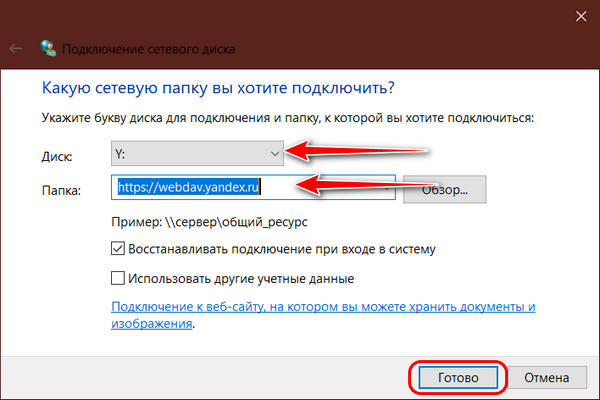
В окне подключения можем выбрать букву диска для содержимого облака. В графе «Папка» вводим адрес подключения облака по WebDav. Жмём «Готово».
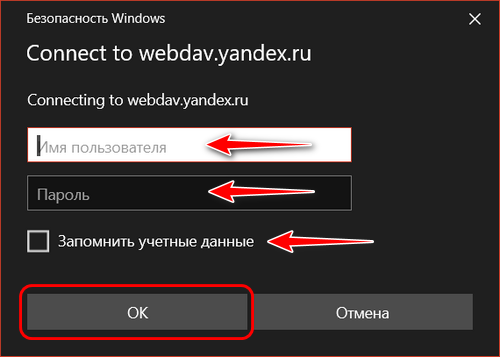
Авторизуемся в облаке. Выставляем галочку запоминания данных авторизации. Жмём «Ок».
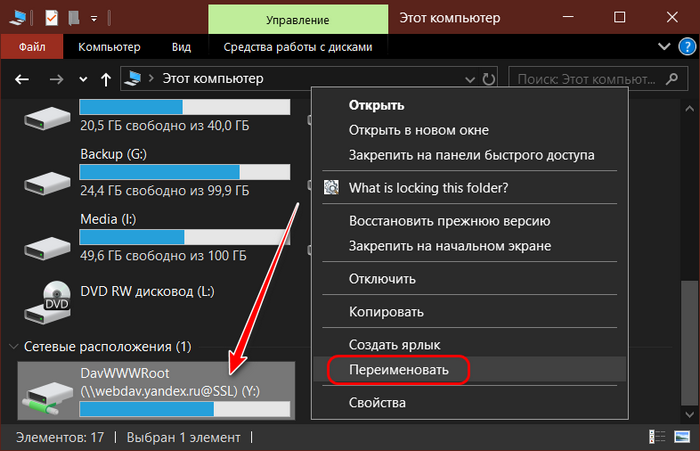
В проводнике должен появиться облачный диск. Можем переименовать его так, как удобно нам.
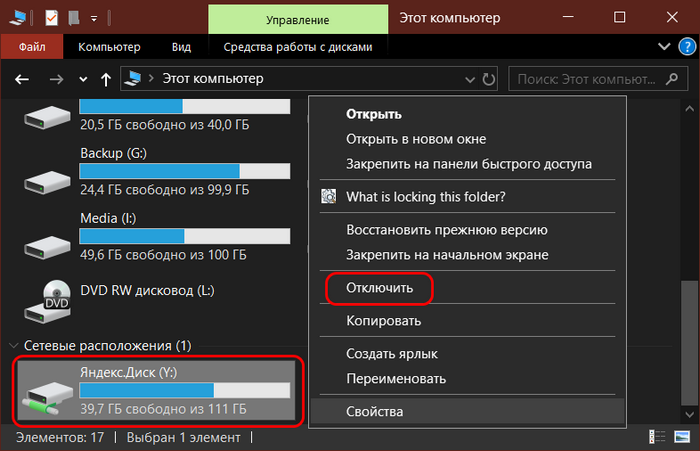
Если облачный диск станет не нужен, отключаем его в контекстном меню.
Вот так всё просто, если, конечно, знать адрес WebDav. Как узнать этот адрес?
• Для Яндекс.Диска это https://webdav.yandex.ru
• Для Box это https://box.net/dav
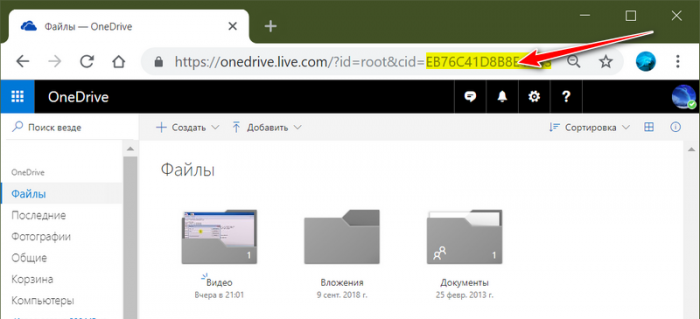
• Для OneDrive это https://docs.live.net/Идентификатор
В случае с OneDrive вместо значения «Идентификатор» необходимо подставить свой уникальный код, который отображается в веб-интерфейса хранилища после значения «id=».
Ну а адреса подключения других облаков, если они поддерживают доступ по WebDav, вы, друзья, можете найти в Интернете. Либо же можете обратиться в службу поддержки сервиса.
Альтернативный способ подключения облачных хранилищ по WebDav – программа RaiDrive. Она полностью бесплатная, это аналог упомянутой выше программы Air Live Drive. RaiDrive не ограничена числом подключаемых сервисов и их аккаунтов, однако, в отличие от Air Live Drive, предлагает весьма скудный перечень готовых настроек подключения облаков. У RaiDrive есть поддержка только Google Drive, Google Photos, Dropbox и OneDrive. Все остальные облачные сервисы подключаются по WebDav, FTP или SFTP при указании нами их адресов. Скачать программу можно на её официальном сайте:
RaiDrive как альтернатива Air Live Drive, конечно же, уступает последней. Но если Raidrive рассматривать как альтернативу штатному способу подключения облаков по WebDav, то у неё есть несколько преимуществ:
• Удобство подключения/отключения сетевых дисков;
• Возможность выбора папки кэша;
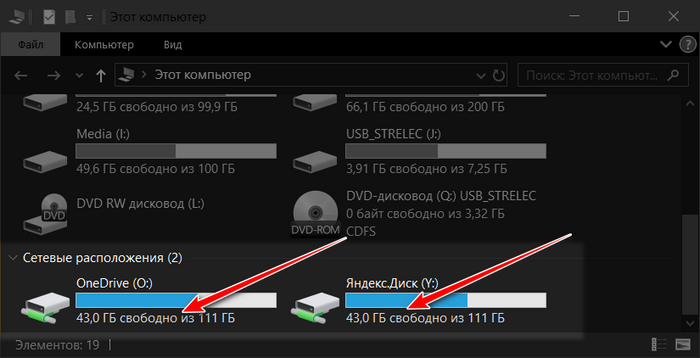
• Корректность отображения в проводнике общего и занятого облачного пространства. При подключении по WebDav штатными средствами Windows по объёму хранилищ отображаются неверные сведения.
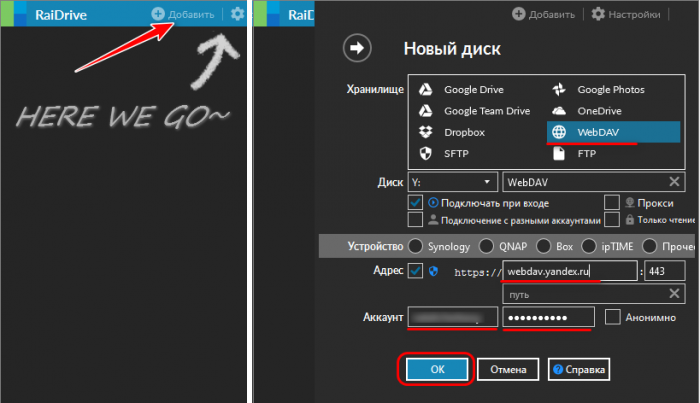
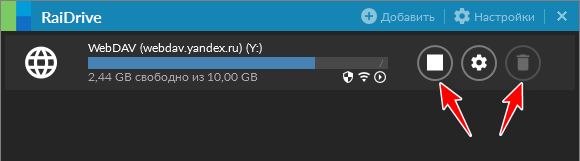
Как работать с RaiDrive? Запускаем программку. Жмём «Добавить». WebDav в качестве типа подключения выбран по умолчанию. Вводим адрес, логин и пароль аккаунта облака. Жмём «Ок».
В окне RaiDrive подключением можем управлять – отключать, включать, удалять.
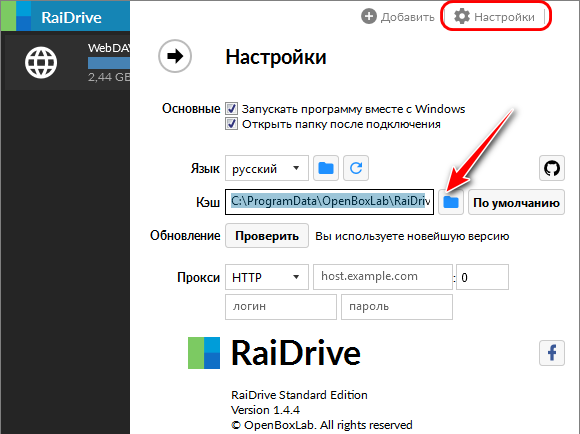
Предустановленную папку кэша программы можно сменить в настройках.
***
В этой заметке мы поговорим о замечательной надстройке над службой Internet Information Services (IIS) под названием WebDAV. WebDAV это протокол для доступа к общим файлам и папкам через интернет, чем то похожий на FTP. Передача файлов по протоколу WebDAV может быть осуществлена через различные межсетевые экраны и брандмауэры, передаваемую информацию можно шифровать, да и работа с файлами и папками реализована намного удобнее, полностью напоминая работу службы общего доступа к фалам и папкам в Windows.
Вместе с выходом Windows Server 2008 Microsoft презентовала обновленную версию модуля WebDAV для IIS 7. Данный модуль существенно расширил возможности, удобство и безопасность использования WebDAV для доступа к файлам в Интернет, кроме того теперь он стал поддерживать многопользовательскую работу и блокировку файлов.
В этой статье мы поговорим о том, как установить WebDAV на ОС Windows 7 и Windows Server 2008 R2, как его настроить и каким образом можно получить доступ к файлам и папкам, к которым открыт общий сетевой доступ по WebDAV .
Еще раз напомню, что WebDAV это расширение службы IIS, поэтому, если у вас еще не установлен IIS, сделайте это (как вы, наверное, помните и в Windows 7 и в Windows Server 2008 R2, IIS идет по умолчанию, но в целях безопасности этот компонент нужно включать отдельно). Установка WebDAV в Windows 7 и в Windows 2008 R2 немного отличается.
Установка WebDAV на IIS 7.5 в Windows Server 2008 R2
- Откройте меню Start-> Administrative Tools-> Server Manager.
- В окне управления сервером выберите Roles и отметьте Web Server (IIS).
- В окне Web Server (IIS), найдите секцию Role Services и добавьте новую роль Add Role Services.
- В списке служб разверните элемент Common HTTP Features, выберите опцию WebDAV Publishing и нажмите Next.

- Затем нажмите Install.
- После установки расширения WebDAV, закройте окно установки кнопкой Close.

Установка WebDAV на IIS 7.5 в Windows 7
- Перейдите в панель управления.
- В панели управления откройте элемент Programs and Features, и перейдите в режим установки функций Windows (Turn Windows Features on or off).
- Разверните узел Internet Information Services, затем World Wide Web Services, и Common HTTP Features.

- Отметьте WebDAV Publishing и нажмите OK.

Настраиваем публикацию WebDAV в менеджере IIS
На этом этапе мы включим WebDAV для сайта IIS и дадим права на редактирование содержимого локальному администратору.
- В менеджере IIS Manager, разверните дерево сайтов и выберите Default Web Site.
- Как показано на рисунке, щелкните по элементу WebDAV Authoring Rules.

- На странице WebDAV Authoring Rules щелкните в правой колонке(Actions) по сслыке Enable WebDAV
- После включения WebDAV, создадим правила доступа к содержимому, нажав кнопку Add Authoring Rule.
- В окне Add Authoring Rule укажем:
- All content – значит, что правило будет применяться для контента всех типов.
- Выберите «Specified users»и введте имя пользователя «administrator»
- Права доступа: Read, Source и Write.
- После настройки, жмите OK.
- В панели управления IIS выберите опцию Authentication.
- В окне аутентификации активируйте аутентификацию Windows (Windows Authentication), если IIS будет работать только в качестве сервера WebDAV, анонимную аутентификацию можно отключить.
- Вернитесь на уровень сайта Default Web Site и выберите Authorization Rules (либо .Net Authorization Rules)
- Создайте Allow правило (либо убедитесь, что оно уже существует), в котором администратору было бы разрешено получать доступ к серверу (в моем случае, такое правило уже было, и всем пользователям — All Users, в том числе администратору был разрешен доступ к IIS).


Попробуем теперь подключиться к сайту WebDAV c учетной записью администратора, для чего в командной строке наберите:
net use * http://localhost/
В результате в системе появиться новый сетевой диск, подключенный с сервера с помощью WebDAV.
Совет. Если при попытке подключить каталог по WebDav появляется ошибка «System error 67 has occurred. The network name cannot be found.«, в Windows 8 /Windows Server 2012 попробуйте установить компонент Desktop Experience и убедится, что служба Web Client запущена.
Если же нужно расшарить определенную папку на диске, необходимо создать виртуальный каталог IIS. Для этого щелкните правой кнопкой мыши по сайту и выберите ‘Add New Virtual Directory’:

Укажите алиас (имя виртуального каталога IIS) и путь к папке, к которой необходимо открыть доступ и нажмите OK.
Теперь, чтобы подключить данный каталог, нужно воспользоваться командой:
net use * _https://winitpro.ru/projects
Сетевой диск, подключенный по WebDAV выглядит так:

Как вы видите WebDAV — это отличное средство для удаленного доступа к файлам и папкам в Windows поверх протокола HTTP, которое можно использовать, даже через межсетевой экран. Кроме того, так как WebDAV базируется на службе IIS, это означает, что в такой архитектуре мы можем использовать различные технологии обеспечения безопасности и средства управления IIS, в том числе HTTPS для шифрования передаваемых данных (при использовании обычного HTTP вся информация передается в открытом виде, кроме пароля, который при использовании Windows Authentication шифруется).
Опишем еще несколько аспектов использования WebDAV
- Если вы используете Basic authentication вместе с HTTP, это означит, что ваш пароль будет пересылаться в открытом виде, поэтому лучше использовать протокол HTTPS или все-таки включить аутентификацию Windows.
- Не забудьте, что IIS работает из под учетной записи, у которой нет доступа к большинству каталогов и файлам, поэтому придется назначить NTFS права этой учетной записи вручную.
- Для того, чтобы подключить диск по WebDAV с клиента Windows XP, необходимо убедится, что запущена служба WebClient

- Чтобы подключить каталог WebDAV по HTTPS, воспользуйтесь командой:
net use x: "_https:// winitpro.ru/projects " /User:UserName Password

В рамках услуги Хранилище данных доступна возможность подключения по протоколу WebDAV. Для подключения можно использовать как специализированные программы, так и обычный файловый менеджер операционных систем Windows, MaсOS, Linux.
Рассмотрим пример подключения в Windows 10.
Реквизиты подключения доступны в разделе хранилища данных в личном кабинете. Для подключения нужна только ссылка с реквизитами WedDAV. Скопируйте её:

Далее потребуется открыть в Windows проводник, нажать правой кнопкой на Этот компьютер и выбрать “Подключить сетевой диск…”:

В появившемся окне нужно будет выбрать желаемую букву диска, вставить ссылку с реквизитами, при необходимости отметить верхнюю галочку, чтобы подключение к диску восстанавливалось после перезагрузки, и нажать “Готово”:

Даже со ссылкой с реквизитами Windows может попросить ввести логин и пароль. После этого подключение будет выполнено и хранилище станет доступно как ещё один диск:

К сожалению, есть некоторые ограничения. В Windows протокол WebDAV работает только в 32-битном режиме, поэтому поэтому работать с файлами больше 4 Гб не получится. При этом лимит по умолчанию ещё ниже, и составляет несколько мегабайт.
Как увеличить лимит до 4 Гб
1) Открыть редактор реестра (Win+R -> regedit), перейти по пути HKEY_LOCAL_MACHINE\SYSTEM\CurrentControlSet\Services\WebClient\Parameters
2) Найти значение FileSizeLimitInBytes, кликнуть на него правой кнопкой и выбрать “Изменить…”
3) Выбрать десятичную систему, ввести значение 4294967295 и нажать “ОК”
4) Перезагрузить компьютер для применения имзенений
Если же потребуется работать с файлами больше 4 Гб, то можно использовать FTP или SFTP.
According to Statcounter, 7 out of 10 desktop computers have the Windows operating system installed. The popularity of Windows is attributed to its user-friendliness. One of the essential features that often comes in handy for server administrators is managing a Remote File Server on their Windows PC without installing any third-party application.
Accessing a Remote File Server to manage it can be done via the WebDAV protocol, which Windows supports natively. This article demonstrates how to configure Windows to allow remote management over WebDAV protocol with ease. Since the WebDAV protocol has been around for a while, even Windows XP users can take advantage of this article without requiring the latest version of Windows. However, it’s advisable to use Windows 7 or above to have better security to prevent man-in-the-middle attacks.
Server-Side Configuration
Configuring a server for WebDAV protocol allows users to access its file system remotely. However, it largely depends on the service provider and the features available for the general public. It’s strongly recommended to subscribe to a provider that has inbuilt WebDAV support on their platform. It makes the whole configuration process convenient for the end-user as the service provider maintains the server free of charge. There are several WebDAV providers available online. Regardless of the provider, the general instructions to sign up on a WebDAV platform are as follows. In this guide, we will be using Qloud as a Remote File System provider.
- Navigate to Security.
- Locate the Devices and sessions section. Type the app’s name, and click the Create new app password button to generate a password for this particular app. Rather than using the master password of the cloud account, it’s recommended to use an app password as it ensures the user assigned to the particular app gains no access to the settings. In addition, it allows sharing the same drive with multiple users without needing a single password. It will enable administrators to revoke the permission of any user without affecting the accessibility of other users.

Adding up a new device - Once the password for the app is created, it will be listed in the Devices and sessions table. Each device represents an app that has a separate password. If the app is no longer needed, the permission can be revoked through the horizontal three-dotted button.


Client-Side Configuration
Client-side configuration allows the end-user to connect with the server over the WebDAV protocol. This phase requires the server URL, username and password of the WebDAV account. Additionally, either a third-party WebDAV client, Windows XP (or later) operating system with built-in WebDAV support. Several tools can be used to connect with the server. This guide uses the inbuilt Map network drive tool to connect with the server over the WebDAV protocol. It’s recommended to update Windows before proceeding as it ensures smooth operation.
- Click on the Start button, then start menu, then select File Explorer.
- Click on This PC in the navigation pane.
- Click on the arrow button at the upper-right corner to expand the ribbon.
- Switch to the Computer tab, and then in the Network section locate the Map network drive option. Click the down arrow on this particular option and select Map network drive to start mapping a local drive with a Remote File Server.

Start mapping a network drive - Clicking on the option above opens a Wizard where the drive to be mapped can be configured. In the drive option, select the alphabet you want to assign to the mapped local folder. In the folder option, type the full path of the WebDAV server. In this particular tutorial, the URL is supposed to be https://efss.qloud.my/remote.php/dav/files/<EMAIL>. Check both Reconnect at sign-in, and Connect using different credentials options that allow the user to use their username and password to connect to the server.

- When the above configuration was confirmed, Windows will prompt the user to enter the username and the password of the WebDAV server in a dialogue box. Type them both, check to remember the my credentials checkbox, and click OK to connect with the server.

- Once the mapping process is completed, a new drive will be created in the My PC section. It shows the username, the path of the WebDAV, and the available space of the Remote File Server. This drive can be used just as a regular partition on Windows.
New drive visible in This PC


How to Find Available and Total Space of the Remote File Server?
Knowing the available and total space of the Remote File Server helps to manage the drive efficiently. This section demonstrates how to find these details with ease.
- Access the drive, right-click anywhere in the drive, and select Properties.
- Switch to the General tab. The Used space represents the utilized file server space, whereas free space represents the available space of the Remote File Server. Similarly, Capacity represents the total space of the Remote File Server.
Troubleshooting: If It’s unable to connect to the WebDev server
Even if the instructions above were followed precisely, the end-user might not be able to connect with the WebDAV server if Windows isn’t configured correctly. WebClient service is a prerequisite for WebDAV mapping to work. If it’s not running in the background, mapping might not work as expected. Use this section to find out how to turn it on.
- Click on the Start button to open the start menu, then search for Services.
- Click on Services to open the Windows Services window.
- Locate WebClient service, and click to select it.
- If it’s not running in the background, click the Start button on the left-hand pane.

- Right-click on the service, select Properties.
- In the Properties Window, switch to General. Select the Automatic option in the start-up type option, which automatically starts the service when Windows boots up. If this option isn’t selected, the WebClient service will have to be manually started whenever Windows boots up.

Selecting the startup type of your choice


Raza Ali Kazmi
Raza Ali Kazmi works as an editor and technology content writer at Sorcim Technologies (Pvt) Ltd. He loves to pen down articles on a wide array of technology related topics and has also been diligently testing software solutions on Windows & Mac platforms. If you have any question about the content, you can message me or the company’s support team.
Recent Post
Listings & Reviews
Best Support to Users
We strive to provide the best support to our users.
Don’t hesitate to get in touch. Ask anything!
ER Kelly freed 1TB of storage on his computer using
Clone Files Checker.
See how the software works!
Are you looking to set up a WebDAV server on your Windows Server system but unsure how to do it? Let us help you! In this guide, we will show you step-by-step how to set up a WebDAV server on your Windows Server.
How to Install the WebDAV Publishing Feature on Windows Server
To use WebDAV on Windows Server, you must first install and set up the WebDAV Publishing feature. Open the “Server Manager” in Windows Server and locate the “Add Roles and Features” button. Select it to continue.
After selecting the “Add Roles and Features” button, click “Next” to select your server. Once you’ve selected your server, locate the “Server Roles” section and click on it. Then, look for “Web Server (IIS)” and check the box next to it.
Note: you may also need to enable “WebDAV Redirector” under “Features”.
When you check the box next to “Web Server (IIS),” Windows Server will prompt you to add various features in the form of a pop-up window. Find the “Add Features” button and click it to add the new features.
Next, you need to add “WebDAV Publishing” to your Windows Server. In the “Select Role Services” window, locate “WebDAV Publishing” under “Web Server” and check the box to enable this feature.
After checking the box next to “WebDAV Publishing,” click the “Next” button to continue. The “Add Roles and Features Wizard” will ask for confirmation. Click the “Install” button, and be sure to also check the box next to “Restart the destination server automatically if required.”
Once you click the “Install” button, Windows Server will begin setting up Web Server (IIS) as well as WebDAV Publishing on your Windows Server. When the process is complete, click on the “Close” button to exit the wizard.
How to Create a WebDAV Website on Windows Server
To use WebDAV, you need to create a WebDAV website on Windows Server. First, open the Internet Information Services Manager in Windows Server, which was installed in the previous section of this guide.
To launch IIS Manager, search for “IIS” in the Start Menu. Once IIS is open, right-click on the “Sites” folder, and select the “Add Website” button. After clicking this button, enter a site name in the “Site name” area.
Next, find the browse button next to “Physical path” and select where your website’s physical files will be located on Windows Server.
After adding a folder to the Physical path area in the “Add Website” page, you’ll need to set the correct permissions to allow WebDAV access through the website. To do this, launch PowerShell and enter the following commands. Make sure to replace “username” with the username you wish to add to IIS_IUSRS.
Note: You will need to run “Add-LocalGroupMember” for each user you wish to add to IIS_IUSRS.
New-LocalGroup -Name "IIS_IUSRS"

Add-LocalGroupMember -Group "IIS_IUSRS" -Member "username"
Once you’ve entered the commands, open Windows Explorer and navigate to the folder you specified in the “Physical path” area. Right-click on the folder and select the “Properties” option. Then, click on the “Security” tab and click the “Edit” button.
When you’ve clicked on the “Edit” button, select the “Add” button, and add “IIS_IUSRS.” Click the “OK” button when done. With “IIS_IUSRS” added to the WebDAV folder, anyone in the “IIS_IUSRS” group will have full access to the physical path.
With the physical path set, go to the “IP address” section and set the IP address for the WebDAV server. You can also add a hostname (domain name) if you wish.
Once everything is configured on the “Add Website” page, click the “OK” button to continue.
Configuring WebDAV Authoring Rules
WebDAV authoring rules need to be configured in IIS for your newly created website so that users can access your WebDAV server. To start, launch IIS Manager, and select your website under “Sites.” After selecting it, find “WebDAV Authorization” and click on it.
Inside the “WebDAV Authorization” area, click “Add Authoring Rule”. Then, under “Allow access to,” choose “All content.” Next, find the “Allow access to this content to” area, and select “Specified roles or user groups.” In the text box, enter “IIS_IUSRS” as the specified group. This means that only users who have been added to the “IIS_IUSRS” group may use WebDAV.
After adding the group, find “Permissions”. Check “Read,” “Source,” and “Write” to configure permissions for those who access your WebDAV server.
Connecting to Your WebDAV Server
To connect to your WebDAV server on Windows, you’ll need to log in using specified users. Open up Windows Explorer on a Windows PC, and enter the address:
\\server-ip\webdav
Press enter to initiate login. Then, enter your WebDAV user credentials to log in. Once you’ve logged in, you’ll be able to read, write, and access files on WebDAV running on your Windows Server.
