
You will learn how to SSH into a VirtualBox guest machine from a local host computer as well as from another computer. I use SSH as an example here, but these settings will work for other scenarios such as a web-server on your VirtualBox machine.
Content
- Why SSH into VirtualBox?
- Prepare VirtualBox
- Install SSH in VirtualBox OS
- Open SSH port in Firewall
- VirtualBox network settings
- Install SSH client
- Connect to VirtualBox from the guest OS
- Connect to VirtualBox from another computer
- Switch to the Bridge Adapter in VirtualBox
- Find out your VirtualBox IP
- SSH to VirtualBox from another computer
- Final thoughts
Why SSH into VirtualBox?
There are multiple reasons you may want to connect to your VirtualBox guest OS through SSH or other means. I often do that to test various things including:
- SSH Key authentication
- SSH in FileZilla
- Mont the remote server to your File Manager
- Transfer files between computers
- Remote desktop software
I use SSH as an example here because it is the simplest use case. However, these settings will work for other scenarios as well. You just need to install the necessary software and configure the corresponding ports in your VirtualBox OS. The rest is the same.
Prepare VirtualBox
Install SSH in VirtualBox OS
First, let’s install SSH in the VirtualBox OS. I assume you run a Debian-based distro such as Ubuntu in your VirtualBox. I have a detailed guide on how to install, configure and use SSH on Linux, if you need instructions for other Linux distros.
In Ubuntu, you need to install the OpenSSH server package:
sudo apt install openssh-server
After the installation, check the SSH status:
sudo systemctl status ssh
You should see that it is active:
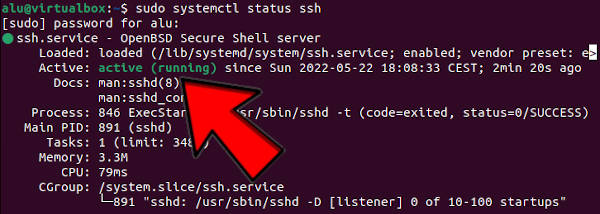
If it is not, enable and start it manually:
sudo systemctl enable ssh --now
sudo systemctl status ssh
Open SSH port in Firewall
If you have a firewall enabled in your VirtualBox, it may block your SSH connection. You can find what ports are open with this command:
sudo lsof -i -P -n | grep LISTEN

If you do not find the port 22 among open ports, open it in your firewall:
sudo ufw allow ssh
sudo ufw status verbose
You can also do it using the graphical interface of the UFW firewall.
VirtualBox network settings
To open VirtualBox for SSH connections, we need to change the VirtualBox network settings to allow the SSH connection. Navigate to VirtualBox settings -> Network
and make sure you have the settings Attached to NAT.
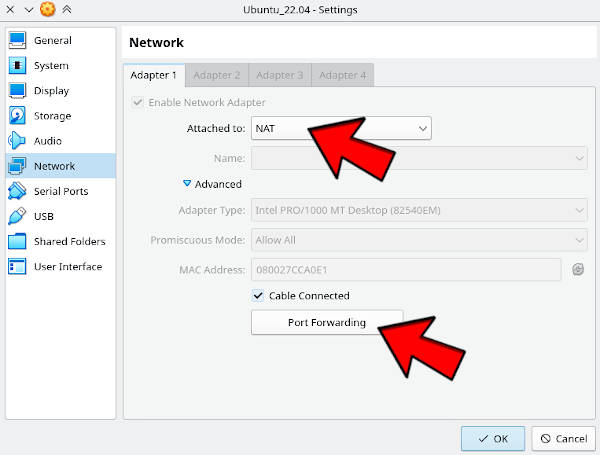
Then go to Advanced -> Port Forwarding and add these settings:
- Name: ssh (or whatever you like)
- Protocol: TCP
- Host Port: 2222 (or any other port you like)
- Gust port: 22
The IP fields can be left empty.

Similarly, you can also set port forwarding for other interfaces.
Install SSH client
To be able to SSH into the VirtualBox OS, you must have an OpenSSH client installed on the computer you are going to connect from e.g. your host computer or your another computer:
sudo apt install openssh-client
If you use Windows as a client, install PuTTY.
Connect to VirtualBox from the guest OS
Now, connect to the VirtualBox OS using the port 2222 that we set earlier and the username of your VirtualBox OS:
ssh -p 2222 virtualbox-user-name@localhost
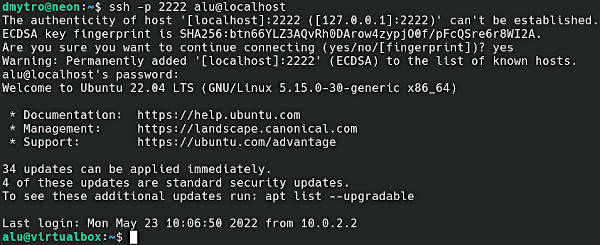
If you get a warning “Are you sure you want to continue connecting (yes/no)?”, type yes. You would also have to type the password of your VirtualBox user.
Now, you should have an SSH connection to your VirtualBox OS.
Connect to VirtualBox from another computer
Connecting to VirtualBox from another computer is a little more complicated. You need to change the network settings of your VirtualBox and also find out the IP address of your VirtualBox.
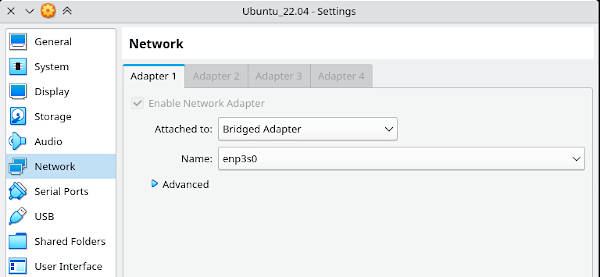
Switch to the Bridge Adapter in VirtualBox
The Bridge Adapter creates a routing that makes your VirtualBox network interface look like your host network interface. That way, you can to reach your VirtualBox machine from another machine.
You need to go to VirtualBox network settings and switch from NAT to Bridge Adapter.
Find out your VirtualBox IP
You can find your VirtualBox IP address, if you run this command:
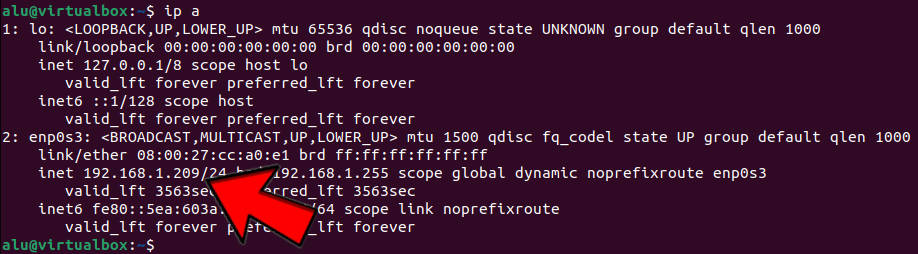
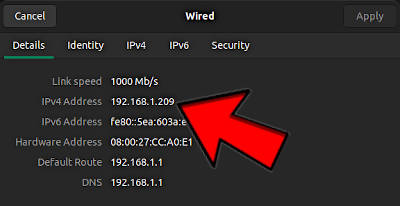
You can also find it in the graphical network settings:
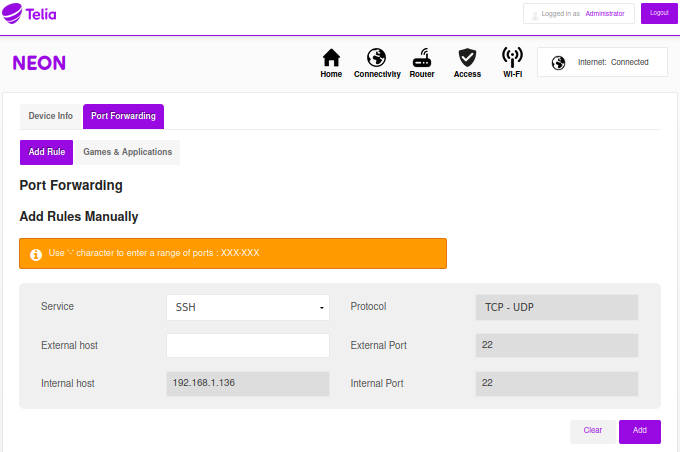
Note, this is your private IP address and to access it you need to be in the same network. You can SSH to your Virtualbox from outside of your local network if you use your public IP and configure the SSH port forwarding in your router. This poses an extreme security risk to your system, so I do not recommend doing so.
If you still want to do that, you can find out your public IP if you just google my ip. To configure the SSH port forwarding in your router, you need to follow the instruction of your router. The settings vary from model to model. This is how it looks in my router:
Also, follow these SSH security measures:
- use a strong password and SSH key authentication
- disallow root access over SSH
- do not use the default 22 port
- disallow numerous SSH login attempts.
SSH to VirtualBox from another computer
Use the IP address you noted earlier to connect to the VirtualBox OS from another computer :
ssh virtualbox-user-name@virtualbox-ip-address
Final thoughts
Now, you know how to SSH into a VirtualBox machine. VirtualBox provides endless possibilities for other tests and I hope now when you know the principle, you would be able to configure it for other use cases as well.
If you want to learn more about SSH, I have a detailed guide on how to install, configure and use SSH on Linux and how to enhance the security of your SSH connection with SSH keys and white-listed IP addresses.
После установки серверного дистрибутива Linux на виртуальную машину VirtualBox вы можете обнаружить, что подключение по SSH не работает. Это связано с тем, что по умолчанию на VirtualBox используется подключение к интернету с помощью NAT.
При таком способе подключения у вас нет возможности подключаться к виртуальной машине из своей реальной операционной системы. В частности, вы не сможете подключиться по SSH.
В данной статье мы рассмотрим сразу два способа, как можно решить эту проблему. Первый вариант – проброс портов через NAT, а второй – использование сетевого моста. Оба этих способа сохраняют доступ к интернету на виртуальной машине.
Проброс портов для SSH
Для проброса портов вам нужно знать IP адрес, который присваивается виртуальной машине. Для этого запустите виртуальную машину и выполните на ней команду «ip addr» или «ifconfig». В ответ вы получите информацию о сетевых подключениях, в которой будет указан и IP адрес. В нашем случае был получен IP адрес – «10.0.2.15».
Обратите внимание, если в вашей системе нет команды «ifconfig», то ее нужно будет установить отдельно. В случае Debian и Ubuntu Linux это можно сделать с помощью команды «apt-get install net-tools».

После того как мы узнали IP адрес виртуальную машину нужно выключить и открыть ее настройки в программе VirtualBox.

В настройках виртуальной машины нужно открыть раздел «Сеть», открыть дополнительные настройки и перейти к пробросу портов.

После этого откроется окно для проброса портов. Здесь нужно нажать на кнопку «Добавить» и заполнить следующие данные:
- Имя: SSH.
- Протокол: TCP.
- Адрес хоста: оставляем пустым или указываем 127.0.0.1.
- Порт хоста: любой свободный порт на вашей основной системе, например, 2222.
- Адрес гостя: IP адрес, который был присвоен вашей виртуальной машине. В нашем случае это 10.0.2.15.
- Порт гостя: порт SSH на виртуальной машине, по умолчанию – 22.
После проброса порта закрываем все окна с помощью кнопки «ОК».

После этого можно подключаться к виртуальной машине по SSH. Для этого можно использовать клиент OpenSSH, который доступен в Windows 10. Поскольку порт «2222» на основной системе был проброшен на порт «22» на виртуальной машине, то для подключения по SSH нам нужно выполнить следующую команду:
ssh user@localhost -p 2222
Где «user» — это имя пользователя, а «2222» — используемый порт на основной системе.

Аналогичным способом выполняется подключение с помощью PuTTY. В поле «Host Name» указываем «localhost», а в поле «Port» — «2222». Более подробно об OpenSSH и PyTTY в отдельной статье о подключении по SSH.

Как видно по скриншоту вверху, данный способ отлично работает, и мы успешно подключились по SSH к виртуальной машине VirtualBox.
Подключение через сетевой мост
Также есть альтернативный способ подключения к виртуальной машине по SSH для этого нужно изменить тип подключения с «NAT» на «Сетевой мост». В этом случае виртуальная машина будет подключена к вашей локальной сети и получит IP адрес от вашего роутера из того же диапазона, что и ваша основная система.
Для этого нужно выключить виртуальную машину и зайти в ее свойства в программе VirtualBox. В настройках нужно зайти в раздел «Сеть» и включить тип подключения «Сетевой мост».

После этого нужно запустить виртуальную машину и выполнить на ней команду «ip addr» или «ifconfig» для того, чтобы узнать, какой IP адрес она получила от роутера. В нашем случае был получен IP адрес «192.168.1.214».

После этого к виртуальной машине можно подключаться по SSH. Для этого нужно просто использовать IP адрес, который был ей присвоен роутером. Например, для того чтобы подключиться с помощью клиента OpenSSH нужно выполнить следующую команду:
ssh [email protected]
Где «user» — это имя пользователя, а «192.168.1.214» — это ее IP адрес.

Аналогично работает и подключение с помощью PuTTY. Вводим «192.168.1.214» и подключаемся по стандартному порту «22».

Как и предыдущий способ, вариант с использованием сетевого моста отлично работает, при этом виртуальная машина не теряет доступа к интернету.
Посмотрите также:
- Как сделать общую папку в VirtualBox
- Как подключиться по SSH из Windows 10
- Как запустить виртуальную машину VirtualBox из командной строки
- Как установить Linux на виртуальную машину
- Как установить Windows 7 или 10 на виртуальную машину
Автор
Александр Степушин
Создатель сайта comp-security.net, автор более 2000 статей о ремонте компьютеров, работе с программами, настройке операционных систем.
Остались вопросы?
Задайте вопрос в комментариях под статьей или на странице
«Задать вопрос»
и вы обязательно получите ответ.
VirtualBox allows to create different guest virtual machines on top of the same host. And, it provides isolation from the host too.
But, what if you need to access the guest machine via SSH?
That’s where Network Address Translation (NAT) helps. It allows SSH access even to the virtual servers.
At Bobcares, we often get requests from customers to enable VirtualBox SSH NAT settings as part of our Infrastructure Management Services.
Today, we’ll see how our Dedicated Engineers setup SSH via NAT in Virtualbox and solve common issues with it.
How VirtualBox NAT helps?
Let’s now take a look on the need for having special settings to SSH to the guest server.
VirtualBox support Network Address Translation aka NAT. NAT simply maps an address to another.
Usually, by enabling NAT networking for any guest server, VirtualBox automatically performs IP address translation between the guest VM and host’s network. And, there is no need to configure anything on the host machine or on the local network in guest. However, this makes guest VM not reachable or visible from external networks. Thus, it creates problems when you want to access the guest VM directly.
Fortunately, by enabling port forwarding for port 22, we can SSH to the guest machine from the host.
Steps to enable SSH on VirtualBox
Now, let’s see how our Dedicated Engineers setup port forwarding for VirtualBox NAT. There are options to do this either from the GUI or from the command line. We’ll check both methods here.
1. Port forwarding from GUI
Firstly, let’s see how to do this from the VirtualBox web interface.
On VirtualBox, to allow SSH access, we need to edit the network settings of the guest VM.
For this, we first choose the guest VM, then open “Settings” >> “Network” >> “Advanced” section. This will show additional network adapter options. Then, we click on “Port Forwarding” button.
Here, we add a new port forwarding rule. It will contain a name for the rule, protocol, host IP, port and guest IP and port.
For example, to enable SSH access on a guest machine with IP 10.0.2.15 on port 2522, our Support Engineers set up the rule from the panel as

When we power on the guest VM, it will automatically enable this rule. However, to confirm that port 2522 is listening, we check using the netstat command.
Now, we can SSH to the guest VM using
ssh -p 2522 <login>@127.0.0.1Here, the SSH login request sent to 127.0.0.1:2522 will automatically be translated into 10.0.2.15:22 by VirtualBox. Thus, we can now SSH to the guest VM.
2. Port forwarding from command line
Similarly, we can add port forwarding from the command line too. Let’s check on how to do this too.
Here, we make use of the VirtualBox command-line management interface called VBoxManage.
To create a port forwarding rule for guest VM named “Centos” with IP address 10.0.2.15 and SSH port 22, mapped to local host at port 2522, our Dedicated Engineers use the command:
VBoxManage modifyvm "Centos" --natpf1 "SSH,tcp,127.0.0.1,2522,10.0.2.15,22"Here, the name of the rule should be set as unique.
After creating the rule, we verify it using
VBoxManage showvminfo "Centos" | grep NICAnd, this will show the rule in the results.
How we fix when things go wrong with VirtualBox SSH ?
From our experience in managing VirtualBox, we often see customers having problems with SSH on guest VMs. Let’s see where customers go wrong in NAT setup and how we fix them.
1. Port problems
Often, problems can arise while choosing the SSH port. Recently, one of our customers reported problems with SSH access to his VirtualBox guest machine. The error said:
ssh: connect to host 192.168.12.131 port 22:Connection refusedHere, our Support Engineers started investigation by checking the SSH configuration and the port forwarding rule. In this case, the forwarding rule was set up on port 2222, while customer was using 22 instead. And, we corrected the customer to use the correct SSH port and that fixed the problem.
2. Network settings
Similarly, network settings also can create problems with access to VirtualBox guests.
The network settings depend on the type of access required on guest VMs. For example, when the guest server need only access via internal network, our Dedicated Engineers setup the network interface as host-only adapter. Here, the machine will not have access to the internet.
And, for machines that need internet access too, we set the Adapter 1 as NAT and set Adapter 2 as a Host-Only adapter. Thus, when users report connection problems, we always ensure that the network adapter is set correctly on the server.
[Have trouble connecting to VirtualBox machine ? We can fix it right away.]
Conclusion
To conclude, VirtualBox SSH NAT settings decide on the access to the guest machines. Today, we saw how our Dedicated Engineers setup port forwarding rules to enable SSH access on guest machines and fix common problems with it.
PREVENT YOUR SERVER FROM CRASHING!
Never again lose customers to poor server speed! Let us help you.
Our server experts will monitor & maintain your server 24/7 so that it remains lightning fast and secure.
GET STARTED
var google_conversion_label = «owonCMyG5nEQ0aD71QM»;
Первый шаг — настройка сети в virtualbox. Виртуальная машина должна быть выключена. Идем в «Настройки -> Сеть», выбираем неиспользуемый адаптер, включаем его и выбираем тип подключения — «виртуальный адаптер хоста»:

Далее загружаем виртуальную машину и проверяем сеть.
В windows сеть можно проверить командой «ipconfig»:

На ОС Linux из терминала сеть можно проверить так:
ifconfig
В ответ вы должны увидеть работающие сетевые интерфейсы:

По ip можно догадаться, какой интерфейс отвечает за организацию локальной сети между компьютером и виртуальной машиной, по умолчанию (если вы сами не настраивали ip в virtualbox) такой ip должен выглядеть так: 192.168.56.* (вместо * обычно бывает 101 или 102 и т. д.).
Этот ip и нужно использовать для доступа к виртуальной машине.

По умолчанию ip выдается dhcp сервером virtualbox. Для удобства можно задать статический ip адрес в самой виртуальной машине. Например в windows это делается редактированием свойств сети. В интерфейсе linux все аналогично, а вот как это сделать в терминале, без графической оболочки, будет показано ниже, на примере добавления нового сетевого интерфейса в ubuntu server.
В linux бывает, что интерфейс локальной сети между компьютером и виртуальной машиной по умолчанию не задействован, и как следствие, отсутствует локальная сеть. В этом случае необходимо поднять интерфейс локальной сети между компьютером и виртуальной машиной вручную. Далее будет описан процесс задействования сетевого интерфейса в ubuntu server.
Сначала нужно найти название сетевого интерфейса, который нам нужен. В терминале набираем:
ip a
В результате вы получите список всех сетевых интерфейсов.
Находим нужный интерфейс, он чаще всего последний. Возможно скорее всего это либо eth1 (для ubuntu server 14.04), либо enp0s8 (для ubuntu server 16.04), все зависит от количества подключенных сетевых адаптеров к виртуальной машине.
Далее редактируем файл /etc/network/interfaces
nano /etc/network/interfaces
Файл /etc/network/interfaces для ubuntu server 14.04:
# The loopback network interface
auto lo
iface lo inet loopback
# The primary network interface
auto eth0
iface eth0 inet dhcp
В конец файла добавляем строку (для ip, задаваемого динамически):
auto eth1
iface eth1 inet dhcp
Для статического ip:
auto eth1
iface eth1 inet static
address 192.168.56.101
netmask 255.255.255.0
Вместо eth1 может быть другое название интерфейса, в зависимости от вашей конфигурации.
После этого нужно перезагрузить виртуальную машину и снова набрать команду:
ifconfig
В списке должен появиться интерфейс eth1, или тот, который прописали вы.
Настройка файла /etc/network/interfaces для ubuntu server 16.04:
# The loopback network interface
auto lo
iface lo inet loopback
# The primary network interface
auto enp0s3
iface enp0s3 inet dhcp
Здесь интерфейс называется enp0s3 вместо eth0. Согласно данным, полученным командой «ip a», в моем случае в конец файла нужно добавить:
auto enp0s8
iface enp0s8 inet dhcp
После внесения изменений так же необходимо перезапустить виртуальную машину, либо можно перезапустить только службу networking:
sudo service networking restart
На ubuntu server 14.04 у меня она не всегда перезапускается, просто продолжает работать, с ubuntu 16.04 в этом плане все впорядке, но для полной уверенности я считаю что лучше все таки перезапустить виртуальную машину.
После перезапуска машины и набора в терминале команды ifconfig в полученном списке сетевых интерфейсов должен появится интерфейс enp0s8.
Что делать, если сетевой интерфейс так и не заработал?
Тут два основных варианта: либо вы указали неправильный интерфейс в файле /etc/network/interfaces — в таком случае еще раз внимательно посмотрите список всех доступных сетевых интерфейсов командой «ip a» и выберите нужный. Либо виртуальная ОС вообще не видит сетевой адаптер. В этом случае скорее всего в ОС нет подходящих драйверов для этого адаптера. Эту проблему можно решить сменой типа адаптера, например на «паравиртуальная сеть (virtio-net)»:

Можете поэксперементировать с типом адаптера для достижения нужного результата.
После успешной настройки локальной сети между компьютером и виртуальной машиной можно к ней подключиться, например по ssh. Для этого набираем ip адрес, про который я писал вначале статьи, в ssh клиенте и радуемся успешному подключению)

Tharun Shiv
Posted on
• Edited on
Hey there!
This is Tharun here. Most of us would have struggled to SSH into a VirtualBox Machine. In this article, I introduce to you what Virtual Box is and how you can SSH into it from your local machine.
What is VirtualBox?
The VirtualBox is a software that can be used to run multiple operating systems on your own operating system and effortlessly switch between them, create snapshots, delete them, restore them on the fly.
We all have wondered if we had an easier way to access our VirtualBox Machines. In this tutorial, we will look at how you can SSH into your VirtualBox machine. This will prevent you to have to open your VirtualBox GUI to do everything. (duh!)
Did you know you could do this??
How to SSH into it?
Open VirtualBox

Click on Settings and go to Network
You can either click on the Settings icon, or you can right-click on a Virtual Machine and select the Settings option

Choose an Adapter
Based on which Adapter is free on your virtual machine. Enable the Network Adapter. Select the NAT network.

Select the Port Forwarding
Open the Advanced options and click on Port Forwarding. Leave other settings as default.

Add a new entry
Click on the + icon on the top-right corner to add a new rule.

The rule
Name: ssh
Protocol: TCP
Host Port: 3022
Guest Port: 22
Leave others empty
What we’re telling here is, basically forward all connections to the port 3022 on host machine to the port 22 on the guest machine. If you didn’t know, SSH uses port 2

Done! Now let’s connect
Open your terminal and type
~$ ssh -p 3022 <username>@127.0.0.1
Enter fullscreen mode
Exit fullscreen mode
Here,
~$ ssh -p 3022 ubuntu-1@127.0.0.1
Enter fullscreen mode
Exit fullscreen mode

Enter the Password of your that you are logging into and we’re done

Hope this article helped. Give this article a like, unicorn, and save it for later. Share it with your friends and let them know this useful trick.
Next article on how you can run a VirtualBox without running it’s GUI. So combining SSH access and no-GUI, VirtualBox made convenient.
My Blog: https://www.tharunshiv.com
Written by,

Thank you for reading, This is Tharun Shiv a.k.a Developer Tharun
