
В Windows 11 есть собственное встроенное приложение календаря, которое помогает планировать задачи, встречи, напоминания и другие события. Календарь Windows также позволяет нам синхронизироваться с нашими учетными записями, такими как Google, Microsoft, iCloud и т.д., и просматривать несколько календарей одновременно в одном месте.
Приложение «Календарь» работает в автономном режиме, поэтому нам не нужно подключаться к сети Интернет каждый раз, когда мы хотим проверить свое расписание.
В этой статье мы рассмотрим, как создать новое событие, управлять расписанием, настроить и синхронизировать календарь.
Для быстрого просмотра календаря, просто щелкаем значок времени и даты в правом углу панели задач. К сожалению, во всплывающем окне календаря нельзя просматривать события (Microsoft убрала эту возможность в Windows 11), здесь мы можем увидеть только даты и дни.

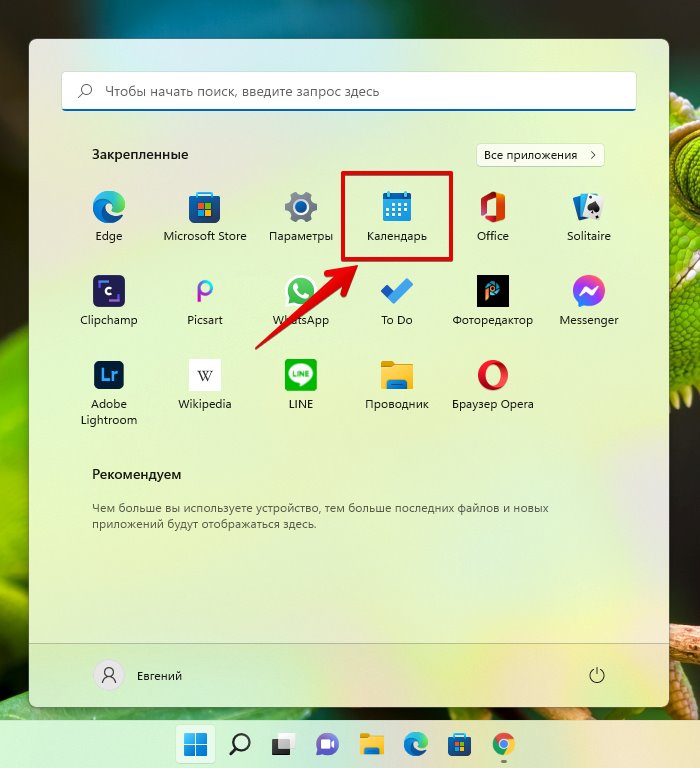
Чтобы просматривать и управлять событиями, необходимо использовать встроенное приложение «Календарь». Для этого открываем меню «Пуск» и нажимаем на значок «Календарь» в разделе «Закрепленные».
Конечно, существует и альтернативный способ, если приложение отсутствует в меню «Пуск» — открываем календарь через поиск Windows 11. Для этого нажимаем клавиши «Win+S» на клавиатуре (или щелкаем по значку лупы на панели задач) и в появившемся меню поиска вводим поисковый запрос «Календарь», затем нажимаем на приложение в разделе «Лучшее соответствие», либо нажимаем по ссылке «Открыть» в правой части меню поиска.
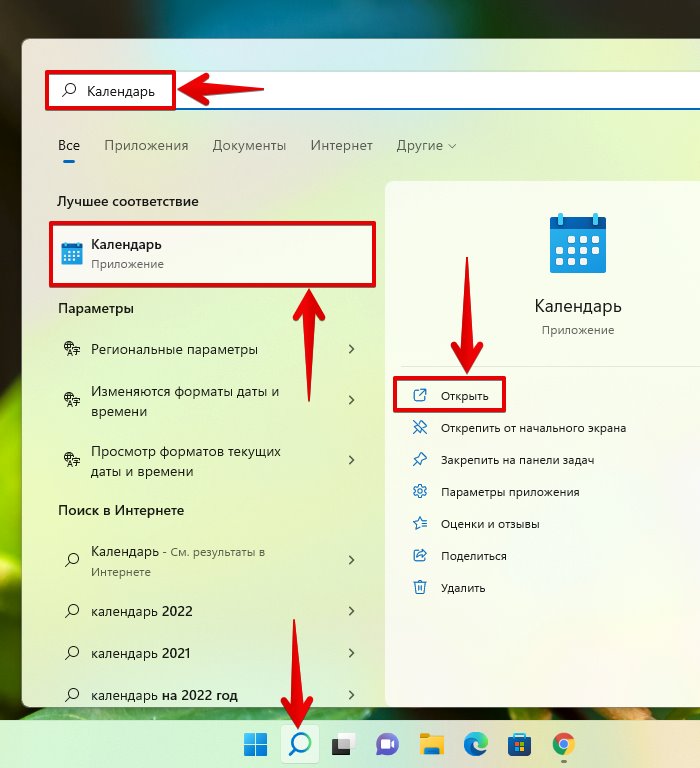
Если мы планируем часто использовать приложение «Календарь», то можно закрепить его на панель задач, для этого щелкаем в правой части меню поиска по ссылке «Закрепить на панели задач».
Итак, запустив приложение Календарь, можно просматривать различные события, а так же переключаться между другими календарями.
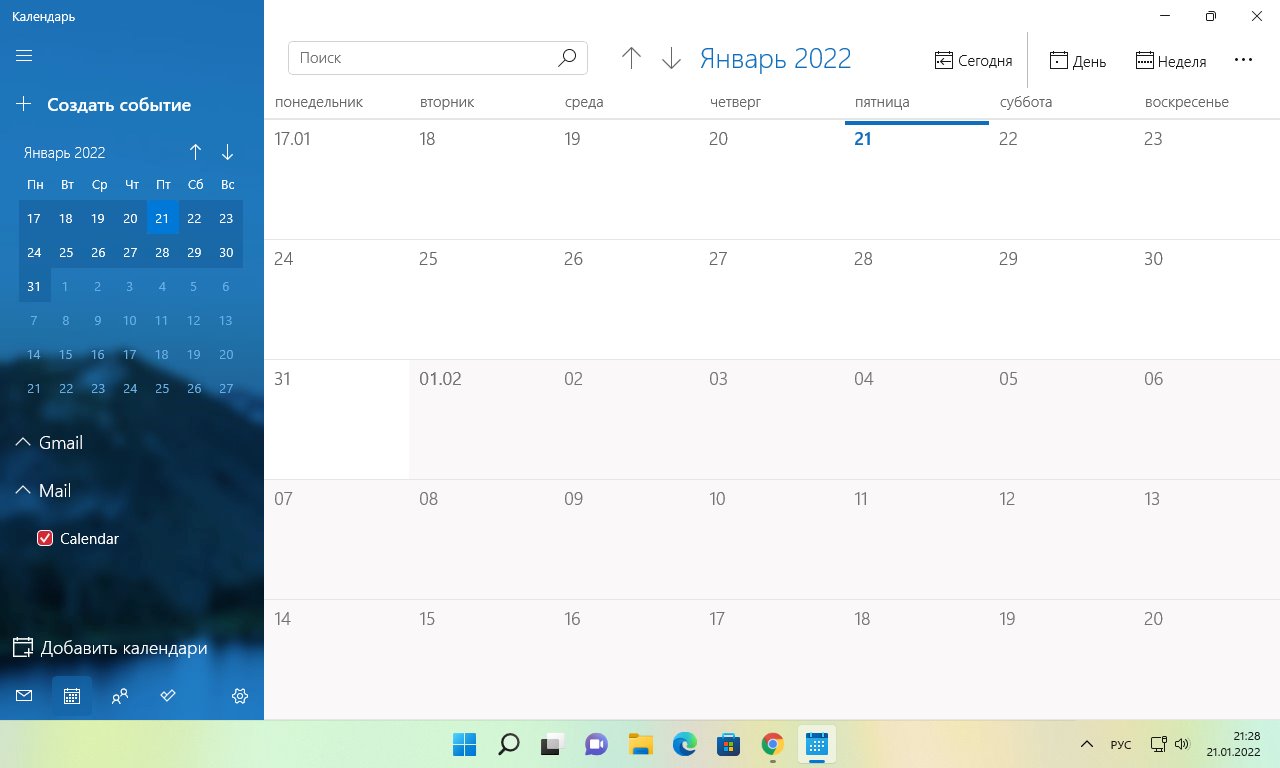
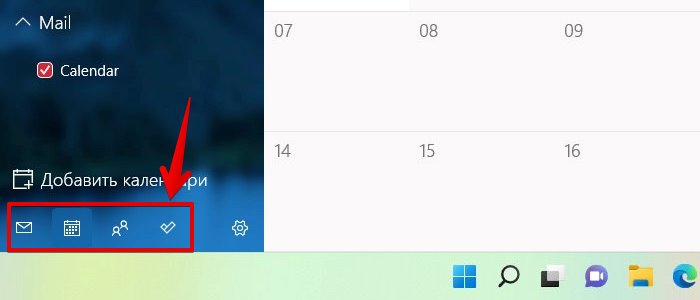
В нижней левой части приложения «Календарь» доступны кнопки для переключения между приложениями «Календарь», «Почта», «Люди» и «Задачи».
Как добавить и удалить учетную запись в приложении «Календарь» Windows 11
Добавление учетной записи в приложение календаря позволит нам синхронизировать календарь на всех устройствах, подключенных к одной и той же учетной записи, управлять расписаниями на нескольких устройствах и делиться своим расписанием с другими пользователями. С помощью приложения «Календарь» мы можем синхронизировать такие сервисы, как Outlook.com, Microsoft 365, Google, Yahoo, iCloud и другие.
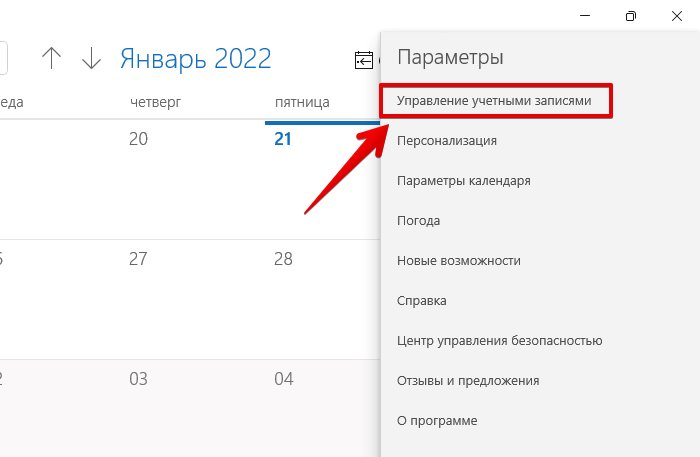
В приложении «Календарь» нажимаем на кнопку «Настройки» в левом нижнем углу.

Затем, в появившемся меню выбираем пункт «Управление учетными записями».
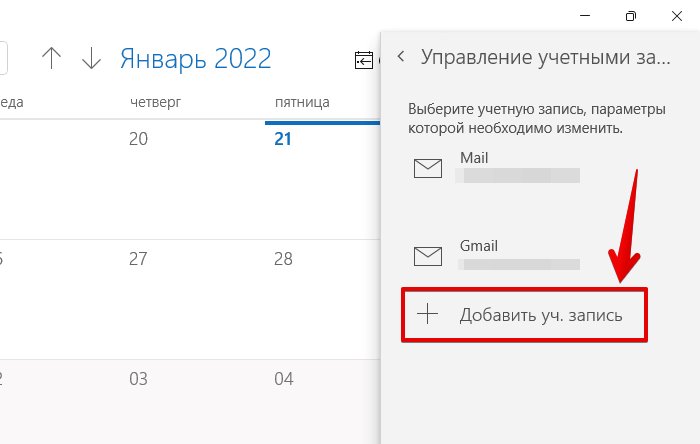
И щелкаем по кнопке «+ Добавить уч. запись».
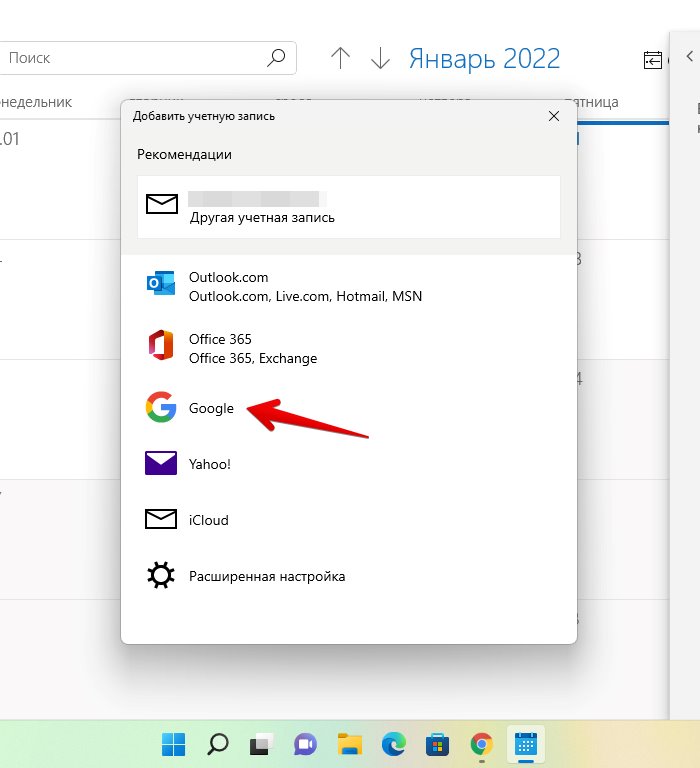
Появится диалоговое окно «Добавить учетную запись» со списком сервисов, которые мы можем добавить в приложение «Календарь». Теперь нажимаем на учетную запись сервиса, который мы хотим добавить.
В примере мы будем использовать учетную запись «Google», выбираем соответствующий вариант.
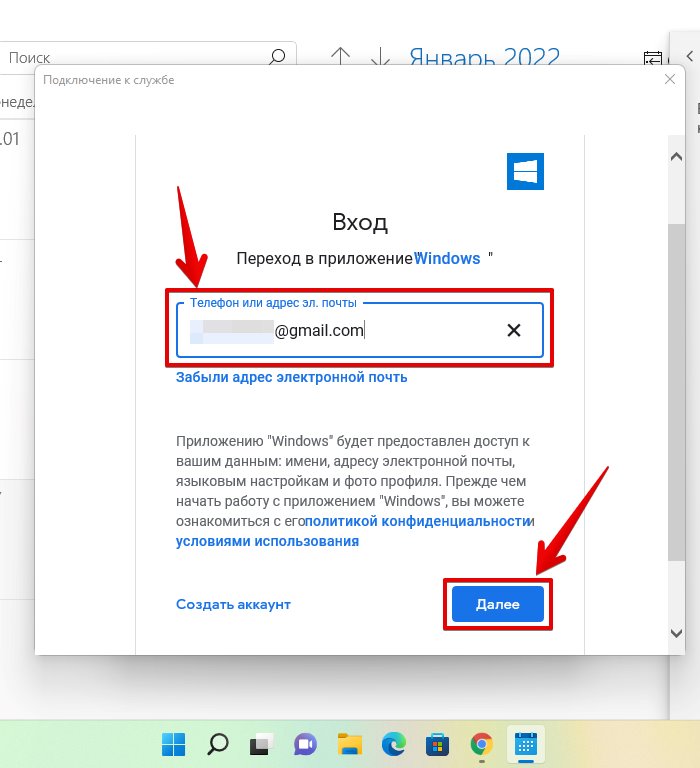
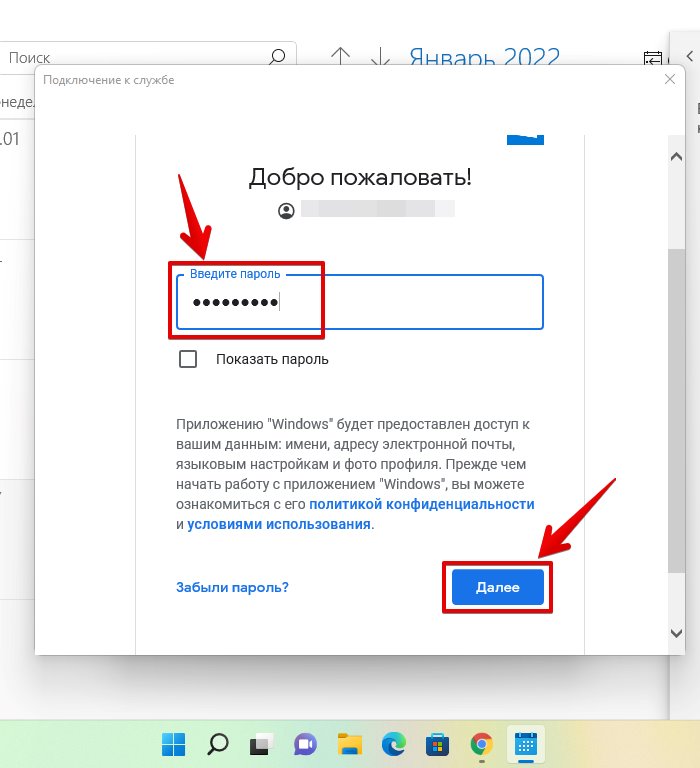
В следующем окне вводим свой адрес электронной почты и нажимаем «Далее».
Затем вводим пароль от учетной записи и нажимаем кнопку «Далее».
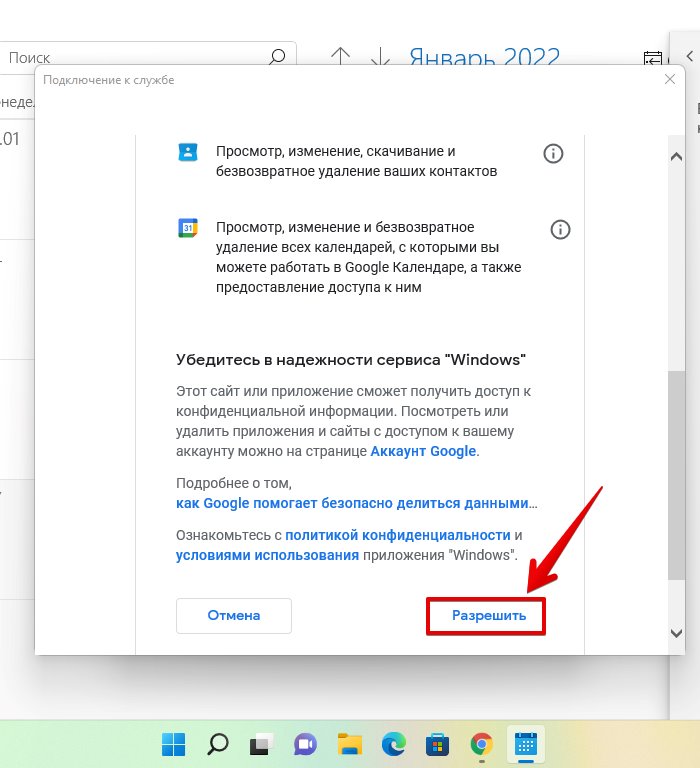
На следующем экране Windows 11 запросит у нас доступ к электронной почте, контактам и календарю. Прокручиваем страницу вниз и нажимаем «Разрешить», чтобы добавить учетную запись.
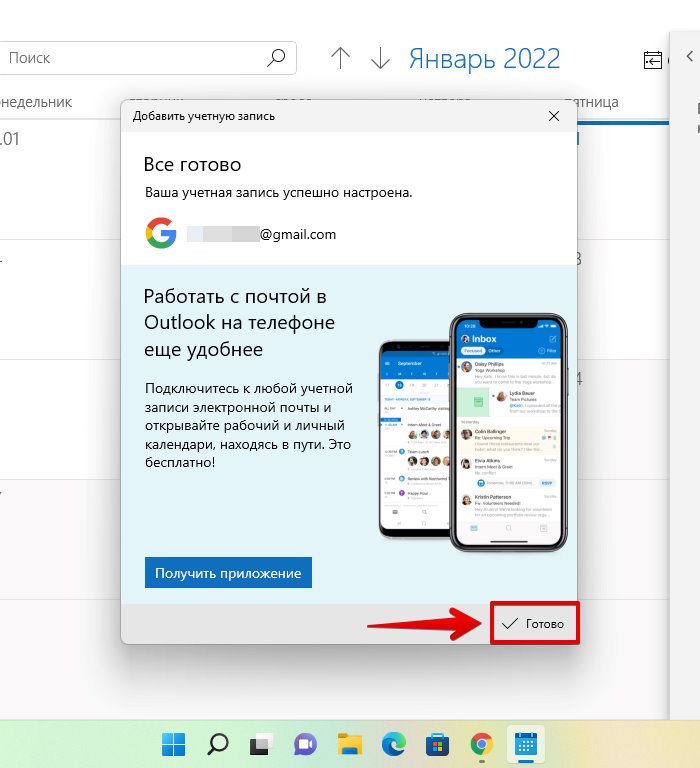
Теперь мы увидим сообщение «Ваша учетная запись успешно настроена», чтобы завершить настройку, щелкаем кнопку «Готово» в правой нижней части окна.
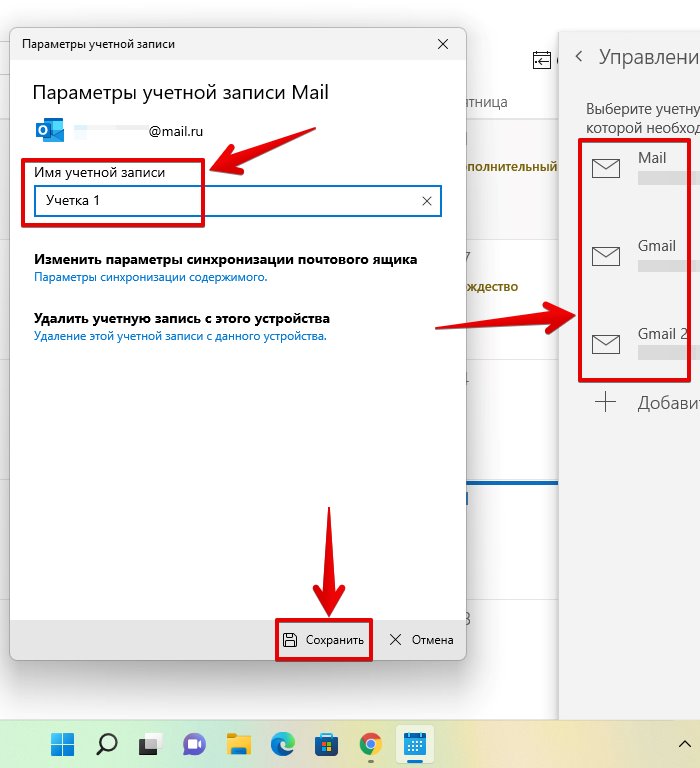
После добавления учетной записи, она будет отображаться в левой части меню, а так же в разделе управления учетными записями.

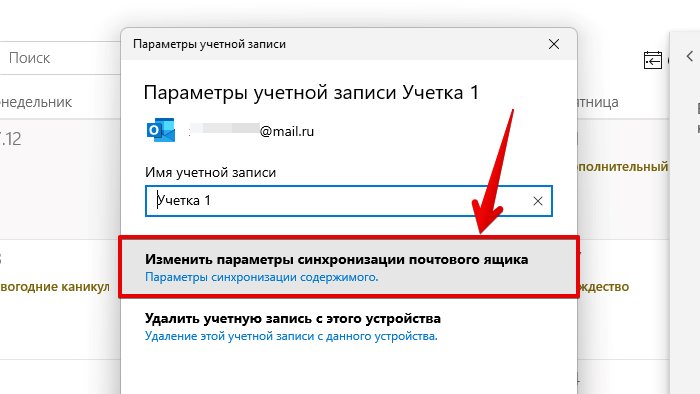
Если у нас подключено несколько учетных записей и чтобы не запутаться в них, можно переименовать каждую. Для этого нажимаем кнопку «Настройки» и щелкаем по пункту «Управление учетными записями» в появившемся меню справа. Далее щелкаем по учетной записи, которую хотим переименовать и в появившемся окне «Параметры учетной записи» вводим новое имя в поле «Имя учетной записи», после чего нажимаем на кнопку «Сохранить».
Чтобы изменить настройки синхронизации учетной записи, снова переходим в окно «Параметры учетной записи» и нажимаем на пункт на «Изменить параметры синхронизации почтового ящика».
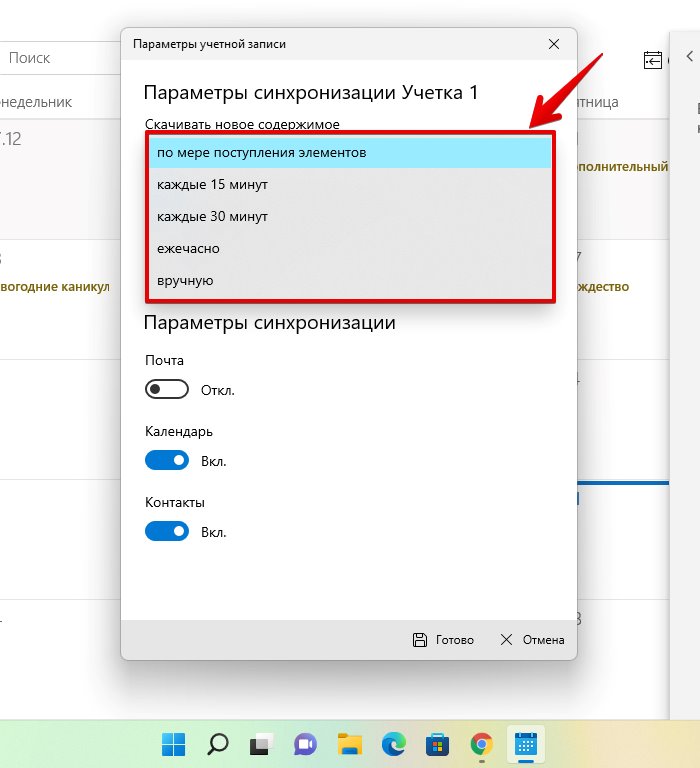
Здесь мы можете изменить различные настройки синхронизации для учетной записи. В раскрывающемся списке «Скачивать новые содержимое» мы можем изменить частоту загрузки новых данных.
Так же можно выбрать период скачивания почты, а в разделе «Параметры синхронизации» мы можем включить или отключить синхронизацию электронной почты, календаря и контактов.
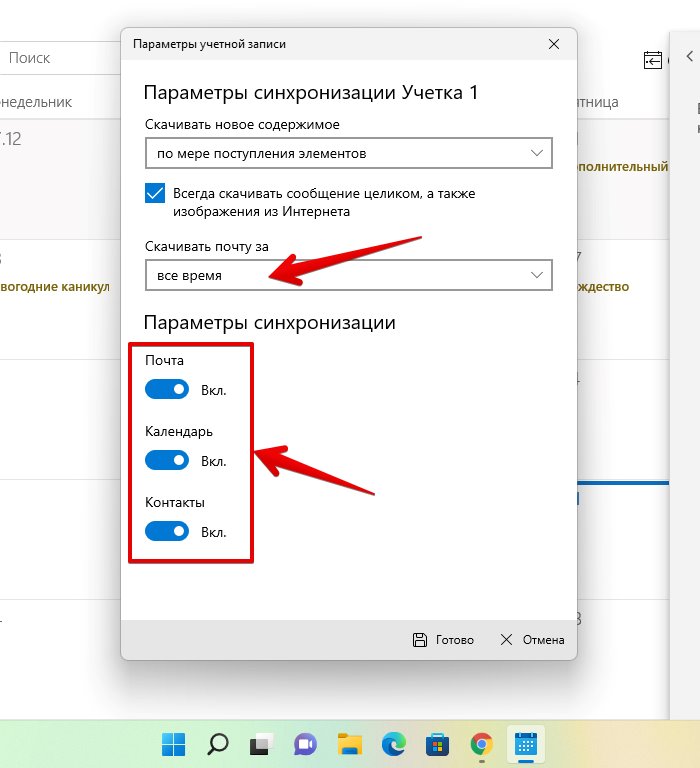
Для сохранения внесенных изменений нажимаем кнопку «Готово».
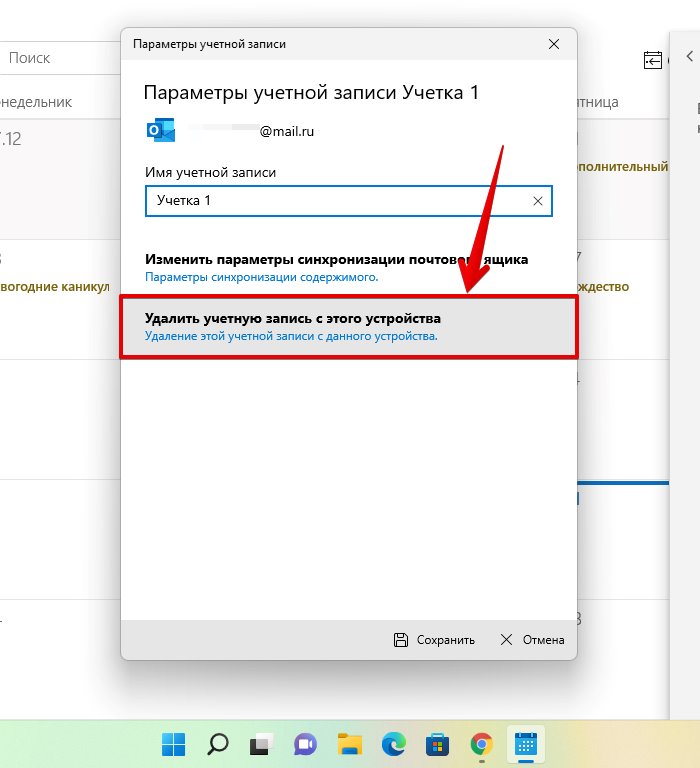
Для удаления учетной записи из приложения Календарь переходим обратно в окно «Параметры учетной записи», предварительно кликнув по УЗ, которую хотим удалить и щелкаем по пункту «Удалить учетную запись с этого устройства».
Управление дополнительными календарями
Мы также можем добавить дополнительные календари в каждую учетную запись. Для этого кликаем по кнопке «Добавить календари» в левой нижней части окна.
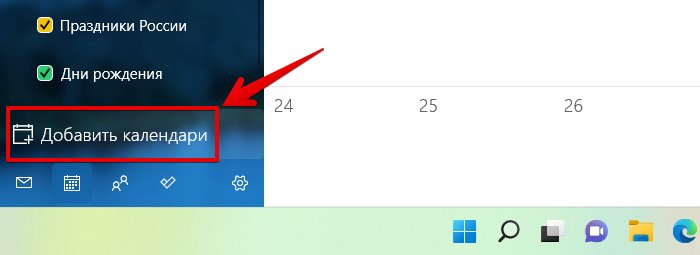
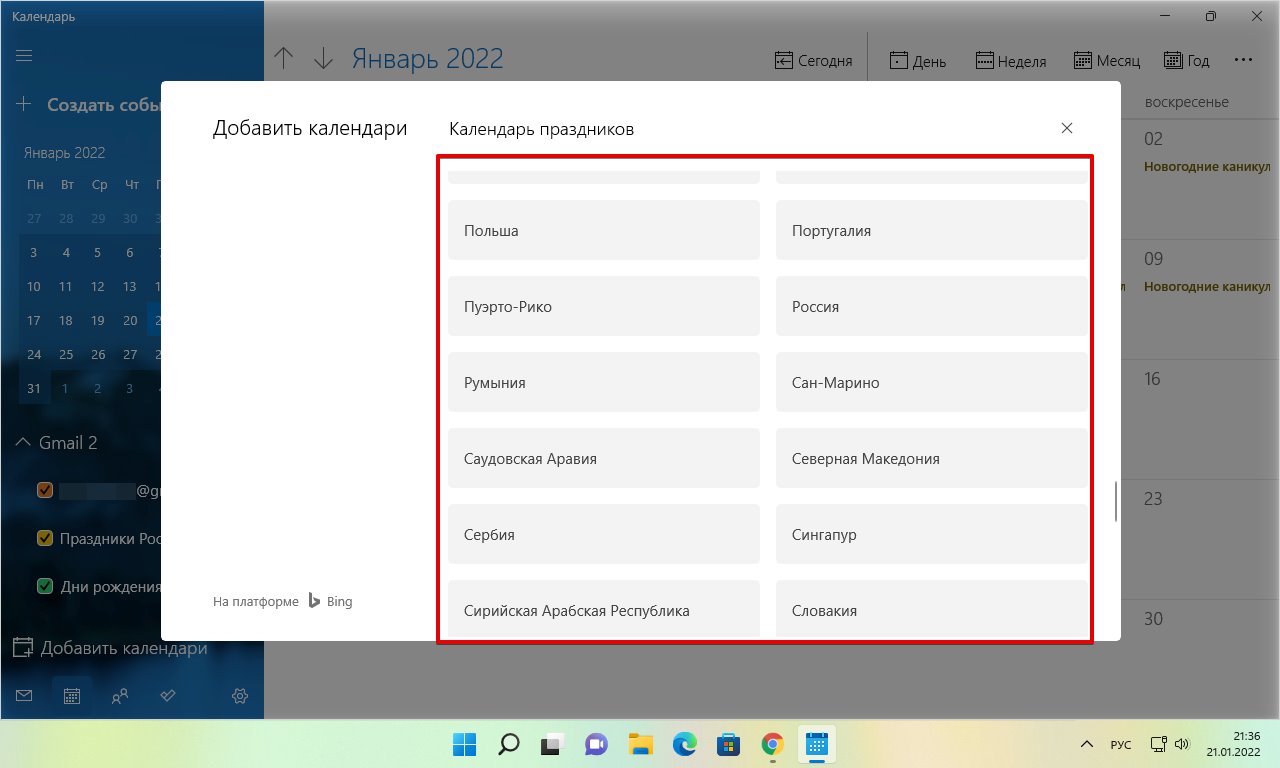
Появится окно, в котором слева будет доступен список различных календарей (в данном примере доступен только один календарь — Календарь праздников), а в правой части подкатегории этих календарей. Щелкаем по любому календарю, чтобы его добавить.
Добавленный календарь теперь доступен в левой части окна. Можно снять флажок, чтобы скрыть все его события.

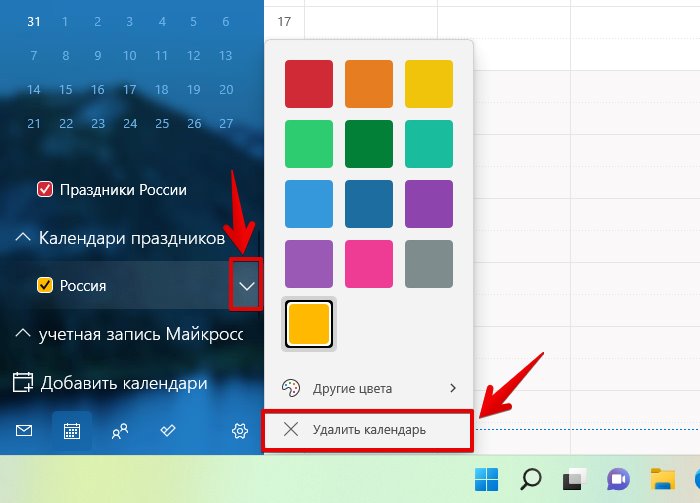
А для удаления дополнительного календаря, щелкаем по кнопке со стрелкой, чтобы отобразить дополнительное меню, в котором выбираем пункт «Удалить календарь».
Как настроить внешний вид календаря в Windows 11
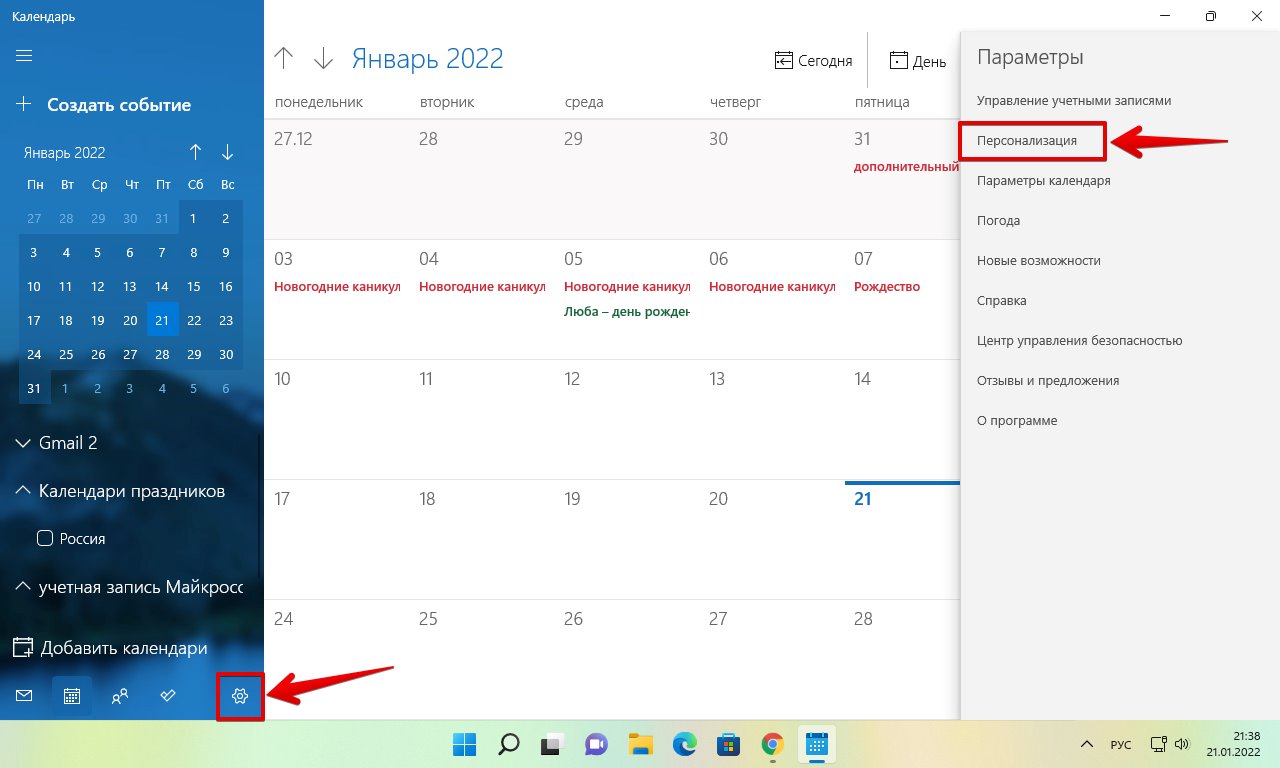
В приложении Календарь можно настроить фоновое изображение, а также установить светлые или темные цвета интерфейса. Чтобы персонализировать приложение «Календарь», выполняем следующие действия. Щелкаем по кнопке «Настройки» и выбираем пункт «Персонализация» в меню справа.
В разделе «Цвета» можно выбрать цвет интерфейса, щелкнув по соответствующей кнопке.
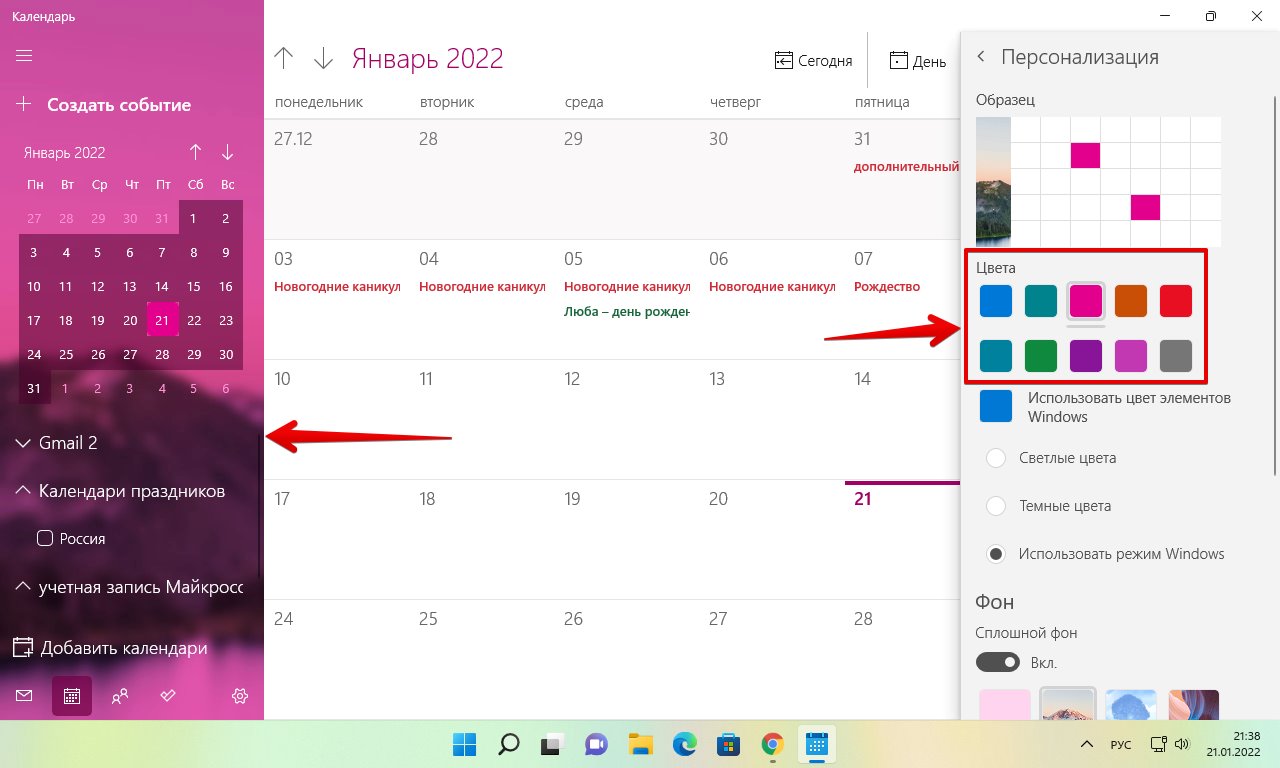
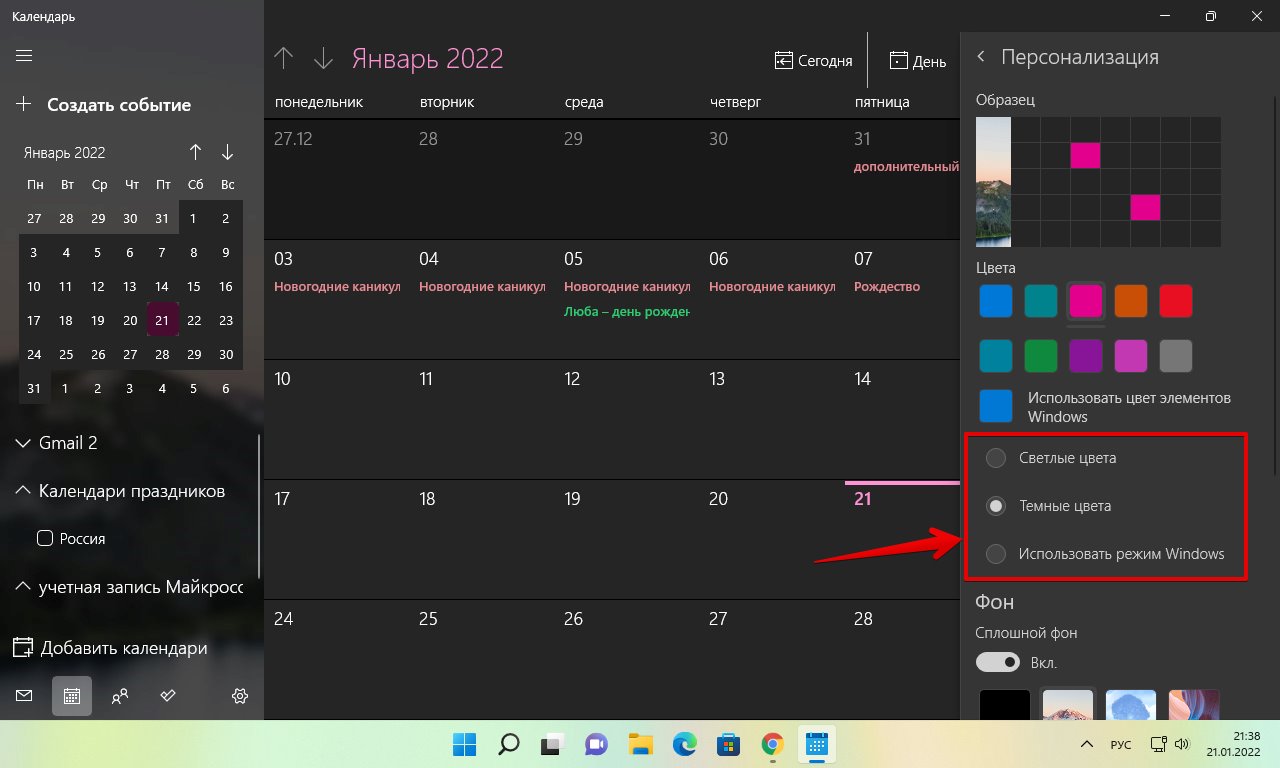
Если необходимо изменить цветовую схему всего календаря, используем один из следующих режимов:
- Светлые цвета
- Темные цвета
- Использовать режим Windows
Если мы хотим изменить фон календаря, выбираем один из предустановленных фонов в разделе «Фон». Если необходимо использовать свой собственный фон для календаря, нажимаем кнопку «Обзор» и выбираем изображение с нашего ПК.

Как изменить цвет всплывающего окна календаря на панели задач
Если необходимо изменить цвет всплывающего окна календаря на панели задач, нам необходимо изменить цветовые настройки в приложении «Параметры» Windows 11.
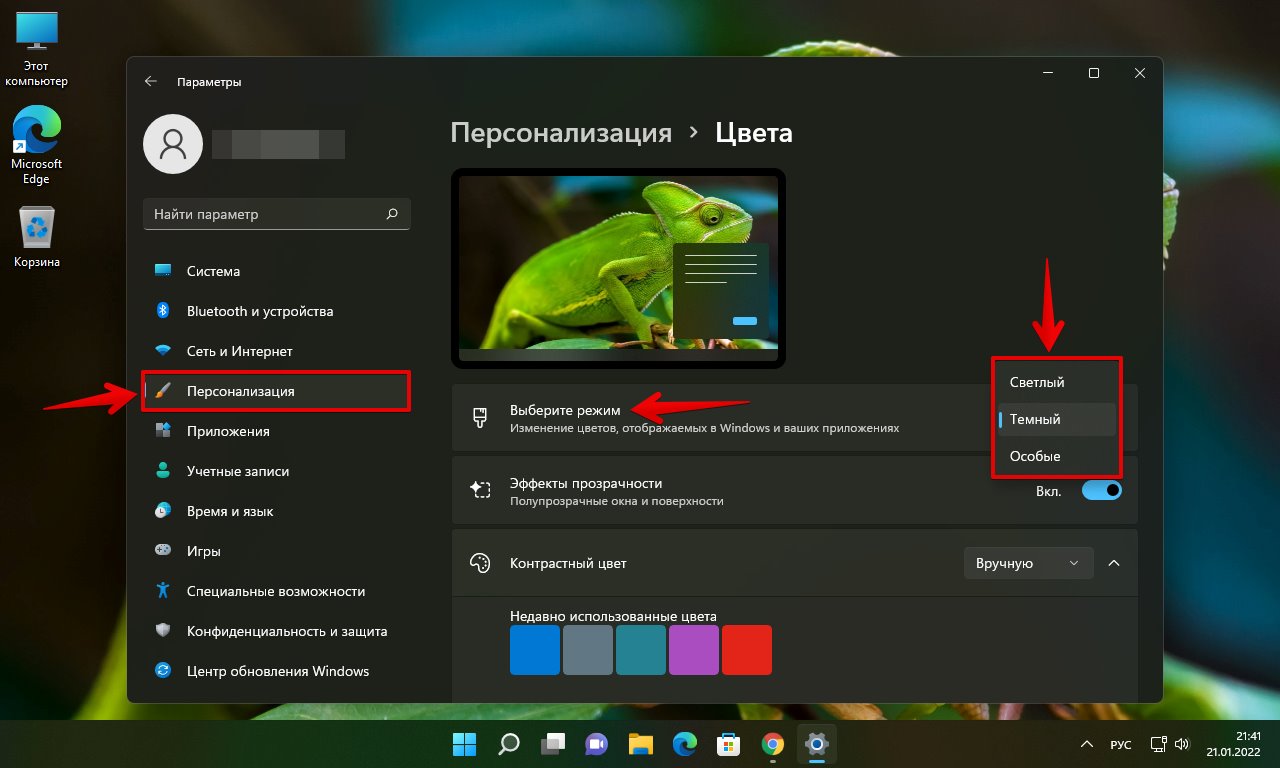
Открываем приложение «Параметры» (клавиши «Win+I») и переходим в раздел «Персонализация» на левой панели. Затем открываем параметры «Цвета» на правой панели.
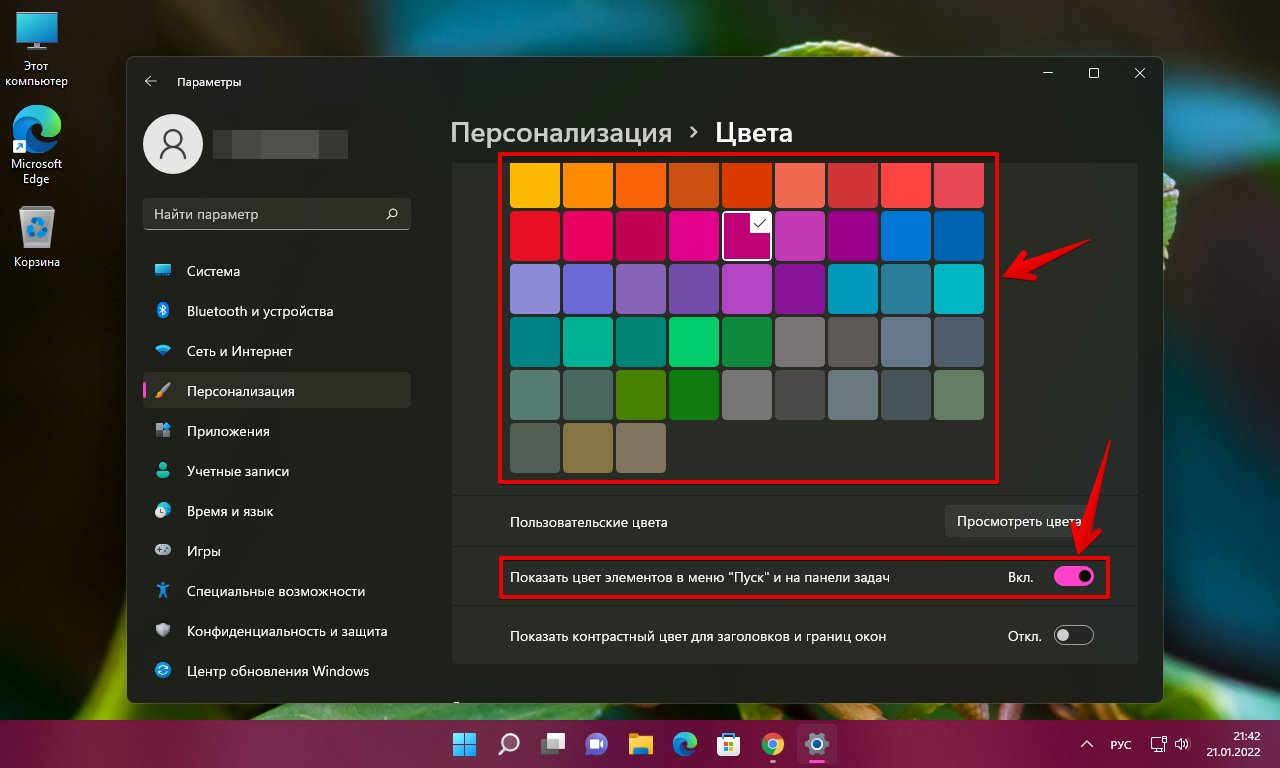
Затем находим параметр «Выберите режим» и устанавливаем значение «Темный».
Далее находим параметр «Контрастный цвет» и устанавливаем значение «Вручную».
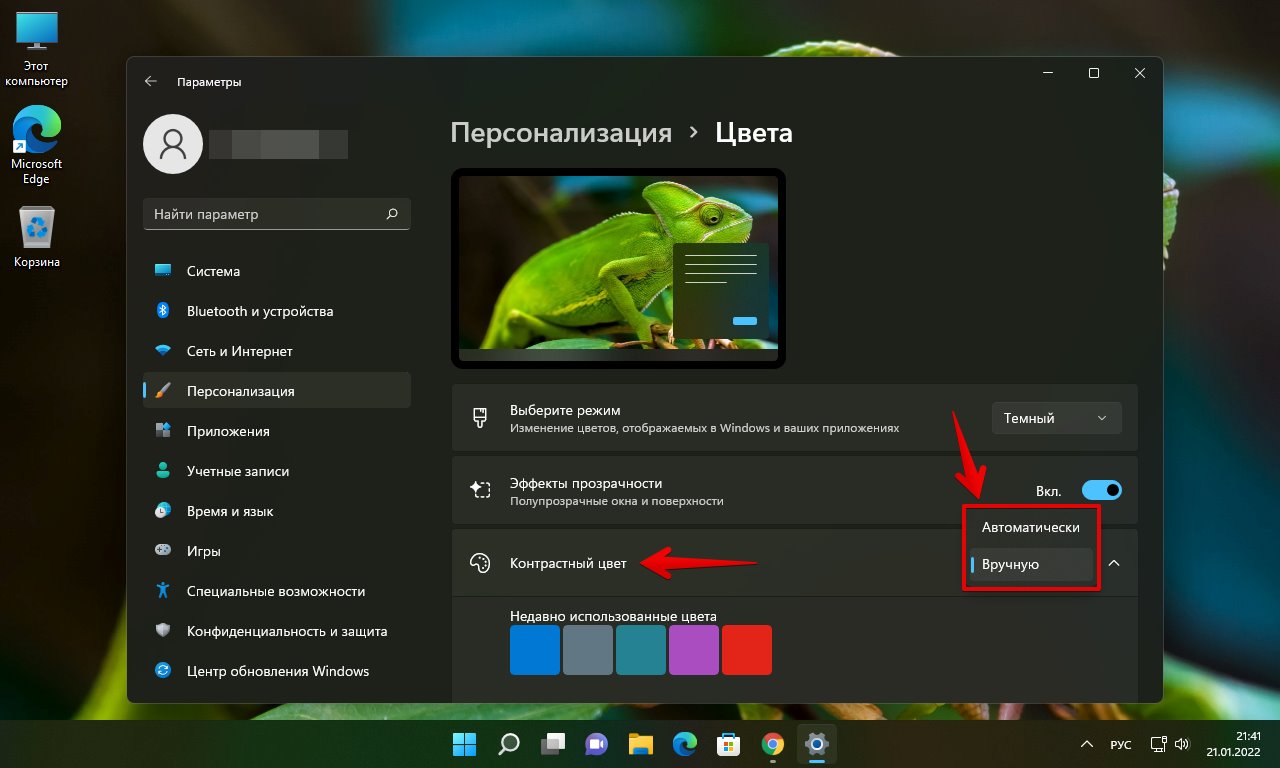
Теперь выбираем желаемый цвет и устанавливаем флажок у параметра «Показать цвет элементов в меню Пуск и на панели задач».
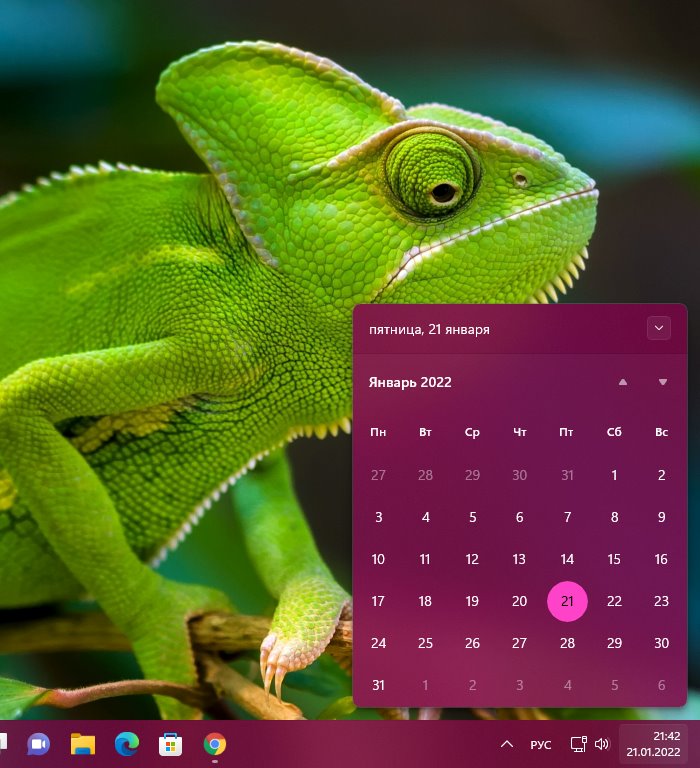
Открываем календарь на панели задач и видим, что он теперь окрашен в установленный нами цвет.
Как изменить вид календаря Windows 11
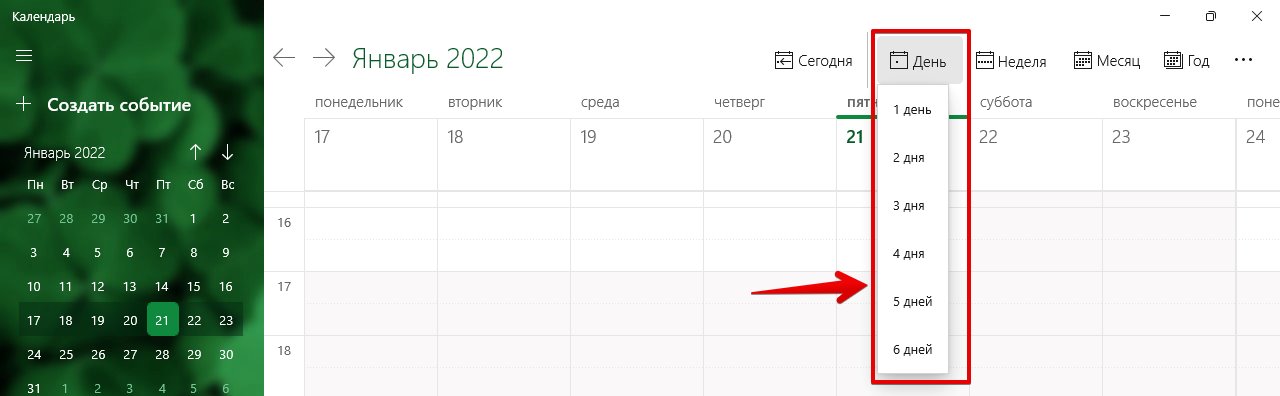
По умолчанию, когда мы открываем приложение «Календарь», оно показывает текущий месяц. Но можно установить различные отображения для календаря. Например, можно настроить просмотр событий за сегодня, за 3 дня, за неделю, за месяц или за год.
Если необходимо просмотреть события за 3 дня, нажимаем кнопку «День» на панели инструментов сверху и в выпадающем списке выбираем вариант «3 дня».
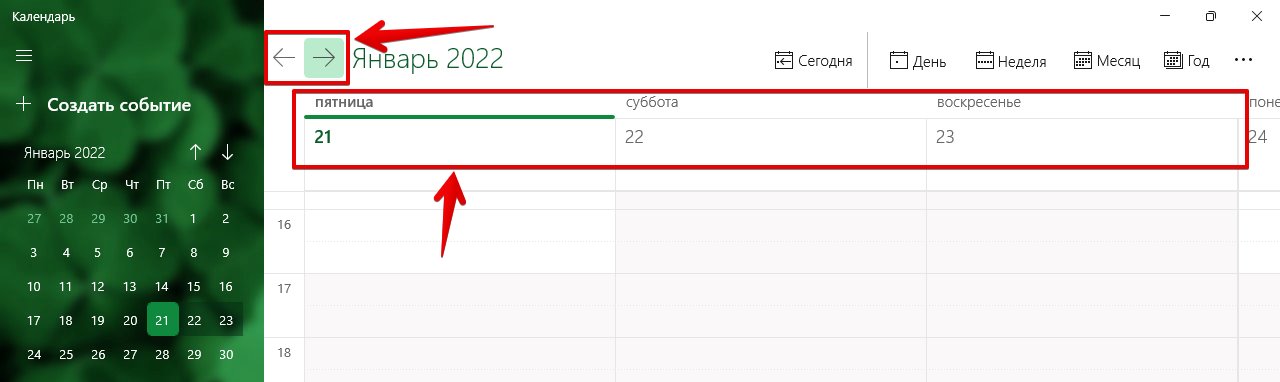
Календарь покажет нам все события за 3 дня, как показано ниже на скриншоте. Чтобы увидеть следующие или предыдущие 3 дня, нажимаем кнопки со стрелками.
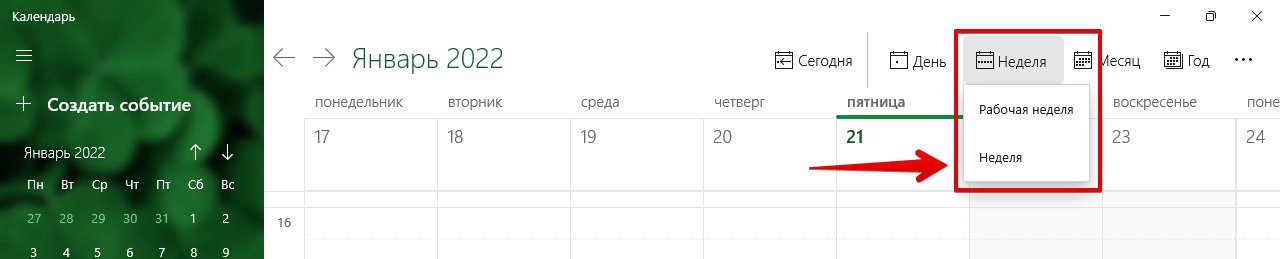
Щелкнув по кнопке «Неделя» можно увидеть события в календаре за всю неделю. Также доступны дополнительные параметры:
- Рабочая неделя
- Неделя
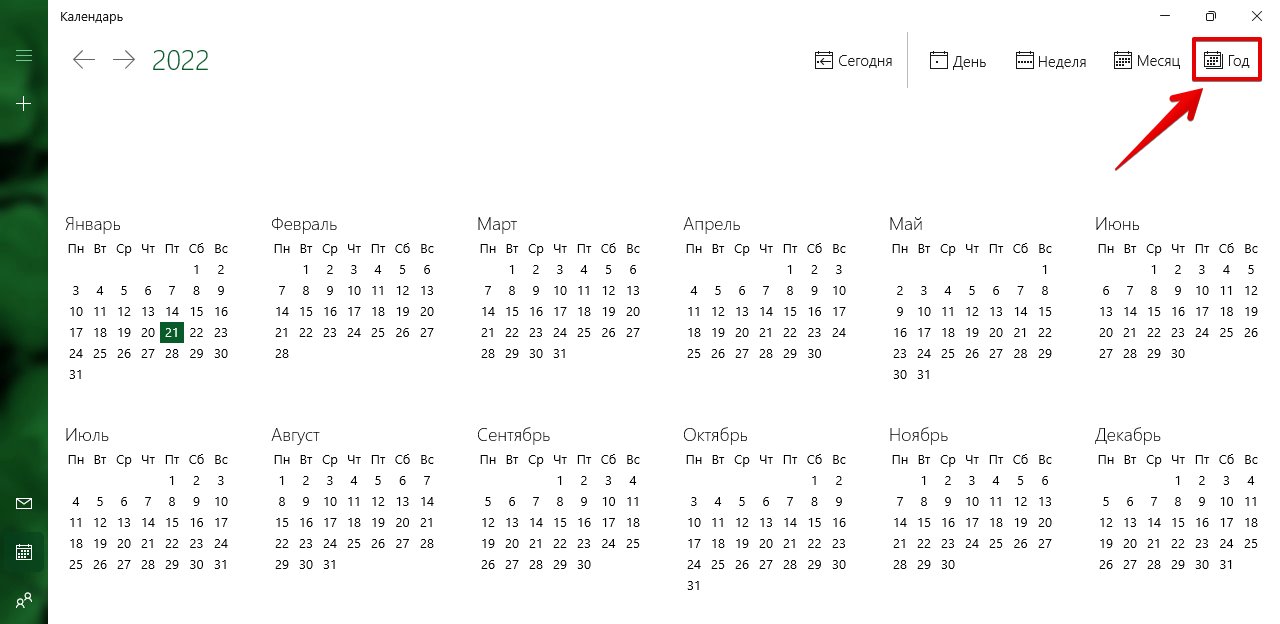
Для того, чтобы быстро найти определенный месяц или день, можно нажать на кнопку «Год», чтобы отобразить весь год в календаре.
Как добавлять события в календарь Windows 11
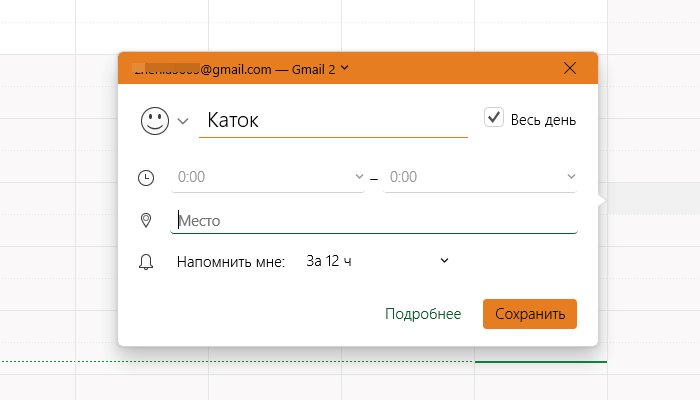
Щелкаем по любой ячейки календаря, чтобы добавить событие. Появится окно добавления события, в котором можно редактировать такие значения как:
- Название события
- Иконка события
- Время начала и окончания события
- Место события
- Напоминание
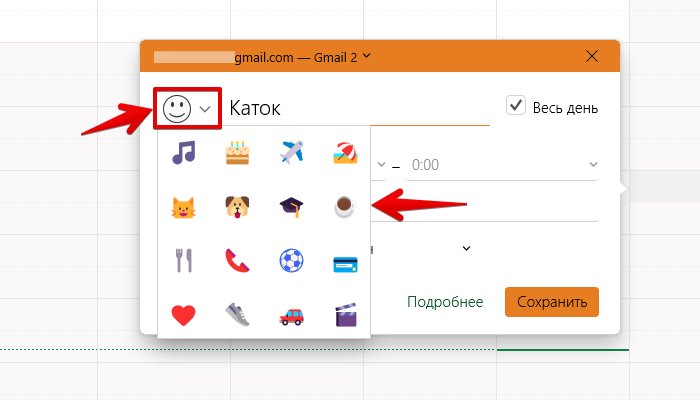
Слева от поля «Название события» доступна кнопка иконка, щелкнув по которой появится всплывающее меню с различными иконками.
Убрав флажок у параметра «Весь день» станут доступны поля начала и окончания события.
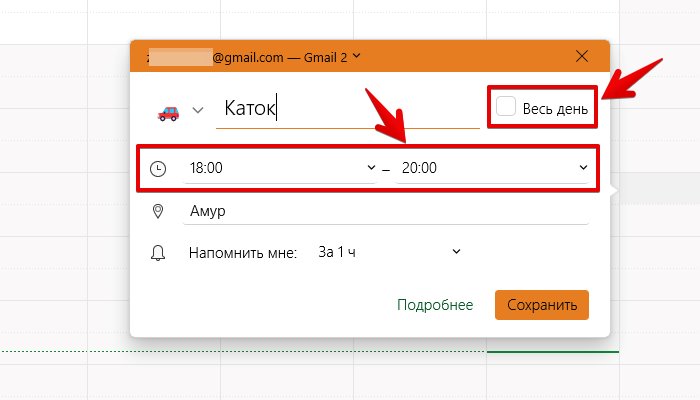
Для сохранения созданного события в календаре нажимаем кнопку «Сохранить».
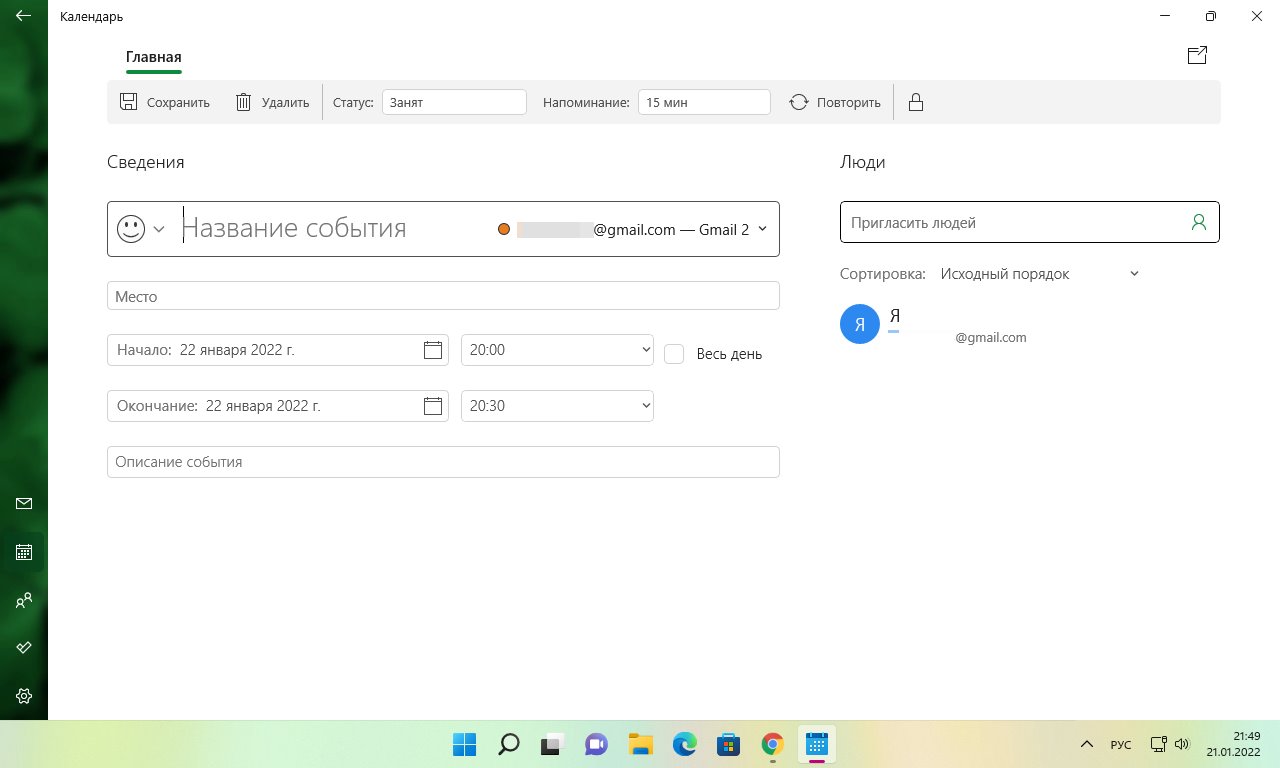
Как создать подробное событие в календаре
Также в календаре можно создать событие с расширенными настройками. Для этого щелкаем по кнопке «Подробнее» в окне быстрого создания события.

После этого мы окажемся в новом окне. Здесь доступны дополнительные настройки — можно указать описание события с возможностью форматирования текста, а так же назначить группу пользователей, у которых событие станет доступно в календаре.
Как синхронизировать события в приложении «Календарь»
Если новые события не приходят в календарь, необходимо его синхронизировать. Сначала откроем приложение «Календарь» и нажмем кнопку меню с тремя точками в правом верхнем углу. Затем выберем опцию «Синхронизировать».
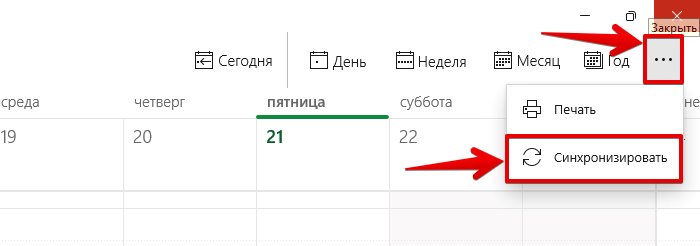
Это синхронизирует события со всех наших устройств и облака.
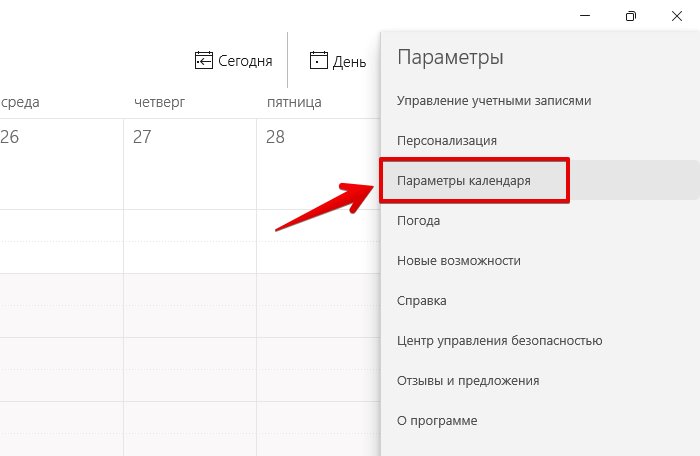
Как настроить параметры календаря в Windows 11
Приложение «Календарь» в Windows 11 позволяет изменять различные настройки, такие как первый день недели, дни рабочей недели, рабочее время и так далее.
Чтобы получить доступ к настройкам, щелкаем по кнопке «Настройки», а затем выбираем пункт «Параметры календаря».
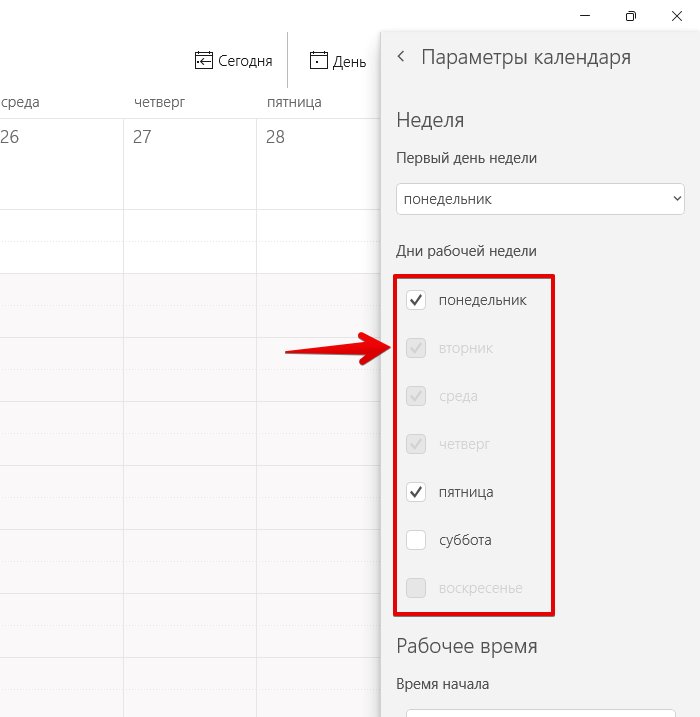
В разделе «Неделя» доступна настройка «Первый день недели«, щелкаем по раскрывающемуся списку, чтобы выбрать день недели.
Ниже доступна настройка «Дни рабочей недели«. Здесь все просто, отмечаем флажком те дни недели, которые являются рабочими.
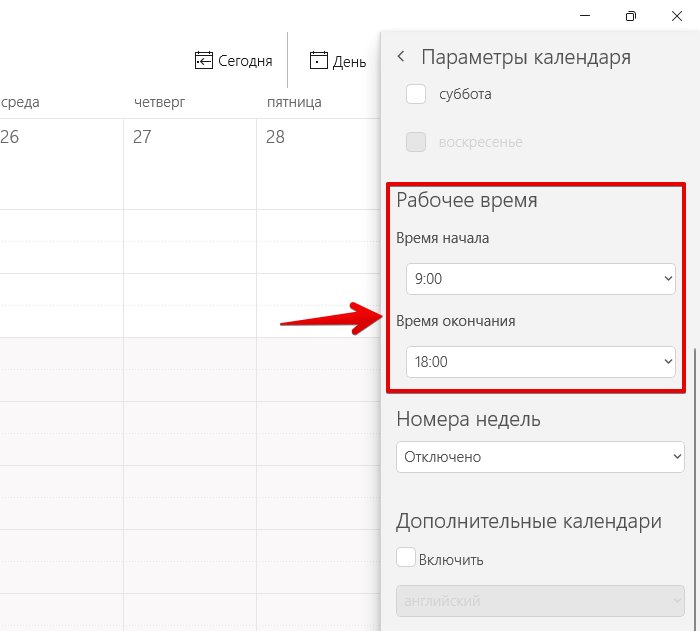
В разделе «Рабочее время» доступно два параметра — «Время начала» и «Время окончания«. Задаем параметры, щелкнув по раскрывающемуся списку.
Applies ToWindows 11
Windows 11 помогает совершать телефонные звонки и планировать события с помощью предлагаемых действий на компьютере. Если эта функция включена, предлагаемые действия отображаются при копировании номера телефона или будущей даты. В качестве примера предлагаемого действия можно позвонить в Teams или Skype или добавить событие в приложение «Календарь». Предлагаемые действия курируются на основе приложений для звонков и календаря, установленных на компьютере.
Примечание: Функция предлагаемых действий в настоящее время доступна только в Северная Америка.
Использование предлагаемых действий для выполнения вызова
Чтобы использовать предлагаемые действия для выполнения звонка, на вашем компьютере будет установлено по крайней мере одно вызывающее приложение.
Чтобы сделать телефонный звонок:
-
Выделите и скопируйте номер телефона.
-
Рядом с полем Номер звонка выберите нужное приложение для звонков и следуйте инструкциям приложения на экране, чтобы выполнить звонок.
Использование предлагаемых действий для создания события календаря
Чтобы использовать предлагаемые действия для создания события календаря, необходимо установить на компьютере по крайней мере одно приложение календаря.
Чтобы добавить событие в календарь, выполните приведенные далее действия.
-
Выделите и скопируйте дату или время в будущем.
-
Рядом с полем Создать событие выберите нужное приложение календаря и введите другие сведения о событии.
Навигация по предложенным действиям с помощью клавиатуры
После открытия меню предлагаемых действий можно использовать клавиатуру.
-
Нажмите клавиши ALT + A , чтобы установить фокус на первый параметр в меню Предлагаемые действия .
-
Затем нажмите клавишу TAB, чтобы перейти вперед по параметрам меню, или SHIFT + TAB , чтобы вернуться к предыдущим параметрам меню.
Управление предлагаемыми действиями в параметрах
Рекомендуемые действия можно включить или отключить в параметрах Windows:
Вы также можете получить доступ к этому параметру из меню предлагаемых действий:
-
В меню Рекомендуемые действия выберите Параметры.Если параметры не отображаются, щелкните стрелку вниз, а затем выберите Параметры .
Нужна дополнительная помощь?
Нужны дополнительные параметры?
Изучите преимущества подписки, просмотрите учебные курсы, узнайте, как защитить свое устройство и т. д.
Windows 11 has a horde of underutilized tools that could improve people’s lives only if they started to use them yesterday. One of those tools is the Calendar app, an updated version of the Calendar app carried over from Windows 10 and its earlier versions.
With the Calendar app on Windows 11, you can do everything from creating an event reminder to a schedule setup—without the complexity that’s necessary for using third-party apps. So let’s look at all the ways you can make use of the Calendar app on Windows 11.
1. Install and Set Up Your Calendar Account on Windows 11
If you are looking to set up your account on Windows 11, you first need to check if you have the Calendar app installed on your PC in the first place.
If you do not have the app, then follow the steps below to get the app right away:
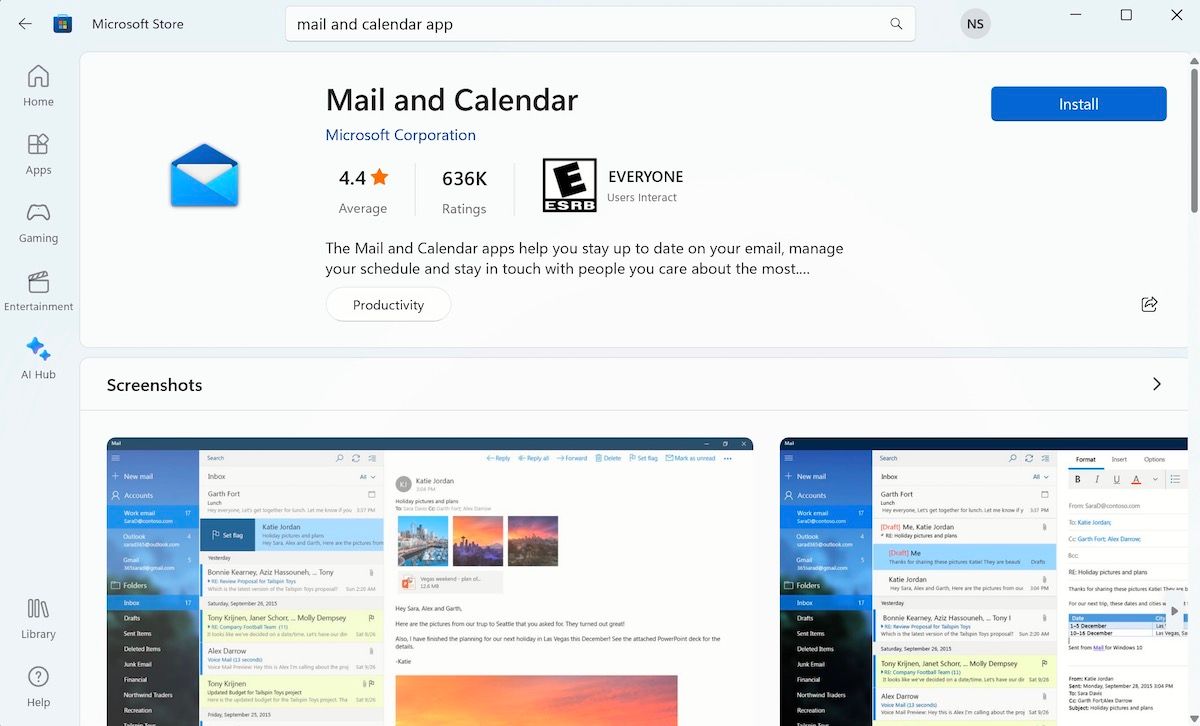
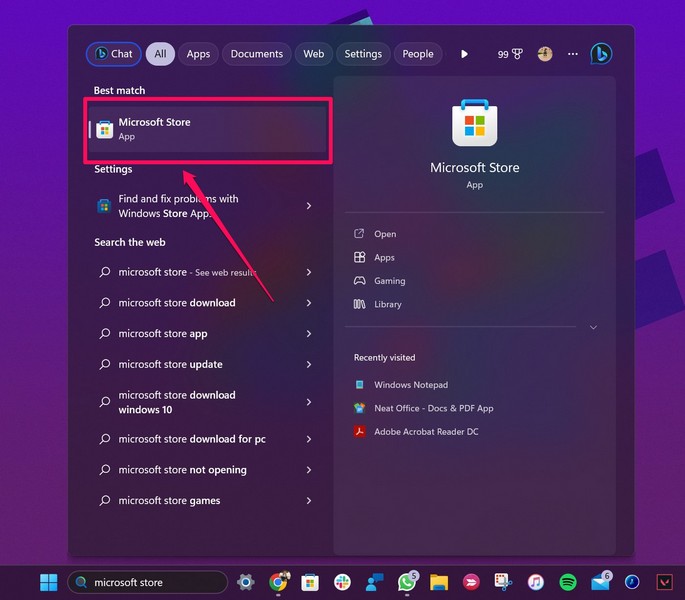
- Launch the Microsoft Store app.
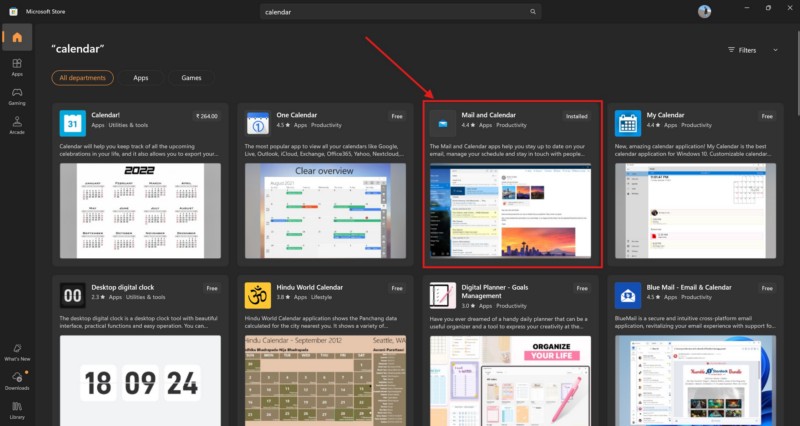
- From the search bar on the top, type in ‘mail and calendar’, and select the Mail and Calendar app from Microsoft, as shown below.
- Click on Install to get the app on your Windows 11.
As soon as you go through the above steps, installation of the Calendar app on your Windows 11 will begin in a few seconds. From there, sign in to the app with your Microsoft account, and you will be able to use the app from here on.
Once the app is installed, you find it from the Start menu search bar, from your taskbar, or you can add the app to your Windows Start menu.
2. Scheduler Your Events in Calendar
Perhaps the most obvious—and also the most neglected—feature of a Calendar app on Windows is the event scheduler. Among a vast variety of schedule and reminder apps online today, it makes sense, too.
But if you’re a regular Windows user, you can skip the third-party apps without much to lose and instead use the free Calendar app from Microsoft. Here’s how:
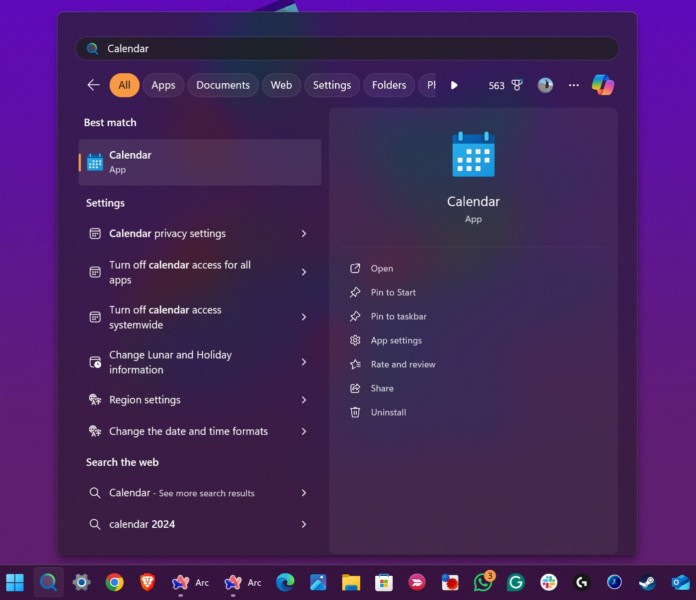
- After you have downloaded the app, head to the Start menu search bar, type in ‘calendar’, and select the best match.
- Put in your account credentials and login to get access to all features of the app.
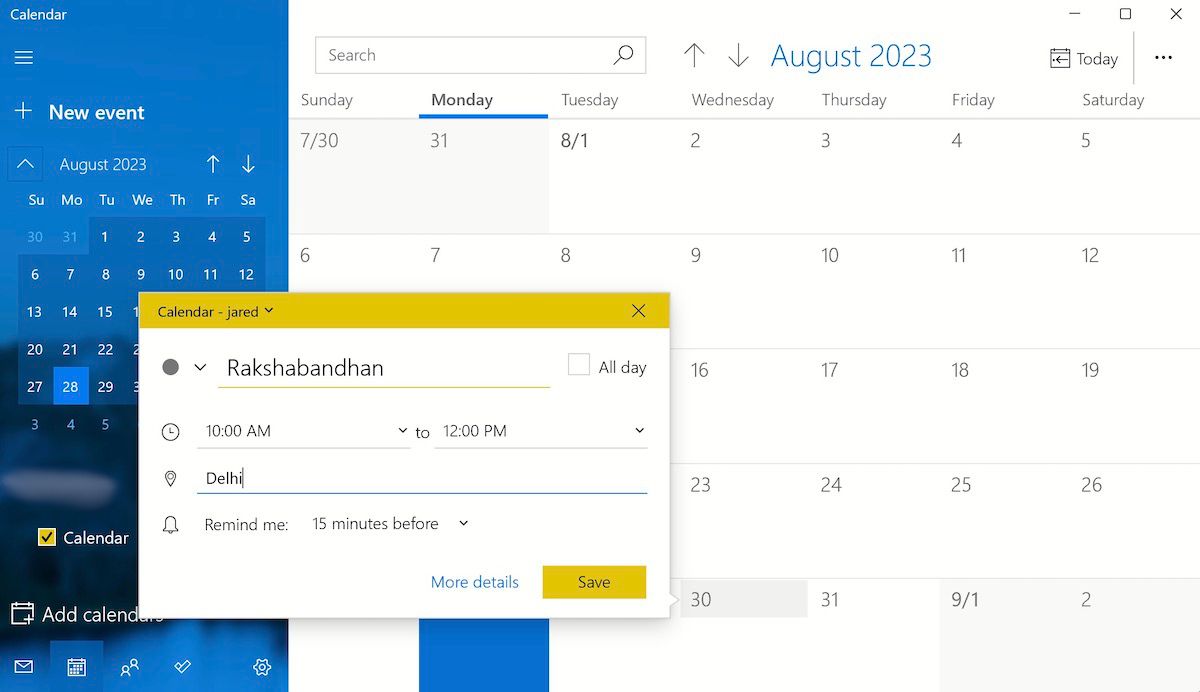
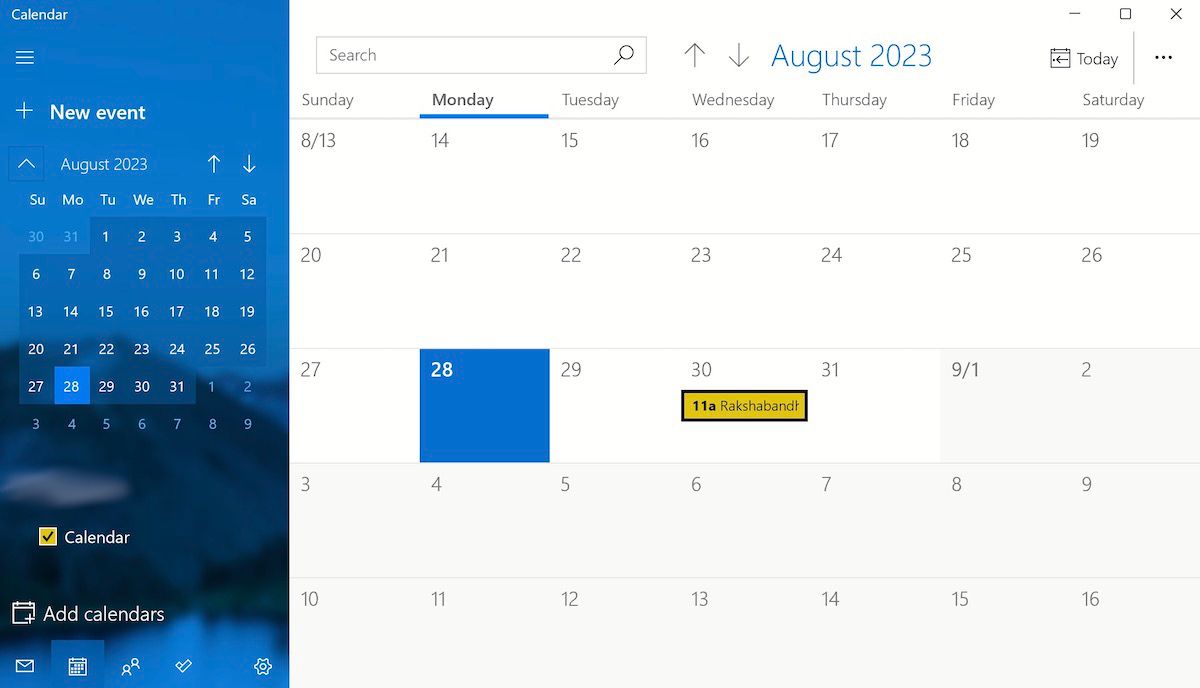
- Once you are in the Calendar, click on any date you’d like to set a reminder for, and you will see an instant window pop-up.
- Now, you can put in the event name, time, and even the place of the event to fill in all the event details.
- Click Save to solidify the information, and you will be ready.
After you have created the event as we laid down in the above steps, you will get the specified date marked with a notification, as you can see below.
3. Use the Calendar Feature
When you first log in and start using the Calendar app, you will notice many default calendars on your app from before. You can add many more.
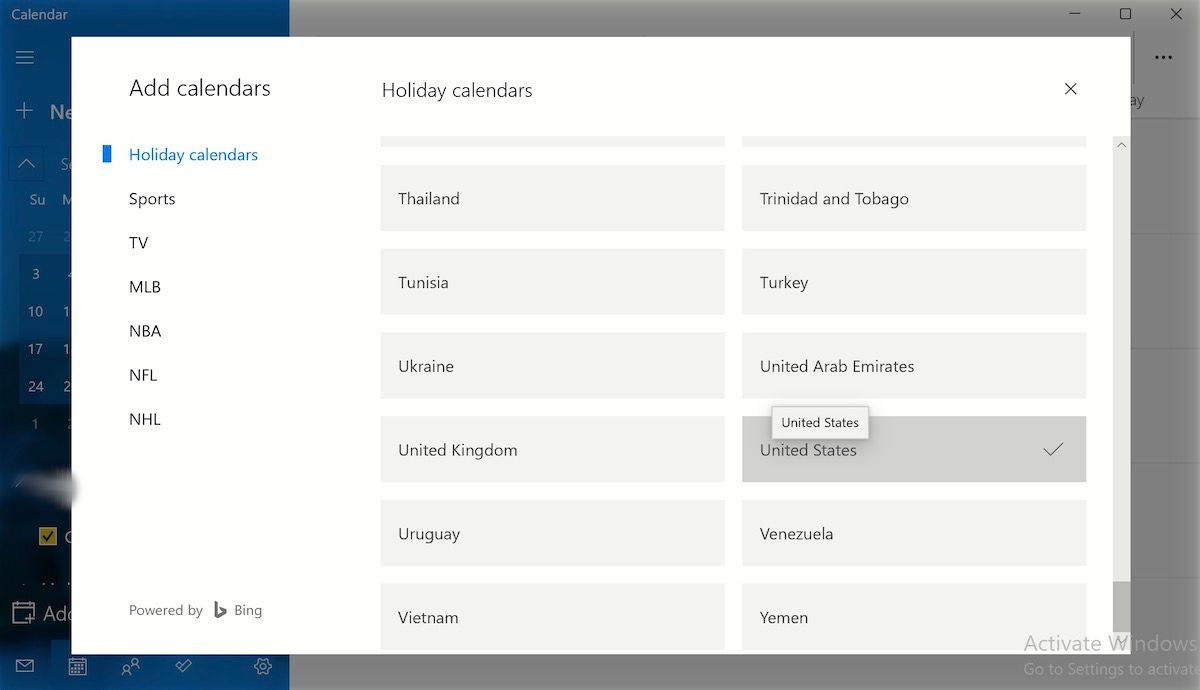
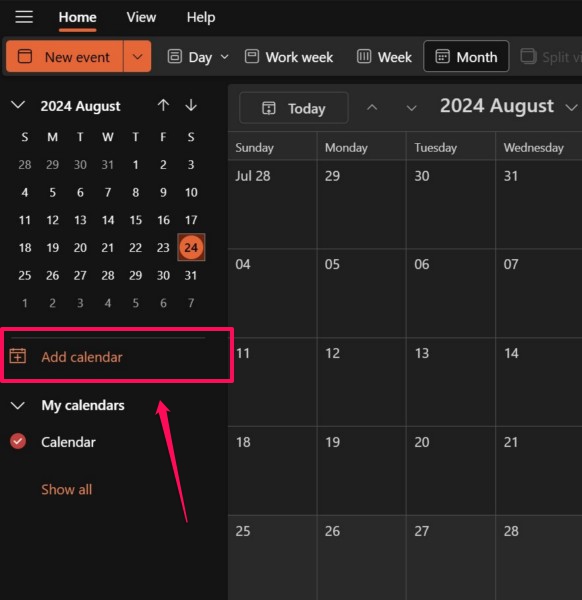
To add new calendars, click the Add calendars option from the bottom left corner.
From the newly launched Add calendars dialog box, you can select from a slew of calendar options: Holiday calendars, Sports, NBA, NHL, and so on. For example, click on Holiday calendars, and you will then get to select the country of your choice.
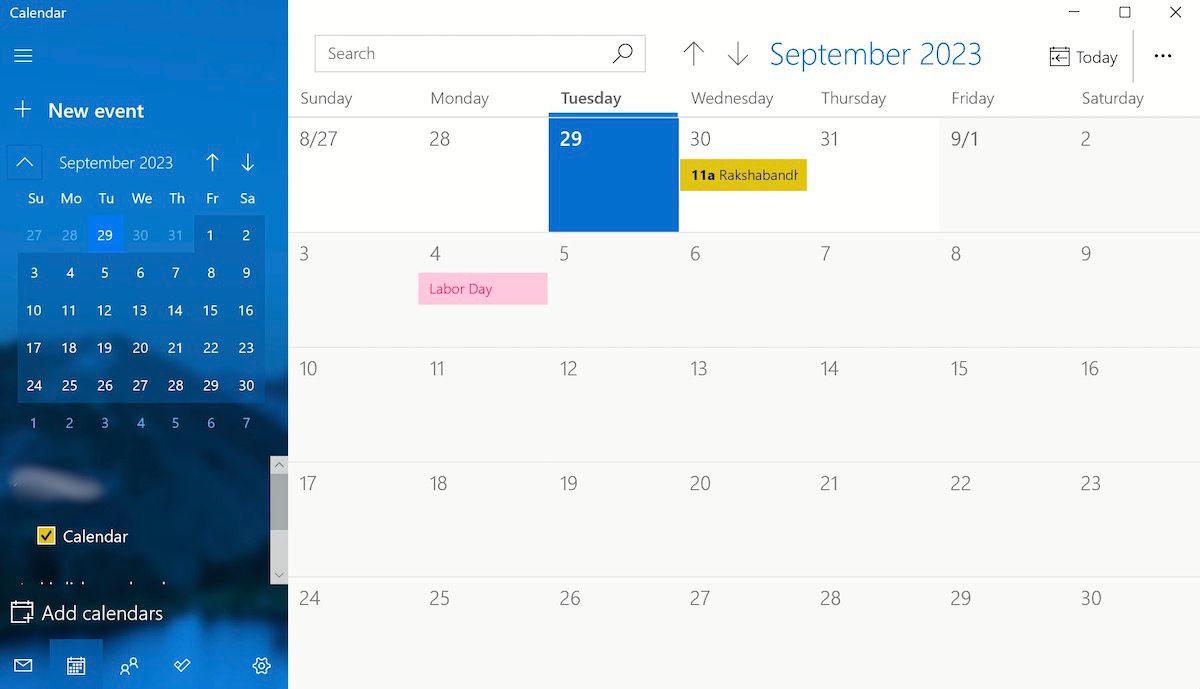
Now go back to your Calendar, and you will see all the essential festive dates marked as holidays in your famous festivals. In our case, we see the date for Labor Day, a prominent holiday celebrated in the USA, marked out differently from the rest.
You are, of course, free to add in multiple holiday calendars like this, whether of different countries or sports events.
Our only tip, though, will be to keep yourself from adding too many calendars right away; that will complicate your Calendar very quickly and will beat the very purpose of using Calendar.
4. Syncing Your Calendar With Other Devices
You can also use the Calendar with other apps on your PC, such as Outlook, iCloud, or Google. Click the Settings icon from the bottom left corner, and select Manage Accounts.

Now click on Add account, and you can pick from Yahoo, Google, iCloud, or Office 365. Pick one, sign in with your account credentials, and that’s it—all your events and meetings from other accounts will be synced with your Calendar app.
4. Tweak Calendar Settings on Windows
The Calendar app also lets you control and manage its settings straight from the app menu on your Windows computer. Just click on the Settings from the bottom left corner and select Calendar Settings.
The Calendar Settings on your PC is the only place where you can tweak the first day of the week, your days in a week, and your working hours—it has a separate section for all the options.

Apart from this, the Calendar app offers a unique way to choose your language and a host of different calendars, such as Hijri, Saka Hera, and so on. So you should definitely play around with the settings and pick the ones that suit you best.
5. Set Reminders & Send Invites
After you have marked your event on the Calendar app, you can then also edit them to add reminders to stay on top of the event; the reminder can be set up to remind you before 1 week, 1 day, 5 minutes, 1 minute, and so on.
To invite someone to your meeting, just head to the People section and click on the Contacts icon. From there, start typing in your saved contacts and then select the best match to add and send an invitation.
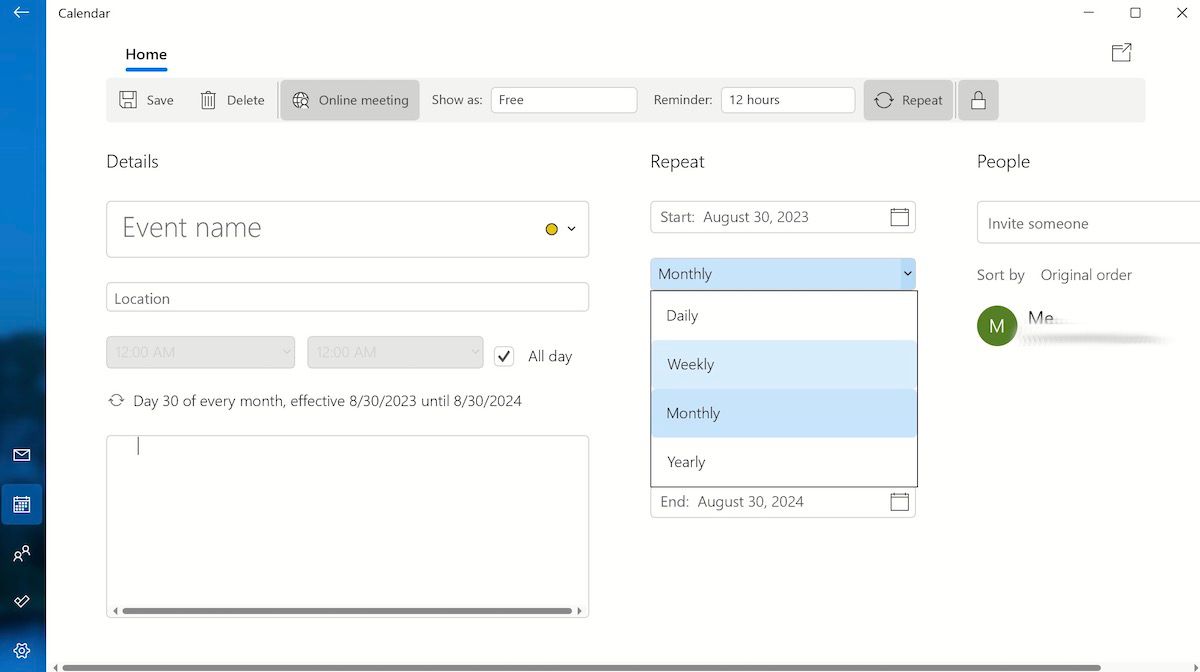
Another handy feature is Repeat, situated right above the People section. Just click on the Repeat icon, select how often you would like your event or reminder to repeat (weekly, monthly, or yearly), and put in the date and time. That’s it; your event will repeat from here on unless you cancel it manually.
Using Your Calendar on Windows 11 Computer
And that, folks, is the Calendar app for you on Windows 11. While it may not be as overloaded with features as many productivity tools that you might encounter all over the productivity space online, its simplicity does make things much easier for you.
A good Calendar app can help you keep track of important life events and milestones to celebrate them or prepare to face them in the future. However, the quest to find a good calendar app on Windows 11 PCs and laptops can be difficult as there are not many options that can satisfy users. Well, let us point you to one of the better calendar apps that you can use on your Windows 11 device: the Outlook Calendar app for Windows. It is usually already installed when you first use a Windows 11 PC or laptop as it is the default Calendar app for Windows.
The Calendar app on Windows 11 is one of the most underrated apps that comes with a ton of great features, including a simple user interface (UI), an event scheduler, and many other handy features to keep you on track. So, in this comprehensive guide, we will discuss everything about the Outlook Calendar app on Windows 11 and how you can use it on your PC or laptop. So, grab a cup of hot coffee and dive into it right away!
Here’s How to Use the Calendar App on Windows 11 PCs and Laptops
The Calendar app on Windows 11 PCs and laptops is a part of the new Outlook app and is integrated into the same along with Microsoft Teams, To Do, People, and other MS Office apps. It serves as the default calendar application on Windows 11 devices and generally comes installed as part of the Windows 11 suite.
The Calendar app offers an easy-to-use layout and comes with various featured baked into it. It has an event reminder and event scheduler, various layouts to customize the view, and the ability to add and use multiple calendars from external sources. In fact, users can even add a dedicated calendar to track the matches of their favorite sports teams on their Windows 11 PC or laptop.
One of the best things about the Calendar app on Windows 11 is that it is connected to the Microsoft Exchange servers and uses Microsoft’s cloud services to sync calendar events. This basically means that when users create and add events to the Microsoft Calendar app on their Windows 11 PCs or laptops, they are synced across all their devices that are logged in with the same Microsoft account.
So, if you want to learn how to use the Calendar app on your Windows 11 PC or laptop to its full potential, continue reading this article!
Install the Mail and Calendar App on Windows 11
Now, if you cannot find the Calendar app on your Windows 11 PC or laptop for some reason, you might need to download and install it. As the Calendar app is a system application, it is available to download on the Microsoft Store and you can do install it very easily on your desktop or laptop.
If you already have the Calendar app installed on your device (Use Windows + S to search for it), you can skip this part. If it is not, simply follow the steps right below to download and install the Mail and Calendar app on your Windows 11 device:
1. Launch the Microsoft Store on your Windows 11 PC or laptop.
2. Use the above search bar to find the Calendar app.
3. On the search results page, click on the Mail and Calendar application to open the listing.
4. On the following page, click the Install button to download and install the same on your Windows 11 device.
Once you have installed the Calendar app on your Windows 11 PC or laptop, you should be able to find it with a simple Window search on your device.
Set Up the Calendar App on Windows 11
Once you download and install the Microsoft Mail and Calendar app on your Windows 11 PC or laptop, the next step is to set up the Calendar. For this, use Windows + S to open Windows search and search for the Calendar app using the search bar. On the search results page, click the Calendar app icon to launch the same on your device.
From thereon, the process is automatic as the Calendar app will automatically use your Microsoft account to sign in. The process might take a few minutes. So, wait for the Calendar app to sign into your Outlook account and open up on your Windows 11 PC or laptop.
Use the Calendar App on Windows 11
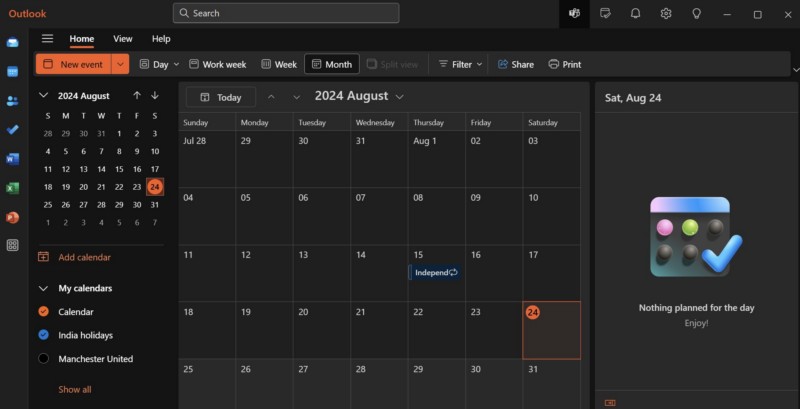
Now, when the Calendar app opens on your Windows 11 PC or laptop, you will see a month-view of the current month along with the current date highlighted on the right pane and on the middle portion. You will also find various menus, buttons, and options spread throughout the user interface to personalize the app according to your preference, view calendar events, and create new ones.
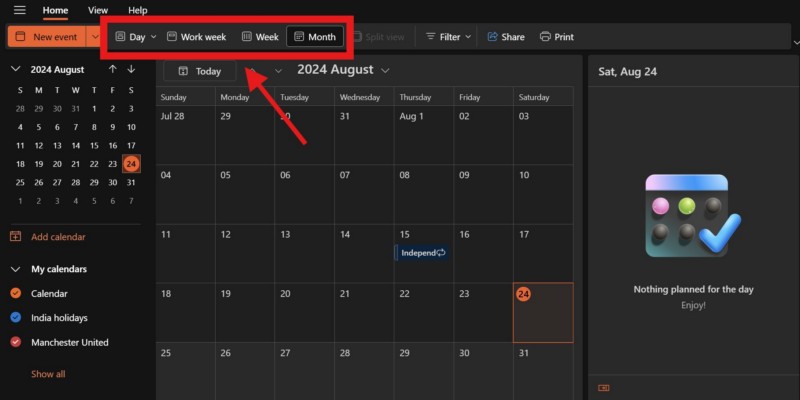
Change Calendar View
The default view of the Calendar app on Windows 11 is set to the Month option. However, you can change this layout to a day-wise view, a week-wise view, or a work week-wise view. You will find all these viewing options at the top ribbon menu as shown in the screenshot below.
Now, the Week view in the Calendar app on Windows 11 shows the current week, including the weekends. The Work week view, on the other hand, shows the current week, excluding the weekends. So, if you want to view your work-week schedules and events, you can switch to the Work week view from the above ribbon menu.
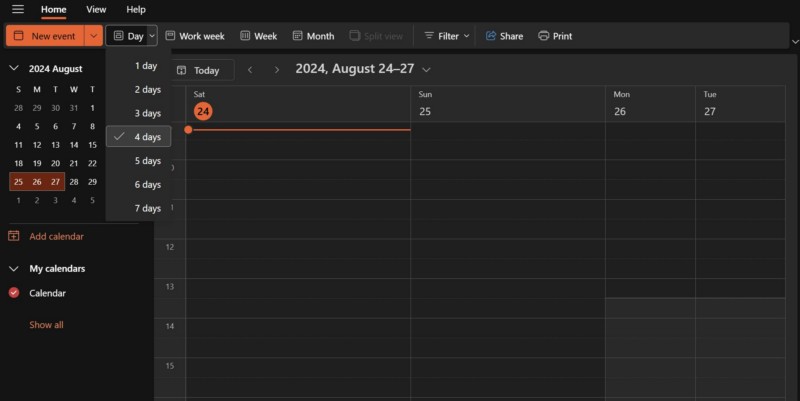
For the Day view option, you can click the down-arrow right next to it to open a drop-down menu and select the number of days that you want to view at a time. The options range from 1 to 7. So, if you select 4 days, the Calendar app will show the events for the next 4 days, including the current day.
Navigate the Calendar App
Coming to the navigation system in the Calendar app on Windows 11, it is fairly simple. The app provides the navigation buttons and menus at the top of the current calendar view.
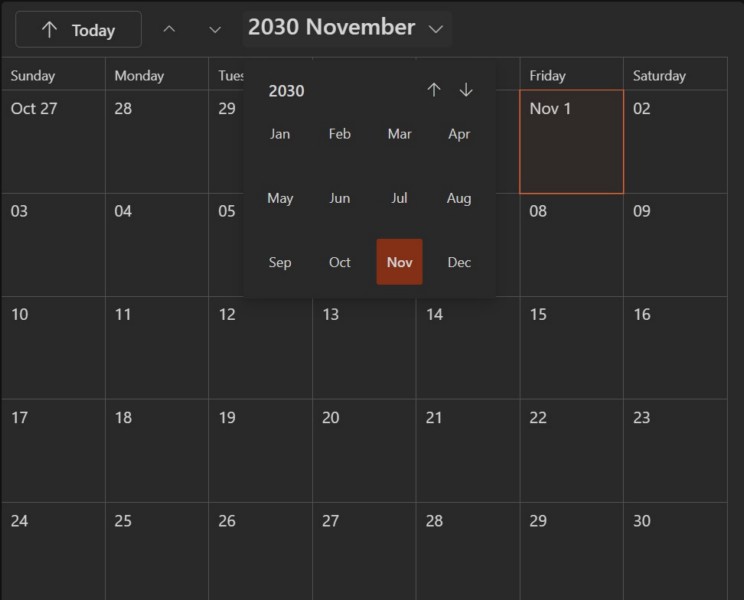
So, if you are in the Month-view, you can simply click the [Year] [Month] button at the top to open a drop-down box. From here, you can use the up or down arrow buttons to change the [Year] and click any of the month to directly open it within the Calendar app on your Windows 11 PC or laptop.
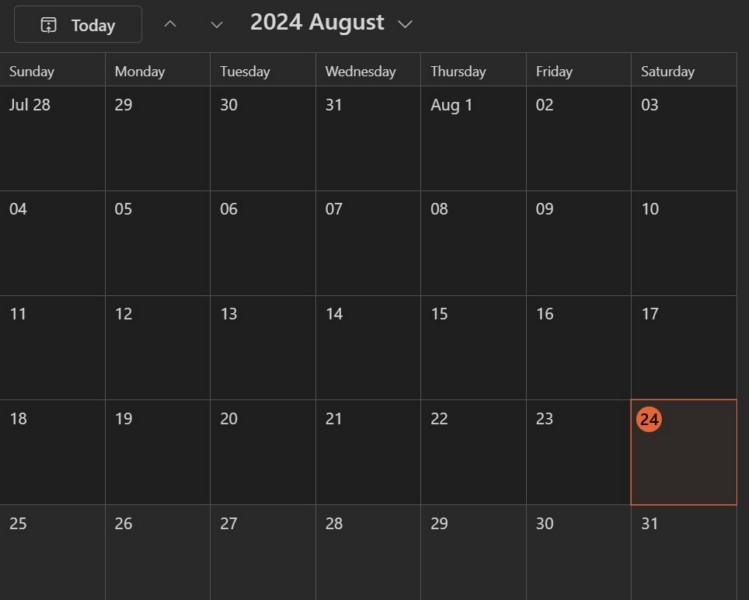
When you want to return to the current date and month in the Calendar app, simply click the Today button directly open the current month and date without needing to use the [Year] [Month] navigation box.
When you are in the Week, Work week, or Day view, you can use the same process to navigate to a specific date in a month within the Calendar app. However, it is worth noting that the UI for each of the viewing layouts will be slightly different.
Add New Calendars in Calendar App
Adding new calendars to the Calendar app on Windows 11 PCs and laptops is also an easy process if you look around the app UI for a few minutes. You will find a dedicated Add calendar button on the right pane of the app UI that you can click to initiate the process.
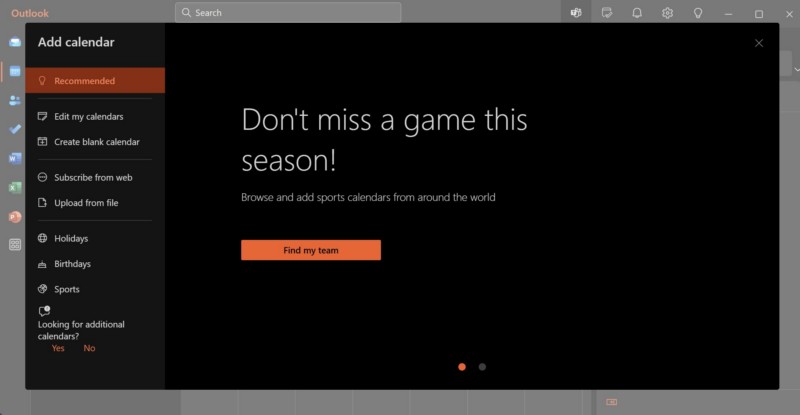
Once you initiate the process, a new Add calendar window will open up with various options. Here, you will get a few recommendations according to your Microsoft account preferences.
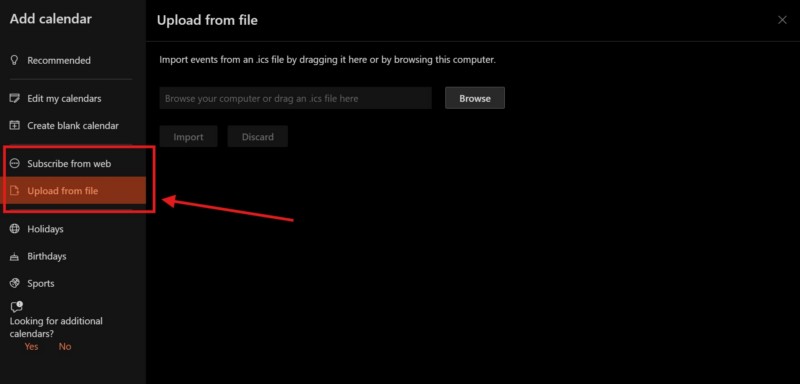
However, you can use the right pane to navigate through all the available calendar options that you can add to the Calendar app on your Windows 11 PC or laptop. For instance, you can use the Subscribe from web option to add a shared calendar from a web source or use the Upload from file option to add a new calendar with a .ics file from your device.
Besides that, you can also add calendars for Holidays, Birthdays, and Sports events from their dedicated sections on the right pane. So, we were not joking when we mentioned that you can add a dedicated calendar to track the schedule of your favorite sports team as you easily add an official schedule-calendar of any sports team from the Sports option.
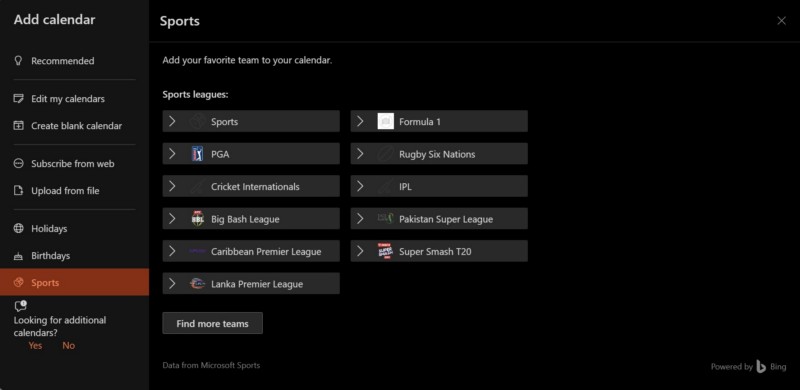
Pro-tip: If you cannot find your team on the initial list, click the Find more teams button to get an extensive list of leagues and teams (national and international).
Once you add new calendars to the Calendar app on your Windows 11 PC or laptop, you can find them under the My calendars section on the right pane. From here, you can even enable or disable individual calendars to show/hide their data within the Calendar app.
Edit and Remove Existing Calendars in Calendar App
After adding new calendars to the Calendar app on your Windows 11 PC or laptop, you can edit them according to your preference and also remove them if you want. However, it is worth noting that although you will be able to remove the calendars that you added from external sources, your primary calendar, which is linked to your Microsoft account, cannot be removed.
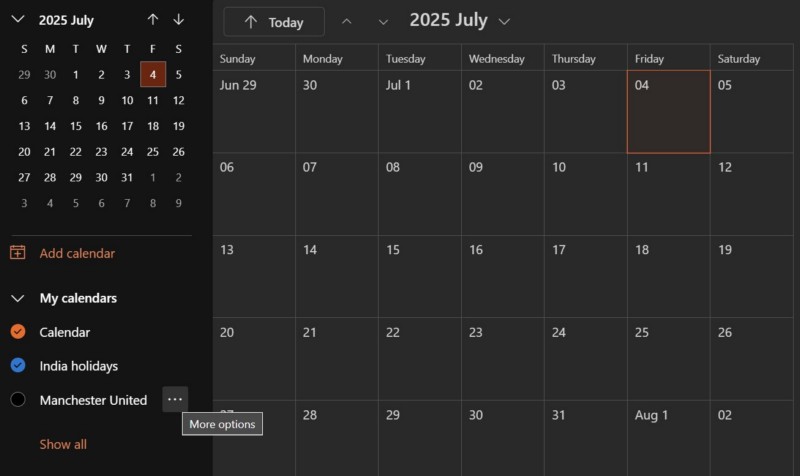
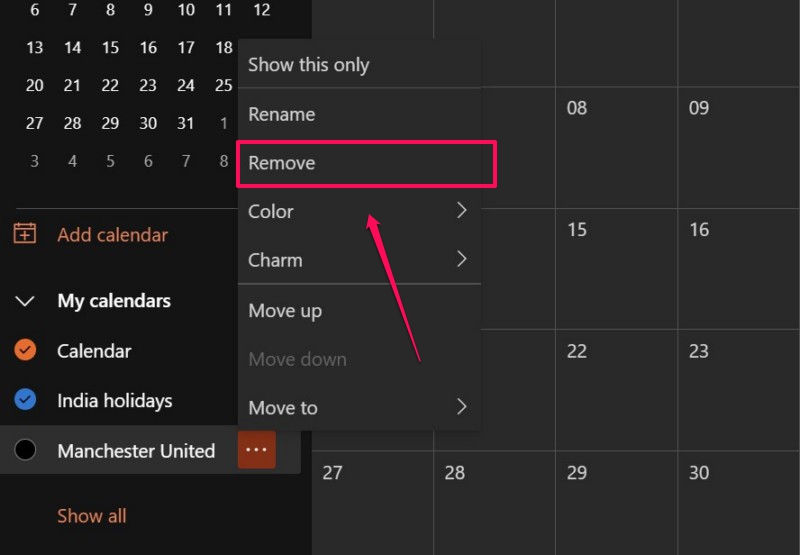
With that being said, you can edit certain elements of your calendars in the Calendar app on Windows 11 by taking the mouse cursor over a calendar under the My calendars section and click the three-dot button for it. From the following context menu, you can rename the calendar, change the color that represents it, and change the charm of it.
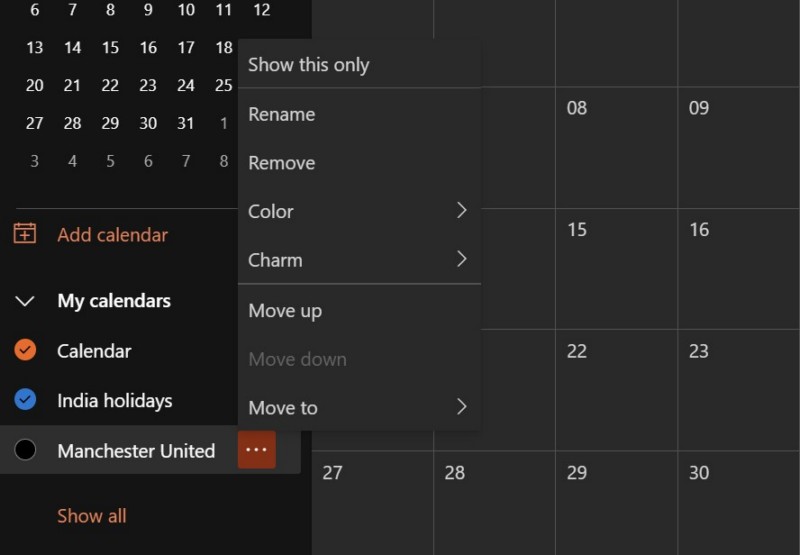
If you want to remove the selected calendar from your My calendars list and delete its data from the Calendar app on your Windows 11 PC or laptop, you can click the Remove button on the context menu.
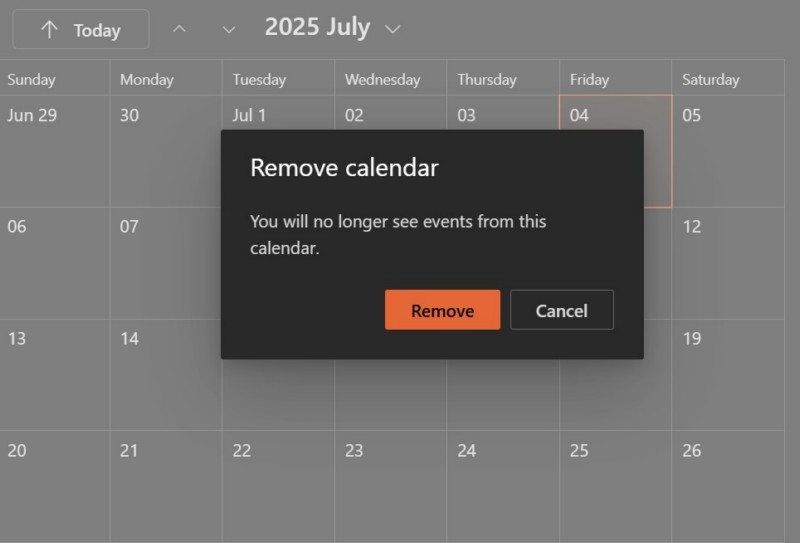
Click the Remove button on the following prompt to confirm your action and remove the selected calendar.
Create New Event in Calendar App
If you like to keep your calendar organized and updated, creating new events can be an important task in the Calendar app on Windows 11. Thankfully, the process to create new events in the Calendar app is as simple as a Sunday morning.
So, to start creating a new event, follow the steps right below:
1. Open the Calendar app on your Windows 11 PC or laptop and navigate to the date for which you want to create a new event in the Calendar app. If you want to create new event for the current date, ignore the latter part of the initial sentence.
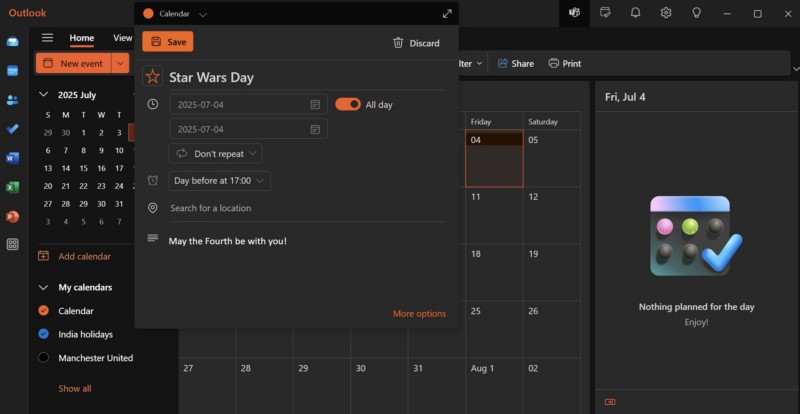
2. Now, if you want to create a quick event, simply left-click on the selected date to open an overlay UI. Here, you can set a time-frame for the event, set it as a repeating/non-repeating event, add a location, and a description. Once you are done, click the Save button to create the new event on the selected date.
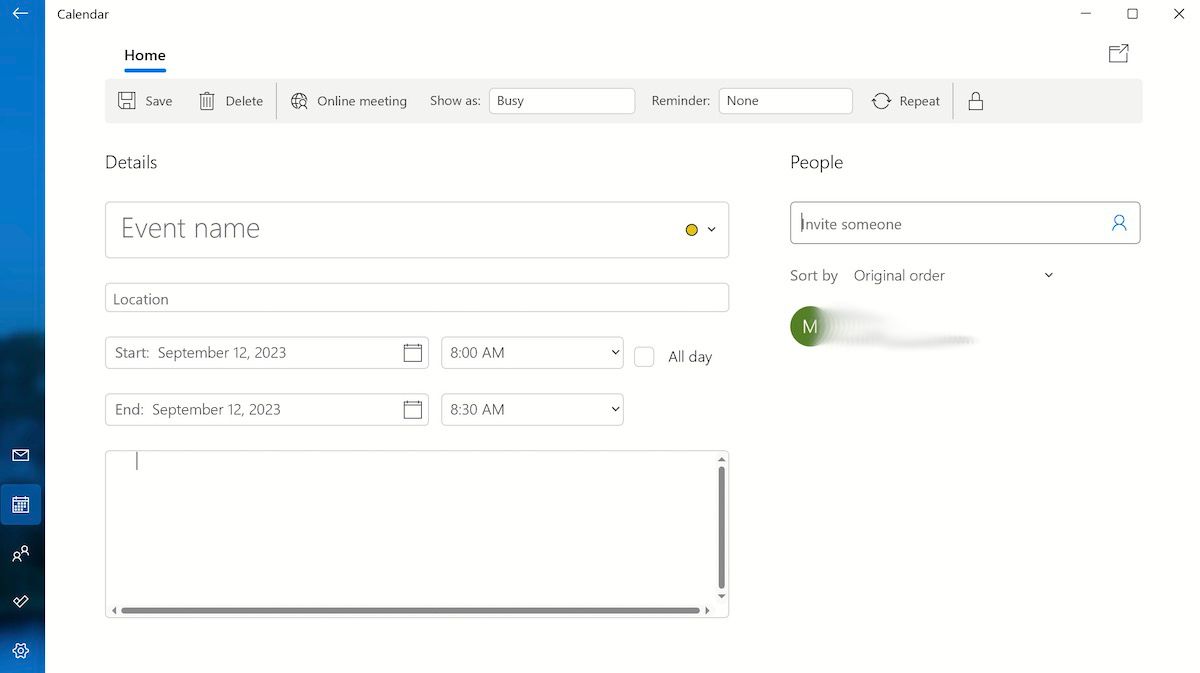
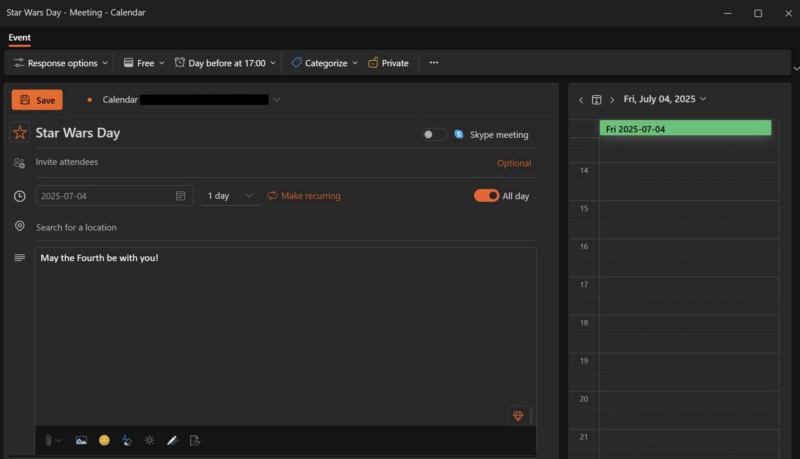
3. Alternatively, you can click the dedicated New event button at the top right corner to open a New event window with numerous other options. So, go through all the customization options and set them according to your preference. After you are satisfied, click the Save button to create the new event.
This way, you can easily create new events for any date within the Calendar app on your Windows 11 PC or laptop.
FAQs
Can I use Google Calendar on Windows 11?
Although there is no app for the Google Calendar app for Windows 11, you can add your Google account to the Calendar app on your Windows 11 PC or laptop to sync your Google Calendar data and view the events within the Calendar or Outlook app.
How to add a calendar widget in Windows 11?
To add a calendar widget on your Windows 11 PC or laptop, open the Widgets board, click the + button above, select the Outlook Calendar on the right pane, and click the Pin button for it to add it to the Widgets board.
How to open Windows Calendar on Windows 11?
The Calendar app on Windows 11 is a part of the Outlook app suite and is installed as Mail and Calendar on PCs and laptops. Users can simply use the Windows search feature to find the Calendar app on their PCs or laptops and click on its app icon to open it.
Wrapping Up
This is how you can use some of the basic functions and features of the Calendar app on your Windows 11 PC or laptop. The Calendar app for Windows 11 is one of the best productivity apps out there, offering easy-to-use features, a simplified layout, and the ability to view events from multiple calendars on desktops or laptops. So, if you find this comprehensive guide useful, be sure to let us know in the comments below. You can also share it with fellow Windows 11 users in your community and friend circle to help them organize their life.
Feel free to subscribe to our website and YouTube channel to get updates about all our latest posts and videos. As always, thank you for reading this article till the very end, and we will see you again in our next guide.
Windows 11 has introduced a sleek, modern interface that enhances user experience across various applications, including the Calendar. The Calendar feature in Windows 11 is essential for organizing your schedule, managing appointments, and keeping track of important dates. This article provides an in-depth guide on how to show the calendar in Windows 11, exploring various methods to access it, tips for maximizing its functionality, and troubleshooting common issues you may encounter.
Getting Started with the Calendar in Windows 11
Before diving into the specifics of how to show your calendar, it’s crucial to understand the basics of the Calendar app in Windows 11. This application is fully integrated with Microsoft services, allowing synchronization with other devices and platforms, such as Outlook, Google Calendar, and other third-party calendars.
Accessing the Calendar App
Method 1: Using the Taskbar Calendar
One of the easiest ways to access the calendar in Windows 11 is through the Taskbar. The Taskbar features a notification area, commonly referred to as the system tray, where various icons appear based on your active applications.
-
Locate the Date and Time: Look at the bottom-right corner of your screen. You will see the current date and time displayed.
-
Click on the Date/Time: Clicking this area will bring up the calendar overlay, displaying the current month with the current day highlighted.
-
Overview of Events: Below the calendar, you may see a summary of your upcoming events, provided you have any scheduled in your linked calendars.
-
Navigating the Calendar: You can browse to other months by clicking the left or right arrows that appear at the top of the overlay.
-
Creating Events: You can quickly add calendar events by clicking on a date in the overlay. This will prompt a new window where you can enter details about the event such as title, time, and location.
Method 2: Launching the Calendar App Directly
For users who need more functionality or prefer a dedicated interface, launching the Calendar app directly is another option:
-
Open the Start Menu: Click on the Windows icon located in the Taskbar.
-
Search for Calendar: Type «Calendar» in the search bar. The Calendar app should appear in the search results.
-
Select the Calendar App: Click on the Calendar app icon to launch it.
-
Exploring the Interface: Once opened, you will see the full interface where you can view your calendar month, week, or day. You can also manage multiple calendars here.
Integrating Your Accounts with the Calendar App
To optimize your calendar usage, it’s essential to connect your personal and professional accounts:
-
Settings: In the Calendar app, click on the gear icon in the bottom-left corner to open settings.
-
Accounts: In the settings menu, find the “Manage Accounts” section. Here, you can add various accounts such as Google, Apple, Outlook, and Exchange.
-
Adding an Account: Click “Add account” and select the type of account you want to integrate. Follow the prompts to log in and authorize the app.
Adding Events to the Calendar
Once you have set up the Calendar app with your accounts, you can easily add events:
-
Add Event Button: In the Calendar app, you will find an «Add Event» button on the toolbar. Clicking this button opens an event creation window.
-
Event Details: Enter details such as event name, location, start and end times, and whether it should repeat (and how often).
-
Reminders: You can set reminders so that you get notifications before your events start.
-
Save: After entering all necessary details, click «Save» to add the event to your calendar.
Customizing Your Calendar View
Windows 11’s Calendar app provides several views that allow you to customize how you see your schedule:
-
Month, Week, Day, and Agenda Views: Use the view selector in the toolbar to choose how you wish to view your calendar. Most users find the month view to be the most comprehensive.
-
Color Coding Events: You can assign different colors to events based on categories like work, personal, or family to differentiate them easily.
-
Adjusting the Display Settings: In the settings menu, you can adjust the display settings, including what day your week starts on (Sunday or Monday) and toggling the show of week numbers.
Syncing Calendars Across Devices
One of the significant advantages of the Calendar app in Windows 11 is its ability to sync across various devices. If you have linked your accounts, any changes you make will be reflected on all devices where those accounts are connected.
-
Microsoft Account: By linking your Microsoft account, you can access your Calendar from other Windows devices, Android phones, or even via a web browser.
-
Google Calendar Sync: If you integrate Google Calendar, events will sync both ways. Any changes made, whether in the Calendar app or Google Calendar, will reflect in both.
Troubleshooting Common Issues
While using the Calendar app, you may encounter some common issues. Here are solutions to resolve them:
Issue 1: Calendar Not Syncing
- Check Internet Connection: Ensure you have a stable internet connection.
- Sign Out and Back In: Go to account settings and try signing out of the account and then signing back in.
- Check Sync Settings: Ensure that sync is enabled for the specific account you are using within the Calendar settings.
Issue 2: Events Not Showing Up
- View Filters: Ensure you haven’t accidentally filtered what events display. Adjust view settings to show all events.
- Account Linkage: Verify that the account where your events are stored is correctly linked and synchronized in the Calendar app.
Issue 3: App Crashing
- Update: Always ensure that Windows 11 and the Calendar app are updated to the latest versions.
- Repair the App: You can go to Settings > Apps > Apps & features, find the Calendar app, and select «Repair» if you are experiencing continuous crashes.
Conclusion
The Calendar app in Windows 11 is a powerful tool for personal and professional organization. By understanding how to show your calendar, integrate multiple accounts, and leverage its customization features, you can enhance your productivity and stay on top of your schedule. With efficient syncing and troubleshooting techniques at your disposal, utilizing the Calendar in Windows 11 can become a seamless part of your everyday routine.
As you familiarize yourself with these functionalities, consider exploring additional third-party applications or enhancements that can sync with the native Calendar app for even greater productivity. The digital world offers an array of tools and resources to help you maximize efficiency and keep your life organized. Embrace these for an enriched experience!