
Когда вы подключаетесь к Wi-Fi сети, обычно в списке доступных беспроводных сетей вы видите список имен (SSID) сетей других людей, чьи роутеры находятся поблизости. Они, в свою очередь, видят имя вашей сети. При желании, можно скрыть Wi-Fi сеть или, точнее, SSID таким образом, чтобы соседи её не видели, а вы все могли подключиться к скрытой сети со своих устройств.
В этой инструкции — о том, как скрыть сеть Wi-Fi на роутерах ASUS, D-Link, TP-Link и Zyxel и подключиться к ней в Windows 10 — Windows 7, Android, iOS и MacOS. См. также: Как скрыть чужие Wi-Fi сети из списка подключений в Windows.
Как сделать Wi-Fi сеть скрытой
Далее в руководстве я буду исходить из того, что у вас уже есть Wi-Fi роутер, а беспроводная сеть функционирует и вы можете к ней подключиться, выбрав имя сети из списка и введя пароль.
Первым шагом, необходимым, чтобы скрыть Wi-Fi сеть (SSID) будет вход в настройки роутера. Это не сложно, при условии, что вы сами настраивали свой беспроводный маршрутизатор. Если же это не так, можно столкнуться с некоторыми нюансами. В любом случае, стандартный путь входа в настройки роутера будет следующим.
- На устройстве, которое подключено к роутеру по Wi-Fi или кабелю, запустите браузер и введите в адресную строку браузера адрес веб-интерфейса настроек роутера. Обычно это 192.168.0.1 или 192.168.1.1. Данные для входа, включая адрес, логин и пароль, обычно указаны на наклейке, находящейся внизу или сзади роутера.
- Вы увидите запрос логина и пароля. Обычно, стандартные логин и пароль — admin и admin и, как упоминалось, указаны на наклейке. Если пароль не подходит — см. пояснения сразу после 3-го пункта.
- После того, как вы вошли в настройки роутера, можно переходить к скрытию сети.
Если вы ранее настраивали этот роутер (или это делал кто-то другой), с большой вероятностью стандартный пароль admin не подойдет (обычно при первом входе в интерфейс настроек роутера просят изменить стандартный пароль). При этом на некоторых роутерах вы увидите сообщение о неверном пароле, а на некоторых других это будет выглядеть как «вылет» из настроек или простое обновление страницы и появление пустой формы ввода.
Если вы знаете пароль для входа — отлично. Если не знаете (например, роутер настраивал кто-то другой) — зайти в настройки получится только сбросив маршрутизатор на заводские настройки, чтобы зайти со стандартным паролем.
Если вы готовы сделать это, то обычно сброс выполняется долгим (15-30 секунд) удержанием кнопки Reset, которая как правило расположена с тыльной стороны роутера. После сброса вам придется не только сделать скрытую беспроводную сеть, но и настроить заново подключение провайдера на роутере. Возможно, необходимые инструкции вы найдете в разделе Настройка роутера на этом сайте.
Примечание: при скрытии SSID соединение на устройствах, которые подключены по Wi-Fi будет разрываться и вам потребуется заново подключаться к уже скрытой беспроводной сети. Еще один важный момент — на странице настроек роутера, где будут производиться описываемые далее шаги, обязательно запомните или запишите значение поля SSID (Имя сети) — оно необходимо, чтобы подключиться к скрытой сети.
Как скрыть Wi-Fi сеть на D-Link
Скрытие SSID на всех распространенных роутерах D-Link — DIR-300, DIR-320, DIR-615 и других происходит почти одинаково, несмотря на то, что в зависимости версии прошивки, интерфейсы немного отличаются.
- После входа в настройки роутера, откройте раздел Wi-Fi, а затем — «Основные настройки» (В более ранних прошивках — нажать «Расширенные настройки» внизу, затем — «Основные настройки» в разделе «Wi-Fi», в еще более ранних — «Настроить вручную», а затем найти основные настройки беспроводной сети).
- Отметьте пункт «Скрыть точку доступа».

- Сохраните настройки. При этом учитывайте, что на D-Link после нажатия кнопки «Изменить», требуется дополнительно нажать «Сохранить», кликнув по уведомлению справа вверху страницы настроек, чтобы изменения были окончательно сохранены.
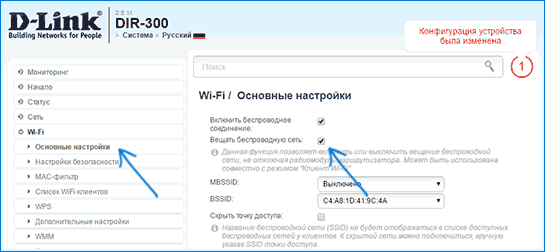
Примечание: при установке отметки «Скрыть точку доступа» и нажатии кнопки «Изменить», вы можете быть отключены от текущей сети Wi-Fi. Если это произошло, то визуально это может выглядеть, как если бы страница «Зависла». Следует заново подключиться к сети и окончательно сохранить настройки.
Скрытие SSID на TP-Link
На роутерах TP-Link WR740N, 741ND, TL-WR841N и ND и аналогичных скрыть Wi-Fi сеть можно в разделе настроек «Беспроводный режим» — «Настройки беспроводного режима».
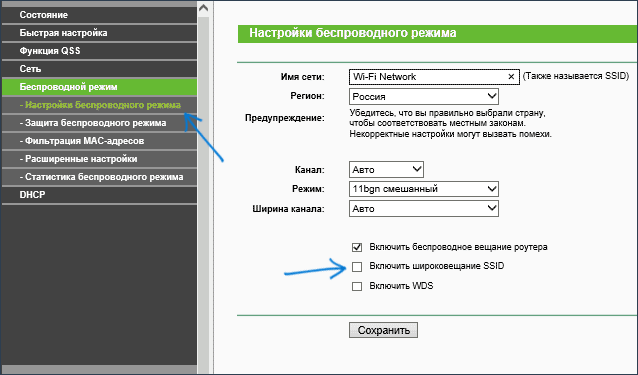
Для скрытия SSID потребуется снять отметку «Включить широковещание SSID» и сохранить настройки. При сохранении настроек сеть Wi-Fi будет скрыта, и вы можете отключиться от нее — в окне браузера это может выглядеть как зависшая или не загрузившаяся страница веб-интерфейса TP-Link. Просто заново подключитесь к уже скрытой сети.
ASUS
Для того, чтобы сделать Wi-Fi сеть скрытой на маршрутизаторах ASUS RT-N12, RT-N10, RT-N11P и многих других устройствах от этого производителя, зайдите в настройки, в меню слева выберите «Беспроводная сеть».
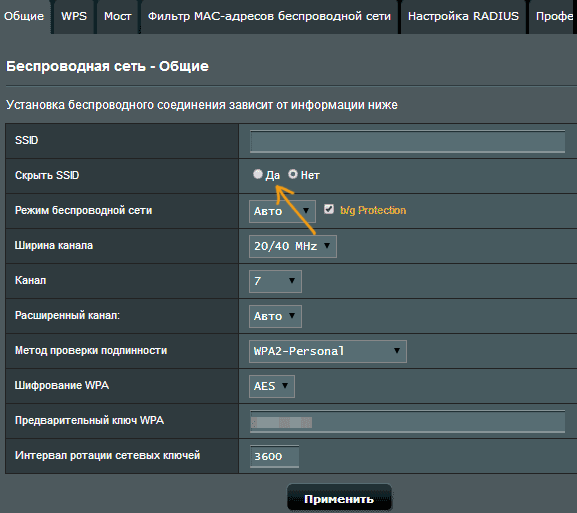
Затем, на вкладке «Общие» в пункте «Скрыть SSID» установите «Да» и сохраните настройки. Если при сохранении настроек страница «зависнет» или загрузится с ошибкой, то просто подключитесь заново, к уже скрытой Wi-Fi сети.
Zyxel
Для того, чтобы скрыть SSID на роутерах Zyxel Keenetic Lite и других, на странице настроек нажмите по значку беспроводной сети внизу.
После этого отметьте пункт «Скрывать SSID» или «Disable SSID Broadcasting» и нажмите кнопку «Применить».
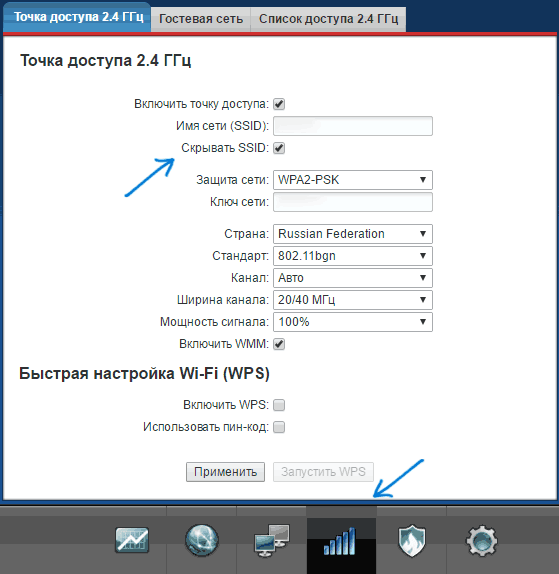
После сохранения настроек, соединение с сетью разорвется (т.к. скрытая сеть, даже с тем же именем — это уже не совсем та же самая сеть) и придется заново подключиться к Wi-Fi сети, уже скрытой.
Как подключиться к скрытой Wi-Fi сети
Подключение к скрытой Wi-Fi сети требует, чтобы вы знали точное написание SSID (имя сети, вы могли его видеть на странице настроек роутера, где сеть делалась скрытой) и пароль от беспроводной сети.
Подключение к скрытой Wi-Fi сети в Windows 10 и предыдущих версиях
Для того чтобы подключиться к скрытой Wi-Fi сети в Windows 10 потребуется выполнить следующие шаги:
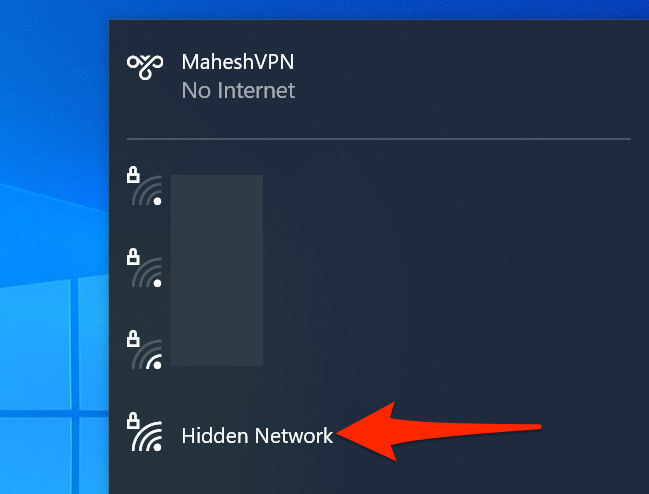
- В списке доступных беспроводных сетей выберите «Скрытая сеть» (обычно, внизу списка).
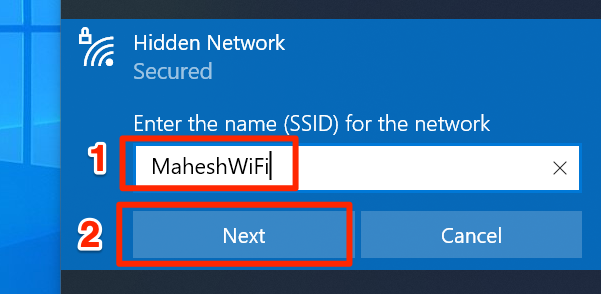
- Введите имя сети (SSID)
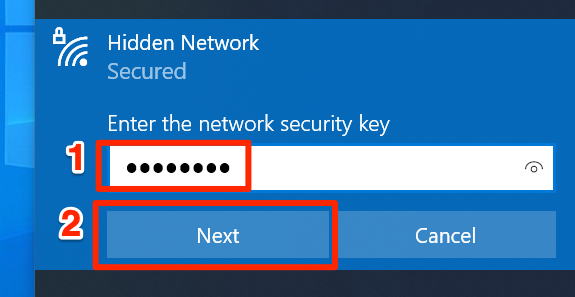
- Введите пароль от Wi-Fi (ключ безопасности сети).
Если все будет введено верно, то через короткое время вы будете подключены к беспроводной сети. Следующий способ подключения также подходит для Windows 10.
В Windows 7 и Windows 8 для подключения к скрытой сети шаги будут выглядеть иначе:
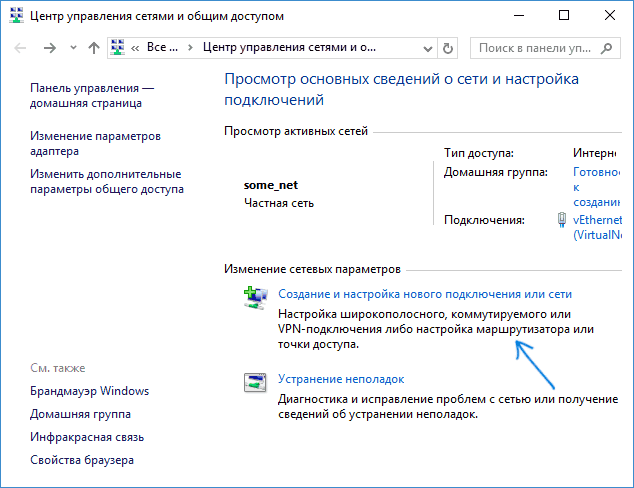
- Зайдите в центр управления сетями и общим доступом (можно через меню правого клика по значку соединения).
- Нажмите «Создание и настройка нового подключения или сети».

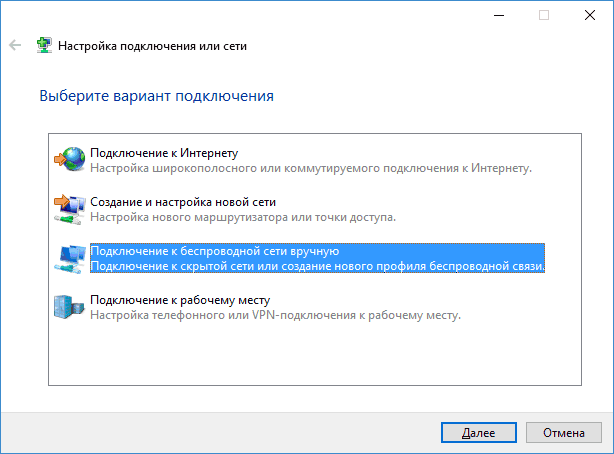
- Выберите «Подключение к беспроводной сети вручную. Подключение к скрытой сети или создание нового профиля сети».

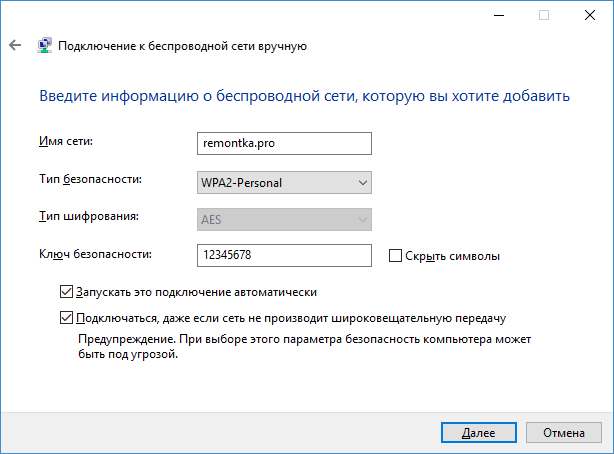
- Введите Имя сети (SSID), тип безопасности (обычно WPA2-Personal) и ключ безопасности (пароль от сети). Отметьте пункт «Подключаться, даже если сеть не производит широковещательную передачу» и нажмите «Далее».
- После создания подключения, соединение со скрытой сетью должно установиться автоматически.
Примечание: если установить подключение таким образом не удалось, удалите сохраненную Wi-Fi сеть с тем же именем (ту, которая была сохранена на ноутбуке или компьютера еще до ее скрытия). Как это сделать можно посмотреть в инструкции: Параметры сети, сохраненные на этом компьютере не соответствуют требованиям этой сети.
Как подключиться к скрытой сети на Android
Для подключения к беспроводной сети со скрытым SSID на Android, сделайте следующее:
- Зайдите в Настройки — Wi-Fi.
- Нажмите по кнопке «Меню» и выберите пункт «Добавить сеть».
- Укажите Имя сети (SSID), в поле защита укажите тип аутентификации (обычно — WPA/WPA2 PSK).
- Укажите пароль и нажмите «Сохранить».
После сохранения параметров, ваш телефон или планшет на Android должен подключиться к скрытой сети, если она в зоне доступа, а параметры введены верно.
Подключение к скрытой Wi-Fi сети с iPhone и iPad
Порядок действий для iOS (iPhone и iPad):
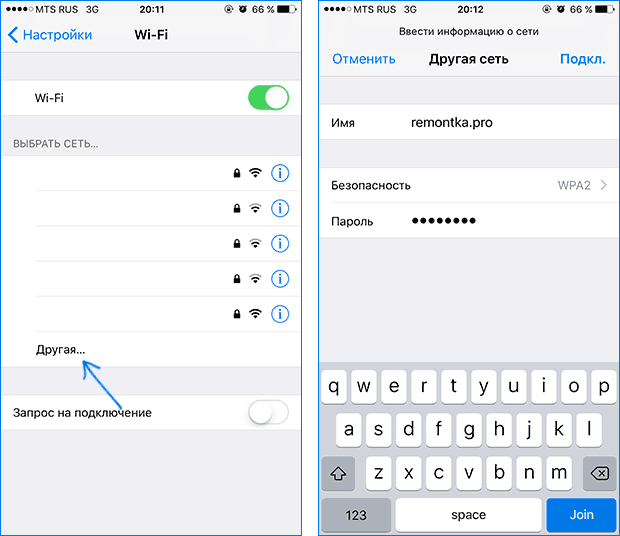
- Зайдите в настройки — Wi-Fi.
- В разделе «Выбрать сеть» нажмите «Другая».
- Укажите имя (SSID) сети, в поле «Безопасность» выберите тип аутентификации (обычно — WPA2), укажите пароль беспроводной сети.

Для подключения к сети нажмите «Подкл.» справа вверху. В дальнейшем подключение к скрытой сети будет осуществляться автоматически при ее наличии в зоне доступа.
MacOS
Для подключения к скрытой сети с Macbook или iMac:
- Нажмите по значку беспроводной сети и выберите внизу меню пункт «Подключиться к другой сети».
- Введите имя сети, в поле «Безопасность» укажите тип авторизации (обычно WPA/WPA2 Personal), введите пароль и нажмите «Подключиться».
В дальнейшем сеть будет сохранена и подключение к ней будет производиться автоматически, несмотря на отсутствие вещания SSID.
Надеюсь, материал получился достаточно полным. Если же остались какие-то вопросы, готов ответить на них в комментариях.
Sign in to your How-To Geek account
Quick Links
-
Connect to Hidden Wi-Fi in the Windows 10 Taskbar
-
Connect to Hidden Wi-Fi Using Windows 10 Settings
Just because a Wi-Fi network is not broadcasting its name doesn’t mean you can’t connect to it. Here, we’ll show you a couple of ways to connect to a hidden Wi-Fi network on Windows 10.
Any security expert will tell you hiding your Wi-Fi network’s name doesn’t really offer security. You should go other routes if you’re looking to keep your home network secure. As you’re about to find out, connecting to a hidden network is fairly straightforward.
In both methods below, you’ll need the name and the password of the Wi-Fi network you want to connect to. So keep these details handy and then follow either method.
A quick way to connect to a hidden Wi-Fi network on Windows 10 is by using the network icon on the Windows taskbar.
To use this method, find the network icon (a globe icon) on your Windows taskbar and click it.
In the menu that opens after clicking the network icon, select «Hidden Network.»
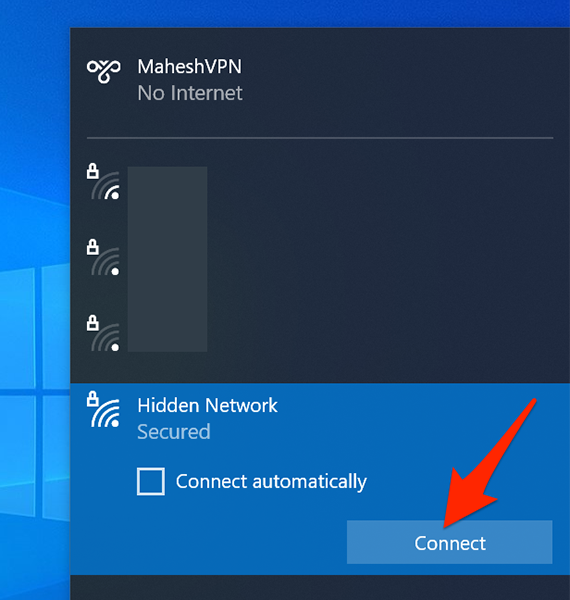
From the expanded «Hidden Network» section, choose «Connect» to connect to a hidden Wi-Fi network.
The «Hidden Network» section will ask you to enter your hidden Wi-Fi network’s name. Click the text field in the section and type that name. Then hit «Next.»
If your specified Wi-Fi network is password-protected, click the text field in the «Hidden Network» section and type the password. Then click «Next.»
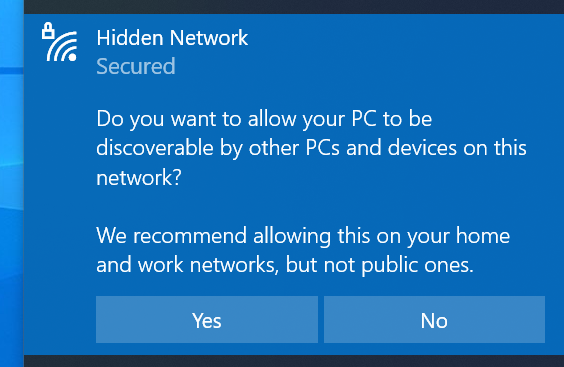
The «Hidden Network» section will now ask if you’d like to make your PC discoverable on your hidden Wi-Fi network. You’ll see that Microsoft recommends you click «Yes» if you are on a home network. If you are on a public network (like cafes), click the «No» option.
And you’re all set. Your PC is now connected to the specified hidden Wi-Fi network.
Another way to connect to a hidden Wi-Fi network is by using the Settings app. With this app, you can save your Wi-Fi network’s details, and your PC will then automatically connect to it.
To start, open the Settings app on your PC. Do this by pressing Windows+i keys at the same time.
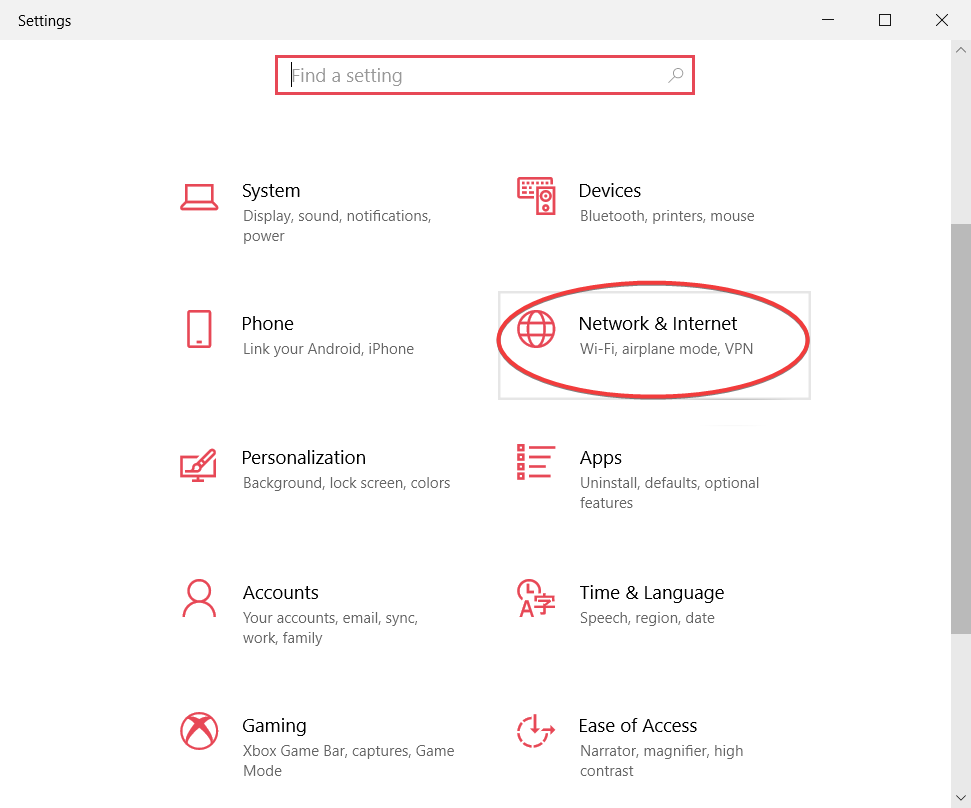
On the Settings window, click «Network & Internet.»

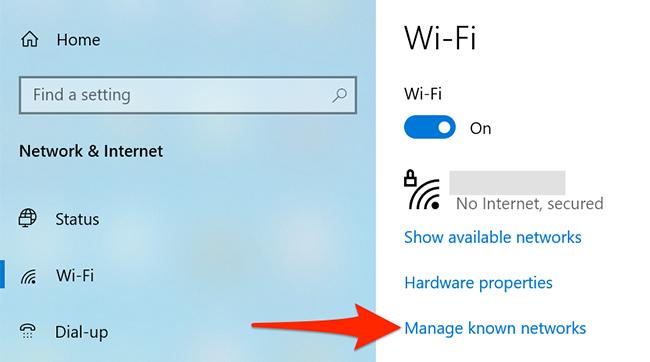
On the Network & Internet screen that opens, from the sidebar to the left, select «Wi-Fi.»

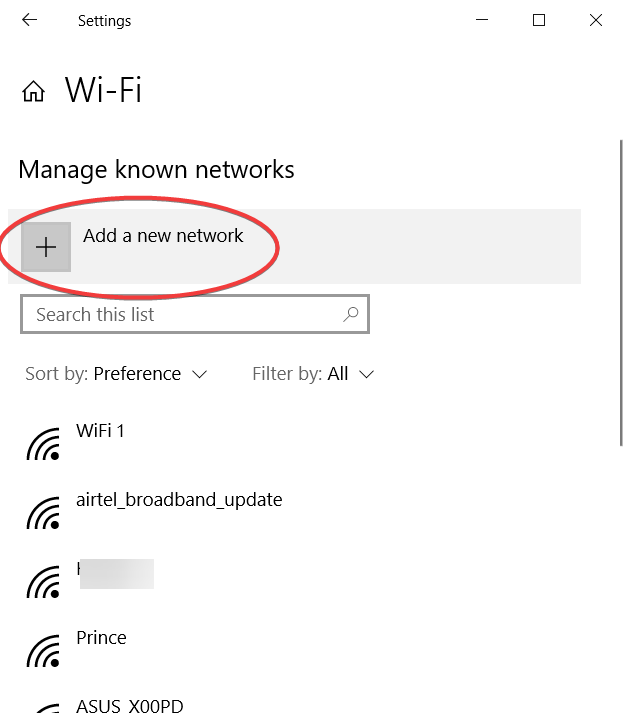
To the right of the «Wi-Fi» page, select the «Manage Known Networks» option.
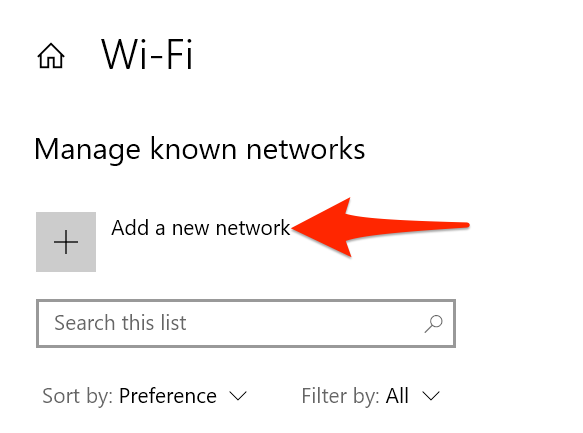
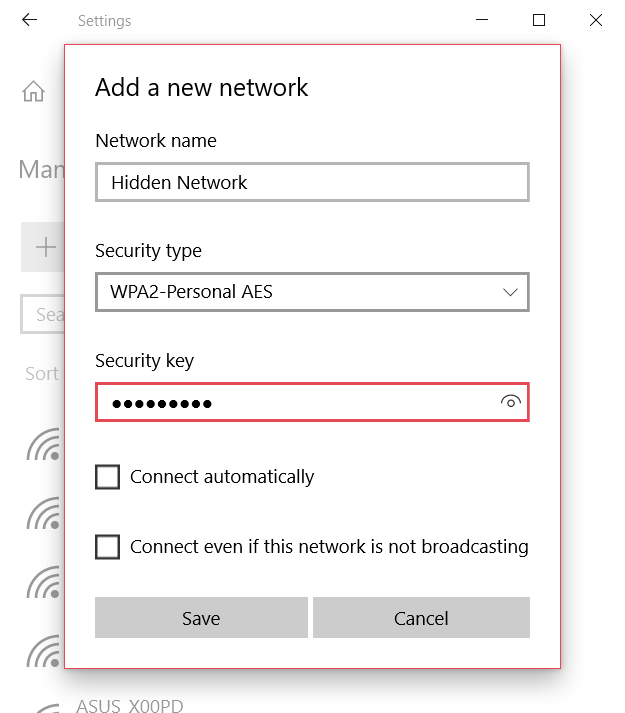
The Manage Known Networks page displays your saved Wi-Fi networks. Here, at the top, click the «Add a New Network» option to add your hidden Wi-Fi network to the list.
Windows 10 will open an «Add a New Network» window.
On this window, click the «Network Name» field and type your Wi-Fi network’s name (SSID.) Click the «Security Type» drop-down menu and choose an option. If you are not sure what to choose, select «WPA2-Personal AES» which should work for most networks.
Then click the «Security Key» field and type your network’s password. Enable both «Connect Automatically» and «Connect Even If This Network is Not Broadcasting» options.
Finally, at the bottom of the window, click «Save» to save your network details.

And your Windows 10 PC will connect to your specified Wi-Fi network!
Did you know you can retrieve a list of all the devices connected to your Wi-Fi network? You might want to do this to find any intruders on your network.
In this article, you will learn how to connect to hidden WiFi in Windows 10. A Hidden Wi-Fi network is a wireless connection that doesn’t broadcast its Service Set Identifier (SSID), i.e., network name. Hidden wireless networks do not enhance any security parameter. This feature is used to hide a WiFi network’s identity from the public. So, only those who already know the network details can connect to a hidden Wi-Fi. Here you will see how you can add hidden networks to Windows 10 PC.
Before you try to connect to a Hidden WiFi network, you must have the following information handy:
- Network name (SSID)
- The Type of Security
- Encryption type
- Security key/ Password
Follow the methods mentioned below to connect to a hidden wireless network in Windows 10 computer.
Table of Contents
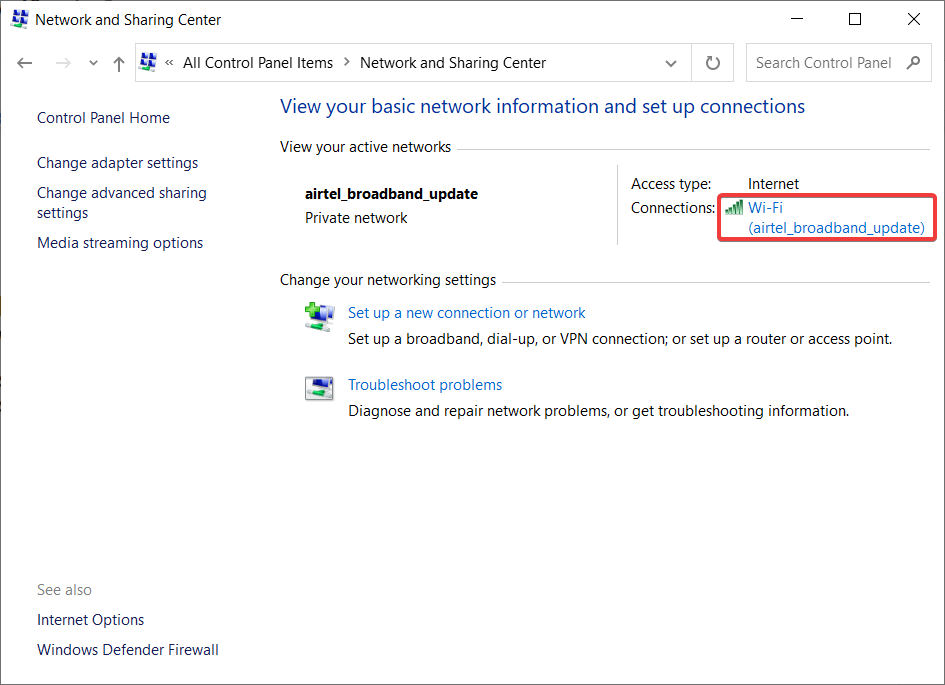
Method 1: Connect to Hidden Wi-Fi Network through Network and Sharing Center
Step 1: Go to the Taskbar on your PC and select the WiFi icon.

Step 2: Select the Network & Internet settings option.
Step3: Go to the Wi-Fi tab and Select the Network and Sharing Center option present on the right side of the interface.

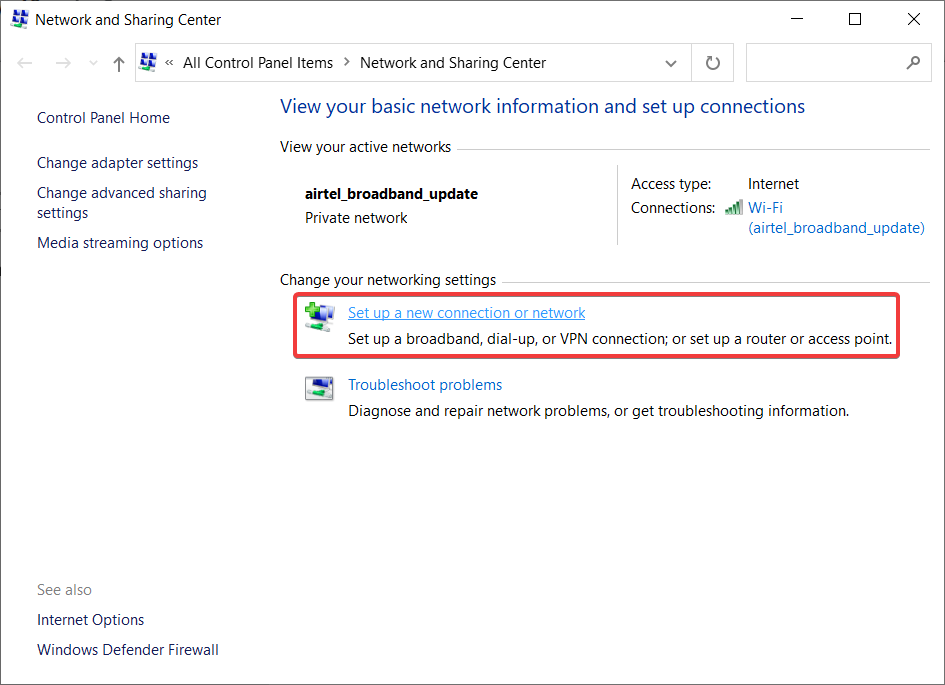
Step 4: Tap on the Set up a new connection or network button.
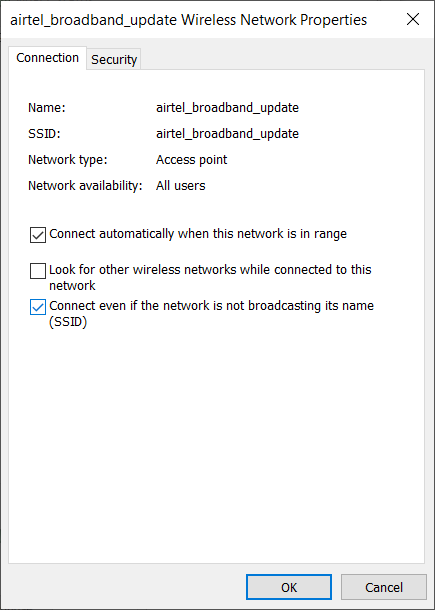
Step 5: Click on the Manually connect to a wireless network option and select the Next option.
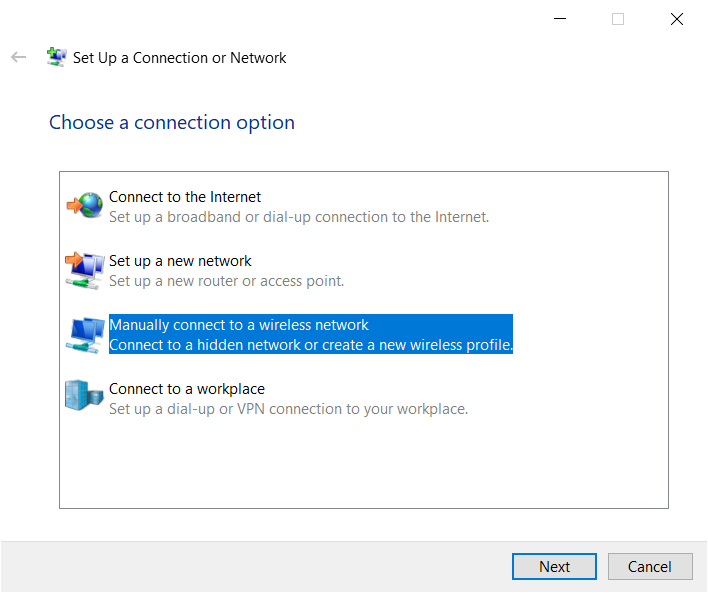
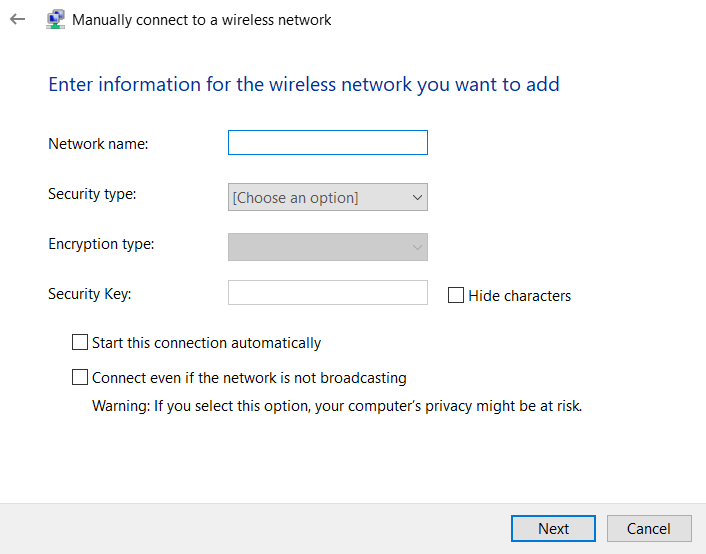
Step 6: Now, you need to provide details about the hidden network you want to connect to. These details include Network Name, Type of Security, Encryption Key, and Security Key (Password). You can also customize options like Start this connection automatically and Connect even if the network is not broadcasting.
Step 7: Click on the Next button to connect to the hidden network in Windows 10.
Here’s another method that you can use to add a new connection or network that is hidden in Windows 10
Method 2: Use Settings app to Connect to Hidden Wi-Fi Network
You can also use the default Settings app with Window 10 to connect to a hidden wireless network. Follow the instructions provided below:
Step 1: Press the Win + X key combination to open the shortcut menu and select the Settings option.
Step 2: From the Settings app, click on the Network & Internet option.
Step 3: Now select the Wi-Fi tab on the left panel and then tap on the Manage available network option.

Step 4: Press the Add a new network button.
Step 5: Next, you will be prompted to enter details of the hidden Wi-Fi network, including SSID, Type of Security, and Security Key. Also, you can select the checkbox that says Connect even if the network is not broadcasting.
Step 6: Lastly, select the Save button to finish setting up the hidden network.
Method 3: Establish Connection With Hidden Wireless Network from Wi-Fi Icon
You can access the internet from hidden networks through the Taskbar as well; here are the steps:
Step 1: Go to the taskbar and select the Wi-Fi icon to view the list of available networks along with the hidden WiFi networks.
Step 2: As the list of available networks opens, select the Hidden Network section and select Connect Automatically, then tap on the Connect option. The Hidden Network is usually present at the bottom of the list.
Step 3: You will be asked for the SSID of the hidden wireless network you want to connect to; Enter the name of the hidden network, then click on the Next button.
Step 4: Next, you need to enter the hidden network’s password and press the Next button.
Step 5: Wait till Windows connects your PC to the hidden Wi-Fi network. When connected to the wireless network, you will be asked if you want to allow your PC to be discoverable by other devices on this network. Select Yes or No as per your preference.
You will now be connected to the hidden Wi-Fi network.
Method 4: Connect to a Wireless Network in Windows 10 via. Control Panel
Here’s an alternative to set up and connect to a hidden wireless network in Windows 10. Here are steps to use this method:
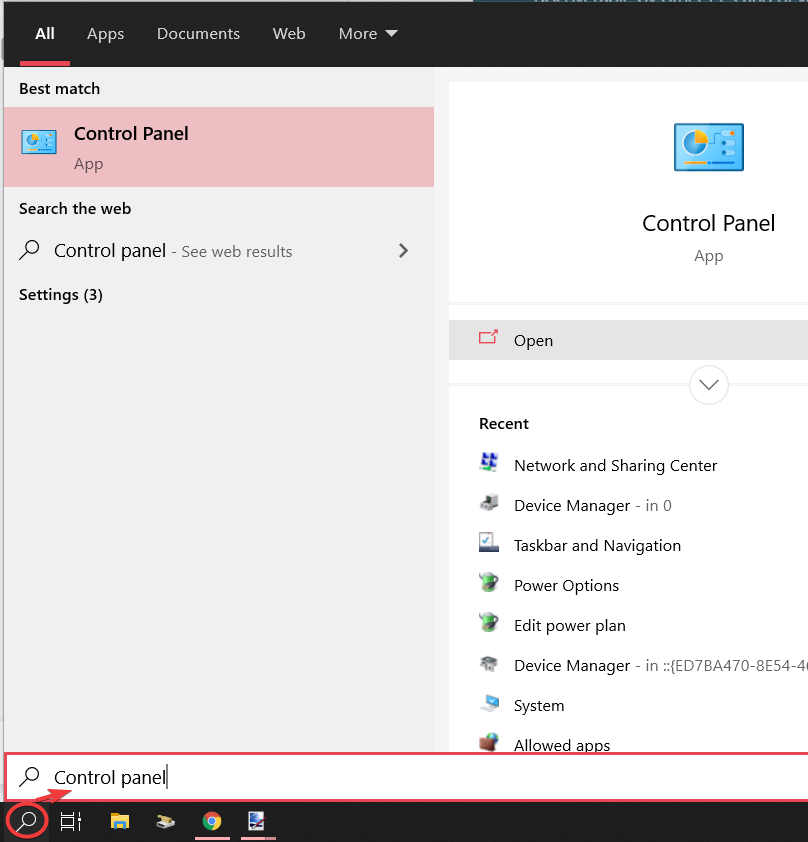
Step 1: Go to the search option present on the taskbar and type Control Panel in it.
Step 2: Click on the Control Panel app to open it.
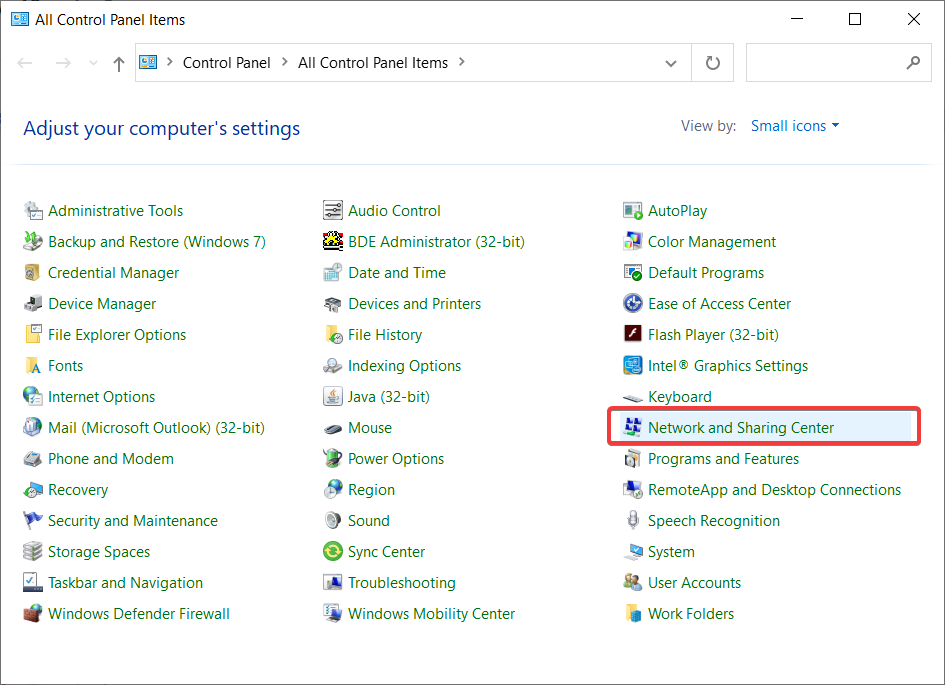
Step 3: Click the Network and Sharing Center option.
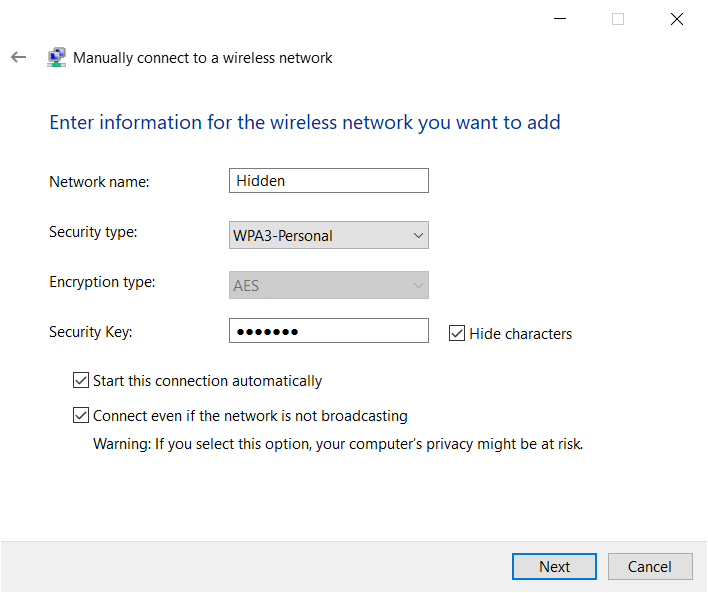
Step 4: Click on the Set up a new connection or network > Manually connect to a wireless network option and press the Next button.
Step 5: Now, enter the information like Name of the Network, Security Type, Encryption Type, and Password of the hidden WiFi network.
Step 6: You can also enable/ disable Start this connection automatically and Connect even if the network is not broadcasting its name options.
Step 7: After setting up all the options, click on the Next button to connect to the hidden Wi-Fi.
Method 5: Configure Wireless Properties to Set Up a New Wireless Network
If you want to connect to Wi-Fi networks even when they are hidden, you need to make wireless properties changes. Follow these steps to set up Wi-Fi properties:
Step 1: Open the Control Panel window and select the Network and Sharing Center option.
Step 2: Click on the Wi-Fi button.
Step 3: After that, select the Wireless Properties button.

Step 4: Now, enable the checkbox that says Connect even if the network is not broadcasting its name, then click the OK button.
You should now be able to connect to the default hidden WiFi in Windows 10 PC.
Method 5: Use WiFi Scanner Software to Find Hidden WiFi Networks
If you are unable to find and connect to a hidden WiFi, try finding hidden WiFi networks. You can scan hidden networks using third-party software. There are multiple of them; let’s check out some:
inSSIDer
inSSIDer is a free WiFi network scanner program for Windows 10 to connect to hidden networks. You can find a hidden network through this software. Click on the ALL button present on its interface to scan all wireless networks, including hidden WiFi networks. It will show the name of the network, signal, clients, and other details of hidden and other wireless networks. Double click on a hidden network, and you will be able to know its information, including SSID, access point, Security type, WiFi mode, etc. Using this information, you can manually connect to a hidden WiFi.
It also displays network graphs to analyze a wireless network.
Note: Register an account on MetaGeek to access the functionalities of this program.

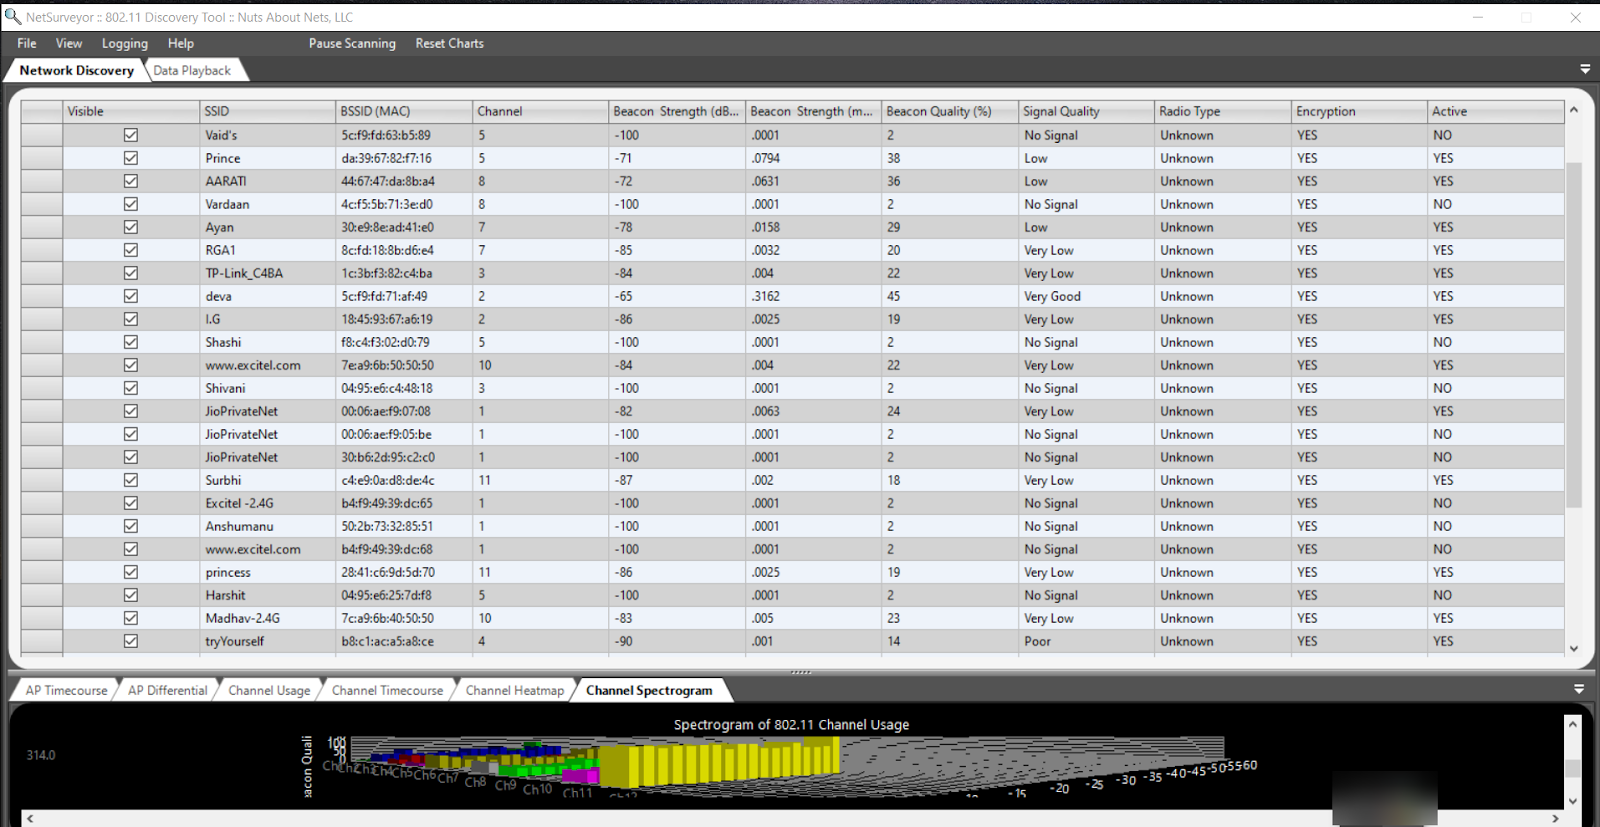
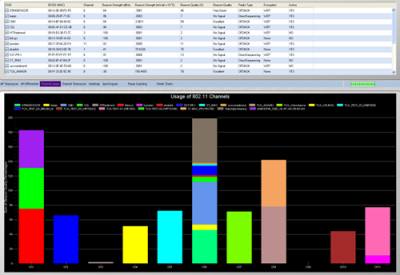
NetSurveyor
NetSurveyor scans all Wi-Fi networks / wireless networks, including hidden WiFi, and displays all networks on your screen. It shows you SSID along with Channel, Beacon Strength, Signal Quality, Encryption, etc. You can try any of the above methods to connect to a hidden WiFi network using its SSID and other required details.
It also shows you various real-time graphs like timecourse, channel heatmap, channel spectrogram, and channel usage, along with wireless network information.
If you are still unable to connect to hidden networks, you can fix it up using a few tricks as following:
- Disable Bluetooth, and for that, press Windows + A hotkey, which will open up Action Center. Check for the Bluetooth option and turn it off.
- Modify the Power option by going to Device Manager app > Network Adapter section. Right-click on the WiFi adapter, then select the Properties option. Go to the Power Management tab and disable the option that says Allow the computer to turn off this device to save power option. Press the OK button to apply changes.
- You still can’t connect to your hidden WiFi; forget it. Go to the network by clicking the WiFi icon from the taskbar and right-click on it. Select Forget option to remove it. After that, reconnect to it manually using any of the discussed methods.
Conclusion
Hidden networks are WiFi networks with their presence hidden from the public. With Windows 10, it has become relatively easy to connect to a hidden WiF network. You can try connecting to a hidden wireless network manually using the Settings app, Control Panel, Taskbar. Just make sure you know the network name, security type, and password of the hidden network you want to connect to.
Download Windows Speedup Tool to fix errors and make PC run faster
We are all surrounded by many Wi-Fi networks and their signals in the air. But are these networks secure? Wi-Fi security has always been a challenge for network administrators. Also, wireless networks usually broadcast the stream of data and hence are considered lesser secure. On the other hand, wired networks are much more secure and require physical intrusion by the hacker. In this article, we will discuss a so-called Wi-Fi security feature ‘Hidden SSID’. This feature was sometimes a topic of the marketing campaign by companies but let’s find out what it is.
What is a Hidden SSID
Whenever you connect to a Wi-Fi network, you must have noticed that there is a name associated with it. An SSID is the name associated with the wireless network and is an identifier for it. All the clients that connect to that network know that network by its SSID.
How to join a Hidden Wi-Fi on Windows 11/10
Wireless Networks constantly broadcast their SSID so that other clients can scan them and connect to these networks. But some networks do not want everyone to see their presence. So, a network not broadcasting its name publicly is having a hidden SSID. These networks also do not show up normally when you scan for Wi-Fi networks.
You might be thinking, this is one good security feature. But let me tell you, it is not. There are a lot of tools available that can scan these hidden networks easily. And by hiding your network you might attract unwanted attention from hackers. Hidden Networks do not add anything to security layer of a Wi-Fi network. Consider changing the password and security type for more security.
So, you have details for a Hidden Network that you want to connect to? It is fairly simple to connect to a hidden network on Windows 11/10. Before continuing, make sure you have the following details about the hidden network:
- SSID (hidden SSID)
- Security Type
- Security Key
- EAP Method (if using WPA2-Enterprise AES security type)
Once you have all these details handy, follow these steps to manually add a hidden wireless network:
- Open ‘Settings’
- Go to ‘Network and Internet’.
- Select ‘Wi-Fi’ from the left menu.
- Click on ‘Manage Known Networks’
- Now click on ‘Add a new network’
- Enter the SSID, choose the security type and enter your password.
- Select ‘Connect Automatically’ if you want to connect to this network whenever available.

There is one more option that says, ‘Connect even if this network is not broadcasting’. Enabling this option can really put your privacy to risk. Windows will always scan for this network even if you are in a different place. Any hackers or intruders can intercept this search and really know which network you are trying to connect to.
How to find Hidden WiFi Networks
As I mentioned, there are a lot of tools that are meant to scan hidden Wi-Fi networks. These tools can help you while connecting to these networks or inspecting the security of your Wi-Fi network. We have already covered some of these tools in detail, please follow the links to know more about these tools.
NetSurveyor
It is a free Wi-Fi network discovery tool that scans your surroundings for available Wi-Fi signals. It will then process this information and present you the report consisting of various diagnostic values and charts. NetSurveyor supports most of the Wi-Fi adapters and even comes with a Demo mode if your device does not have a supported Wi-Fi adapter.
NetStumbler
NetStumbler is a similar tool but it is relatively old, perfect for older systems. It supports network discovery and all other major features that you will need while auditing the area for wireless networks. There is a possibility that NetStumbler might not recognize your Wi-Fi adapter as the tool has not been updated lately.
Kismet
Kismet is an open-source network detector, sniffer, and intrusion detection system. It is a rather complex tool and a user might need to compile it before using it. The documentation provides instructions for compiling the tool on both Windows and Linux systems.
How to make your wireless network hidden
Some countries do not allow wireless networks that broadcast their SSID publicly. So, you might be looking for hiding the SSID of your network. The steps we’ve covered here depend majorly on the router and its manufacturer. These steps can vary a lot and should be considered only for getting a general idea.
- Open a web browser and navigate to the router’s configuration page. Usually, it is something like ‘http://192.168.0.1’. Read the instruction manual that came along with your router for more details.
- Enter the default credentials from the guide.
- Now go to Wireless Settings and set ‘SSID Broadcast’ to ‘Disabled’.
This should stop your router from broadcasting the network SSID.
Are Hidden WiFi networks secure?
Is it worth it? Hiding the SSID won’t really add any extra security features to your wireless network. Because Wi-Fi networks are the broadcast type, hiding SSID won’t make any difference. Conversely, it makes it a little difficult to connect to the network as there is one additional step. Also, if your computer is constantly scanning the area for a hidden network, you are risking your privacy with that network.
Conclusion
So that was all you want to know about hidden SSIDs and Wi-Fi networks. You can grab one of the tools mentioned and start hunting Wi-Fi networks around you. Or you can go ahead and hide your Wi-Fi network to test the security features offered by your router. The science behind these networks and how they work is interesting. Curious readers can read more by searching the internet for 802.11.
TIP: See this post if you can’t connect to Hidden Network in Windows 11.
Lavish loves to follow up on the latest happenings in technology. He loves to try out new Windows-based software and gadgets and is currently learning JAVA. He loves to develop new software for Windows. Creating a System Restore Point first before installing a new software is always recommended, he feels.
195299
Давайте сначала разберемся, что такое скрытая Wi-Fi сеть. А затем я покажу, как подключится к скрытой Wi-Fi сети в Windows 11, Windows 10, 8, 7, на Android-смартфоне или планшете, а так же на iPhone и iPad.
Скрытой считается Wi-Fi сеть, имя (SSID) которой не транслируется. Это значит, что название беспроводной сети не будет отображаться в списке доступных для подключения на компьютере, телефоне, планшете, или другом устройстве. Вы когда на своем устройстве открываете список доступных сетей, то можете видеть там кроме своей сети, соседние Wi-Fi сети с разными именами. Если сеть скрыта, то ее в списке не будет. А чтобы к ней подключится, нужно указать не только пароль, но и ее имя.
Если ваш компьютер увидит в радиусе скрытую Wi-Fi сеть (или несколько), то в списке доступных появится сеть с названием «Скрытая сеть», или «Другие сети». Вы так же можете скрыть беспроводную сеть в настройках своего роутера. Как это сделать на примере роутера TP-Link я писал в статье: как на роутере Tp-Link сделать Wi-Fi сеть невидимой. Это дополнительная защита. Как я уже писал выше, чтобы подключится к такому Wi-Fi, нужно кроме пароля указать еще и имя сети.
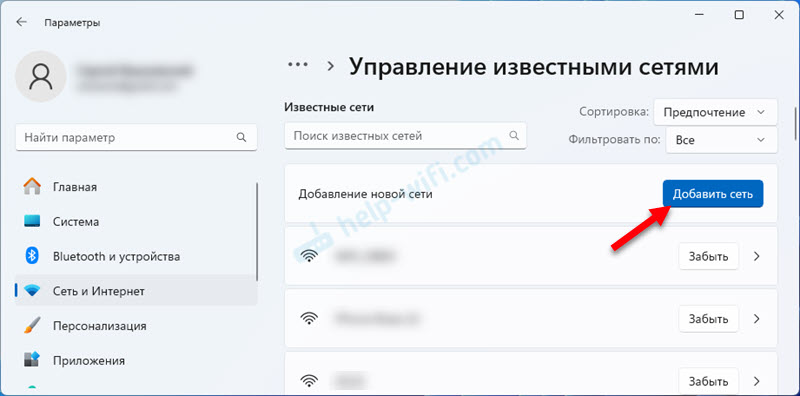
Настройка подключения к скрытой Wi-Fi сети в Windows 11
- Откройте Параметры. Я обычно делаю это через меню, которое можно открыть нажатием правой кнопки мыши по меню Пуск.
- Перейдите в раздел «Сеть и Интернет».
- Справа нажмите на вкладку «Wi-Fi» – «Управление известными сетями».
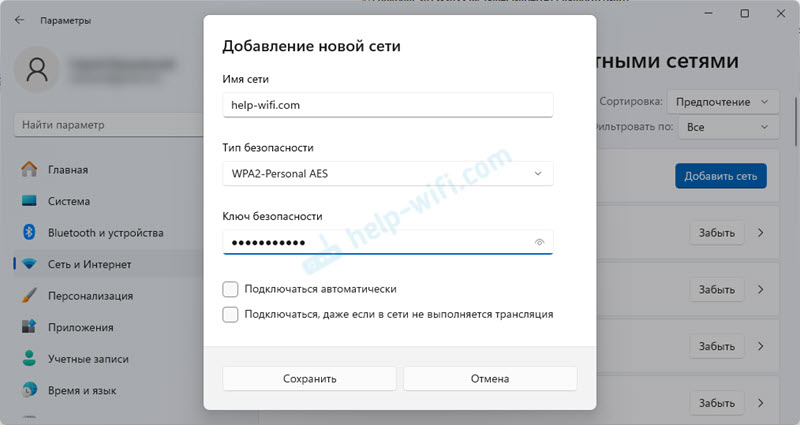
- Нажмите на кнопку «Добавить сеть».

- Укажите имя сети (SSID), тип безопасности который установлен в настройках роутера (чаще всего это WPA2-Personal AES), и пароль.

Если все поля заполнены правильно, то Windows 11 установит подключение к скрытой Wi-Fi сети.
Подключаемся к скрытой Wi-Fi сети в Windows 10
Сам процесс практически ничем не отличается от обычного подключения к Wi-Fi в Windows 10. Откройте список доступных сетей и нажмите на «Скрытая сеть». Если хотите, чтобы компьютер подключался к этой сети автоматически, то оставьте галочку возле «Подключатся автоматически». Если такого пункта у вас нет, то попробуйте создать сеть вручную, об этом я напишу ниже. Так же хорошо бы убедится, что такая сеть есть.
Вводим имя Wi-Fi сети.
Вводим пароль и нажимаем «Далее».
Если вы все указали верно, то Windows 10 подключится к скрытой Wi-Fi сети.
Вот собственно и все.
Подключение Windows 7 и Windows 8 к Wi-Fi со скрытым SSID
Если у вас установлена Windows 7, или Windows 8, то проще всего создать новое подключение к беспроводной сети вручную. Это можно сделать и в «десятке».
Зайдите в «Центр управления сетями и общим доступом» и нажмите на «Создание и настройка нового подключения или сети».

Дальше выбираем «Подключение к беспроводной сети вручную».
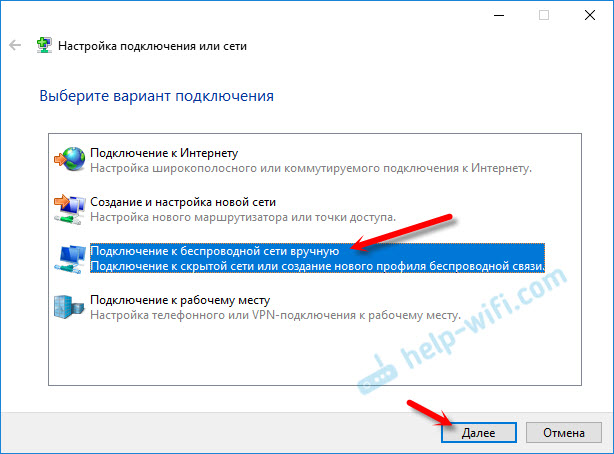
В следующем окне задаем такие параметры:
- Имя Wi-Fi сети.
- Выбираем тип безопасности. Скорее всего WPA2-Personal.
- Указываем «Ключ безопасности» (пароль).
- Если хотите, чтобы компьютер подключался к этой сети автоматически, оставьте включенным пункт «Запускать это подключение автоматически».
- Поставьте галочку возле «Подключаться, даже если сеть не производит широковещательную передачу».
Вот так:

Ноутбук подключится к сети и запомнит ее.
Как подключится к скрытой Wi-Fi сети на iPhone и iPad (iOS)
Если у вас планшет или телефон от Apple, то подключится к скрытой Wi-Fi сети там очень просто. Я покажу на примере iPhone. На iPad все точно так же.
- Заходим в настройки, и переходим в раздел «Wi-Fi».
- Дальше нажимаем на пункт «Другая…».
- Указываем имя сети, выбираем «Безопасность» (скорее всего WPA2), и указываем пароль.
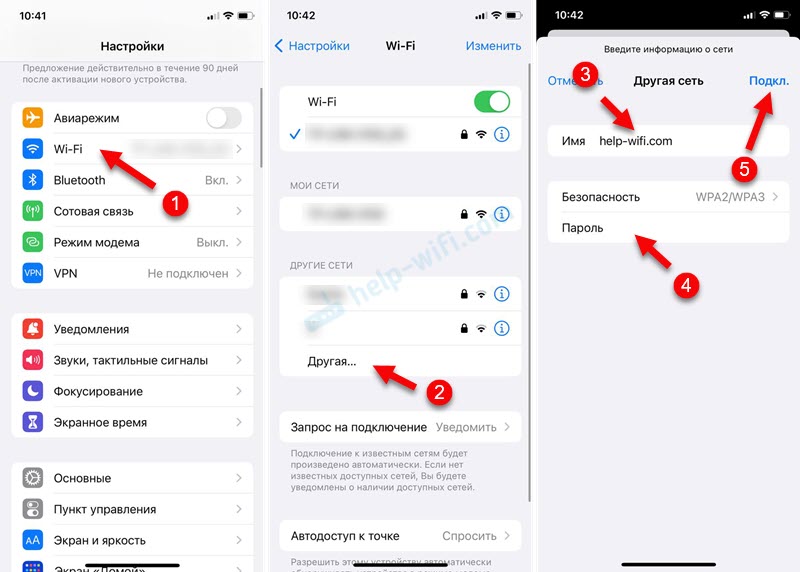
Вот так просто можно подключить свой iPhone, или iPad к беспроводной сети со скрытым SSID.
Подключаем Android-смартфон или планшет к скрытому Wi-Fi
Сам процесс подключения может немного отличатся, в зависимости от версии Android, устройства и производителя (оболочки).
Нужно сначала зайти в настройки, в раздел «Wi-Fi».

Дальше нажмите на меню (скорее всего в виде трех точек), и выберите «Добавить сеть».

Вводим имя сети, выбираем «Защита» – WPA/WPA2 PSK, и вводим пароль от сети. Дальше нужно нажать на «Сохранить».

Ваш телефон, или планшет на Android подключится к скрытому Wi-Fi. При условии, что вы все указали правильно.
Независимо от того, какое устройство вы хотите подключить к скрытому Wi-Fi, нужно создать новую беспроводную сеть, указать ее название, тип безопасности и пароль.
Если у вас остались какие-то вопросы, то оставляйте их в комментариях к этой статье.