
После того, как установлен и настроен Windows server 2019, можно приступить к установке различных служб и компонентов. В данном случае установим службу печати и документов, которая позволяет управлять печатающими устройствами в домене, а также развертывать принтеры с помощью групповой политики.
Установка роли «Служба печати и документов»
Установка принтера в домене
Развертывание принтера (МФУ) в домене с помощью групповой политики
Проверка установки принтера в домене с помощью групповой политики
Установка роли «Служба печати и документов».
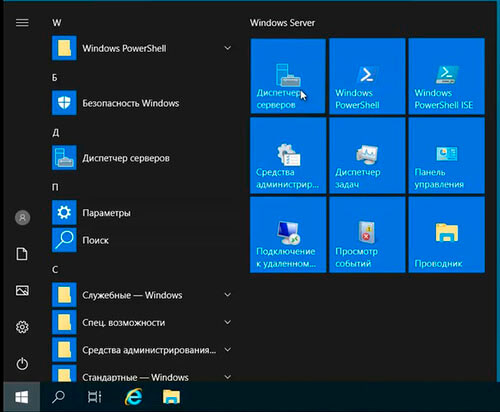
1. нажимаем «Пуск» — «Диспетчер серверов«.
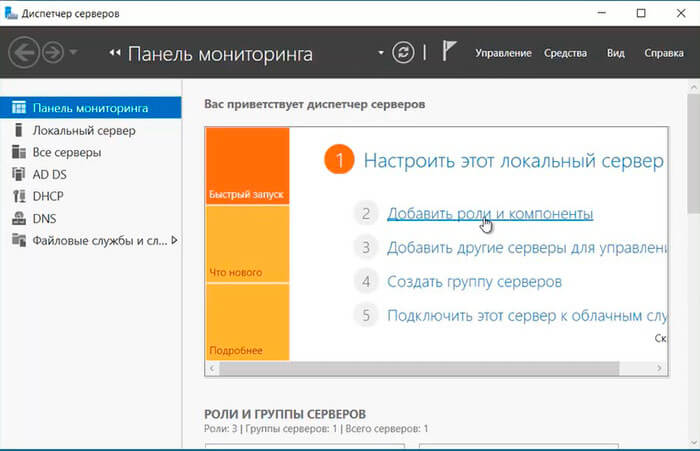
2. Выбираем «Добавить роли и компоненты«.
3. В мастере добавления ролей и компонентов читаем условия, которые необходимы для установки ролей и компонентов.
- Учётная запись администратора защищена надежным паролем;
- Настроены сетевые параметры, такие как статические IP-адреса;
- Установлены новейшие обновления безопасности из Центра обновления Windows.
Нажимаем «Далее«.

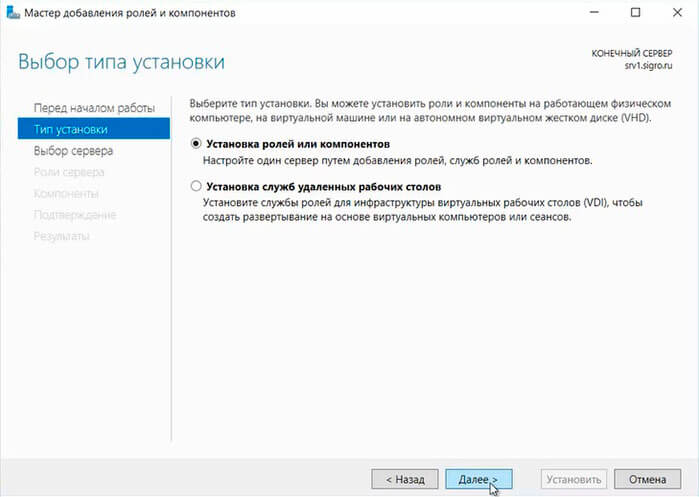
4. В следующем окне выбираем «Установка ролей или компонентов«, нажимаем «Далее«.
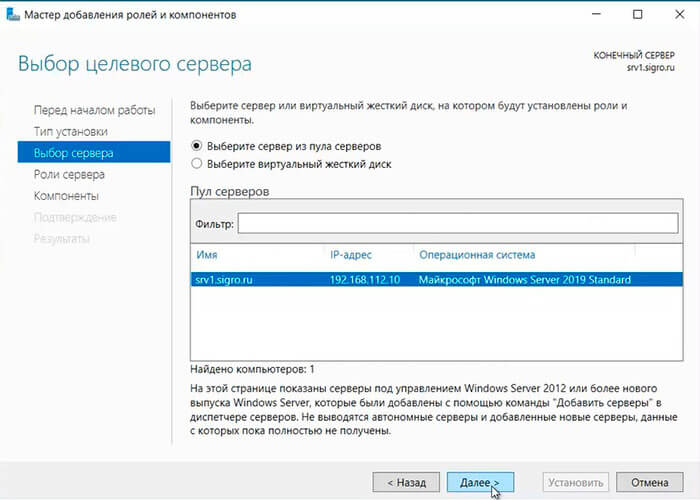
5. Выбираем сервер из пула серверов, затем «Далее«.
6. Выбираем «Службы печати и документов«.
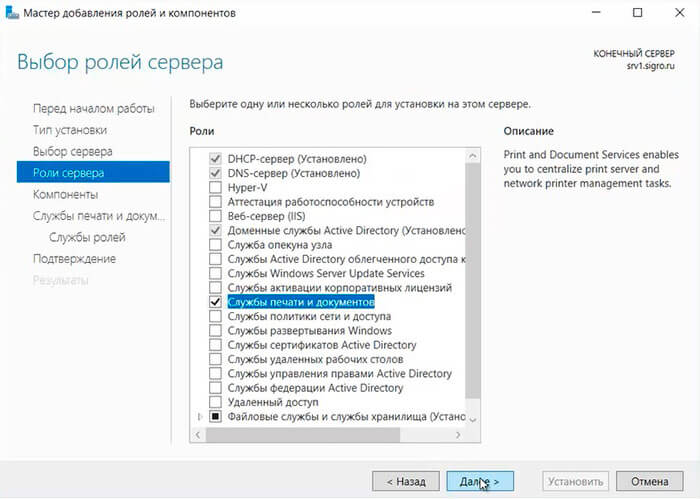
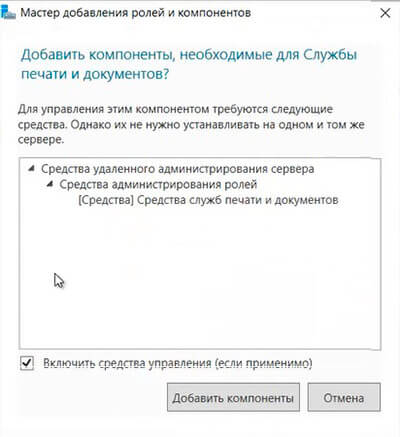
7. В открывшемся окне выбираем «Добавить компоненты«, снова «Далее«.
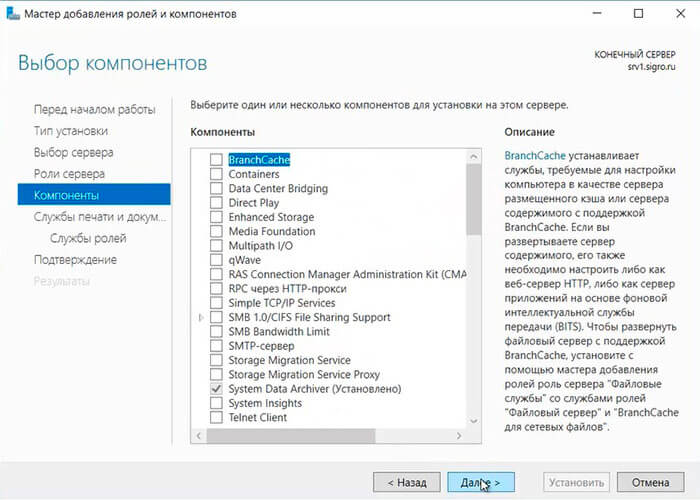
8. Компоненты для установки на этом сервере устанавливать нет необходимости, нажимаем «Далее«.
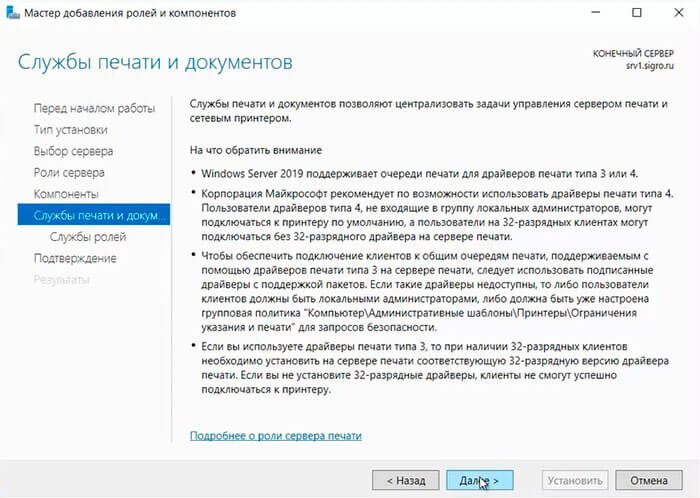
9. Читаем на что обратить внимание при установке службы печати и документов, нажимаем «Далее«.
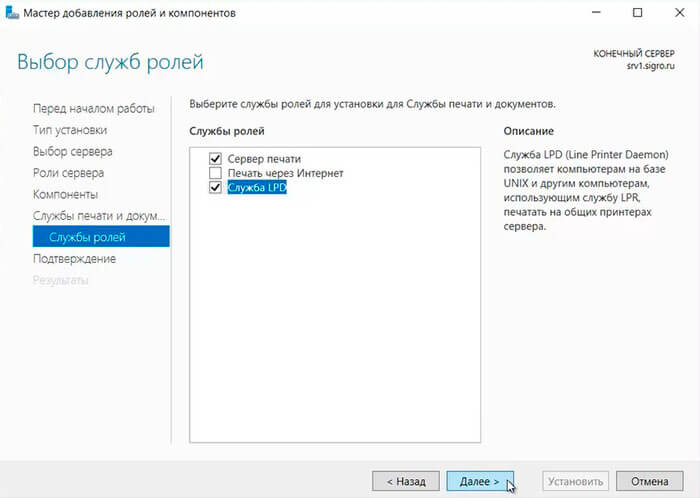
10. В следующем окне оставляем по умолчанию чекбокс на «Сервер печати«. Если в сети имеются компьютеры, работающие на базе UNIX (в том числе Linux), ставим чекбокс на «Службы LPD«. Затем «Далее«.
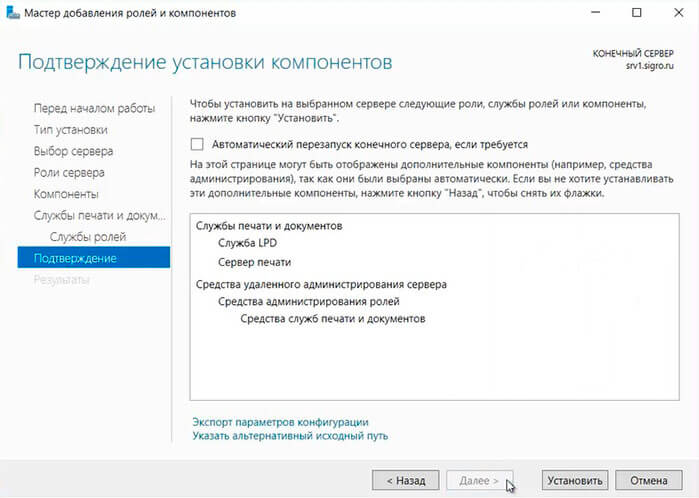
11. В открывшемся окне Нажимаем «Установить«.
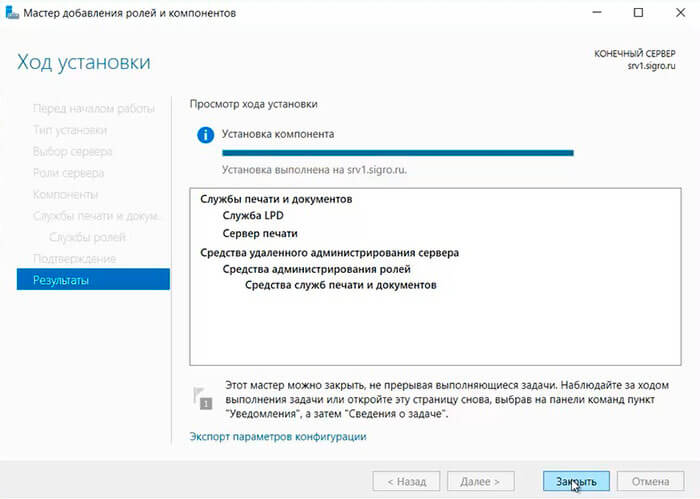
12. По окончании установки нажимаем «Закрыть«. Служба печати и документов после установки не требует перезагрузки сервера.
Установка принтера в домене
Для того, чтобы установить принтер, МФУ в домене, сначала необходимо установить драйвер печатающего устройства на сервере. В данном случае установим драйвер для МФУ Kyocera Ecosys M2835dw.
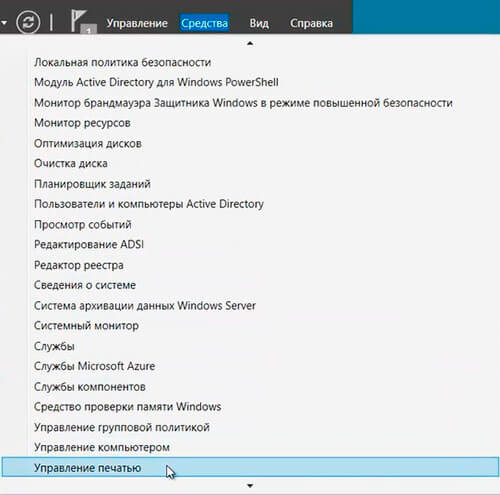
1. Открывает «Диспетчер серверов» (Пуск — Диспетчер серверов), далее «Средства» — «Управление печатью«.
2. В открывшемся окне «Управление печатью» раскрываем «Серверы печати«. Нажимаем правой клавишей мыши на «Принтеры«, далее «Добавить принтер…«.

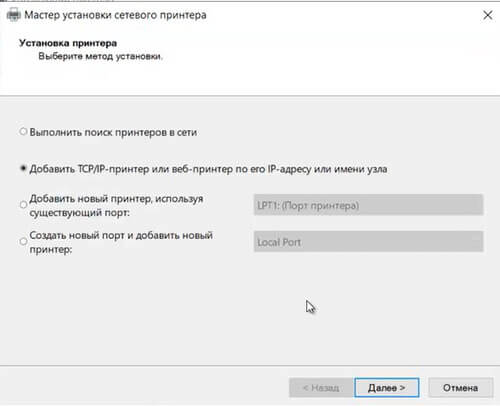
3. В мастере установки сетевого принтера выбираем «Добавить TCP/IP-принтер или веб-принтер по его IP-адресу или имени узла«, затем «Далее«.
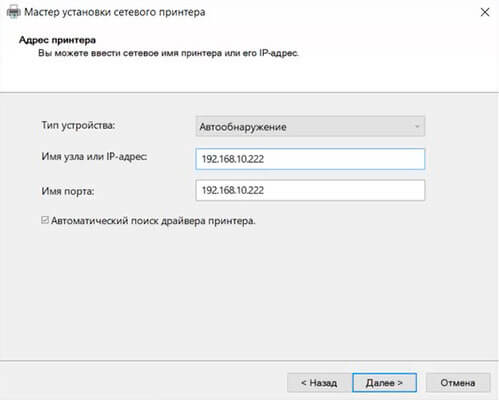
4. Задаём «Имя узла или IP-адрес«, «Имя порта«. Устанавливаем чекбокс «Автоматический поиск драйвера принтера«, если не стоит. Нажимаем «Далее«.
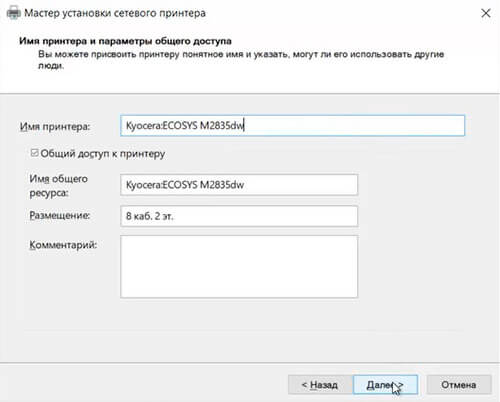
5. После того, как принтер (МФУ) найден, задаём «Имя принтера«, «Имя общего ресурса«, устанавливаем чекбокс «Общий доступ к принтеру«, если не стоит. Для удобства заполняем поле «Размещение» и если есть необходимость, заполняем «Комментарий«. Нажимаем «Далее«.
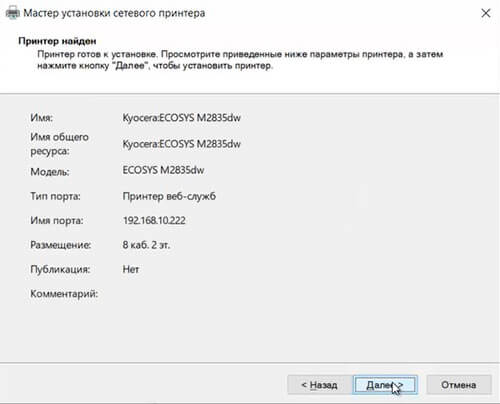
6. Дожидаемся установки драйвера сетевого принтера (МФУ), затем «Далее«.
7. После окончания установки устройства, мастер установки сетевых принтеров напишет состояние «Принтер установлен». Можно напечатать пробную страницу, а также установить другой принтер, установив чекбокс в соответствующее поле. Нажимаем «Готово«.
т
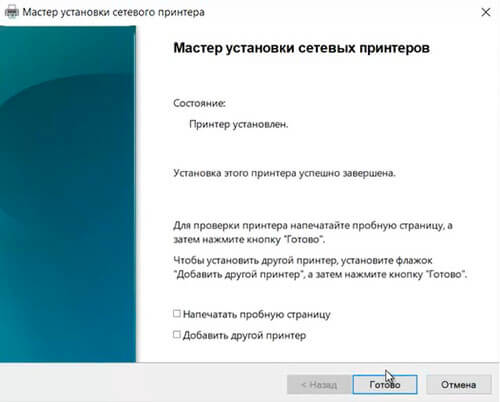
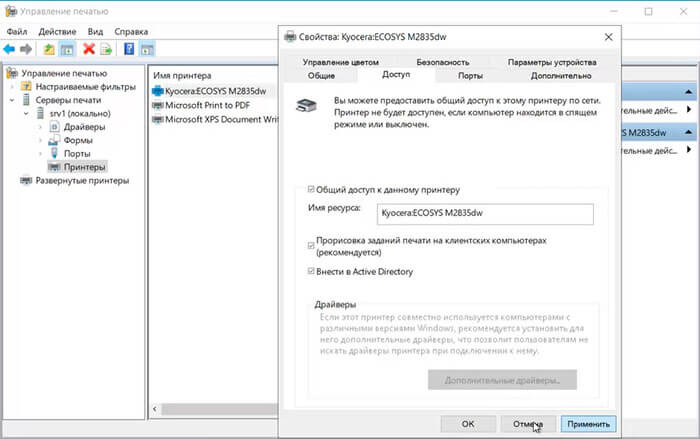
8. Далее в окне «Управление печатью«, нажимаем правой клавишей на установленное устройство, выбираем «Свойства«. В открывшемся окне ставим чекбокс «Внести в Active Directory«. Нажимаем «Применить«, затем «ОК«.
Развертывание принтера (МФУ) в домене с помощью групповой политики
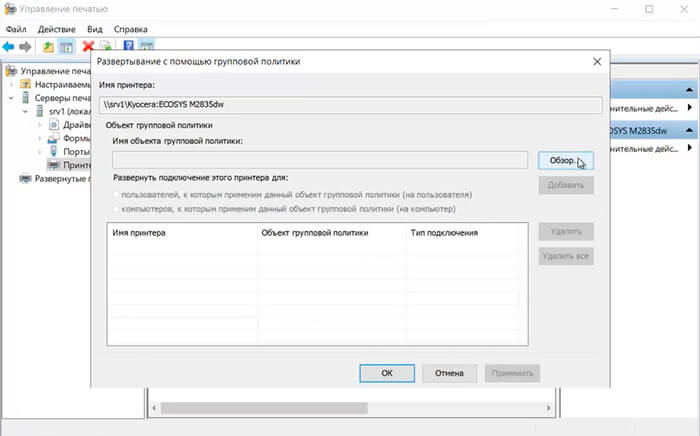
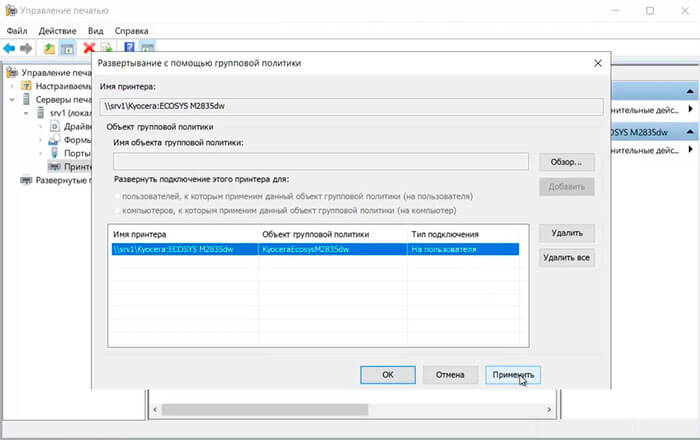
1. Для развертывания принтера (МФУ) в домене с помощью GPO в окне «Управление печатью» переходим к «Принтеры«, далее выбираем необходимый принтер. Нажимаем правой клавишей мыши на выбранный принтер, далее «Развернуть с помощью групповой политики«. В новом окне нажимаем «Обзор«.
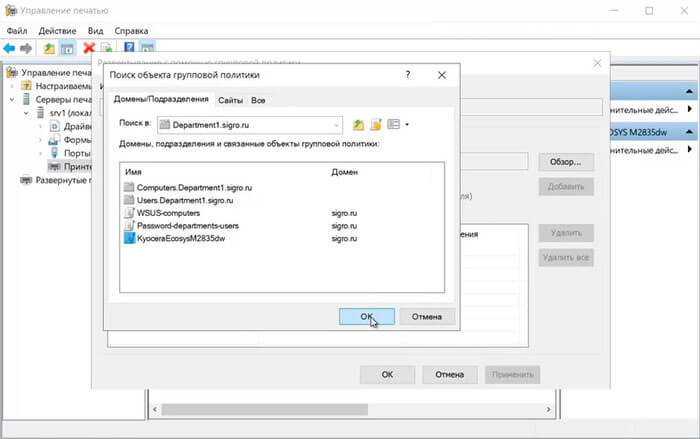
2. В открывшемся окне выбираем подразделение, в котором будет развернуто устройство для печати, затем нажимаем на «+» и задаём имя для новой групповой политики.
3. В зависимости от применения групповой политики (для пользователей, для компьютеров), ставим чекбокс. В данном случае применяем политику для пользователей, к которым применен данный объект групповой политики (на пользователя). Нажимаем «Добавить» — «Применить«.
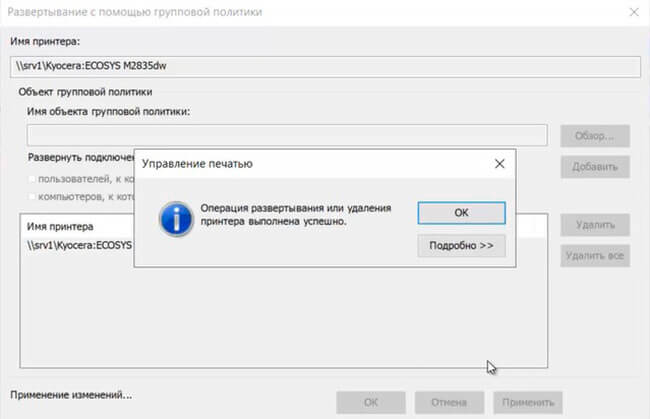
4. Появится сообщение, что операция развертывания или удаления принтера выполнена успешно. Для закрытия сообщения нажимаем «ОК«, затем «ОК«.
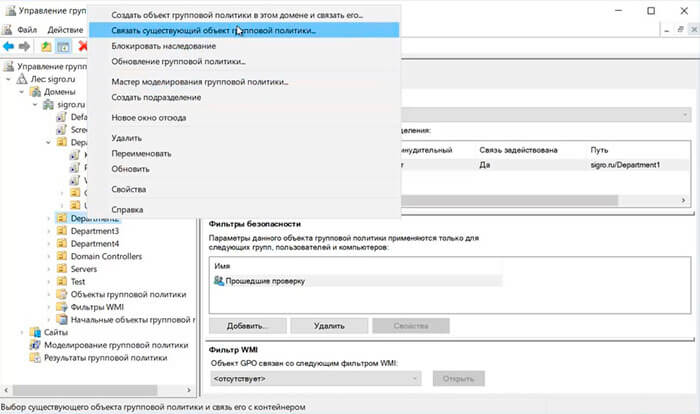
5. Для того, чтобы связать созданную групповую политику с другими подразделениями в домене, открываем оснастку консоли «Управление групповой политикой«. Выбираем нужное подразделение, правой клавишей мыши — «Связать существующий объект групповой политики…«.
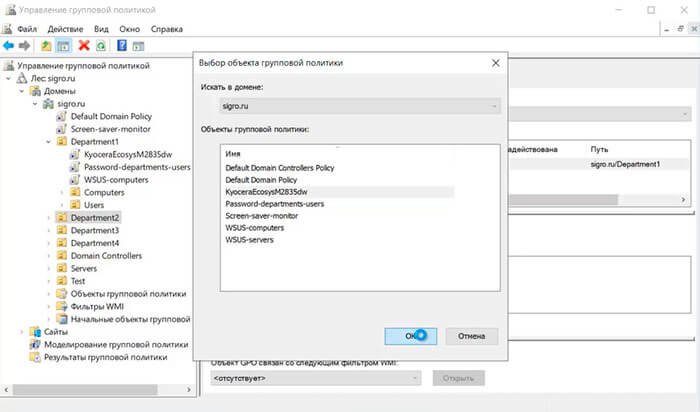
6. Выбираем созданную групповую политику, нажимаем «ОК«. Применяем групповую политику к нужным подразделениям, или можем сразу выбрать весь домен.
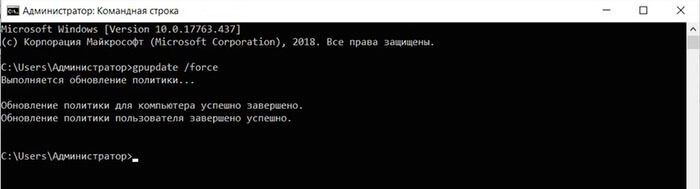
7. Для немедленного применения групповой политики открываем командную строку, набираем gpupdate /force.
Проверка установки принтера в домене с помощью групповой политики
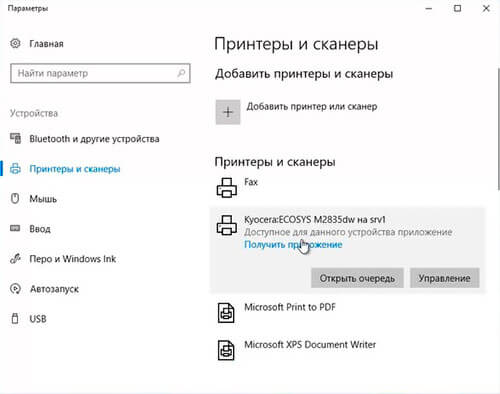
1. Для проверки установки принтера (МФУ) в домене, заходим на компьютере пользователя под учетной записью. В строке поиска пишем «Принтеры«, нажимаем на появившееся «Принтеры и сканеры«.
2. В новом окне проверяем, что появилось устройство печати.
Посмотреть, как установить и настроить службу печати и документов, а также развернуть принтер в домене с помощью групповой политикой можно здесь:
Читайте также:
- Windows server 2019 — установка и настройка WSUS, создание и настройка GPO
- Windows server 2019 — добавление и удаление компьютера в домене
- Windows server 2019 — переименование администратора домена, изменение формата выводимого имени пользователя
- Windows server 2019 — установка и настройка Active Directory, DNS, DHCP
- Windows server 2019 — создание и удаление пользователя, группы, подразделения в домене
- Windows server 2019 — GPO изменение экранной заставки, отключение монитора, изменение политики паролей
Adding a network printer in Windows Server 2012 R2 is relatively straightforward. To get started, you will need the IP address of the printer and a few other pieces of information depending on the model. Once you have this prepared, follow these steps:
1. Open Control Panel > Hardware and Sound > Devices and Printers.
2. Select “Add a Printer” from the top menu bar to open the Add Printer wizard window.
3. Choose “Add a Network, Wireless or Bluetooth Printer” option then click Next button to move ahead with installation process.
4a) If your printer has already been installed over your network, select it from printers list displayed by Add Printer wizard screen; else if not yet added over network, choose ‘The printer that I want isn’t listed’ option present at bottom left corner of same window panel & then click Next button to proceed further with installation procedure for same device type i-e Network print servers (if available).
4b) In next step enter correct Hostname/IP Address of target system where network connected/wireless enabled printing machine is running as well as exact name of driver being used for its operation & then tap Next key to start searching desired device available on specified server location using entered credentials details; post successful completion of search task performed by windows OS based computer system all compatible drivers related data pertaining to desiredly selected target printing gadget will be automatically populated onto provided fields located within same wizard’s interface so that users can easily finish up remaining configuration tasks without any hassle whatsoever !
How do I manually add a printer to a network?
Manually adding a printer to a network requires a few steps and can be done using either the Windows Control Panel or Mac’s System Preferences. Depending on your operating system, here are the steps you need to follow:
Windows 10:
1. Open the Start Menu and navigate to Settings > Devices > Printers & Scanners.
2. Select “Add a Printer or Scanner” from the list of options in Printers & Scanners.
3. If prompted, select “The printer that I want isn’t listed” then click Next.
4. Select “Add Printer using TCP/IP address or hostname” then click Next again
5. Enter your printer IP address into the field labeled Hostname or IP Address, select Device Type as Automatic then click Next once more
6. Choose your printer manufacturer and model from the list provided by Windows then click Next
Mac OS X:
1 .Open System Preferences from Applications Folder (or Launchpad).
2 .Select Print & Fax option in Hardware section of System Preferences window 3 .Click + button at bottom left corner of printers window 4 .Choose IP tab in Add dialog box 5 .Enter Printer Name , Protocol type , Address and Queue name correctly 6 .Press Continue button after all information is entered correctly 7 .Install driver if asked for it by clicking Install Software button 8 Finally Press Add Button
How do I add a new network printer?
Adding a new network printer to your system can be done with just a few steps. To get started, first determine if the printer is available on the same local area network (LAN) as the computer you’re using. If so, you will need to access your device manager and locate “printers and devices” in order to add it. Once you do this, click “Add Printer” and select the type of printer that you are connecting from the list of options provided.
Next, follow any instructions given by your operating system for setting up a shared or networked printer. Your device should automatically detect and install drivers for your chosen model once it finds it on the LAN. Finally, check that everything has been installed properly by printing out a test page or checking its status in Device Manager again. With these simple steps completed, you should now have successfully connected a new network printer!
How to enable File and printer sharing in Windows Server 2012?
Enabling File and Printer Sharing in Windows Server 2012 is an essential step for many businesses. It allows users to share files, printers, and other resources between computers on the same network. The following steps will guide you through the process of enabling File and Printer Sharing on a Windows Server 2012 machine:
1. Open Control Panel from the Start Menu by clicking “Start” > “Control Panel”.
2. Select Network and Internet > Network Connections link.
3. Right-click on your active network connection (the one with an orange/green icon) that you want to enable file sharing for, then select Properties from the dropdown menu.
4. On the General tab of this window, under “This connection uses the following items” check both boxes next to File & Printer Sharing For Microsoft Networks & Client For Microsoft Networks if they are not already checked off; click OK when done.
5. Go back into your control panel > Open System & Security > Advanced Sharing Settings link at bottom left corner of window .
6. Under Home or Work profile settings find “File And Printer Sharing” section> turn it ON (if it isn’t already). You can also choose what type of networks should have access to this computer’s shared resources here as well (ie: Domain vs Private vs Public). Click Apply when done making changes .
Once these steps are completed, your Windows Server 2012 machine should be ready for file and printer sharing over the local network!
How do I add a network printer not listed?
There are several steps you can take to add a network printer that is not listed. First, you’ll need to know the exact model of your printer and its IP address or hostname. Once you have this information, you can try adding it manually by following these steps:
1. Open the Control Panel on your computer and select “Devices and Printers”.
2. Select “Add Printer” from the top menu bar, then choose “Add a Network Printer” in the wizard window that appears next.
3. Enter the IP address or hostname of your printer into the field provided and click Next to continue through the setup process until complete.
4. Reconnect any cables or restart any services necessary for your specific device, if applicable, before attempting to print anything out of it for confirmation that everything has been set up correctly.
How to setup a print server on Windows Server 2012?
Setting up a print server on Windows Server 2012 is a straightforward process. Below are the steps you need to follow in order to configure your server for printing:
1. Install and configure the Print and Document Services role from Server Manager. Make sure that you select all necessary components, such as printer spooler, Internet Printing, LPD Service etc.
2. Add each printer driver you wish to use on the server by downloading them from the manufacturer’s website or copying over any existing drivers installed on other computers with similar printers connected.
3. Once all of the drivers have been added, create one or more shared printers using either Printer Management (for local printers) or Print Management (for networked printers).
4. Configure access permissions for each printer; decide which users can connect to it and what actions they will be allowed to perform (e.g., printing documents). You can also set up quotas if needed in order to limit usage of certain resources like toner cartridges or paper rolls etc.).
5. Finally test out your setup by attempting to print something from another computer connected within the same network as your Windows Server 2012 machine – this should complete your print server configuration!
How do I add a network printer with an IP address?
Adding a network printer with an IP address is a straightforward process. To get started, you’ll need to gather the necessary information about your printer such as its model and make, as well as its IP address. Once you have this information ready, follow these steps:
1. Open the “Settings” menu in Windows 10 and select “Devices” from the main page.
2. Select “Add Printer or Scanner” from the options on the left side of the window.
3. When prompted, choose “The printer that I want isn’t listed” option then click Next.
4. On the next screen, select Add a Printer using TCP/IP Address or Hostname then click Next again to continue setup process for your device..
5. Enter your Printer’s IP Address into given field when asked for it and click on Next button afterward to proceed further with installation process..
6 . Choose Manufacturer & Model of your printer from list available there & press OK button after selection..
7 . Now wait until setup completes all tasks required by software connected with selected device & connection type used for same purpose .. 8 . Finally press Done button once you see successful completion message appears on screen which indicates success of above discussed procedure ..
How do I get my computer to recognize my network printer?
Getting your computer to recognize a network printer can be a straightforward process. To ensure that the process runs smoothly, first check if your printer is connected correctly and within range of the Wi-Fi connection. If it is, you should then install the necessary drivers for your particular device on both your computer and your printer. Once this is done, you will need to configure the settings in order for them to communicate with each other. Depending on what type of operating system you’re using (Windows or Mac), there are several different ways to do this:
For Windows users:
1) Open up “Settings” from either Start Menu or by pressing Windows Key + I at the same time
2) Select “Devices” from Settings page
3) Click “Add Printer or Scanner” under Printers & Scanners section
4) Follow through any prompts that appear in order to add the device
5) Your machine should now recognize and connect with the new device automatically
For Mac Users:
1) Go into System Preferences and select Print & Scan 2) Press “+” button at bottom left corner of window 3) The Add Printer window should pop up – choose IP option 4 ) Enter information about printer such as IP address and model number 5 ) You may have an additional step where you enter admin username/password 6 ) Printer should now appear in list of available devices 7 ) Selecting it should initiate installation process which may take some minutes 8 ) When complete, machine will now recognize newly added device
{“@context”:”https://schema.org”,”@type”:”FAQPage”,”mainEntity”:[{“@type”:”Question”,”name”:”How do I manually add a printer to a network?”,”acceptedAnswer”:{“@type”:”Answer”,”text”:”nnManually adding a printer to a network requires a few steps and can be done using either the Windows Control Panel or Mac’s System Preferences. Depending on your operating system, here are the steps you need to follow: nnWindows 10: n1. Open the Start Menu and navigate to Settings > Devices > Printers & Scanners. n2. Select u201cAdd a Printer or Scanneru201d from the list of options in Printers & Scanners. n3. If prompted, select u201cThe printer that I want isn’t listedu201d then click Next. n4. Select u201cAdd Printer using TCP/IP address or hostnameu201d then click Next again n5. Enter your printer IP address into the field labeled Hostname or IP Address, select Device Type as Automatic then click Next once more n6. Choose your printer manufacturer and model from the list provided by Windows then click Next nnMac OS X: n1 .Open System Preferences from Applications Folder (or Launchpad). n2 .Select Print & Fax option in Hardware section of System Preferences window 3 .Click + button at bottom left corner of printers window 4 .Choose IP tab in Add dialog box 5 .Enter Printer Name , Protocol type , Address and Queue name correctly 6 .Press Continue button after all information is entered correctly 7 .Install driver if asked for it by clicking Install Software button 8 Finally Press Add Button”}},{“@type”:”Question”,”name”:”How do I add a new network printer?”,”acceptedAnswer”:{“@type”:”Answer”,”text”:”nnAdding a new network printer to your system can be done with just a few steps. To get started, first determine if the printer is available on the same local area network (LAN) as the computer youu2019re using. If so, you will need to access your device manager and locate u201cprinters and devicesu201d in order to add it. Once you do this, click u201cAdd Printeru201d and select the type of printer that you are connecting from the list of options provided. nnNext, follow any instructions given by your operating system for setting up a shared or networked printer. Your device should automatically detect and install drivers for your chosen model once it finds it on the LAN. Finally, check that everything has been installed properly by printing out a test page or checking its status in Device Manager again. With these simple steps completed, you should now have successfully connected a new network printer!”}},{“@type”:”Question”,”name”:”How to enable File and printer sharing in Windows Server 2012?”,”acceptedAnswer”:{“@type”:”Answer”,”text”:”nnEnabling File and Printer Sharing in Windows Server 2012 is an essential step for many businesses. It allows users to share files, printers, and other resources between computers on the same network. The following steps will guide you through the process of enabling File and Printer Sharing on a Windows Server 2012 machine: nn1. Open Control Panel from the Start Menu by clicking “Start” > “Control Panel”. n2. Select Network and Internet > Network Connections link. n3. Right-click on your active network connection (the one with an orange/green icon) that you want to enable file sharing for, then select Properties from the dropdown menu. n4. On the General tab of this window, under u201cThis connection uses the following itemsu201d check both boxes next to File & Printer Sharing For Microsoft Networks & Client For Microsoft Networks if they are not already checked off; click OK when done. n5. Go back into your control panel > Open System & Security > Advanced Sharing Settings link at bottom left corner of window . n6. Under Home or Work profile settings find u201cFile And Printer Sharingu201d section> turn it ON (if it isn’t already). You can also choose what type of networks should have access to this computer’s shared resources here as well (ie: Domain vs Private vs Public). Click Apply when done making changes . nnOnce these steps are completed, your Windows Server 2012 machine should be ready for file and printer sharing over the local network!”}},{“@type”:”Question”,”name”:”How do I add a network printer not listed?”,”acceptedAnswer”:{“@type”:”Answer”,”text”:”nnThere are several steps you can take to add a network printer that is not listed. First, you’ll need to know the exact model of your printer and its IP address or hostname. Once you have this information, you can try adding it manually by following these steps: n1. Open the Control Panel on your computer and select u201cDevices and Printersu201d. n2. Select u201cAdd Printeru201d from the top menu bar, then choose u201cAdd a Network Printeru201d in the wizard window that appears next. n3. Enter the IP address or hostname of your printer into the field provided and click Next to continue through the setup process until complete. n4. Reconnect any cables or restart any services necessary for your specific device, if applicable, before attempting to print anything out of it for confirmation that everything has been set up correctly.”}},{“@type”:”Question”,”name”:”How to setup a print server on Windows Server 2012?”,”acceptedAnswer”:{“@type”:”Answer”,”text”:”nnSetting up a print server on Windows Server 2012 is a straightforward process. Below are the steps you need to follow in order to configure your server for printing: nn1. Install and configure the Print and Document Services role from Server Manager. Make sure that you select all necessary components, such as printer spooler, Internet Printing, LPD Service etc. n2. Add each printer driver you wish to use on the server by downloading them from the manufactureru2019s website or copying over any existing drivers installed on other computers with similar printers connected. n3. Once all of the drivers have been added, create one or more shared printers using either Printer Management (for local printers) or Print Management (for networked printers). n4. Configure access permissions for each printer; decide which users can connect to it and what actions they will be allowed to perform (e.g., printing documents). You can also set up quotas if needed in order to limit usage of certain resources like toner cartridges or paper rolls etc.). n5. Finally test out your setup by attempting to print something from another computer connected within the same network as your Windows Server 2012 machine u2013 this should complete your print server configuration!”}},{“@type”:”Question”,”name”:”How do I add a network printer with an IP address?”,”acceptedAnswer”:{“@type”:”Answer”,”text”:”nnAdding a network printer with an IP address is a straightforward process. To get started, you’ll need to gather the necessary information about your printer such as its model and make, as well as its IP address. Once you have this information ready, follow these steps: n1. Open the u201cSettingsu201d menu in Windows 10 and select u201cDevicesu201d from the main page. n2. Select u201cAdd Printer or Scanneru201d from the options on the left side of the window. n3. When prompted, choose u201cThe printer that I want isn’t listedu201d option then click Next. n4. On the next screen, select Add a Printer using TCP/IP Address or Hostname then click Next again to continue setup process for your device.. n5. Enter your Printer’s IP Address into given field when asked for it and click on Next button afterward to proceed further with installation process.. ttttt n6 . Choose Manufacturer & Model of your printer from list available there & press OK button after selection.. n7 . Now wait until setup completes all tasks required by software connected with selected device & connection type used for same purpose .. t 8 . Finally press Done button once you see successful completion message appears on screen which indicates success of above discussed procedure ..”}},{“@type”:”Question”,”name”:”How do I get my computer to recognize my network printer?”,”acceptedAnswer”:{“@type”:”Answer”,”text”:”nnGetting your computer to recognize a network printer can be a straightforward process. To ensure that the process runs smoothly, first check if your printer is connected correctly and within range of the Wi-Fi connection. If it is, you should then install the necessary drivers for your particular device on both your computer and your printer. Once this is done, you will need to configure the settings in order for them to communicate with each other. Depending on what type of operating system you’re using (Windows or Mac), there are several different ways to do this: nnFor Windows users: n1) Open up “Settings” from either Start Menu or by pressing Windows Key + I at the same time n2) Select “Devices” from Settings page n3) Click “Add Printer or Scanner” under Printers & Scanners section n4) Follow through any prompts that appear in order to add the device n5) Your machine should now recognize and connect with the new device automatically nn For Mac Users: n1) Go into System Preferences and select Print & Scan tt 2) Press “+” button at bottom left corner of window 3) The Add Printer window should pop up u2013 choose IP option 4 ) Enter information about printer such as IP address and model number 5 ) You may have an additional step where you enter admin username/password 6 ) Printer should now appear in list of available devices 7 ) Selecting it should initiate installation process which may take some minutes 8 ) When complete, machine will now recognize newly added device”}}]}
Introduction
In this article, we will show you how to set up a Print Server in Windows Server 2022. Print Server is a service that allows you to share printers and print jobs with other computers on your network. Setting up a Print Server is a relatively simple process, and we will walk you through each step of the process.
Step 1: Install the Print Server Role
The first step is to install the Print Server role. To do this, open the Server Manager console and click on “Add Roles and Features”.
On the “Before you begin” page, click “Next”. On the “Select installation type” page, select “Role-based or feature-based installation” and click “Next”. On the “Select destination server” page, select the server on which you want to install the Print Server role and click “Next”.
On the “Select server roles” page, select the “Print Server” role and click “Next”. On the “Confirm installation selections” page, click “Install”.
On the “Results” page, you should see that the Print Server role has been installed successfully.
Step 2: Configuring the Print Server
Now that the Print Server role has been installed, we need to configure it. To do this, open the Print Management console. This can be done by going to Start > Administrative Tools > Print Management.
In the Print Management console, expand the “Print Servers” node and then select the server on which you installed the Print Server role. In the right pane, you should see a list of all the printers that are installed on the server. Right-click on the printer that you want to share and select “Share”.
In the “Share this printer” dialog box, enter a share name for the printer and click “OK”.
Now that the printer has been shared, we need to add it to the list of printers that the Print Server will manage. To do this, right-click on the “Print Servers” node and select “Add/Remove Servers”.
In the “Add or Remove Servers” dialog box, click “Add”. In the “Add Servers” dialog box, enter the name of the server on which you installed the Print Server role and click “OK”.
You should now see the server in the “Print Servers” list. Select the server and click “Add >”. Click “OK”.
The server should now be added to the list of servers that the Print Server manages. You can now close the Print Management console.
Step 3: Adding Printers to the Print Server
Now that the Print Server is configured, we need to add the printers that we want to share. To do this, open the Devices and Printers control panel. This can be done by going to Start > Devices and Printers.
In the Devices and Printers control panel, click “Add a printer”. In the “Add a printer” wizard, select “Add a network, wireless or Bluetooth printer”.
On the “Choose a printer” page, select the printer that you want to add and click “Next”. On the “Install the printer driver” page, select the driver for the printer and click “Next”.
On the “Choose a printer port” page, select the port for the printer and click “Next”. On the “Install the printer driver” page, click “Finish”.
The printer should now be added to the Print Server. You can now close the Devices and Printers control panel.
Step 4: Testing the Print Server
To test the Print Server, we will try to print a document from a client computer. To do this, open the document that you want to print and select the “Print” option. In the “Print” dialog box, select the printer that you want to use and click “Print”.
The document should now be sent to the Print Server and should start printing. If the document does not print, check the printer queue on the Print Server to see if the document is stuck in the queue.
Conclusion
In this article, we showed you how to set up a Print Server in Windows Server 2022. We also showed you how to add printers to the Print Server and how to test the Print Server. If you have any questions or feedback, please feel free to leave a comment.
In order to set up a print server in Windows Server 2022, you will need to perform the following steps:
1. Install the Print and Document Services role.
2. Configure the Print and Document Services role.
3. Add the printers that you want to make available to the server.
4. Configure the printers.
5. Configure the printer permissions.
6. Test the print server.
1. Installing the Print and Document Services role
To install the Print and Document Services role, open the Server Manager console and click on the “Add Roles and Features” link. On the “Before you begin” page, click on the “Next” button. On the “Select installation type” page, select the “Role-based or feature-based installation” option and click on the “Next” button. On the “Select destination server” page, select the server on which you want to install the Print and Document Services role and click on the “Next” button.
On the “Select server roles” page, select the “Print and Document Services” role and click on the “Next” button. On the “Print and Document Services” page, click on the “Next” button. On the “Confirm installation selections” page, click on the “Install” button. On the “Results” page, click on the “Close” button.
2. Configuring the Print and Document Services role
After you have installed the Print and Document Services role, you need to configure it. To do this, open the Server Manager console and click on the “Tools” menu. In the “Tools” menu, select the “Print Management” option.
In the Print Management console, expand the “Print Servers” node and select the server on which you have installed the Print and Document Services role. In the “Actions” pane, click on the “Configure Server” link.
On the “Welcome to the Configuration Wizard for Print and Document Services” page, click on the “Next” button. On the “Select Role Services” page, select the “Print Server” and “Internet Printing” role services and click on the “Next” button. On the “Confirm Selections” page, click on the “Next” button.
On the “Results” page, click on the “Close” button.
3. Adding the printers to the server
After you have installed and configured the Print and Document Services role, you need to add the printers that you want to make available to the server. To do this, open the Print Management console and expand the “Print Servers” node.
In the “Actions” pane, click on the “Add Printer” link. On the “Add Printer” page, select the “Local printer” option and click on the “Next” button. On the “Choose a printer port” page, select the “Create a new port” option and click on the “Next” button.
On the “Type a port name” page, enter the name of the printer port and click on the “Next” button. On the “Configure Port” page, select the “Standard TCP/IP Port” option and click on the “Next” button.
On the “Add Standard TCP/IP Printer Port Wizard” page, enter the IP address of the printer and click on the “Next” button. On the “Completing the Add Standard TCP/IP Printer Port Wizard” page, click on the “Finish” button.
4. Configuring the printers
After you have added the printers to the server, you need to configure them. To do this, open the Print Management console and expand the “Print Servers” node.
In the “Actions” pane, click on the “Manage Printers” link. In the “Printers” list, right-click on the printer that you want to configure and select the “Properties” option.
In the “Printer properties” dialog box, select the “Ports” tab. In the “Ports” list, select the printer port that you have created and click on the “Configure Port” button.
In the “Configure Port” dialog box, select the “Printer pooling” option and click on the “OK” button.
5. Configuring the printer permissions
After you have configured the printers, you need to configure the printer permissions. To do this, open the Print Management console and expand the “Print Servers” node.
In the “Actions” pane, click on the “Manage Printers” link. In the “Printers” list, right-click on the printer for which you want to configure the permissions and select the “Manage sharing” option.
In the “Printer sharing” dialog box, select the “Share this printer” option and click on the “OK” button.
6. Testing the print server
After you have configured the print server, you need to test it. To do this, open the Control Panel and select the “View devices and printers” option.
In the “Devices and Printers” window, double-click on the printer that you have configured. In the “Printing Preferences” dialog box, select the “Print Test Page” option and click on the “OK” button.
If the test page is printed successfully, then the print server is working correctly.
Для того что бы настроить добавление необходимых принтеров пользователю, нужно установить на сервере роль Принт Сервера.
Делается это через Диспетчер серверов -> Добавить роли и компоненты -> на странице ролей ставим галочку напротив Службы печати и документов -> Сервер печати -> Далее Далее… и дожидаемся окончания установки.

Теперь создаем группы безопасности в оснастке Пользователи и компьютеры Active Directory. В моем случае я создал отдельный OU с названием printers а сами группы внутри него. Группы для удобства назвал PRN — что означает что это группа принтера, название отдела к которому принтер относится например KADRY, и географическое место положение MSK — что означает что данный принтер находится в Москве. Например PRN-KADRY-MSK. Также группы которые которые добавляют пользователю все принтеры на предприятии ALL-PRN-ACCESS-MSK, но по сути может понадобиться либо админам, либо руководителям.

После чего добавляем в каждую группу принтера пользователей, которые будут его использовать.
Ввиду того, что политика после создания принтера у пользователя не умеет удалять принтер, в случае если пользователя убрать из группы, то создадим еще столько же групп, сколько принтеров, с таким же названием, но с приставкой RM, для того что бы если пользователю более не понадобится принтер, убрать его из устройств. Выглядеть это должно примерно следующим образом:

Теперь идем в оснастку управления сервером печати и создаем принтеры на сервере.

Переходим Серверы печати -> имя сервера(локально) -> принтеры -> Добавить принтер

Далее Добавляем принтер по IP адресу TCP/IP -> Поле Имя узла или IP адрес добавляем ip адрес принтера (оно же будет как имя порта по умолчанию) -> Имя принтера лучше всего задать такое же как имя группы безопасности для этого принтера, дабы избежать путаницы в дальнейшем, Галочку Общий доступ к принтеру оставляем и имя общего ресурса даем такое же как название принтера и группы безопасности (вообще лучше не указывать в качестве имени принтера название его производителя, так как принтер потом сломается, вместо киосеры будет hp, а название останется киосера….не очень удобно) Если потребуется подсунуть драйвер — подсовываем, предварительно скачав его на официальном сайте производителя в формате .inf
Когда принтер добавлен, проваливаемся внутрь него и на вкладке Доступ ставим галочку Внести в Active Directory (для того что бы его можно было найти в AD, а не вписывать имя принтера руками)

Принтер готов к использованию, и его уже можно добавлять пользователю напрямую в формате \\<Имя принт сервера>\<Название принтера>. Но для автоматизации добавления потребуется создать объект групповой политики.
В нашем случае я создал политику распространяющуюся на весь домен, но если необходимо добавить политику на отдельный OU, то создаем политику внутри него. Тогда политика применится только на те объекты, которые находятся внутри него.
Нажимаем правой кнопкой мыши и редактируем политику. Нам потребуется Конфигурация пользователя -> Настройка -> Параметры панели управления -> Принтеры -> Создать -> Общий принтер
Внутри: Действие — Обновить, Путь к общему ресурсу: Выбираем наш ранее созданный принтер, Если хотим чтобы при появлении у пользователя данный принтер сразу ставился по умолчанию, то ставим галочку Использовать принтер по умолчанию.

На вкладке Общие параметры: ставим галочку напротив Выполнять в контексте безопасности вошедшего пользователя, а так же Нацеливание на уровень элемента.

Переходим в Нацеливание, Нажимаем Создать элемент и выбираем пункт Группа Безопасности

Напротив поля Группа жмем три точки и находим группу безопасности соответствующую принтеру

И таким образом собираем все принтеры в групповой политике. Должно получиться что то наподобие этого:

Затем аналогично создаем те же принтеры, только в качестве действия выбираем не обновить, а удалить. В качестве группы безопасности выбираем нацеливание на RM-PRN-название принтера. Выглядит это следующим образом:

Работает это следующим образом: Для добавления принтера мы суём пользователя в группу PRN-Название принтера. Когда принтер пользователю более не нужен, мы удаляем его из группы PRN-Название принтера и добавляем в группу RM-PRN-Название принтера. Если этого не сделать, то принтер так и останется в устройствах, и рядом с ним будут отрастать каждый новый принтер, в группу которого мы будем добавлять пользователя. Поэтому, дабы не наводить хаос и бардак в устройствах и принтерах пользователя, следует соблюдать эти несложные правила. Ну и соответственно, если пользователю вдруг понадобился обратно его старый принтер, то удаляем пользака из группы RM-PRN-Название принтера и добавляем в группу PRN-Название принтера.
Все готово. Как можно заметить у меня как у админа компании группа которая добавляет все принтеры. И вот они все на месте под мои пользователем:

Какие подводные камни у данного способа:
- Достаточно большое время до появления принетра, так как политика применяется после входа выхода пользователя из системы, либо после перезагрузки, либо после применения команды gpupdate /force (но это очень вряд ли, так как политика гласит о том что Выполнять в контексте безопасности вошедшего пользователя)
- Принтер не отрастет у пользователя пока у него не будут установлены драйвера принтера. Решается легко: Под доменным админом цепляемся к пользователю к его локальному принт серверу и на вкладке драйверов добавляем необходимое. Либо через Панель управления в Устройствах и принтерах, добавление принтера, необходимый принтер отсутствует в списке, выбрать общий принтер по имени, \\имя_сервера\имя_принтера. В этом случае запросится пароль доменного администратора и после его ввода драйвера также подтянутся вместе с принтером. Кстати отличный способ когда надо добавить здесь и сейчас.
Какие плюсы:
- Отсутствие в необходимости ходить по пользователям, качать дрова с сайтов и сидеть ждать пока все это дело заведется
- Удобное управление через группы безопасности, Нужен принтер — добавил пользователя , проверил драйвера у пользователя, попросил перезагрузиться, всё.
- Удобное администрирование принтеров собранных на одном сервере.
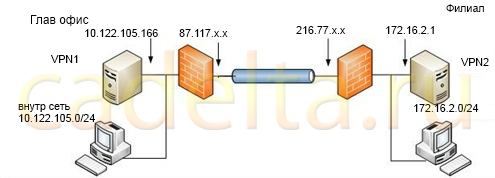
Рис. 1. Схема сети.
Настроить сервер печати для Windows Server можно следующим образом.
Выберите команду «Пуск» -> «Администрирование» -> «Управление данным сервером«.
В открывшемся окне нажмите кнопку «Добавить или удалить роль«, после чего нажмите кнопку «Далее» в открывшемся окне «Мастер настройки сервера«.
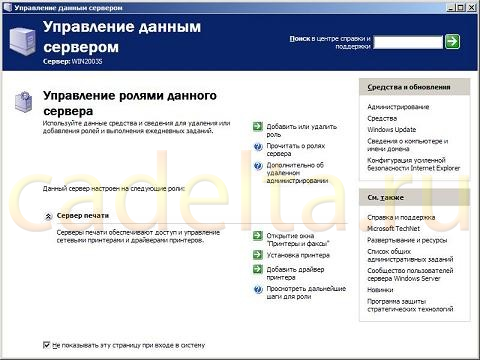
Рис. 2. Окно управления сервером.
В списке «Роль сервера» выберите параметр «Сервер печати» и нажмите кнопку «Далее«.
Рис. 3. Выбор ролей сервера.
В новом окне необходимо выбрать клиентскую операционную систему, для которой будут установлены логические принтеры и драйверы. Выберите переключатель «Все клиенты«. Щелкните на кнопке «Далее«.
В новом окне следует щелкнуть на кнопке «Далее«, после чего откроется окно «Мастер установки принтеров«. Эта программа установки используется для подключения локальных или сетевых принтеров к серверу на базе Windows Server. Щелкните в окне мастера кнопку «Далее«.
В следующем окне следует выбрать тип устанавливаемого принтера. При настройке сервера печати для отправки заданий непосредственно на принтер выберите переключатель «Локальный принтер» (принтер с собственным сетевым адаптером также считается локальным). Переключатель «Сетевой принтер, подключенный к другому компьютеру» следует выбрать при передаче заданий печати второму серверу печати. Например, с сервера печати регионального офиса можно передавать задания печати в центральном офисе. Щелкните кнопку «Далее«.
Если принтер, подключенный к серверу, не был обнаружен, откроется новое окно, в котором необходимо вручную выбрать локальный порт принтера. Если у принтера есть собственный сетевой адаптер, и вы отправляете задания для печати по сети, выберите тип порта в раскрывающемся меню «Создать новый порт«. Если тип порта неизвестен, рекомендуется выбирать параметр Standard TCP/IP Port.
При выборе параметра Standard TCP/IP запустится программа «Мастер добавления стандартного порта TCP/IP принтера«. С помощью этого мастера следует указать IP-адрес принтера и имя порта, к которому будет осуществляться подключение. При этом IP-адрес принтера обычно указываются в параметрах принтера системным администратором.
После указания IP-адреса мастер сделает попытку подключения к принтеру, после чего работа мастера будет завершена, и новый принтер станет доступным для печати.
После установки принтера необходимо настроить доступ к нему конечных пользователей. Принтер для операционной системы является таким же логическим ресурсом, как файл или каталог, поэтому в процессе поиска принтера конечные пользователи могут просмотреть ресурсы сервера печати (при наличии соответствующего разрешения доступа). Кроме того, на клиентской системе можно настроить доступ к принтеру с помощью мастера «Установка принтера» («Пуск«-> «Панель управления» -> «Принтеры и факсы«) или с помощью команды «net send«, используемой в командной строке Windows. Также принтер можно опубликовать в службе каталогов Active Directory, что пригодится при поиске нужного принтера в больших организациях, в которых работают тысячи сотрудников.
Для управления параметрами принтера в Windows Server нужно правой кнопкой мыши на значке принтера щелкнуть и выбрать команду «Свойства«. В новом окне можно настроить различные свойства принтера, включая разрешения печати, параметры доступа, порты и многое другое.
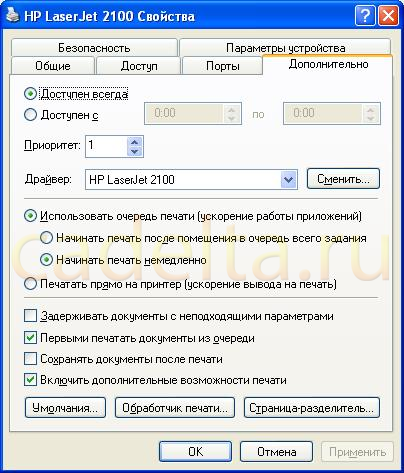
Рис. 4. Свойства принтера.
Выражаем благодарность автору Markuzya за предоставленный материал.