
Вариант 1: Создание ярлыка в меню
Добавление иконки приложения в «Пуск» Windows 10 обычно занимает немного времени – достаточно перенести его ярлык в то место на локальном хранилище, где находятся все элементы главного меню.
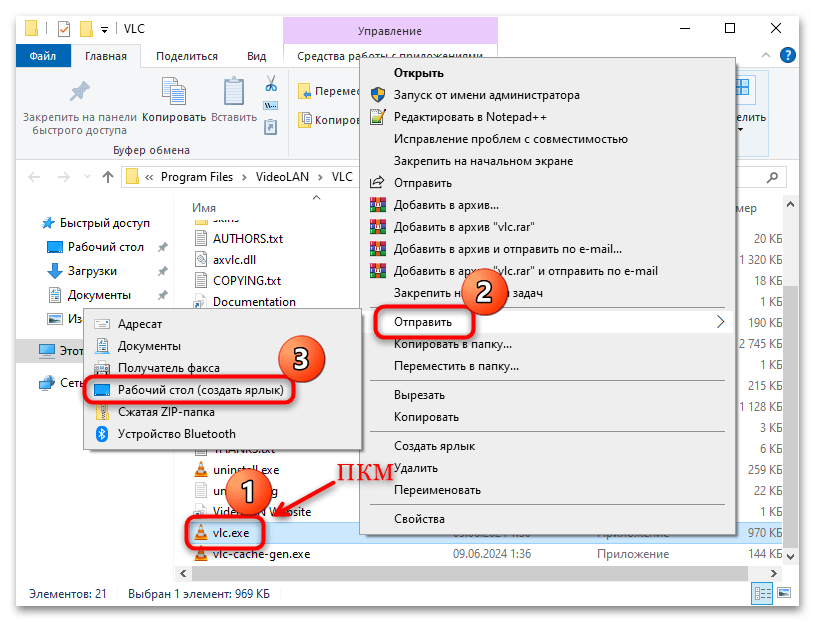
- Если нужно перенести уже имеющийся ярлык с рабочего стола, тогда сразу переходите к Шагу 2 данной инструкции. Что касается исполняемых файлов, понадобится предварительно создать ярлык. Через «Проводник» найдите EXE-файл программы, которую хотите добавить, в ее корневом каталоге, затем кликните по нему правой кнопкой мыши, наведите курсор на пункт «Отправить» и выберите «Рабочий стол (создать ярлык)».
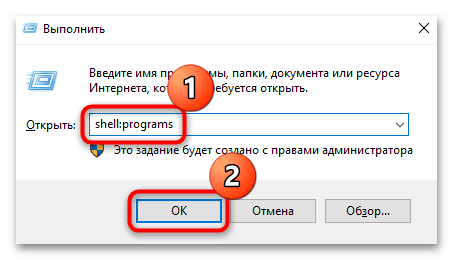
- На рабочем столе появится ярлык нашего приложения, который, в свою очередь, можно перенести в главное меню. Используйте сочетание клавиш «Win + R» и введите команду
shell:programs, после чего нажмите на кнопку «ОК». - Сразу откроется каталог в «Проводнике», где хранятся все ссылки на элементы из стартового меню Windows 10 – в эту папку нужно перенести ранее созданный ярлык. Можете его перетащить с рабочего стола в окно «Проводника» либо воспользоваться сочетанием клавиш «Ctrl + C» для вырезки элемента в буфер обмена, затем «Ctrl + V» — для вставки в папку с элементами меню.
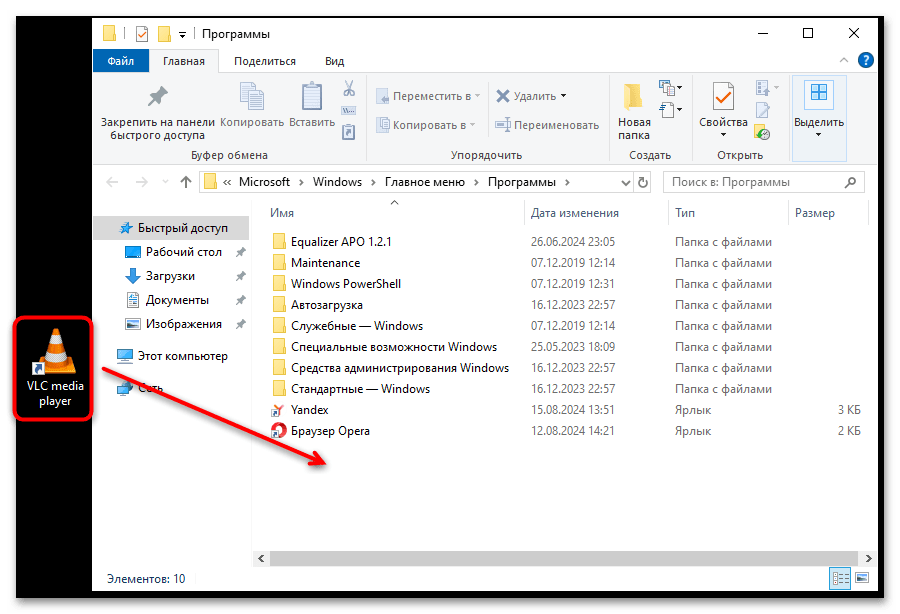
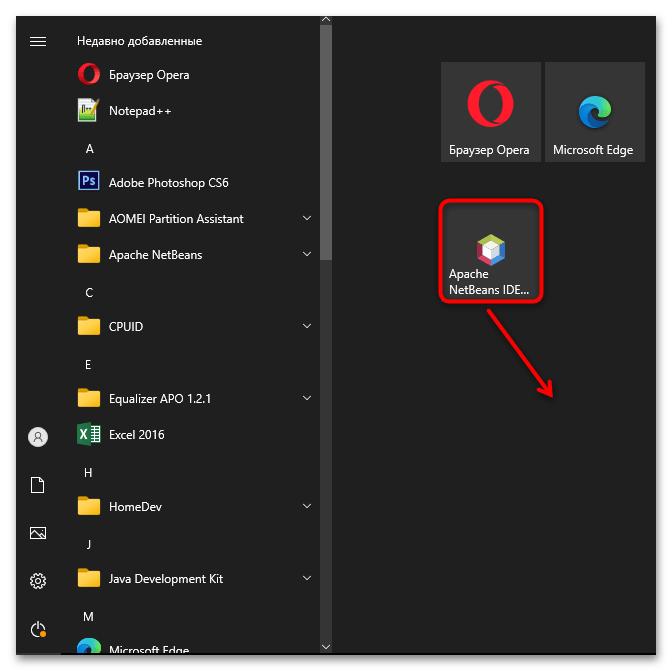
Перенесенный в папку на системном диске ярлык можно переименовать на свое усмотрение – в таком виде он и будет отображаться в главном меню. Откройте главное меню, нажав на «Пуск», после чего в блоке «Недавно добавленные» вы увидите ярлык программы, который вручную был добавлен. Само приложение будет располагаться под той буквой в меню, на которую начинается его название.
Вариант 2: Закрепление на боковой панели
В главном меню Windows 10 также присутствует боковая панель с иконками приложений, формировать которую может сам пользователь. Значки предназначены для быстрого доступа к тем или иным программам, и добавление ярлыка происходит посредством простого перетягивания файла из главного меню на эту панель.
По сути, потребуется проделать то же самое, что и в предыдущей инструкции из Варианта 1 (создать ярлык исполняемого файла, если тот отсутствует, затем добавить значок через соответствующую папку в «Проводнике»), но после этого иконку приложения нужно отыскать в меню и перетащить, удерживая левую кнопку мыши, на панель, располагающуюся правее.

Есть еще один способ копирования ярлыка программы из главного меню – кликните по ее названию правой кнопкой мыши и выберите пункт «Закрепить на начальном экране».
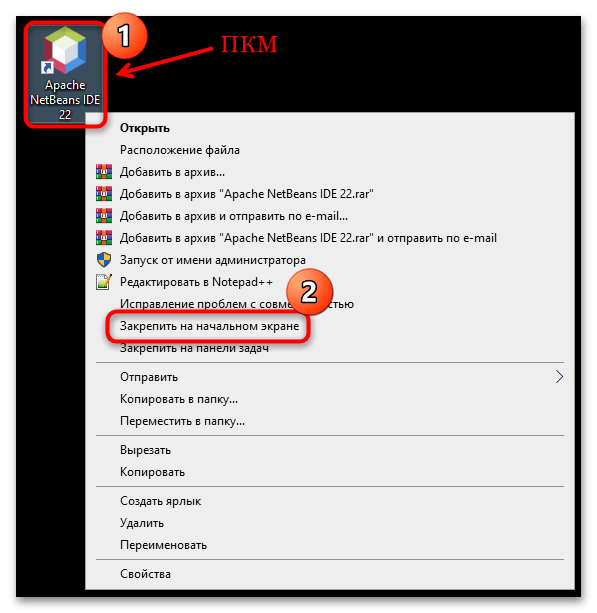
Кстати, с помощью контекстного меню закрепить ярлык можно не только из главного меню, но и с рабочего стола или любой папки в «Проводнике». Достаточно кликнуть по ярлыку правой кнопкой мыши и выбрать соответствующий пункт.
Стоит еще добавить, что размер ярлыков и их расположение на начальном экране главного меню можно отрегулировать самостоятельно. Например:
- Чтобы перетащить значок в другое место, нажмите на него левой кнопкой мыши и, не отпуская ее, протяните его в любую свободную область панели.
- Все иконки можно разбить по категориям или папкам – между строками есть свободное пространство, которое визуально разделяет ярлыки. По умолчанию оно не подписано, но достаточно навести курсор на это место и появится надпись «Назвать группу». Щелкните по ней, после чего можно переименовать категорию.
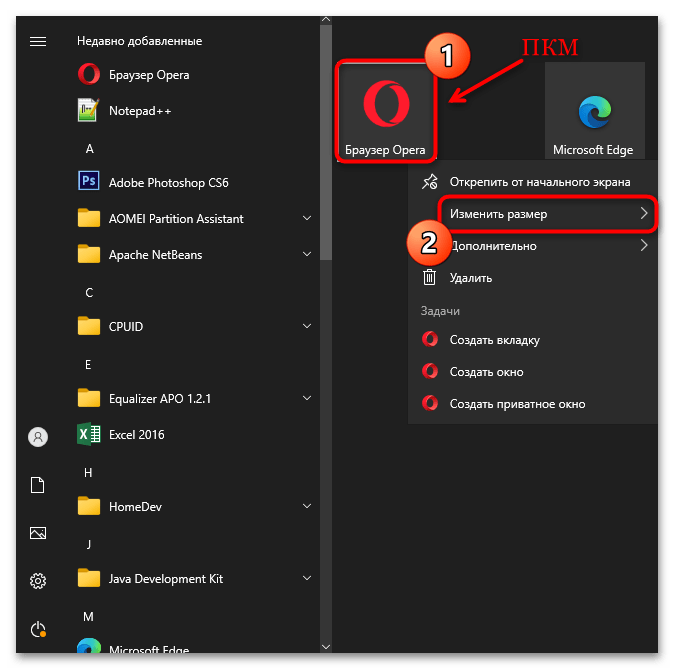
- Размер почти каждого ярлыка можно изменить – кликните по нему правой кнопкой мыши, затем наведите курсор на пункт «Изменить размер» и выберите подходящий вариант. Следует отметить, что для разных значков есть разные размеры. Для одних выбрать его нельзя, для других есть возможность разместить средний или мелкий ярлык, для третьих предусматривается и большой размер иконки.

Таким образом, боковую панель главного меню Windows 10 можно сформировать самостоятельно, подстроив ее внешний вид и размеры и расположение иконок под свои предпочтения. Чтобы открепить значок, нужно в его меню (клик правой кнопкой мыши) выбрать пункт «Открепить от начального экрана».

То же самое можно проделать и с ярлыком на рабочем столе – в его контекстном меню предусматривается эта возможность.
Наша группа в TelegramПолезные советы и помощь
-
Home
-
News
- How To Add Program To Start Menu Windows 10
By Sarah |
Last Updated
After you clicking on the Start button in your system (Windows 10/8/7), you’ll see the apps and programs list in the opening Start menu. You can access certain programs easily by clicking them here. However, some people want to add custom shortcuts to the Start menu Windows 10 for convenience’s sake. I’ll show them the detailed steps to finish the task.
As you know, the Windows Start menu is an important component in Windows systems. Users can locate their installed programs and find the files or folders quickly by accessing the Start menu. In general, when you install a new program on the computer, the shortcut or folder pointing to it will be added to the Start menu as part of the installation process. Right after that, people can find it quickly by checking the Start menu.
However, there are cases when some programs can’t make themselves appear in the All apps list in Start menu. Can they add the Start menu shortcut manually? Certainly, yes. They can follow the steps mentioned below to add program to Start menu Windows 10 with ease.
Tip: You are strongly advised to download a data recovery tool to your computer because the data loss issue can be caused suddenly by a lot of factors, such as accidental deletion, virus attack, and system crash. The data recovery software provided by MiniTool Solution owns millions of users and enjoys high reputation; you may give it a shot.
MiniTool Power Data Recovery TrialClick to Download100%Clean & Safe
How to Add Programs to Startup Windows 10
Step 1: Find the Executable File of the Program You Want to Add
The very first step of Windows 10 add to Start menu is locating the target program and finding its executable file.
- Right click on the app icon on the desktop.
- Choose Open file location from the context menu.
- The executable file (.exe file) will be selected in the opening folder by default.
Tip: You can also open File Explorer, open the correct drive, and double click on the folder saving the program manually. (How to fix when your Windows Explorer is not responding or Windows Explorer has stopped working?)
Step 2: Add Shortcut to Start Menu Windows 10
Firstly, you need to create shortcut Windows 10 for the executable file.
- Right click on the correct exe file.
- Choose Create shortcut from the pop-up menu.
- Give the shortcut a name which you want to see in the Start menu (you’d better remove .exe – shortcut from the name).
Tip: You can also create a shortcut by this way: press and hold the Alt key -> drag and drop the exe file in the same folder.
After that, you should access Start Menu\Programs.
- Press Win+R to open the Run dialog window.
- Type shell:start menu into the textbox and then press Enter on the keyboard to open Windows 10 Start Menu folder.
- Double click on the Programs folder in the opening window.
The default Windows 10 Start menu location is: C:\Users\username\AppData\Roaming\Microsoft\Windows\Start Menu.
Tip: Here’s easy way to go to the Programs folder (inside Start Menu) directly: open Run by right clicking on the Start button and selecting Run -> type %AppData%\Microsoft\Windows\Start Menu\Programs into the textbox and click OK.
Finally, you can add shortcut to Start menu.
- Go back to copy the shortcut you created earlier by pressing Ctrl + C.
- Paste the shortcut to the Programs folder by pressing Ctrl + V.
- Restart your computer to apply the changes in your Start menu.
- Go to the Start menu to check. (How to fix when the Windows 10 Start menu won’t open/not working?)
Sometimes, you may get a window saying that file access denied; you can’t copy or move files as you expected. Here’s how to deal with it:
That’s all what I want to say about the steps to add program to Start menu Windows 10. Please repeat this process to add more app shortcuts to the Start menu.
Want to know more about how to customize Windows 10 Start menu? Please read this page.
About The Author
Position: Columnist
Sarah has been working as an editor at MiniTool since she graduated from university. Sarah aims at helping users with their computer problems such as disk errors and data loss. She feels a sense of accomplishment to see that users get their issues fixed relying on her articles. Besides, she likes to make friends and listen to music after work.
Download Article
Download Article
At the bottom of your Windows 10 desktop is a horizontal black bar called the “Taskbar.” This bar contains the “Start” button, the Cortana search box, and icons of programs and apps. A single click or tap on one of these program icons will launch the program or app. If you use a program or an app very often, then you can “pin” it to the Windows 10 Taskbar. This way, the program is readily accessible from the Windows 10 Taskbar and can be launched with a single click or tap.
Things You Should Know
- Click and hold the desktop icon of your program. Drag it towards the taskbar. When you see a «pin to taskbar» option pop up, release to add the program to the taskbar.
- From the start menu, right-click (or press and hold) your program. Hover over the «More» option and choose “Pin to taskbar” from the context menu.
- Open File Explorer. Find your program using the directory tree. Right click (or press and hold) your program. The context menu will pop up—tap the «Pin to taskbar» button.
- If the program you want to pin is already running, right click (or press and hold) it in your taskbar. Choose the “Pin this program to the taskbar” from the menu that pops up.
-

Click and hold the desktop shortcut of the desired program or app.
-
After a moment, you should see the “Pin to Taskbar” option.
Advertisement
-

The program’s icon will appear in the Taskbar and is now pinned there for easy access.


Advertisement
-

It is located at the bottom of the left side of your Desktop. Click it to open the Start menu.
-
If the program you want is not on the Most Used list or the Recently Added list, click or tap “All apps” at the bottom of the left pane of the Start menu. When you click “All apps,” a directory tree appears with an alphabetical list of all available programs or program folders.
-
When you right-click on a program, a context menu appears beside the program which gives five options: “Pin to Start” (or “Unpin from Start” if the app is already set up as a tile), “More” and “Uninstall,”
-
-
The icon on the program will then appear in the Taskbar. You can now launch the program quickly by clicking/tapping the pinned icon on the Taskbar.


Advertisement
-
You can click/tap the File Explorer icon pinned to the Taskbar. You can also click/tap the Start button to open the “Start” menu, and then click/tap “File Explorer” in the left pane.
-
Click/tap the C: drive to expand the directory tree of the C: drive. Then locate and click/tap the “Program Files” folder to see the list of programs or program folders.
-
This will cause a context menu to pop up beside the program/app name .
-
The list of options in the context menu is rather long, so look for the option “Pin to taskbar” and tap it. Doing so will pin the program/app to the Taskbar.


Advertisement
-
If the “File Explorer’ icon is pinned to the Taskbar, click/tap on icon to open the “File Explorer” window. Alternatively, you can click the Start button to open the “Start” menu and then click/tap “File Explorer” in the left pane.
-
At the left pane of the “File Explorer” window is a directory tree. Locate then click/tap the arrow beside the C: drive to expand its directory.
- Look for and then click/tap the “Program Files” folder. When you do this, you will see the list of programs or program folders on the right pane of the window.
- Double-click or double-tap the program folder you want.
-
When you click/tap the program you want, the “Application tools/Manage” tab will appear. This is a contextual tab—a tab that is not visible every time and appears only when specific options are available. Click/tap the “Application tools/Manage” tab.
-
When you click/tap the “Application tools/Manage” tab, you will see three tiles or buttons appear on the ribbon. On the leftmost side of the ribbon is the “Pin to taskbar” button (the icon looks like a push pin). Click/tap the “Pin to taskbar” button, and the program’s icon will appear on the Taskbar, indicating that it is now pinned.


Advertisement
-
When you open the program, its icon appears on the Taskbar; however, this icon will disappear when you close the program or app.
-
An options menu will pop up. It will list some actions that you can take with the open program or app.
-
From the pop-up menu, click/tap “Pin this program to taskbar.” This will pin the program to the Taskbar, even after it’s closed.
- If you want to change your Windows computer from English to Chinese or Spanish, you should install the additional language packs.
- Then go to Windows settings. It has a section called time and language. You can go to it and add the languages you want.
- After that, you will see two letters in the taskbar. They indicate the language currently used by the system.


Advertisement
Add New Question
-
Question
How make taskbar withdraw and appear?
Right-click anywhere on your Desktop, then choose ‘Personalize’.
This will bring you to the Windows Settings/Personalization menu. Once there, choose ‘Taskbar’ and then activate the option ‘Automatically hide the Taskbar in Desktop Mode’ and/or ‘Automatically hide the Taskbar in Tablet Mode’. -
Question
How do I put an address bar on the task bar?
This is easy and only takes 3 steps: Right click on your Windows 10 taskbar. Select ‘Toolbars’. Select ‘Address’.
-
Question
How do I get the task bar icons to show on the bar at the bottom of the page?
Noah Waite
Community Answer
Go to where all the apps are. Then you will right-click on the program you want to pin to the task bar. From there you will see a group of options. Just press Pin to Taskbar and you’re done.
See more answers
Ask a Question
200 characters left
Include your email address to get a message when this question is answered.
Submit
Advertisement
Video
Thanks for submitting a tip for review!
About This Article
Thanks to all authors for creating a page that has been read 182,531 times.
Is this article up to date?

On Windows 10, as part of the installation process, apps usually add a shortcut or folder in the Start menu to make easier to open them. However, some apps are not capable of registering themselves to appear in the «All apps» list, such as portable and very old apps.
If you have an app that doesn’t have a shortcut in this list, it’s possible to create a shortcut to quickly find and open the app using the Start menu.
In this Windows 10 guide, we’ll walk you through the easy steps to add an app entry to the All apps list manually.
- Use the Windows key + R keyboard shortcut to open the Run command.
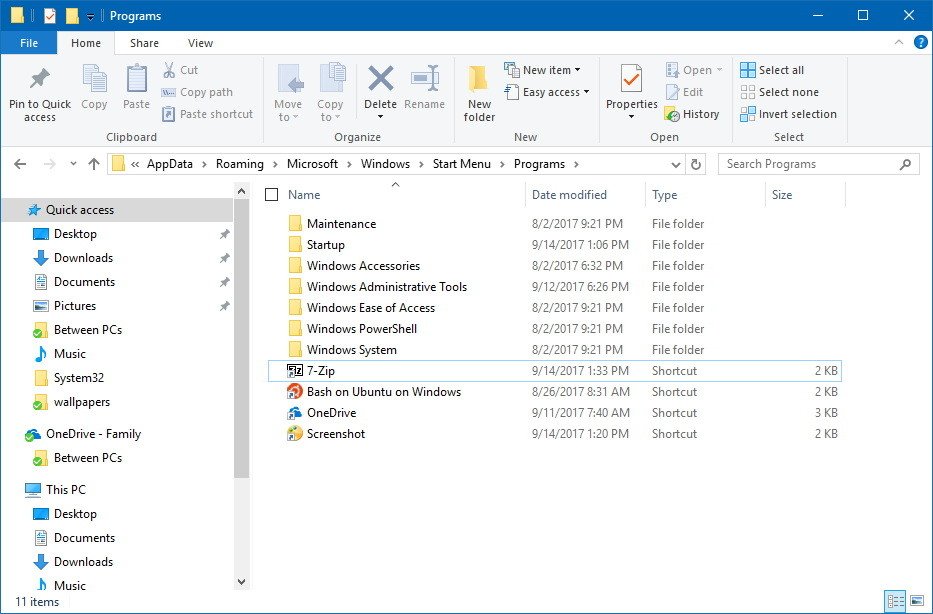
- Type the following path and click OK:
%AppData%\Microsoft\Windows\Start Menu\Programs - Using the Windows key + Right arrow keyboard shortcut snap the window to the right.
- Browse to the location of the app, where the .exe file is located.
- Using the Windows key + Left arrow keyboard shortcut snap the window with the application files to the left.
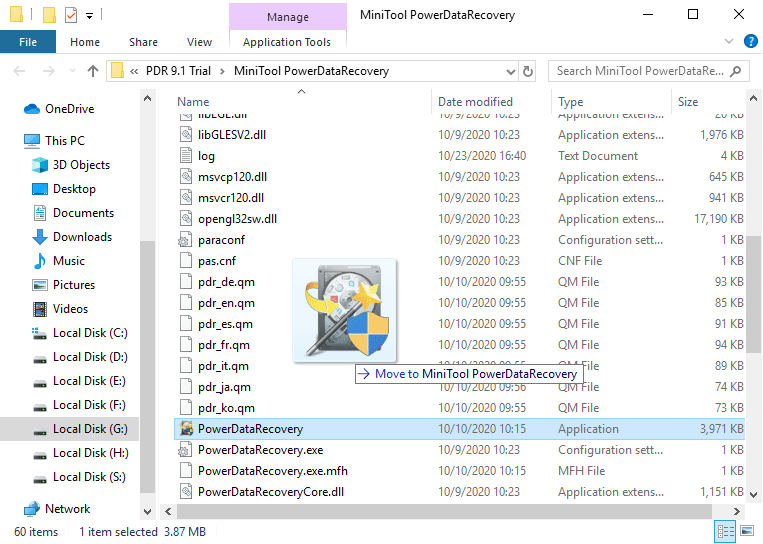
- Right-click, hold, drag and drop the .exe file that launch the apps to the Programs folder on the right.
- Select Create shortcuts here from the context menu.

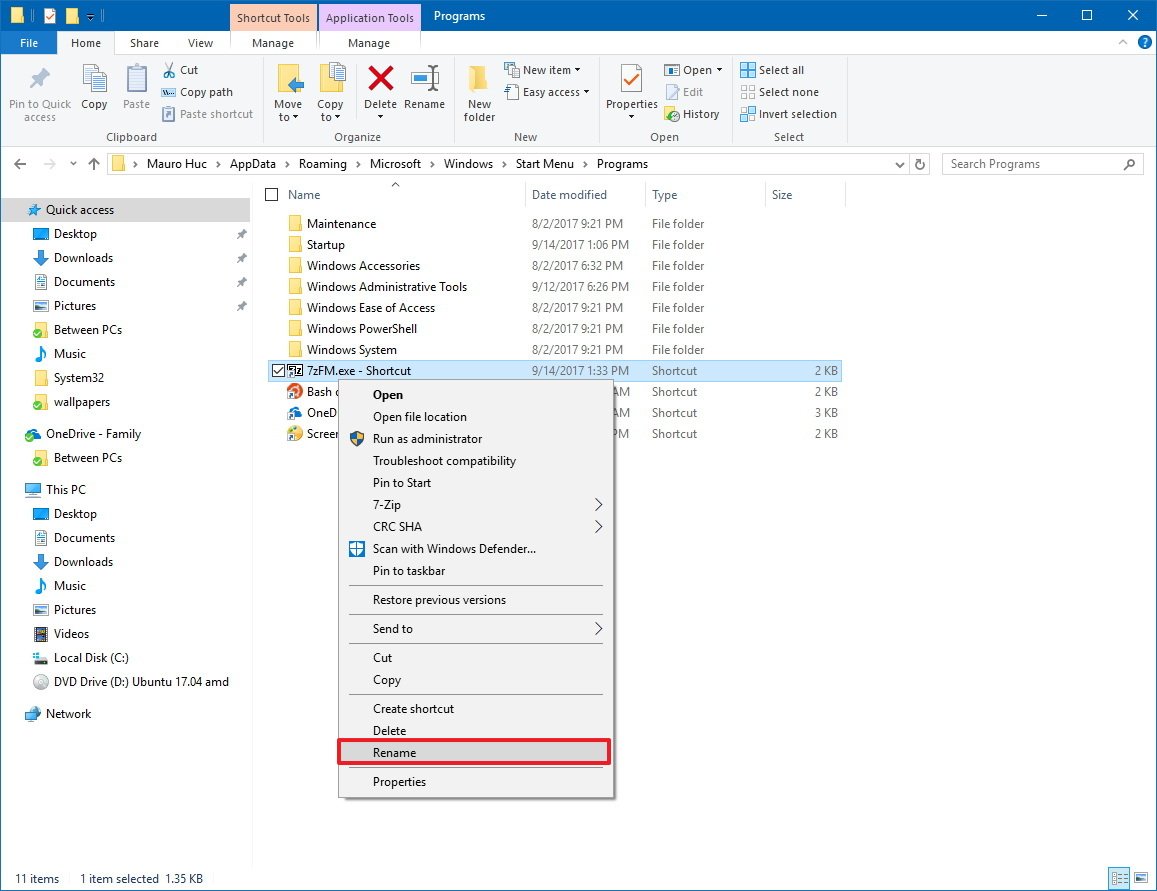
- Right-click the shortcut, select Rename, and name the shortcut exactly how you want it to appear in the All apps list.
- Repeat the steps for all the apps you want to add to the list.
- Restart your computer to apply the changes in the Start menu.
Once you’ve completed the steps, simply open the Start menu and the list will now show the new app shortcut.
You can also use these instructions to create shortcuts for apps that create folders with a bunch of links (e.g., Apple’s iTunes and 7-Zip). This way you can click the letter at the top of the group to use the index to quickly jump to the app without having to drill-down through the folder to open it.
More Windows 10 resources
For more helpful articles, coverage, and answers to common questions about Windows 10, visit the following resources:
- Windows 10 on Windows Central – All you need to know
- Windows 10 help, tips, and tricks
- Windows 10 forums on Windows Central
All the latest news, reviews, and guides for Windows and Xbox diehards.
Mauro Huculak has been a Windows How-To Expert contributor for WindowsCentral.com for nearly a decade and has over 15 years of experience writing comprehensive guides. He also has an IT background and has achieved different professional certifications from Microsoft, Cisco, VMware, and CompTIA. He has been recognized as a Microsoft MVP for many years.
106
106 people found this article helpful
Launch your favorite apps every time you boot up
What to Know
- Open the Run dialog box, enter shell:startup, then right-click inside the Startup folder and select New > Shortcut to add a program.
- If you can’t find the app, enter shell:appsfolder in the Run dialog box, then drag apps from that folder into the Startup folder.
- Some apps offer a ‘run at startup’ option, which is an easier way to add a program to startup in Windows 10.
This article explains how to add a program to startup in Windows 10. Applications that are designated as startup programs are launched as Windows 10 boots.
How to Add Programs to Startup in Windows 11
How to Add Programs to Startup in Windows 10
You can enable or disable apps from running on startup in the App Startup Control Panel and the taskbar, but the only place you can add new startup programs is through the Windows startup folder.
Some modern apps have a ‘run at startup’ capability built into their options. If your app has that option, then turning it on is a lot easier than the following method, which is designed to work with all programs.
-
Press the Windows key+R to open the run dialog box.
-
Type shell:startup in the run dialog box and press Enter on your keyboard.
-
Right click in the startup folder and click New.
-
Click Shortcut.
-
Type the location of the program if you know it, or click Browse to locate the program on your computer.
If you can’t find your app, try opening the run dialog box back up and typing shell:appsfolder. You can drag any app from that folder into the startup folder to instantly create a shortcut.
-
Click Next.
-
Type a name for the shortcut, and click Finish.
-
Create additional links for any other programs you want to run automatically when Windows starts.
-
Restart your computer, and the new programs will launch automatically.
What Is the Windows Startup Folder?
The Windows startup folder is a folder that Windows looks in for programs to run every time it starts. This was the only way to manage startup programs in older versions of Windows. Adding a program shortcut causes that program to launch when Windows starts, and removing a program shortcut stops it from launching when Windows starts.
While Windows 10 has moved to the newer app startup control panel as the primary way to manage which apps, the startup folder remains the best way for users to add their own startup programs.
Drawbacks to Adding Programs to the Startup Folder in Windows 10
The benefits of adding programs you use every day to the Windows 10 startup folder are obvious. Instead of waiting for Windows to start up and then manually clicking on everything you launch every day, all you have to do is turn your computer on and wait for everything to load.
The issue is that it takes time for programs to load along with Windows, and every program you load takes up resources like memory and processor power. Load too many unnecessary programs, and you’ll find that Windows 10 starts slow and may even remain sluggish after loading everything.
If you change your mind about programs you’ve added to the startup folder, you can simply delete the shortcuts to prevent those programs from launching whenever you turn on your computer. You can also change startup programs in Windows 10 using the task manager or the startup app control panel.
What to Do If You Have Too Many Windows 10 Startup Programs
If you have some essential programs that you use for work every day, or you mainly use your computer to play a specific game, try adding the programs that are important to you and then removing programs you don’t ever use.
Your computer probably came with bloatware you never actually use, and applications are often set to run when Windows starts up even if you don’t want them to. Disable those startup programs, add the ones you want, and you’ll enjoy both convenience and faster startup times.
FAQ
-
To improve startup time in Windows 10, disable startup programs, run an anti-virus scan, disable hardware you don’t use, upgrade your RAM, or switch to an SSD.
-
To change your home page in Microsoft Edge, go to the three-dot menu > Settings > On startup > Open a Specific page or pages > Add a new page. In Chrome, go to the three-dot menu > Settings > Show home button > Enter custom web address.
-
To access Windows Advanced Startup Options, hold down the Shift key and restart your computer. Keep holding Shift until you see the Advanced Startup Options menu. Alternatively, go to the Recovery options in Windows Settings.
-
To add desktop shortcuts, right-click anywhere on the desktop, then select New > Shortcut > Browse. You can use desktop shortcuts to access applications, navigate to a website, or open a file.
Thanks for letting us know!
Get the Latest Tech News Delivered Every Day
Subscribe