
When it comes to optimizing your workflow on Windows 11, one key feature that can make a significant difference is the ability to add a node to the path. Did you know that by adding a node to the path, you can easily access and run executables from any directory in the command prompt or PowerShell? It’s a small but powerful tweak that can save you valuable time and streamline your development process.
Add Node to Path Windows 11 gives you the flexibility to expand the capabilities of your command line interface. By adding directories to the system path, you can effortlessly navigate between different folders and run applications without having to specify their full paths. This feature has been a part of Windows for quite some time, allowing developers and power users to enhance their efficiency and productivity. With the latest iteration of Windows, Windows 11, the process of adding a node to the path has become even more seamless and user-friendly. Whether you’re a seasoned developer or just starting your coding journey, incorporating this technique can greatly enhance your command line experience.
Adding a Node to the Path on Windows 11 involves a few simple steps. First, open the Control Panel by clicking on the Start menu and selecting «Control Panel.» Next, navigate to the System and Security category and click on «System.» From there, click on «Advanced system settings» and go to the «Advanced» tab. Under the «System Variables» section, locate the «Path» variable and select «Edit.» Finally, add the desired Node path and click «OK» to save the changes. Following these steps, you’ll be able to successfully add a Node to the Path on Windows 11.

How to Add Node to Path in Windows 11
Windows 11 is the latest operating system developed by Microsoft, bringing new features and enhancements to the Windows experience. If you are a developer working with Node.js, you may need to add the Node.js executable path to the system’s PATH environment variable to easily run Node.js commands from any directory in the command prompt. In this article, we will guide you on how to add Node to the PATH in Windows 11, ensuring a seamless workflow for your Node.js development projects.
What is the PATH Environment Variable in Windows?
The PATH environment variable in Windows is a system variable that contains a list of directories where the operating system looks for executable files when you run a command in the command prompt or PowerShell. When you add a directory to the PATH variable, you allow the system to find and execute the programs located in that directory without specifying the full path every time.
By default, the PATH variable in Windows includes directories such as C:\Windows\System32 and C:\Program Files, among others. However, if you want to run a command or executable from a directory that is not on the default PATH, you need to add that directory to the PATH environment variable.
Adding Node.js to the PATH in Windows 11 allows you to access the Node.js command-line tool, npm, and other globally installed packages from any command prompt or PowerShell session, regardless of the current working directory.
Methods to Add Node to Path in Windows 11
Method 1: Using the Node.js Installer
The easiest and recommended way to add Node.js to the PATH in Windows 11 is by using the Node.js installer, which automatically sets up the environment variables during the installation process.
Follow these steps to add Node.js to the PATH using the installer:
- Download the latest Node.js installer from the official website (https://nodejs.org).
- Double-click the downloaded installer to launch it.
- Follow the on-screen instructions to install Node.js.
- Make sure to select the option «Automatically install the necessary tools» during the installation process.
Once the installation is complete, Node.js will be added to the PATH environment variable, and you can now run Node.js commands from any command prompt or PowerShell window.
Method 2: Manually Adding Node.js to the PATH
If you have already installed Node.js without selecting the option to add it to the PATH, or if you want to add a specific version of Node.js to the PATH, you can manually configure the environment variable.
Follow these steps to manually add Node.js to the PATH in Windows 11:
- Open the Start menu and search for «Environment Variables.»
- Click on the «Edit the system environment variables» option that appears.
- In the System Properties dialog, click on the «Environment Variables» button.
- In the Environment Variables dialog, locate the «Path» variable under the «System variables» section and click on the «Edit» button.
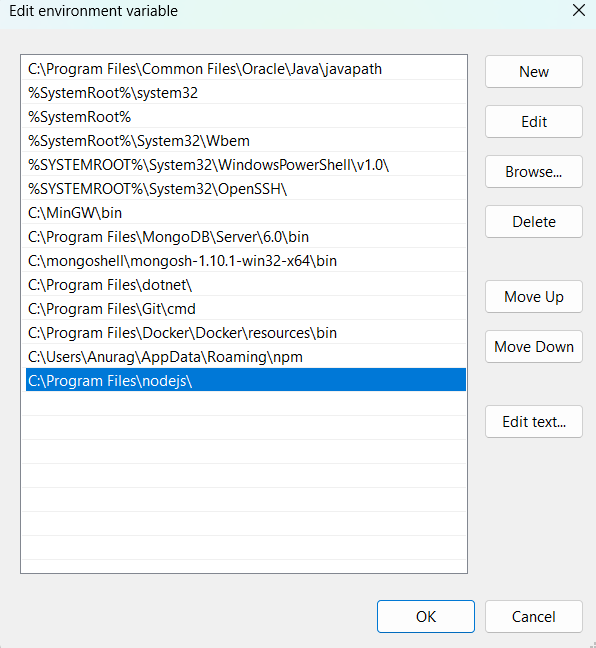
- In the Edit Environment Variable dialog, click on the «New» button to add a new entry.
- Enter the path to the Node.js executable. By default, it is located in the following directory:
C:\Program Files\nodejs. - Click «OK» on all the open dialogs to save the changes.
After adding Node.js to the PATH manually, open a new command prompt or PowerShell window, and you should be able to run Node.js commands without specifying the full path.
Verifying Node.js Installation
Once you have added Node.js to the PATH in Windows 11, you can verify the installation by running a few basic commands.
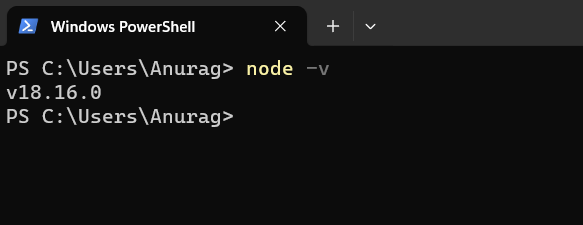
To check the Node.js version installed, open a command prompt or PowerShell window and type the following command:
node -v
If Node.js is correctly installed and added to the PATH, it will display the installed version number.
You can also check the npm version by running the following command:
npm -v
If npm is installed and configured correctly, it will display the installed version number.
Conclusion
Adding Node.js to the PATH in Windows 11 is essential for seamless development with Node.js projects. Whether you choose to use the Node.js installer or manually configure the PATH variable, you can now run Node.js commands from any directory in the command prompt or PowerShell, enhancing your productivity and workflow.

Adding Node to Path in Windows 11
When working with Node.js on Windows 11, it is essential to add Node to the system’s Path environment variable. This allows you to run Node commands from any directory in the command prompt. Here’s how you can add Node to the Path:
- Open the Start menu and search for «environment variables.»
- Click on «Edit the system environment variables.»
- In the System Properties window, click on the «Environment Variables» button.
- In the «System Variables» section, scroll down and find the «Path» variable.
- Click on «Edit.»
- In the «Edit Environment Variable» window, click on «New.»
- Enter the path to your Node.js installation folder (e.g., «C:\Program Files\nodejs») and click «OK.»
- Close all the windows and open a new command prompt.
- Type «node -v» to verify that Node is added to the Path successfully.
Add Node to Path Windows 11: Key Takeaways
- Adding a node to the path in Windows 11 allows you to run commands and access programs from anywhere in the system.
- You can add a node to the path by modifying the environment variables in Windows 11.
- Open the System Properties window and click on «Environment Variables» to add a node to the path.
- In the Environment Variables window, under the «System variables» section, select the «Path» variable and click «Edit.»
- Add the path of the desired node to the variable value list, separating it with a semicolon.
Frequently Asked Questions
Here are some frequently asked questions about adding Node to Path in Windows 11:
1. How can I add Node to Path in Windows 11?
To add Node to Path in Windows 11, you need to follow these steps:
1. Download and install Node.js on your Windows 11 computer. Make sure to select the appropriate version (32-bit or 64-bit) for your system.
2. Open the System Properties by searching for «System Properties» in the Start menu and selecting the corresponding option.
3. In the System Properties window, click on the «Advanced» tab and then click on the «Environment Variables» button.
4. In the Environment Variables window, locate the «Path» variable under the «System variables» section and click on the «Edit» button.
5. In the Edit Environment Variable window, click on the «New» button and enter the path to the Node.js installation directory. Typically, this will be something like «C:\Program Files\nodejs».
6. Click «OK» to save the changes and close all the windows. Node.js has now been added to the system’s PATH variable.
2. Why is it important to add Node to Path?
Adding Node to Path in Windows 11 is important because it allows you to run Node.js and npm (Node Package Manager) commands from any directory in the command prompt or PowerShell. Without adding Node to Path, you would need to navigate to the Node.js installation directory every time you want to run a Node.js or npm command.
By adding Node to Path, you can easily access Node.js and npm commands from any location on your computer, making your development workflow more efficient and streamlined.
3. Can I add multiple versions of Node to Path in Windows 11?
Yes, you can add multiple versions of Node to Path in Windows 11. Each version of Node.js will have its own installation directory, and you can add the paths to these directories to the system’s PATH variable following the steps mentioned earlier.
By adding multiple versions of Node to Path, you can easily switch between different versions of Node.js and use the desired version for your projects without having to modify the PATH variable every time.
4. Do I need to restart my computer after adding Node to Path in Windows 11?
No, you do not need to restart your computer after adding Node to Path in Windows 11. The changes to the system’s PATH variable take effect immediately, allowing you to use Node.js and npm commands without rebooting your system.
However, if you have any command prompt or PowerShell windows open, you may need to close and reopen them for the changes to take effect in those specific instances.
5. How do I verify if Node is correctly added to Path in Windows 11?
To verify if Node is correctly added to Path in Windows 11, follow these steps:
1. Open the command prompt or PowerShell.
2. Type the command «node -v» (without quotes) and press Enter. This command will display the installed version of Node.js if it is correctly added to the system’s PATH variable.
3. Type the command «npm -v» (without quotes) and press Enter. This command will display the installed version of npm if it is correctly added to the system’s PATH variable.
If both commands return the respective versions, then Node.js and npm are correctly added to Path in Windows 11.
So, to summarize, adding a node to the path in Windows 11 is a straightforward process that can greatly enhance your system’s functionality. By adding a node, you can easily access and run executables from anywhere on your computer without having to navigate through multiple folders. This can save you time and simplify your workflow.
To add a node to the path in Windows 11, you need to access the system’s environment variables and modify the «Path» variable to include the desired node. This can be done through the Control Panel or the Command Prompt. Remember to be cautious when modifying system settings and make sure to enter the correct node path to avoid any errors or issues.
When working with Node.js on Windows 11, it’s crucial to have Node properly configured within your environment. This ensures that you can easily run Node.js and npm (Node Package Manager) commands from any command prompt or terminal window. One of the key steps in this configuration is adding Node.js to your system’s PATH. This article will guide you through the process of adding Node.js to the PATH variable in Windows 11, detailing each step along the way to make it as easy as possible.
Understanding PATH Variables
Before we dive into the process, it’s essential to understand what a PATH variable is. The PATH variable is an environment variable that informs the operating system where to look for executable files. When you run a command in Command Prompt or PowerShell, Windows checks these directories for the command that you type. If the directory containing the executable isn’t in the PATH, you will encounter an error indicating that the command is not recognized.
In the case of Node.js, without adding it to your PATH, you won’t be able to run Node.js commands directly from the command prompt.
Prerequisites
To successfully add Node.js to your PATH in Windows 11, ensure that:
-
Node.js is Installed: You should have Node.js installed on your system. You can download the latest version from the official Node.js website. Alternatively, if you use a version manager like nvm-windows, ensure that it’s installed and configured correctly.
-
Administrator Rights: While modifying the PATH variable generally doesn’t require administrator rights, being an administrator can simplify some of the steps. Make sure you have the necessary permissions.
Installing Node.js
If you haven’t installed Node.js yet, here’s a brief guide:
-
Download Node.js: Go to the Node.js website and download the Windows Installer (.msi) for your operating system.
-
Run the Installer: Double-click the downloaded installer and follow the prompts. Make sure to check the box that says «Automatically install the necessary tools» during the setup.
-
Complete Setup: Finish the installation. This should also give you the option to install additional components like npm.
-
Verify Installation: After installation, open Command Prompt or PowerShell and run the following commands to check that Node.js and npm are installed correctly:
node -v
npm -v
This will display the versions of Node.js and npm you installed. If you see the version numbers, you’re ready to proceed.
Adding Node.js to PATH
Now that you have Node.js installed, let’s add it to the PATH variable:
Method 1: Using the Installer
When you install Node.js using the installer, it typically adds itself to the PATH automatically. If, for any reason, this does not happen, you can still add Node.js to your PATH manually. Before proceeding, you might want to check if it’s already in your PATH.
-
Open Command Prompt: Press
Win + Xand selectWindows TerminalorCommand Prompt. -
Check the PATH: Type the following command to see if Node.js is in the PATH:
echo %PATH%Look for a path similar to
C:Program Filesnodejs.
Method 2: Manually Adding Node.js to PATH
If Node.js is not in the PATH, follow these steps to add it manually:
-
Locate the Node.js Installation Path:
- The default installation path for Node.js is
C:Program Filesnodejs. If you installed Node.js in a different directory, locate that path.
- The default installation path for Node.js is
-
Open Environment Variables:
- Right-click the Start button and select
System. - In the System settings window, click on
Advanced system settingson the left sidebar. - Click the
Environment Variablesbutton at the bottom of the System Properties window.
- Right-click the Start button and select
-
Edit the PATH Variable:
- In the Environment Variables window, under the «System variables» section (or «User variables» for a user-specific installation), look for the
Pathvariable and select it. - Click the
Editbutton.
- In the Environment Variables window, under the «System variables» section (or «User variables» for a user-specific installation), look for the
-
Add a New Entry:
- In the Edit Environment Variable window, click
New. - Type the path to the Node.js installation (e.g.,
C:Program Filesnodejs) and press Enter. - Click
OKon all open windows to close them and apply the changes.
- In the Edit Environment Variable window, click
-
Verify the Changes:
- Open a new Command Prompt or PowerShell window and type:
node -vIf it returns the Node.js version, it means that Node.js has been successfully added to your PATH.
Method 3: Using Windows Terminal
If you’re a fan of using Windows Terminal, you can add Node.js to PATH directly through it by performing the same steps as above but using the in-built terminal settings for accessibility.
Troubleshooting
If you still can’t run Node.js commands after adding it to PATH, consider the following troubleshooting steps:
-
Restart Your Command Prompt: Changes to the PATH variable won’t take effect in already opened command prompts. Always open a new Command Prompt session.
-
Check for Typos: Ensure you typed the path correctly while editing the PATH variable. Typos can lead to failures in recognizing Node.js commands.
-
Permission Issues: Ensure that you have the required permissions to modify the PATH variable. If you are running into issues, try running the command prompt as an administrator.
-
Multiple Installations: If you have multiple installations of Node.js (like using both the standard installer and a version manager), make sure that the path you’re pointing to is the one you intend to use.
-
Conflicting Entries: If you previously added Node.js to PATH and removed it, make sure there is no residual entry that might conflict with the new one. Clean up any old or incorrect path entries.
Using Version Managers
If you frequently switch between projects that require different Node.js versions, consider using a version manager like nvm-windows. This tool allows you to install and manage multiple versions of Node.js without the hassle of manually configuring the environment each time.
-
Install nvm-windows:
- Download it from the official nvm-windows repository.
- Run the installer and follow the prompts.
-
Add nvm to PATH: The nvm-windows installer should automatically add itself to PATH. To check:
nvm -v -
Install Node.js Versions:
- You can now install Node with nvm. For instance:
nvm install 14.17.0 -
Switch Versions:
- Switch between installed versions easily using:
nvm use 14.17.0
Using nvm greatly simplifies the management of different Node.js versions, and you won’t have to worry about PATH changes every time.
Conclusion
Adding Node.js to your PATH in Windows 11 is a simple yet vital process for anyone developing JavaScript applications. With the steps outlined above, you should be able to configure your system to run Node.js commands seamlessly. Whether you chose the conventional installation method or are planning to utilize version managers like nvm-windows, thorough understanding and proper setup will ensure a smoother development experience.
Updating your PATH correctly is sometimes a bit challenging, especially if you are not familiar with Windows system settings, but with patience, you can master it. Armed with this knowledge, you can focus more on building your applications and less on configuration issues. Happy coding!
Setting up the PATH environment variable for Node.js is not required, it simplifies the development process. You may still load each Node.js tool or module separately, but you won’t need to give their whole path when you set the PATH variable. This improvement makes the development process easier.
This tutorial walks over the methods and fundamental procedures for setting up the environment Path variable for Node.js on Windows.
Also Read – NodeJS: Installation, Setup, and Creating a Hello World Application in NodeJS
Configuring the Node.js PATH Variable
The two methods for configuring the PATH variable for Node.js on Windows are listed and described below along with the appropriate actions to take.
1. Setting Up Node.js PATH Variable Using GUI
A graphical user interface, or GUI, is a program’s visual representation that enables users to interact with it using windows, menus, buttons, and icons.
Follow the procedures given below to set or configure the PATH environment variable using a graphical user interface:
Step 1: Select Directory
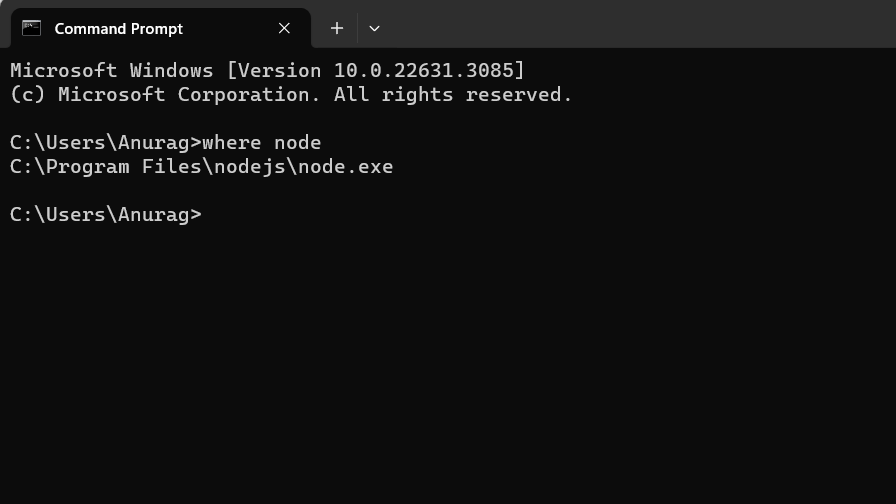
Locate the “nodejs” directory within the “Program Files” folder if Node.js is installed in “64-bit” mode, or inside the “Program Files(x86)” folder if Node.js is installed in “32-bit” mode. Next, enter the “nodejs” directory and copy the directory path where the “node.exe” file is located.
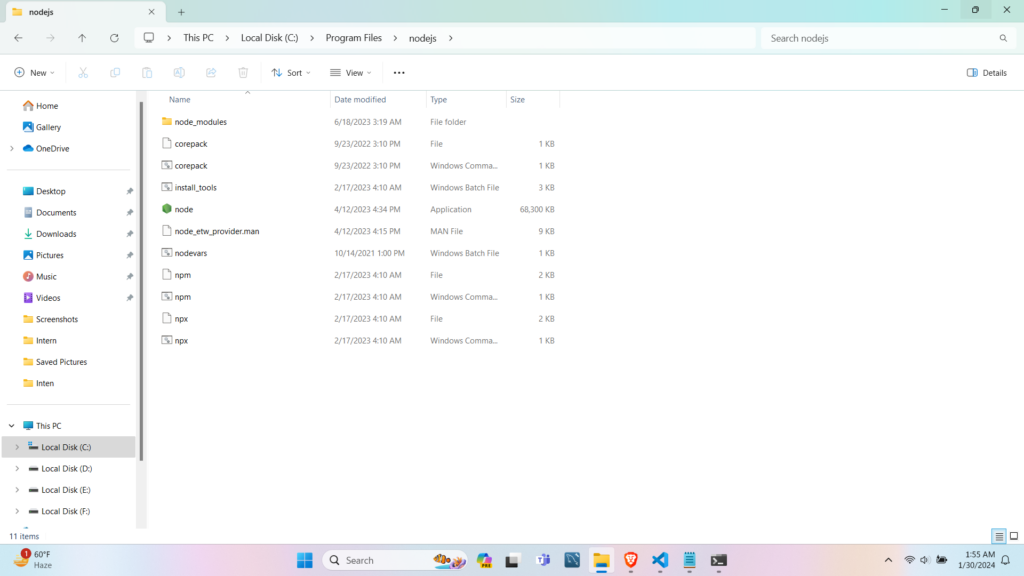
Or we can use the command prompt or terminal to run the “where node” command if the “node.exe” file cannot be located. Using this command, you may find the file’s location on the system.
Step 2: Open Environment Variables Settings
Click on the Start Menu icon, search env, select “Edit the system environment variables” from the menu and then click “Environment Variables”.
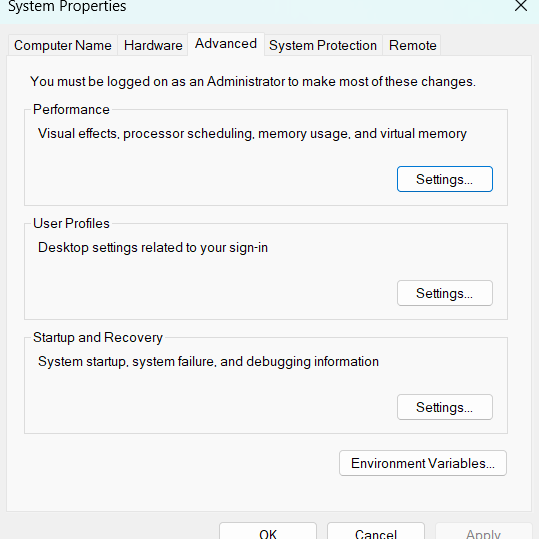
Step 3: Edit System Environment Variables
Locate and pick the “Path” variable from the “System variables” and Click on the “Edit” button.
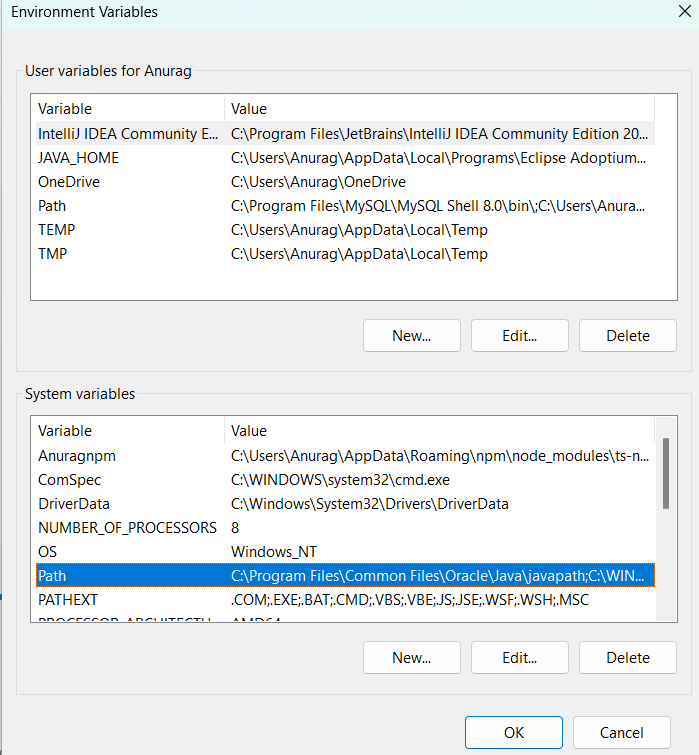
Step 4: Add System Variable
Click “New” and enter the path where Node.js are installed and then click “ok”.
Step 5: Click “OK” on each open window to apply the changes and then restart the command line.
Step 6: Verify Node Installation
Use the following command to verify node installation:
If Node.js is added to PATH, this command will display the installed Node.js version.
2. Setting Up Node.js PATH Variable Using CLI
The Command-Line Interface (CLI) is a text-based platform that enables users to engage with a program by inputting commands into a terminal or console. Employing the CLI involves executing commands via the terminal to set or modify environment variables while specifying the PATH for Node.js.
To set or configure the PATH environment variable for Node.js utilize the Command Prompt CLI terminal and visit the below steps:
Step 1: Open the Command Prompt
First, launch the Command Prompt via the “Startup” menu.
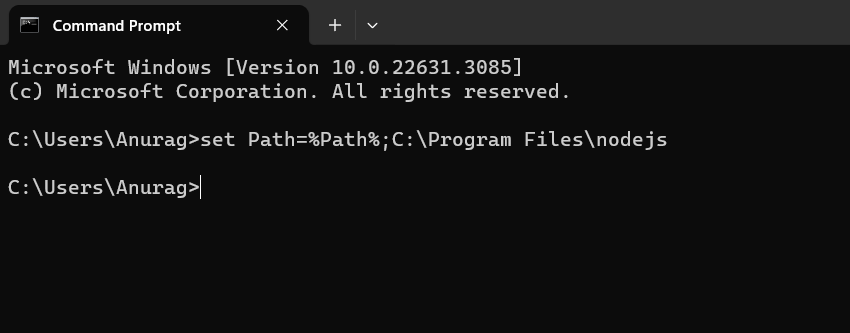
Step 2: Setting up the Path Variable For Node.js
To set the value temporarily for the path environment variable, use the command:
set Path=%Path%;C:\Program Files\nodejs
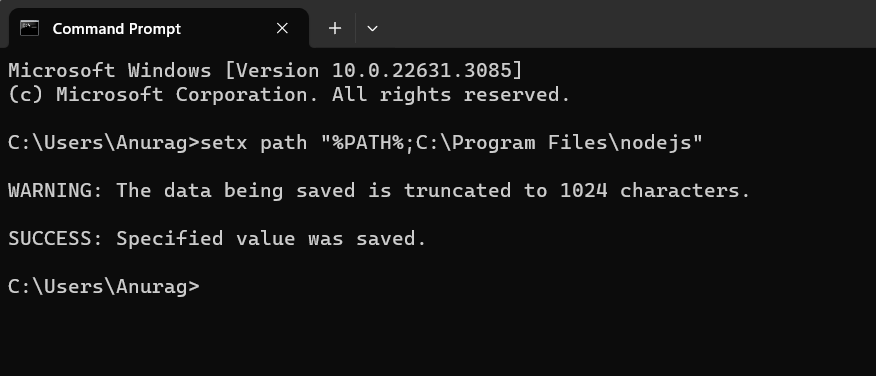
Step 3: Setting up the Path Variable For Node.js Permanently
To set the value Permanently for the path environment variable, use the command:
setx path "%PATH%;C:\Program Files\nodejs"
That’s all the procedure for configuring the PATH environment variable for Node.js.
Conclusion
In conclusion, the process of adding the Node.js path to the system variables, as discussed through the GUI and CLI methods, empowers developers with diverse approaches for configuring their development environment. Whether using the CLI’s command-line efficiency or the GUI’s visual simplicity, both approaches accomplish the same thing: they integrate Node.js seamlessly. Because of this flexibility, developers are guaranteed to select the approach that best suits their tastes and workflow. Through proficiency in both GUI and CLI methods, developers can effectively manage their Node.js applications.
Continue Reading:
- Resolving ‘node’ is not recognized as an internal or external command
- Reading File Line by Line in Node.js
Reference
https://github.com/nodejs/node-v0.x-archive/issues/4356
Node.js is a popular JavaScript runtime built on Chrome’s V8 JavaScript engine, widely used for building scalable network applications. Developers often work with Node.js to create server-side applications, run scripts, or develop tools. However, to use Node.js effectively from the command line, you need to make sure that its executable is accessible from any command prompt session. This typically involves adding it to the system’s PATH environment variable in Windows 11.
In this article, we’ll explore how to add Node.js to the PATH variable on Windows 11, ensuring that you can run Node.js and npm (Node Package Manager) commands from the terminal without encountering issues. We’ll also cover the importance of PATH, how to verify your Node.js installation, and troubleshoot common problems.
Understanding the PATH Variable
The PATH environment variable is a system-defined list of directories that the operating system searches when you enter a command in the command prompt or terminal. When you type a command, like node or npm, Windows looks through these directories to find the executable files that correspond to those commands. If the directories containing these executables are not in the PATH, Windows will not recognize the commands, and you’ll receive an error message.
Why Add Node.js to PATH?
By adding Node.js to the PATH:
- You can use Node.js commands globally, regardless of your current working directory in the command prompt.
- You can easily install and manage npm packages without needing to specify the full path.
- It simplifies development and script execution, making your workflow smoother.
Step-by-Step Guide to Add Node.js to PATH in Windows 11
Prerequisites
Before adding Node.js to PATH, you need to ensure that it’s installed on your machine. You can download the installer from the official Node.js website.
- Download Node.js: Choose the LTS (Long-Term Support) version for stability or the Current version for the latest features.
- Install Node.js: Run the installer, and follow the prompts. Ensure that the option to add Node.js to PATH is checked during installation. This step may automatically add Node.js to your PATH.
Manual Method to Add Node.js to PATH
If you have already installed Node.js without adding it to the PATH or need to add it manually for any reason, follow these steps:
1. Locate Node.js Installation Path
By default, Node.js is installed in C:Program Filesnodejs. You can verify its presence by navigating to this directory in File Explorer.
2. Open System Properties
- Press
Windows + Rto open the Run dialog. - Type
sysdm.cpland hitEnter. This action will bring up the System Properties window.
3. Access Environment Variables
- Inside the System Properties window, click on the Advanced tab.
- Click on the Environment Variables button at the bottom.
4. Edit the PATH Variable
- In the Environment Variables window, find the System variables section.
- Locate the
Pathvariable in the list and select it. - Click on the Edit button.
5. Add Node.js Path
- In the Edit Environment Variable window, click on New.
- Enter the path to the Node.js installation directory, usually
C:Program Filesnodejs. - Click OK to close the Edit Environment Variable window.
6. Apply Changes
- Click OK again in the Environment Variables window to apply the changes.
- Finally, click OK in the System Properties window to close it.
Verifying Node.js PATH Configuration
After adding Node.js to the PATH, you should verify that the command prompt recognizes it.
1. Open Command Prompt
- Press
Windows + Xand select Terminal or Windows Terminal from the menu, or typecmdin the search bar and hitEnterto launch Command Prompt.
2. Check Node.js Installation
-
Type the following command and hit
Enter:node -v -
This command returns the installed version of Node.js. If you see a version number, it means Node.js is correctly added to your PATH.
3. Check npm Installation
-
To ensure npm is also accessible, run the following command:
npm -v -
Again, you should see a version number for npm.
Troubleshooting Common Issues
Despite following the above methods, you may run into a few issues. Here are some common problems and their solutions:
Issue 1: ‘node’ is Not Recognized
Solution: If you see an error like 'node' is not recognized as an internal or external command, it means Node.js is not in your PATH. Double-check your PATH variable as described in the earlier steps, making sure you added the correct directory.
Issue 2: Command Prompt Does Not Reflect Changes
Solution: If you recently changed the PATH but still see the error, you may need to restart the command prompt for the changes to take effect. Close any open command prompt windows and start a new one.
Issue 3: Installation Issues
If you can’t run the installer or something goes wrong during installation:
- Ensure that you have administrative privileges on your computer.
- Check that your system meets the minimum requirements for running Node.js.
- Consider using the Node Version Manager (nvm) for Windows to handle installations. nvm allows you to manage multiple Node.js versions seamlessly.
Using Node.js and npm
After successfully adding Node.js to your PATH, you can start building your Node.js applications. Here’s a quick overview of npm and some commands:
-
Initialize a New Project:
npm initThis command creates a new
package.jsonfile, where you can specify your project’s dependencies and scripts. -
Install Packages:
npm installThis command installs the specified package locally. To install globally, use the
-gflag:npm install -g -
Start a Node.js Script:
If you have a simple Node.js script namedapp.js, you can run it using:node app.js
Best Practices for Managing Node.js
To take full advantage of Node.js in your development workflow, consider the following practices:
1. Use a Version Manager
Using a version manager like nvm (Node Version Manager) lets you switch between Node.js versions easily, should your application require a specific version or if you’re maintaining different projects using different versions.
2. Keep Node.js Updated
Regularly check and update Node.js to benefit from the latest features and security updates. You can upgrade Node.js using the installer or with nvm if you’re using it.
3. Use .npmrc for Custom Configurations
If you have specific configurations for npm, consider creating a .npmrc file in your project’s root directory to manage settings like custom registries, proxies, and cache configurations.
4. Explore Node.js Packages
There are thousands of packages available on npm. Familiarize yourself with the npm ecosystem to leverage libraries that can help you solve common problems or add functionality to your projects.
Conclusion
Adding Node.js to the PATH in Windows 11 is a necessary step to streamline your development workflow and eliminate command recognition issues. By understanding and managing the PATH variable effectively, you enhance your ability to work with Node.js and npm seamlessly.
The guide provided in this article should have you set up and ready to dive into the world of Node.js development. Remember to explore the wealth of resources available, engage with the community, and continuously practice building applications to enhance your skills. Happy coding!
Adding a Node to the Path in Windows 11
When developing applications with Node.js on a Windows 11 machine, it’s essential to ensure that your system’s environment variables are set up correctly. This entails adding Node.js to your system’s PATH variable. This article presents a detailed guide on how to add Node.js to the PATH on Windows 11, including explanations of the concepts involved and step-by-step instructions.
Understanding the PATH Variable
The PATH environment variable is a system-level setting that tells the operating system where to look for executable files. When you enter a command in a command prompt or terminal window, Windows checks the current directory for that command first. If it doesn’t find it there, it searches the directories listed in the PATH variable in sequential order. If the command is found in one of these directories, the associated executable file is run.
For developers, particularly those working with languages like JavaScript through Node.js, having Node.js in your PATH simplifies the process of running Node.js applications and executing package management commands without needing to specify the full path to the Node.js executable.
Why Adding Node.js to the PATH is Important
-
Ease of Access: By adding Node.js to your PATH, you can run Node.js commands – like
nodeandnpm– from any command prompt without needing to navigate to the specific directory where Node.js is installed. -
Script Development: Many JavaScript projects involve using Node.js for running scripts, managing dependencies, and building applications. If Node.js isn’t correctly set in the PATH, developers may frequently encounter errors indicating that the command could not be found.
-
Package Management: NPM (Node Package Manager) is a vital part of the Node.js ecosystem, allowing developers to manage libraries and packages. Having NPM accessible from any command prompt speeds up development processes.
How to Download Node.js
Before you can add Node.js to your PATH, you need to install Node.js itself. Here’s how you can download and install Node.js on your Windows 11 machine:
-
Visit the Node.js Website:
Go to the official Node.js website at nodejs.org. -
Choose Your Version:
You will see two versions available for download: LTS (Long Term Support) and Current. If you’re new to Node.js, it is typically recommended to download the LTS version for stability. -
Download the Installer:
Click on the appropriate version to download the Windows installer (a.msifile). -
Run the Installer:
Once the download is complete, run the installer by double-clicking on the.msifile. This will start the installation wizard. -
Follow the Installation Prompts:
- Click «Next» in the welcome window.
- Accept the License Agreement and continue.
- Choose the installation location (it’s best to use the default directory unless you have a specific need).
- Make sure the «Add to PATH» option is checked during the setup.
-
Finish Installation:
Click «Install» to complete the installation. Once installed, you should see a completion message. Click «Finish» to exit the installer.
Verifying Node.js Installation and PATH Configuration
After installing Node.js, it’s crucial to verify that both Node.js and npm (Node Package Manager) are correctly installed and accessible from the command line.
-
Open Command Prompt:
PressWin + R, typecmd, and hit Enter. -
Check Node.js Version:
Type the following command and hit Enter:node -vIf Node.js is installed correctly, you should see the current version of Node.js displayed.
-
Check NPM Version:
Similarly, verify that NPM is also operational by running:npm -vYou should see the version number of npm if everything is configured correctly.
Adding Node.js to the PATH Manually
In most cases, the Node.js installer automatically adds Node.js to your PATH. However, if you encounter issues or if you’ve installed Node.js without the «Add to PATH» option, you can manually update the PATH variable. Here’s how to do it:
Step 1: Locate Node.js Installation Directory
First, you need to know where Node.js is installed on your system. By default, the installation path is:
C:Program FilesnodejsIf you installed Node.js somewhere else, make sure to note down that specific directory.
Step 2: Access Environment Variables
-
Open System Properties:
Right-click on the Start button and select «System». -
Open Advanced System Settings:
In the System window, click on «Advanced system settings» on the right side. -
Environment Variables:
In the System Properties dialog that appears, click the «Environment Variables» button.
Step 3: Edit the PATH Variable
-
Locate the PATH Variable:
In the Environment Variables dialog, look for the «Path» variable in the «System variables» section and select it. Click on «Edit». -
Adding the Node.js Path:
In the Edit Environment Variable window, click on «New» and enter the path to the Node.js installation directory, which is typically:C:Program FilesnodejsPress Enter after adding the new entry.
-
Confirm Changes:
Once you have added the path, click «OK» to close each dialog box.
Step 4: Restart Command Prompt
After making changes to the PATH variable, it’s essential to close any open command prompt instances and restart them. This step ensures that the updated PATH is loaded.
Step 5: Verify the Changes
To confirm that the changes have taken effect, follow the same verification steps as before by running node -v and npm -v in a new command prompt.
Troubleshooting Common Issues
Even with a correct installation and PATH configuration, developers may face some common issues. Here’s how to address them.
Issue 1: ‘node’ is Not Recognized as an Internal or External Command
This error typically means that your system can’t find the Node.js executable. This could be due to:
- Node.js not being installed.
- The PATH variable not being set correctly.
Solution: Go back to the PATH settings and ensure that the Node.js directory is added correctly. Also, verify the installation directory.
Issue 2: Different Versions of Node.js
If you have multiple versions of Node.js installed, you might run into conflicts when executing commands.
Solution: Use version managers like nvm-windows, which allows you to easily switch between different Node.js versions without modifying system PATH settings manually.
Issue 3: When Updates to Node.js are Required
If you encounter a situation where npm packages won’t install or Node.js functionality is lacking, you may need to update Node.js.
Solution: Download and run the latest installer from nodejs.org, and it will update the existing installation while keeping your path settings intact.
Best Practices for Using Node.js on Windows 11
-
Use Recommended Versions: Stick to LTS versions for production applications to ensure stability and support. Use other versions for development if necessary but be cautious.
-
Keep it Updated: Regularly check for new versions of Node.js and npm, as they bring enhancements, security updates, and bug fixes.
-
Environment Management: Consider using version management tools such as
nvm-windowsto handle different Node.js versions for various projects. -
Package Management: Regularly review and update dependencies within your Node.js projects to maintain performance and security.
Conclusion
Adding Node.js to your PATH on Windows 11 significantly enhances your development experience by simplifying access to Node.js and npm commands across your system. Following the above steps will ensure you set it up correctly, and knowing how to troubleshoot common issues will help you resolve potential obstacles during development. By taking full advantage of Node.js in your PATH settings, you are well on your way to building efficient and powerful applications in JavaScript.
As you continue your journey with Node.js, consider exploring frameworks like Express.js for web applications, or delve into package development for npm to broaden your horizons. Happy coding!