
After accidentally removing the Microsoft Print to PDF as a device from my system, I can no longer find a way of adding it back. I want to print to PDF on my Windows 7 PC; what should I do to achieve that?
— From Microsoft Community
Just like the Microsoft Community user above, you may need printed documents for offline access, thus overcoming technological limitations. Though digital file formats prevail, printing a PDF is still valuable for many reasons. It becomes crucial to print a PDF in Windows 7 for legal documentation, record keeping, and other professional purposes, like physical handouts. Even some people prefer to read and annotate physical documents to make handwritten notes.
So what to do if you can’t print a PDF in Windows 7? No need to worry! Let’s explore this guide offering 3 efficient ways to print a PDF in Windows 7.
|
Method |
Effectiveness |
Difficulty Level |
|
EaseUS PDF Editor |
High — Print PDF in Windows with simple clicks; offer many advanced features before printing; |
Super easy |
|
Adobe Acrobat |
Medium — Allow print to PDF, but limited tools in the free version; |
Moderate |
| Microsoft Print to PDF | Medium — Only allows you to print PDF; | Easy |
Easiest Way to Print PDF in Windows 7
If you need all-in-one software to print a PDF in Windows 7, EaseUS PDF Editor is an efficient solution. Supporting Excel, Word, PowerPoint, and other formats., it lets you convert the desired document to PDF. You can also edit the custom printing settings, such as margins, size, shape, etc.
Moreover, adding, deleting, or rotating PDF pages is possible. Even you can insert bookmarks or page numbers. You can edit images, text, or links, add watermarks, and remove signatures from PDF. Lastly, it helps you compress the PDF file to reduce size.
Here is a brief tutorial:
Step 1. Open EaseUS PDF Editor and click «Open» to import the PDF file you want to print.
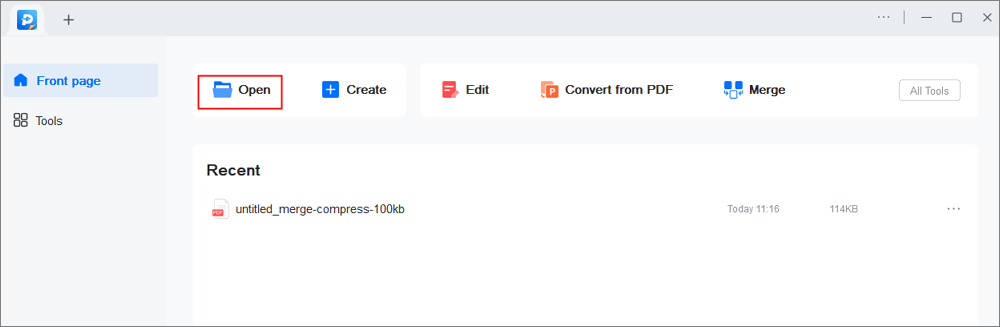
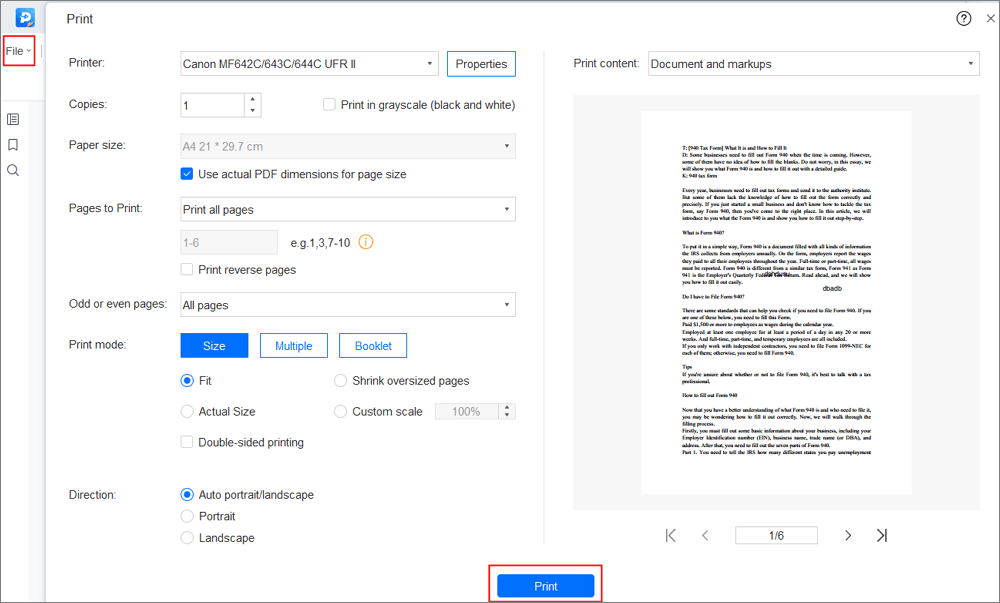
Step 2. Then, click «File» > «Print» to open the printing window. Then, adjust the printing settings in the pop-up window, like the margin, paper size, pages, direction, booklet, and more. When it’s done, click «Print» to start.
If you are looking for a video tutorial solution, check out the below one!
Print PDF in Windows 7 with Adobe Acrobat
Adobe Acrobat is a powerful and more comprehensive software than Microsoft Print to PDF. You can perform multiple tasks, such as making editable PDF files, combining multiple PDF, and e-signing the PDF document.
In addition, it offers many advanced printing features, like changing layout, greyscaling, etc. You can even annotate, OCR, convert, flatten, add/remove watermarks, protect, or create a PDF.
Let’s comply with the steps on how to print an Adobe PDF in Windows 7:
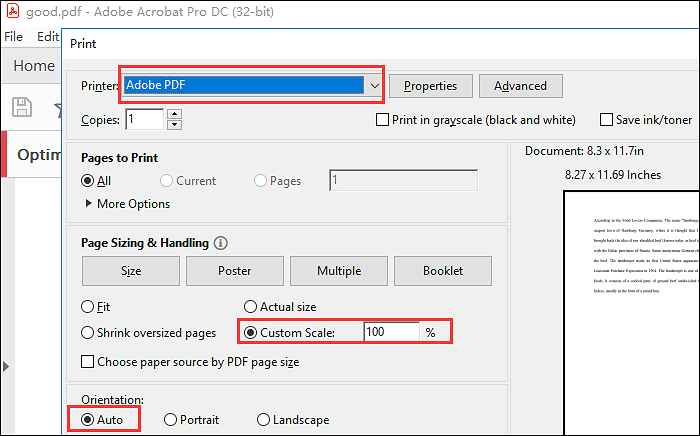
Step 1. After launching Adobe Acrobat on your PC, open the required document. Click «File» from the above menu, and tap «Print» to open the new interface.
Step 2. Here, it will display the «Properties» tab. Click it to adjust the advanced settings, like color, resolution, layout, etc.
Step 3. Once done, hit the «Print» tab to save the document as PDF in the destination folder, and that’s all!
Print PDF in Windows 7 with Microsoft Print to PDF
If you are looking for a quick way to convert your document to high-quality PDF via a virtual printer, Microsoft Print to PDF must be your way to go. However, it never allows you to edit these kinds of PDFs.
So there will be a requirement for a professional Windows PDF editor to make changes to your PDF document. Plus, it is a must to enable this feature before activating Windows.
Here is how to use Microsoft Office Print to PDF in Windows 7:
Step 1. Firstly, press the Windows key and R at once, enter the optionalfeatures.exe command, and tap the «Enter» tab to expand the «Turn Windows Features on or off» function. Go down to enable the «Microsoft Print to PDF» feature.
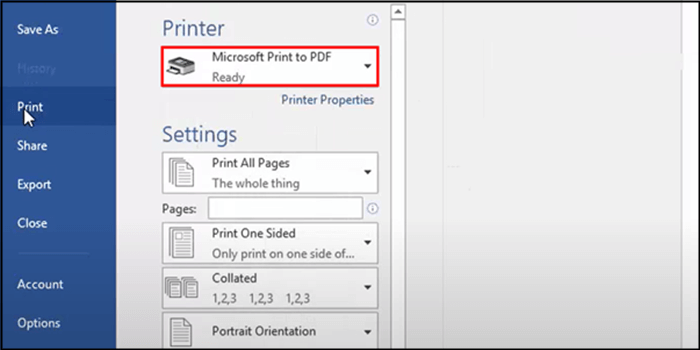
Step 2. Secondly, open the required document in Microsoft Office Word. Quickly type the «File» tab from the menu and opt for the «Print» section. You can also enter «Ctrl + P» using your keyboard. Here, this will display the «Print» Window.
Step 3. The last step involves expanding the drop-down menu of «Printer» and choosing «Microsoft Print to PDF» from available choices. Next, it allows you to choose how many copies you require. Later, click Print to save PDF, and you are all done!
Conclusion
It is obvious to struggle when printing a PDF being Windows 7 user. The reason is that it doesn’t have the necessary print-to-PDF feature. However, the problem has been solved by acknowledging the right tools from the above guide on how to print a PDF in Windows 7.
It is worth mentioning here EaseUS PDF Editor is the most recommended solution because of its wide range of extra-efficient features. Not only it offers an easy installation method but also an intuitive interface.
Print PDF in Windows 7 FAQs
In addition to the above details on how to print a PDF in Windows 7 using various software, here are some questions for more clarification!
1. How to add a PDF printer in Windows 7?
For this purpose, click the Start button and open the Control Panel. Now, choose Add a Printer under Device and Printers. From the dialog box of Add a Device, select Add a local printer, and from Add Printer pop-up, choose to Add a Local Printer or Network printer via manual settings.
2. Why can’t I Print a PDF in Windows 7?
Unfortunately, you are not allowed to print a PDF in Windows 7 because there is no basic print to PDF function. But this feature has been introduced to Windows 10. To overcome this problem, you can use an alternative PDF printer, like EaseUS PDF Editor, Adobe Acrobat, and Microsoft Print to PDF.
3. How do I enable Print to PDF in Windows?
To enable the print to PDF feature in Windows, go to the Start menu and type Turn Windows Feature On or Off. Now, it’s time to checkmark the Microsoft Print to PDF option. Lastly, hit the Ok tab, and that’s all. Don’t forget to restart your PC once.
After you have downloaded and installed the printer, you should now know how to install Microsoft Print to PDF on Windows 7. Open the Control Panel by clicking the Start button and typing “devices and printers” and press enter. Click on Microsoft Print to PDF and make it your default printer. Reboot your computer after making these changes to save the changes. You should also restart your computer if you need to make changes to your printer settings.
To remove this printer driver, open the Control Panel and go to the Devices and Printers tab. Next, find and select Microsoft Print to PDF from the list of devices and printers. Now, you will need to enter the printer driver for Microsoft Print to PDF and restart your computer. After printing, your document will be converted to PDF. When you open it, you will be able to view it in a PDF format.
The first step to install Microsoft Print to PDF in Windows 7 is to add a printer. You can either install a local printer or a network printer. If you have no printer, you will need to add it manually. On the left-hand pane, click Add a printer. The next window will have an existing port for your printer. Select the printer you want to install and select its name. Then, restart your PC and try using it.
You will need to install a printer driver to enable Microsoft Print to PDF. Windows will detect the printers it detects and prompt you to choose one. To install a printer driver manually, follow the instructions below. After installing the printer driver, restart your computer. When you are finished, you can use Microsoft Print to PDF to create a PDF document. It will also convert a document to a PDF file.
Does Windows 7 Have Microsoft Print to PDF?
You may be wondering if Windows 7 includes Microsoft Print to PDF, but it does not come as a default feature. To remove this feature, you can use PowerShell or the Command Prompt. In the Control Panel, click Devices and Printers. In the right pane, click Microsoft Print to PDF. You may also uninstall this feature by choosing Remove device. After removing this feature, you will have to reboot your PC to make changes.
If you can’t see the print option in the list of printers, try unticking it and checking the box. Microsoft Print to PDF is a feature you can use in Windows Vista. This feature can let you print from any program without restrictions, so you won’t be limited to Microsoft Word or text documents. It will also create a file with zero bytes. However, it will not work if you place a comma at the end of the file name.
After enabling Microsoft Print to PDF, you can convert any document or web page to a PDF. To do this, go to your Control Panel, click Printers, and then select the “Print to PDF” option. Once this option is enabled, click Print to PDF, and you will see a new window appear. On the right side, you should find the option Microsoft Print to PDF. Click Add to Printer to see if Microsoft Print to PDF is available in Windows.
How Do I Get Microsoft Print to PDF?
To access the Microsoft Print to PDF on Windows 7 option, start by pressing the combination of Windows + R keys. In the search field, type devices and printers and click the first result. From here, select the Microsoft Print to PDF option under the Printers dialog. Once you have chosen it, you can click on the Add printer or Scanner button. Note that you can also access this option by right-clicking an empty space in the printers list.
To enable the Microsoft Print to PDF feature, go to the Windows Features window and choose “Print to PDF.” Tick the option and hit OK. Alternatively, open a web page and select the File>Print option from the Application menu. Select Microsoft Print to PDF from the Print Output As dialog and specify the location, filename and save button. You can also do the same thing with the application menu: Microsoft Office has an Export option and a feature called “Create PDF/XPS document.” Likewise, LibreOffice has a File menu item that says “Export as PDF”.
Can I Reinstall Microsoft Print to PDF?
After uninstalling the program, you can reinstall it by following some steps: 1. Right-click on the device and select the option to remove it; 2. Choose “remove from system” and then click OK. You will notice that Microsoft Print to PDF is no longer visible in the Devices and Printers window. To reinstall it, simply follow the steps above. The program’s settings are stored in a special folder.
In order to reinstall the program, first make sure that it is not conflicting with any other printers on your computer. This application may cause problems with other printers if you have multiple printers on your computer. To fix this, you can launch the Run application by pressing Windows + R. Then, type the name of the program in the text field. Click the OK button and your printer should be back.
If you want to use the program to print web pages, you need to install the driver for it. After that, click the Windows Print to PDF option in the Printing and Scanning menu. This option will appear in the Windows Settings window. If you do not see the print driver for the printer, then you must add it. After that, you can select the printer you want to use. Then, click OK to save any changes you have made.
Where is the Microsoft Print to PDF Driver?
If you want to use the Microsoft Print to PDF feature in Windows 7, you will have to install a printer driver. If you have a network printer, you must set up a manual setting. Once you’ve installed the driver, you should restart your computer. You can then try using the feature. However, if the problem still persists, you should consult your printer manufacturer’s support website for further guidance.
You can install the latest version of the Microsoft Print to PDF driver by running Windows Update. Click the “Update Driver Software” button to update your system. The list of installed printer drivers should also be updated. Once this process is complete, you can remove the problematic driver from your PC. In case you’re not sure how to remove the driver, you can use the Device Manager. In the Device Manager, look for a printer driver called “Microsoft Print to PDF” and click on it.
The Microsoft Print to PDF driver is only available for Windows 10 and later. In Windows 7, it’s still possible to install the driver. Open Control Panel and navigate to Devices and Printers. Click Microsoft Print to PDF on the first option. After installing the driver, restart your computer. Your document will now be converted into a PDF. You can then open it with Adobe Reader. You can also select PDF in the print dialog box.
Where Does Microsoft Print PDF Drivers?
If you want to print from Microsoft software, you must know where the Print to PDF driver is located. If the driver is missing or corrupted, you can reinstall it. You can open the Device Manager and look for the Microsoft Print to PDF driver. Double-click on it and expand its properties. Choose the option to enable or disable it, and then restart your computer. After this process, you should be able to use Microsoft Print to PDF on your PC.
To install the Microsoft Print to PDF driver, you must add a printer to your computer. You can add a printer by selecting a print port from the Print & Scanners section. You can then click on Add printer or scanner and select the Microsoft Print to PDF option. Then, follow the instructions in the window to install the driver. After the driver installation, you should be able to use Microsoft Print to PDF on your computer.
How Do I Print to File in Windows 7?
To print the contents of a folder in Windows 7, you can use the Windows Print Utility. This simple utility allows you to print the entire directory or subdirectory. You can also specify the size of the file or set a limit for the filename length. For more advanced users, you can even specify the file format. To print the contents of a folder, follow these steps. However, before you start printing, make sure that you have administrator privileges.
You can also print the contents of a folder by using the Print Screen option. You can also copy and paste the contents of the folder into a text file. However, this method does not work well for very long folders. For longer folders, you can use third-party utilities. To print a folder in Windows 7, you have a few options. First, you can use the File Explorer. Next, go to the ‘Print Screen’ option. This option will open a list of files in the current folder. After that, select the file you want to print and save it.
Learn More Here:
1.) Android Help Center
2.) Android – Wikipedia
3.) Android Versions
4.) Android Guides
Как установить принтер Microsoft Print to PDF.
Печать в PDF (Microsoft Print to PDF) это функция позволяет легко конвертировать любые документы, фото, страницы в формат PDF с помощью операции печати.
Бывают сборки Windows, где она отключена или же просто удален сам принтер Microsoft Print to PDF, как раз в данной статье расскажу как подключить данный принтер.
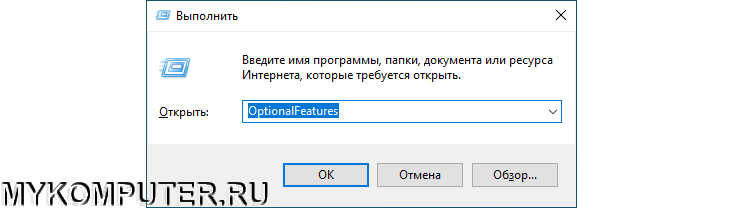
Шаг 1 Клавишами Win + R вызываем окно Выполнить. Вводим команду OptionalFeatures и жмем OK.
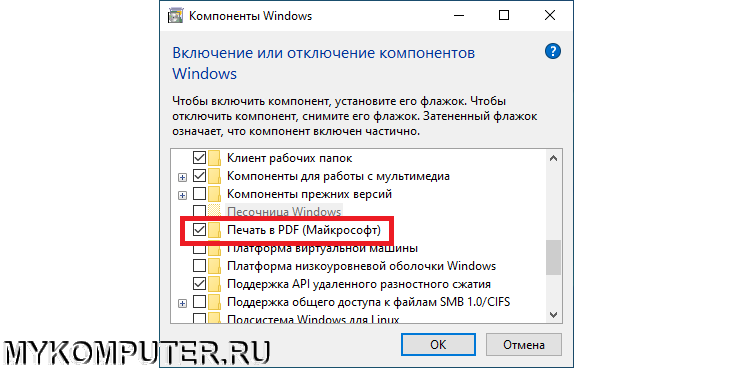
Шаг 2 В окне Компоненты Windows, находим компаненту параметр Печать в PDF (Майкрософт) и ставим флажок, чтобы ее активировать и нажмите кнопку OK.
После того как Windows применит требуемые изменения, нажмите кнопку Закрыть, при этом перезагрузка компьютера не требуется.
Поддержать развитие блога
Отправить Донат
Many users may want to add PDF as a printer, but sometimes you may notice that Windows print to PDF is missing or unavailable. You are disabled to print as a PDF. When you feel like to install this feature again, Windows print to PDF can’t reinstall.
In fact, printing PDF has some unspeakable advantages over other forms of the printer. Print to PDF enables you to print from any program, not restricting to Microsoft Word or text document.
And maybe that is why so many users are eager to remove the Microsoft print to PDF disappeared issue and hope to learn well how to print to PDF on Windows 7, 8, and 10.
Fix it for Windows 10
Fix it for Windows 7, 8
Part 1: Fix Missing Print to PDF on Windows 10
Prior to Windows 10, there is no Microsoft print to PDF. But as for the users who are running on Windows 10, print to PDF can’t either be used, it is high time to solve this printing error for your PC.
You may know that print as PDF is a feature pre-installed on Windows 10, so as long as you couldn’t print to PDF Windows, you need to deal with this issue instantly if you would like to print as you wish in programs.
Now in this part, it will mainly help you resolve Windows 10 Microsoft print to PDF not working.
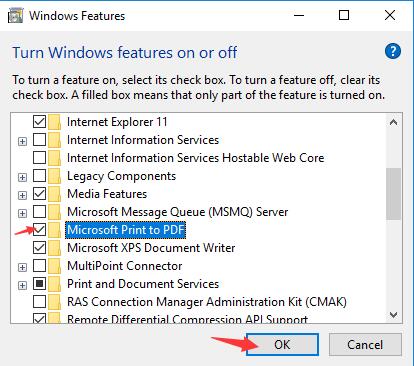
1. Press Windows + R to activate the Run box and then in this box, input optionalfeatures.exe.
At last, click OK to turn on Windows features window.
2. In Windows Features window, scroll down to locate Microsoft Print to PDF and tick the box of it to turn on the feature –Microsoft Print to PDF. Then hit OK to save changes.
Step 1 to 2 is to enable Microsoft print to PDF. After that, you may also fail to print as PDF Windows 10. This time, you are supposed to obey the following steps below to further fix Windows 10 Microsoft print to PDF.
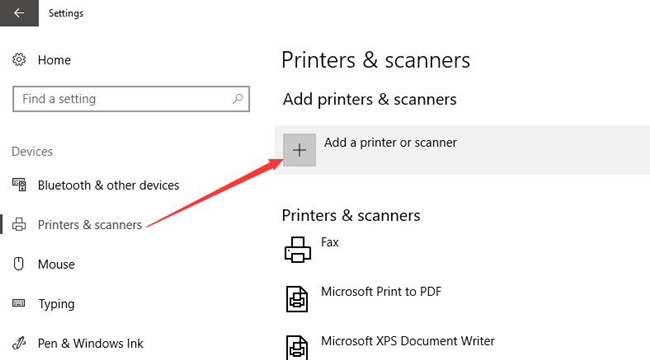
3. Then go to Start > Settings > Devices.
4. Under Printers &scanners, hit Add a printer or scanner.
5. Click The printer that I want isn’t listed.
Here if Windows 10 couldn’t detect any printer, you are able to choose the option – The printer that I want isn’t listed.
6. Then you will go to Add printer window, tick the box of Add a local printer or network printer with manual settings. Finally, hit Next.

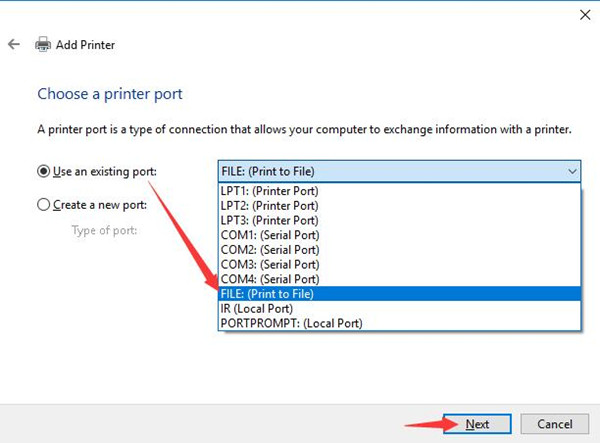
7. Choose to Use an existing port and then select FILE: (Print to File). Soon after that, stroke Next.
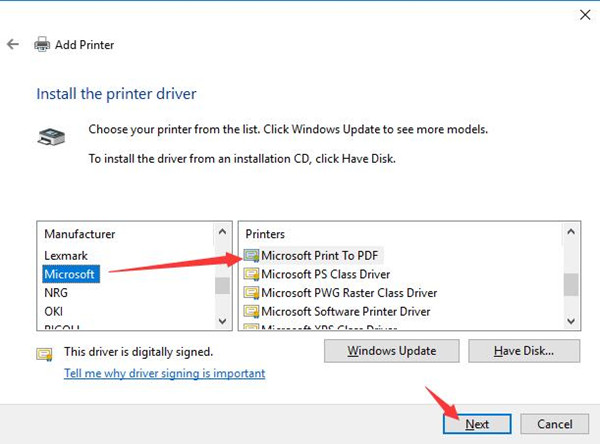
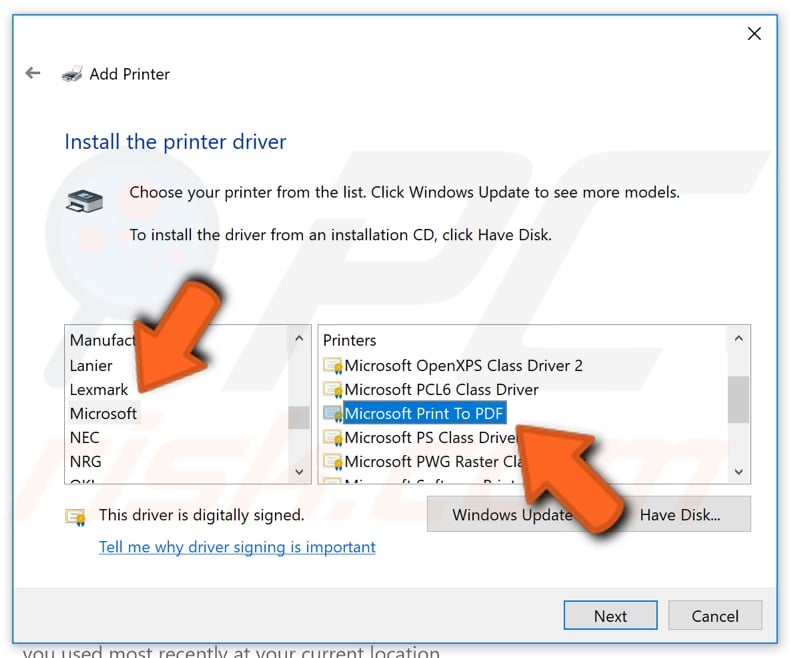
8. In Add printer window, under Manufacturer, choose Microsoft. And under Printers, select Microsoft print to PDF. After that, click Next to go on.
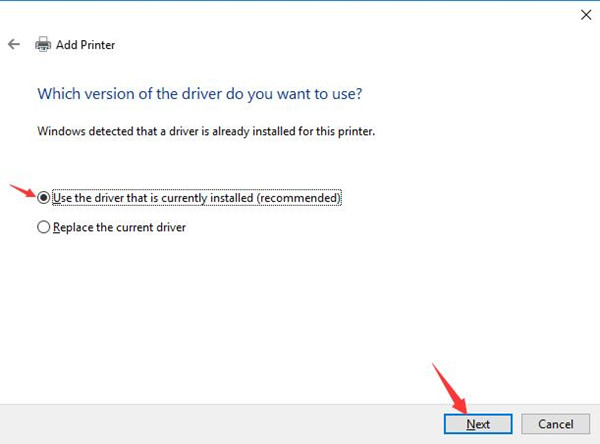
9. Decide to Use the driver that is currently installed (Recommended) and then click Next.
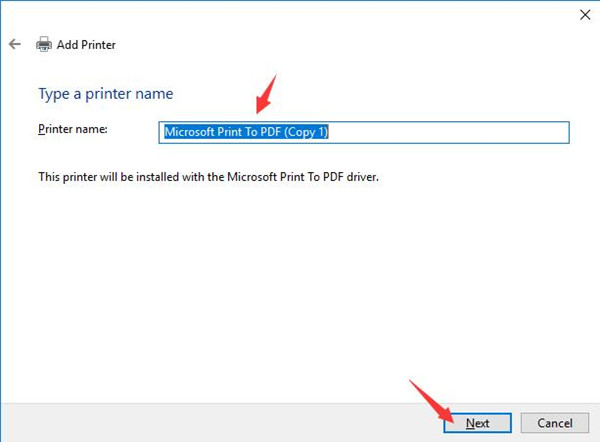
10. Input a Printer name. And then hit Next for more steps.
Then you can see a printer with the name you have just added will be installed with the Microsoft print to PDF driver. And the Windows 10 missing print to PDF would be fixed in this way.
Related: How to add a printer on Windows 10
Part 2: Microsoft Print to PDF Missing on Windows 7, 8
With regard to Windows 7 or 8 consumers, although you have no Microsoft print to PDF choice, this post would let you know how to add print to PDF when print to PDF disappeared from Windows features on Windows 7 and Windows 8.
Since there is no Microsoft Print to PDF, you would better make use of tools which are able to install this feature on Windows 8.1.
To replace print to PDF, you can use some helper to help you to achieve this goal, such as Adobe Acrobat and doPDF.
Even if you couldn’t print as PDF on Windows 7, 8 with built-in applications, these tools can assist you to print to PDF Windows.
To make a summarization, whatever it is on Windows 7, 8 or 10, to better solve unavailable print to PDF issue, this article will introduce to you how to effectively remove print to PDF unable usable problem.
More Articles:
Fixed: Printer Driver is Unavailable on Windows 10/11
6 Ways to Fix Printer Offline Status on Windows 10/11
Fix Print Management Issue on Windows 10/11
How to Print to PDF in Windows 10 and Windows 7?
PDF is a portable file standard and a more compatible format than other types of documents. Printing to a PDF file is quite simple — you can install a free ‘PDF printer’ or use various other programs. And, if you are using Windows 10, then it is effortless. This article will show you a few easy ways to print to PDF in Windows.

Video Showing How to Print to PDF in Windows 10
Video Showing How to Print to PDF in Windows 7
Table of Contents:
- Introduction
- How to print to PDF in Windows 10?
- How to set up «Microsoft Print To PDF» manually in Windows?
- How to print to PDF in Windows 7 with installed PDF Printer?
- Online PDF printers
- Print to XPS and convert to PDF
- Video showing how to print to PDF in Windows 10
- Video showing how to print to PDF in Windows 7
Download Computer Malware Repair Tool
It is recommended to run a free scan with Combo Cleaner — a tool to detect viruses and malware on your device. You will need to purchase the full version to remove infections. Free trial available. Combo Cleaner is owned and operated by Rcs Lt, the parent company of PCRisk.com read more.
How to print to PDF in Windows 10?
Windows 10 has a built-in PDF printer, and so it is simple to print to PDF files. Just attempt to print your file as you normally would and select «Microsoft Print To PDF» as your printer choice. In the example below, we selected a webpage to print.
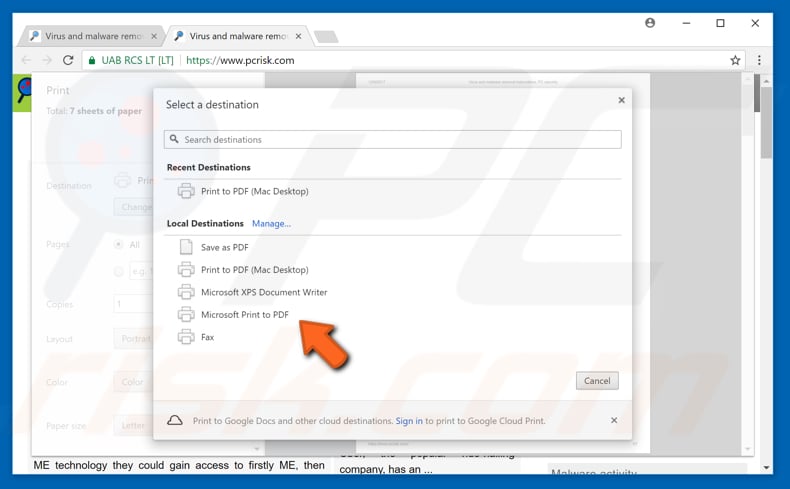
After selecting the «Microsoft Print To PDF» option, the «Save Print Output As» dialog box will appear. You will be asked where you want to save your PDF file. Choose your file destination, enter a name, and click «Save«.
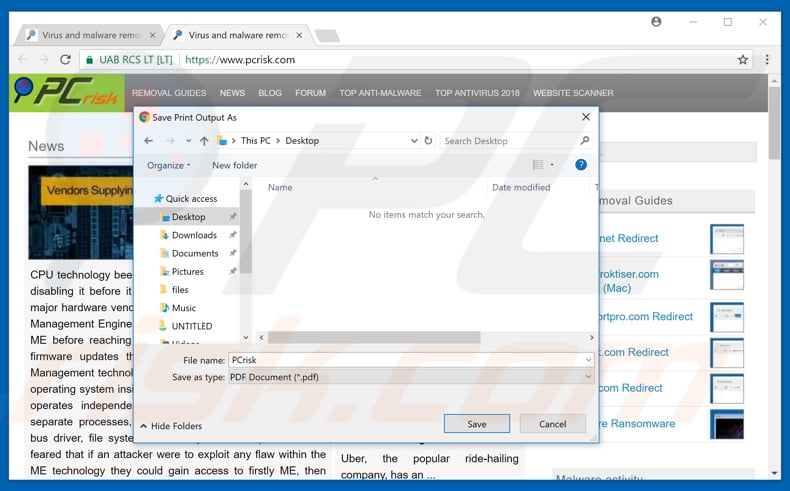
Done! You have your PDF file ready to use and share.
[Back to Table of Contents]
How to set up «Microsoft Print To PDF» manually in Windows?
If there is no printing to PDF option on the list, you will have to set it up manually. This is easy to do. First, go to your Windows «Settings» page, which you will wind in the «Start» menu.
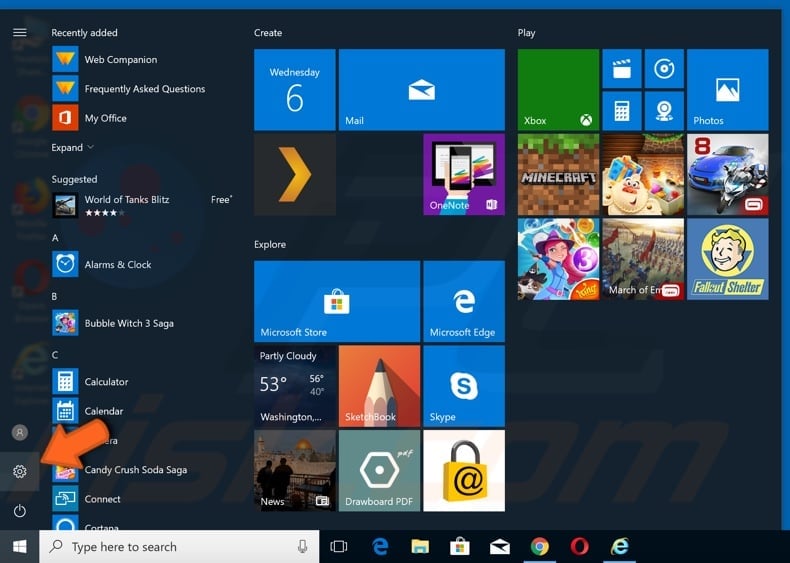
Once you are on the «Settings» page, click «Devices«
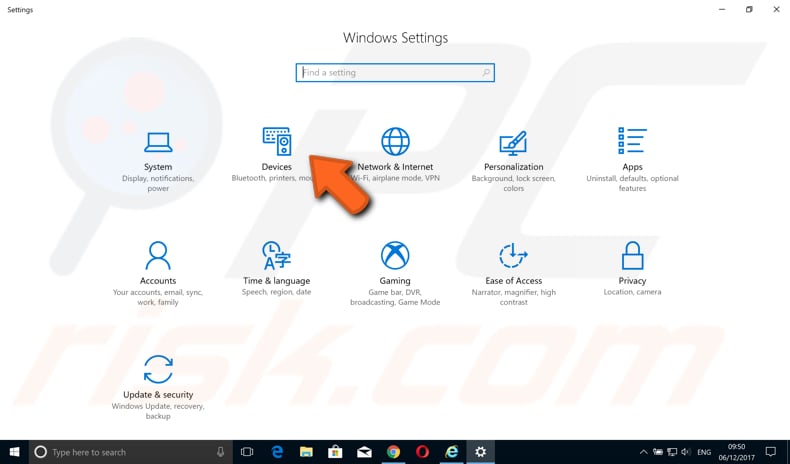
Then click «Printers and scanners«
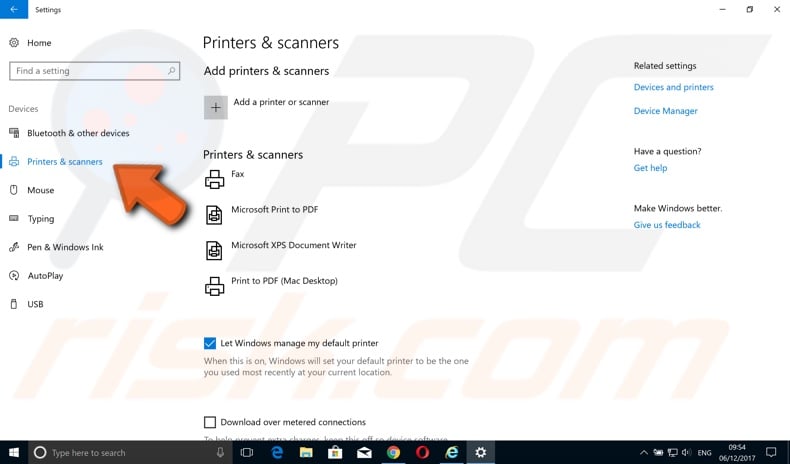
Now you will see the «Printers and Scanners» window displaying all printers available to you on your Windows 10 operating system. This is where you should see «Microsoft Print To PDF«. If not, click «Add a printer or scanner«.

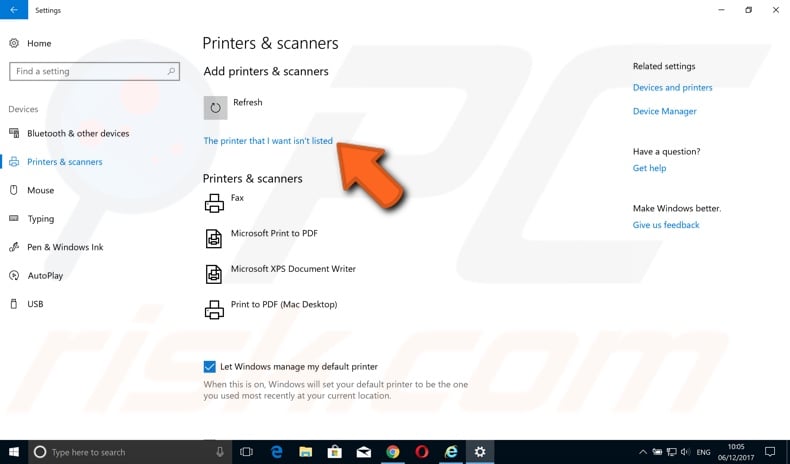
Windows will try to find new printers but will probably fail. This is normal (unless you actually connected a new printer to your computer). Now click «The printer that I want isn’t listed«.
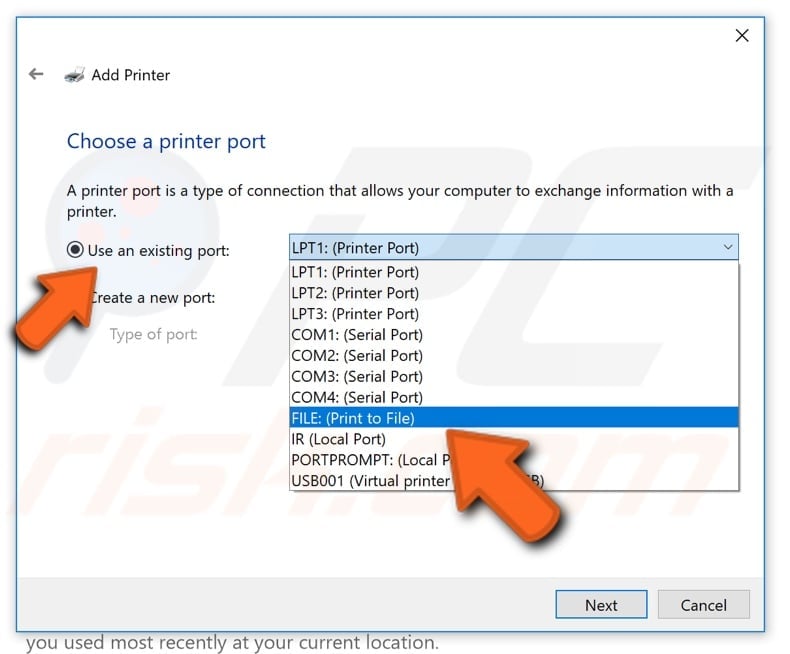
This will open a new window where you can add a printer manually. Click «Add a local printer or network printer with manual settings«.
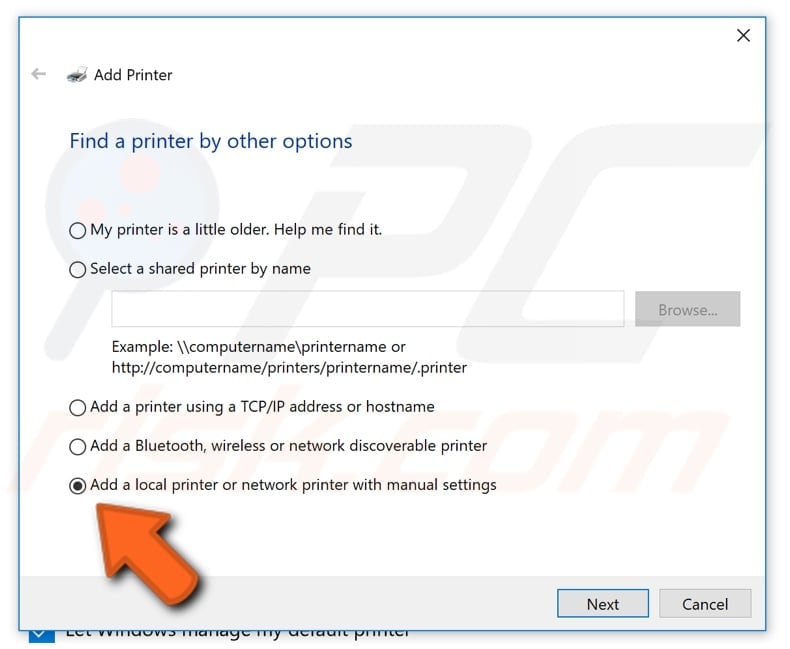
In the next window, choose between two options: «Use an existing port» and «Create a new port«. Choose the first one and then choose «FILE: (Print to File)» and click next.
After clicking next button you will see another window in which you need to choose the manufacturer and the printer. Scroll down to find «Microsoft» as manufacturer and «Microsoft Print To PDF» as the printer. Choose both and then click next.
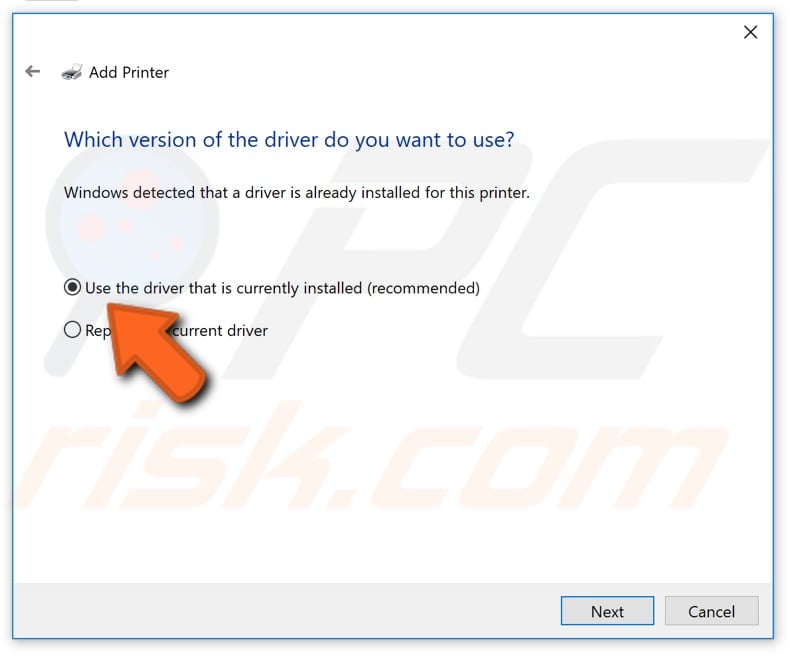
In the new window, Windows will ask you which driver version you want to use — if you want to use the driver that is currently installed or replace the current driver. As Windows recommends, choose the first «Use the driver that is currently installed» option and then click next.
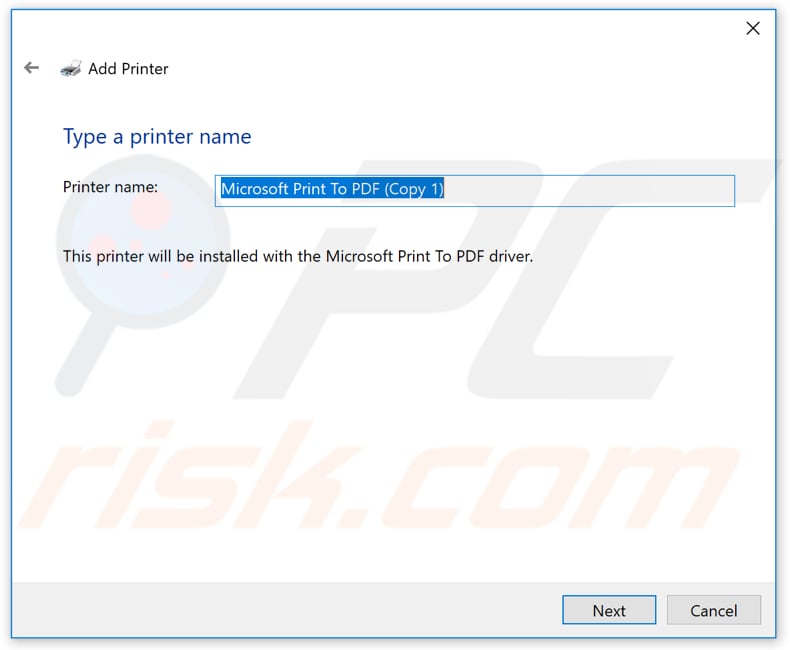
Then type a printer name. We suggest you leave the proposed name.
Windows will now install the «Microsoft Print to PDF» driver. When the installation is finished (which should take only a few seconds), you are ready to use your «Microsoft Print to PDF» function.
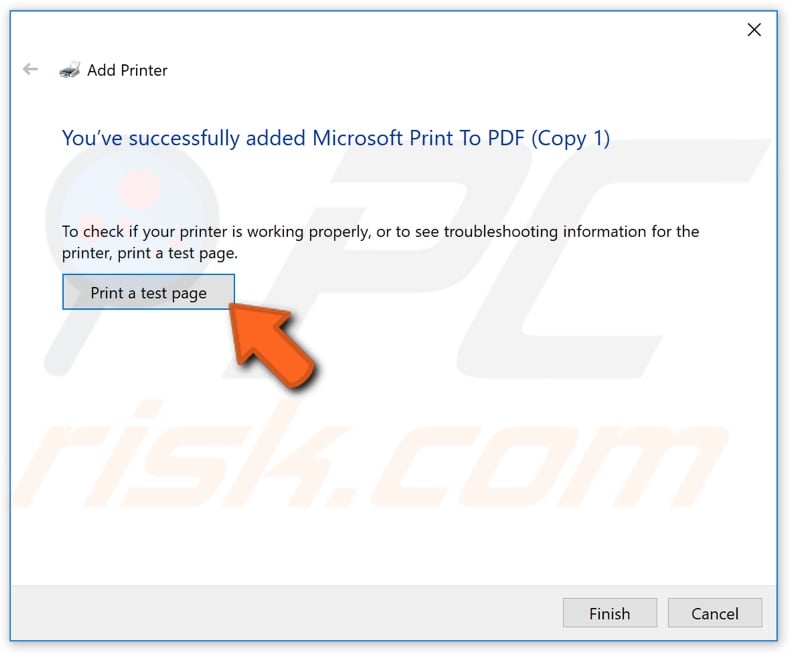
Before clicking «Finish» on the last dialog box, you can print a test page.
[Back to Table of Contents]
How to print to PDF in Windows 7 with installed PDF Printer?
If you install a PDF printer, you can print to PDF from any printable Windows application that has a print dialog. The installed program adds a virtual printer to your operating system printers list. We are going to use CutePDF Writer as an example.
Download and install CutePDF Writer (you can easily find it on Google, and it is free). After the install is finished, you can start printing your documents to PDF. Select a document you want to print and choose the print option as you normally would. When a new window with a list of printers pops up, choose CutePDF Writer printer and click print.

Then name your new document, choose a file saving destination, and click «Save«.
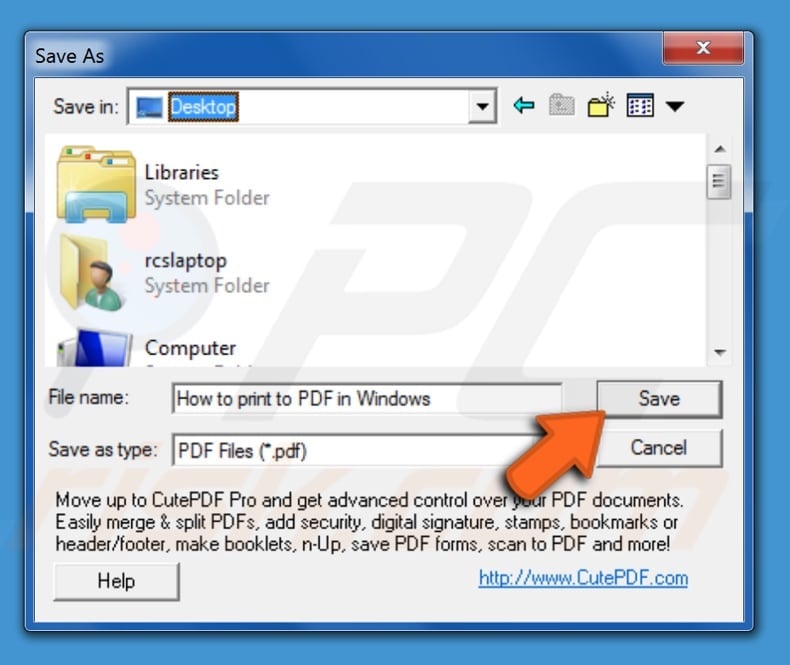
Your PDF is ready.
[Back to Table of Contents]
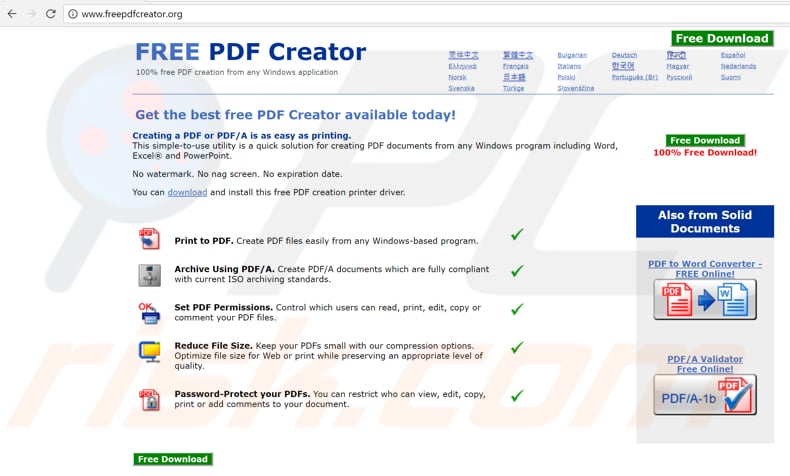
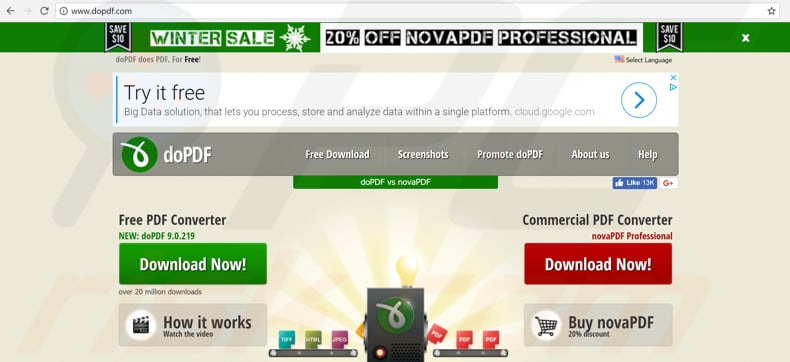
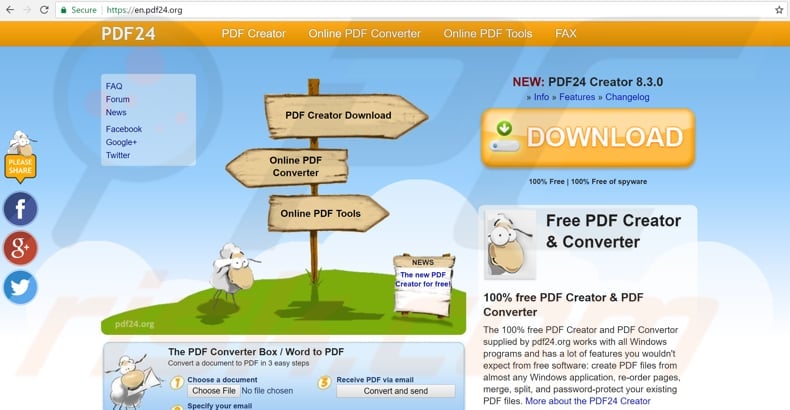
There are other PDF writers on the internet for you to try. Here are some alternatives:
Solid PDF Creator (http://www.freepdfcreator.org/)
DoPDF (http://www.dopdf.com/)
PDF24 PDF Creator (https://en.pdf24.org/)
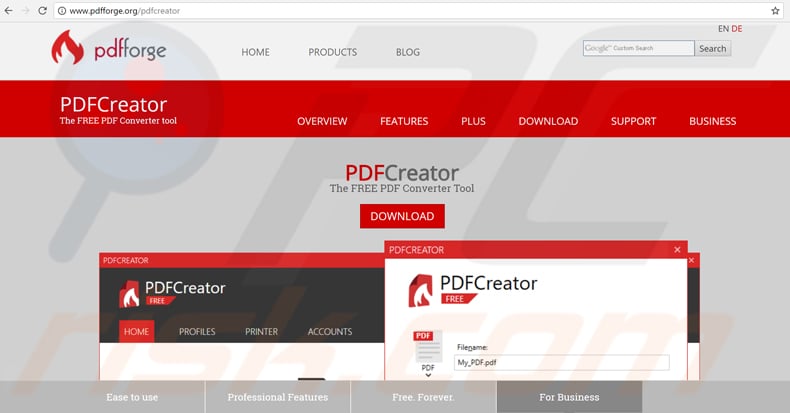
FreePDF (http://pdfforge.org/)
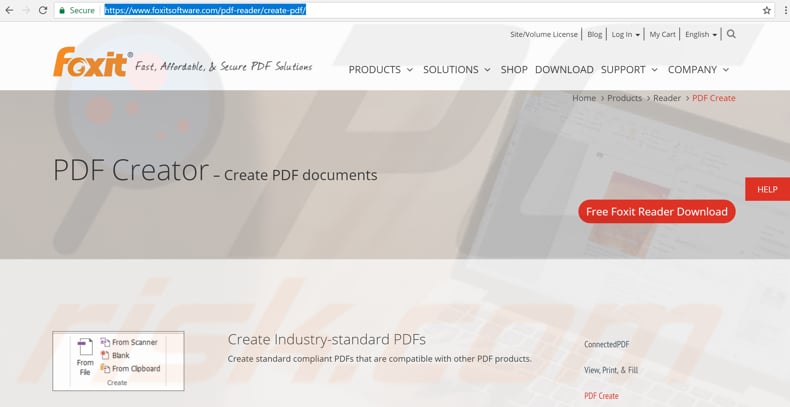
Foxit PDF (https://www.foxitsoftware.com/pdf-reader/)
[Back to Table of Contents]
Print to XPS and convert to PDF
If you use Windows 7 or 8, you can always choose «Microsoft XPS Document Writer» as a printer and later convert the XPS file to a PDF file.
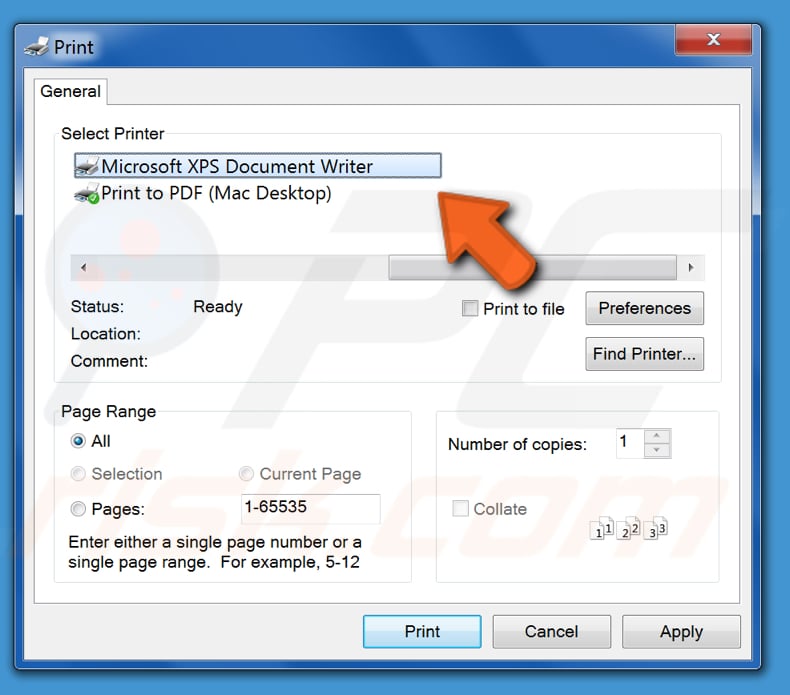
After choosing this printer, click «Print«, and a new window will pop up asking you how and where you want to save your XPS file. Type a name, choose a file destination, and then click «Save«.
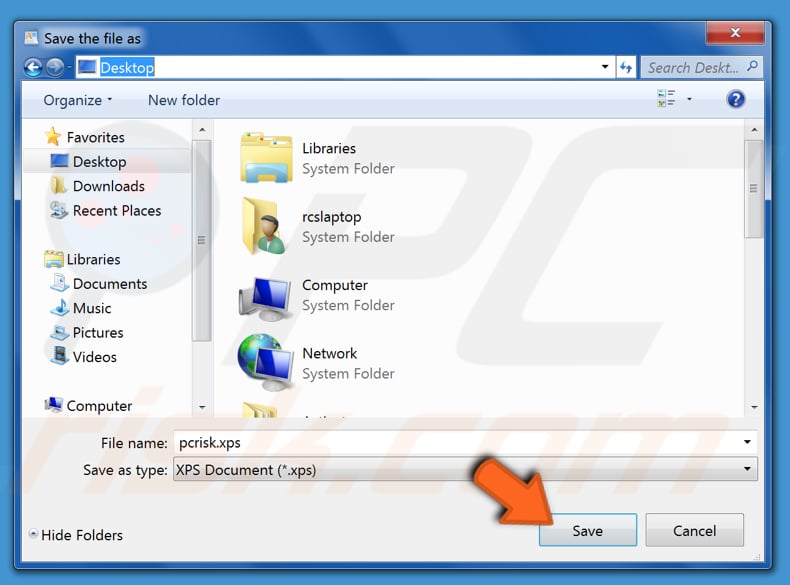
When you have your XPS file, you can convert it using an online converter such as XPS2PDF or print it to a PDF document on a computer with a PDF printer installed — this will print your XPS to PDF, both files with identical contents.
We hope this tutorial helped you learn all you need to know about printing your documents (or other files) to PDF.
[Back to Top]