
Все способы:
- Шаг 1: Установка JRE
- Шаг 2: Скачивание и распаковка Maven
- Шаг 3: Добавление переменной среды
- Шаг 4: Проверка доступности Maven
- Вопросы и ответы: 2
Шаг 1: Установка JRE
Фреймворк управления сборками пакетов Maven относится к Java, поэтому возможность его работы в Windows 10 обеспечена JRE. Перед инсталляцией основного пакета нужно скачать последнюю версию Java, установить ее на компьютер, а также добавить переменную среды. Только после этого можно переходить к следующим этапам, поэтому если ранее вы не инсталлировали JDK или JRE, начните с данной инструкции.
Скачать JRE с официального сайта
- Откройте ссылку выше и выберите офлайн-инсталлятор JRE в соответствии со своей разрядностью Windows 10.
- Сразу же начнется скачивание исполняемого файла, а вам нужно дождаться завершения этого процесса и запустить установщик.
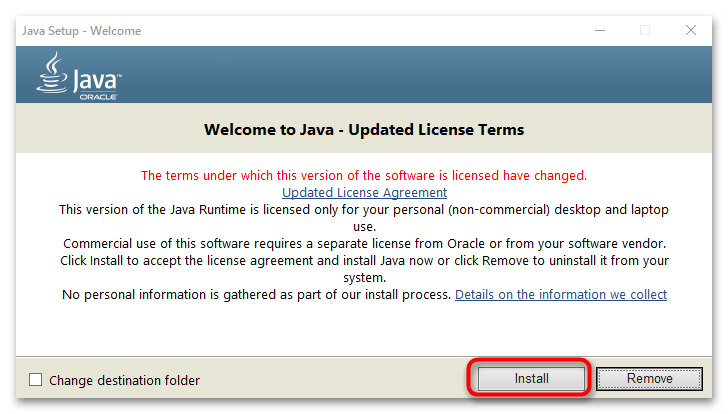
- В нем не меняйте путь инсталляции и другие параметры, просто нажмите кнопку «Install».
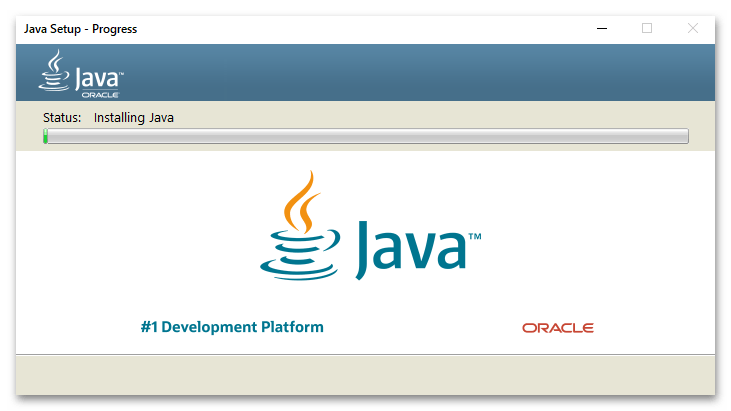
- Ожидайте окончания установки или обновления всех компонентов, после чего просто закройте данное окно.
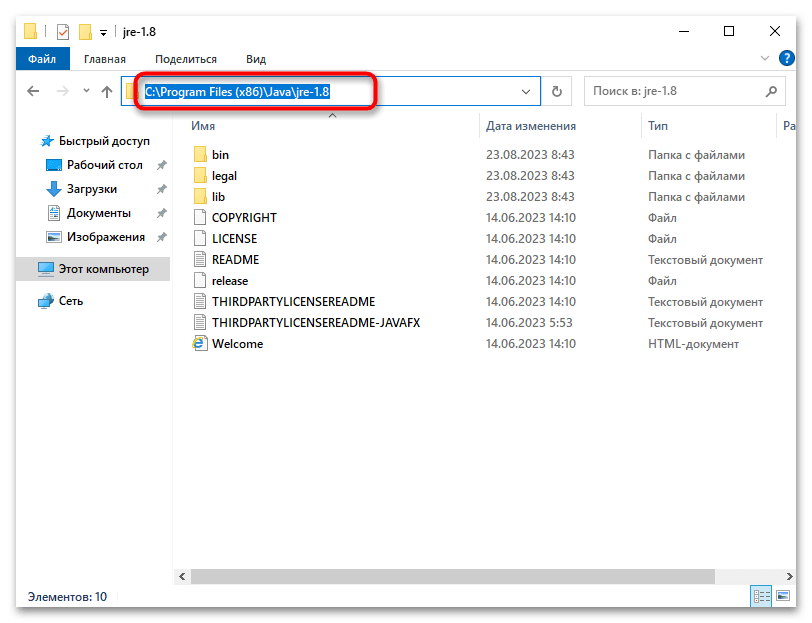
- Откройте «Проводник» в любом удобном месте и перейдите по пути установки Java. Обычно для этого нужно выбрать каталог «Program Files (x86)» в системном разделе накопителя. Этот путь нужно полностью скопировать, включая саму папку с версией JRE, поскольку далее он понадобится при добавлении переменной среды.
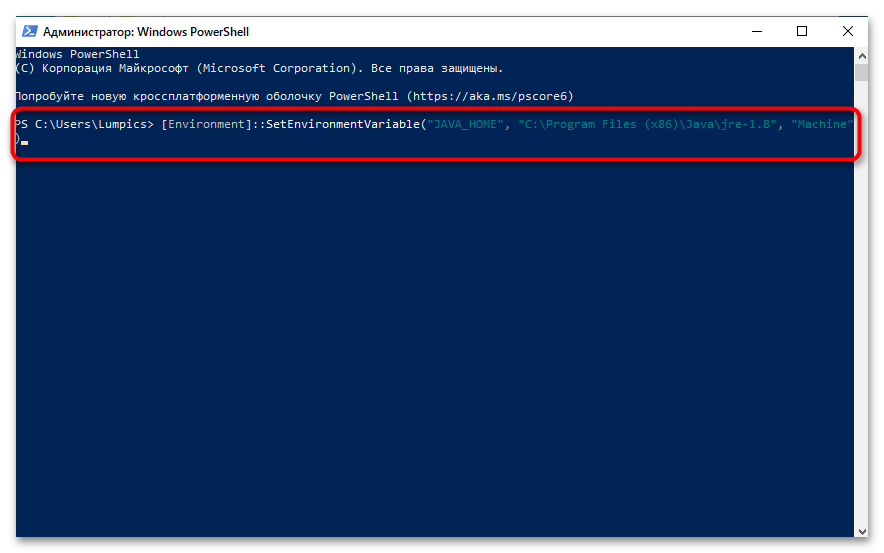
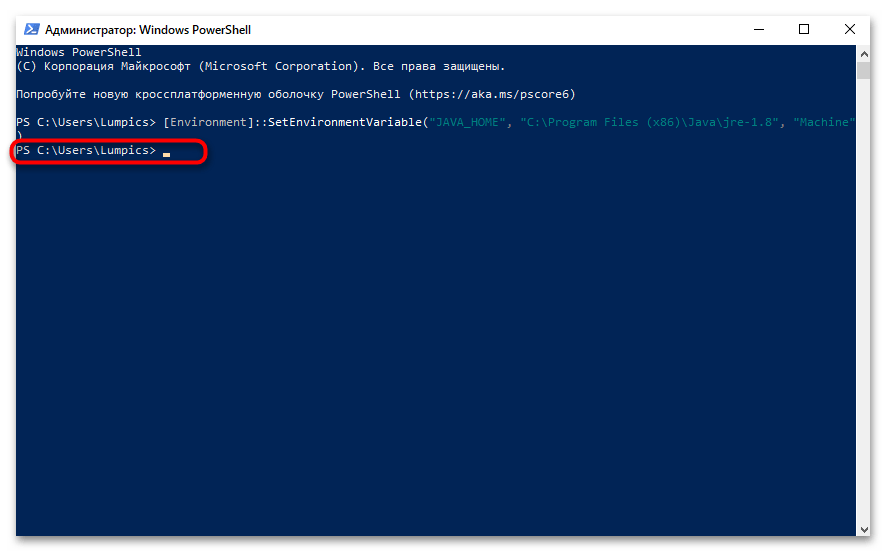
- В этот раз мы пропишем переменную среды при помощи «PowerShell», чтобы вы понимали, как в будущем можно использовать инструмент. Однако мы еще обратимся к этой настройке через графический интерфейс, и вы всегда сможете выбирать один из двух методов, отталкиваясь от своих предпочтений. Нажмите правой кнопкой мыши по «Пуску» и из появившегося контекстного меню выберите пункт «Windows PowerShell (администратор)».
- Введите команду
[Environment]::SetEnvironmentVariable("JAVA_HOME", "C:\Program Files\Java\jre-1.8", "Machine"), заменив при этом в ней путь до своей версии JRE. Эта команда автоматически регистрирует новую переменную окружения среды, указывая для нее название и путь. - После активации вы должны просто получить пустую строку нового ввода, что означает успешное завершение предыдущей операции без ошибок.
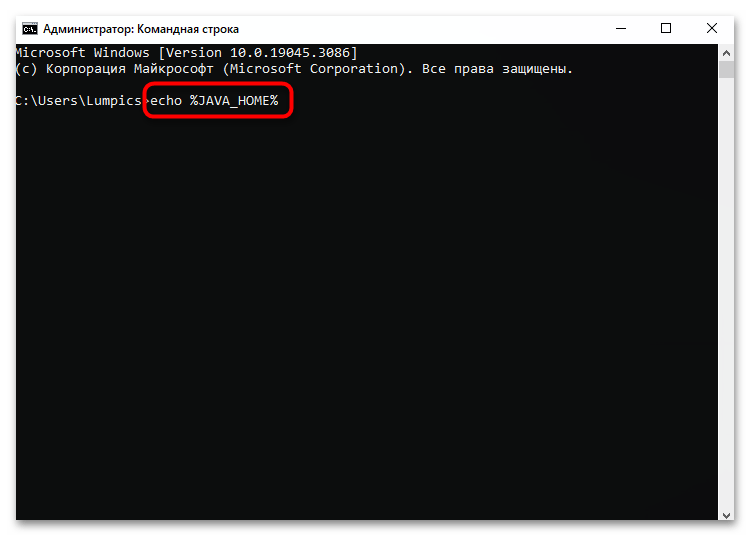
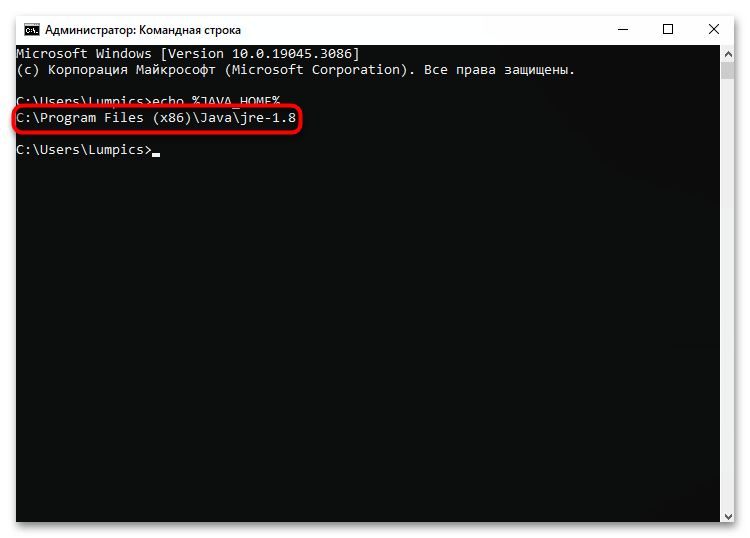
- Для проверки успешности добавления переменной среды можете открыть «Командную строку» любым удобным для вас методом и использовать команду
echo %JAVA_HOME%. - Вы должны получить в выводе путь к вашей JRE, что означает успешную работу переменной.


Точно также вы можете использовать команду "%JAVA_HOME%"\bin\java -version для проверки Java-приложения. Это актуально в тех случаях, когда осуществляется первичная проверка работы всех компонентов. Вывод такой команды должен иметь примерно следующий вид:
java version "1.8.0_251"

Java(TM) SE Runtime Environment (build 1.8.0_251-b08)

Java HotSpot(TM) 64-Bit Server VM (build 25.251-b08, mixed mode)
И еще отдельно можно проверить Java-приложение без обращения к переменной среды. В этом случае команда имеет простой вид и наверняка известная многим — java -version. Ее вывод, если все работает корректно, будет примерно таким же, каким вы видите его ниже с отличием в версии установленных компонентов.
java version "1.8.0_251"

Java(TM) SE Runtime Environment (build 1.8.0_251-b08)

Java HotSpot(TM) 64-Bit Server VM (build 25.251-b08, mixed mode)
Шаг 2: Скачивание и распаковка Maven
Maven скачивается в Windows 10 в виде репозитория, то есть не имеет установщика через EXE-файл. Полученный архив необходимо будет просто распаковать в подходящее для него место на компьютере, которое далее будет использоваться для работы с бинарными файлами проекта. Если вы пока еще только проводите знакомство с фреймворком и его основными функциями, можете прочитать все основные сведения на официальном сайте. После этого приступайте непосредственно к скачиванию и распаковке необходимых файлов.
Скачать Maven с официального сайта
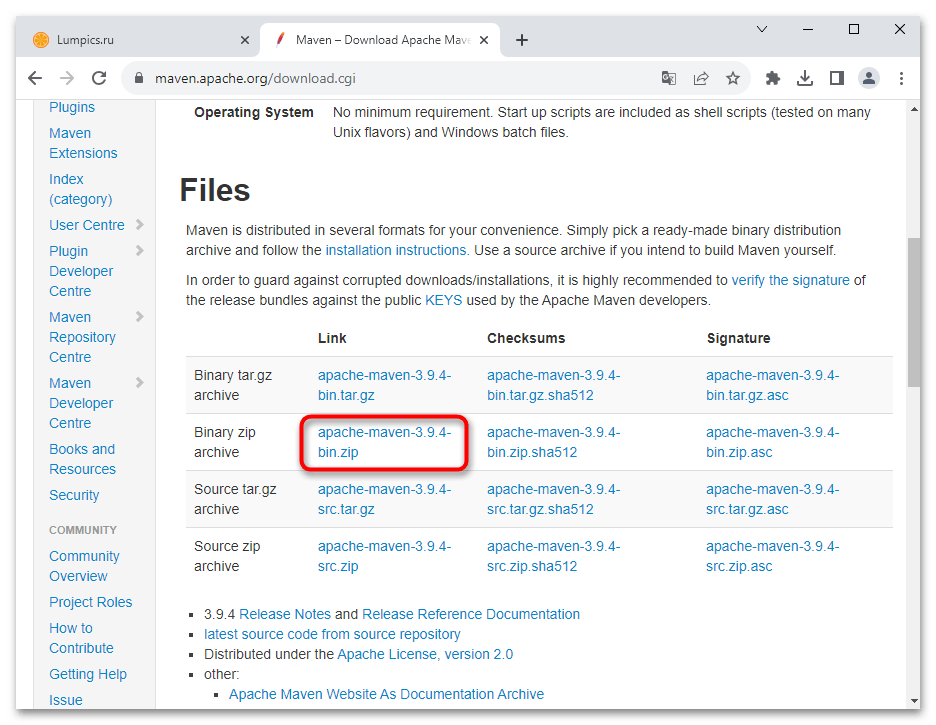
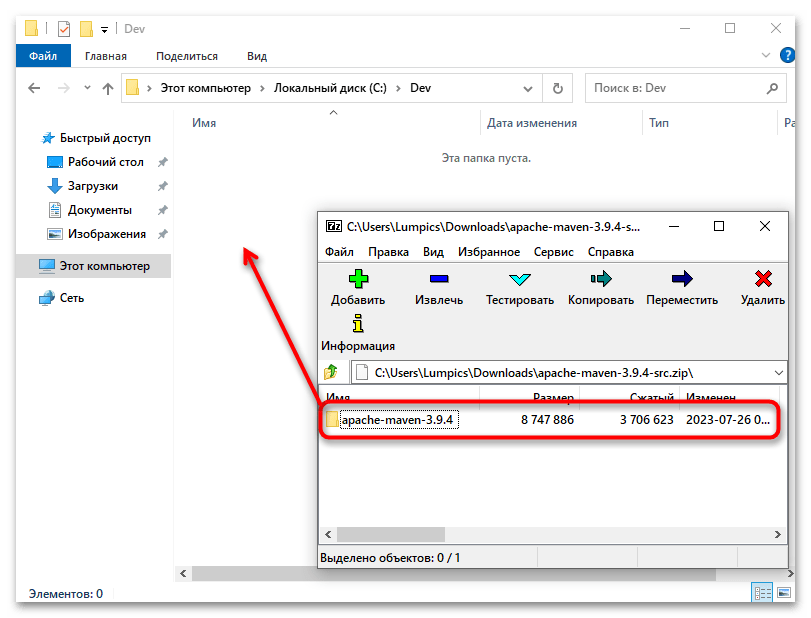
- Перейдите по ссылке выше, чтобы попасть в хранилище файлов. В нем скачайте бинарный ZIP-архив, кликнув по ссылке с соответствующим названием. Учитывайте, что TAR.GZ в вашем случае не подходят, поскольку это архивы для Linux, а Source предназначается для других целей.
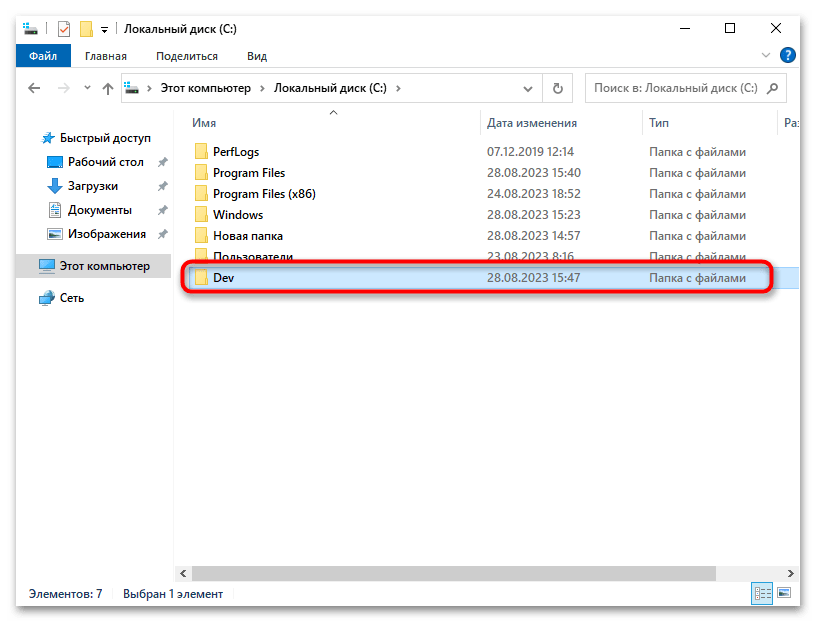
- После загрузки архива создайте новую папку, желательно в системном разделе диска, куда в дальнейшем будете помещать все связанные с Maven каталоги.
- Как раз в такую папку и переместите содержимое полученного архива. Дальнейшая установка не требуется, поэтому можно сразу перейти к регистрации переменных среды.
Шаг 3: Добавление переменной среды
Для дальнейшей корректной работы Maven в Windows 10 понадобится добавить переменную среды. Если вы хорошо управляетесь консолью и в первом шаге без проблем разобрались с командой для работы с переменными, можете использовать ее же, заменив необходимую информацию. Однако в большинстве случаев проще открыть графическое меню и в несколько нажатий изменить основную переменную среды, добавив в нее всего один путь.
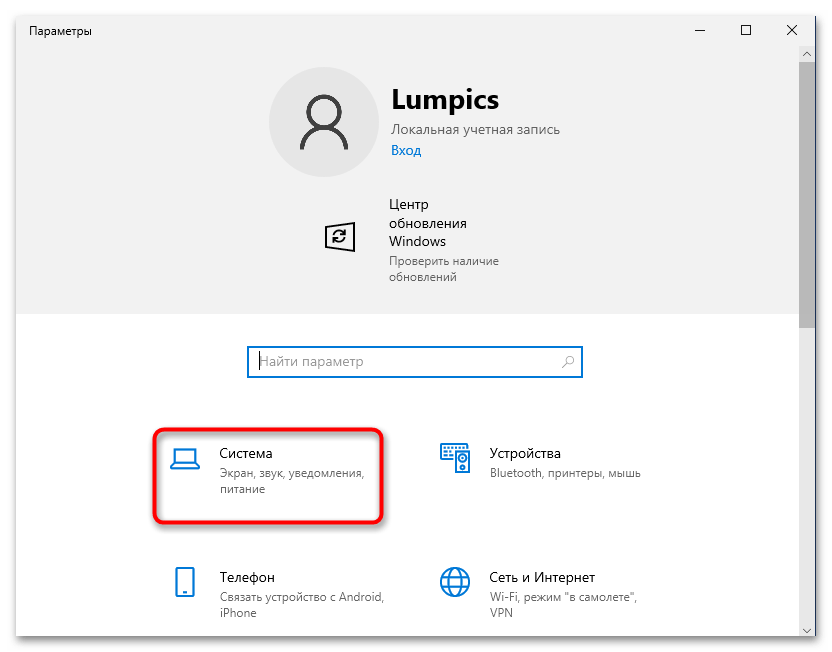
- Для этого откройте «Пуск» и на панели слева нажмите по значку с шестеренкой, чтобы перейти в «Параметры».
- Щелкните по плитке с названием «Система».
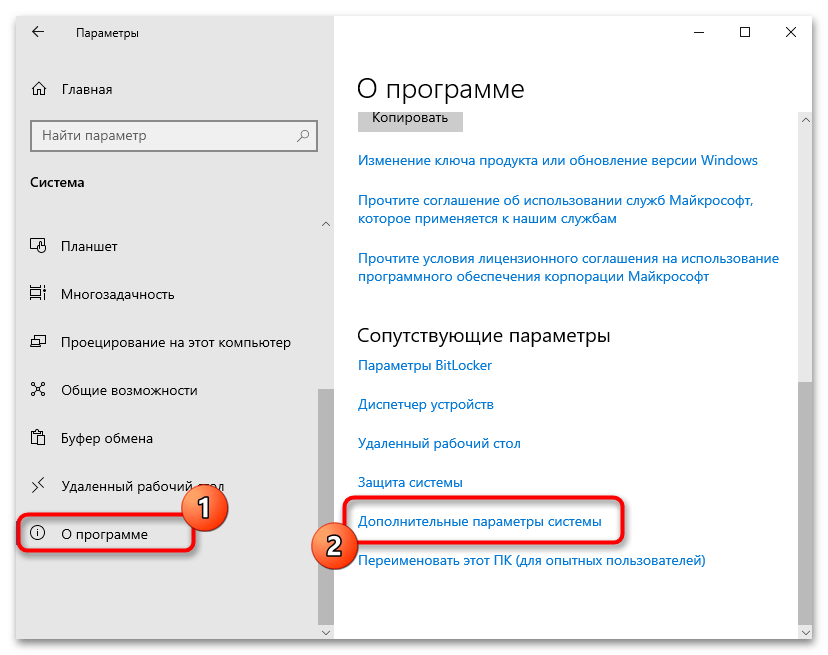
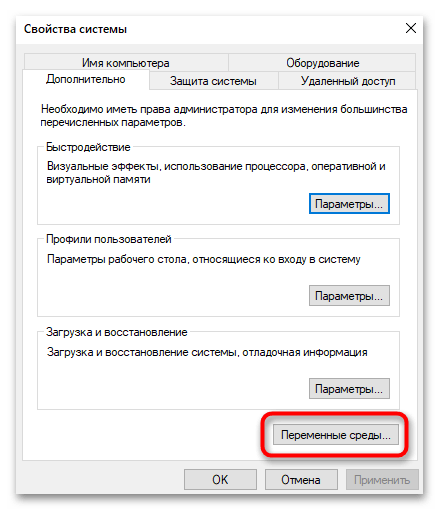
- Прокрутите список категорий слева вниз, выберите «О программе», затем перейдите по ссылке «Дополнительные параметры системы», отыскав ее в блоке «Сопутствующие параметры».
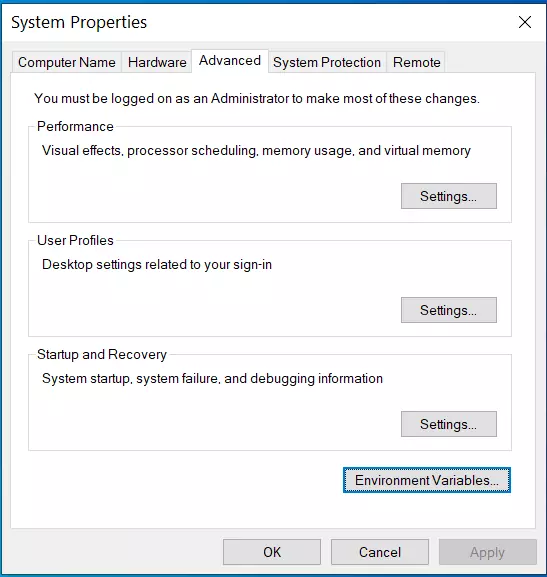
- Отобразится новое окно — «Свойства системы». В нем вы сразу окажетесь на вкладке «Дополнительно», поэтому можете щелкнуть по «Переменные среды» для перехода к работе с этими компонентами.
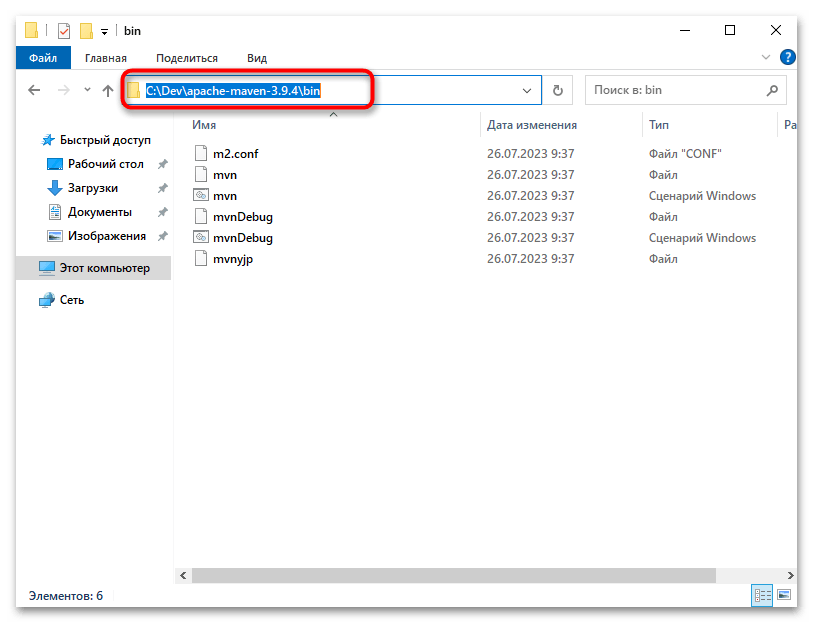
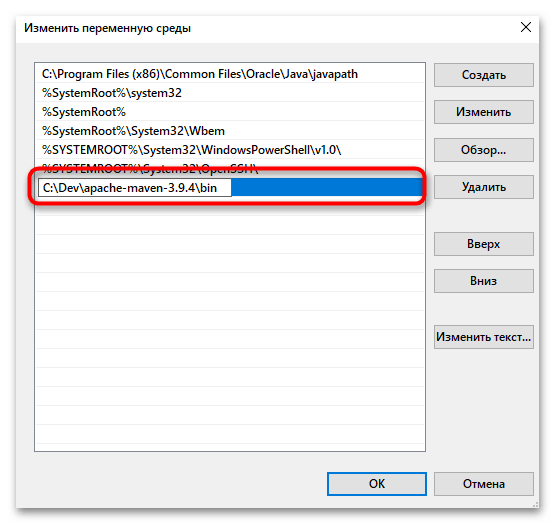
- Отдельно откройте папку «bin» в созданном каталоге с Maven и скопируйте полный путь.
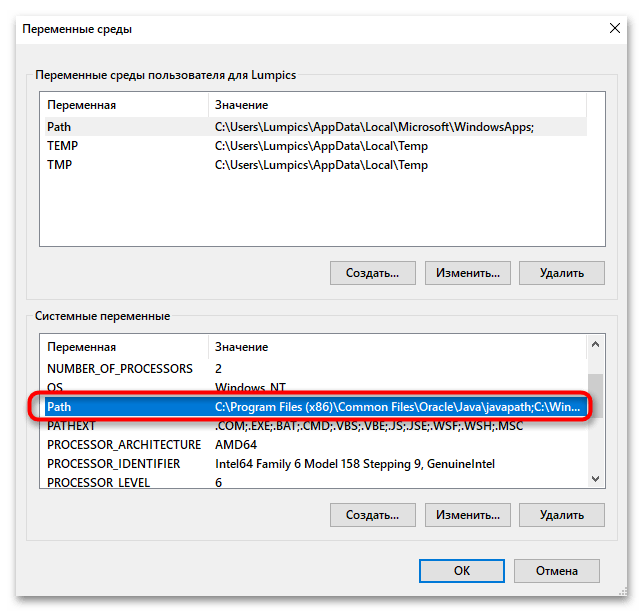
- В списке «Системные переменные» дважды нажмите по «Path» для перехода к редактированию этой переменной.
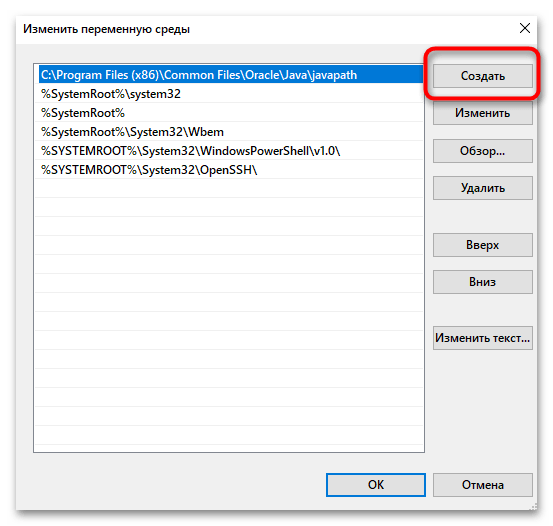
- Кликните по «Создать».
- Внизу появится новая строка ввода, куда вставьте скопированный ранее путь. На этом создание завершено, можете сразу переходить к проверке доступности Maven или сначала перезагрузить компьютер, если сомневаетесь, что изменения сразу вступят в силу.
Шаг 4: Проверка доступности Maven
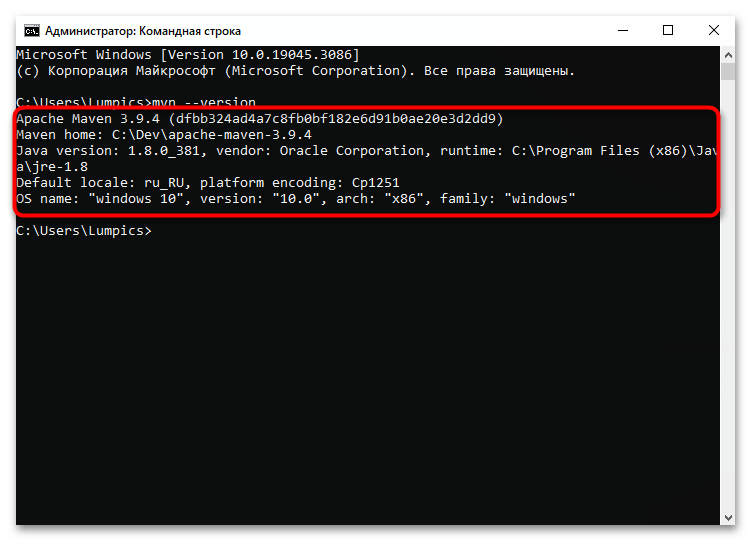
Конечно, если вы уверены в правильности выполнения всех действий, можете прямо сейчас переходить к работе с фреймворком, однако лучше перестраховаться и заранее проверить успешность его установки. Проверяется она через основную команду фреймворка, которая выводит информацию об установленной версии.
- Для ее использования запустите «Командную строку».
- Введите
mvn --versionи нажмите Enter. - Вывод должен быть примерно таким:
Apache Maven 3.9.4 (r01de14724cdef164cd33c7c8c2fe155faf9602da; 2023-02-19 15:51:28+0200)

Maven home: T:\apache-maven-3.9.4\bin\..

Java version: 1.8.0_65, vendor: Oracle Corporation

Java home: C:\Program Files\Java\jdk1.8.0_65\jre

Default locale: ru_RU, platform encoding: Cp1251

OS name: "windows 10", version: "10.0", arch: "x86", family: "windows"


Следующие этапы уже связаны непосредственно с конфигурацией Maven под собственные цели. Сюда относятся: создание основного каталога хранение создаваемых файлов, дополнительные переменные среды и еще некоторые папки. Обо всем этом лучше прочитать в официальной документации, отталкиваясь от того, чем именно вы собираетесь заниматься с использованием Maven.
Официальная документация по настройке Maven
Наша группа в TelegramПолезные советы и помощь
Last Updated :
04 Jan, 2025
Apache Maven is an automation tool. The tool is written in Java. It was initially released on 13 July 2004. It is developed by the Apache software foundation. It is part of the Jakarta Project. It is working on two aspects: how software is built, and its dependencies. It was created by Jason van Zyl. It is built by using a plugin-based architecture that allows it to make the use of any application controllable by standard input. It dynamically downloads Java libraries.
How to Install Maven on Windows
Follow the below steps to install Apache Maven on Windows:
Step 1: Download Maven Zip File and Extract

1. Click on the Download button.

2. Click on the apache-maven-3.8.4-bin.zip button.

3. Now check for the executable file in downloads in your system
4. Now right-click on the file and click on extract here to extract the file.
5. After extracting, you get the extracted folder.
6. Now copy the extracted folder.

7. Now paste the copy folder in your windows drive in the Program files folder.

8. Now the Permission Windows appears to paste the folder in program files then click on “Continue”.

9. Now open the folder apache maven.

10. Now after opening the folder then copy the address of the folder in program files.

Step 2: Add MAVEN_HOME System Variable
1. Now click on Start Menu and search “Edit the system environment variables” and open it.

2. After opening System, Variable New window appears, and click on “Environment Variables…”

3. Now click on New under user variable.

4. Now you can write any variable name and then paste the address we copy from program files in the variable value and then click on OK.

Step 3: Add MAVEN_HOME Directory in PATH Variable
1. Now go to the “System variables” Path option and double click on Path or Click on the Edit button.

2. Now click on New Button.

3. After New Paste the address we copy from program files to new.

4. After pasting the address add the \bin in the last and then click on OK.

5. Now click on the OK button.

6. Click on the OK button.

Step 4: Verify Maven Installation
1. Now your Apache Maven is installed on your computer. You may check by going to the “Start” menu typing Command Prompt. Open it.

2. When the Command Prompt opens, type mvn -version and click the enter button on the keyboard.

3. Now command prompt shows the version of Apache Maven installed on your windows.

You have successfully installed Apache Maven on your Windows 10 system.
Setting up the Maven path on Windows 10 is a crucial step for anyone looking to leverage the powerful functionalities of Apache Maven, a popular project management and comprehension tool in the Java ecosystem. By configuring the Maven path, you ensure that your system can locate and execute Maven commands from any directory. In a nutshell, you’ll need to download Maven, extract it, and set the environment variables so Windows knows where to find it.
This tutorial will guide you through each step required to set the Maven path on Windows 10, ensuring your system can effectively utilize Maven’s capabilities for managing Java projects.
Step 1: Download Maven
First, download the latest Maven binary zip file from the official Apache Maven website.
Head over to the Apache Maven download page and look for the binary zip file under the «Files» section. Ensure you download the latest stable version to avoid compatibility issues.
Step 2: Extract the Downloaded File
Extract the downloaded Maven zip file to a convenient location on your computer.
After downloading, right-click the zip file and select ‘Extract All’. Choose a directory where you want Maven to reside. For example, you might opt for C:Program FilesMaven.
Step 3: Open Environment Variables Editor
Open the Environment Variables editor in Windows 10 by searching for «Environment Variables» in the Start menu.
Once in the Environment Variables window, you’ll be able to set the system and user variables.
Step 4: Add MAVEN_HOME Variable
Create a new environment variable named MAVEN_HOME and set its value to the path where Maven was extracted.
Click on «New» under System variables, name it MAVEN_HOME, and set the variable value to your Maven directory path (e.g., C:Program FilesMaven).
Step 5: Update the PATH Variable
Add the Maven bin directory to the system PATH variable.
Find the Path variable in the System variables section, click «Edit», then click «New». Add C:Program FilesMavenbin to the list and save your changes.
Step 6: Verify Maven Installation
Open Command Prompt and type mvn -v to verify that Maven is correctly installed.
If everything was set up properly, you should see the Maven version info along with other details about the Java version being used.
After you’ve completed these steps, your system will be able to locate and execute Maven commands from any directory, making project management smoother and more efficient.
Tips for Setting Maven Path in Windows 10
- Ensure Java is installed: Maven requires Java. Make sure Java is installed and the
JAVA_HOMEenvironment variable is set. - Use the latest version: Always download the latest stable version of Maven to benefit from the latest features and bug fixes.
- Double-check environment variables: A typo in the path or variable names can cause issues. Double-check your entries.
- Restart Command Prompt: After setting environment variables, restart Command Prompt to apply changes.
- Regular updates: Periodically check for Maven updates to keep your toolchain up to date.
Frequently Asked Questions
What is Maven used for?
Maven is a build automation tool used primarily for Java projects. It helps manage project dependencies, lifecycle, and documentation.
Do I need to set the JAVA_HOME variable?
Yes, Maven requires JAVA_HOME to be set to the JDK installation directory.
What if mvn -v doesn’t work?
Ensure that the MAVEN_HOME and Path environment variables are correctly set and restart Command Prompt.
Can I use Maven without setting the environment variables?
No, setting environment variables is essential for Maven to work properly on your system.
How can I update Maven?
Download the latest version from the Apache Maven website, extract it, and update the MAVEN_HOME and Path variables accordingly.
Summary
- Download Maven.
- Extract the downloaded file.
- Open Environment Variables Editor.
- Add MAVEN_HOME variable.
- Update the PATH variable.
- Verify Maven installation.
Conclusion
Setting the Maven path in Windows 10 is a straightforward process that can significantly enhance your Java development workflow. By ensuring the correct configuration of environment variables, you enable your system to efficiently utilize Maven for building, managing, and documenting Java projects.
It’s essential to keep your Maven installation up to date and regularly check your environment variables for accuracy. If you’re new to Maven, consider exploring its extensive documentation and community resources to get the most out of this powerful tool. Happy coding, and may your builds always succeed!
Matt Jacobs has been working as an IT consultant for small businesses since receiving his Master’s degree in 2003. While he still does some consulting work, his primary focus now is on creating technology support content for SupportYourTech.com.
His work can be found on many websites and focuses on topics such as Microsoft Office, Apple devices, Android devices, Photoshop, and more.
Setup MAVEN_HOME on Windows
This tutorial will set up Maven on the Windows 10 operating system. Maven depends on JDK, so make sure you have JDK installed on your computer. Setup involves downloading files, extracting them, and setting up the MAVEN_HOME environment variable.
Download Maven
Navigate to the following URL on a web browser:
- https://maven.apache.org/download.cgi
Download the zip archive file:
apache-maven-<version>-bin.zip
Extract the contents
Save the file on your computer.
Extract the contents to a favorable directory using 7zip or a similar utility.
- Download & Install 7-zip utility tool
For example, to c:\maven
Set MAVEN_HOME
MAVEN_HOME is an environment variable that should point to the install directory of the Maven tool setup. Some inbuilt scripts use this variable. It’s important to set up this variable for the smooth running of the Maven tool.
Ask Cortana or key in “Edit the system environment variables” in the search bar.

In the Advanced Tab >> Click on the Environment Variables… button.
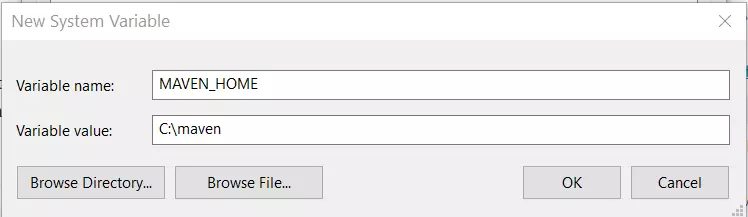
New Variable
Click on the New… button to create a new environment variable. Add a MAVEN_HOME variable and point it to the c:\maven directory. Click on the OK button.
Add the Maven bin folder to the PATH variable.
Select the PATH variable in the user variables. Click on the Edit… button.
Click on New and add %MAVEN_HOME%\bin to the PATH. Click on the OK button.
Verify the setup
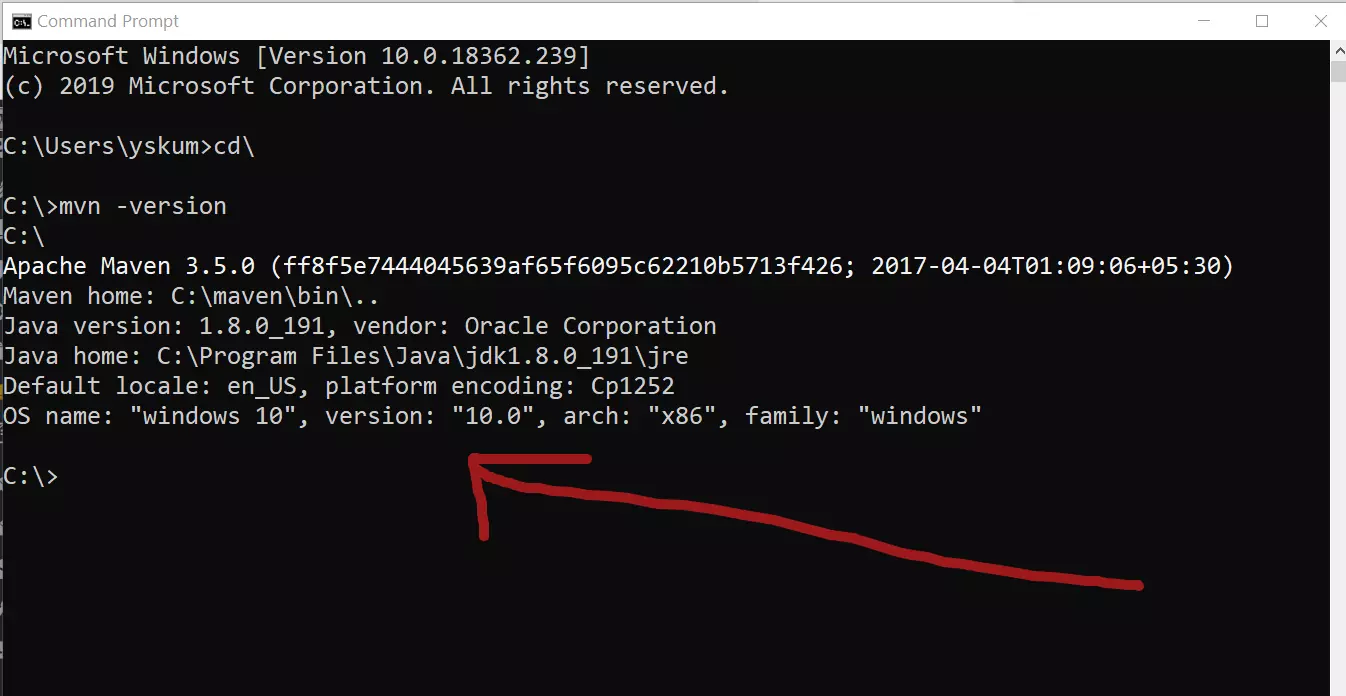
You can try a bunch of commands to verify the setup. To verify the maven setup, launch the command shell, and type
/> mvn -version
You should see the version information.
C:>mvn -versionC:
Apache Maven 3.5.0 (ff8f5e7444045639af65f6095c62210b5713f426;
2017-04-04T01:09:06+05:30)
Maven home: C:\maven\bin\..
Java version: 1.8.0_191, vendor: Oracle Corporation
Java home: C:Program FilesJavajdk1.8.0_191jre
Default locale: en_US, platform encoding: Cp1252
OS name: "windows 10", version: "10.0", arch: "x86", family: "windows"
To know that the MAVEN_HOME is set, issue the following command in the command prompt:
c:> echo %MAVEN_HOME%
The output should display the Maven folder path. We have set up MAVEN_HOME and added it to the PATH variable so that you can work from any directory path regardless of the Maven setup.
Maven Tutorials
Maven Tutorials on this website can be found at:
- https://www.testingdocs.com/apache-maven-tutorial/
Apache Maven is a software project management and comprehension tool. It’s not pre-installed software with any Operating System, explicitly we need to download and install it. In this article, we are going to download Maven for Windows and install Maven on Windows 10 (64-bit) operating system.
Table of Contents
Software Dependency
- Apache Maven 3.6.3
- JDK 1.8
- Windows 10
Steps to install Maven in Windows 10:
- Install JDK
- Download Apache Maven
- Configure JAVA_HOME and M2_HOME in the environment variable
- Set the maven path in the environment variable
- Check Maven Installation
Install JDK (Java Development Kit)
In order to install Maven software, it required Java. So make sure that your system already has JDK installed. If it’s not installed, then you have to install JDK first. Visit another article for this: JDK installation on Windows 10 operating system.
For Example: jdk1.8.0_144 is installed at ‘C:\Program Files\Java\jdk1.8.0_144’
Download Maven for Windows
To install apache maven on Windows, you need to download Maven for Windows. You can download it from its official website: Download Apache Maven. For example, here we have downloaded the apache-maven-3.6.3-bin.zip as shown in the below image:

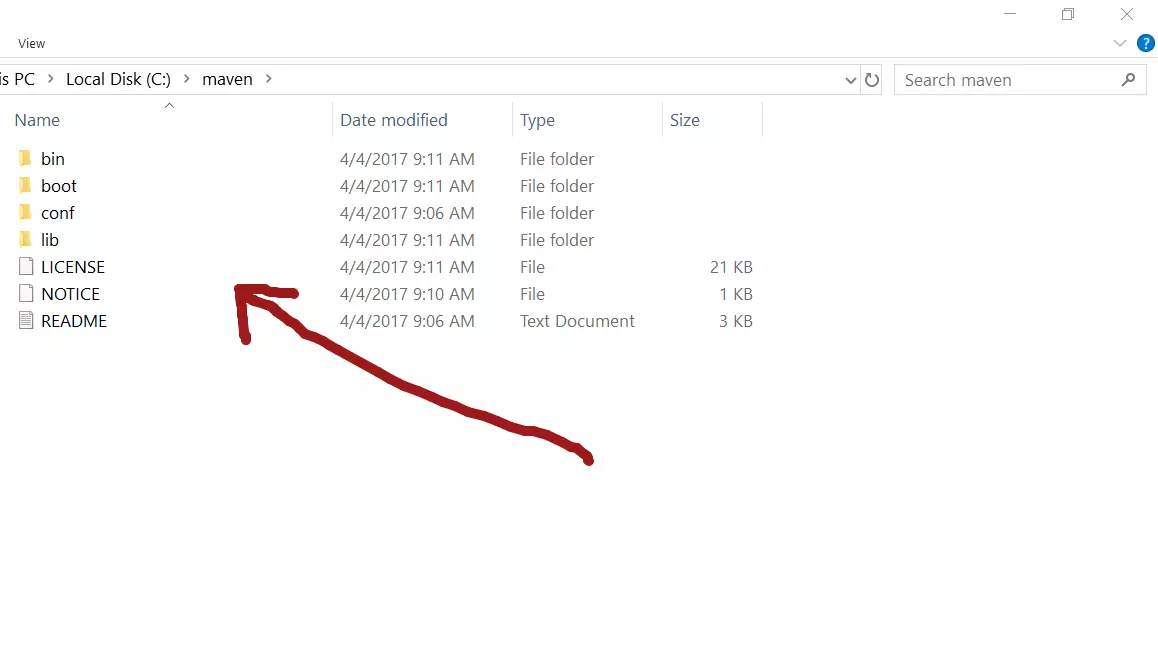
Now extract the downloaded zip files into some folder. The extracted file looks like the below image:

Set maven path in an environment variable in Windows 10
We have to configure two environment variables JAVA_HOME and M2_HOME in Windows. JAVA_HOME is used by many Java-based applications to define the place of Java Runtime Environment (JRE) installation. And M2_HOME is used by Maven, and again it tells the program where to find Maven installation. These configurations need to be added to System Environment Variables.
System Environment Variables path:
Right click on MyComputer -> properties -> Advanced System Settings -> Environment variables

Now click on the Environment Variables button > add JAVA_HOME & M2_HOME one by one like the below images:


Set maven path in Windows 10
The Path variable is used to find applications (executables, and scripts) and DLLs on Windows. If the Path variable is already there then click on Edit to add a Maven path like the below image:

How to check whether Maven is installed or not?
To verify whether Maven is installed or not, open the command prompt by pressing Window Key+R, type “cmd” and then press Enter Key.
After opening a command prompt type the maven command “mvn -version” then press Enter and see the below output:

This is how you can find out which version of Maven is installed in your system now.
Conclusion
In this article, you have seen how you download apache maven and install it on the Windows 10 operating system.
FAQ
mvn is not recognized as an internal or external command
C:\Windows\System32>mvn -version'mvn' is not recognized as an internal or external command, operable program or batch file.
This means that the installation of maven is not done properly, make sure %M2_HOME%\bin is prepended to the PATH variable the right way.
JAVA_HOME environment variable is not defined correctly
C:\Windows\System32>mvn -versionThe JAVA_HOME environment variable is not defined correctly This environment variable is needed to run this program NB: JAVA_HOME should point to a JDK not a JRE
This simply means that JDK is not installed and the JAVA_HOME variable is not properly configured.
Related Article:
- JDK 8 Installation on Windows 10 Operating System
- How to Download and Install JDK 11 on Windows 10?
- JDK 17 Installation on Windows 10 [step-by-step]
- Install MySQL Server 8.0.27 [zip Archive] on Windows 10
- Install MySQL Workbench 8.0.27 on Windows 10[step-by-step]
You may also like:
- Creating a Spring Boot Project with Eclipse and Maven
- File Upload in Java Servlet Example
- How to write Excel files in Java using Apache POI?
- How to create password-protected Excel in Java?