
Элемент PictureBox в C# Windows Forms предоставляет удобный способ отображения изображений в графическом интерфейсе пользователя. Он позволяет загружать, отображать и манипулировать изображениями, что делает его незаменимым инструментом для разработки приложений, где требуется работа с графикой. В этой статье мы рассмотрим основные аспекты использования PictureBox, включая загрузку изображений, их отображение и базовые манипуляции.
Основные возможности PictureBox
PictureBox предоставляет следующие основные возможности:
- Отображение изображений: Загрузка и отображение изображений из файлов или ресурсов.
- Масштабирование: Изменение размера изображения для подгонки под размеры PictureBox.
- Рисование на изображении: Использование графических методов для рисования поверх изображения.
- События: Обработка событий, таких как щелчки мыши на изображении.
Загрузка и отображение изображений
Чтобы отобразить изображение в PictureBox, вы можете загрузить его из файла или ресурса. Вот пример загрузки изображения из файла:
public Form1()

{

    InitializeComponent();
// Загрузка изображения из файла
pictureBox1.Image = Image.FromFile("path_to_image.jpg");
// Масштабирование изображения
pictureBox1.SizeMode = PictureBoxSizeMode.StretchImage;
}
Масштабирование изображений
PictureBox поддерживает несколько режимов масштабирования изображений, которые определяют, как изображение будет отображаться внутри элемента:
- Normal: Изображение отображается в своем оригинальном размере.
- StretchImage: Изображение растягивается, чтобы заполнить весь
PictureBox. - AutoSize: PictureBox автоматически изменяет свой размер в соответствии с размером изображения.
- CenterImage: Изображение центрируется внутри PictureBox.
- Zoom: Изображение масштабируется с сохранением пропорций, чтобы поместиться в
PictureBox.
Пример использования масштабирования:
pictureBox1.SizeMode = PictureBoxSizeMode.Zoom;
Рисование на изображении
Вы можете использовать класс Graphics для рисования поверх изображения в PictureBox. Это полезно для добавления текста, линий или других графических элементов:
private void DrawOnImage()

{

    using (Graphics g = Graphics.FromImage(pictureBox1.Image))

    {

        // Рисование текста на изображении

        g.DrawString("Hello, PictureBox!", new Font("Arial", 20), Brushes.Red, 10, 10);

    }
// Обновление PictureBox для отображения изменений
pictureBox1.Refresh();
}
Обработка событий
PictureBox поддерживает различные события, такие как Click, MouseEnter, MouseLeave и другие. Вы можете использовать эти события для добавления интерактивности:
private void pictureBox1_Click(object sender, EventArgs e)

{

    MessageBox.Show("Изображение было нажато!");

}
Заключение
Элемент PictureBox в C# Windows Forms предоставляет мощные и гибкие возможности для работы с изображениями в графическом интерфейсе. С его помощью можно легко загружать, отображать и манипулировать изображениями, а также добавлять интерактивные элементы. Это делает PictureBox незаменимым инструментом для разработчиков, работающих с графикой в приложениях на платформе .NET.
Для большего понимания, рекомендую видеокурс Программирование на C# с Нуля до Гуру, в котором подробнее рассказано о C#
-
Создано 27.03.2025 09:33:12
-
Михаил Русаков
Копирование материалов разрешается только с указанием автора (Михаил Русаков) и индексируемой прямой ссылкой на сайт (http://myrusakov.ru)!
Добавляйтесь ко мне в друзья ВКонтакте: http://vk.com/myrusakov.
Если Вы хотите дать оценку мне и моей работе, то напишите её в моей группе: http://vk.com/rusakovmy.
Если Вы не хотите пропустить новые материалы на сайте,
то Вы можете подписаться на обновления: Подписаться на обновления
Если у Вас остались какие-либо вопросы, либо у Вас есть желание высказаться по поводу этой статьи, то Вы можете оставить свой комментарий внизу страницы.
Если Вам понравился сайт, то разместите ссылку на него (у себя на сайте, на форуме, в контакте):
-
Кнопка:
Она выглядит вот так:
-
Текстовая ссылка:
Она выглядит вот так: Как создать свой сайт
- BB-код ссылки для форумов (например, можете поставить её в подписи):
Последнее обновление: 31.10.2015
PictureBox предназначен для показа изображений. Он позволяет отобразить файлы в формате bmp, jpg, gif, а также метафайлы ищображений
и иконки. Для установки изображения в PictureBox можно использовать ряд свойств:
-
Image: устанавливает объект типа Image
-
ImageLocation: устанавливает путь к изображению на диске или в интернете
-
InitialImage: некоторое начальное изображение, которое будет отображаться во время загрузки главного изображения,
которое хранится в свойстве Image -
ErrorImage: изображение, которое отображается, если основное изображение не удалось загрузить в PictureBox
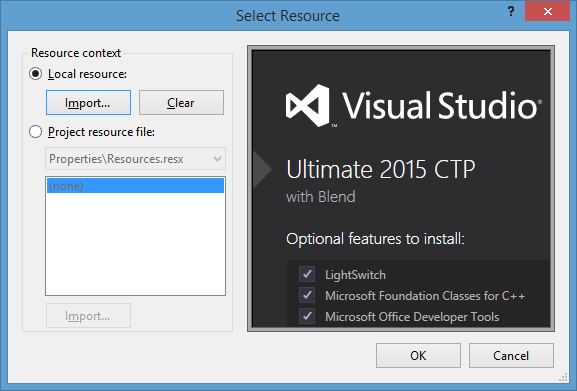
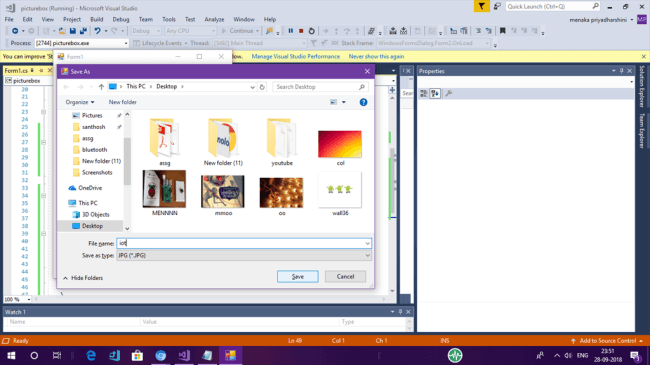
Чтобы установить изображение в Visual Studio, надо в панели Свойств PictureBox выбрать свойство Image. В этом случае нам откроется окно импорта изображения
в проект, где мы собственно и сможем выбрать нужное изображение на компьютере и установить его для PictureBox:
И затем мы сможем увидеть данное изображение в PictureBox:
Либо можно загрузить изображение в коде:
pictureBox1.Image = Image.FromFile("C:\Users\Eugene\Pictures\12.jpg");
Размер изображения
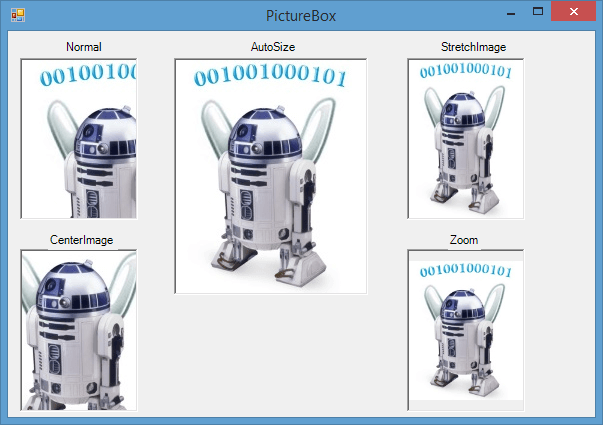
Для установки изображения в PictureBox используется свойство SizeMode, которое принимает следующие значения:
-
Normal: изображение позиционируется в левом верхнем углу PictureBox, и размер изображения не изменяется. Если
PictureBox больше размеров изображения, то по справа и снизу появляются пустоты, если меньше — то изображение обрезается -
StretchImage: изображение растягивается или сжимается таким обраом, чобы вместиться по всей ширине и высоте элемента PictureBox -
AutoSize: элемент PictureBox автоматически растягивается, подстраиваясь под размеры изображения -
CenterImage: если PictureBox меньше изображения, то изображение обрезается по краям и выводится только его центральная часть.
Если же PictureBox больше изображения, то оно позиционируется по центру. -
Zoom: изоражение подстраивается под размеры PictureBox, сохраняя при этом пропорции
Sign in to your MUO account

Windows Forms is a framework that lets you build desktop applications. You can click and drag components like buttons onto a visual user interface. It also helps you manually create various shapes within your code.
This article will show you how to add lines, shapes, and images to your application. This tutorial uses the Visual Studio 2019 Community Edition to show examples.
What Are the Built-In Classes Used for Drawing Graphics?
Windows Forms uses the C# programming language. Its built-in classes and methods allow you to draw various shapes onto a Windows Form canvas. These include the Graphics, Pen, Color, and Brush classes.
|
Class |
Description |
|---|---|
|
Graphics |
The Graphics class allows you to draw shapes and lines onto the canvas. It includes methods such as:
|
|
Pen |
The Pen class allows you to specify the properties of a ‘pen’ tip which you can use to draw your shapes. You can specify properties such as color, thickness, or dash style. Methods include:
|
|
Color |
A color object made up of R (red), G (green), and B (blue) values. You will need a color object for many of the built-in methods that create shapes. |
|
SolidBrush, HatchBrush, TextureBrush |
These brush classes derive from the «Brush» interface. These classes allow you to color in blank spaces on the canvas. You can also choose to fill the spaces using different patterns or textures. You can specify properties such as the color. |
|
Rectangle, Line, Polygon, Ellipse |
You can create objects based on these shapes, and use them when calling methods such as DrawRectangle(). Instead of passing the x, y, width, and height as arguments, you can choose to pass an existing Rectangle object instead. |
To view the source code for a running example of the above tutorial, visit the GitHub repository. You can try out the following examples once you’ve created a Winforms application.
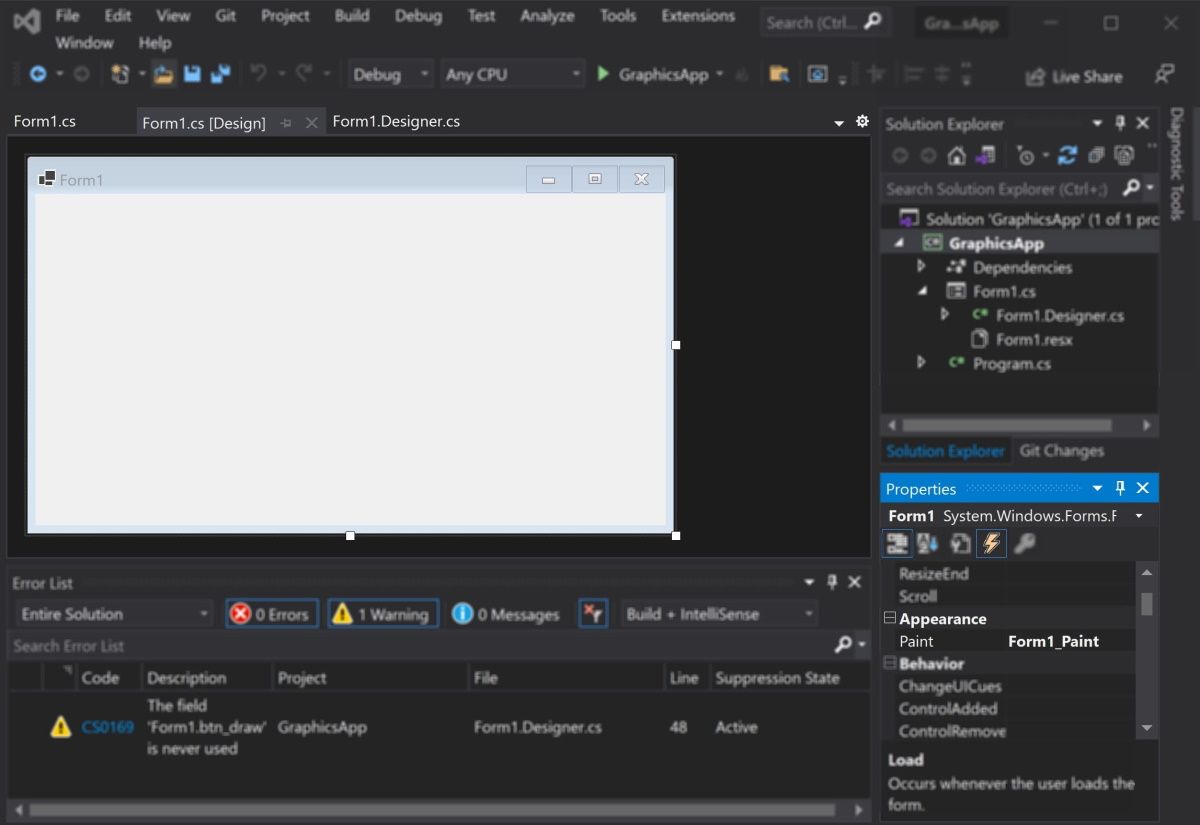
How to Add a Paint on Form Load Event Handler
First, add an event handler to draw shapes when the canvas loads.
-
Add a Paint function for the form.
        private void Form1_Paint(object sender, PaintEventArgs e)
{
    // Code goes here
} - Go into the Design View Tab.
- In the Properties window, select the lightning icon to open the «Events» tab.
-
In «Paint», under «Appearance», select the Form1_Paint function. This will execute the function when you run the application.

How to Draw Lines Onto a Windows Form Canvas
You can use a Color, Pen, and the DrawLine() method to draw lines on a canvas.
-
Inside the Form1_Paint() function, create a Color object with the color you want the line to be. Then, create a Pen object to draw the line with.
        Color black = Color.FromArgb(255, 0, 0, 0);
Pen blackPen = new Pen(black); -
The DrawLine() method from the Graphics class will draw a line using the pen. This will start drawing a line from an x, y position to another x, y position.
e.Graphics.DrawLine(blackPen, 300, 200, 800, 200); -
You can modify the properties for the pen object to change its width, dash style, and start or end cap.
        blackPen.Width = 20;
blackPen.DashStyle = System.Drawing.Drawing2D.DashStyle.Dash;
blackPen.StartCap = System.Drawing.Drawing2D.LineCap.ArrowAnchor;
e.Graphics.DrawLine(blackPen, 300, 200, 800, 200); -
Press the green play button at the top of Visual Studio to see the changes.


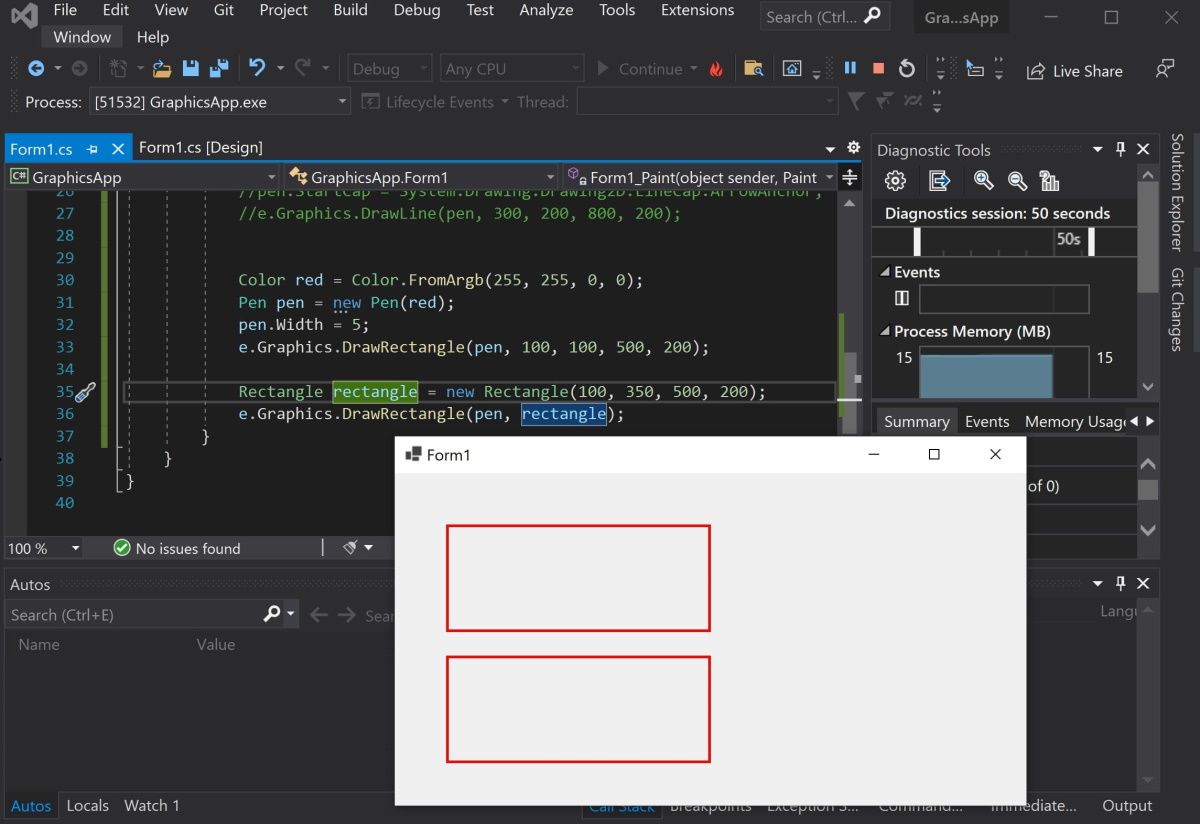
How to Draw Shapes Such as Rectangles and Circles
You can use the shapes classes for different shapes, or draw shapes manually onto the canvas.
-
Create a Color and Pen object as shown in the previous steps. Then, use the DrawRectangle() method to create the rectangle. The arguments are the x and y coordinates for the top-left of the rectangle, along with its width and height.
        Color red = Color.FromArgb(255, 255, 0, 0);
Pen redPen = new Pen(red);
redPen.Width = 5;
e.Graphics.DrawRectangle(redPen, 100, 100, 500, 200); -
You can also create a rectangle using the Rectangle Class. First, create a Rectangle object. The arguments are also the x and y coordinates for the top-left corner, width, and height.
Rectangle rectangle = new Rectangle(100, 350, 500, 200); -
Use the DrawRectangle() function to draw the rectangle. Instead of passing the x, y, width, and height like before, you can use the Rectangle object instead.
e.Graphics.DrawRectangle(redPen, rectangle); -
Press the green play button at the top of Visual Studio to see the changes.

-
Go back to the code to draw other shapes. Use the DrawEllipse() function to draw a circle.
        Color green = Color.FromArgb(255, 0, 255, 0);
Pen greenPen = new Pen(green);
greenPen.Width = 5;
e.Graphics.DrawEllipse(greenPen, 400, 150, 400, 400);
When you draw a circle, the x and y coordinates (x=400, y=150) refer to the top-left corner of the circle, not the center of the circle.

-
To draw other shapes such as triangles or hexagons, use the DrawPolygon() method. Here you can specify a list of coordinates to represent the points of the shape.
        Color blue = Color.FromArgb(255, 0, 0, 255);
Pen bluePen = new Pen(blue);
bluePen.Width = 5;PointF[] coordinatesForTriangle = new PointF[] {
    new PointF(400, 150),
    new PointF(300, 300),
    new PointF(500, 300)
};e.Graphics.DrawPolygon(bluePen, coordinatesForTriangle);
The DrawPolygon() method will draw lines between the points specified.


How to Use the Brush Class to Fill In Shapes With Color
You can use the FillRectangle(), FillEllipses() or FillTriangle() methods to create shapes with a solid color.
-
First, create a brush object.
        Color purple = Color.FromArgb(255, 128, 0, 0);
SolidBrush solidBrush = new SolidBrush(purple); -
Use the FillRectangle(), FillEllipses() or FillTriangle() methods. They work the same way as the draw functions above, except instead of a Pen, they use a Brush object.
        e.Graphics.FillRectangle(solidBrush, 50, 50, 200, 250);
e.Graphics.FillEllipse(solidBrush, 300, 50, 200, 200);
e.Graphics.FillPolygon(solidBrush, new PointF[] { new PointF(700, 150), new PointF(600, 300), new PointF(800, 300) });
-
You can also input a shape object directly instead of providing coordinates.
        Rectangle rectangle = new Rectangle(100, 350, 500, 200);
e.Graphics.FillRectangle(solidBrush, rectangle); -
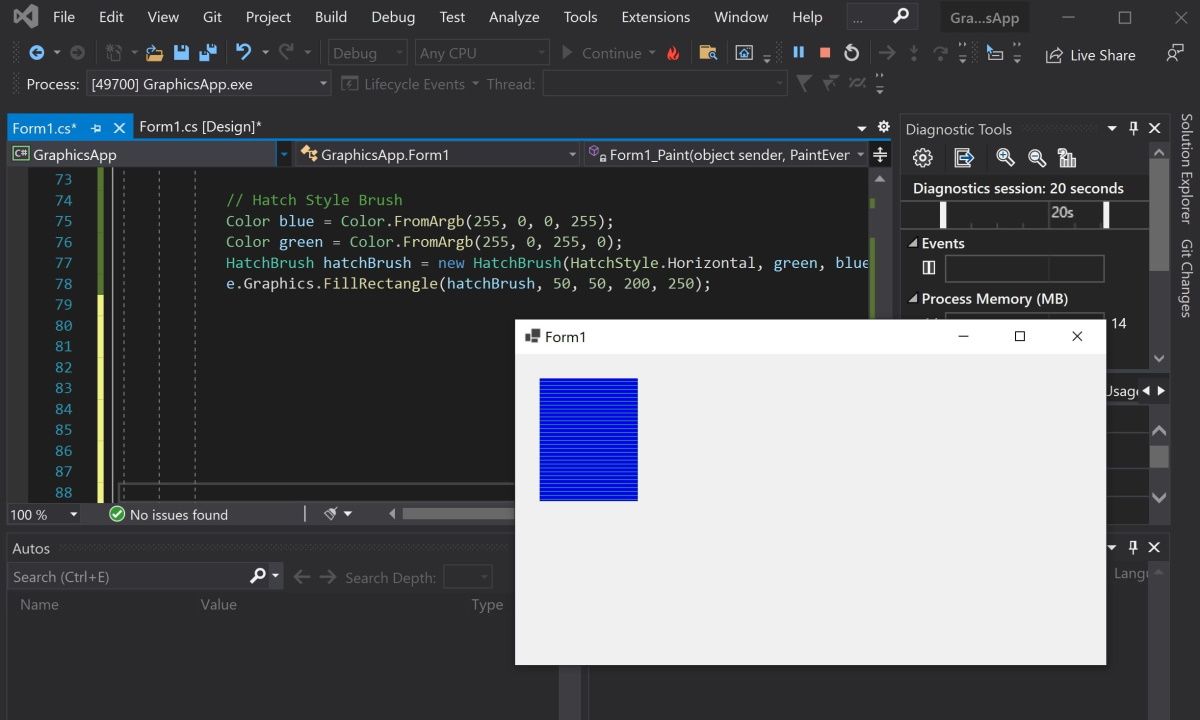
Use the HatchBrush to fill the shape using a different fill style, such as a horizontal or vertical pattern.
        Color blue = Color.FromArgb(255, 0, 0, 255);
Color green = Color.FromArgb(255, 0, 255, 0);
HatchBrush hatchBrush = new HatchBrush(HatchStyle.Horizontal, green, blue);
e.Graphics.FillRectangle(hatchBrush, 50, 50, 200, 250);
-
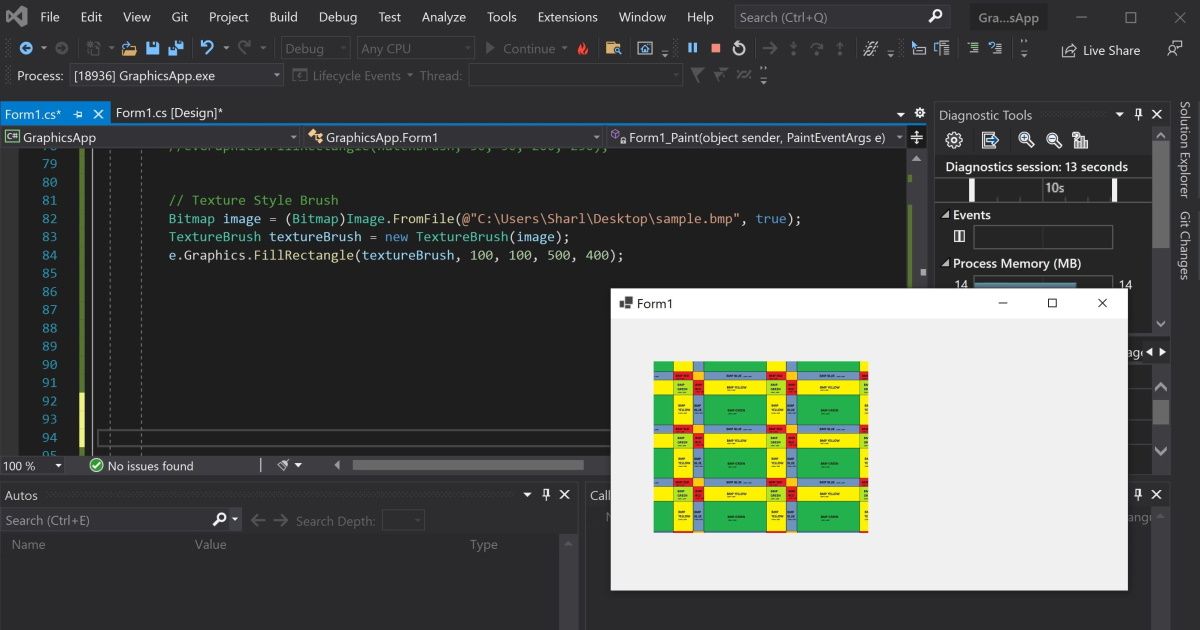
You can use the TextureBrush to fill a shape using an image. Here, create a bitmap by pointing to an image file. Instead of creating a brush using a color, create it using the image.
        Bitmap image = (Bitmap)Image.FromFile(@"C:\Users\Sharl\Desktop\flag.bmp", true);
TextureBrush textureBrush = new TextureBrush(image);
e.Graphics.FillRectangle(textureBrush, 100, 100, 500, 400);

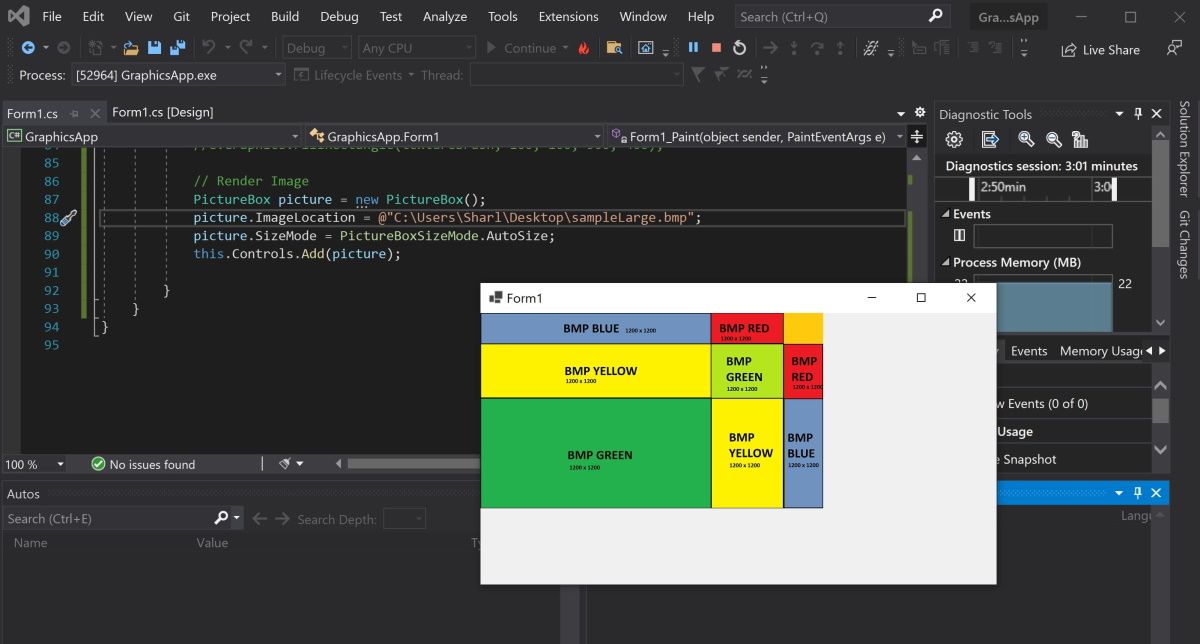
How to Render Images Onto the Form
To render an image, create a PictureBox control object and add it to the form.
-
Create a PictureBox control object using an image file.
        PictureBox picture = new PictureBox();
picture.ImageLocation = @"C:\Users\Sharl\Desktop\flagLarge.bmp"; -
Set the size of the image and add it onto the form so it renders.
        picture.SizeMode = PictureBoxSizeMode.AutoSize;
this.Controls.Add(picture); -
Press the green start button at the top to view the image.

Adding More Shapes to Your Windows Form
You should now understand how to add lines, shapes, and images to your Windows form. You can combine shapes to create new shapes. You can also play around with the built-in functions to create more complex shapes.
Introduction
In this article, I am going to explain how to use a PictureBox on a Windows. Forms app using Visual Studio 2017.
Step 1. Start the Project
Let’s create a new project using Visual Studio 2017.
Select New Project—>Visual C#—>Windows Forms App (.NET Framework), give your project a name and click OK.

This action creates a WinForms project with a default form and you should see the Windows Designer.
Step 2. Drag and Drop Control
Let’s add a PictureBox control to the form by dragging it from Toolbox and dropping it into the form. You will see that PictureBox 1 is added to the form. This control is now available to you in the code behind.

Additional control
Now, let’s add another control to the form by dragging the other control from the Toolbox to the form. Drag and drop openFileDialog, saveFileDialog and button control from Toolbox. You can also change the properties of the other controls.
PictureBox
The PictureBox control is used for displaying images on the form. The Image property of the control allows you to set an image both at design time or at runtime.
Properties of PictureBox
- AllowDrop Property: Specifies whether the picture box accepts data that a user drags on it.
- ImageLocationProperty: Gets or sets the path or the URL for the image displayed in the control.
- InitialImage Property: Gets or sets the image displayed in the control when the main image is loaded.
- WaitOnLoad Property: Specifies whether or not an image is loaded synchronously.
Step 3. Coding for Button Click Event
You can add a button-click event handler by simply double-clicking on the button control event handler. We can open and save the picture using saveFileDialog and openFileDialog.
public partial class Form1 : Form
{
    Image file;

    public Form1()
    {
        InitializeComponent();
    }

    private void button1_Click(object sender, EventArgs e)
    {
        OpenFileDialog f = new OpenFileDialog();
        f.Filter = "JPG (*.JPG)|*.jpg";
        if (f.ShowDialog() == DialogResult.OK)
        {
            file = Image.FromFile(f.FileName);
            pictureBox1.Image = file;
        }
    }

    private void button2_Click(object sender, EventArgs e)
    {
        SaveFileDialog f = new SaveFileDialog();
        f.Filter = "JPG (*.JPG)|*.jpg";
        if (f.ShowDialog() == DialogResult.OK)
        {
            file.Save(f.FileName);
        }
    }
}
Step 4. Compile and Run
Now, simply compile and run the application. Click the open button. Choose the image from the local disk and it will be displayed in the PictureBox.


Now, click and save the button. The picture will be saved to the disk in the local folder.
Summary
In this article, you saw how to use a PictureBox control. Hope you found this article interesting. For any feedback, please post it as a comment at the bottom of this article. Thank you!.
PictureBox control is used to display the picture. Once we place the control on Windows Form, we need to set the right properties to load & display the image on the PictureBox control. We use this control when we need to deal with the images. It acts as a container for the loaded images, and it provides the necessary properties & methods to load the images. Through this article, we are going to discuss the usage of PictureBox control.
Properties of the PictureBox control
Add Image to the PictureBox control
The control, the name tells us, deals with the images. So, it provides the required properties to load the images to the control. Few of the frequently used properties, we will discuss here.
Image property is used to assign the image to this control. We can load images to PictureBox control, during Design time or through the code.
Image property is of Image class type. Hence, in the code, we can not directly assign the image path, to this property. We have to write the code, which should load the image first, from the given location, and then assign the Image object to this property, to display the image on the control. For this, Image class provides, FromFile method to us. This method takes a single argument, path, or URL of the image and returns the Image object. Here is the code snippet to map the image to the control;
picBox.Image = Image.FromFile(@"c:\sample.png");
It is simple right? But, if you want the image to be part of the Project; you can import the image into the project, and then assign it to the control in design mode.
ImageLocation is another property, which we can use to give the path of the image (or URL of the image); then, the control loads it & display the image. Below is an example;
picBox.ImageLocation = @"c:\sample.png";
InitialImage property is used to set an alternate image when the main image is loading to display. Usually, we set the low-resolution image to this property; so, that it will be quickly displayed on the control. Meanwhile, a high-resolution image set to the control will be loaded.
During the image load, if any error is encountered, the image will fail to load. We can use ErrorImage property to set the error image and this will be displayed when an error is encountered, to indicate to the user that the image load was failed.
How to resize the image?
Another important, frequently used property is its SizeMode property. This property controls the way the image is displayed on the PictureBox control. It is of PictureBoxSizeMode enum type. Depending on the value we give, this control will control the display of the image. Here are the valid values and their meaning;
Normal– The image will display as it is, from the top-left corner of the control. If the size of the image is bigger than the control display size, the control will clip the image; we see only the portion of the image.StretchImage– This has elastic nature. When set, the control stretches the image to fit into the size of the control. Remember that, this option, doesn’t maintain the size ratio (or aspect ratio); it simply stretches or shrinks the image to fit into the boundaries of the control.AutoSize– When setting this, the image will be displayed as Normal; but, when the image size is different than thePictureBoxcontrol size, the control size will adjust accordingly. Got it? With other size mode values, an image within the control will be adjusted; whereas with thisAutoSizevalue, the control size will be adjusted depending on the size of the image.CenterImage– Image center is in the center of the control. Image center? That’s correct. The Center of the image will be displayed in the center of the control. If the image size is bigger than the size of the control; the outer edges of the image will be clipped.Zoom– This option will resize the image in the control. UnlikeStretchImage,this maintains the aspect or size ratio. Hence, the image looks good, compared to the image displayed with the valueStretchImage.
Let’s look at some frequently used methods.
Methods of PictureBox control
Loading image to the control
Load method is used to load the image from the specified path or URL. For example, we can load the image from the internet, by specifying the complete path of the image;
picBox.Load(url);
LoadAsync is an important method we use, to load the image asynchronously to allow other statements to continue to execute during the image load. You can use this when the image size is too big and takes time to load. Above code, we can write it as below;
picBox.LoadAsync(@"c:\sample.png");
CancelAsync() method is used to cancel the asynchronous load of the image to the control.
Like other Windows Forms controls, this control also triggers the events. Here are the few commonly used ones;
PictureBox control Events
LoadCompleted event will be triggered when the asynchronous image load is completed. We can use LoadProgressChanged event to show the progress of the asynchronous image load to the user. These two events will be triggered, when we use, LoadAsync method(s) to load the images.
Click event will be triggered when we click on the control.
Let’s put all together, what we have learned so far about this control; and prepare the simple application. Here is the working code;
Here is the screenshot of the Application;

(Raju)