
Applies ToWindows 7 Enterprise Windows 7 Professional Windows 7 Home Basic Windows 7 Home Premium Windows 7 Starter Windows 7 Ultimate Windows Server 2008 R2 Enterprise Windows Server 2008 R2 Datacenter Windows Server 2008 R2 for Itanium-Based Systems Windows Server 2008 R2 Foundation Windows Server 2008 R2 Standard Microsoft Windows XP Home Edition Microsoft Windows XP Professional Microsoft Windows XP Professional x64 Edition Microsoft Windows XP Tablet PC Edition Windows Server 2008 Datacenter Windows Server 2008 Enterprise Windows Server 2008 for Itanium-Based Systems Windows Server 2008 Foundation Windows Vista Business Windows Vista Enterprise Windows Vista Home Basic Windows Vista Home Premium Windows Vista Starter Windows Vista Ultimate Windows Server 2008 Datacenter without Hyper-V Windows Server 2008 Enterprise without Hyper-V Windows Server 2008 R2 Service Pack 1 Windows Server 2008 Service Pack 2 Windows Server 2008 Standard without Hyper-V Windows Vista Business 64-bit Edition Windows Vista Enterprise 64-bit Edition Windows Vista Home Basic 64-bit Edition Windows Vista Home Premium 64-bit Edition Windows Vista Service Pack 2 Windows Vista Ultimate 64-bit Edition Windows 7 Service Pack 1
Notes
-
This article is intended for advanced users, administrators, and IT Professionals.
-
Importing Registration Entries (.reg) files is a feature of Regedit.exe and is not supported by Regedt32.exe. You can use Regedit.exe to make some changes to the registry on a Windows NT 4.0-based or Windows 2000-based computer, but some changes require Regedt32.exe. For example, you cannot add or change REG_EXPAND_SZ or REG_MULTI_SZ values with Regedit.exe on a Windows NT 4.0-based or Windows 2000-based computer. Regedt32.exe is the primary Registry Editor for Windows NT 4.0 and Windows 2000. If you must use Regedt32.exe, you cannot use Registration Entries (.reg) files to modify the registry. For more information about the differences between Regedit.exe and Regedt32.exe, click the following article number to view the article in the Microsoft Knowledge Base:
141377 Differences between Regedit.exe and Regedt32.exe
IN THIS TASK
-
SUMMARY
-
Syntax of .Reg Files
-
Adding Registry Subkeys or Adding and Changing Registry Values
-
Deleting Registry Subkeys and Values
-
Renaming Registry Subkeys and Values
-
Distributing Registry Changes
-
Summary
Important This section, method, or task contains steps that tell you how to modify the registry. However, serious problems might occur if you modify the registry incorrectly. Therefore, make sure that you follow these steps carefully. For added protection, back up the registry before you modify it. Then, you can restore the registry if a problem occurs. For more information about how to back up and restore the registry, click the following article number to view the article in the Microsoft Knowledge Base:
322756 How to back up and restore the registry in Windows
This step-by-step article describes how to add, modify, or delete registry subkeys and values by using a Registration Entries (.reg) file. Regedit.exe uses .reg files to import and export registry subkeys and values. You can use these .reg files to remotely distribute registry changes to several Windows-based computers. When you run a .reg file, the file contents merge into the local registry. Therefore, you must distribute .reg files with caution.
back to the top
Syntax of .Reg Files
A .reg file has the following syntax:
RegistryEditorVersionBlank line
[RegistryPath1]
«DataItemName1«=»DataType1:DataValue1«DataItemName2«=»DataType2:DataValue2«Blank line
[RegistryPath2]
«DataItemName3«=»DataType3:DataValue3«
where:
RegistryEditorVersion is either «Windows Registry Editor Version 5.00» for Windows 2000, Windows XP, and Windows Server 2003, or «REGEDIT4» for Windows 98 and Windows NT 4.0. The «REGEDIT4» header also works on Windows 2000-based, Windows XP-based, and Windows Server 2003-based computers.
Blank line is a blank line. This identifies the start of a new registry path. Each key or subkey is a new registry path. If you have several keys in your .reg file, blank lines can help you to examine and to troubleshoot the contents.
RegistryPathx is the path of the subkey that holds the first value you are importing. Enclose the path in square brackets, and separate each level of the hierarchy by a backslash. For example:
[HKEY_LOCAL_ MACHINE\SOFTWARE\Policies\Microsoft\Windows\System]
A .reg file can contain several registry paths. If the bottom of the hierarchy in the path statement does not exist in the registry, a new subkey is created. The contents of the registry files are sent to the registry in the order you enter them. Therefore, if you want to create a new subkey with another subkey below it, you must enter the lines in the correct order.
DataItemNamex is the name of the data item that you want to import. If a data item in your file does not exist in the registry, the .reg file adds it (with the value of the data item). If a data item does exist, the value in your .reg file overwrites the existing value. Quotation marks enclose the name of the data item. An equal sign (=) immediately follows the name of the data item.
DataTypex is the data type for the registry value and immediately follows the equal sign. For all the data types other than REG_SZ (a string value), a colon immediately follows the data type. If the data type is REG_SZ , do not include the data type value or colon. In this case, Regedit.exe assumes REG_SZ for the data type. The following table lists the typical registry data types:
|
Data Type |
DataType in .reg |
|---|---|
|
REG_BINARY |
hexadecimal |
|
REG_DWORD |
dword |
|
REG_EXPAND_SZ |
hexadecimal(2) |
|
REG_MULTI_SZ |
hexadecimal(7) |
For more information about registry data types, click the following article number to view the article in the Microsoft Knowledge Base:
256986 Description of the Microsoft Windows registry
DataValuex immediately follows the colon (or the equal sign with REG_SZ) and must be in the appropriate format (for example, string or hexadecimal). Use hexadecimal format for binary data items.
Note You can enter several data item lines for the same registry path.
Note the registry file should contain a blank line at the bottom of the file.
back to the top
Adding Registry Subkeys or Adding and Changing Registry Values
To add a registry subkey or add or change a registry value, make the appropriate changes in the registry, and then export the appropriate subkey or subkeys. Exported registry subkeys are automatically saved as .reg files. To make changes to the registry and export your changes to a .reg file, follow these steps:
-
Click Start, click Run, type regedit in the Open box, and then click OK.
-
Locate and then click the subkey that holds the registry item or items that you want to change.
-
Click File, and then click Export.
This step backs up the subkey before you make any changes. You can import this file back into the registry later if your changes cause a problem.
-
In the File name box, type a file name to use to save the .reg file with the original registry items, and then click Save.
Note Use a file name that reminds you of the contents, such as a reference to the name of the subkey.
-
In the right pane, add or modify the registry items you want.
-
Repeat steps 3 and 4 to export the subkey again, but use a different file name for the .reg file. You can use this .reg file to make your registry changes on another computer.
-
Test your changes on the local computer. If they cause a problem, double-click the file that holds the backup of the original registry data to return the registry to its original state. If the changes work as expected, you can distribute the .reg you created in step 6 to other computers by using the methods in the «Distributing Registry Changes» section of this article.
back to the top
Deleting Registry Keys and Values
To delete a registry key with a .reg file, put a hyphen (-) in front of the RegistryPath in the .reg file. For example, to delete the Test subkey from the following registry key:
HKEY_LOCAL_MACHINE\Software
put a hyphen in front of the following registry key in the .reg file:
HKEY_LOCAL_MACHINE\Software\Test
The following example has a .reg file that can perform this task.
[-HKEY_LOCAL_MACHINE\Software\Test]
To delete a registry value with a .reg file, put a hyphen (-) after the equals sign following the DataItemName in the .reg file. For example, to delete the TestValue registry value from the following registry key:
HKEY_LOCAL_MACHINE\Software\Test
put a hyphen after the «TestValue»= in the .reg file. The following example has a .reg file that can perform this task.
HKEY_LOCAL_MACHINE\Software\Test
«TestValue»=-
To create the .reg file, use Regedit.exe to export the registry key that you want to delete, and then use Notepad to edit the .reg file and insert the hyphen.
back to the top
Renaming Registry Keys and Values
To rename a key or value, delete the key or value, and then create a new key or value with the new name.
Distributing Registry Changes
You can send a .reg file to users in an e-mail message, put a .reg file on a network share and direct users to the network share to run it, or you can add a command to the users’ logon scripts to automatically import the .reg file when they log on. When users run the .reg file, they receive the following messages:
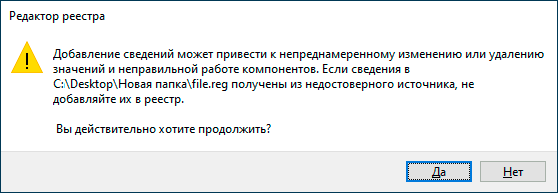
Registry Editor
Are you sure you want to add the information in path of .reg file to the registry?
If the user clicks Yes, the user receives the following message:
Registry Editor
Information in path of .reg file has been successfully entered into the registry.
Regedit.exe supports a /s command-line switch to not display these messages. For example, to silently run the .reg file (with the /s switch) from a login script batch file, use the following syntax:
regedit.exe /s path of .reg file
You can also use Group Policy or System Policy to distribute registry changes across your network. For additional information, visit the following Microsoft Web site:
Need more help?
Want more options?
Explore subscription benefits, browse training courses, learn how to secure your device, and more.
Файлы с расширением .reg в Windows 10, 8.1 и Windows 7 служат для добавления или изменения определенных параметров реестра. Часто, вместо редактирования реестра вручную, удобнее быстро создать такой файл (особенно если у вас есть готовый код для него) и «запустить» его, чтобы добавить в реестр нужные параметры.
В этой инструкции для начинающих пошагово о том, как создать REG файл средствами системы и что именно он в себе содержит. См. также: Как создать bat файл в Windows.
Содержимое REG файла
Файл .reg является простым текстовым файлом, содержащим данные, которые вносятся в реестр. Разберем пример:
Windows Registry Editor Version 5.00

[HKEY_LOCAL_MACHINE\SOFTWARE\Microsoft\Windows\CurrentVersion\Explorer]

"SmartScreenEnabled"="Off"

[HKEY_CURRENT_USER\Software\Classes\Local Settings\Software\Microsoft\Windows\CurrentVersion\AppContainer\Storage\microsoft.microsoftedge_8wekyb3d8bbwe\MicrosoftEdge\PhishingFilter]

"EnabledV9"=dword:00000000

[HKEY_CURRENT_USER\Software\Microsoft\Windows\CurrentVersion\AppHost]

"EnableWebContentEvaluation"=dword:00000000
Приведенный код служит для отключения фильтра SmartScreen в Windows 10 последних версий. Файл начинается со строки «Windows Registry Editor Version 5.00», обязательной для reg-файлов актуальных на сегодня версий ОС.
Далее в квадратных скобках указывается раздел реестра, где нужно создать или изменить параметр (при отсутствии раздела, он будет создан), а затем сам параметр и его значение. В рамках одного раздела мы можем указать более одного параметра, каждый на новой строке.
Наиболее часто используемые параметры реестра — это значения DWORD и строковые параметры. В приведенном выше коде присутствуют оба типа:
- Строковый параметр с именем SmartScreenEnabled и значением Off, задаваемый без указания типа, но значение при этом берется в кавычки:
"SmartScreenEnabled"="Off"
- Параметрs DWORD со значением 0, например, EnabledV9, задаваемый с указанием типа:
"EnabledV9"=dword:00000000
Создание файла REG с помощью текстового редактора
Для создания REG-файлов вы можете использовать любой текстовый редактор, работающий с простым текстом без форматирования. Далее — пример создания REG-файла с помощью встроенного редактора «Блокнот», присутствующего в Windows:
- Запустите Блокнот (есть в стандартных программах Windows, находится через поиск в панели задач Windows 10).
- Вставьте в него код REG-файла или введите собственный код.

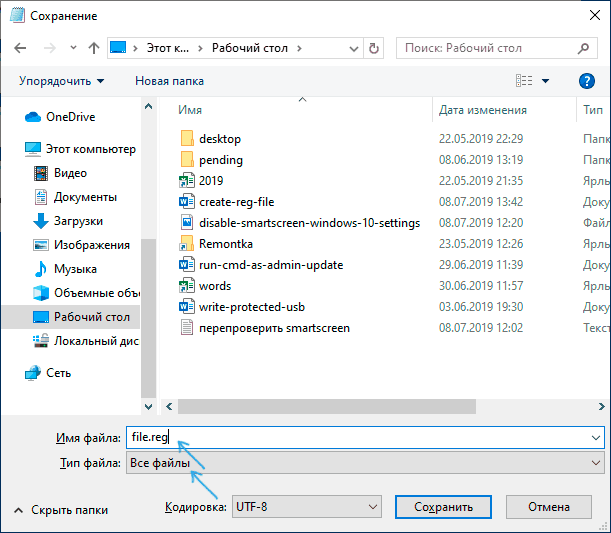
- В меню выберите «Файл» — «Сохранить как». В поле «Тип файла» обязательно выберите «Все файлы», укажите место сохранения и обязательно — расширение .reg для файла.

- После сохранения файла вы можете добавить его содержимое в реестр, с помощью простого двойного клика и подтверждения добавления данных в реестр Windows.


На всякий случай — видео, где всё описанное выше показано наглядно (а также рассказывается, как удалять параметры и разделы реестра через REG-файл):
На этом всё. Как видите, ничего сложного и, надеюсь, инструкция оказалась полезной.
Sometimes, as part of a troubleshooting step, or a registry hack of some kind, you may need to do some type of «work» in the Windows Registry. Maybe it’s adding a new registry key to fix some kind of bug with how Windows handles something or deleting a rogue registry value that’s causing problems with a piece of hardware or a software program.
Regardless of what you’re doing, most people find the registry a bit overwhelming; it’s huge and seems very complex. Plus, you’ve probably heard even the slightest mistake in there on your part could render your computer useless.
Do not fear! It’s really not difficult to make changes in the registry if you know what you’re doing. Follow the steps below to modify, add to, or delete parts of the Windows Registry:
Always Back up the Registry First (Yes, Always)
Hopefully, this was your initial thought as well, but before you get into any of the specific to-dos outlined in the next several sections, start by backing up the registry.
Basically, this involves selecting the keys you’ll be removing or making changes to, or even the entire registry itself, and then exporting it to a REG file. See How to Back Up the Windows Registry if you need help.
If your registry edits don’t go well and you need to undo your changes, you’ll be very happy you were proactive and chose to back up.
How to Add New Registry Keys and Values
Randomly adding a new registry key or a collection of registry values probably won’t hurt anything, but it isn’t going to do you much good, either.
However, there are a few instances where you might add a registry value, or even a new registry key, to the Windows Registry to accomplish a very specific goal, usually to enable a feature or fix a problem.
For example, an early bug in Windows 10 made two-finger scrolling on the touchpad on some Lenovo laptops stop working. The fix involved adding a new registry value to a specific, pre-existing registry key.
No matter what tutorial you’re following to fix whatever issue, or add whatever feature, here’s how to add new keys and values to the Windows Registry:
-
Execute regedit to start Registry Editor. See How to Open Registry Editor if you need help.
-
On the left side of the editor, navigate to the registry key you want to add another key to, usually referred to as a subkey, or the key you want to add a value to.
You can’t add additional top-level keys to the registry. These are special keys, called registry hives, and are preset by Windows. You can, however, add new values and keys directly under an existing registry hive.
-
Once you’ve located the registry key you want to add to, you can add the key or value you want to add:
- If you’re creating a new registry key, right-click or tap-and-hold on the key it should exist under and choose New > Key. Name the new registry key and then press Enter.
- If you’re creating a new registry value, right-click or tap-and-hold on the key it should exist within and choose New, followed by the type of value you want to create. Name the value, press Enter to confirm, and then open the newly created value and set the Value data it should have.
-
Close the open Registry Editor window.
-
Restart your computer, unless you’re sure the new keys and/or values you’ve added won’t need a restart to do whatever it is they’re supposed to do. Just do it if you’re not sure.
Hopefully, whatever thing you were trying to accomplish with these registry additions worked out, but if not, check again that you added the key or value to the correct area of the registry and that you’ve named this new data properly.
How to Rename & Make Other Changes to Registry Keys and Values
Like you read above, adding a new key or value that doesn’t have a purpose doesn’t usually cause a problem, but renaming an existing registry key, or changing the value of an existing value, will do something.
Hopefully, that something is what you’re after, but we make this point to stress that you should be very careful when changing existing parts of the registry. Those keys and values are already there, presumably for a good reason, so make sure whatever advice you’ve gotten that led you to this point is as accurate as possible.
So long as you’re careful, here’s how to make different kinds of changes to existing keys and values in the Windows Registry:
-
Execute regedit to start Registry Editor. Anywhere you have command line access will work fine. See How to Open Registry Editor if you need help.
-
On the left side of Registry Editor, locate the key you want to rename or the key that contains the value you want to change in some way.
You can’t rename registry hives, the top-level keys in the Windows Registry.
-
Once you’ve located the part of the registry you want to make changes to, you can actually make those changes:
- To rename a registry key, right-click or tap-and-hold on the key and choose Rename. Give the registry key a new name and then press Enter.
- To rename a registry value, right-click or tap-and-hold on the value on the right and choose Rename. Give the registry value a new name and then press Enter.
- To change a value’s data, right-click or tap-and-hold on the value on the right and choose Modify…. Assign a new Value data and then confirm with the OK button.
-
Close Registry Editor if you’re done making changes.
-
Restart your computer. Most changes to the registry, especially those that impact the operating system or its dependent parts, won’t take effect until you’ve restarted your computer, or at least signed out and then back into Windows.
Assuming the keys and values you made changes to were doing something prior to your change, expect some kind of change in behavior after you restart your PC. If that behavior isn’t what you were after, it’s time to dig up that backup you made.
How to Delete Registry Keys & Values
As crazy as it sounds, you might sometimes need to delete a registry key or value, most often to fix a problem, likely caused by a program that added a particular key or value it shouldn’t have.
The UpperFilters and LowerFilters values issue comes to mind first. These two registry values, when located in a very particular key, are regularly the root cause of certain errors you’ll sometimes see in Device Manager.
Don’t forget to back up, and then follow these steps exactly to remove a key or value from the Windows Registry:
-
Start Registry Editor by executing regedit from any command-line area in Windows. See How to Open Registry Editor if you need a bit more help than that.
-
From the left pane in Registry Editor, drill down until you locate the registry key you want to delete or the key that contains the registry value you want to remove.
You can’t delete registry hives, the top-level keys you see in the editor.
-
Once found, right-click or tap-and-hold on it and choose Delete.
Remember, registry keys are a lot like the folders on your computer. If you delete a key, you’ll also delete any keys and values that exist within it! That’s great if that’s what you want to do, but if not, you may need to dig a bit deeper to find the keys or values you were really after.
-
Next, you’ll be asked to confirm the key or value deletion request, with either a Confirm Key Delete or Confirm Value Delete message, respectively, in one of these forms:
- Are you sure you want to permanently delete this key and all of its subkeys?
- Deleting certain registry values could cause system instability. Are you sure you want to permanently delete this value?
In Windows XP, these messages are slightly different:
- Are you sure you want to delete this key and all of its subkeys?
- Are you sure you want to delete this value?
-
Whatever the message, select Yes to delete the key or value.
-
Restart your computer. The kind of thing that benefits from a value or key removal is usually the kind of thing that requires a PC restart to take effect.
Did Your Registry Edits Cause Problems (or Not Help)?
Hopefully, the answer to both questions is no, but if not, undoing what you’ve changed, added, or removed from the Windows Registry is super easy, assuming you backed up, which we recommended above as the first thing you should do.
Dig up that REG file your backup created and execute it, which will restore those saved sections of the Windows Registry back to where they were before you did anything.
See How to Restore the Windows Registry if you need more detailed help restoring your registry backup.
FAQ
-
Registry keys for Windows users are created under a different name based on the situation. HKEY_CURRENT_USER (abbreviated as HKCU) is for the currently logged-in user. Other active (but not logged in) user accounts are saved under HKEY_USERS (abbreviated HKU), which HKCU is a subkey of.
-
The short answer is: Don’t. Microsoft does not support or condone the use of registry cleaning utilities. Registry cleaners could, at best, not solve your issue or make things worse, and at worst infect your PC with malware, spyware, or viruses. The best approach is to figure out the specific registry problems and address them directly.
Thanks for letting us know!
Get the Latest Tech News Delivered Every Day
Subscribe

(Image credit: Future)
On Windows 11 (and 10), the Registry is a critical hierarchical database that stores low-level settings that help the operating system and applications to work correctly.
You typically use the «Registry Editor» to modify this database when fixing an issue or configuring or turning off a specific feature. However, you probably may not know that the operating system includes «Reg.exe,» a command-line tool that allows you to edit the Registry through the Command Prompt.
«Reg.exe» comes built into Windows 11 and 10, including the same functionalities available in the Registry application. You can edit entries faster, as you don’t have to browse the confusing tree database manually. And you get the flexibility of being able to implement tweaks using scripts.
In this how-to guide, I will walk you through the steps to get started using the Microsoft «Reg.exe» tool to edit the Registry using Command Prompt.
Important: If you plan to use these commands on your computer, understand that modifying the Registry is risky and can cause irreversible damage to your installation if you don’t do it correctly. It’s recommended to make a full backup of your computer before proceeding.
How to edit the Registry from Command Prompt
To start the Reg tool, you first need to start Command Prompt as an administrator using these steps:
- Open Start.
- Search for Command Prompt, right-click the result, and select Run as administrator.
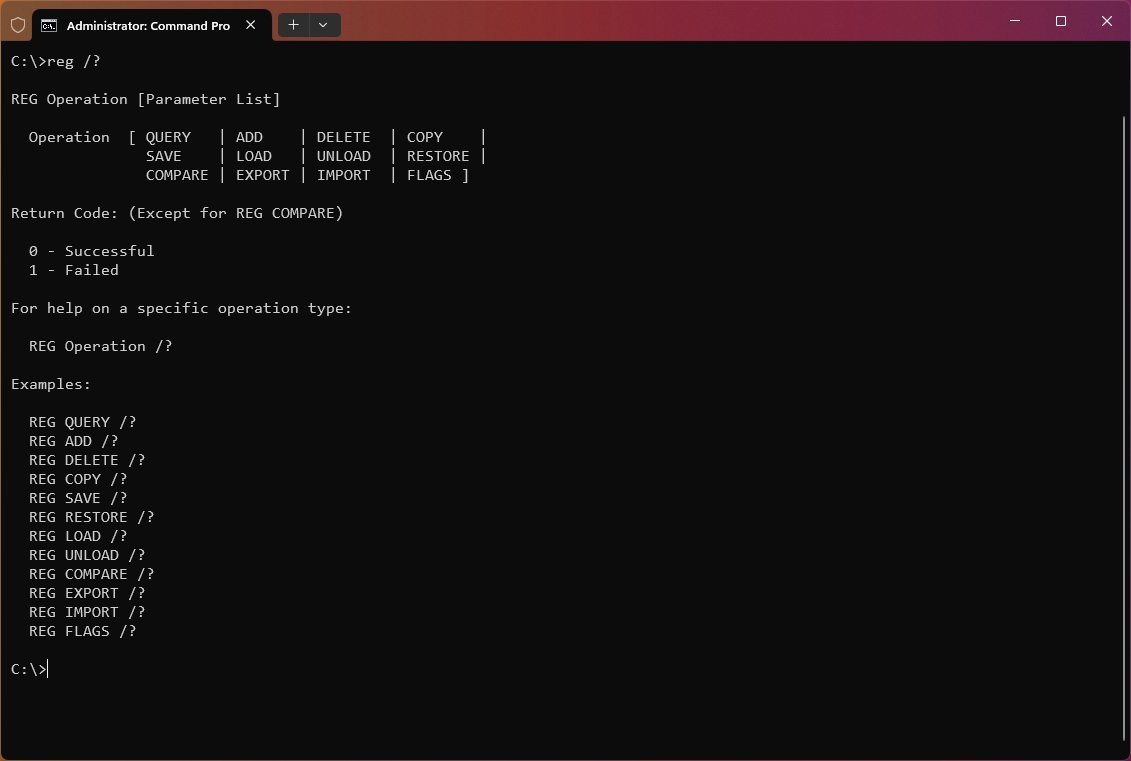
- Type the following command to access the help menu and press Enter: reg /?
- Confirm the options available with the tool, including:
- REG Query
- REG Add
- REG Delete
- REG Copy
- REG Save
- REG Load
- REG Unload
- REG Restore
- REG Compare
- REG Export
- REG Import
- REG Flags
You can also use «REG» followed by the operation type and «/?» to get more help. For example, REG QUERY /? or REG ADD /?.
All the latest news, reviews, and guides for Windows and Xbox diehards.
Using this tool, you will also get two return codes, including «0,» meaning that the operation was completed successfully, and «1,» indicating that the operation failed. However, you won’t get any return codes using the «Compare» option.
While there is a long list of possible combinations, below, I will only highlight the most useful commands to get started using Reg with Command Prompt.
How to add and delete registry entries
Syntax
- Add:
REG ADD KeyName [{/v ValueName | /ve}] [/t Type] [/f] - Delete:
REG DELETE KeyName [{/v ValueName | /ve | /va}] [/f]
Command description
- KeyName: Defines the path to the subkey or entry. Valid registry key shortcuts include HKLM, HKCU, HKCR, HKU, and HKCC. If you want to edit the registry on a remote computer, you can only use HKLM and HKU shortcuts.
- /v ValueName: Specifies the name for the registry key to be added or deleted.
- /ve: Defines if you’re adding or deleting an entry with a null value.
- /f: Adds or deletes registry content without prompting for confirmation.
- /s Separator: Defines the character to separate multiple instances of data when the REG_MULTI_SZ data type is specified and you need to add more than one entry. The default separator is \0 if it is not specified.
- /d Data: Specifies the data for the new entry in the registry.
- /t Type: Specifies the type of registry entries. Here’s the list of valid types: REG_SZ, REG_MULTI_SZ, REG_DWORD_BIG_ENDIAN, REG_DWORD, REG_BINARY, REG_DWORD_LITTLE_ENDIAN, REG_LINK, REG_FULL_RESOURCE_DESCRIPTOR, and REG_EXPAND_SZ.
REG ADD examples
To add a subkey named MySubkey under HKEY_LOCAL_MACHINE\Software, use the following example: REG ADD HKLM\Software\MySubkey

To add a new DWORD (32-bit) value entry named «AppInfo» with the value of «1,» use the following example: REG ADD HKLM\Software\MySubkey /v AppInfo /t REG_DWORD /d 1
To add a new DWORD (32-bit) value entry named «AppInfo» with the value of «1» on a remote computer, use the following example: REG ADD \\ComputerName\HKLM\Software\MySubkey /v AppInfo /t REG_DWORD /d 1
To add a new Binary Value entry named «Data» with data of «fe340ead,» use the following example: REG ADD HKLM\Software\MySubkey /v Data /t REG_BINARY /d fe340ead
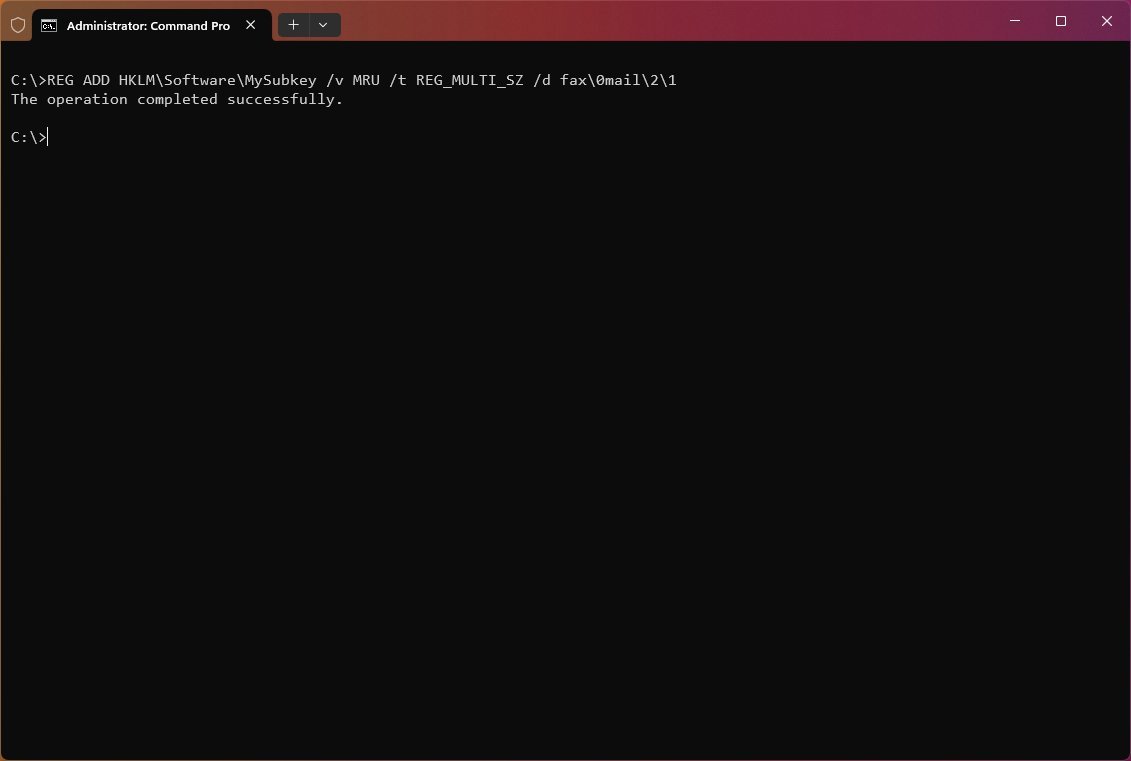
To add a registry entry with multiple values to «MySubkey» with a value name of MRU of type «REG_MULTI_SZ» and data of «fax\0mail\2\1,» use the following example: REG ADD HKLM\Software\MySubkey /v MRU /t REG_MULTI_SZ /d fax\0mail\2\1
To add an expanded registry entry to «MySubkey» with a value name of «Path» of type «REG_EXPAND_SZ» and data of «%systemroot%,» use the following example: REG ADD HKLM\Software\MySubkey /v Path /t REG_EXPAND_SZ /d ^%systemroot^%
REG DELETE examples
To delete the subkey named «MySubkey,» use the following example: REG DELETE HKLM\Software\MySubkey /f

To delete the subkey named «MySubkey» on a remote computer, use the following example: REG DELETE \\ComputerName\HKLM\Software\MySubkey /f
To delete the registry entry named «AppInfo» within the «MySubkey» subkey, use the following example: REG DELETE HKLM\Software\MySubkey /v AppInfo /f
To delete only the registry entries that have no value inside the subkey named MySubkey, use the following example: REG DELETE HKLM\Software\MySubkey /ve
To delete all the registry entries from the «MySubkey» subkey, use the following example: REG DELETE HKLM\Software\MySubkey /va
How to copy registry entries
Syntax
- Copy: REG COPY KeyName1 KeyName2 [/s] [/f]
Command description
- KeyName1: Defines the path to the subkey you want to copy. Valid registry key shortcuts include HKLM, HKCU, HKCR, HKU, and HKCC. If you’re trying to copy the registry on a remote computer, you can only use HKLM and HKU shortcuts.
- KeyName2: Defines the path to the subkey destination. Valid registry key shortcuts include HKLM, HKCU, HKCR, HKU, and HKCC. If you’re trying to copy the registry on a remote computer, you can only use HKLM and HKU shortcuts.
- /s: Copies all subkeys and entries of a particular subkey.
- /f: Executes the copy command without prompting for confirmation.
REG COPY examples
To copy all subkeys and values under the key «MySubkey1» to the key «MySubkey2,» use the following example: REG COPY HKLM\Software\MySubkey1 HKLM\Software\MySubkey2 /s
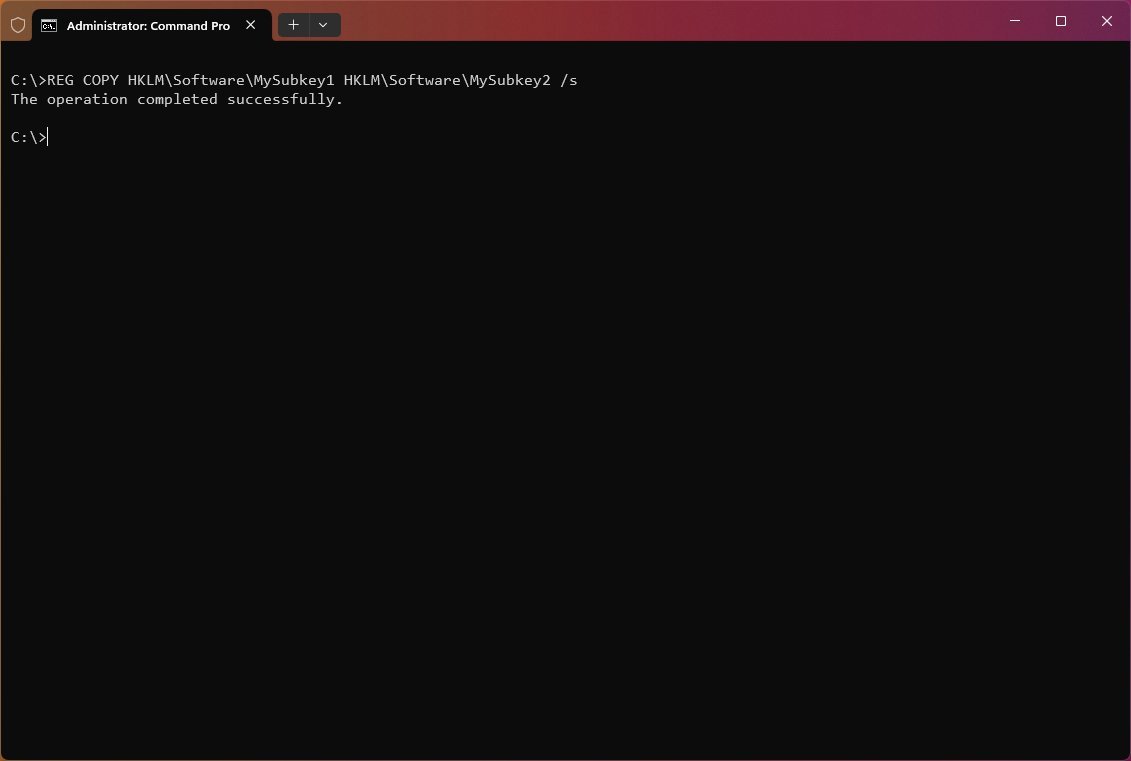
To copy all values under the subkey «MySubkey1» from a remote computer to the subkey «MySubkey2» on the new computer, use the following example: REG COPY \\ComputerName\HKLM\Software\MySubkey1 HKLM\Software\MySubkey2
How to export and import registry entries
Syntax
- Export: REG EXPORT KeyName FileName [/y]
- Import: REG IMPORT FileName
Command description
- KeyName: Defines the path to the subkey or entry. Valid registry key shortcuts include HKLM, HKCU, HKCR, HKU, and HKCC.
- FileName: Specifies the name and path of the .reg file to be exported or imported.
- /y: Overwrites the registry content without prompting for confirmation.
REG EXPORT examples
To export all the content within the subkey «MySubkey,» use the following example: REG EXPORT HKLM\Software\MySubkey C:\RegKeyBackup.reg

To export and overwrite any existing file, use the following example: REG EXPORT HKLM\Software\MySubkey C:\RegKeyBackup.reg /y
REG IMPORT examples
To import all the content, including subkeys, entries, and values within the subkey named «MySubkey,» use the following example: REG IMPORT C:\RegKeyBackup.reg
How to save and restore registry entries
Syntax
- Save: REG SAVE KeyName FileName [/y]
- Restore: REG RESTORE KeyName FileName
Command description
- KeyName: Defines the path to the subkey or entry. Valid registry key shortcuts include HKLM, HKCU, HKCR, HKU, and HKCC. If you’re trying to edit the registry on a remote computer, you can only use HKLM and HKU shortcuts.
- FileName: Specifies the name and path of the .hiv file to be saved or restored.
- /y: Overwrites the registry content without prompting for confirmation.
REG SAVE examples
To save a copy of subkeys, entries, and values within the subkey named «MySubkey,» use the following example: REG SAVE HKLM\Software\MySubkey C:\RegKeyBackup.hiv

To save and overwrite any existing file, use the following example: REG SAVE HKLM\Software\MySubkey C:\RegKeyBackup.hiv /y
REG RESTORE examples
To restore all the content, including subkeys, entries, and values within the subkey named «MySubkey,» use the following example: REG RESTORE HKLM\Software\MySubkey C:\RegKeyBackup.hiv

Although you can always use the Registry Editor, you’ll find that it’s sometimes easier and faster to use the Reg command-line tool. However, you will still be editing the system’s database, which can cause problems no matter the method.
When editing the Registry with commands, it’s recommended to double-check your commands before executing, as you can make mistakes. For example, «REG ADD HKLM\Sofware\MySubkey» is different from «REG ADD HKLM\Software\MySubkey.» A mistake like that might not do anything, or it could wreck your entire system.
If you’re wondering, yes, there is a big difference between «Export» and «Save.» The command EXPORT exports Registry content into a text format you can easily distribute to other computers as a «.reg» file. On the other hand, SAVE saves the Registry content into a hive file format (.hiv), which preserves ownership and additional important information. You should only use this command to restore entries to the same computer.
Also, while you can use many of these commands on a remote computer, «IMPORT» and «EXPORT» only work on a local computer (not over the network).
These instructions are more focused on Windows 11 and 10, but since the Reg tool has been part of the operating system for a long time, you can refer to these steps even in older versions, such as Windows 8.1 and 7.
More resources
For more helpful articles, coverage, and answers to common questions about Windows 10 and Windows 11, visit the following resources:
- Windows 11 on Windows Central — All you need to know
- Windows 10 on Windows Central — All you need to know
Mauro Huculak has been a Windows How-To Expert contributor for WindowsCentral.com for nearly a decade and has over 15 years of experience writing comprehensive guides. He also has an IT background and has achieved different professional certifications from Microsoft, Cisco, VMware, and CompTIA. He has been recognized as a Microsoft MVP for many years.
В этой статье показаны действия, с помощью которых можно выполнить запуск редактора реестра, создать и применить reg-файл в операционной системе Windows 10 и 8.1.
Содержание
- Как открыть редактор реестра
- Создание reg-файла с помощью текстового редактора в Windows 10
- Создание reg-файла в Windows 8.1
- Применение reg-файла
Как открыть редактор реестра
Открыть редактор реестра очень просто, выбирайте любой из способов.
Открытие реестра через окно «Выполнить»
Нажмите сочетание клавиш Win + R
В открывшемся окне Выполнить введите команду regedit и нажмите кнопку ОК.

Если вы работаете под учетной записью администратора, то при отключенном UAC (контроле учетных записей) программа запустится с правами администратора.
В реестр через горячие клавиши
Нажмите сочетание клавиш Win + S
В боковой панели, в строке поиска введите regedit и в результатах поисковой выдачи, щелкните правой кнопкой мыши на regedit.exe и в появившемся контекстном меню выберите пункт Запуск от имени администратора.

Другой вариант: нажмите сочетание клавиш Win + X и появившемся контекстном меню выберите пункт Командная строка (администратор)

В окне Администратор: Командная строка введите команду regedit и нажмите клавишу Enter ↵.

Открытие редактора реестра через Проводник
Откройте в Проводнике папку C:\\Windows.
Щелкните правой кнопкой мыши по файлу regedit.exe и в появившемся контекстном меню выберите пункт Запуск от имени администратора.

Создание reg-файла с помощью текстового редактора в Windows 10
Первое что нужно сделать, это включить отображение расширений для файлов, по умолчанию операционная система Windows не отображает расширения файлов. Для этого откройте Панель управления, установите в выпадающем списке Просмотр: Мелкие значки и выберите пункт Параметры проводника.

В окне Параметры папок, которое будет открыто, перейдите ко вкладке Вид и уберите флажок с пункта «Скрывать расширения для зарегистрированных типов файлов», затем нажмите кнопку OK.
Теперь можно приступать непосредственно к созданию reg-файла. Для этого щелкните ПКМ в любой свободной части рабочего стола и в появившемся контекстном меню выберите действие Создать → Текстовый документ.

Откройте только что созданный документ (по умолчанию будет открыт в программе Блокнот), скопируйте и вставьте необходимый вам код в окно программы.

В меню Файл выберите «Сохранить как…» (CTRL+Shift+S). В выпадающем списке «Тип файла» обязательно установите «Все файлы», укажите место сохранения, а также в имени файла укажите расширение .reg. Нажмите кнопку Сохранить.

После того как файл будет сохранен вы можете добавить его содержимое в реестр. Дважды щелкните по нему ЛКМ и подтвердите ваше намерение внести изменения в реестр нажав на кнопку «Да».

Создание reg-файла в Windows 8.1
Включить отображение расширений для файлов в операционной системе Windows 8.1 можно также через Панель управления. В раскрывающемся списке Просмотр: установите Мелкие значки и перейдите к пункту Параметры папок.

В открывшемся окне Параметры папок перейдите на вкладку Вид и уберите флажок возле пункта Скрывать расширения для зарегистрированных типов файлов и нажмите кнопку OK.
Для того чтобы создать reg-файл, щелкните правой кнопкой мыши на рабочем столе и в появившемся контекстном меню выберите Создать ► Текстовый документ.

Откройте созданный текстовый документ (по умолчанию текстовые документы открываются в программе Блокнот), скопируйте необходимый вам код в окно программы.
Сохраните текстовый документ нажав сочетание клавиш Ctrl + S, закройте окно.

Далее переименуйте текстовый документ, измените при этом расширение файла вместо .txt укажите .reg, например Demo.reg.
При этом система предупредит вас о том что файл может оказаться недоступным, нажмите кнопку Да.

Файл реестра (reg-файл) создан
Применение reg-файла
Для внесения изменений в реестр можно использовать несколько способов.
Щелкните два раза левой кнопкой мыши по reg-файлу.
В открывшемся окне нажмите кнопку Да.

В следующем окне нажмите кнопку ОК.

Другой вариант такой: щелкните правой кнопкой мыши на reg-файле и в появившемся контекстном меню выберите пункт Слияние.
В открывшемся окне нажмите кнопку Да.
В следующем окне нажмите кнопку ОК.
В третьем способе придётся использовать команду.
Нажмите сочетание клавиш Win + R и в открывшемся окне Выполнить введите команду такого вида:
regedit /s Путь_к_файлу\\Имя_файла.reg
Нажмите кнопку ОК.
Например:
regedit /s D:\\Demo.reg

Для применения многих reg-файлов необходимо, чтобы вы работали под учетной записью администратора и Контроль Учетных Записей (UAC) был отключен.
Ну и 4 вариант: нажмите сочетание клавиш Win + X и появившемся контекстном меню выберите пункт Командная строка (администратор):
В открывшемся окне введите команду такого вида:
regedit /s Путь_к_файлу\\имя_файла.reg
Нажмите клавишу Enter ↵.
Например:
regedit /s D:\\Demo.reg

Если в реестре уже присутствует параметр добавляемый reg-файлом, то при применении reg-файла, имеющиеся значения параметров будут заменены на новые.