
В этой статье Вы узнаете, как поменять иконку в форме Windows Forms в Visual Studio. Это очень легко!
При создании проекта форма со стандартной иконкой выглядит так:
Нам хочется внести оригинальность в оформление нашей программы, и стандартная иконка нам не нужна. Но где же поменять её?
Для этого мы заходим в «Свойства». Они практически всегда находятся в правой части Visual Studio и обозначаются небольшой иконкой :
Если по каким-либо причинам Вы не нашли «Свойства», то просто кликните правой кнопкой мыши на форме и там выберите этот пункт.

С этим разобрались. Теперь ищем строку с названием Icon. Именно она нам и нужна:
Видим справа тот самый значок, что всегда висит у нас в форме.
Нажимаем на кнопку с многоточием — она откроет нам обозреватель файлов. И, казалось бы, осталось выбрать любую картинку и всё готово, но это не так.
Visual Studio примет в этом параметре только те изображения, которые соответствуют формату .ico (специальный формат для иконок). однако в сети существует множество программ и сайтов, которые без труда переведут любое изображение в формат .ico.
Также существует огромное количество паков и просто отдельных изображений этих форматов. Допустим, мы создали или выбрали наше изображение в нужном формате. Теперь нам остаётся лишь загрузить его.
У нас для примера будет вот такое изображение формата .ico:
Мы выбираем его в обозревателе файлов и нажимаем «Открыть».
Значок в свойствах сменился.
Смотрим на нашу форму:
Всё работает!
Sign in to your MUO account
If you are creating a new desktop application, you may be following your own branding and design. This might include a custom color palette, UI design, or the icon that displays when a user opens your app.
When using Windows Forms to create your app, Visual Studio adds a default icon in the top-left corner of your application’s window. You can change this to an icon of your choice by modifying the form’s properties.
How to Change the Application’s Icon
You can change the default icon by accessing the form’s properties and uploading a new icon image.
- Create a new Windows Forms application or open up an existing one.
-
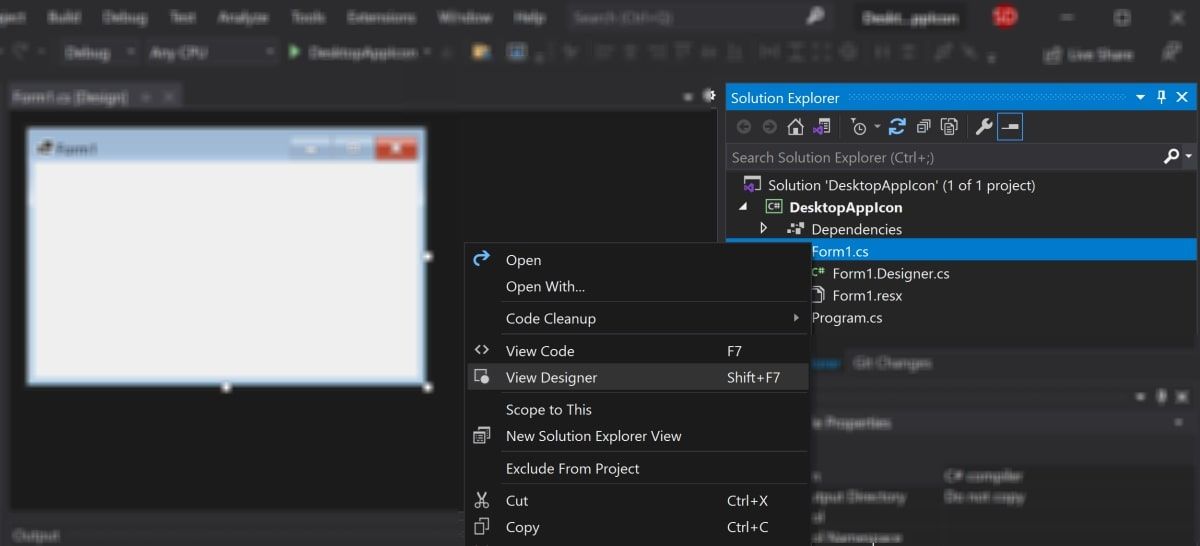
By default, the designer view should be open. If not, right-click on the Form in the Solution Explorer window and click on View Designer.

-
The designer view acts as a canvas that you can use to add and modify UI elements. It also reflects what your application will look like at runtime. The current icon for your application shows in the top-left corner of the form. If you do not have an icon, Visual Studio will use a default icon.

-
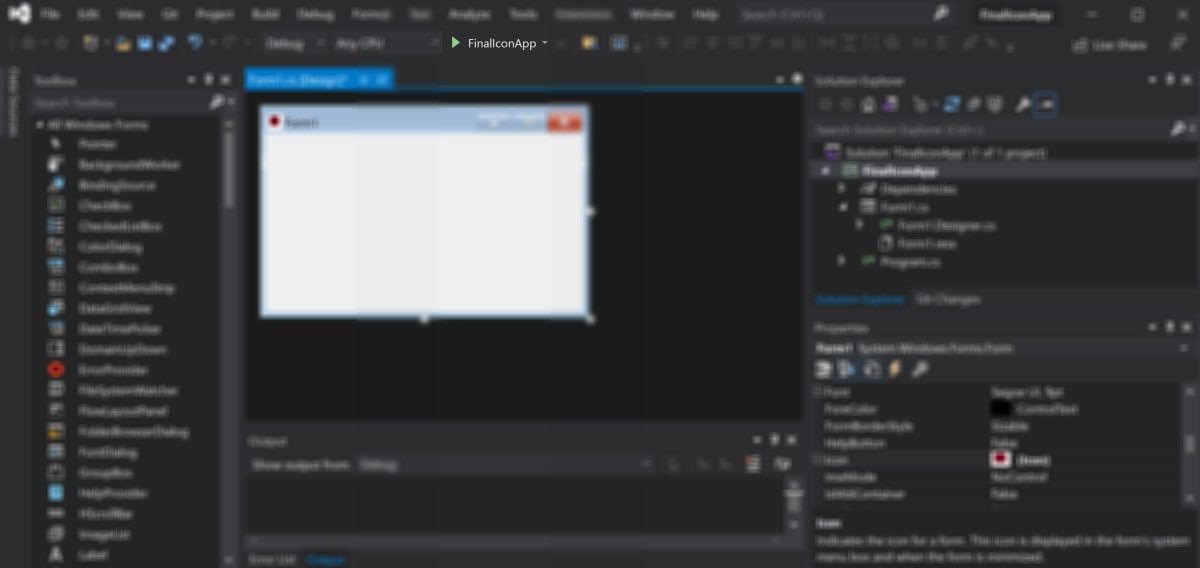
Highlight the form by selecting it, and navigate to the Properties pane. This is usually located in the lower right-hand corner of the Visual Studio window.

- Click on the three dots (…) next to the Icon field.
- In the new file explorer window pop-up, select your new icon. Upload a photo that uses an icon format such as an .ico file. If you are having trouble finding or creating icons, you can create a custom icon using Rainmeter.
-
In the file explorer window, click on open to save the file. This will update the canvas with the new icon.


How to Run the Application and View Your Icon
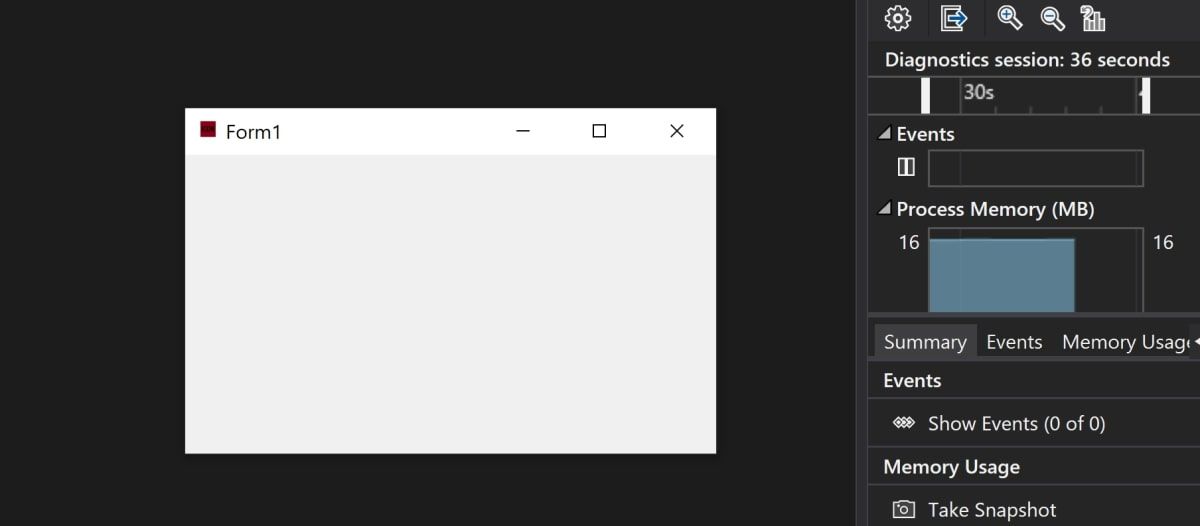
You can view what your new icon looks like at runtime by launching the application.
-
Click on the green play button at the top of the Visual Studio window.
-
Wait for the application to compile. Once completed, the application window will launch showing the new icon in the top-left corner.

Creating Desktop Applications Using Windows Forms
If you are developing an application using Windows Forms, there is a chance you may want to change the icon to match your design.
You can change the icon in Visual Studio by opening the properties window for the form. You can then upload a new icon image to the icon field.
You may also want to add other UI elements or images to your app. If so, you can learn more about how to add graphics to a Windows Form application.
Introduction
It was difficult to create an icon with the bitmap editor that comes with Visual Studio, so I tried to summarize how to create an icon using Microsoft Paint.
Note 1
You cannot edit 32-bit icons and PNGs with the image editor provided as standard in visual studio. A separate paint tool is required.
Note 2
The file format of ico files is different from that of bmp that can be displayed using the windows system compatibility function. Use an app such as @icon Converter to convert to ICO file format.
If the format is not changed correctly, a warning will be displayed when adding an icon.

File formats that can be used for icons
| size | Number of colors | file format |
|---|---|---|
| 256 x 256 | 32bit | PNG |
| 48 x 48 | 8bit | BMP |
| 32 x 32 | 8bit | BMP |
| 16 x 16 | 8bit | BMP |
| 256 x 256 | 32bit | PNG |
| 64 x 64 | 32bit | BMP |
| 48 x 48 | 32bit | BMP |
| 32 x 32 | 32bit | BMP |
| 16 x 16 | 32bit | BMP |
Icon registration procedure
-
Create a bmp file with a paint tool such as mspaint. Format conversion with @icon etc.
-
Create (or open) the project to which you want to add an icon in visual studio.
-
Open the project properties.

-
Click the [Browse] button on the icon.
-
Select the ico file from Windows Explorer.
-
Confirm that the icon is loaded.
-
When you build the project (or build with debugging), you can see that ico is embedded in the executable file.


reference
—Visual Studio Operation How to make an icon via Lonely computer
http://ulalablog.jugem.jp/?eid=106
- https://docs.microsoft.com/ja-jp/visualstudio/extensibility/ux-guidelines/images-and-icons-for-visual-studio?view=vs-2019
- https://docs.microsoft.com/ja-jp/visualstudio/ide/how-to-specify-an-application-icon-visual-basic-csharp?view=vs-2019
The app used for icon conversion
-@Icon conversion https://www.vector.co.jp/soft/win95/amuse/se201729.html
how to add icons in windows form application in c# using visual studio 2019
Visual Studio | How to change the Icon of an exe file in Visual Studio 2019 (2021) (C#, etc)
c# (Csharp) video :- How to add icons to Menu ?
How to add an icon to a Visual Studio Project
How to Create Setup(.exe) File in c# windows Form Application with Icon Step By Step.
Creating Icons For Windows Forms Applications
C# | How to change application icon?
How To Add An Icon To Your C# Application | Visual Studio 2019
Set icon in Label,Button and Form in C#
Add/Change Icons In Visual Studio 2019 For Windows form project
Create Your First C# Windows Forms Application using Visual Studio
open Picture and Icon in windows form
How to Create Setup (.exe) File with Icon in Windows Form Application Step by Step
C# Tutorial 4: Add pictures and icons in Frame
C# Add Button Icon or Image and get Icons easily from Pichon
Visual C# Change Windows Form Icon
How to set a custom Icon in Visual Studio C++
How to set cursor icon in C# Windows Form | C# Windows Form tuturial
Login UI (User Interface) in C# (C sharp) with all icons and images
Conclusion
Upon a thorough analysis, it can be concluded that this specific article presents enlightening facts pertaining to How To Add Icons In Windows Form Application In C Using Visual Studio 2019. In every section, the journalist depicts significant acumen about the subject matter.
Crucially, the chapter on contributing variables stands out as a highlight. The narrative skillfully examines how these aspects relate to create a comprehensive understanding of How To Add Icons In Windows Form Application In C Using Visual Studio 2019.
In addition, the publication performs admirably in disentangling complex concepts in an straightforward manner. This simplicity makes the material useful across different knowledge levels.
The author further augments the review by including applicable illustrations and actual implementations that help contextualize the theoretical constructs.
An extra component that sets this article apart is the in-depth research of diverse opinions related to How To Add Icons In Windows Form Application In C Using Visual Studio 2019. By exploring these multiple standpoints, the content gives a well-rounded understanding of the theme.
The meticulousness with which the journalist treats the matter is extremely laudable and sets a high standard for equivalent pieces in this area.
To conclude, this piece not only instructs the audience about How To Add Icons In Windows Form Application In C Using Visual Studio 2019, but also encourages further exploration into this engaging area. For those who are a novice or an authority, you will encounter useful content in this detailed write-up.
Many thanks for taking the time to this comprehensive write-up. If you would like to know more, do not hesitate to drop a message using the discussion forum. I look forward to your comments.
To deepen your understanding, here are a few related publications that are potentially useful and supportive of this topic. Happy reading!
Related images with how to add icons in windows form application in c using visual studio 2019
Related videos with how to add icons in windows form application in c using visual studio 2019
Changing the icon in a Windows Form using C# involves a few straightforward steps. Here’s how you can do it:
- Prepare Your Icon: Ensure you have the icon file (
.icoformat) that you want to use. Place this file in an appropriate location within your project’s directory structure. - Add the Icon to Your Project:
- In Visual Studio, right-click on your project in the Solution Explorer.
- Choose “Add” > “Existing Item…”.
- Navigate to the location of your
.icofile, select it, and click “Add”.
- Set the Icon for the Form:
- Open the Form’s design view by double-clicking on the Form in the Solution Explorer.
- In the Properties window (usually found at the bottom right), find the property named “Icon”.
- Click on the ellipsis (…) button next to the Icon property.
- This will open a dialog where you can select your icon file from the project resources.
- Alternatively, Set the Icon Programmatically:
- You can also set the icon in the code. In the Form’s constructor (after
InitializeComponent();), add the following line of code:csharp
this.Icon = new Icon("path_to_your_icon.ico");
- Replace
"path_to_your_icon.ico"with the relative path to your icon file within the project.
- You can also set the icon in the code. In the Form’s constructor (after
- Build and Run Your Application: After setting the icon, build and run your application. The new icon should now appear in the title bar of your form, as well as in the taskbar when the application is running.
Remember, the icon file needs to be included in your project’s output. Ensure it’s set to be copied to the output directory if it’s not in the root of your project. This can be done in the properties window for the icon file in Solution Explorer.
To change the icon in a Windows Form using C#, here’s a tabular representation of the steps:
| Step | Action | Description |
|---|---|---|
| 1 | Prepare Your Icon | Ensure you have an icon file in .ico format. |
| 2 | Add the Icon to Your Project | – Right-click on your project in Solution Explorer in Visual Studio. <br> – Choose “Add” > “Existing Item…”. <br> – Navigate to and select your .ico file, then click “Add”. |
| 3 | Set the Icon in Design View | – Open the Form’s design view by double-clicking the Form. <br> – In the Properties window, find the “Icon” property. <br> – Click the ellipsis (…) button next to it. <br> – Select your icon file from the resources. |
| 4 | Set the Icon Programmatically | – In the Form’s constructor, after InitializeComponent();, add: <br> this.Icon = new Icon("path_to_your_icon.ico"); <br> – Replace "path_to_your_icon.ico" with the relative path to your icon file. |
| 5 | Build and Run Your Application | After setting the icon, build and run your application to see the changes. |
Note: The icon file should be included in your project’s output. Make sure it’s set to be copied to the output directory, especially if it’s not located in the root of your project. You can set this in the properties window for the icon file in the Solution Explorer.
Changing the icon in a Windows Form using C# is a straightforward process that can greatly enhance the visual appeal of your application. By following the steps outlined in this article, you can easily assign a custom icon to your form. Remember to choose an appropriate icon file and consider using multiple sizes for optimal rendering. With these simple steps, you can personalize your application and create a more engaging user experience.