
Readers help support Windows Report. We may get a commission if you buy through our links.
Read our disclosure page to find out how can you help Windows Report sustain the editorial team. Read more
If you are unable to set up Hamachi and want to know how to allow the app through Firewall, you are at the right place.
When trying to set up Hamachi, you may often come across errors such as Inbound Traffic blocked, check firewall settings, which arise due to the Firewall blocking the application.
Why does Firewall block Hamachi?
There could be different reasons why the Firewall may block Logmein Hamachi as below:
- Hamachi is included in the list of Protected Network Connections – If the application is among the protected networks, you may have difficulty accessing it.
- Firewall is blocking Hamachi – Sometimes, the Firewall may block the VPN considering it harmful.
- No inbound rule in Firewall for Hamachi – The application fails to maintain inbound connections due to strict firewall settings.
How do I allow Hamachi through Firewall?
Make sure to run a few preliminary checks to rule out any other issues:
- Disable any 3rd party antivirus.
- Allow the app in the antivirus.
- Restart your PC. If your computer is stuck on restarting, rest assured we have a remedy for this issue.
1. Add Hamachi to the list of excluded Firewall items
- Press the Win + R to open the Run console, type firewall.cpl, and press Enter to launch Windows Defender Firewall.
- In the Windows Defender Firewall screen, click on Allow an app or feature through Windows Defender Firewall on the left.
- Next, in the Allowed applications window, click on Change settings.

- Now, under Allowed apps and features, click on Allow another app at the bottom.

- In the Add an app dialog, click on Browse.
- Next, in the File Explorer window, navigate to the following location:
C:\Program Files (x86)\LogMeIn Hamachi\x64 - If using a 32-bit Windows version, navigate to the below path instead:
C:\Program Files (x86)\LogMeIn Hamachi - Here, double-click on hamachi-2.exe to add it to the applications list.

- It should show Hamachi Client Tunneling Engine, click on Add. Press OK to save the changes and exit.


Restart your PC, and Hamachi is successfully added to the Firewall exception list.
But, if Windows Defender is not working, here we have a comprehensive guide on how to fix it in a few quick steps.
2. Clear Hamachi from the list of Protected network connections
- Open the Run dialog box by pressing the Win + R shortcut keys. Then, type firewall.cpl and press Enter to open Windows Defender Firewall.
- Next, click on Advanced settings on the left.
- In the Windows Defender Firewall with Advanced Security window, click on Action, and select Properties.

- It will open a new dialog box. Here, go to the Public Profile tab, navigate to Protected network connections, and click on Customize.
- Now, on the Protected Network Connections for the Public Profile screen, go to Network connections, and uncheck the box next to Hamachi. Press OK.

- Press Apply and OK again to save the changes and exit.


This is how you can allow Hamachi through Firewall and you can now use the VPN app easily.
- Hamachi Not Working With Minecraft: 6 Ways to Fix it in 2022
- VPN Application Blocked by Security Settings [Solved]
- How to Configure your Firewall Rules for Windows Activation
3. Establish a new inbound rule for Hamachi
- Press the Win + R to open up a Run dialog box. Then, type firewall.cpl and press Enter to open up the Windows Defender Firewall window.
- Next, click on the Advanced settings option on the left to open Windows Defender Firewall with Advanced Security.
- Here, click on Inbound Rules on the left. Next, on the right, go to Actions and click on New Rule.

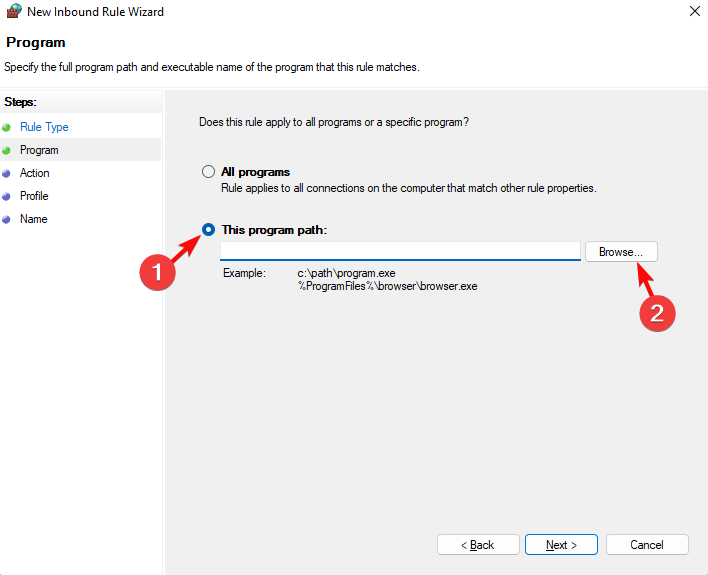
- Inside the New Inbound Rule Wizard, select Program in Rule Type, and click Next.

- On the next screen, select This program path and click on Browse.

- In the File Explorer window, navigate to the below path, and double-click on hamachi-2.exe:
C:\Program Files (x86)\LogMeIn Hamachi\x64
- For a 32-bit Windows version, navigate to the below path instead, double-click on hamachi-2-ui.exe:
C:\Program Files (x86)\LogMeIn Hamachi - Once the path is selected, click Next.

- Next, select Allow the connection in the Action screen, and press Next.

- On the Profile page, select Domain, Private and Public, and click Next.

- Now, name the new rule as, for example, Allow Hamachi, and click Finish.


Once the inbound rule is created successfully, reboot your PC, and now Firewall would not be blocking Hamachi anymore.
What can I do if Hamachi is not connecting?
- To open the Run console, press the Win + R keys together. Now, type devmgmt.msc and hit Enter to open up Device Manager.

- Next, expand the Network adapters section, and select LogMeIn Hamachi Virtual Ethernet Adapter.
- Click on the Actions tab at the top, and select Add legacy hardware.

- On the Add Hardware wizard, click Next.

- Next, select the Install the hardware that I manually select from a list (Advanced) option and press Next.

- Now, under Common hardware types, find and select Network adapters in the list, and select Next.

- On the next screen, click on Have Disk button at the bottom.

- In the Install from Disk window, click on the Browse button, navigate to the below path, and double-click on hamachi.inf:
C:\Program Files (x86)\LogMeIn Hamachi\x64
- Back in the Install From Disk dialogue, press OK.
- As you return to the Add Hardware window, press Next.


This will trigger the Hamachi driver installation. Now, follow the on-screen instructions to finish the installation.
Once done, reboot your computer and check if the issue is resolved and Hamachi is connecting now. But, if Hamachi does not work on your Windows 11 PC, we have some best solutions for you.
However, if you are unable to allow hamachi through Firewall because the Windows Exclusions are not working, we have some quick fixes to help you troubleshoot the issue.
Above are three quick methods to allow Hamachi through Windows Defender Firewall. However, if it’s the Avast Firewall that’s blocking a program, you can follow the solutions in our detailed post.
For any other issues with the Hamachi VPN service or the Windows Defender Firewall, let us know in the comments section below.
Madhuparna Roy
A diploma holder in computers and with a keen interest in technology, Madhuparna is passionate about writing How-to guides and helping people solve the most intricate Windows issues.
It all started with the evolution of mobile phones and Google, and that has now settled with Windows.
Все способы:
- Вариант 1: «Безопасность Windows»
- Вариант 2: «Монитор брандмауэра Windows в режиме повышенной безопасности»
- Вариант 3: «Командная строка»
- Вопросы и ответы: 0
Вариант 1: «Безопасность Windows»
Если нужно добавить приложение или игру в список исключений брандмауэра Windows 11, можно воспользоваться обновленным интерфейсом панели управления средства «Безопасность Windows»:
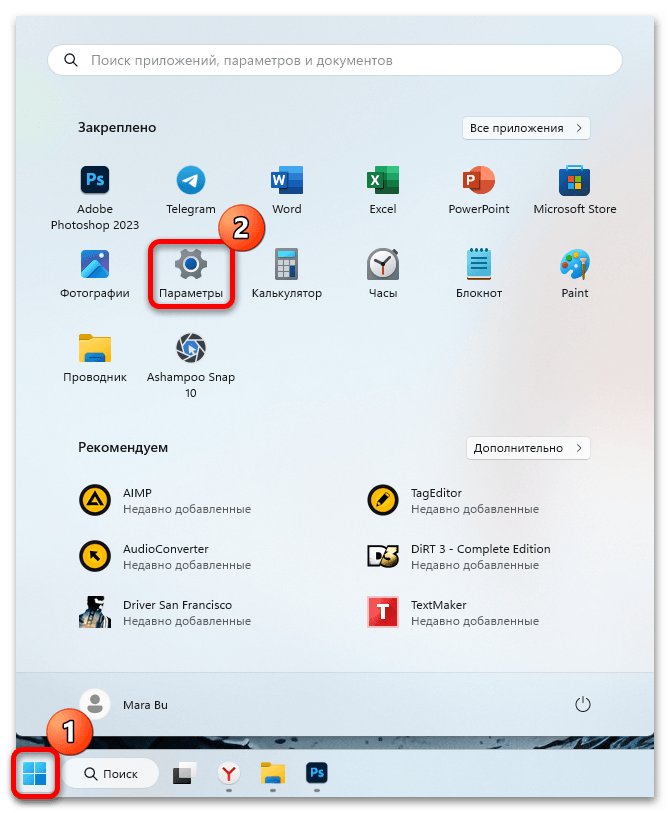
- Нажмите на кнопку «Пуск» и перейдите в штатные «Параметры».
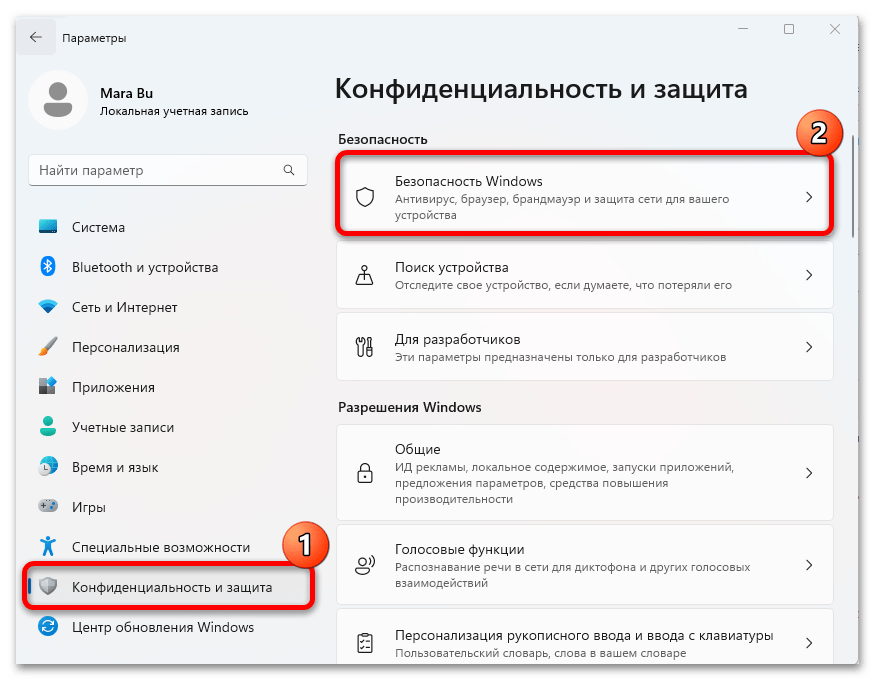
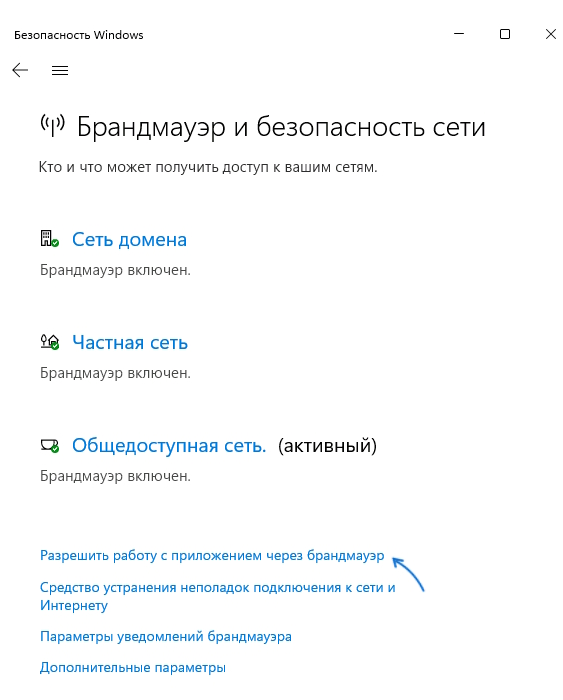
- Выберите вкладку «Конфиденциальность и защита» на панели слева, а в центральной части окна кликните по строке «Безопасность Windows».
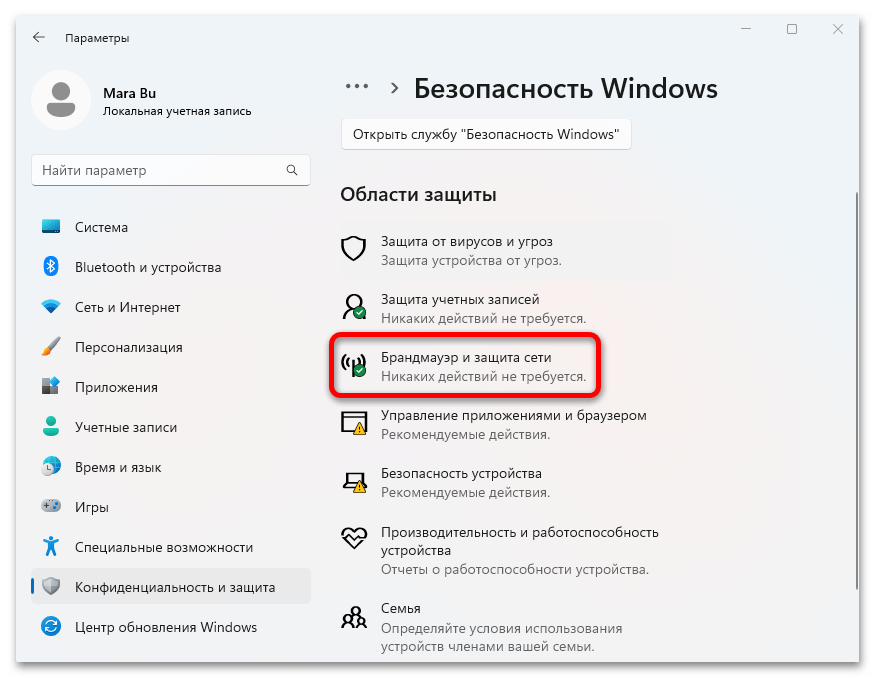
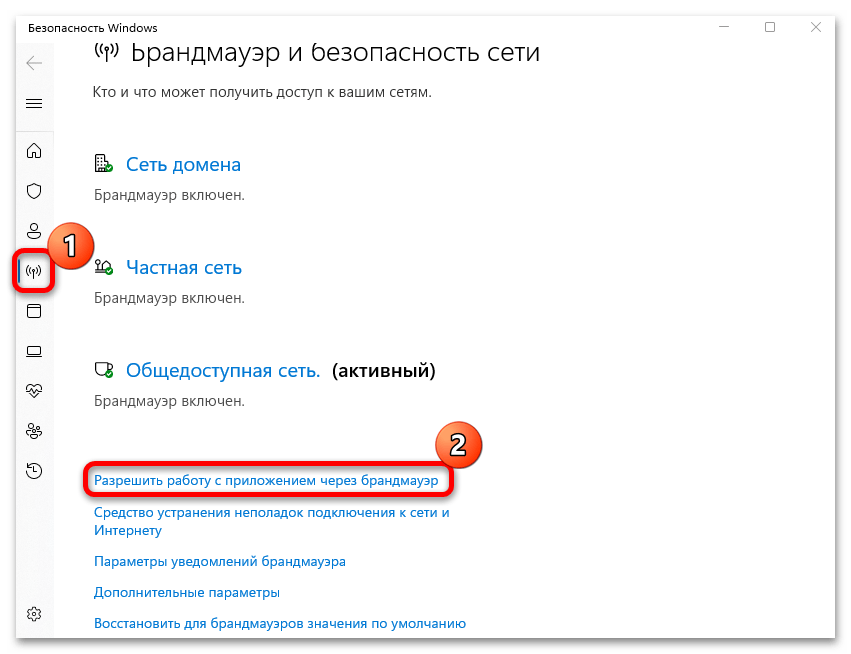
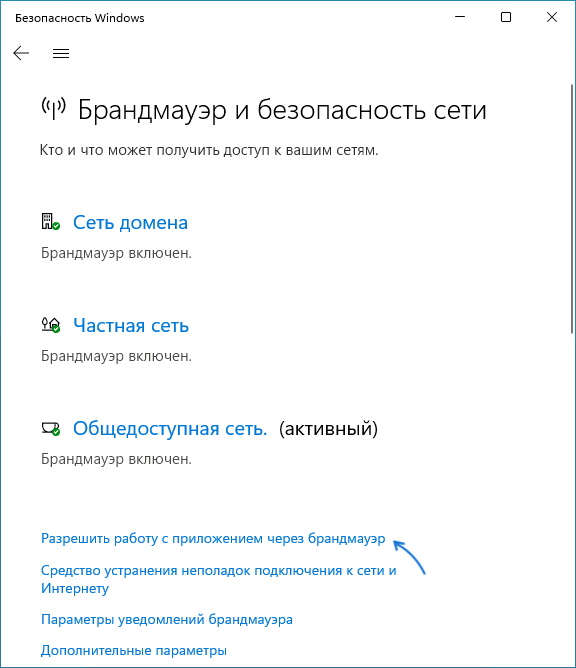
- Далее нужно выбрать пункт «Брандмауэр и защита сети».
- Вы попадете в окно «Безопасность Windows». Оставаясь на вкладке «Брандмауэр и безопасность сети», нажмите по строке «Разрешить работу с приложением через брандмауэр».
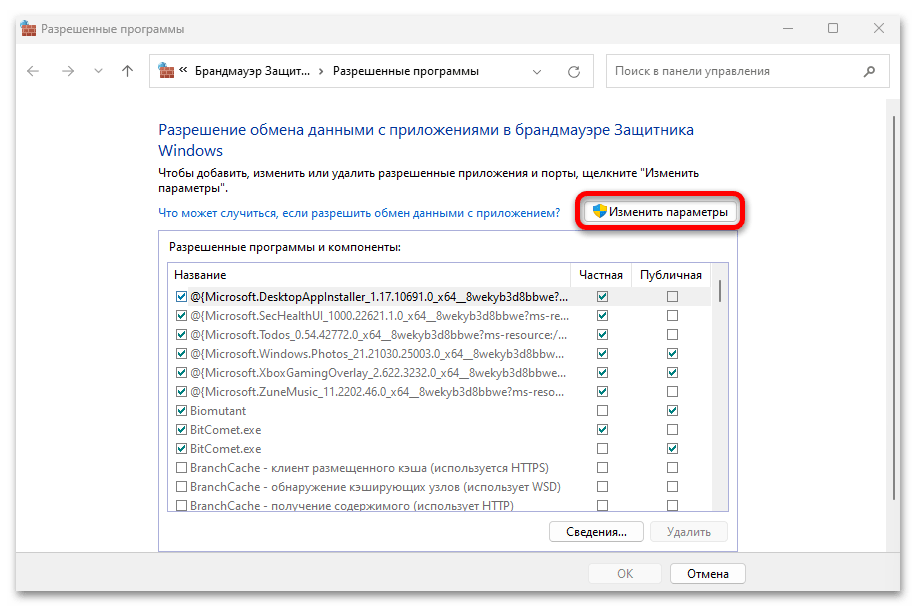
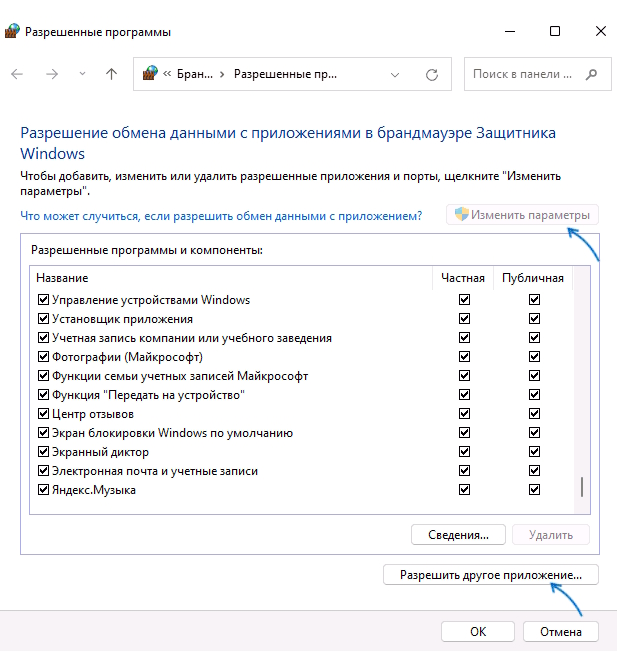
- В открывшемся окне щелкните по «Изменить параметры».
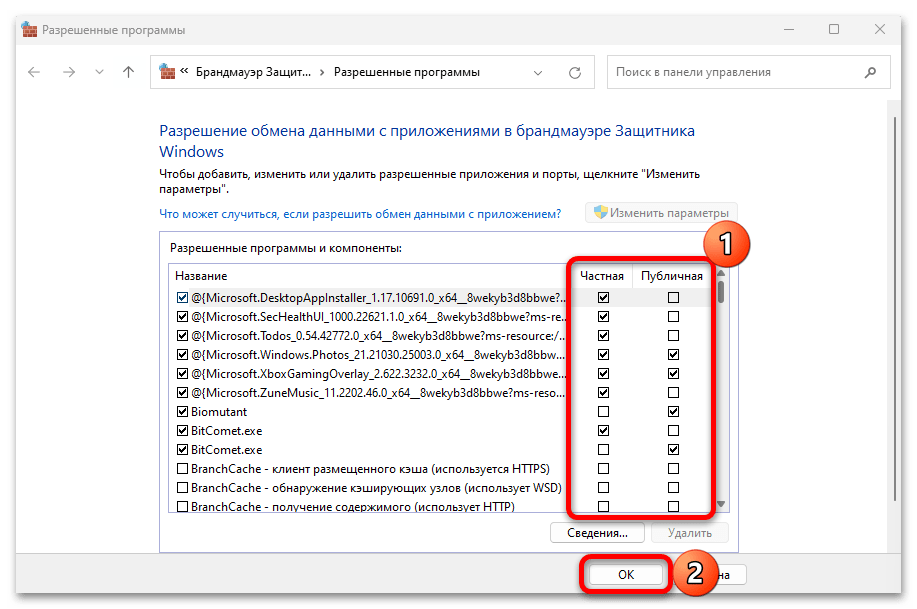
- Ниже станет доступен список приложений и игр, которые вы сможете добавить в список исключений. Найдите нужный софт и поставьте галочку в чекбоксах у столбцов «Частная» и «Публичная», после чего сохраните настройки, кликнув на «ОК».
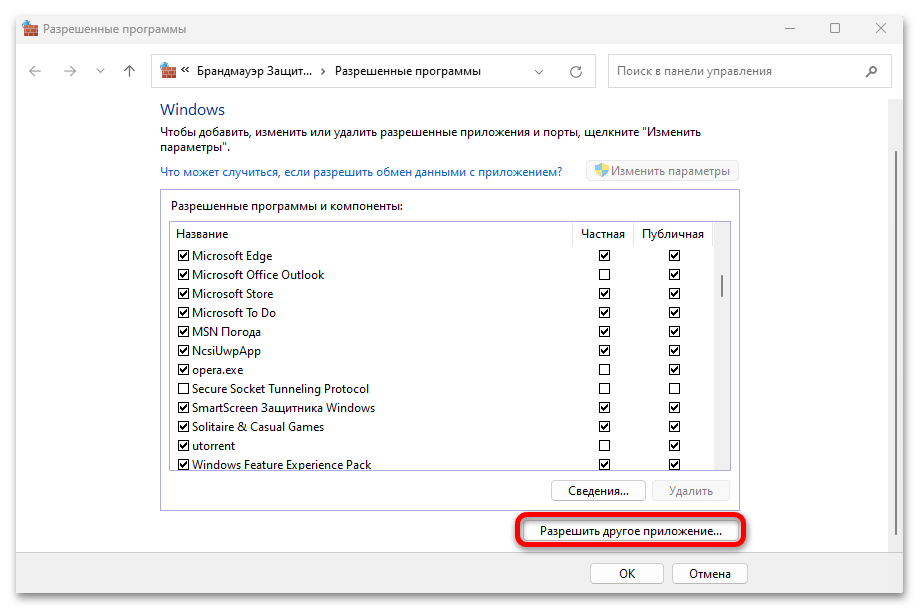
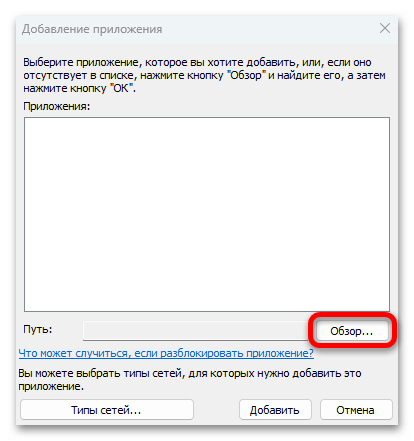
- Если в перечне нет искомой программы, нажмите на кнопку внизу «Разрешить другое приложение».
- Затем выберите «Обзор».
- Запустится штатный «Проводник» — через него и указывается путь к исполняемому файлу, который надо добавить в список исключений.
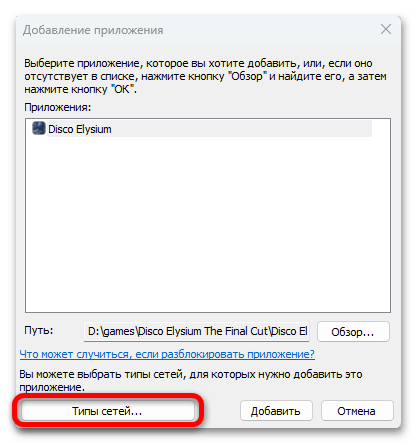
- Потом в предыдущем окне выберите кнопку «Типы сетей».
- В открывшемся окне укажите нужную – частная или публичные сети (можно отметить оба пункта).
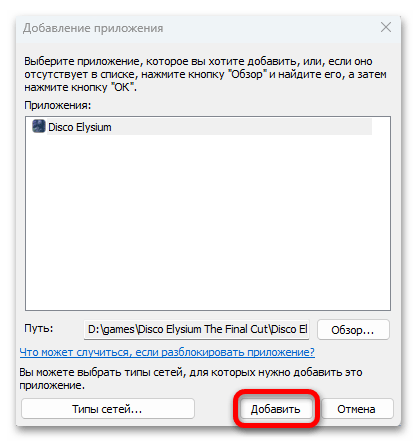
- Далее кликните по «Добавить» — выбранный файл поместится в списке «Разрешенные программы и компоненты». Не забудьте сохранить настройки.
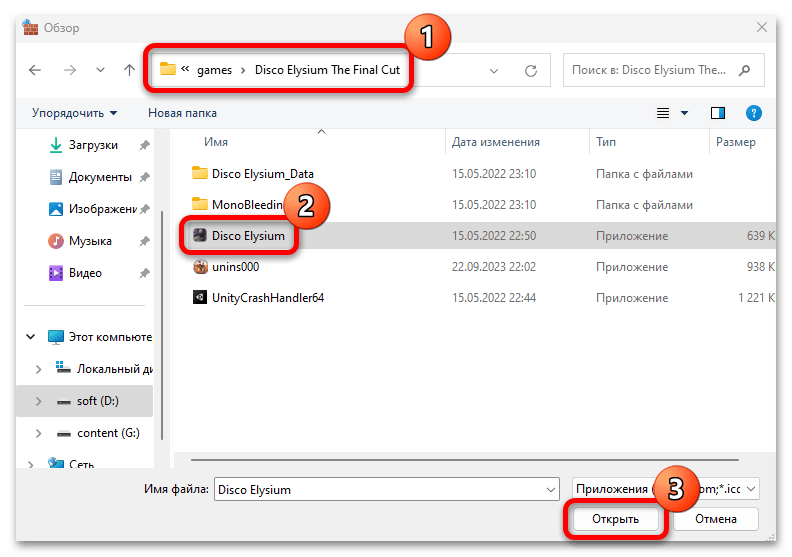
Таким образом можно добавить в исключения фактически любой исполняемый файл, отыскав его на локальном диске.
Кстати, попасть в окно «Разрешенные программы» можно и через классическую «Панель управления». Для этого потребуется проделать всего несколько шагов:
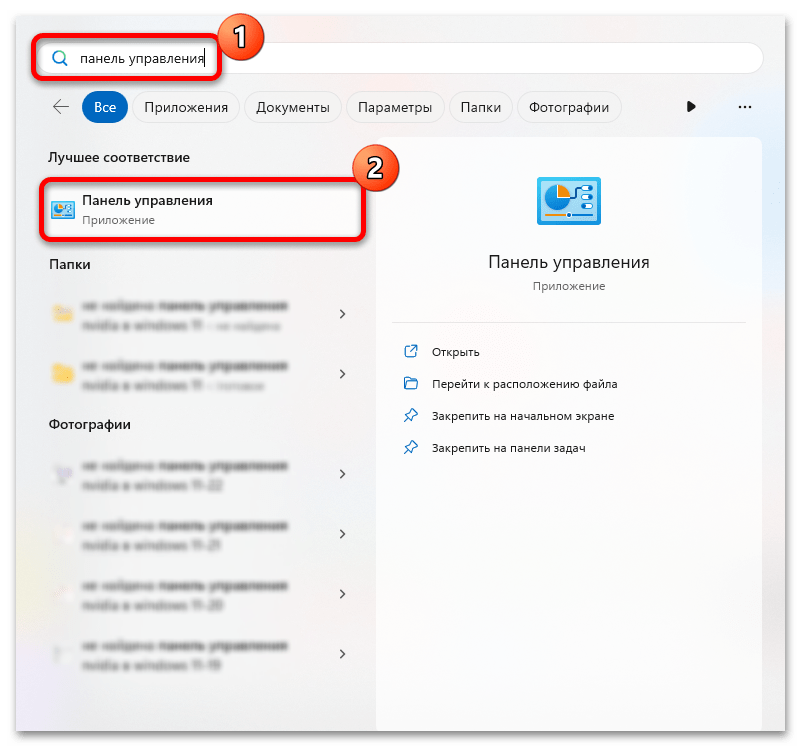
- Найдите в главном меню Windows 11 или с помощью строки системного поиска «Панель управления».
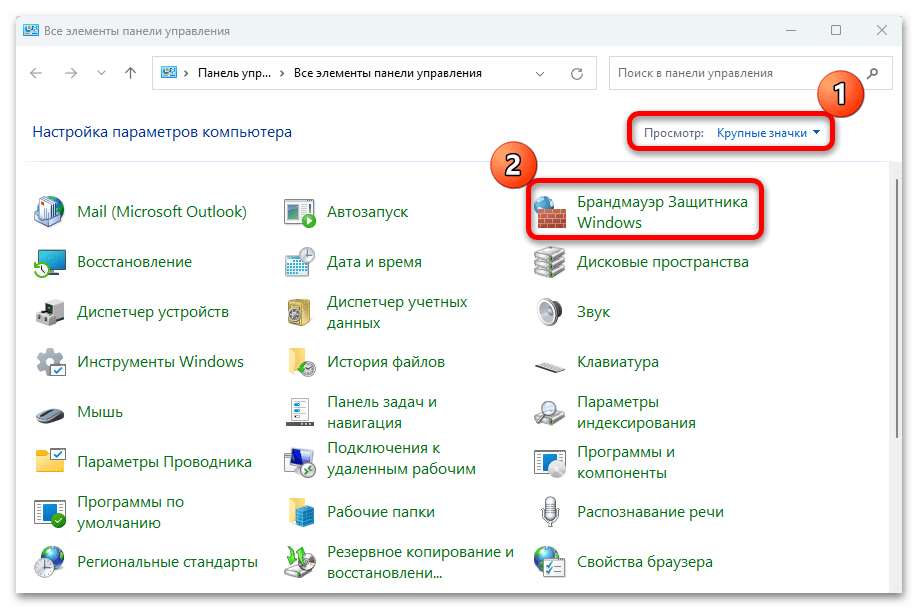
- В меню «Просмотр» выберите отображение разделов как крупные или мелкие значки, затем перейдите в раздел «Брандмауэр Защитника Windows».
- На панели слева кликните по строке «Разрешение взаимодействия с приложением или компонентом в брандмауэре Защитника Windows».
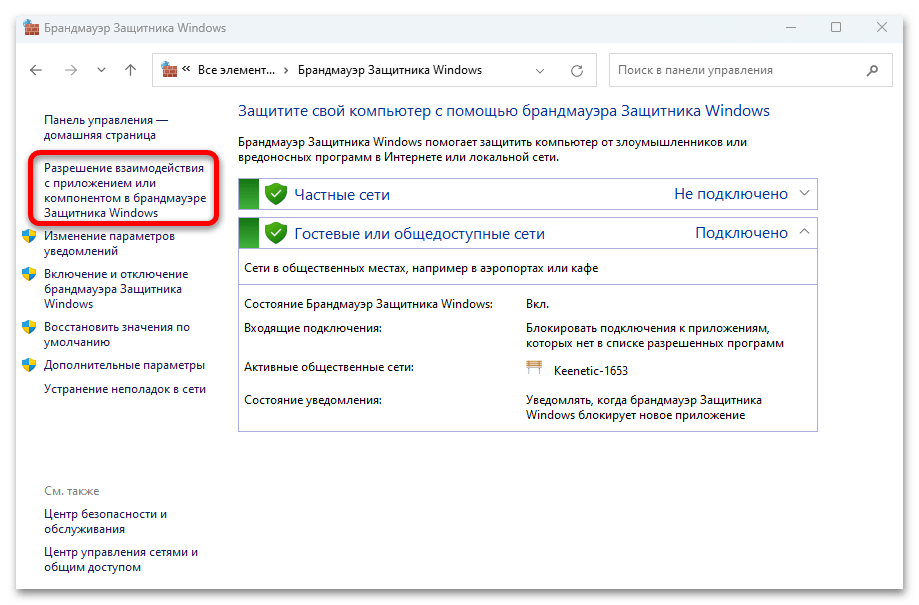
После этого вы попадете в окно «Разрешенные программы», после чего можно следовать первой инструкции с Шага 5.
Вариант 2: «Монитор брандмауэра Windows в режиме повышенной безопасности»
В Windows 11 реализована специальная оснастка для брандмауэра, где осуществляется управление не только настройками, но и правилами, исключениями на продвинутом уровне. Добавить программу или порт в исключения можно и через это средство – «Монитор брандмауэра Windows в режиме повышенной безопасности»:
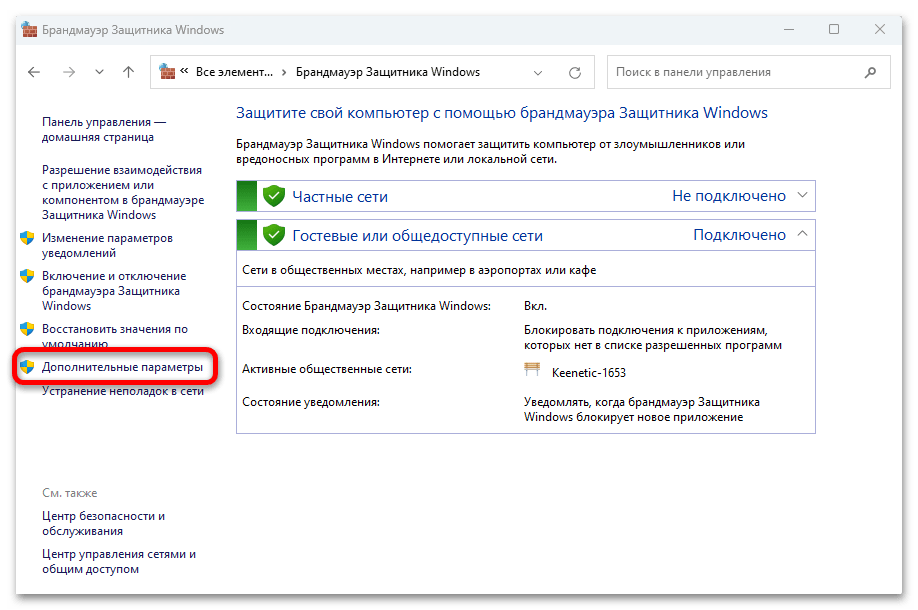
- Запустить оснастку можно через окно «Брандмауэр Защитника Windows», открытое через «Панель управления» (как во второй инструкции Варианта 1), но на панели слева нужно выбрать строку «Дополнительные параметры».

Также для быстрого перехода используется специальная команда
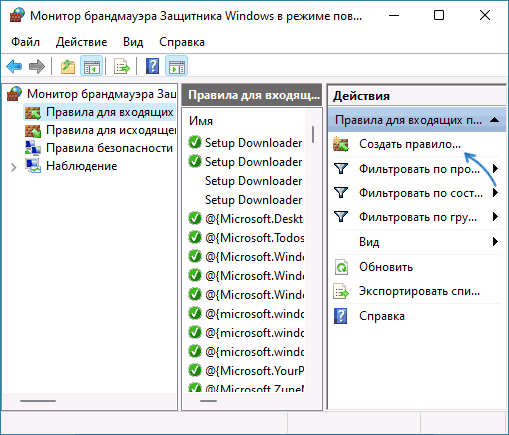
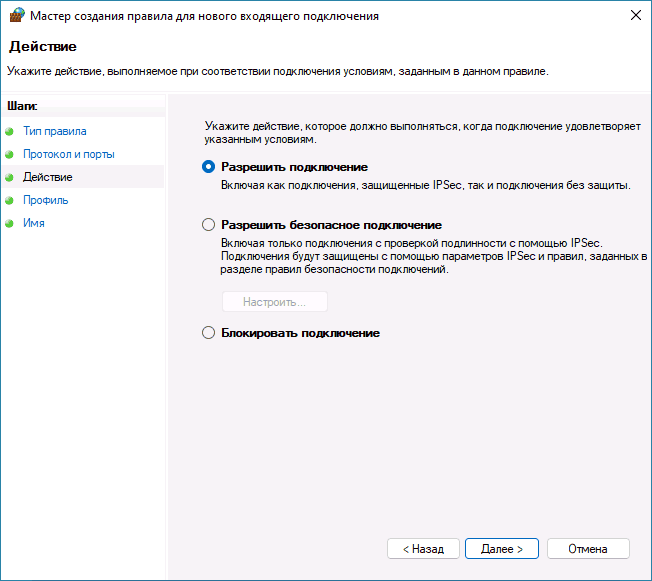
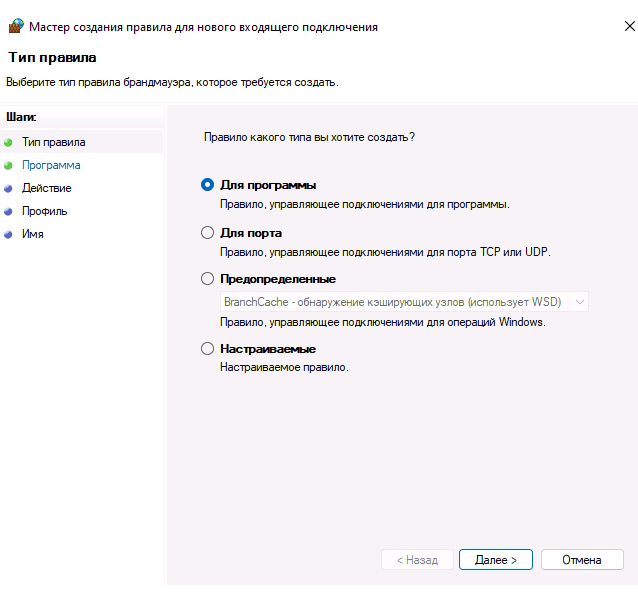
wf.msc, введенная в окно «Выполнить». - Откроется окно монитора брандмауэра, где на левой панели щелкните по пункту «Правила для входящих подключений» (или «Правила для исходящих подключений» — зависит от программы), затем по строке «Создать правило» справа.
- Выберите, для чего будет создаваться исключение (в нашем случае для программы), и переходите «Далее».
- Укажите путь к исполняемому файлу приложения и продолжите настройку.
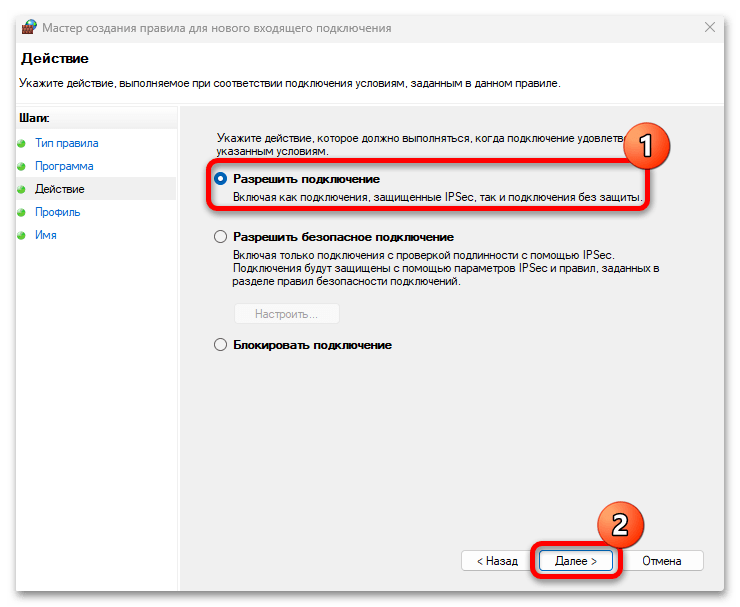
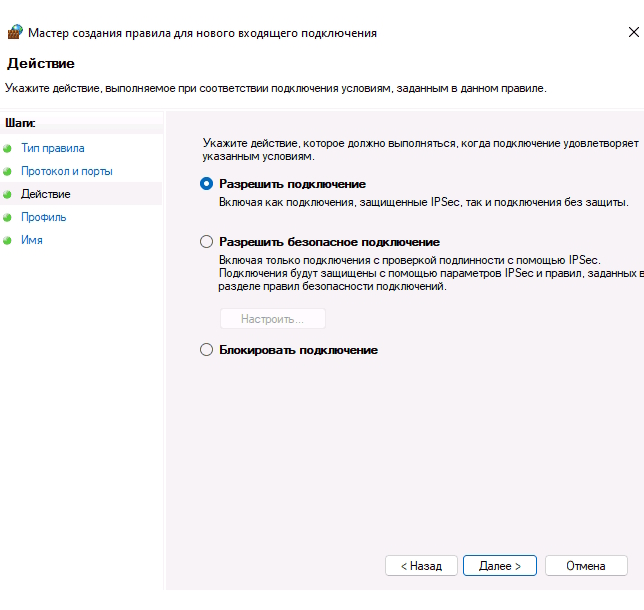
- В разделе «Действие» отметьте опцию «Разрешить подключение», что предотвратит блокировку действий программы брандмауэром, кликните по «Далее».
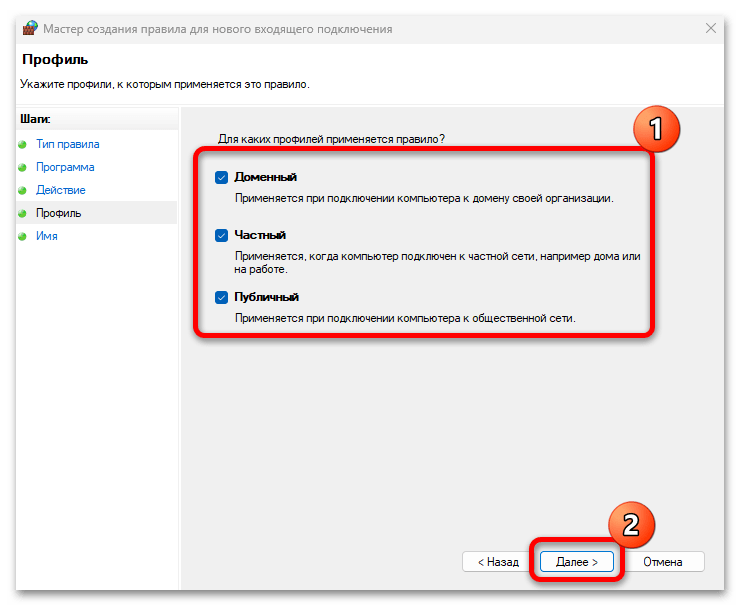
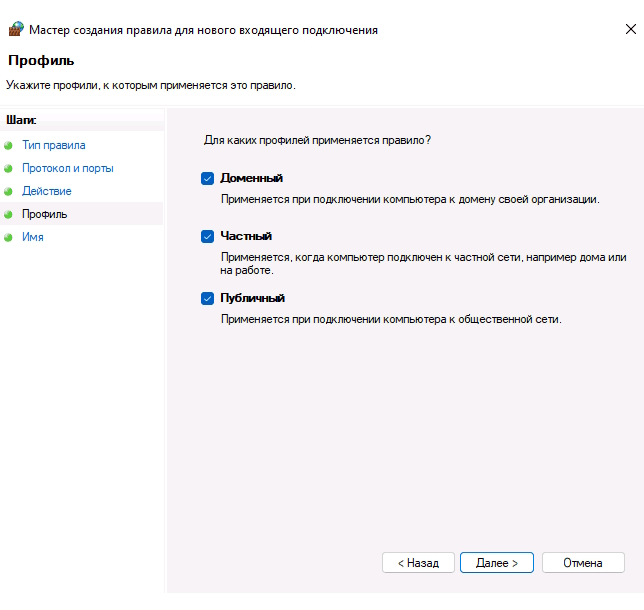
- Останется выбрать типы подключения.
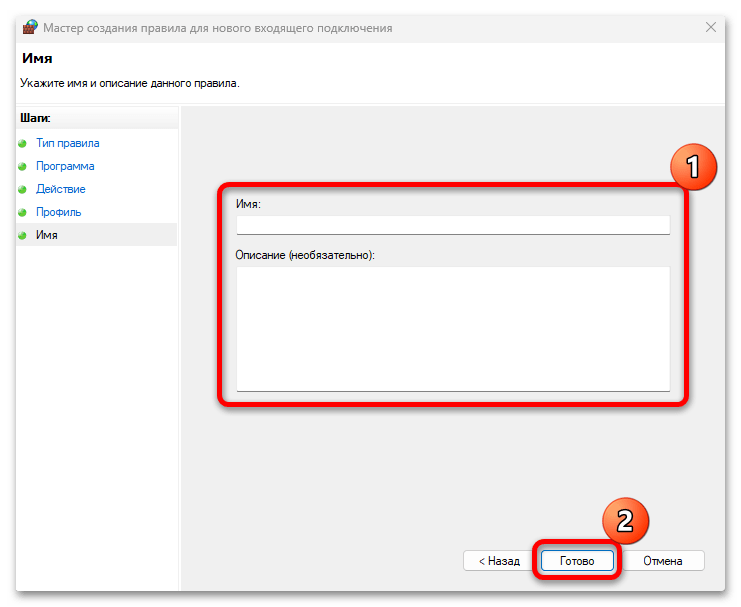
- На последнем шаге можно придумать имя и описание для созданного правило, после чего нажать на кнопку «Готово», чтобы завершить настройку.
После данной настройки трафик для выбранного приложения будет разрешен в соответствии с созданным правилом. Причем в оснастке есть возможность задавать неограниченное количество правил для различных типов подключений – как входящих, так и исходящих.
Вариант 3: «Командная строка»
Поскольку консоль в Windows является универсальным инструментом, с помощью которого можно выполнять различные действия и управлять системой в целом, добавление исключений в брандмауэр — не исключение. Используя специальные команды, вы сможете через «Терминал» или «Командную строку» разрешить подключения (входящие или исходящие) определенному приложению.
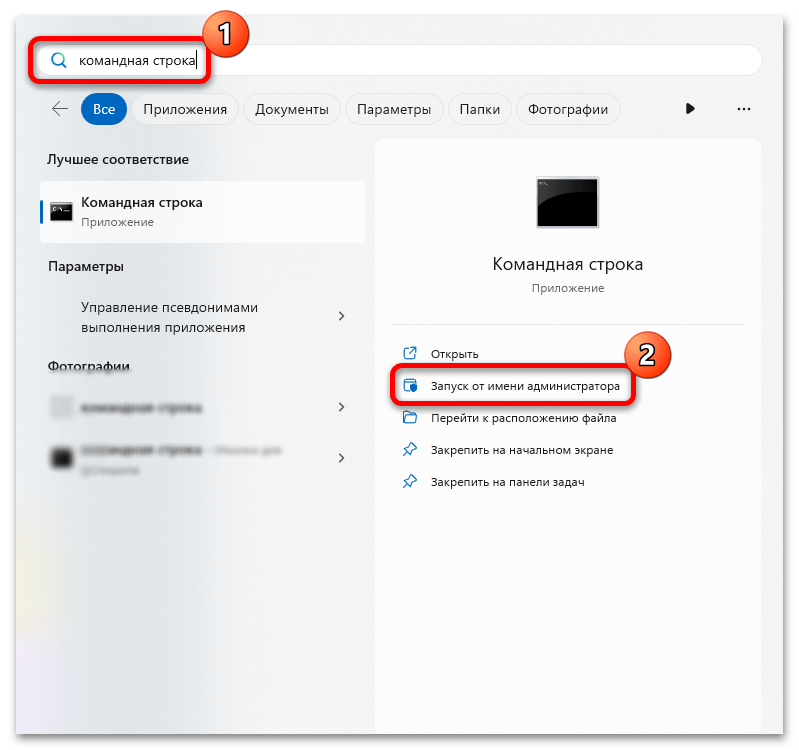
- Запустите консоль с расширенными правами – можете воспользоваться строкой системного поиска, затем выбрать пункт «Запуск от имени администратора».
- Чтобы добавить в исключения входящего подключения, введите команду ниже, где вместо «Имя_правила» задайте свое значение, например название программы, а вместо «путь_к_программе» скопируйте адрес к корневому каталогу, где располагается исполняемый файл. Клавишей «Enter» подтвердите выполнение команды.
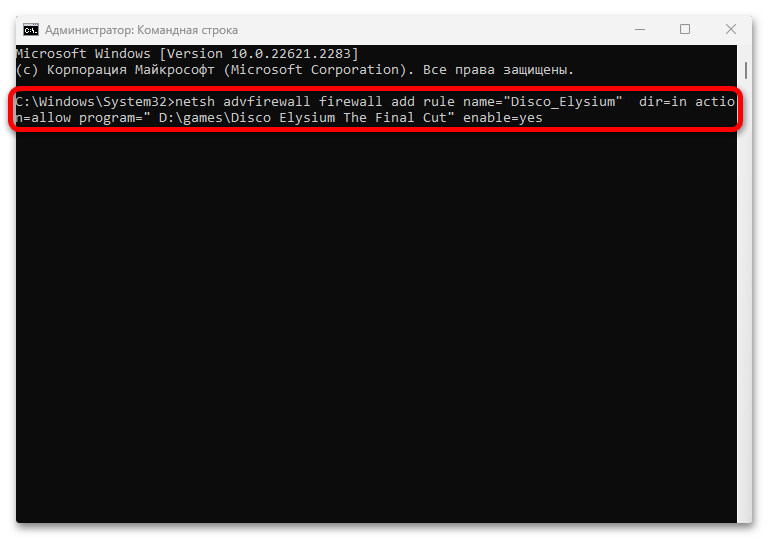
netsh advfirewall firewall add rule name="Имя_правила" dir=in action=allow program="путь_к_программе" enable=yesЕсли ее нужно добавить в исключения исходящего трафика, она будет выглядеть следующим образом:
netsh advfirewall firewall add rule name="Имя_правила" dir=out action=allow program="путь_к_программе" enable=yesК примеру, при добавлении игры в список исключений брандмауэра выполняемая команду преобразуется в:
netsh advfirewall firewall add rule name="Disco_Elysium" dir=in action=allow program=" D:\games\Disco Elysium The Final Cut" enable=yes
Также через выбранную консоль есть возможность ознакомиться со справкой по добавлению исключений в брандмауэр. Для этого достаточно выполнить команду
netsh advfirewall firewall add rule ?, после чего отобразится дополнительная информация о процедуре.
Наша группа в TelegramПолезные советы и помощь
What is Hamachi?
Hamachi is a virtual private network (VPN) application that allows you to create secure connections between multiple devices over the internet. It creates a private network that enables you to access remote computers, share files, and play games as if you were on the same local network.
Developed by LogMeIn, Hamachi provides a reliable and convenient way to connect your devices across different geographical locations. Whether you want to collaborate with coworkers, host a LAN gaming session, or access your home computer remotely, Hamachi simplifies the process without the need for complex network configurations.
Using Hamachi is straightforward. You simply download and install the software on the devices you want to connect, create a network, and invite others to join. Once connected, you can securely share files, chat, and play games with other members of the network.
One of the key features of Hamachi is its secure connection. All data transmitted between devices is encrypted using advanced algorithms, ensuring that your information remains private and protected from eavesdropping.
Furthermore, Hamachi is available for multiple operating systems, including Windows, macOS, and Linux, making it accessible to a wide range of users. It also offers a free version with limited features, as well as a paid subscription for additional functionality and scalability.
Overall, Hamachi is a versatile and reliable VPN solution that enables you to establish secure connections between devices over the internet. Its ease of use, cross-platform compatibility, and robust security features make it an ideal choice for various applications, from online gaming to remote work and collaboration.
Why do you need to allow Hamachi through the firewall?
Firewalls act as a barrier between your device and external networks, monitoring and controlling incoming and outgoing network traffic. While firewalls are essential for network security, they can sometimes block legitimate connections, including those established by Hamachi. Allowing Hamachi through the firewall is necessary to ensure that it functions properly and can establish secure connections.
Here are a few reasons why you need to allow Hamachi through the firewall:
- Enable seamless connectivity: Hamachi relies on network communication protocols to establish connections between devices. By allowing Hamachi through the firewall, you ensure that these protocols can function unhindered, enabling seamless connectivity between devices on the Hamachi network.
- Facilitate file sharing and remote access: Hamachi is commonly used for accessing remote devices and sharing files securely. When the firewall blocks Hamachi, it can prevent the transfer of files or remote access to devices on the network. Allowing Hamachi through the firewall enables these features to work as intended.
- Enable online gaming: Hamachi is popular among gamers for creating virtual LANs and playing multiplayer games over the internet. If the firewall blocks Hamachi, it can prevent gaming sessions or cause connectivity issues. By allowing Hamachi through the firewall, you ensure a smooth gaming experience for all players.
- Ensure secure connections: Hamachi encrypts data transmitted between devices to ensure privacy and security. If the firewall blocks Hamachi, it can interfere with the encryption process or prevent secure connections from being established. Allowing Hamachi through the firewall ensures that your connections remain protected.
Keep in mind that the process of allowing Hamachi through the firewall may differ depending on the operating system and firewall software you are using. However, the general concept remains the same – you need to create an exception or rule in the firewall settings to allow Hamachi to communicate freely.
By allowing Hamachi through the firewall, you can experience the full functionality and benefits of this powerful VPN application. Whether you are collaborating with remote colleagues, accessing files on different devices, or enjoying multiplayer gaming sessions, allowing Hamachi through the firewall is crucial for a seamless and secure experience.
Check if Hamachi is blocked by the firewall
Before you begin allowing Hamachi through the firewall, it’s important to determine whether or not it is currently being blocked. Here are some steps to check if Hamachi is blocked by the firewall:
- Check Windows Firewall: On a Windows PC, open the Control Panel and click on “System and Security” or “Windows Security.” Then, click on “Windows Defender Firewall” or “Windows Firewall.” In the firewall settings, look for any rules blocking Hamachi. If you find any, you will need to create an exception to allow Hamachi through.
- Check Mac Firewall: On a Mac, go to System Preferences and click on “Security & Privacy.” Then, click on the “Firewall” tab and check if Hamachi is listed as an application that is being blocked. If it is, you will need to allow it through the firewall.
- Check third-party firewalls: If you are using a third-party firewall software, such as Norton, McAfee, or ZoneAlarm, you will need to access the settings of that software and check if Hamachi is being blocked. Each firewall software may have different steps, so refer to the documentation or support resources provided by the software manufacturer.
- Test network connectivity: If you suspect that Hamachi is being blocked by the firewall, you can also try testing the network connectivity. Create a network on Hamachi and have someone else join it. If they are unable to join or you cannot establish a connection with them, it could be an indication that Hamachi is blocked by the firewall.
Remember, it’s important to check if Hamachi is blocked by the firewall before making any changes to the firewall settings. This will help ensure that you are addressing the correct issue and can take the appropriate steps to allow Hamachi through the firewall.
If you are using Hamachi on a Windows PC and it is being blocked by the Windows Firewall, you can follow these steps to allow Hamachi through the firewall:
- Open Windows Firewall settings: Go to the Control Panel and click on “System and Security” or “Windows Security.” Then, click on “Windows Defender Firewall” or “Windows Firewall.”
- Click on “Allow an app or feature through Windows Firewall”: On the left-hand side of the screen, you will see a link that says “Allow an app or feature through Windows Firewall.” Click on it to proceed.
- Find Hamachi in the list: In the “Allowed apps” window, click on the “Change settings” button. Scroll down the list of apps and features until you find “Hamachi.” Ensure that both the “Private” and “Public” boxes are checked next to Hamachi.
- Add Hamachi if it’s not listed: If you don’t see Hamachi in the list, you can click on the “Allow another app…” button. In the dialog box that appears, click on the “Browse” button and navigate to the location where Hamachi is installed. Select the Hamachi application file (usually named “hamachi-2-ui.exe” or similar) and click “Open.” Then, make sure that the “Private” and “Public” boxes are checked next to Hamachi.
- Save the changes: Once you have ensured that Hamachi is listed and both the “Private” and “Public” boxes are checked, click on the “OK” button to save the changes and close the Windows Firewall settings.
By following these steps, you have allowed Hamachi through the Windows Firewall. This should prevent the firewall from blocking Hamachi and enable you to establish connections, share files, and use Hamachi without any issues.
Note that if you are using a different firewall software or a third-party antivirus program that includes a firewall, the steps to allow Hamachi may vary. Consult the documentation or support resources provided by the software manufacturer for instructions specific to your firewall software.
Allow Hamachi through Mac Firewall
If you are using Hamachi on a Mac and it is being blocked by the macOS Firewall, you can follow these steps to allow Hamachi through the firewall:
- Open System Preferences: Click on the Apple menu in the top-left corner of the screen and select “System Preferences.”
- Access Firewall settings: In the System Preferences window, click on the “Security & Privacy” icon.
- Unlock the settings: If the settings are locked, click on the lock icon in the bottom-left corner of the window and enter your administrator password when prompted.
- Click on the Firewall tab: In the Security & Privacy window, click on the “Firewall” tab.
- Click on the “Firewall Options” button: Underneath the Firewall options, click on the “Firewall Options” button to open the advanced settings.
- Add Hamachi to the allowed applications: In the “Firewall Options” window, click on the “+” button and navigate to the location where Hamachi is installed. Select the Hamachi application file (usually named “hamachi-2-ui” or similar), and click “Add.”
- Allow incoming connections: Make sure that the checkbox next to Hamachi is checked in the “Block all incoming connections” section. This ensures that incoming connections to Hamachi are allowed.
- Save the changes: Click on the “OK” button to save the changes and close the Firewall Options window.
By following these steps, you have allowed Hamachi through the Mac Firewall. This ensures that the firewall does not block Hamachi and allows you to establish connections, share files, and use Hamachi without any interruptions.
Note that if you are using a different firewall software or a third-party antivirus program that includes a firewall, the steps to allow Hamachi may vary. Refer to the documentation or support resources provided by the software manufacturer for instructions specific to your firewall software.
Allow Hamachi through third-party firewalls
If you are using a third-party firewall software, such as Norton, McAfee, or ZoneAlarm, and Hamachi is being blocked, you can follow these general steps to allow Hamachi through the firewall:
- Open the firewall software: Locate the firewall software on your computer and open the program.
- Access the firewall settings: Look for an option or tab that allows you to configure the firewall settings. This may vary depending on the specific firewall software you are using.
- Find the applications or program permissions: Look for a section or category within the firewall settings that deals with application or program permissions. This is where you can manage which programs are allowed through the firewall.
- Add Hamachi to the allowed list: In the application or program permissions section, click on the option to add a new program or application. Navigate to the location where Hamachi is installed on your computer. Select the Hamachi executable file (usually named “hamachi-2-ui.exe” or similar) and add it to the allowed list.
- Specify network permissions: Depending on the firewall software, you may also need to specify network permissions for Hamachi. Ensure that both inbound and outbound network connections are allowed for Hamachi.
- Save the changes: Once you have added Hamachi to the allowed list and specified the appropriate network permissions, save the changes in the firewall software.
These steps are a general guideline for allowing Hamachi through third-party firewalls. The exact steps may vary depending on the firewall software you are using. Refer to the documentation or support resources provided by the software manufacturer for specific instructions on allowing programs through their firewall.
By allowing Hamachi through third-party firewalls, you ensure that the firewall does not block Hamachi and allows you to establish connections, share files, and use Hamachi without any interruptions.
Troubleshooting common issues
While allowing Hamachi through the firewall should resolve most connectivity issues, there are a few common problems that you may encounter. Here are some troubleshooting steps to help you address these issues:
- Ensure Hamachi is running: Check that Hamachi is running on both your device and the devices you are trying to connect with. If Hamachi is not running or has encountered an error, restart the application and try connecting again.
- Verify network connectivity: Make sure that your device is connected to the internet and has a stable network connection. If your network connection is unstable or experiencing issues, it may affect the performance of Hamachi.
- Check for software conflicts: Sometimes, other software or applications on your device can conflict with Hamachi. Temporarily disable any antivirus, firewall, or VPN software, and check if Hamachi can establish connections. If Hamachi works without conflicts, you may need to adjust the settings of the conflicting software or contact their support for guidance.
- Update Hamachi: Ensure that you are using the latest version of Hamachi. Outdated versions can have compatibility issues, so updating to the latest release may resolve connectivity problems.
- Restart devices and routers: Sometimes, a simple restart of your device or router can resolve connectivity issues. Power off your device and router, wait for a few minutes, and then power them back on.
- Reset network adapters: If you are experiencing persistent connectivity issues, you can try resetting your network adapters. Open the command prompt (CMD) as an administrator and enter the following command:
netsh int ip reset. Restart your device after running the command. - Contact Hamachi support: If you have tried all the troubleshooting steps and are still experiencing issues with Hamachi, it may be beneficial to reach out to Hamachi support for further assistance. They can provide specific guidance based on your situation and help you resolve any persistent problems.
Remember, troubleshooting steps may vary depending on your operating system, network setup, and specific circumstances. It’s always recommended to consult relevant documentation, forums, or support resources for comprehensive troubleshooting specific to your environment.
By following these troubleshooting steps, you can address common connectivity issues and ensure that Hamachi functions properly, allowing you to establish secure connections, share files, and enjoy a seamless Hamachi experience.
При появлении проблем с подключением каких-либо программ к Интернету, некоторые пользователи полностью отключают брандмауэр Windows, однако это нельзя назвать лучшим решением с точки зрения безопасности. Возможно, предпочтительнее будет добавить такую программу в список разрешенных.
В этой пошаговой инструкции подробно о способах добавить исключения в брандмауэр Windows 11 или Windows 10 (способы подойдут и для предыдущих версий системы). Также может быть полезным: Как сбросить настройки брандмауэра Windows.
Добавление программы в исключения брандмауэра в окне «Безопасность Windows» или через Панель управления
Первый способ — использование нового интерфейса управления брандмауэром Windows в окне «Безопасность Windows» или Панели управления.
Шаги для добавления программы в исключения брандмауэра будут следующими:
- Откройте окно «Безопасность Windows», для этого можно использовать значок Microsoft Defender в области уведомлений или «Параметры» (путь в Windows 11: Конфиденциальность и защита — Безопасность Windows — Открыть службу «Безопасность Windows».
- Откройте пункт «Брандмауэр и безопасность сети».
- Нажмите «Разрешить работу с приложением через брандмауэр» ниже списка профилей сети.

- Вместо шагов 1-3 можно открыть Панель управления, открыть пункт «Брандмауэр Защитника Windows», а затем нажать по ссылке «Разрешение взаимодействия с приложением или компонентом в брандмауэре защитника Windows».

- В открывшемся окне нажмите «Изменить параметры» (для этого требуются права администратора).
- Если нужного приложения нет в списке (если есть — просто установите отметки для нужных сетей, чтобы разрешить ему работу с сетью), нажмите кнопку «Разрешить другое приложение».

- Нажмите кнопку «Обзор» и укажите путь к нужной программе.
- Нажмите кнопку «Типы сетей» и отметьте те сети, с которыми программе должно быть разрешено работать.
- Нажмите кнопку «Добавить».


Программа будет добавлена в список разрешенных в брандмауэре, останется нажать «Ок» для того, чтобы настройки были применены.
Добавление порта или программы в исключения в мониторе брандмауэра Защитника Windows в режиме повышенной безопасности
Еще один способ добавления программ и портов в исключения брандмауэра Windows 10 и Windows 11 — Монитор брандмауэра в режиме повышенной безопасности.
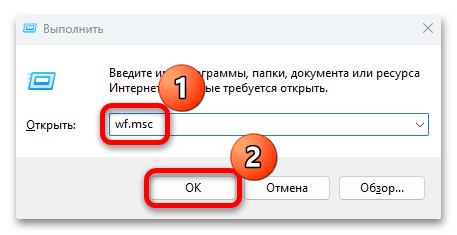
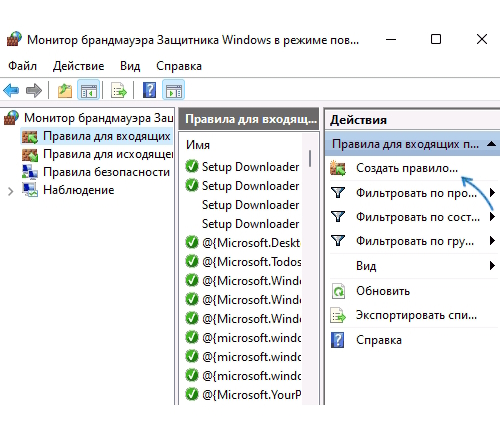
- Нажмите клавиши Win+R, введите wf.msc и нажмите Enter, либо откройте пункт «Брандмауэр защитника Windows» в Панели управления, а затем нажмите «Дополнительные параметры» в панели слева.
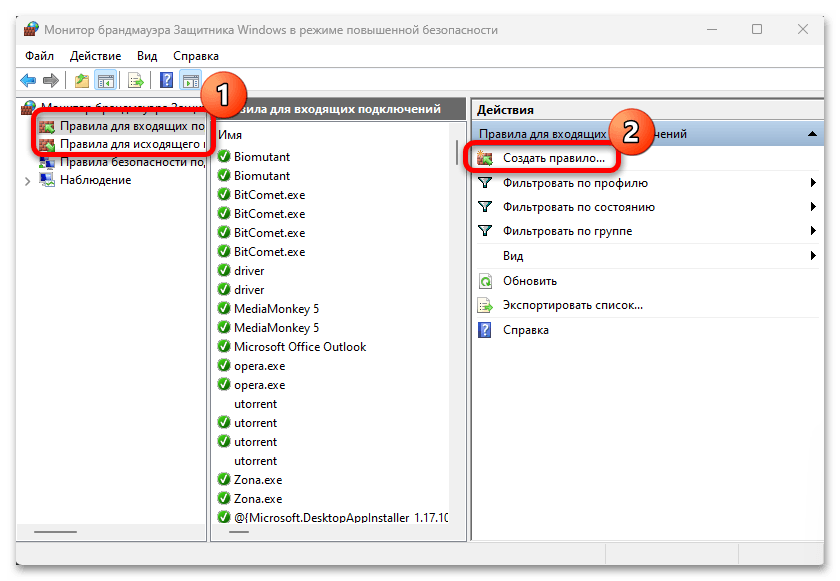
- В панели слева выберите «Правила для входящих подключений» или «Правила для исходящих подключений» (часто бывает необходимо настроить и то и другое).
- В панели справа нажмите «Создать правило».

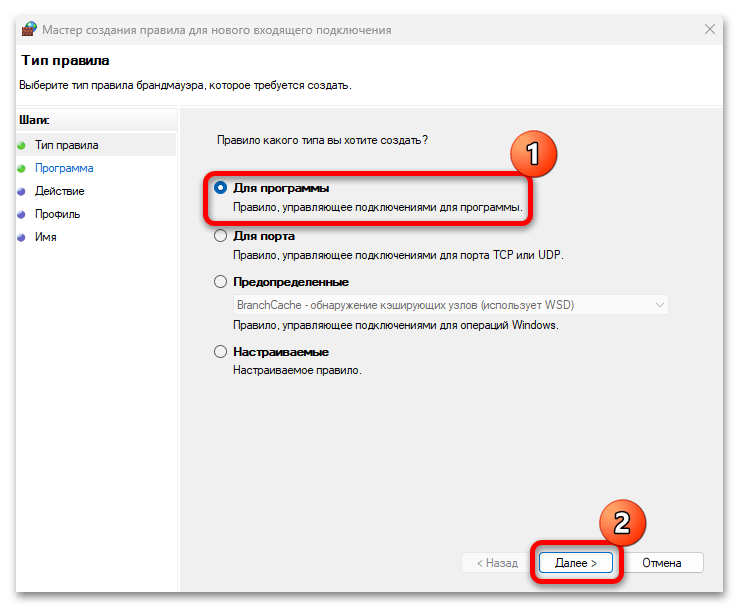
- Укажите, для программы или порта создается правило и нажмите «Далее».

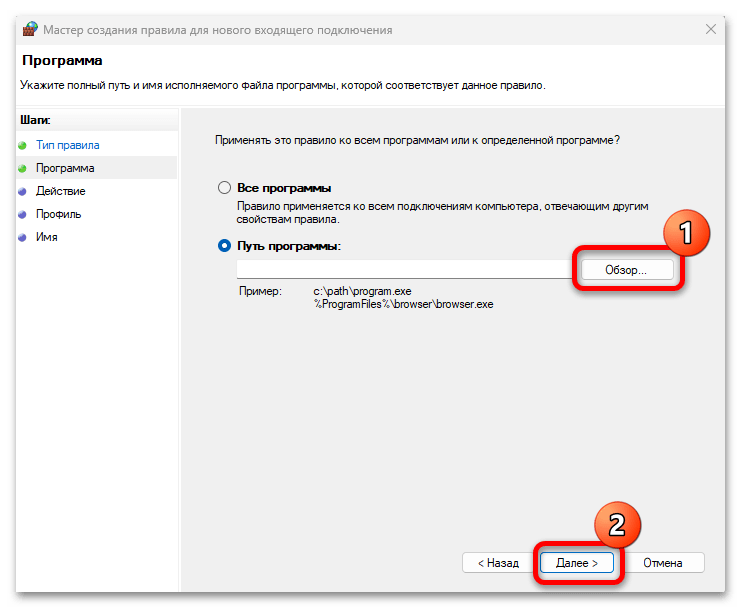
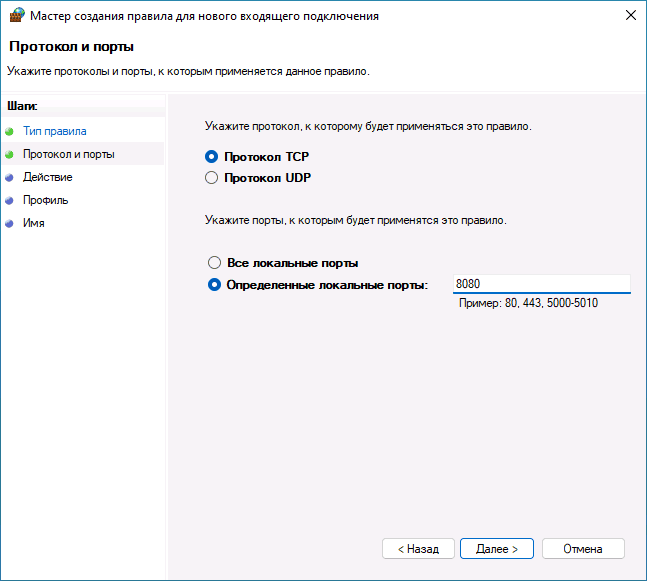
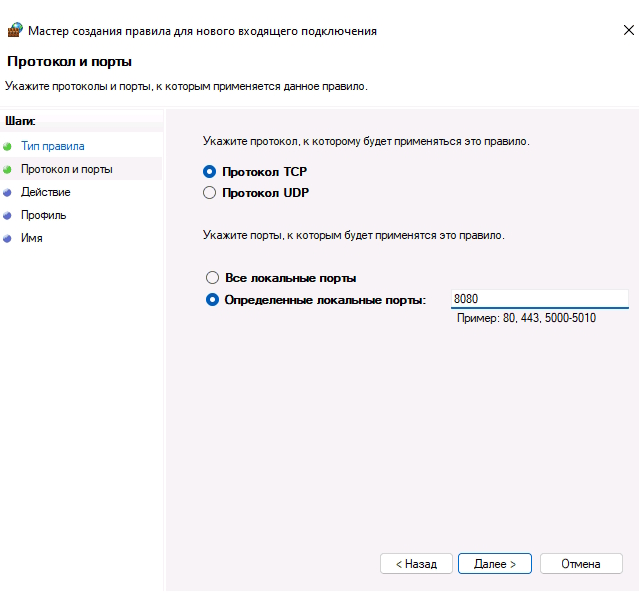
- Укажите путь к программе, либо протокол и номера портов для правила. Нажмите «Далее».
- Выберите пункт «Разрешить подключение», чтобы для выбранного порта или программы подключение не блокировалось. Нажмите «Далее».

- Выберите, для каких сетевых профилей будет применяться правило.

- Укажите имя и, при необходимости, описание созданного правила. Нажмите кнопку «Готово».


В результате трафик для выбранного порта или программы будет разрешен, при необходимости создайте аналогичное правило для другого типа подключений (для входящих вместо исходящих или наоборот).
Добавление исключений брандмауэра с помощью командной строки
Запустив командную строку от имени администратора, вы можете использовать следующие команды для разрешения доступа в сеть для программы или открытия определенного порта.
Для программы. Первая команда — разрешает входящие, вторая — исходящие подключения, в обоих случаях для всех сетевых профилей:
netsh advfirewall firewall add rule name="Имя_правила" dir=in action=allow program="путь_к_программе" enable=yes
netsh advfirewall firewall add rule name="Имя_правила" dir=out action=allow program="путь_к_программе" enable=yes
Для порта. Первая команда — входящие, вторая — исходящие подключения:
netsh advfirewall firewall add rule name="Имя_правила" dir=in action=allow protocol=TCP localport=номер_порта
netsh advfirewall firewall add rule name="Имя_правила" dir=out action=allow protocol=TCP localport=номер_порта
Справку по добавлению правил брандмауэра с помощью командной строки можно получить с помощью команды
netsh advfirewall firewall add rule ?
Если у вас остаются вопросы по теме, можно задать их в комментариях к этой статье, я постараюсь найти решение.
Когда у пользователей возникают проблемы с подключением программ к интернету, часть из них выбирают полное отключение брандмауэра Windows, чтобы решить проблему. Стоит отметить, что такое решение не самое безопасное, если вы хотите обеспечить защиту компьютера. Вместо этого более предпочтительным вариантом будет добавление нужной программы в список исключений брандмауэра.

В нашей пошаговой инструкции описаны методы добавления исключений в брандмауэр Windows 10 или Windows 11, причем эти методы подходят и для более старых версий операционной системы.
Добавление программы в исключения брандмауэра через Панель управления или окно «Безопасность Windows»
Способ 1 – через новый интерфейс управления брандмауэром Windows в разделе «Безопасность Windows» либо Панель управления.
Порядок действий следующий:
- Открываем окно «Безопасность Windows» через «Параметры» (для Windows 11 путь будет таким: Конфиденциальность и защита — Безопасность Windows — Открыть службу «Безопасность Windows») либо при помощи значка Microsoft Defender в области уведомлений
- Открываем пункт «Брандмауэр и безопасность сети».
- Под перечнем профилей сети жмем на кнопку «Разрешить работу с приложением через брандмауэр».

- Если вы хотите работать с Панелью управления, то вместо первых трех этапов, открываем Панель управления, потом пункт «Брандмауэр Защитника Windows» и жмем на ссылку «Разрешение взаимодействия с приложением или компонентом в брандмауэре защитника Windows».

- Откроется окно, где нужно будет выбрать «Изменить параметры» (это может сделать только пользователь с правами администратора).
- В том случае, когда необходимое приложение отсутствует, жмем кнопку «Разрешить другое приложение». Если оно есть – ставим отметку напротив необходимых сетей для того, чтобы позволить ему с ними работать.

- Нажимаем на кнопку «Обзор» и выбираем путь к необходимой программе.
- Нажимаем на кнопку «Типы сетей» и выбираем те сети, для которых дадим разрешение программе с ними работать.
- Жмем на кнопку «Добавить».
- После этого программа окажется в списке разрешенных в нашем брандмауэре и нужно будет только нажать на кнопку «Ок», чтобы применить настройки.

Добавление в исключения программы или порта в мониторе брандмауэра Защитник Windows в режиме повышенной безопасности
Добавить порты и программы в список исключений брандмауэра операционной системы Windows 10 или 11 также можно при помощи монитора брандмауэра, выбрав режим повышенной безопасности. Это делается следующим образом:
- Нажимаем комбинацию клавиш Win+R, пишем wf.msc, жмем на Enter или открываем через Панель управления пункт «Брандмауэр защитника Windows», после чего жмем в левой части панели на кнопку «Дополнительные параметры».
- В левой части панели надо выбрать «Правила для входящих подключений» либо «Правила для исходящих подключений» (иногда требуется настроить оба пункта).
- В правой части панели жмем на «Создать правило».

- Пишем, для кого создаем правило: программа или порт и жмем на кнопку «Далее».

- Указываем номера портов и протокол или путь к выбранной программе. Жмем на кнопку «Далее».

- Чтобы нужный порт или программа не блокировались, выбираем пункт «Разрешить подключение». Жмем на кнопку «Далее».

- Выбираем сетевые профили, для которых будет действовать правило.
- Пишем название и, если нужно, создаем описание правила. Жмем на кнопку «Готово».
Благодаря выполненным шагам перестанет блокироваться трафик для выбранной программы или порта. Если используется другой тип подключения, то может понадобиться создать еще одно правило (для исходящих вместо входящих, и наоборот).
Как добавить исключения брандмауэра при помощи командной строки
Если нужно открыть конкретный порт или разрешить доступ в сеть конкретной программе, можно применять определенные команды, вводя их в командной строке от имени администратора.
Для программы
1-я команда — разрешает входящие подключения, 2-я — исходящие, для любого сетевого профиля:
netsh advfirewall firewall add rule name=»Имя_правила» dir=in action=allow program=»путь_к_программе» enable=yes
netsh advfirewall firewall add rule name=»Имя_правила» dir=out action=allow program=»путь_к_программе» enable=yes
Для порта
1-я команда — разрешает входящие подключения, 2-я — исходящие.
netsh advfirewall firewall add rule name=»Имя_правила» dir=in action=allow protocol=TCP localport=номер_порта
netsh advfirewall firewall add rule name=»Имя_правила» dir=out action=allow protocol=TCP localport=номер_порта
Если вы хотите больше узнать о том, как добавлять правила брандмауэра при помощи командной строки, вы можете использовать следующую команду:
netsh advfirewall firewall add rule ?
Задать вопросы или поделиться опытом использования нашей инструкции вы можете ниже в комментариях.