This Windows Server 2022 Tutorial covers how to Create Users and Groups on Active Directory. Windows Server Active Directory Domain Service (ADDS) is a directory service that stores information about all objects in the domain and makes this data available to network users and administrators. Active Directory Domain Service provides secure, structured, hierarchical data storage for objects and the admin can easily manage all objects. The user represents a real user who is part of an organization’s AD network. A group is an object that can contain other AD objects such as other groups, users, and computers, Hence, a group object is a container object.
Table of Contents
- Create a User on Active Directory – Windows Server 2022
- Create a Group on the Active Directory – Windows Server 2022
Prerequisite Required
- Install and configure Active Directory Domain Services
Demo environment
- Computer Name: server1.test.com
- Operating System: Windows Server 2022 Datacenter
- IP Address: 192.168.0.3
In this step, we are going to create a user (user1@test.com)
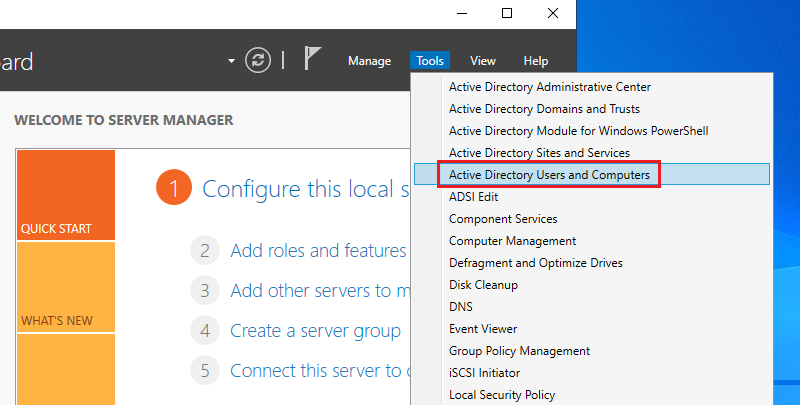
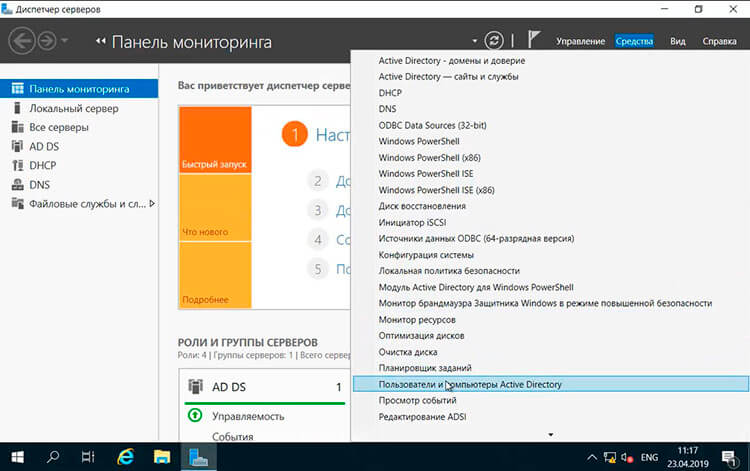
1. Open Server Manager, click Tools and select Active Directory Users and Computer.
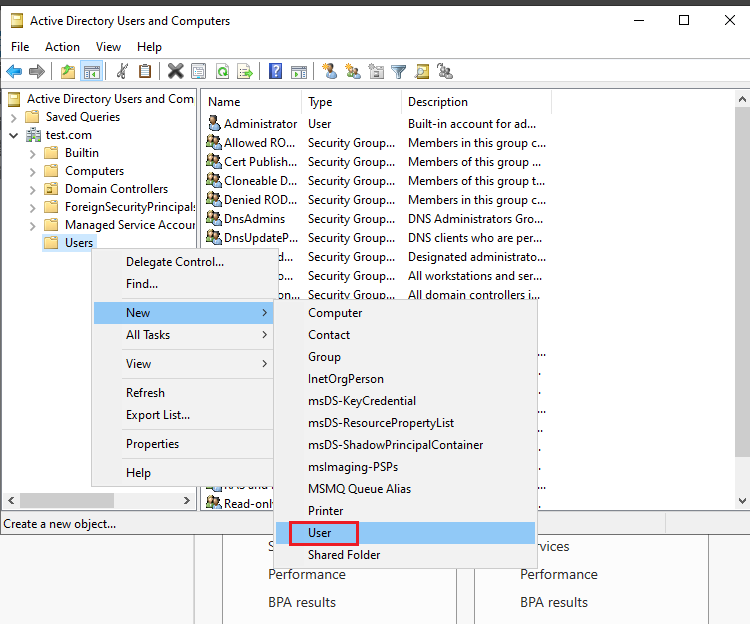
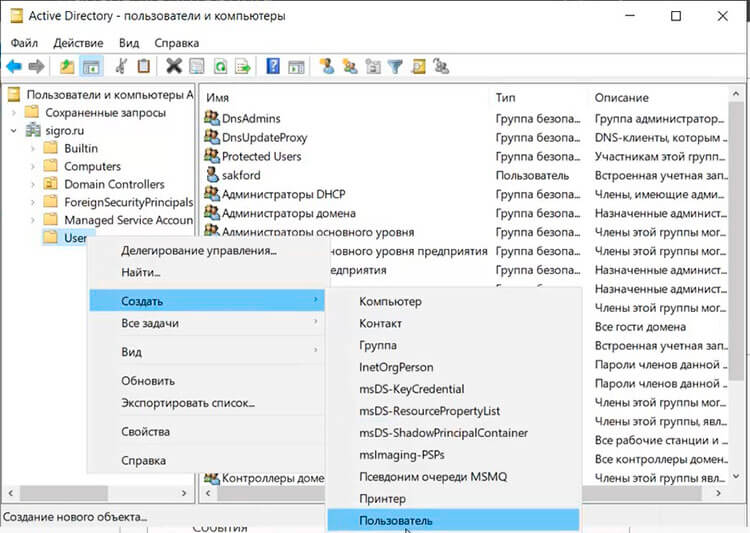
2. Right-click on Users, click New and select User.
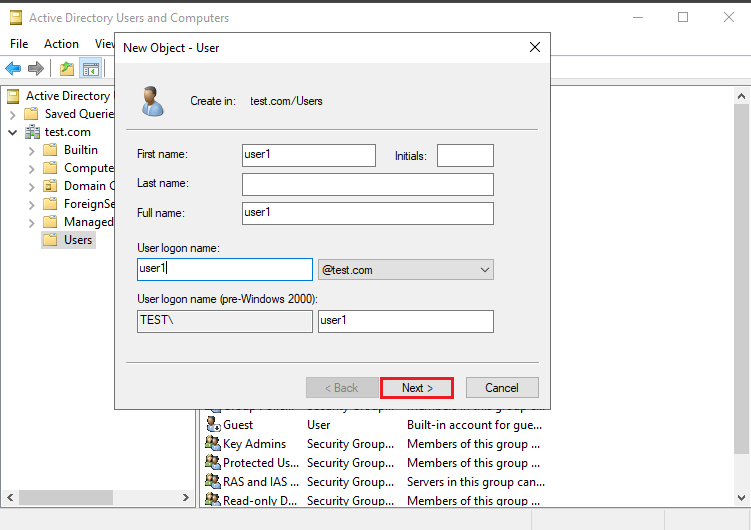
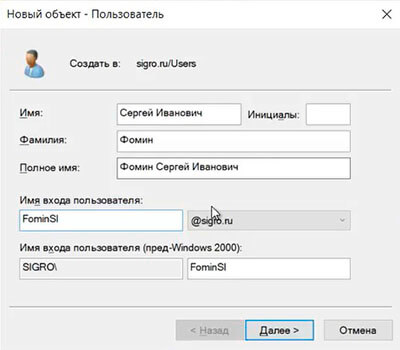
3. Enter the Name and User login name for a new user and click Next.
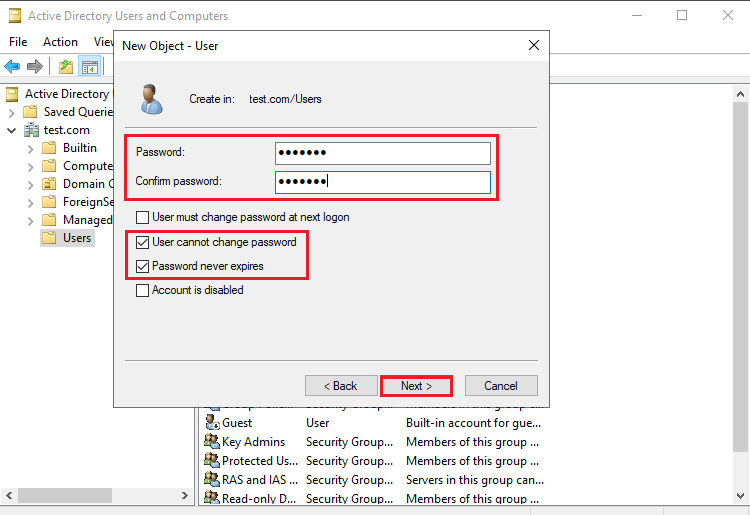
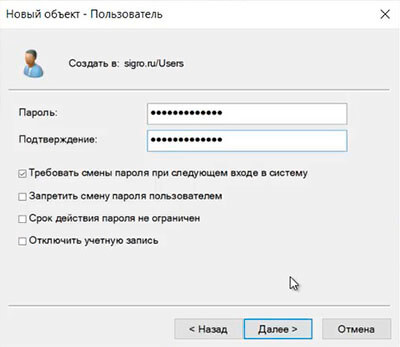
4. Set a password for a new User Click Next.
- Tick User cannot change password.
- Tick Password never expires.
If you need the user to change the password at the next logon Tick User must change password at the next logon.
5. Click Finish.
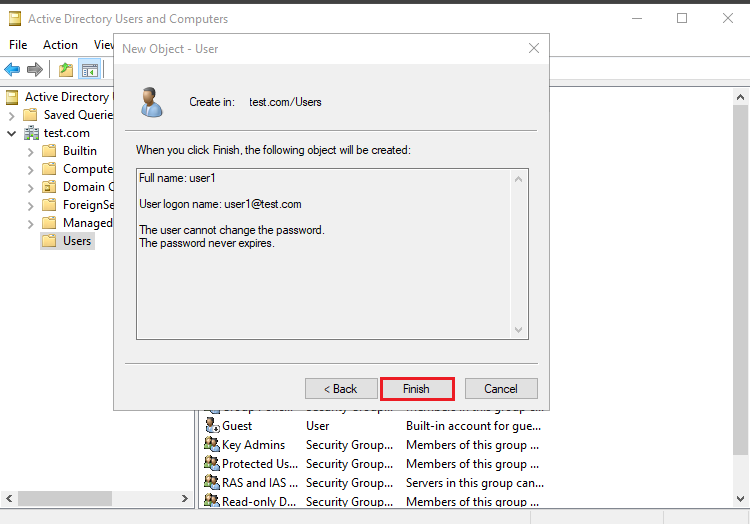
The Active Directory User has been created.
Create a Group on the Active Directory
In this step, we are going to create a group and add users to the group.
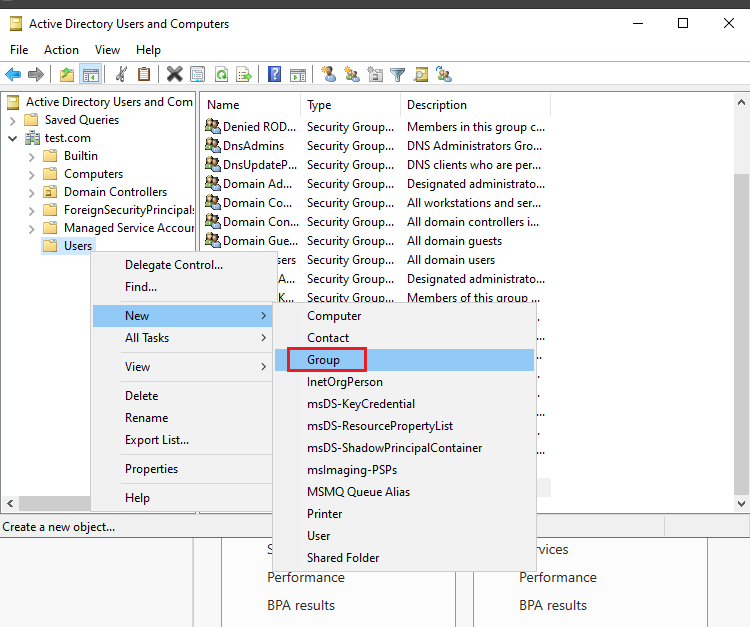
1. Open Server Manager, click Tools and select Active Directory Users and Computer.

2. Right-click on Users, click New and select Group.
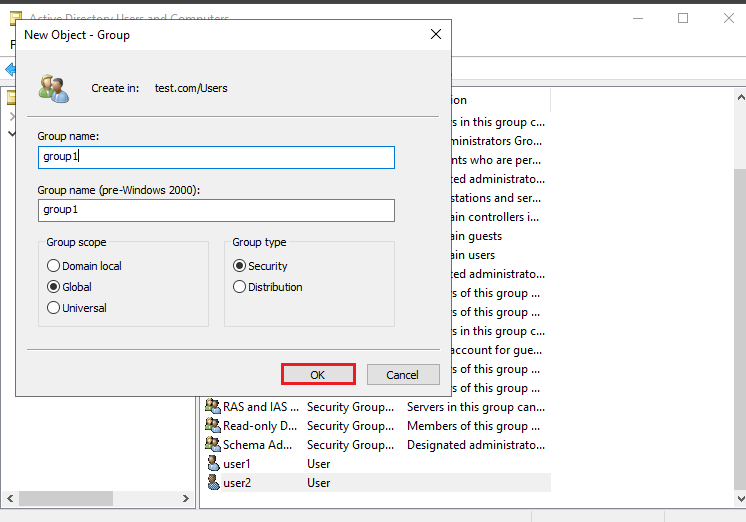
3. Enter the Group name and click OK.
- Default Group scope: Global
- Default Group type: Security
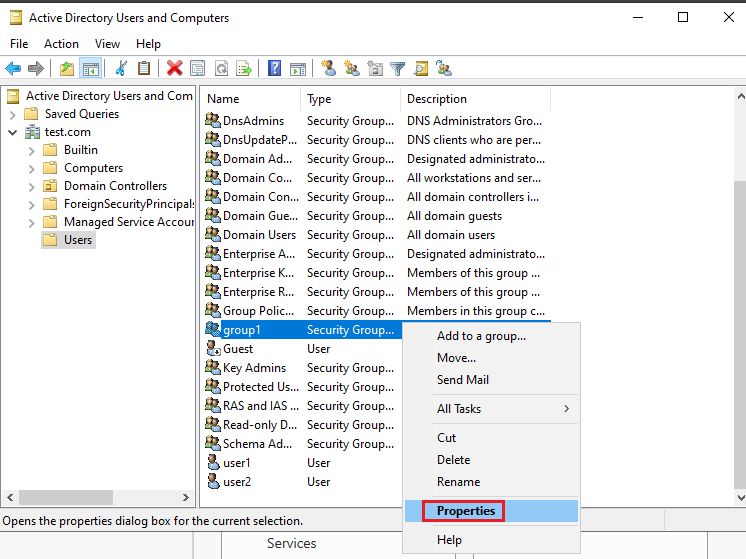
4. Right-click on the Group name and select Properties.
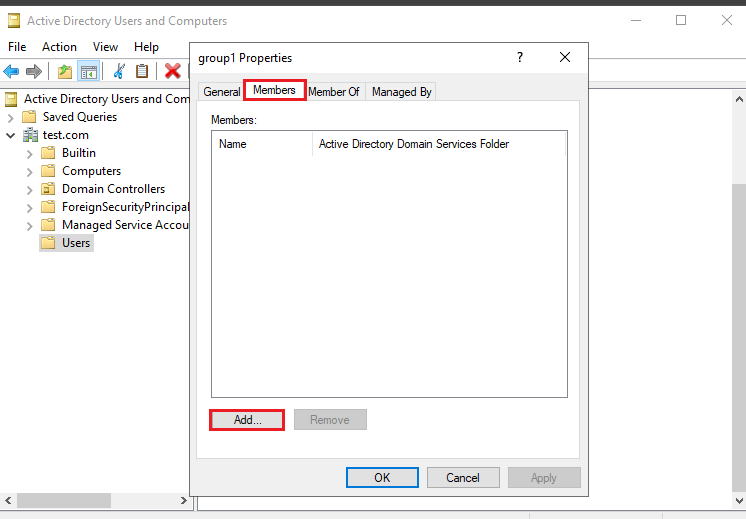
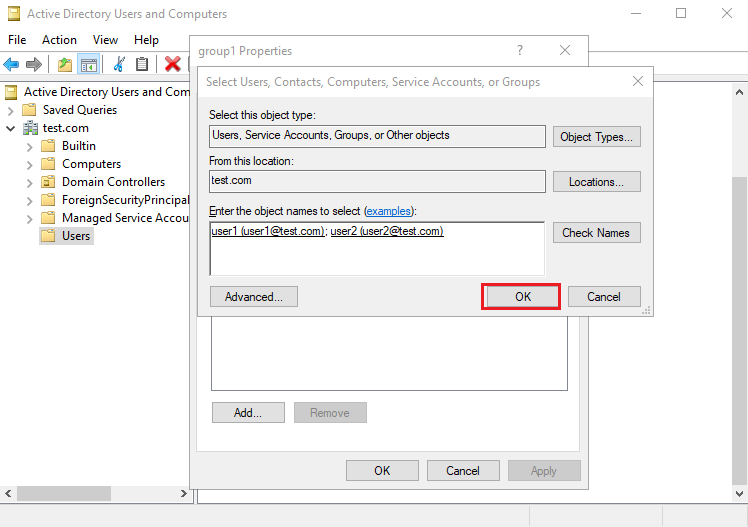
5. Select the Members tab and click Add.
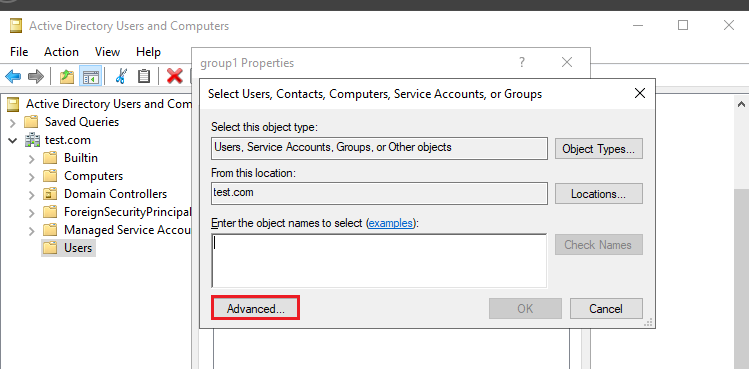
6. Click Advanced.
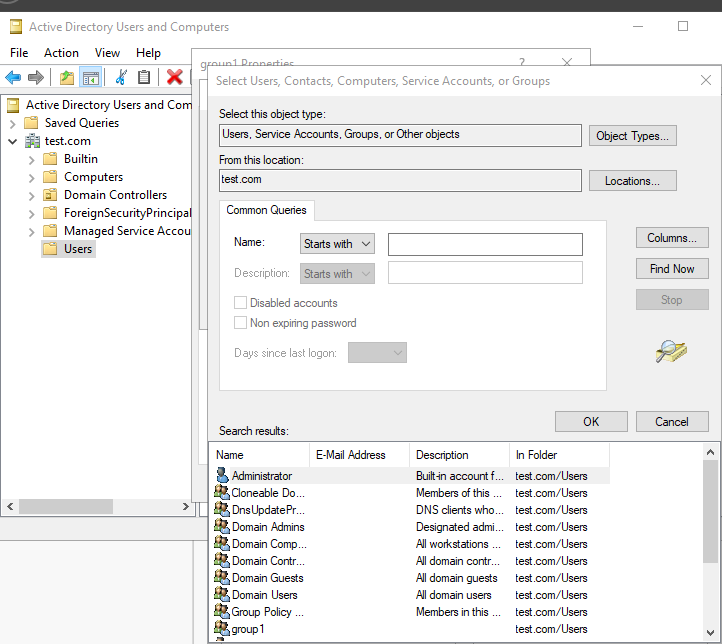
7. Click Find Now, Select the Users and Click OK.
In this tutorial, we select user1 and user2.
8. Click OK.
9. Click OK.
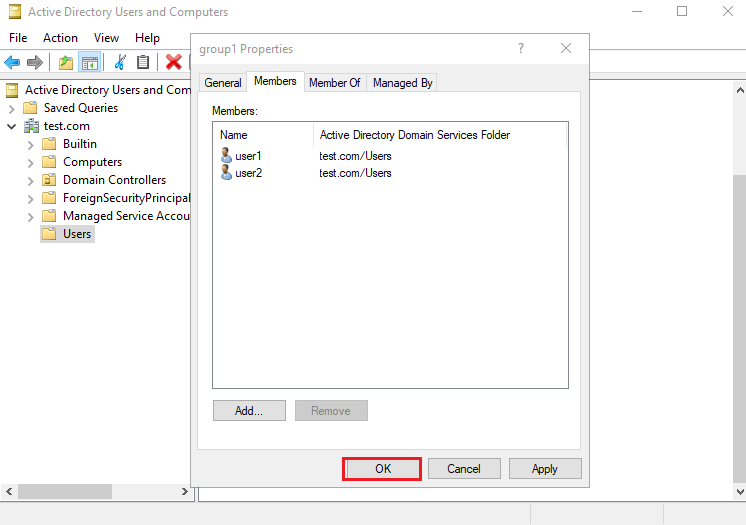
The Active Directory Group has been created.
Windows Server 2022 Tutorial
A Complete Guide to Managing Users and Groups in Windows Server 2019
The robust operating system Windows Server 2019 is capable of efficiently managing users and groups. Any organisation must manage users and groups in Windows Server 2019 because it improves security and resource management.
This guide will cover effective user and group management in Windows Server 2019.
Establishing Users and Groups
Creating new users and groups is the first step in managing users and groups in Windows Server 2019.
Follow these steps to create a new user:
- Launch the «Local Users and Groups» section of the Server Manager console.
- From the context menu, click «Users» and choose «New User.»
- Type the user’s name, full name, description, and password in the «New User» dialogue box.
- To create a new user, click «Create.»
The steps below should be followed to create a new group:
- Launch the «Local Users and Groups» section of the Server Manager console.
- From the context menu, click «Groups,» then choose «New Group.»
- Enter the group name, description, and group type in the «New Group» dialogue box.
- To create the new group, click «Create.»
Taking care of Users and Groups
The next step is to manage new users and groups efficiently after they have been created.
Various tools are available in Windows Server 2019 to manage users and groups.
These tools consist of:
- Active Directory Users and Computers: This application is used for Active Directory user and group management.
- Local Users and Groups: On a local computer, users and groups are managed using this tool.
- PowerShell: PowerShell is an effective scripting language that can be used to manage users and groups.
Active Directory Users and Computers User Management
Follow these steps to manage users with Active Directory Users and Computers:
- Launch the console for Active Directory Users and Computers.
- Locate the container labelled «Users.»
- Double-click the user whose account you wish to manage.
- You can change a number of attributes, including the user’s name, description, password, and group membership, in the user’s properties dialogue box.
- To save the changes, click «OK.»
Using Active Directory Users and Computers for Group Management
The steps listed below can be used to manage groups with Active Directory Users and Computers:
- Launch the console for Active Directory Users and Computers.
- Select the «Groups» container from the list.
- Double-click the group that needs management.
- You can change a number of attributes, including the group’s name, description, membership, and scope, in the group’s properties dialogue box.
- To save the changes, click «OK.»
Using PowerShell for User and Group Management
An effective command-line interface for managing users and groups is offered by PowerShell.
Follow these steps to manage users and groups using PowerShell:
- Launch the PowerShell console.
- Use the «Get-ADUser» and «Set-ADUser» cmdlets to manage users.
- Use the «Get-ADGroup» and «Set-ADGroup» cmdlets to manage groups.
- Use the appropriate parameters to change different user and group attributes.
Managing Permissions for Users and Groups
Enhancing security and resource management requires managing user and group permissions.
Various tools are available in Windows Server 2019 to manage user and group permissions.
These tools consist of:
- File Explorer: File Explorer can be used to control folder and file permissions.
- Security Configuration Wizard: You can set up security settings on servers and applications using the Security Configuration Wizard.
- Group Policy: Group Policy allows users and groups to have their security settings customised.
File Explorer’s User and Group Permissions Management
2. Select «Security» from the tabs.
3. To change the permissions, click the «Edit» button.
4. You can edit the permissions for users and groups in the «Permissions for [file or folder]» dialogue box by adding or removing them.
5. To save the changes, click «OK.»
Utilizing Group Policy to Manage User and Group Permissions
The steps listed below can be used to manage user and group permissions using Group Policy:
- Launch the console for Group Policy Management.
- Make changes to an existing Group Policy Object (GPO) or create a new one.
- Select «Computer Configuration> Policies> Windows Settings> Security Settings> Local Policies> User Rights Assignment.»
- Double-click the user right that needs to be changed.
- You have the option to add or remove users and groups in the user right properties dialogue box.
- Press «OK» to save the modifications.
Conclusion
In conclusion, optimising security and resource management in an organisation requires managing users and groups in Windows Server 2019.
In order to effectively manage users, groups, and resources, Windows Server 2019 offers a variety of features and tools.
Using tools like Active Directory Users and Computers, Local Users and Groups, and PowerShell, we covered how to create and manage users and groups in Windows Server 2019 in this guide.
We also covered the use of tools like File Explorer, Security Configuration Wizard, and Group Policy for managing user and group permissions.
You can effectively manage users and groups in Windows Server 2019 and improve resource management and security in your company by following the instructions provided in this guide.
FAQs
- How do I define Windows Server 2019?
The robust operating system Windows Server 2019 is made for servers, and it offers many features and tools for efficiently managing users, groups, and resources.
- In Windows Server 2019, what role does managing users and groups play?
Enhancing security and resource management in an organisation requires managing users and groups in Windows Server 2019.
It aids in maintaining data integrity and limiting access to resources.
- What tools are available in Windows Server 2019 for managing users and groups?
Active Directory Users and Computers, Local Users and Groups, PowerShell, and other tools are available in Windows Server 2019 to manage users and groups.
- In Windows Server 2019, how do I manage user and group permissions?
In Windows Server 2019, tools like File Explorer, the Security Configuration Wizard, and Group Policy can be used to manage user and group permissions.
- What advantages does Windows Server 2019’s management of user and group permissions offer?
In Windows Server 2019, managing user and group permissions improves resource management and security within an organisation. It aids in regulating resource access, preserving data integrity, and preventing unauthorised access.
После того, как установлена роль Active Directory в домене windows server 2019, появляется возможность управления доменом. Далее необходимо создать пользователей, которые будут входить под учетными записями, группы и подразделения.
Как создать и удалить пользователя, группу и объект в домене
- Создание пользователя в домене
- Создание группы в домене
- Создание объекта в домене
- Удаление пользователя в домене
- Удаление группы в домене
- Удаление подразделения в домене
Для создания и удаления пользователя, группы и подразделения воспользуемся средством централизованного управления сервером — Диспетчер серверов. Далее выбираем «Пользователи и компьютеры Active Directory».
Создание пользователя в домене.
1. Нажимаем «Пуск«, далее выбираем «Диспетчер серверов«.
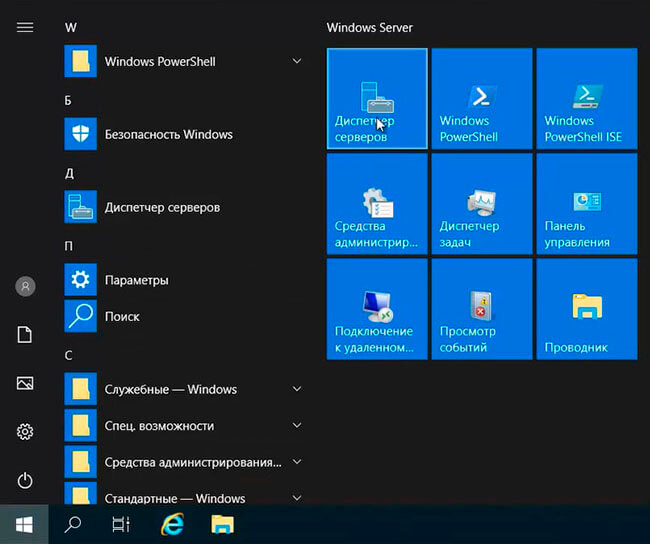
2. В новом окне нажимаем «Средства«, в открывшемся списке выбираем «Пользователи и компьютеры Active Directory«.
3. Далее нажимаем правой клавишей на «User«, далее «Создать» — «Пользователь«.
4. Заполняем необходимые поля для создания пользователя (Имя, Фамилия, Имя входа пользователя). «Полное имя» заполнится автоматически. Затем нажимаем «Далее«.
5. В следующем окне дважды набираем пароль для пользователя. Затем устанавливаем чекбокс на «Требовать смены пароля при следующем входе в систему«. Тогда при входе в систему пользователю будет предложено заменить текущий пароль. Нажимаем «Далее«.
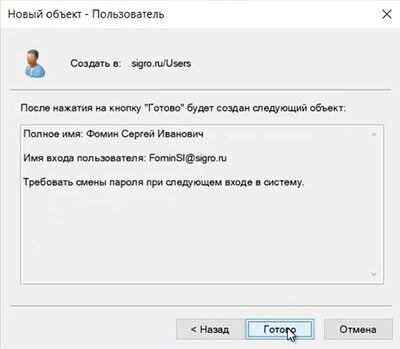
6. В новом окне смотрим сводную информацию по вновь созданному пользователю и нажимаем «Готово«. Будет создан новый пользователь.
Создание группы в домене
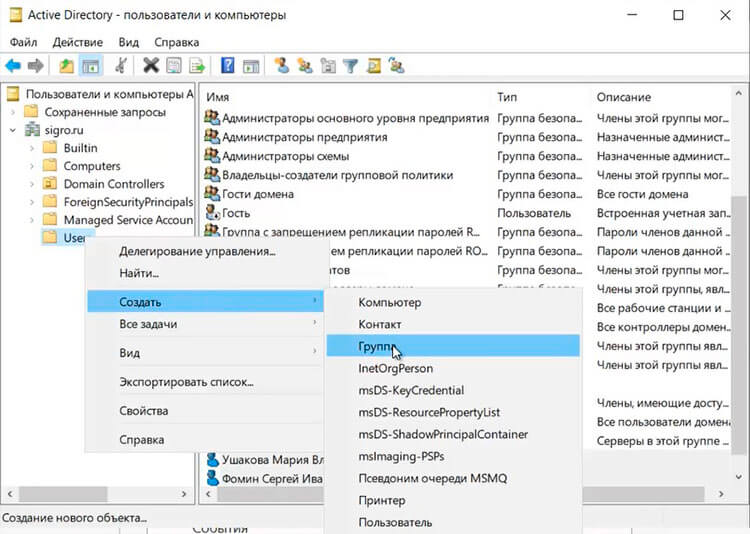
1. Для создания группы в домене, нажимаем правой клавишей мыши на «Users«, далее «Создать» — «Группа«.
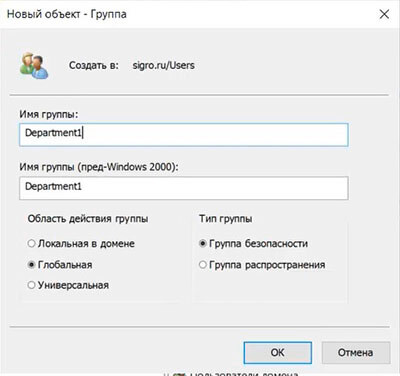
2. Задаем «Имя группы«, «Область действия группы» и «Тип группы«, далее нажимаем «ОК«. Будет создана группа.
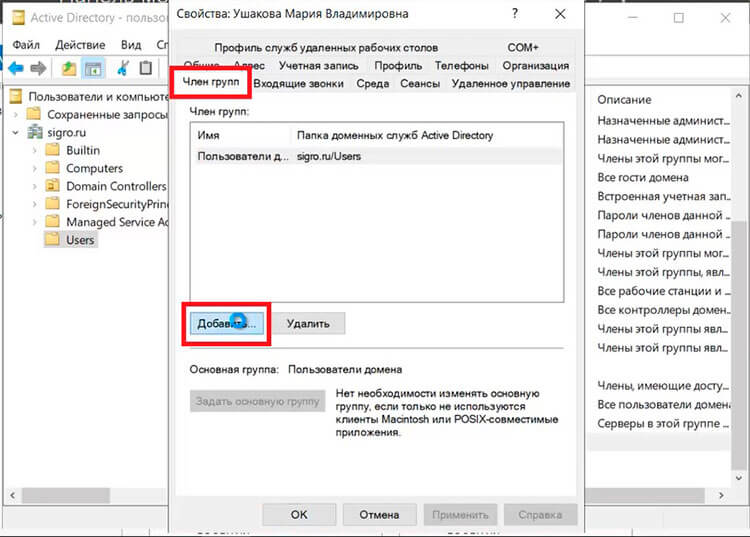
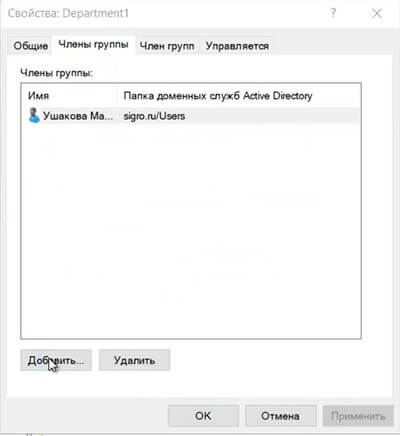
3. Для добавления пользователей в группу, открываем пользователя, выбираем вкладку «Член групп«, нажимаем кнопку «Добавить«.
4. В новом окне вводим имя группы, в которую будет добавлен пользователь. Проверяем нажав кнопку «Проверить имена«, далее «ОК«.
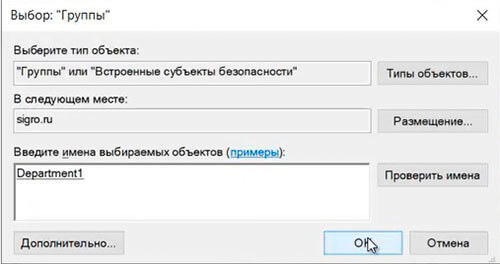
5. Также возможно добавить пользователя в группу, открыв нужную группу. Далее выбираем вкладку «Члены группы«. Нажимаем «Добавить«.
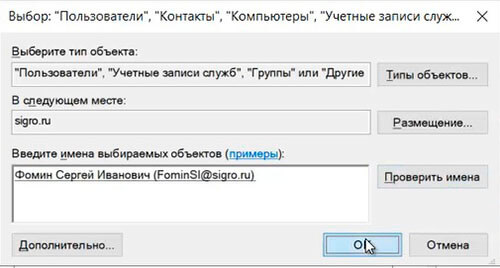
6. В новом окне вводим имена пользователей, которые будут добавлены в группу. Проверяем нажав клавишу «Проверить имена«, далее «ОК«.
Добавление подразделения в домене
1. Для добавления подразделения в домене нажимаем правой клавишей мыши на домен, в появившемся меню «Создать» — «Подразделение«.
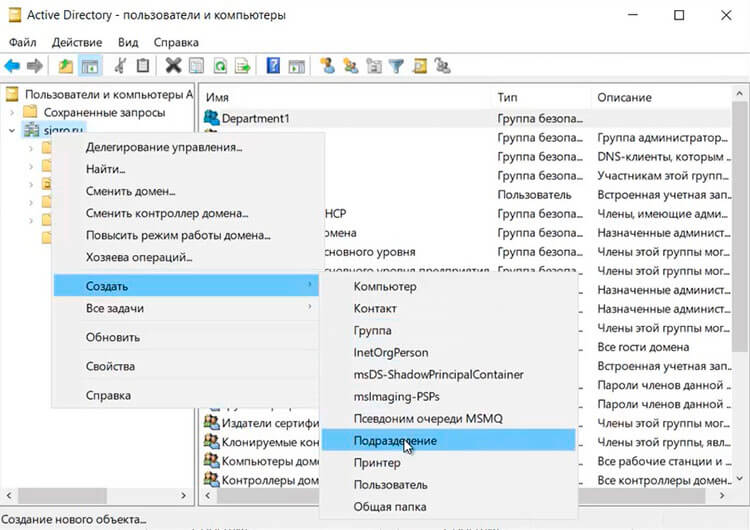
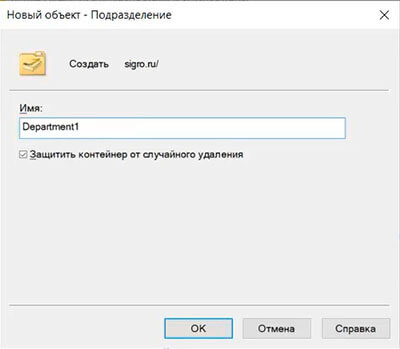
2. Задаём имя подразделения, далее «ОК«.
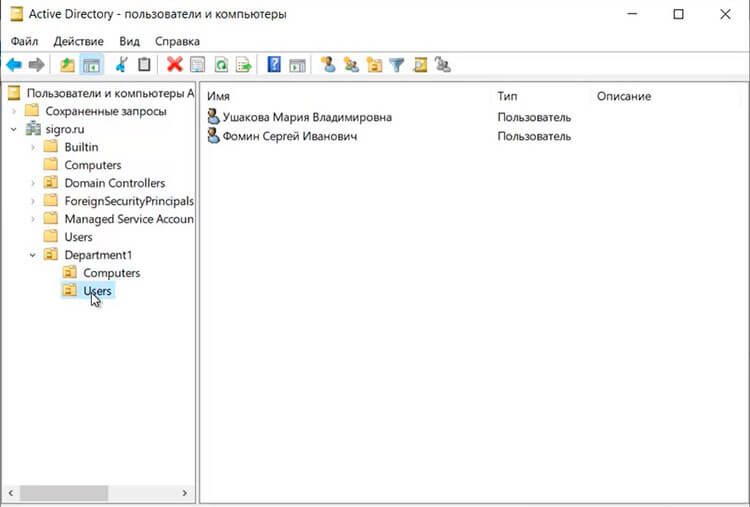
3. Если необходимо, в созданном подразделении создаём вложенные подразделения. Далее в созданные подразделения можно перенести или создать различные объекты (пользователи, компьютеры, группы).
Удаление пользователя
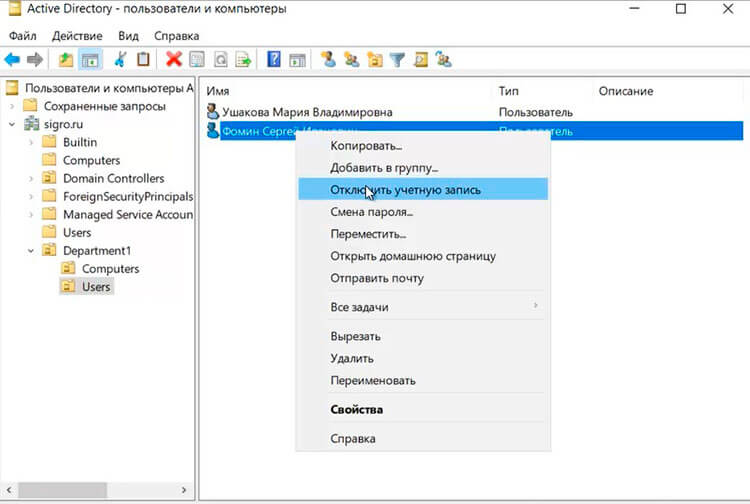
1. Обычно сначала пользователя отключают и по истечении определенного промежутка времени удаляют. Для этого выбираем пользователя, правой клавишей мыши — «Отключить учетную запись«.
2. Для удаления выбирают необходимого пользователя, далее правой клавишей мыши — «Удалить«.
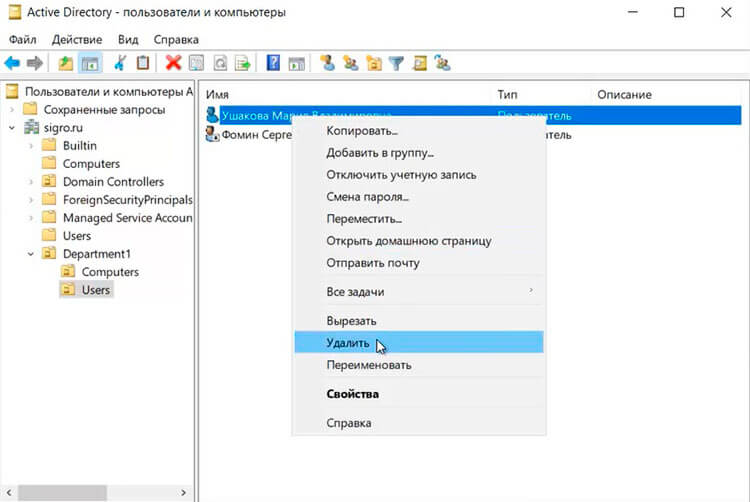
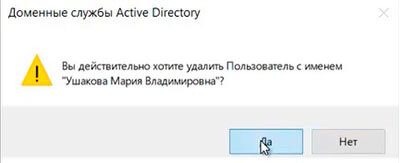
3. Появится предупреждение о том, что «Вы действительно хотите удалить Пользователь с именем…«. Нажимаем «Да» и выбранный пользователь будет удален из домена.
Удаление группы
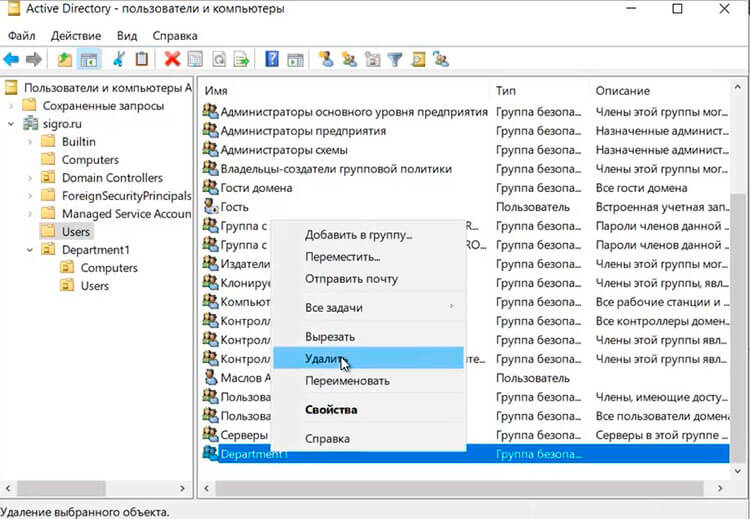
1. Для удаления группы в домене выбираем нужную группу, нажимаем правой клавишей — «Удалить«.
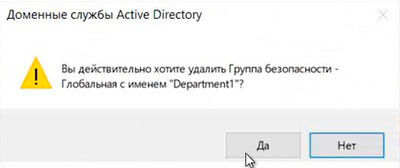
2. Появится предупреждение о том, что «Вы действительно хотите удалить Группу безопасности….«. Нажимаем «Да«. Выбранная группа будет удалена из домена.
Удаление подразделения
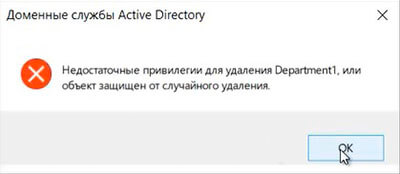
1. Перед тем, как удалять подразделение, необходимо снять защиту, которая не дает удалить объект от случайного удаления. Если попробовать просто удалить подразделение, то появится предупреждение — «Недостаточные привилегии для удаления Departmnet1, или объект защищен от случайного удаления«.
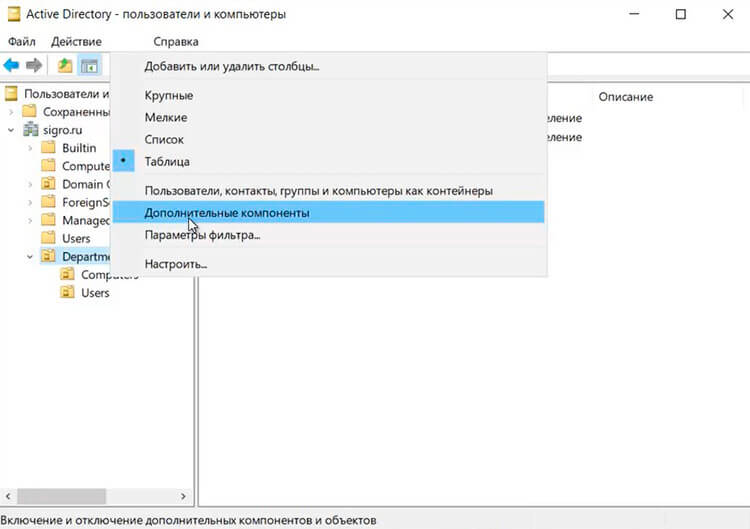
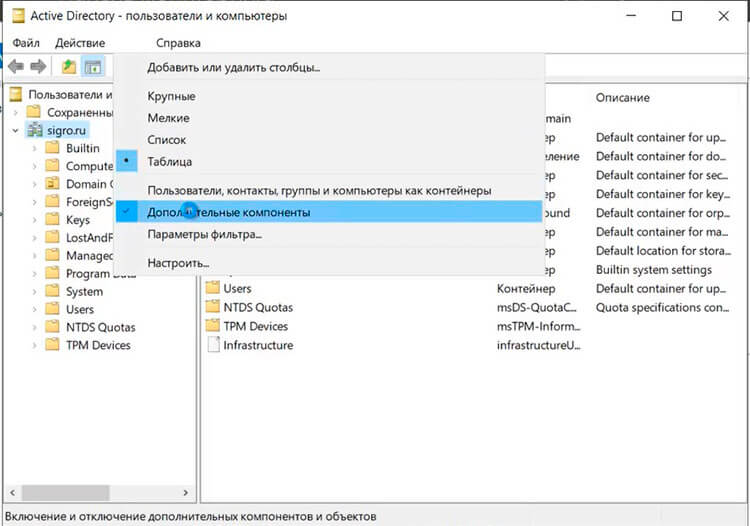
2. Для снятия защиты в меню «Вид» выбираем «Дополнительные компоненты«.
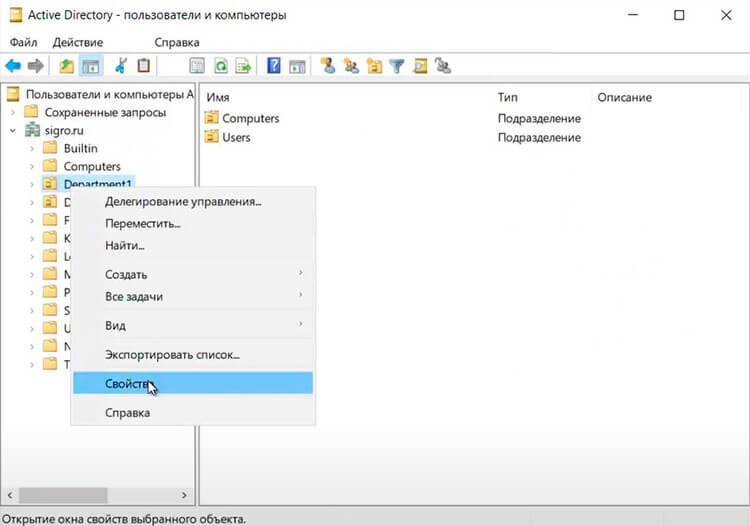
3. Далее выбираем подразделение (объект), которое хотим удалить. Правой клавишей мыши — «Свойства«.
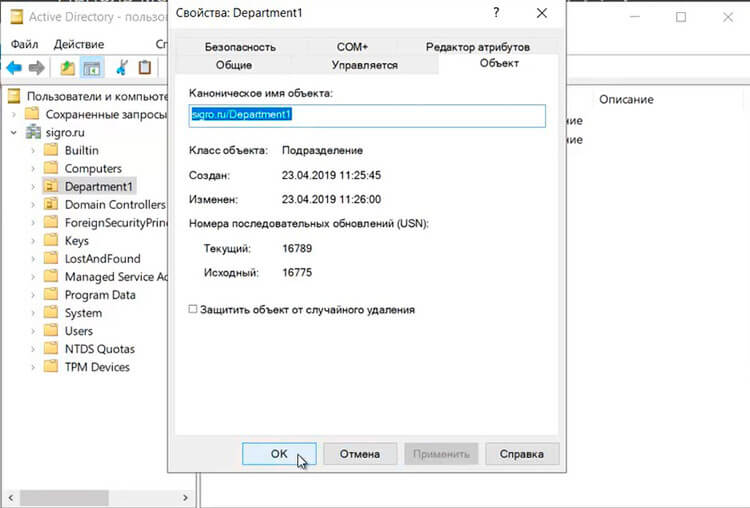
4. Выбираем вкладку «Объект«. Убираем чекбокс «Защитить объект от случайного удаления«, далее «ОК«.
5. Далее нажимаем правой клавишей мыши на выбранное подразделение — «Удалить«.
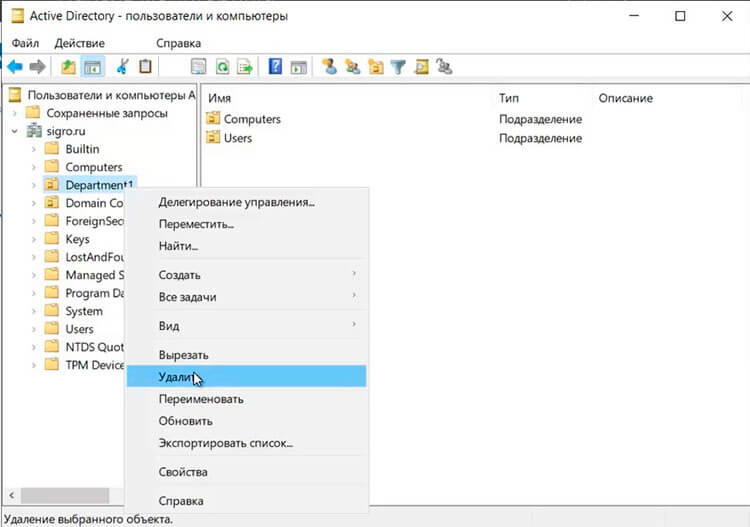
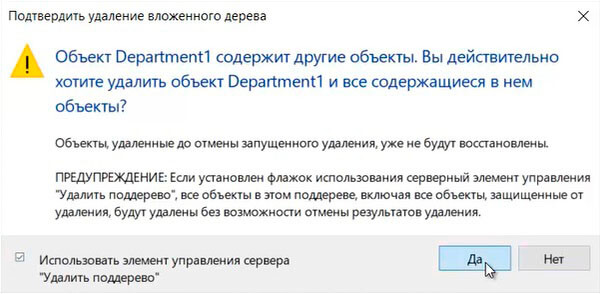
6. Появится предупреждение о том, что «Вы действительно хотите удалить Подразделение с именем….?«. Нажимаем «Да«. Если в выбранном объекте не будет других вложенных объектов, то подразделение будет удалено.

7. Если объект содержит другие объекты, то появится предупреждение «Объект Department1 содержит другие объекты. Вы действительно хотите удалить объект Department1 и все содержащиеся в нем объекты?«. Нажимаем «Да» и выбранный объект будет удален с вложенными объектами.
8. Далее в окне «Active Directory — пользователи и компьютеры» в меню «Вид» возвращаем галочку напротив «Дополнительные компоненты«.
Посмотреть видео о том, как создать или удалить пользователя, группу, объект в домене можно здесь:
- Windows server 2019 — установка и настройка WSUS, создание и настройка GPO
- Windows server 2019 — добавление и удаление компьютера в домене
- Windows server 2019 — переименование администратора домена, изменение формата выводимого имени пользователя
- Windows server 2019 — установка и настройка Active Directory, DNS, DHCP
- Windows server 2019 — установка и настройка сервера печати, разворачивание МФУ с помощью GPO
- Windows server 2019 — GPO изменение экранной заставки, отключение монитора, изменение политики паролей
{/source}
To grant local administrator permissions on domain computers to technical support personnel, the HelpDesk team, certain users, and other privileged accounts, you must add the necessary Active Directory users or groups to the local Administrators group on servers or workstations. In this article, we’ll show you how to manage members of the local Administrators group on domain computers manually and through GPO.
Contents:
- Add a User to the Local Admins Group Manually
- How to Add Domain Users to Local Administrators via Group Policy Preferences?
- Adding a Single User to the Local Admins Group on a Specific Computer with GPO
- Managing Local Admins with Restricted Groups GPO
Add a User to the Local Admins Group Manually
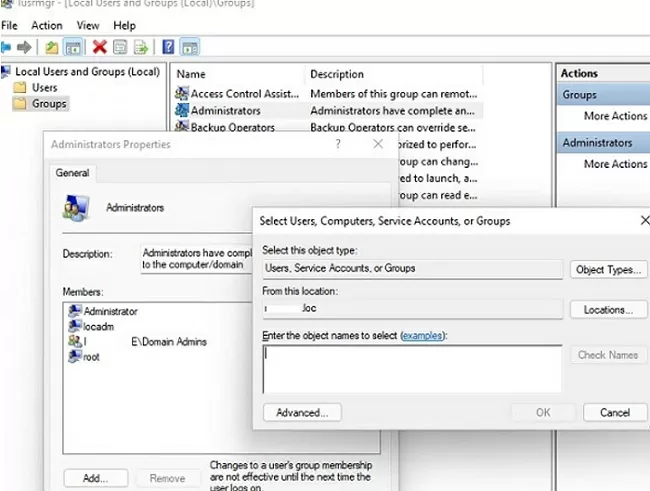
The easiest way to grant local administrator rights on a specific computer for a user or group is to add it to the local Administrators group using the graphical Local Users and Groups snap-in (lusrmgr.msc).
When you join a computer to an AD domain, the Domain Admins group is automatically added to the computer’s local Administrators group and the Domain User group is added to the local Users group.
Click the Add button and specify the name of the user, group, computer, or service account (gMSA) that you want to grant local administrator rights. With the Location button, you can switch between searching for principals in the domain or on the local computer.
You can also display a list of users with local computer administrator permissions with the command prompt:
net localgroup administrators
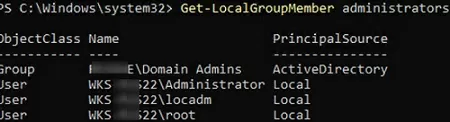
You can use the following PowerShell command to get a list of users in a local group:
Get-LocalGroupMember administrators
This command shows the object class that has been granted administrator permissions (ObjectClass = User, Group, or Computer) and the source of the account or group (ActiveDirectory, Azure AD, Microsoft, or Local).
To add a domain group munWksAdmins (or user) to the local administrators, run the command:
net localgroup administrators /add munWksAdmins /domain
Using PowerShell, you can add a user to administrators as follows:
Add-LocalGroupMember -Group Administrators -Member ('woshub\j.smith', 'woshub\munWksAdmins','wks1122\user1') –Verbose

In this example, we added a user and groups from the woshub domain and a local user wks1122\user1 to the computer administrators.
You can add users to the Administrators group on multiple computers at once. In this case, you can use the Invoke-Command cmdlet from PowerShell Remoting to access the remote computers over a network:
$WKSs = @("PC001","PC002","PC003")
 Invoke-Command -ComputerName $WKSs –ScriptBlock {Add-LocalGroupMember -Group Administrators -Member woshub\munWksAdmins'}
You can also completely refuse to provide any administrator privileges to domain users or groups. In this case, you can use the built-in local administrator with a password stored in Active Directory (implemented using the Local Administrator Password Solution/LAPS) to perform one-time administrative tasks on user computers.
In an Active Directory domain environment, it is better to use Group Policy to grant local administrator rights on domain computers. This is much easier, more convenient, and safer than manually adding users to the local Administrators group on each computer. You can use two Group Policy options to manage the Administrators group on domain computers:
- Manage local group membership with Group Policy Preferences;
- Adding users to local groups using the Restricted Groups GPO feature.
How to Add Domain Users to Local Administrators via Group Policy Preferences?
Group Policy Preferences (GPP) provide the most flexible and convenient way to grant local administrator privileges on domain computers through a GPO.
Let’s say your task is to grant local administrator privileges on computers in a specific Active Directory OU (Organizational Unit) to a HelpDesk team group. Create a new security group in your domain using PowerShell and add the Helpdesk team accounts to it:
New-ADGroup munWKSAdmins -path 'OU=Groups,OU=Munich,OU=DE,DC=woshub,DC=com' -GroupScope Global –PassThru
 Add-AdGroupMember -Identity munWKSAdmins -Members amuller, dbecker, kfisher
Open the domain Group Policy Management console (GPMC.msc), create a new policy (GPO) AddLocaAdmins and link it to the OU containing computers (in my example, it is ‘OU=Computers,OU=Munich,OU=DE,DC=woshub,DC=com’).
- Edit the AddLocaAdmins GPO you created earlier;
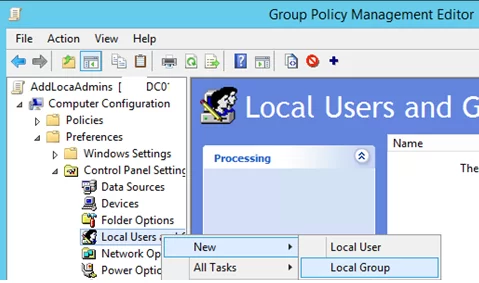
- Go to the following GPO section: Computer Configuration –> Preferences –> Control Panel Settings –> Local Users and Groups;
- Add a new rule (New -> Local Group);

- Select Update in the Action field (it is an important option!);
- Select Administrators (Built-in) in the Group Name dropdown list. Even if this group has been renamed on the computer, the settings will be applied to the local Administrators group by its SID (
S-1-5-32-544); - Click the Add button and select the groups you want to add to the local Administrators group (in our case, this is munWKSAdmins);
You can remove all manually added users and groups from the local Administrators on all computers. Check the “Delete all member users” and “Delete all member groups” options. In most cases, it is reasonable because you guarantee that only the approved domain groups will have administrator permissions on your domain computers. If you add a user to the Administrators group manually using the “Local users and groups” snap-in, it will be automatically removed next time when the policy is applied.
- Save the policy and wait for it to be applied to the client workstations. To apply the Group Policy settings immediately, run this command
gpupdate /forceon a user’s computer; - Open the
lusrmgr.mscsnap-in on any domain computer and check the local Administrators group members. Only the munWKSAdmins group should be added to this group, while other users and groups will be removed (except for the built-in Windows Administrator account).
If the policy is not applied on a domain computer, use the gpresult command to troubleshoot the resulting GPO settings. Also, make sure that the computer is located in the OU the GPO is linked to, and check the recommendations from the article “Why Group Policies not applied to computers?”.
Adding a Single User to the Local Admins Group on a Specific Computer with GPO
Sometimes you may need to grant a single user the administrator privileges on a specific computer. For example, you have several developers who need elevated privileges from time to time to test drivers, debug or install them on their computers. It is not reasonable to add them to the group of workstation admins with privileges on all domain computers.
You can use GPO WMI filters or Item-level Targeting to grant local admin permission on a specific computer.
Create a new entry in the GPO preference section (Computer Configuration –> Preferences –> Control Panel Settings –> Local Users and Groups) of AddLocalAdmins policy created earlier:
- Action:
Update - Group Name:
Administrators (Built-in) - Description: “
Add amuller to the local administrators on the mun-dev-wsk21 computer” - Members: Add ->
amuller
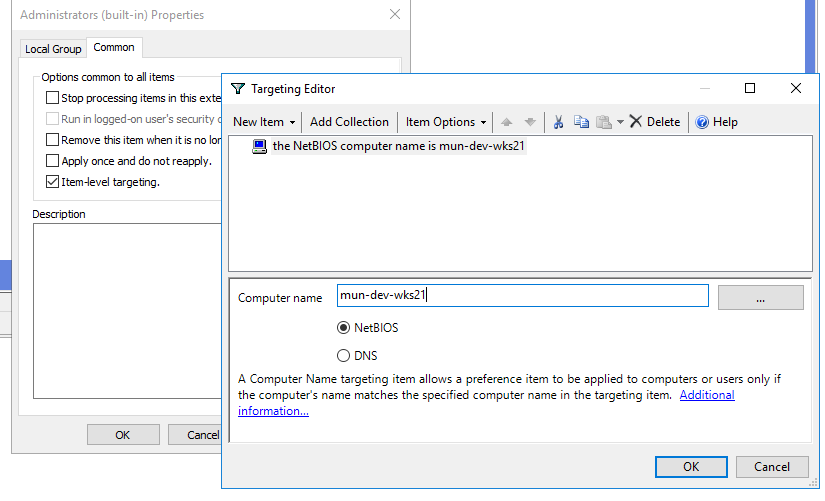
- In the Common -> Targeting tab, specify this rule: “
the NETBIOS computer name is mun—dev-wks24.” It means that this Group Policy item will be applied only to the computer specified here.
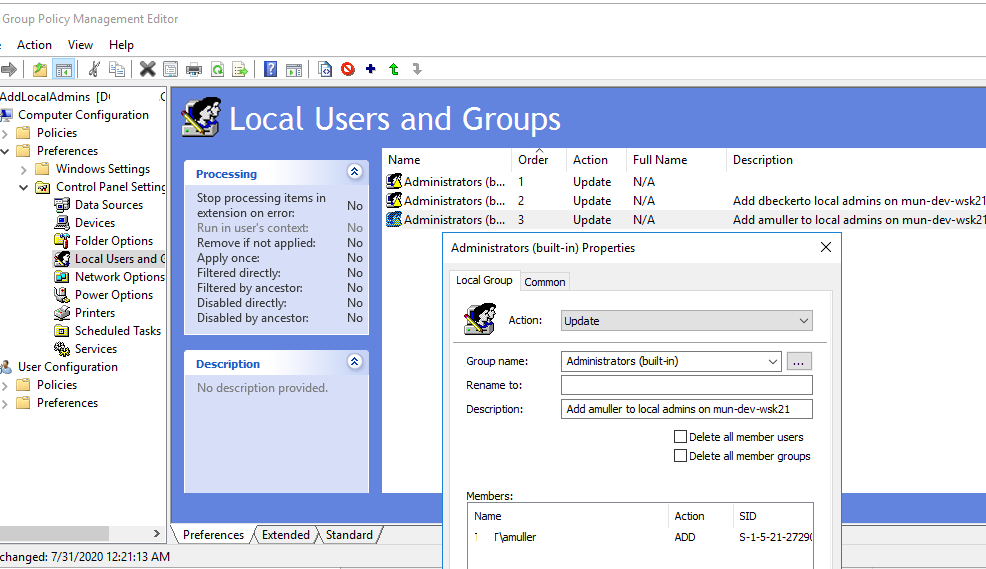
Also, note the order in which group membership is applied on the computer (the Order GPP column). Local group membership is applied from top to bottom (starting from the Order 1 policy).
The first GPP policy option (with the “Delete all member users” and “Delete all member groups” settings as described above) removes all users/groups from the local Administrators group and adds the specified domain group. Then the additional computer-specific policies are applied that add the specified user to the local admins. If you want to change the membership order in your Administrators group, use the buttons on top of your GPO Editor console.
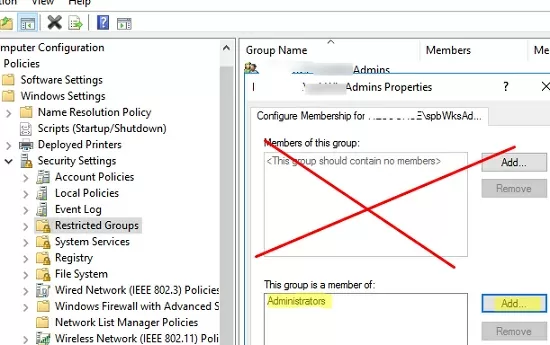
Managing Local Admins with Restricted Groups GPO
The Restricted Groups policy also allows adding domain groups/users to the local security group on computers. This is an older method of granting local administrator privileges and is used less often now (it is less flexible than the Group Policy Preferences method described above).
- Open your GPO;
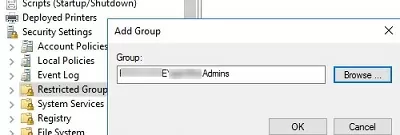
- Expand the section Computer Configuration -> Policies -> Security Settings -> Restricted Groups;
- Select Add Group in the context menu;
- In the next window, type Administrators and then click OK;
- Click Add in the Members of this group section and specify the group you want to add to the local admins;
- Save the changes, apply the policy to users’ computers, and check the local Administrators group. It must contain only the group you have specified in the policy.
These Group Policy settings always (!) remove all existing members of the local Administrators group (which are added manually, by other policies or scripts).
If you need to keep the current membership of the Administrators group and add an additional group (user) to it using Restricted Groups GPO, you need to:
- Create a new entry in Restricted Groups and select the AD security group (!!!) that you want to add to the local admins;

- Then add the Administrators in the This group is a member of section;

- Update the GPO settings on the client and make sure your domain group has been added to the local Administrators group. In this case, the current principals in the local group stay untouched (not removed from the group).
At the end of the article, I will leave some recommendations for managing administrator permission on Active Directory computers and servers.
Microsoft’s classic security best practices recommend using the following groups to separate administrator permissions in an AD domain:
- Domain Admins are used only on domain controllers;
From the security point of view for privileged administrator accounts, it is not recommended to perform daily administration tasks on workstations and servers under an account with the Domain Admin privileges. These accounts must be used only for AD management tasks (adding new domain controllers, replication management, Active Directory schema modification, etc.). Most user, computer, or GPO management tasks must be delegated to regular administrator accounts (without Domain Admin permissions). Do not use Domain Admin accounts to log on to any workstations or servers other than domain controllers.
- Server Admins is a group that allows managing the Windows Server hosts in an AD domain. Must not be a member of the Domain Admins group or local Administrators group on workstations;
- Workstation Admins is a group for performing administrative tasks on workstations only. Must not be a member of the Domain Admins and Server Admins groups;
- Domain Users are common user accounts to perform typical office operations. They must not have administrator privileges on servers or workstations;
- It is not recommended to add individual user accounts to the local Administrators group. It is better to use the domain security groups. In this case, to grant administrator privileges to the next tech support employee, it is enough to add him to the domain group (without the need to edit the GPO).
Доменом в Windows Server называют отдельную область безопасности компьютерной сети.
В домене может быть один или несколько серверов выполняющих различные роли. Разрешения, применяемые администратором, распространяются на все компьютеры в домене.
Пользователь, имеющий учетную запись в домене, может войти в систему на любом компьютере, иметь учетную запись на локальном компьютере не требуется.
В домене могут работать несколько тысяч пользователей, при этом компьютеры могут принадлежать к разным локальным сетям.
Несколько доменов имеющих одну и ту же конфигурацию и глобальный каталог называют деревом доменов. Несколько деревьев могут быть объединены в лес.
В домене есть такое понятие как групповая политика. Под групповой политикой понимают настройки системы, которые применяются к группе пользователей. Изменения групповой политики затрагивают всех пользователей входящих в эту политику.
Параметры групповой политики хранятся в виде объектов групповой политики (Group Policy Object, GPO). Эти объекты хранятся в каталоге подобно другим объектам. Различают два вида объектов групповой политики – объекты групповой политики, создаваемые в контексте службы каталога, и локальные объекты групповой политики.
Не будем подробно вдаваться в теорию и перейдем к практике.
Запускаем Диспетчер серверов -> «Добавить роли и компоненты».
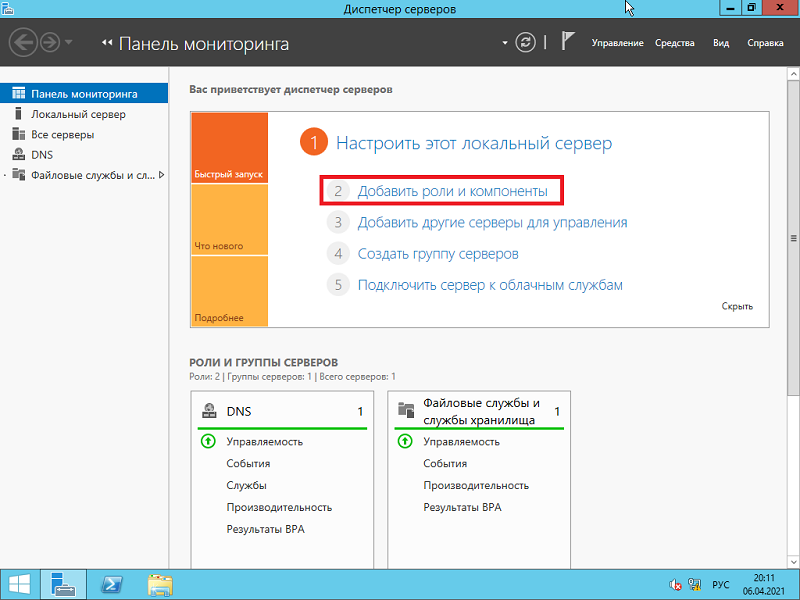
На первой странице мастер напоминает, что необходимо сделать перед началом добавления роли на сервер. Нажмите «Далее».
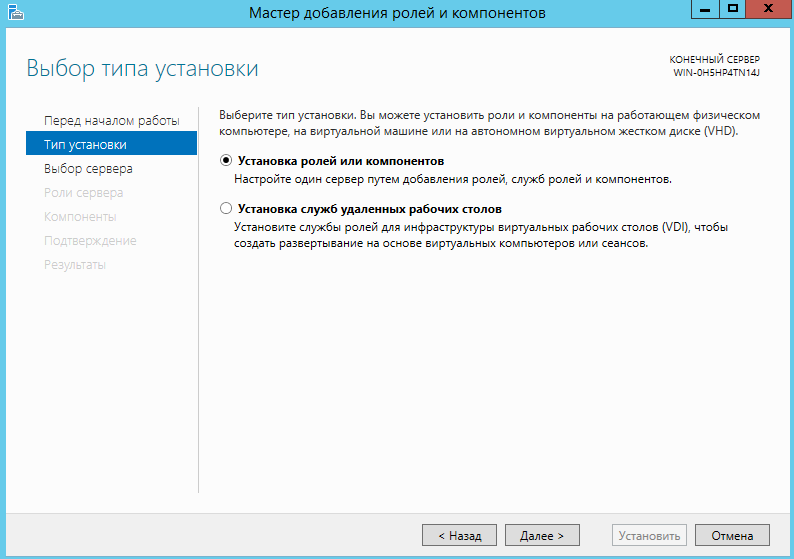
На втором шаге нужно выбрать «Установка ролей и компонентов» и нажать «Далее».
Выбираем сервер, на который нужно установить Active Directory (он у нас один), «Далее».
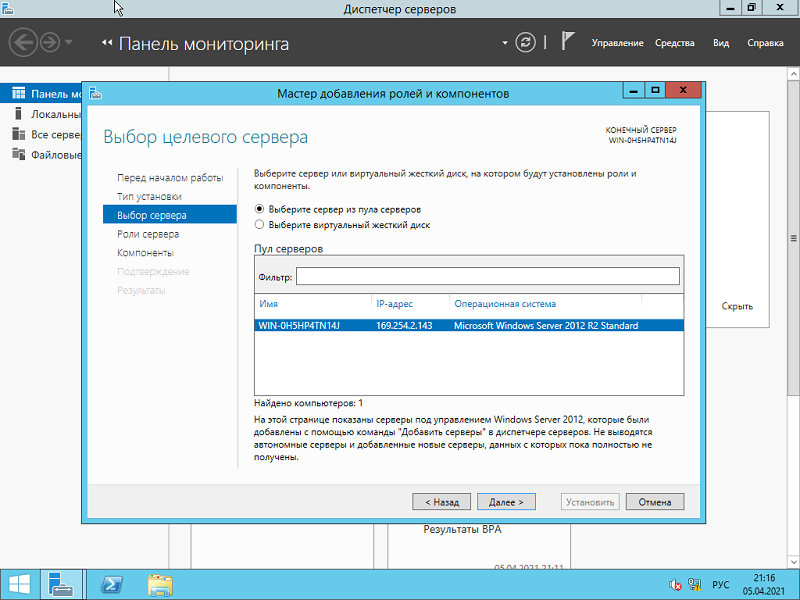
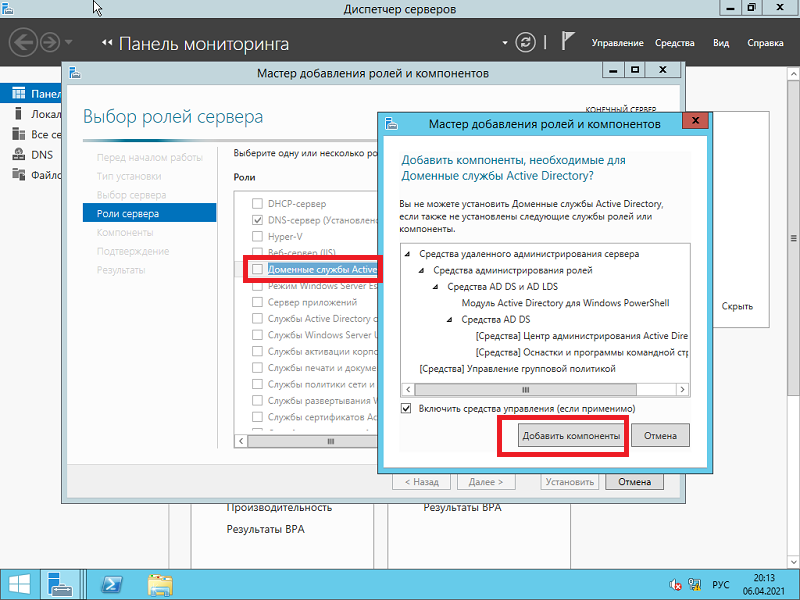
Теперь нужно выбрать роль, которую нужно добавить. Выбираем «Доменные службы Active Directory». После чего откроется окно, в котором будет предложено установить службы ролей или компоненты, необходимые для установки роли Active Directory, нажмите кнопку «Добавить компоненты», после чего кликните «Далее».
PЗатем нажимайте «Далее», «Далее» и «Установить».
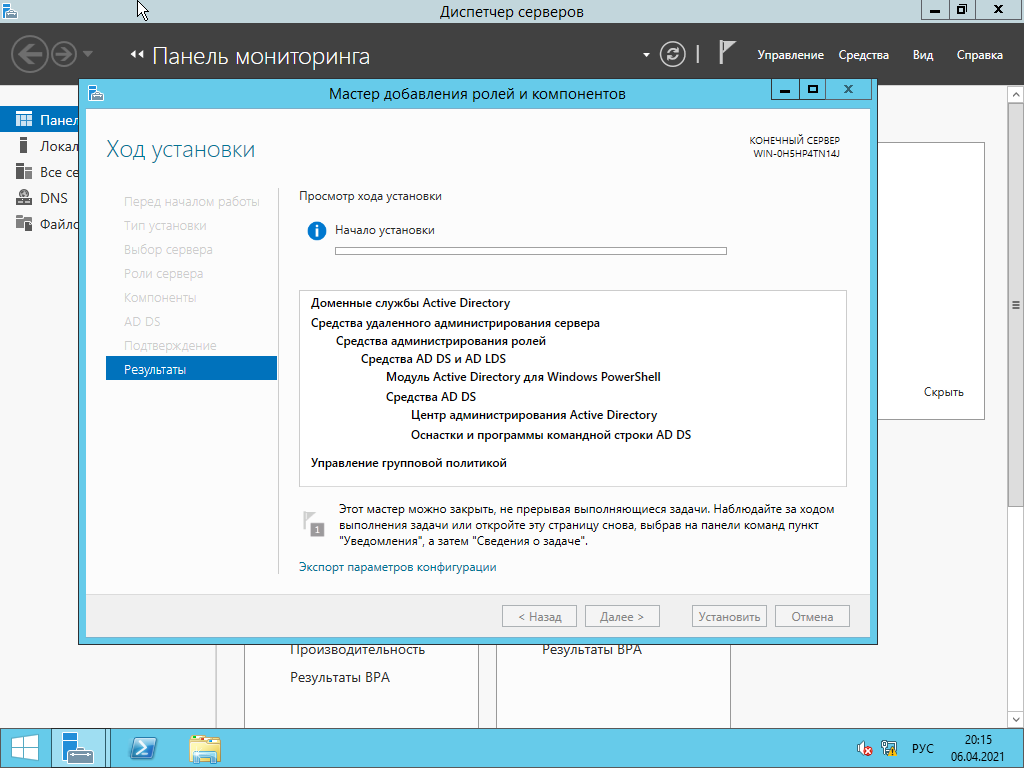
Перезапустите компьютер.
После того, как роль была добавлена на сервер, необходимо настроить доменную службу, то есть установить и настроить контроллер домена.
Настройка контроллера домена Windows Server
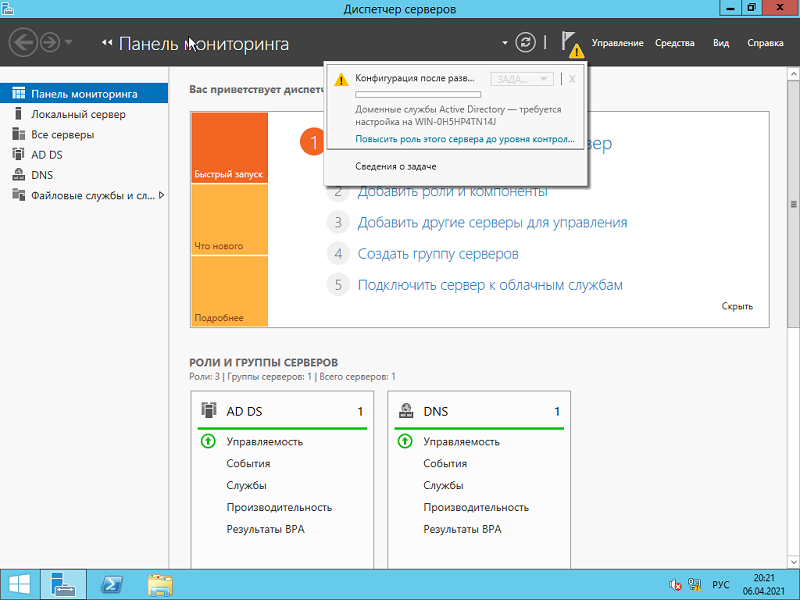
Запустите «Мастер настройки доменных служб Active Directory», для чего нажмите на иконку «Уведомления» в диспетчере сервера, затем нажмите «Повысить роль этого сервера до уровня контроллера домена».
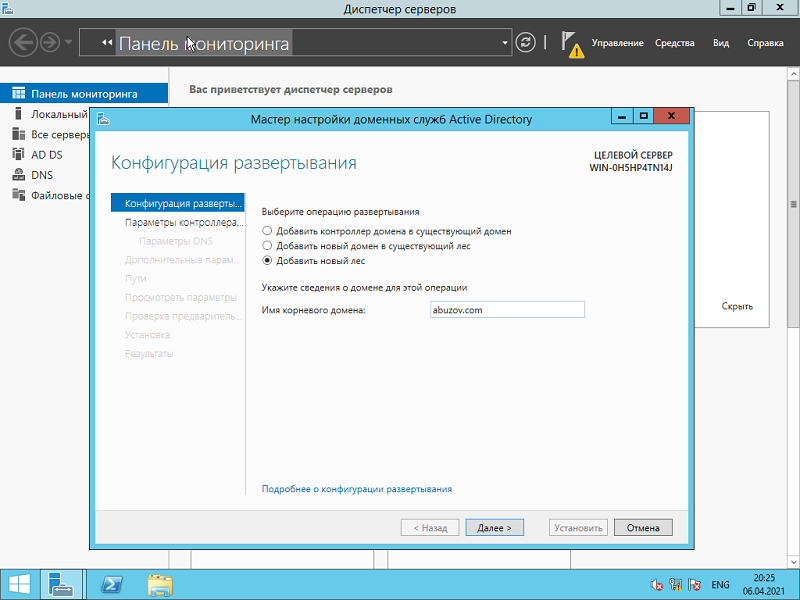
Выберите пункт «Добавить новый лес», затем введите имя домена в поле «Имя корневого домена». Домены в сети Windows имеют аналогичные названия с доменами в интернете. Я ввел имя домена buzov.com. Нажимаем «Далее».
На этом шаге можно изменить совместимость режима работы леса и корневого домена. Оставьте настройки по умолчанию. Задайте пароль для DSRM (Directory Service Restore Mode – режим восстановления службы каталога) и нажмите «Далее».
Затем нажимайте «Далее» несколько раз до процесса установки.
Когда контроллер домена установиться компьютер будет перезагружен.
Добавление и настройка групп и пользователей в домене Windows Server
Теперь нужно добавить пользователей домена, что бы присоединить к сети рабочие места сотрудников.
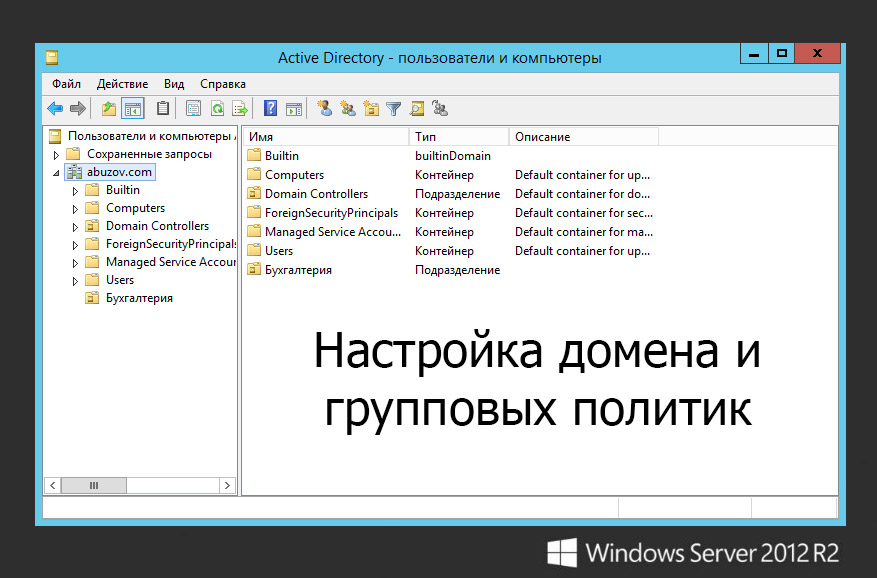
Отроем «Пользователи и компьютеры Active Directory». Для этого перейдите в Пуск –> Панель управления –> Система и безопасность –> Администрирование –> Пользователи и компьютеры Active Directory.
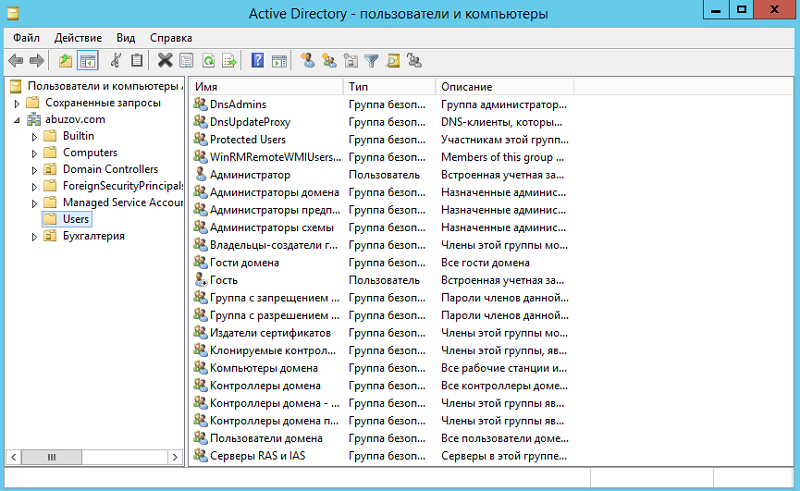
Создадим отдел «Бухгалтерия», для этого выделите название домена и вызовите контекстное меню, в котором выберите (Создать – Подразделение). Введите имя отдела (бухгалтерия) и нажмите «OK»
Подразделения служат для управления группами компьютеров пользователей. Как правило их именуют в соответствии с подразделениями организации.
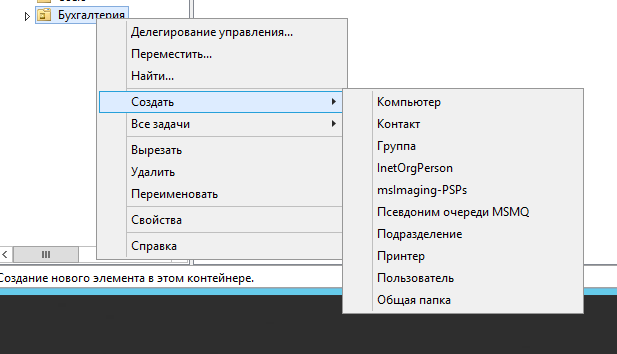
Создайте учетную запись пользователя в новом подразделении. Для этого в контекстном меню нового подразделения выберите пункт Создать –> Пользователь. Пусть первым пользователем будет Бухгалтер.
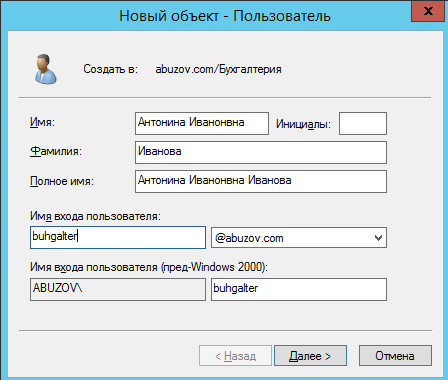
После ввода имени пользователя и учетной записи нажмите «Далее». Теперь нужно ввести пароль. По умолчанию пароль должен соответствовать требованиям сложности, то есть содержать три из четырех групп символов: заглавные буквы, строчные буквы, цифры, специальные знаки ( . , + – = ? № $ и так далее). Установите параметр «Требовать смену пароля при следующем входе в систему».
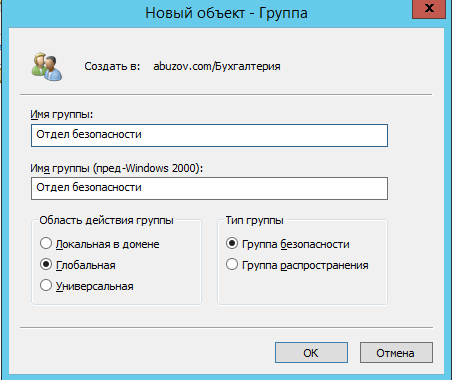
Создайте учетную запись группы безопасности. Для этого в контекстном меню нового подразделения (бухгалтерия) выберите пункт (Создать – Группа). При создании новой группы безопасности необходимо ввести имя, область действия и тип группы. Область действия определяет видимость данной группы в службе каталога. Глобальная группа видна в любом домене службы каталога и ей могут назначаться привилегии доступа к ресурсам других доменов. Локальная группа видна только в своем домене, то есть ей будут доступны ресурсы только ее домена. Группы безопасности позволяют
объединять пользователей и другие группы для назначения им одинаковых привилегий на различные объекты. Группы распространения используются для рассылки сообщений, они не участвуют в разграничении прав доступа.
Теперь нужно ввести компьютер в домен и зайти под новым пользователем. Для этого на клиентском компьютере нужно указать DNS-адрес. Для этого откройте «Свойства сетевого подключения» (Пуск –> Панель управления –> Сеть и Интернет – >Центр управления сетями и общим доступом – Изменение параметров адаптера), вызовите контекстное меню подключения и выберите «Свойства».
Выделите «Протокол Интернета версии 4 (TCP/IPv4)», нажмите кнопку «Свойства», выберите «Использовать следующие адреса DNS-серверов» и в поле «Предпочитаемый DNS-сервер» укажите адрес вашего DNS-сервера. Проверьте, что задан IP-адрес и маска той же подсети, в которой находится сервер.
Присоединение компьютера к домену
Откройте свойства системы (Пуск –> Панель управления –> Система и безопасность –> Система –> Дополнительные параметры системы). Выберите вкладку «Имя компьютера» и нажмите «Изменить». Выберите «Компьютер является членом домена» и введите имя домена.
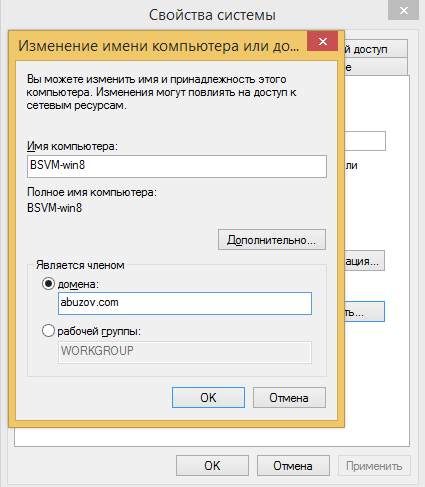
После этого необходимо ввести логин и пароль пользователя с правами присоединения к домену (обычно администратора домена). Если вы всё указали правильно, то появиться приветственное сообщение «Добро пожаловать в домен …».
Для того чтобы завершить присоединение, необходима перезагрузка.
После перезагрузки войдите в систему под доменной учётной записью пользователя, которая была создана ранее
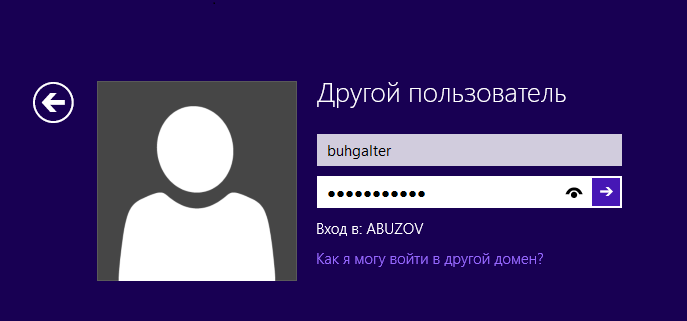
После ввода пароля операционная система попросит вас сменить пароль.
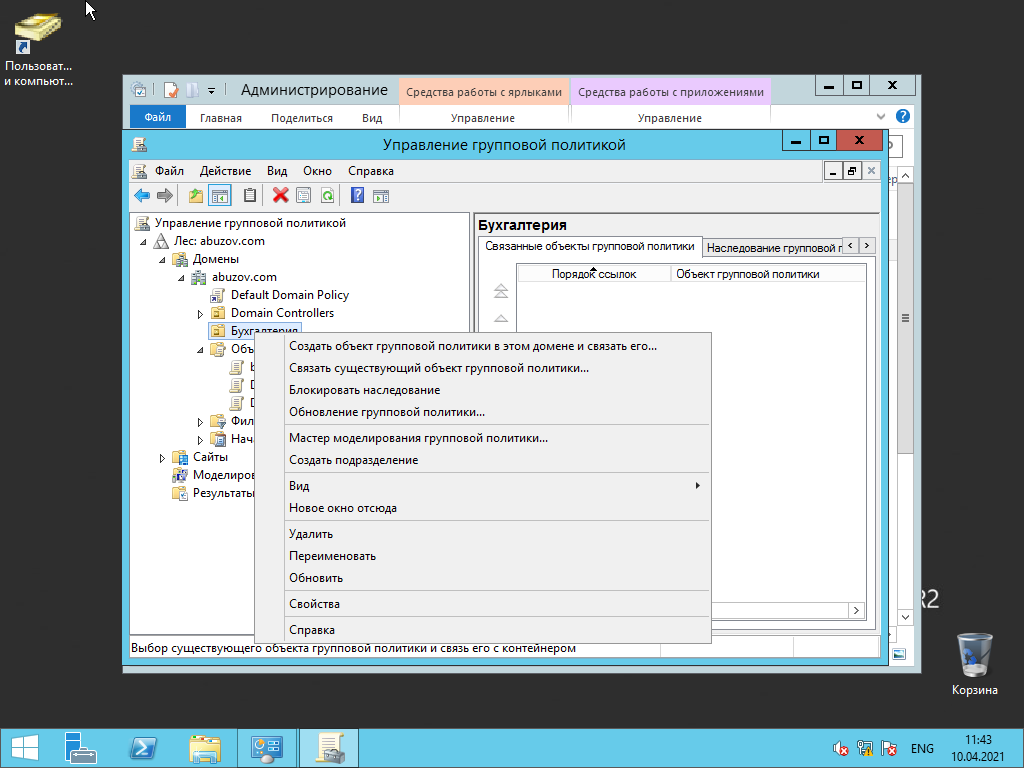
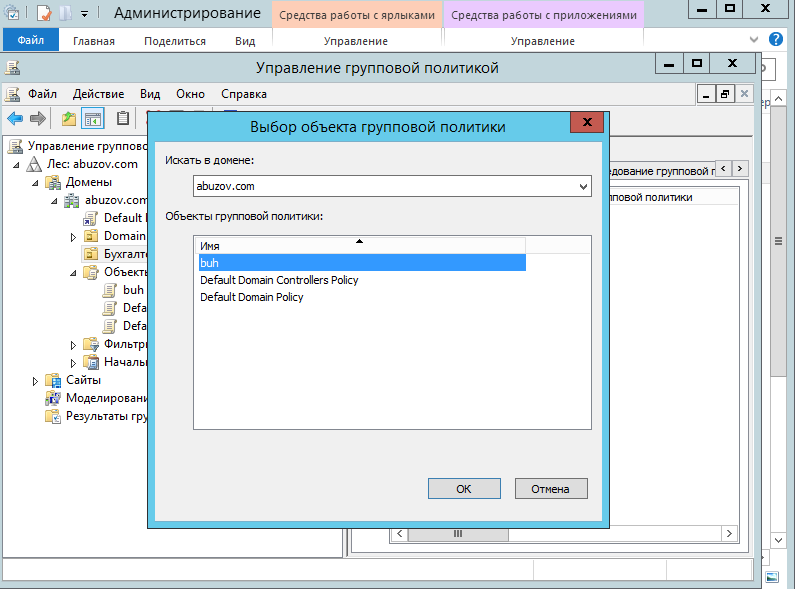
Вернемся на сервер. Нажмите «Пуск» -> Администрирование и перейдите в окно Управления групповой политикой. Выбираем наш лес, домен, Объекты групповой политики, щелкаем правой кнопкой мыши -> создать. Называем его buh (это объект групповой политики для группы Бухгалтерия).
Теперь необходимо привязать данный объект групповой политики к созданной группе. Для этого нажмите правой кнопкой на созданное подразделение (Бухгалтерия) и выберите «Связать существующий объект групповой политики…», затем выберите созданный ранее объект в списке и нажмите «ОК».
Далее выбираем созданный объект.
Выбранный объект должен появиться в списке связанных объектов групповой политики. Для редактирования параметров, определяемых данным объектом, нажмите на него правой кнопкой и выберите «Изменить».
Установка параметров безопасности
Установка параметров безопасности — завершающий этап настройка домена и групповых политик в Windows Server.
Ограничения парольной защиты
Ограничение на параметры парольной системы защиты задаются в контексте «Конфигурация компьютера». Выберите Конфигурация Windows –> Параметры безопасности –> Политики учетных записей –> Политика паролей.
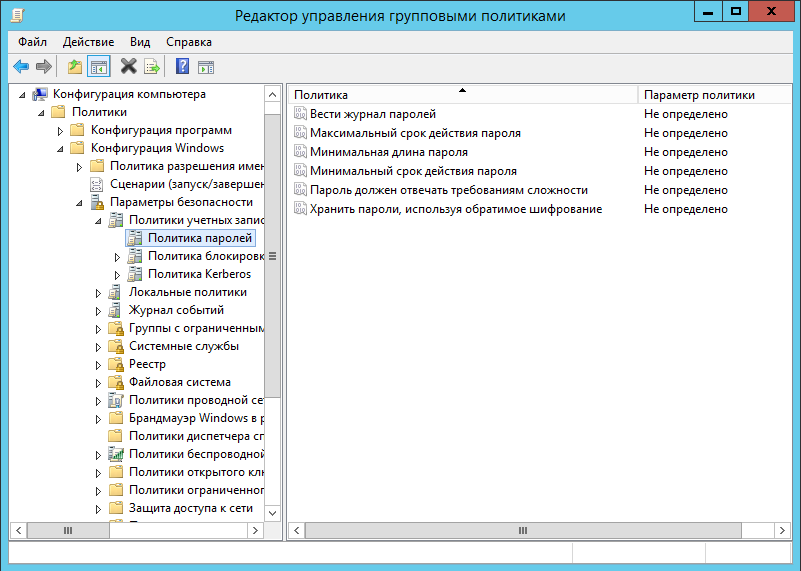
В данном разделе объекта групповой политики определяются следующие параметры:
- «Минимальный срок действия пароля» задает периодичность смены пароля.
- «Минимальная длина пароля» определяет минимальное количество знаков пароля.
- «Максимальный срок действия пароля» определяет интервал времени, через который разрешается менять пароль.
- «Пароль должен отвечать требованиям сложности» определяет требования к составу групп знаков, которые должен включать пароль.
- «Хранить пароли, используя обратимое шифрование» задает способ хранения пароля в базе данных учетных записей.
- «Вести журнал паролей» определяет количество хранимых устаревших паролей пользователя.
Тут нужно указать необходимые параметры (определите самостоятельно).
Политика ограниченного использования программ
Объекты групповой политики позволяют запретить запуск определенных программ на всех компьютерах, на которые распространяется действие политики. Для этого необходимо в объекте групповой политики создать политику ограниченного использования программ и создать необходимые правила. Как это сделать.
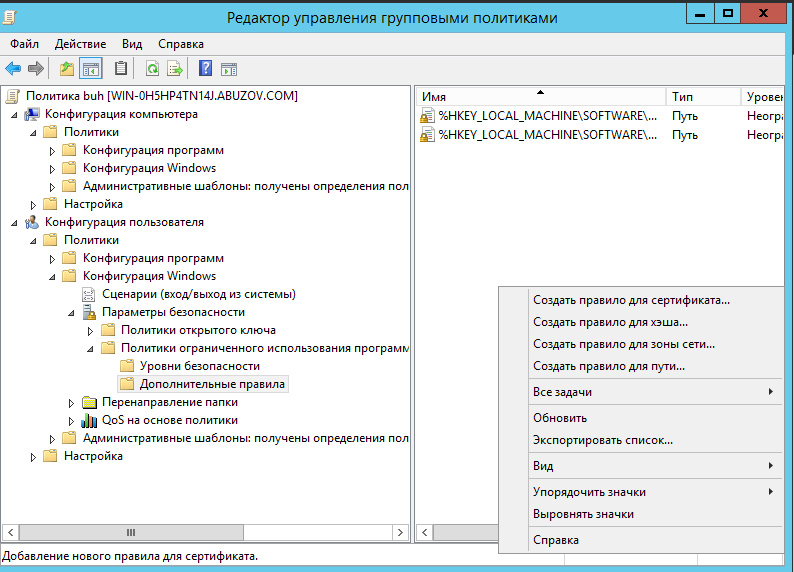
Выберите раздел Конфигурация пользователя –> Политики –> Конфигурация Windows –> Параметры безопасности –> Политики ограниченного использования программ. Нажмите правой кнопкой на «Политики ограниченного использования программ», далее заходим в «Дополнительные правила» и жмем правой кнопкой мыши, затем выбираем «Создать правило для пути».
После обновления объекта групповой политики на рабочей станции, политика ограниченного использования программ вступит в действие и запуск программ, соответствующих правилам, будет невозможен.
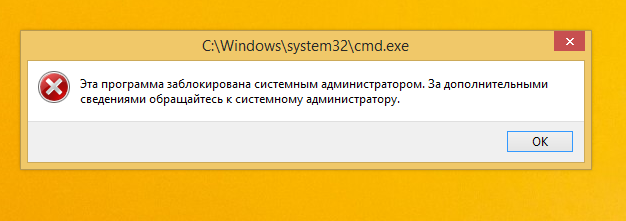
Давайте запретим использовать командную строку на клиентском компьютере.
Запрет запуска командной строки (cmd.exe).
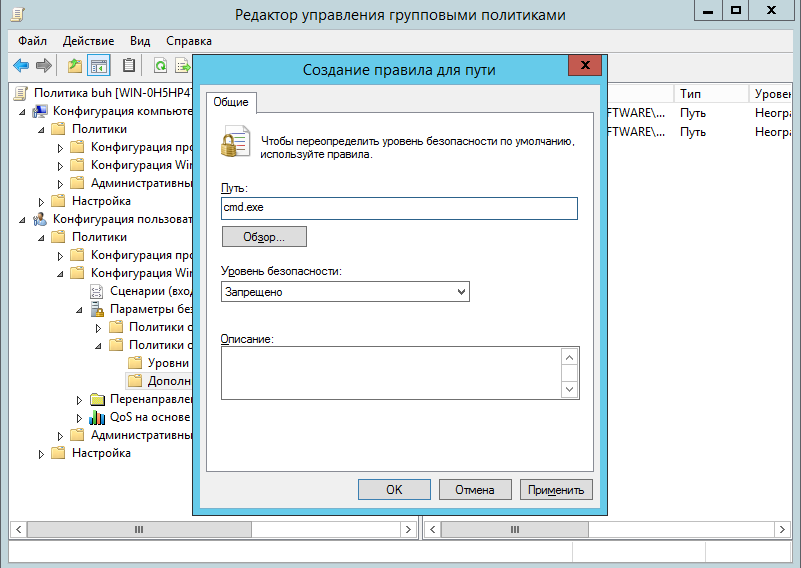
На этом все. Если у вас остались вопросы, обязательно задайте их в комментариях.
При попытке запустить командную строку на клиентской машине вы получите сообщение.