
-
Understanding the Crucial Role of
PATH -
Manually Add
gitto thePATHon Windows -
Add
gitto thePATHon Windows using Batch Script -
Add git to
PATHusing PowerShell -
Conclusion

Git is a free, open-source version control system designed to handle projects quickly and efficiently. You can use this on Windows, Mac and Linux operating systems. Whether you’re collaborating with a team or working on personal projects, Git empowers you to track changes, collaborate effectively, and manage your codebase efficiently.
This article will explain how to add the git to the Windows PATH environment variable.
Understanding the Crucial Role of PATH
Before we dive into the step-by-step guide, it’s worth understanding why adding Git to the PATH environment variable is crucial.
The PATH variable is a list of directories that the operating system searches for executable files when you run a command.
By adding Git’s directories to the PATH, you enable seamless access to Git’s commands from any directory in the command prompt.
Manually Add git to the PATH on Windows
Git executable files are located in the C:\Program Files\Git\bin\git.exe and C:\Program Files\Git\cmd. These directories must be added to the PATH environment variable to run the program.
Let’s explain step by step how to do this.
Step 1: Navigate to the System Properties on Windows
To access the environment variables, you have a couple of routes.
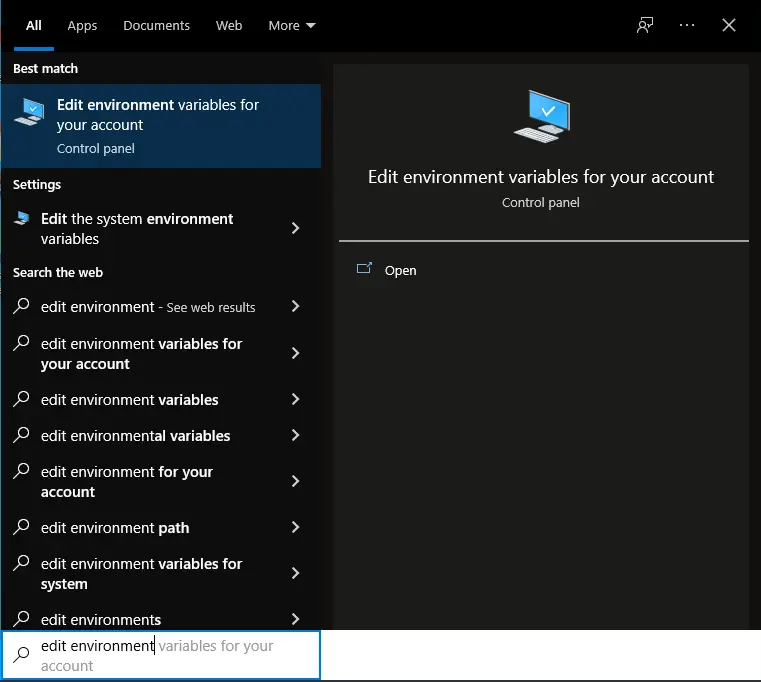
- Environment variables are located under the System Properties. We can navigate there by typing
edit environment variablesin the search box and clicking on the best match.
-
Alternatively, follow these steps:
-
Right-click on the
This PC. -
Select the
Propertiestab.
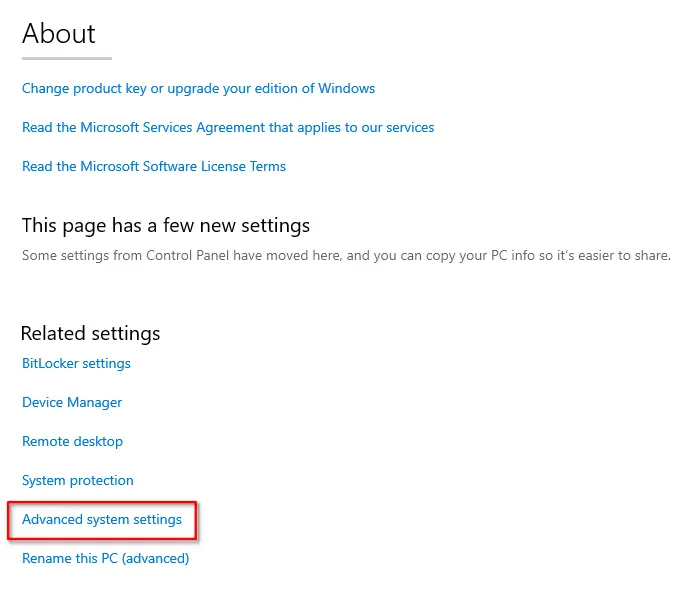
- Scroll and click on the
Advanced System Settings.
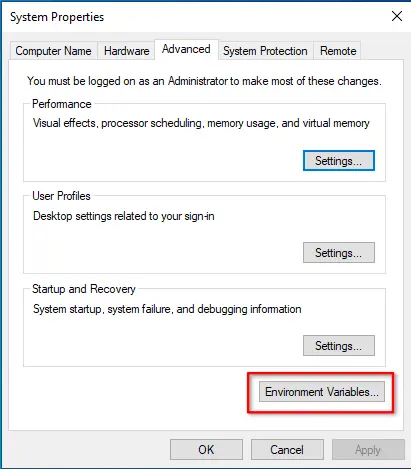
Step 2: Edit Environment Variables to Add Values to the PATH Variable
Click Environment Variables under System Properties to add values to the PATH.
Select Path under the System variables and click the Edit button.
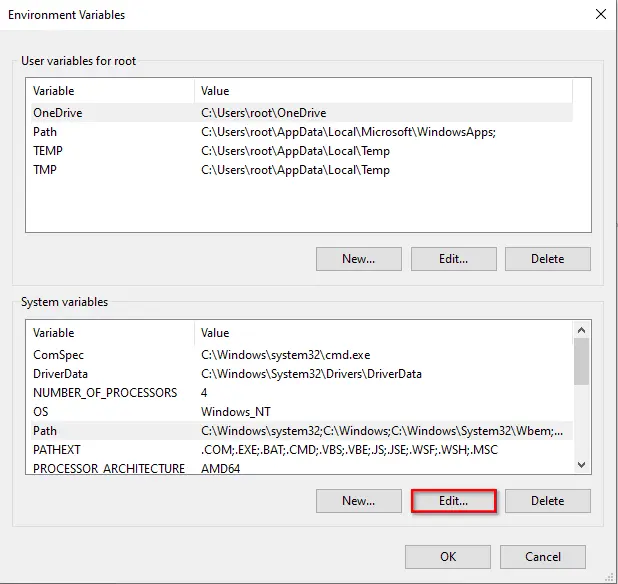
Click the New button and add the C:\Program Files\Git\cmd value. Save it and repeat the same process for the C:\Program Files\Git\bin\git.exe.
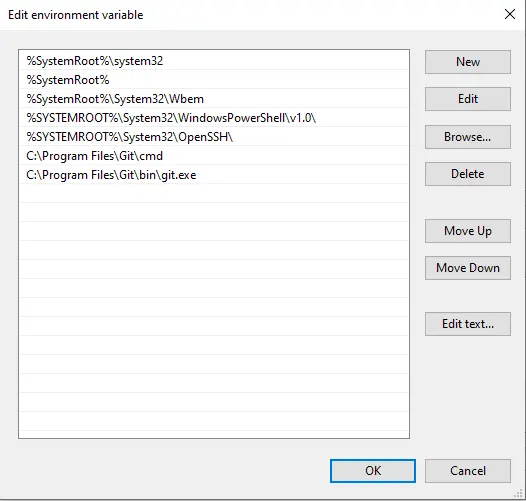
If your executable files are located in the C:\Users\<user>\AppData\Local\GitHub\PortableGit_<guid>\bin and C:\Users\<user>\AppData\Local\GitHub\PortableGit_<guid>\cmd directories, add them to the Path variable.
Save the changes and close the page.
Add git to the PATH on Windows using Batch Script
A batch script is a series of commands executed by the Windows Command Prompt. Here’s how you can create a batch script to add Git to the PATH:
Step 1: Create a Batch Script
- Open a text editor such as Notepad.
- Copy and paste the following lines into the text editor:
```batch
@echo off
setlocal

REM Specify your Git installation path
set "gitPath=C:\Program Files\Git"

REM Add Git to the PATH
setx PATH "%PATH%;%gitPath%\bin;%gitPath%\cmd" /M

echo Git has been added to the PATH.
echo Please restart your command prompt to use Git.
```
- Save the file with a
.batextension (e.g.,add_git_to_path.bat).
Below is the explanation of the above code.
setlocal: This command starts a local environment to contain variables, preventing them from affecting the system globally.set "gitPath=C:\Program Files\Git": Set thegitPathvariable to the path of your Git installation directory.setx PATH "%PATH%;%gitPath%\bin;%gitPath%\cmd" /M: This line uses thesetxcommand to modify the PATH environment variable. It appends Git’s bin and cmd directories to the existing PATH.
Step 2: Run the Batch Script
- Locate the saved batch script (
add_git_to_path.bat). - Right-click on the script and select
Run as administrator. This ensures that the script can modify system variables. - The batch script will execute, adding Git’s directories to the
PATH. - After the script completes, you’ll see the messages indicating that Git has been added to the
PATH. To apply the changes, restart your command prompt.
Add git to PATH using PowerShell
Using PowerShell to add Git to the PATH is straightforward and can be accomplished in a few steps:
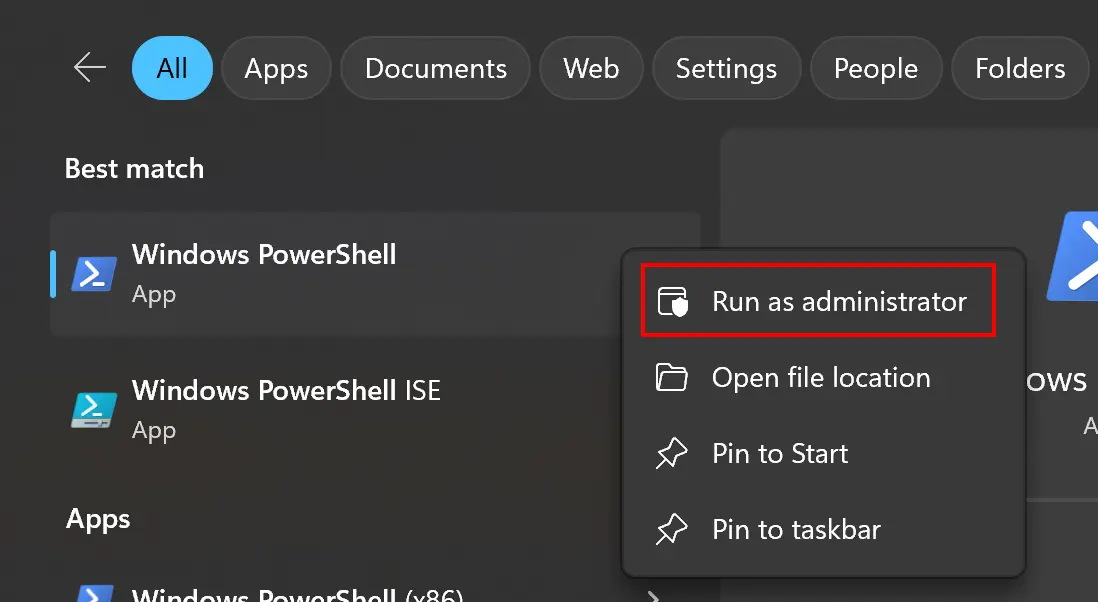
Step 1: Open PowerShell as Administrator
-
Open PowerShell as Administrator: Press Win + S, type
PowerShell, right-click onWindows PowerShelland chooseRun as administrator. This ensures that you have the necessary permissions to make changes.
Step 2: Add Git to PATH
-
In the elevated PowerShell window, run the following command to obtain the path of your Git installation:
$gitPath = (Get-Command git).Source.Replace("git.exe", "")Explanation:
(Get-Command git): This command retrieves information about thegitexecutable..Source: This property of the command’s output contains the full path to the executable..Replace("git.exe", ""): This part of the command removes thegit.exeportion from the path, leaving the directory path.
-
Now, run the following command to add Git to the PATH:
Explanation:
$env:Path: This environment variable contains the current PATH.+=: This operator is used to add the Git path to the existing PATH.";$gitPath": This part of the command appends the Git path to the existing PATH.
Verification and Advanced Considerations
With Git integrated into the PATH, let’s verify its successful integration:
- Open a new Windows Command Prompt.
- Type
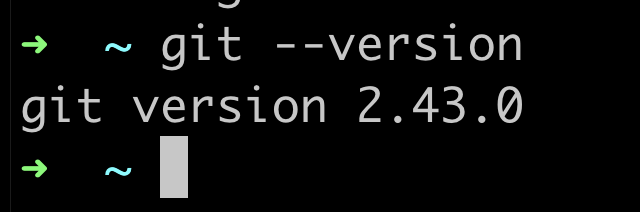
git --versionand press enter.
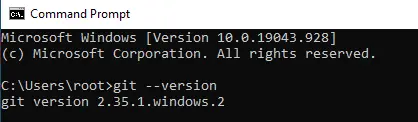
If you see the Git version information, congratulations, Git is now accessible from any command prompt window.
Conclusion
The process of adding Git to the PATH environment variable goes beyond mere technicality—it’s a gateway to efficient version control and seamless collaboration.
By following this comprehensive guide, you’ve learned how to integrate Git with your command prompt, enhancing your development capabilities.
Whether you’re a beginner or an experienced developer, this knowledge empowers you to harness the full capabilities of Git and excel in the world of software development.
Enjoying our tutorials? Subscribe to DelftStack on YouTube to support us in creating more high-quality video guides. Subscribe
To add Git to your system’s PATH variable, allowing you to access Git commands from any command line interface, you can use the following command depending on your operating system.
For Windows
setx PATH "%PATH%;C:\Program Files\Git\bin"
For macOS/Linux
echo 'export PATH=$PATH:/usr/local/git/bin' >> ~/.bash_profile && source ~/.bash_profile
What is PATH?
The PATH environment variable is a crucial component of operating systems used to locate executable files. Essentially, when you type a command in the terminal, the operating system searches through the directories listed in PATH to find the executable that corresponds to that command.
How PATH Works
When you enter a command, like `git`, the shell checks each directory listed in the PATH variable until it finds an executable file that matches the command. If the command is found, it executes; if not, you’ll receive an error indicating that the command is not recognized. By adding Git to your PATH, you make it accessible from any terminal session without needing to specify its installation folder each time.
Mastering Git Path: Your Quick Guide to Success
Why You Need Git in PATH
Inclusion of Git in your PATH significantly enhances your productivity as a developer. Here’s why:
Shortcuts for Productivity
With Git in PATH, you can execute Git commands from anywhere in your terminal window without navigating to Git’s installation directory. This feature saves time and effort, enabling you to focus on coding rather than file management.
Simplified Workflow
Having Git readily available in your terminal creates a seamless experience for managing your version control tasks. You’ll be able to commit changes, push to remote repositories, and pull updates with just a few keystrokes.
Common Use Cases
Consider a typical development scenario where you clone a repository, create branches, and push code changes. Having quick access to Git commands ensures you can rapidly iterate through your development processes without interruption.
Mastering Git Pathspec: Your Quick Reference Guide
How to Add Git to PATH in Different Operating Systems
Adding Git to PATH on Windows
To configure your Windows system to add Git to PATH, follow these steps:
-
Locate Git Installation: The installation path is generally `C:\Program Files\Git`. Check if Git is installed by searching for it in the Start menu.
-
Open Environment Variables:
- Right-click on ‘This PC’ and choose ‘Properties’.
- Click on ‘Advanced system settings’.
- In the System Properties window, click on the ‘Environment Variables’ button.
-
Edit the PATH Variable:
- In the Environment Variables window, find the System variables section and locate the variable named `Path`.
- Select it and click ‘Edit’.
- In the Edit Environment Variable window, click ‘New’ and add the following path:
C:\Program Files\Git\cmd -
Confirming the Setup: Open a new Command Prompt window and execute:
git --versionIf Git is correctly added to your PATH, it will display the installed version.
Adding Git to PATH on macOS
To add Git to PATH on a macOS system, follow these steps:
-
Open Terminal: You can find Terminal in Applications > Utilities or by searching with Spotlight.
-
Locate Git Installation: Typically, Git is installed at `/usr/local/git/bin`. You can verify by typing:
which git -
Edit .bash_profile or .zshrc: Depending on your shell, you’ll need to edit the appropriate configuration file. Most macOS users will use `zsh` by default.
Open the file in a text editor. If you are using `bash`, use:
nano ~/.bash_profileIf you are using `zsh`, use:
nano ~/.zshrc -
Add Git to PATH: Insert the following line at the end of the file:
export PATH=$PATH:/usr/local/git/bin -
Confirming the Setup: After saving and closing the file, refresh your terminal or execute:
source ~/.bash_profileor
source ~/.zshrcThen, confirm by typing:
git --version
Adding Git to PATH on Linux
To add Git to PATH on a Linux system, you can follow the steps outlined below:
-
Open Terminal: Access the terminal application from your application menu.
-
Locate Git Installation: You can check if Git is available and its path with:
which git -
Edit .bashrc or .profile: Open your profile configuration file. Typically, this will be `.bashrc` for most distributions.
nano ~/.bashrc -
Add Git to PATH: At the end of the file, add the following line, adjusting the path as necessary based on the output of `which git`:
export PATH=$PATH:/usr/bin/git -
Confirming the Setup: After editing the file, run:
source ~/.bashrcValidate the change by executing:
git --version
Mastering Git to GitHub: A Quick Guide
Troubleshooting Common Issues
Git Command Not Found
If you encounter a message stating that the command is not recognized, it likely indicates that Git is not correctly added to your PATH. Double-check the path you entered in the environment variable configurations.
Double-Checking PATH
To inspect your PATH settings and verify if Git is included, you can run this command on your terminal or command prompt:
echo $PATH
or on Windows:
echo %PATH%
Review the output to ensure that Git’s installation path appears.
Rebooting and Refreshing
Often, changes to PATH take effect immediately. However, in some cases, you may need to restart your terminal application or your computer to ensure the updates are recognized.
Add Git Dependency Cargo: A Quick Guide
Best Practices for Managing PATH
Keeping PATH Organized
A cluttered PATH variable can lead to confusion and command conflicts. Periodically review your PATH entries and remove any that are no longer necessary or relevant to your work.
Finding the Right Order
The order of items in your PATH can affect command execution. If multiple commands share the same name (for example, different versions of Git), the one listed first in PATH will be executed. Therefore, maintain a sensible sequence by placing the paths you use most frequently at the beginning of the list.
Add Git Bash to Windows Terminal: A Quick Guide
Conclusion
Adding Git to your PATH is an essential step for anyone serious about using Git as part of their development toolkit. By streamlining your access to Git commands, you can improve your efficiency and enhance your overall workflow. We encourage you to practice these steps and make Git a seamless part of your development process.

Download Git Bash: A Quick Guide to Get Started
Additional Resources
For those looking to further their understanding of Git and its capabilities, consider visiting the official Git documentation or exploring online courses that offer advanced tips and techniques for mastering this powerful version control tool. Continuous learning will equip you with the knowledge to make the most of Git in your projects.
How do I add my GIT directory to the PATH on Windows?
On Windows NT+ and Windows Server 2000+:
- Go to Control Panel and open the System icon (Start -> Settings -> Control Panel -> System, or just Start -> Control Panel -> System for Windows XP/2003+)
- Go to the Advanced tab
- Click on the ‘Environment Variables’ button
- Look into the ‘System Variables’ pane
- Find the Path entry (you may need to scroll to find it.
- Double click on the Path entry
- Enter your GIT directory at the end, including ‘;’ before (e.g. ;C:\git
- Press OK
On Windows 98/Me you need to edit the autoexec.bat file:
Open the Notepad (Start -> Run and enter notepad)
-
Open the C:\autoexec.bat file
-
Locate the line with PATH=C:\WINDOWS;C:\WINDOWS\COMMAND;….. and add: ;C:\git to the end of the line
-
Save the file and restart your computer
-
Note: Be sure to reboot after following the steps above to ensure that the PATH changes are applied.
How do I add my GIT directory to the PATH On Mac
Do the following
sudo vi /etc/paths
Add the git path in a line.
As an essential version control system used by millions of software developers across the world, having Git configured on your Windows machine is non-negotiable. By adding the Git executable to your system PATH environment variable, you ensure quick access to Git functionality from your favorite terminal and allow seamless Git-based collaboration.
This comprehensive guide will take you from Git installation to configuration to integration with essential remote services like GitHub. Follow these steps and you‘ll wield the full power of streamlined Git workflows in no time.
Understanding Why Git is Essential
Before jumping into the setup, it helps to understand why Git is fundamentally important for developers:
-
Distributed version control – Git redefined version control by building a system that does not rely on a central server to store all file versions and changes. This paved the way for innovative collaboration workflows.
-
Ubiquitous adoption – Today, Git is used at over 90% of software firms including industry titans like Google, Facebook, and Microsoft. Knowing Git is a basic requirement for developer roles at almost all tech companies.
-
Powerful capabilities – Git makes branching, merging, reverting, and experimenting with code painless. This flexible approach supercharges development velocity.
-
Efficient handling of large codebases – Git is optimized to manage the huge code repositories of complex, modern applications with ease.
In short, Git provides key advantages over previous version control systems that have led to its meteoric rise as the tool of choice for software teams.
Architectural Basics: How Git Version Control Works
To grasp Git fully, it helps to understand its architectural design and inner workings:
As a distributed version control system (DVCS), Git does not necessarily rely on a central server to store all file versions, changes, etc. Instead, each developer has a full local copy of the entire Git repository with all commits (a snapshot of changes), branches (independent lines of development), and the full project history:
Core Components
- The Git directory stores all Git‘s metadata for the project as well as the object database which contains compressed versions of file contents – this allows Git to store multiple file versions efficiently.
- Commits are the core building block representing a snapshot of changes. The HEAD ref points to the latest commit.
- Branches act as movable pointers to different commits in the timeline. The master branch is the default main branch.
- Remotes are pointers to Git repositories in other locations which you can push to or pull from. Origin typically points to the main remote server housing a central repo copy.
This architecture provides immense flexibility for teams to control when and how often they integrate changes from distributed branches.
Now let‘s get Git running on your Windows machine!
Step 1: Download and Install Git
First, head to the Git downloads page and grab the Windows installer:
Run through the installation using standard settings. This will install Git CLI tools as well as GUI clients, Git Bash terminal, plugins for IDEs/editors, and more.
I recommend opting into these extras to ensure full integration with your dev environment.
Step 2: Add Git to System PATH Variable
With Git installed, enabling global command line access via the PATH variable is critical so you can seamlessly use git commands system-wide.
Here is how to add Git to PATH on Windows 10:
- Search for «Edit environment variables» and launch the dialog box.
- Click the «Environment Variables» button near the bottom.
- Under «System Variables», scroll down and double click the PATH entry.
- In the Edit Environment Variable dialog, click New and enter the path to your Git bin folder, likely
C:\Program Files\Git\bin\ - Click OK to close all dialog boxes and save changes.
Now open a new terminal session, and check that Git commands work properly:
$ git --version
git version 2.38.1.windows.1
If not, you may need to restart your machine or shell session before PATH changes apply.
Troubleshooting PATH Issues
If git --version still returns a «not recognized» type of error, double check that:
- The Git bin path was entered correctly
- Any old Git PATH entries were removed
- Terminal/shell has restarted since change
- Git has reinstalled cleanly
Once git --version returns correctly, you have integrated Git CLI access system-wide.
Step 3: Configure User Settings
With PATH setup, configure your default Git user name and email which publicly marks your commits:
git config --global user.name "John Doe"
git config --global user.email johndoe@example.com
Verify settings with git config -l. This info together serves as your Git identity.
I also highly recommend generating SSH keys to simplify pushing to and pulling from GitHub repositories.
SSH provides a secure encrypted channel for communicating with remote repositories without entering credentials constantly.
Step 4: Initializing a Local Git Repository
Armed with Git CLI access and configuration, let‘s initialize a sample project!
Navigate into any project directory and type:
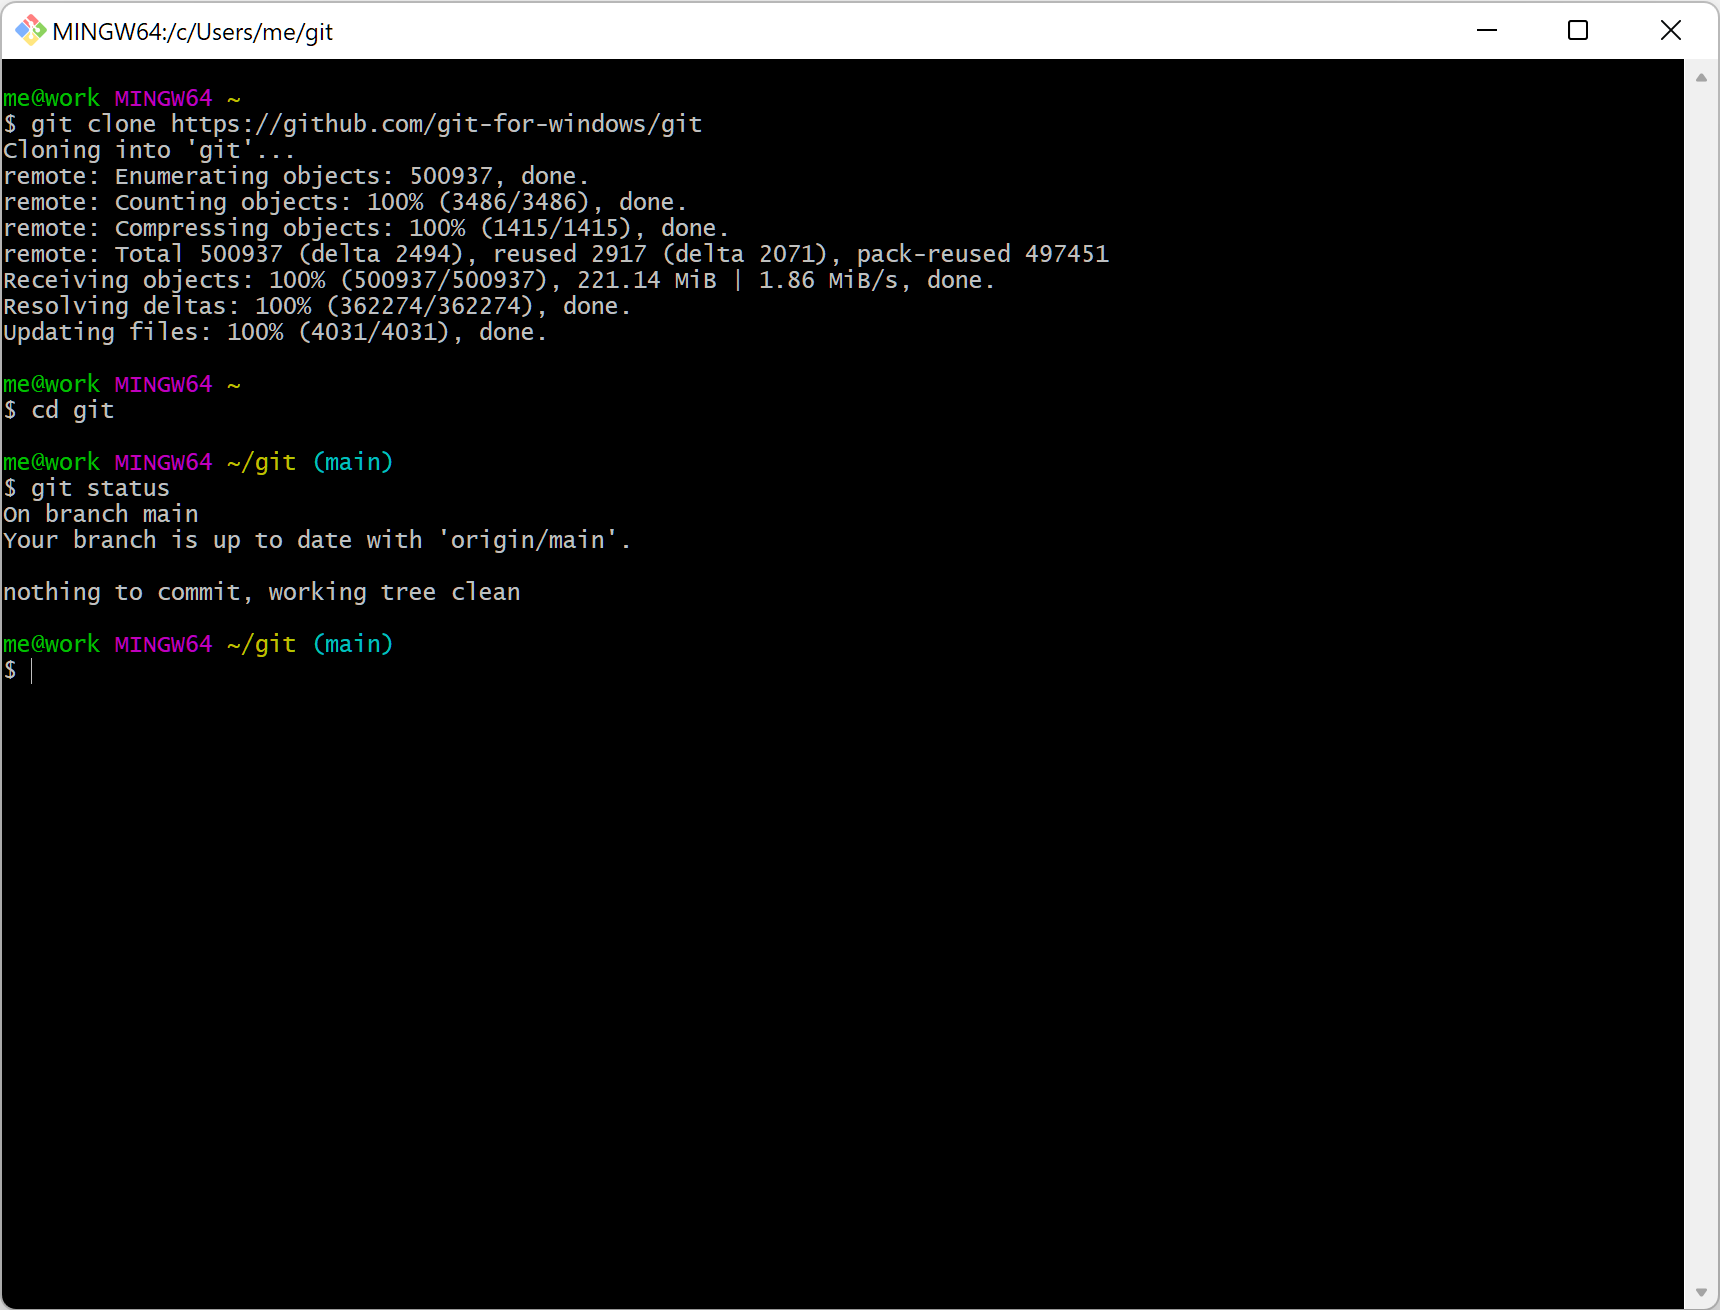
git initThis will create a .git subdirectory containing all needed repository data/config to start version controlling the project.
Follow this by adding files, making commits, pushing to a remote GitHub repository and more.
For example, to add all files and commit changes with a message:
git add .
git commit -m "Initial commit with some project files"
This commit snapshot is now part of the project revision history.
Step 5: Pushing Code to GitHub Remote Repo
As a vast ecosystem hosting over 200 million Git repositories, GitHub has become the de facto platform for hosting and collaborating on Git managed source code.
Follow these steps to publish your local Git repo to GitHub:
- Create a new repository on GitHub (do not check «Initialize this repository with a README»)
- Copy the
.gitHTTPS or SSH clone URL - Run
git remote add origin <URL>locally to link remote - Push commits with
git push -u origin master
That‘s it! Changes are now hosted on GitHub for simple collaboration using mature pull request (PR) workflows:
Well constructed pull requests is considered a best practice for team Git usage.
Additional Tips for Smoother Git Operation
Here are some additional troubleshooting fixes and configuration tweaks for operating Git efficiently:
Resolving SSL Certificate Errors
When pushing to or pulling from remote servers like GitHub via HTTPS, you may encounter SSL certificate errors preventing communication like:
fatal: unable to access ‘https://github.com/user/repo.git‘: SSL certificate problemThis can arise from out-of-date certificates on older Git versions. You can override checks with:
git config --global http.sslVerify falseFor better security, update the CA certificate bundle instead:
git config --global http.sslCAInfo <path to certificate bundle>AutoCRLF: Prevent Unexpected LINE ENDINGS
On Windows, Git may silently convert UNIX style LF line endings to CRLF creating inconsistencies.
Use core.autocrlf and associated settings to handle line endings properly:
# Normalize to LF on commit
git config --global core.autocrlf true

# Deny pushing CRLF to remote repo
git config --global core.safecrlf true
Useful Git Remotes Commands
Interacting with remote repositories is easy with these handy commands:
# Show remote URLs
git remote -v

# Change remote URL
git remote set-url origin https://newurl

# Verify connection
git remote update
Workflows: Git in Teams and Enterprise
While individual developer workflow is enabled by default Git configuration, expanding to manage multiple developers calls for structured Git processes.
Popular flavors of team Git workflow include:
Centralized Workflow
A single central repository acts as the source of truth with all developers syncing their work to it.
Gitflow Workflow
A structured branching model defines distinct branches for integrating and releasing features based on release cycles.
GitHub Flow
A lightweight flow using pull requests for reviewing changes before merging to the central master branch.
Study these workflows in-depth when coordinating a team to identify discrepancies before they derail productivity. Protect main branches with protected policies and code reviews.
Comparison to Other Version Control Systems
When weighing options for version controlling projects, Git proves advantageous over predecessors like SVN and CVS in multiple facets:
Git vs SVN:
- Fully distributed architecture vs centralized model
- Cheap local branching and merging vs expensive commits
- All history and version stored locally vs reliance on central server for history
- Cryptographic integrity checking of code
Git vs Mercurial:
- Mercurial lacks native Windows support
- Slightly faster branching/merging performance per benchmarks
- Larger open source community contributions of extensions, GUIs, etc
Foster Best Practices for Maximum Efficiency
Follow these expert best practices from initial setup through active development in Git:
- Format commit messages concisely to summarize changes
- Modularize changes into small, focused commits
- Name branches descriptively using slashes (e.g.
feature/new-module) - Keep a clean, linear Git history avoiding messy merges
- Preface work in feature branches rather than direct
mastercommits - Resolve merge conflicts diligently through communication
- Protect the
masterbranch with peer reviews before merging
Internalize core Git workflows and commands over time until they become second-nature. Your future self will thank you.
Conclusion: What‘s Next After Learning Git
With dedicated focus and guided practice, Git proficiency is within your grasp. Approach Git systematically:
- Fundamentals: Commit snapshots, branching, merging, cloning remote repos
- Collaborating: Pushing/pulling commits, handling merge conflicts
- Workflows: Feature branching, pull requests, issue tracking integration
- Tooling: Git CLI, GUI clients, IDE plugins, hosts like GitHub/GitLab
Learning Git requires an investment of time and mental energy. But you unlock unparalleled flexibility in your development practices.
The payoff? Application source code evolving cleanly as a well-tended garden under your team‘s nurturing care.
Happy Gitting!
Encountering the error git is not recognized or git command not found typically indicates that Git is either not installed on your system or its installation path is not included in the system’s PATH environment variable. This guide will help you troubleshoot and resolve these issues, ensuring that Git commands operate smoothly in your terminal or command prompt.
1. Verify git installation
The first step is to check whether Git is installed on your Windows machine.
-
Open the command prompt or PowerShell and run:
git --version -
If Git is installed, you should see a version number as output.
- If you see an error like
"git is not recognized as an internal or external commandproceed to the next steps.
Stop wrestling with Git commands
The Graphite CLI takes all the pain out of Git, allowing you to ship faster and stop googling Git commands.
2. Install Git for Windows
If Git is not installed, you’ll need to download and install it.
-
Download Git: Visit the official Git website to download the latest version of Git for Windows.
-
Run the installer: Execute the downloaded file and follow the installation prompts. Default options are typically sufficient for most users.
-
Verify installation: Reopen the Command Prompt or PowerShell and type
git --versionto confirm Git is now recognized.
2a. Consider using the Graphite CLI
While Git is an incredibly useful tool, it has many shortcomings, particularly with rebasing, and managing stacked pull requests.
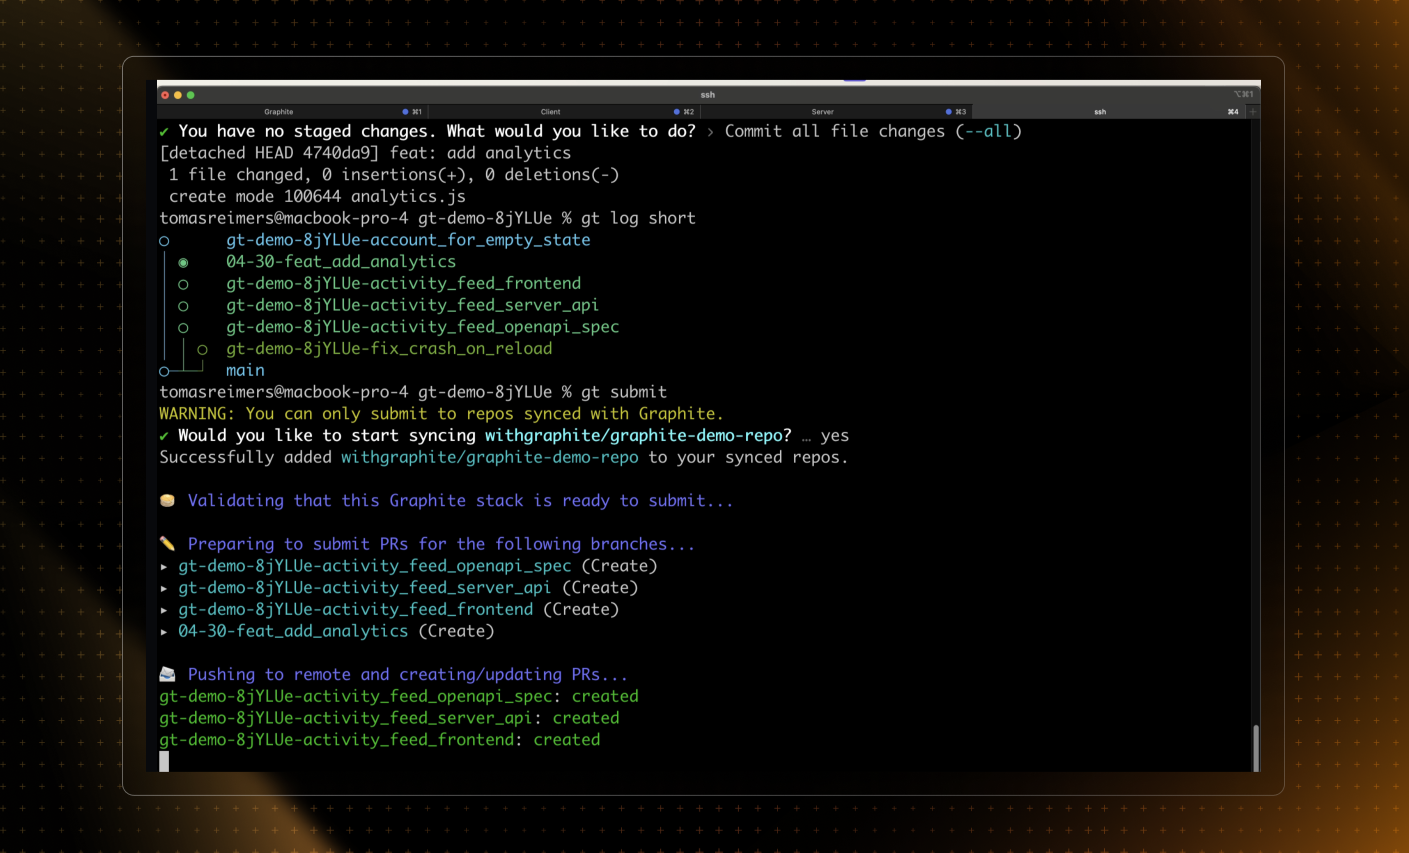
The Graphite CLI simplifies git, handles rebasing automatically, and allows you to create, submit, and stack pull requests right from the command line.
Under the hood, the CLI runs Git to create branches, commits, and metadata, which means you can still use Git in your scripts, tooling, or whenever you feel like it. Read more about installing the Graphite CLI in our docs.
3. Add Git to the PATH environment variable
If Git is installed but not recognized, it’s likely not added to the PATH environment variable. Adding Git to the PATH allows the system to locate the Git executable from any command line interface.
-
Find git installation path: The default installation path is usually
C:\Program Files\Git\cmd. Verify this location exists or find where Git is installed on your machine. -
Edit system PATH:
-
Open the Start Menu Search, type in
env, and choose «Edit the system environment variables». -
In the System Properties window, click on «Environment Variables».
-
Under «System variables», scroll to find the «Path» variable and select it, then click «Edit».
-
Click «New» and paste the path to your Git
cmdfolder (e.g.,C:\Program Files\Git\cmd). -
Click «OK» to close all dialogs and apply these changes.
-
-
Verify the change: Close and reopen your Command Prompt or PowerShell and type
git --versionto ensure Git is now recognized.
4. Check for typos in commands
Sometimes, the issue might be as simple as a typo in the Git command you’re trying to execute. Ensure you’re typing the command correctly, such as git clone instead of incorrectly spelled variations like gti clone.
The best engineers use Graphite to simplify Git
Engineers at Vercel, Snowflake & The Browser Company are shipping faster and staying unblocked with Graphite.
5. Use Git bash
If you continue to experience issues in the Command Prompt or PowerShell, consider using Git Bash, which is installed alongside Git for Windows. Git Bash provides a Unix-like terminal where Git commands should work without additional configuration.
-
Find and open Git Bash: Locate Git Bash in your Start Menu or use the search function to find it.
-
Try your Git command: Use Git Bash to run the Git command that was previously not recognized.
6. Reinstall Git
As a last resort, if Git still isn’t recognized, there might have been an issue with the initial installation.
-
Uninstall Git: Go to «Control Panel» > «Programs and Features», find Git in the list, and uninstall it.
-
Reinstall Git: Download the latest version of Git for Windows and follow the installation process again, making sure to add Git to the PATH during installation.
For further reading check out the official Git For Windows documentation.