

GCC, abbreviation for ‘GNU Compiler Collection’ (thanks @saphirakai) (and not Gulf Cooperation Council, like I’d assumed) is a necessity if you (or your pesky college) is into C Programming.
Almost all Linux distros come pre-installed with it so they are out of the trouble. But for those of you who were constant users of Windows and Command Prompt, and never felt the necessity for a C compiler, GCC seems to come out of the blue and a tough nut to install. 1000 rage-quits later, I present you this article.
This article is written so that the installation process is made easier than most of the trashy articles I had to go through.
Installation
-
Go to MinGW official website and click on ‘Downloads’ on the left panel. You’ll be redirected to the site which hosts the files.
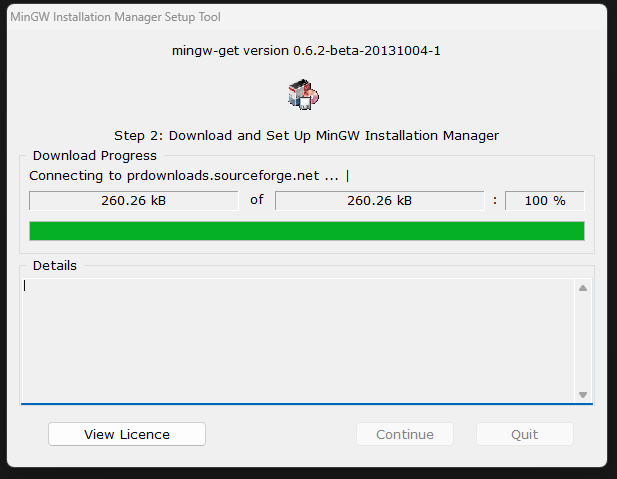
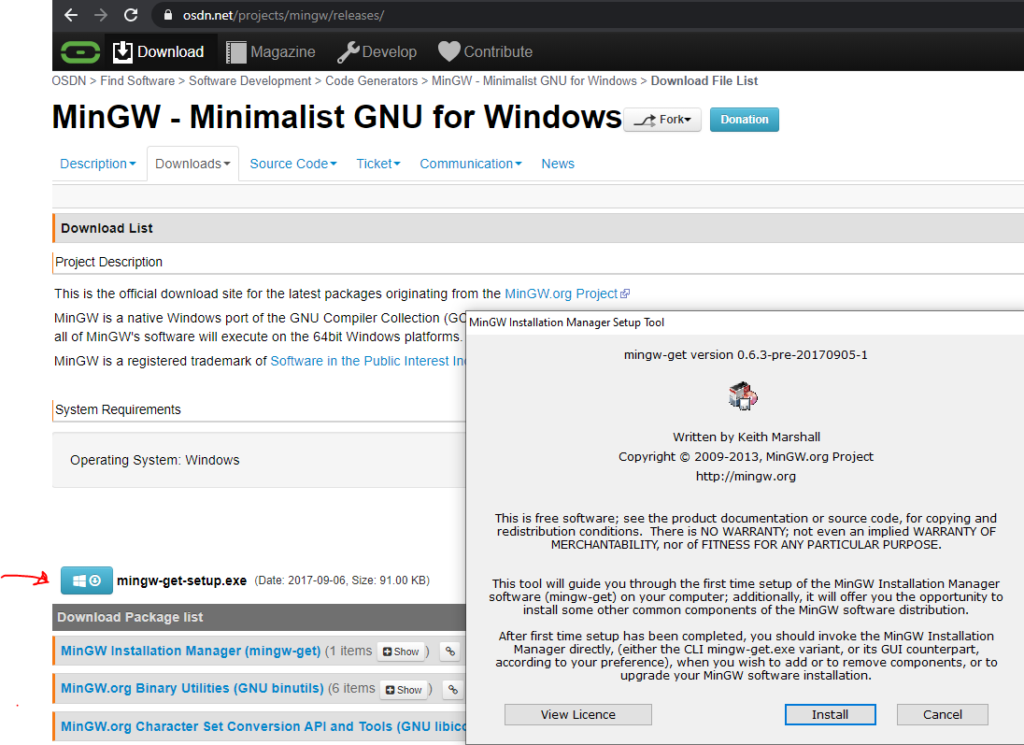
Important Edit: MinGW official website is now down (as of 24th March 2021). Hence, instead of their official website, download from MinGW SourceForge page - Look for mingw-get-setup.exe for downloading. Download it and launch the installer. Accept the terms and move on.
- You’ll now see that the installer is connecting to the Internet and downloading a lot of tiny and small files. Wait till it ends.
- Right when it ends (which won’t take long), you’ll be presented a window with title MinGW Installation Manager. You should be in the ‘Basic Setup’ tab by default when it launches. If not, click on Basic Setup.
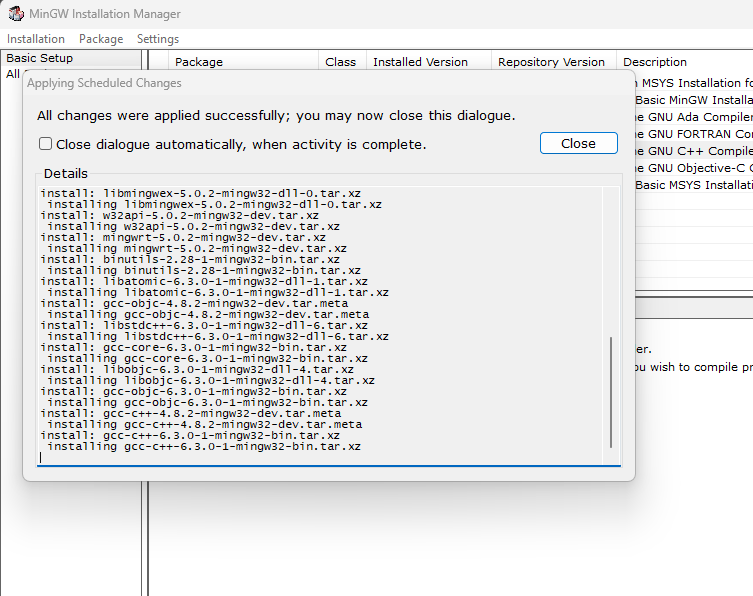
- Out of the numerous check boxes presented to you on the right side, tick «mingw32-gcc-g++-bin«. If you are prompted with a menu, click on Mark for Install.
- Then on the top left corner click on Installation > Apply Changes. And wait while it downloads a billion files and installs them.

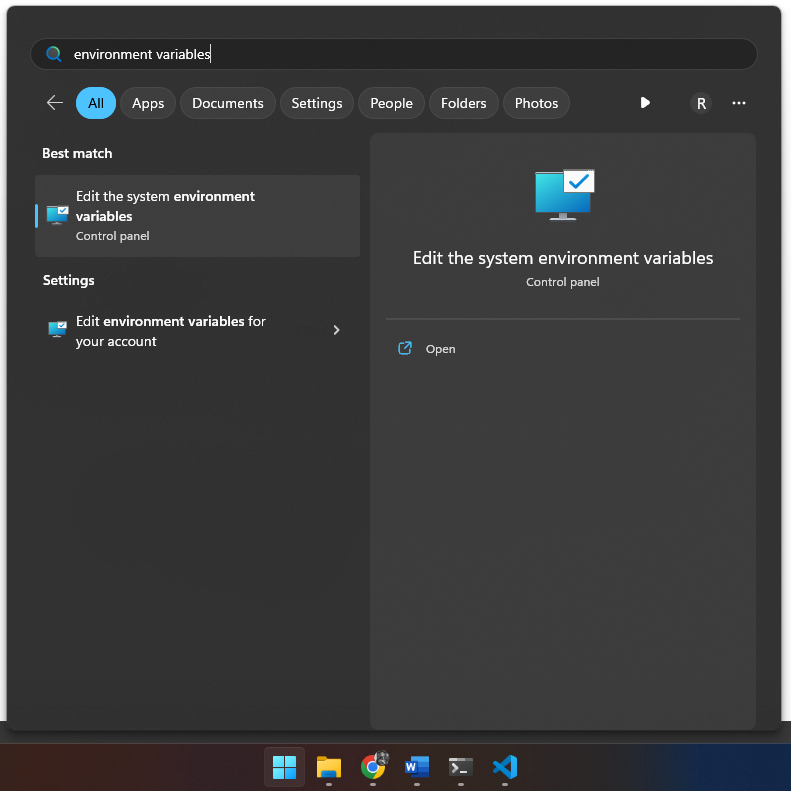
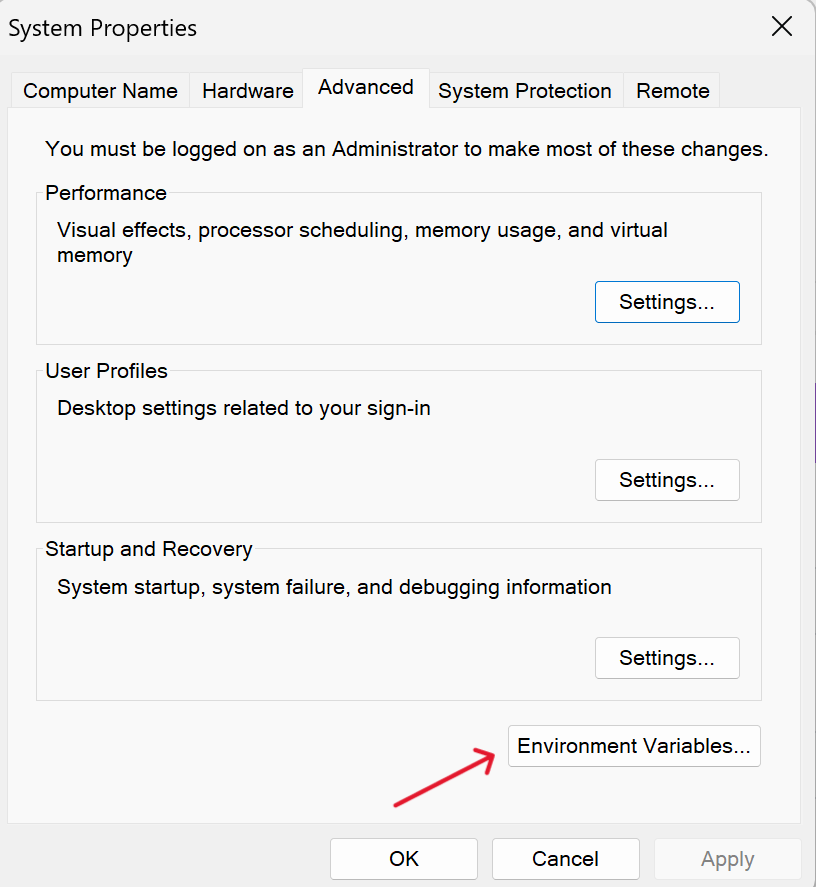
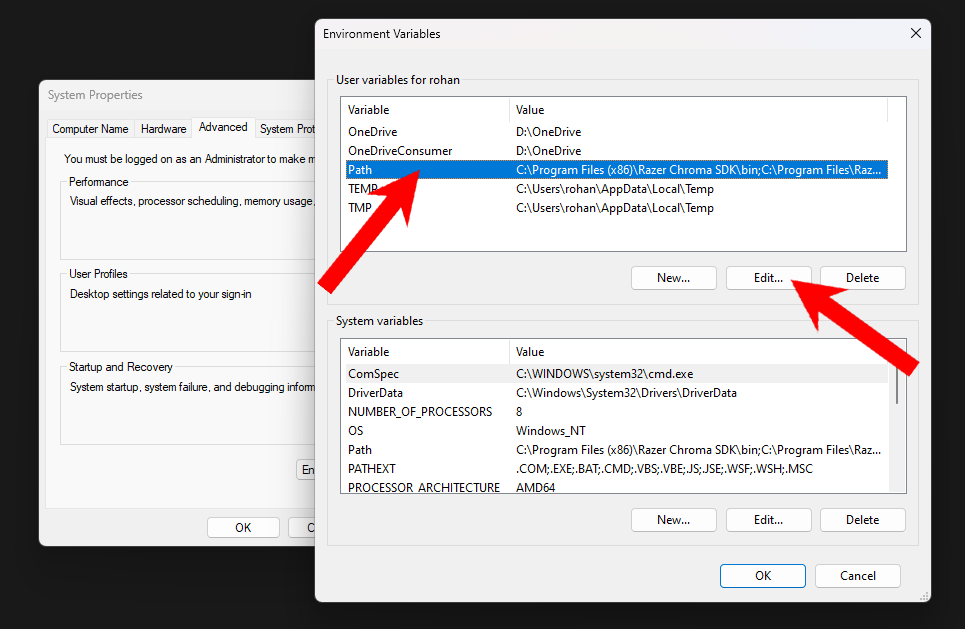
- Now you gotta edit your «Environment Variables» as well, so that gcc works in cmd no matter the file location.
- For that go to Windows Explorer > Right click on This PC > Properties > Advanced system settings > Environment Variables or you could just search for «Environment Variables» in Windows Search…
-
At the bottom «System Variables» panel, look for a Variable named «Path» and double click on it. Some systems show a good UI for adding a New Path easily (by clicking New), else you just need to add ; at the end and add the following path
C:\MinGW\bin
    ###### (This is assuming you didn't manually change any installation paths and went with just clicking 'Next' during installation)

10. Click on OK, and OK and close the other windows. Open a Command Prompt Terminal and try typing `gcc --version` and press Enter.

    If you get something like
    ```


    gcc (MinGW.org GCC Build-2) 9.2.0
    Copyright (C) 2019 Free Software Foundation, Inc.
    This is free software; see the source for copying conditions.
    There is NO warranty; not even for MERCHANTABILITY or FITNESS
    FOR A PARTICULAR PURPOSE.
Enter fullscreen mode
Exit fullscreen mode
gcc has been successfully installed in your PC. Enjoy!
Enter fullscreen mode
Exit fullscreen mode
Cheers and happy coding!
Installation
To check if GCC already exists by running the following command in your command promt gcc -v
-
Install MSYS2 MSYS2.
-
This will install the linux shell on your Machine.
-
Update packages and mirrors using
pacman -Syu. -
You may have to restart
-
To install GCC copy the following code and paste in the shell
Ctrl + vmight not work -
Note: Keep pressing ENTER to select the default installation instructions.
pacman -S --needed base-devel mingw-w64-i686-toolchain mingw-w64-x86_64-toolchain \git subversion mercurial \mingw-w64-i686-cmake mingw-w64-x86_64-cmake
- This command will take a while to download and install all files.
- After this GCC is installed but you still need to add it to your path.
- Note: IF you get the following error
gcc is not recognized as an internal or external commandGCC may not be added to your path
PATH
-
To set the path to GCC Compiler
-
Open Start and type
environment variables -
Click
Advanced System Settings -
Click
Environment Variables -
In the
System variablessection add a new entry toPATH/Path. -
Add the following two lines
-
C:\msys64\mingw64\binandC:\msys64\ming32\bin -
Note: The path may vary according to where you have installed MSYS2
-
GCC installation is complete you may use gcc to compile programs
If you still get this error
gcc is not recognized as an internal or external command
try this
Compiling
Locate your program
I will be giving this example considering .c program
cd into your desired directory where file is locate or type cmd in the adress bar
then type command
gcc -o name name.c
eg. gcc -o helloworld helloworld.c
The name after -o is the name given to exe file that is generated
Correct errors if any and run the above command again when done
If no errors are generated
Type name that is the name of your .exe
the program will have run
CODE::BLOCKS
You could also download CODE::BLOCKS IDE which comes with the GCC compiler
Download the binary release from here
Download the one that says mingw-setup.exe
Make sure that you dont have gcc previously installed in your computer
Follow the instructions
You will have to set the path manually as we did previously
The bin lies in C:\Program Files(x86)|CodeBlocks\MinGW\bin
MinGW
MSYS2
GCC
CodeBlocks
More
Installing CodeBlocks
Thank you

«Learn how to install GCC and g++ compilers on Windows 11 with this step-by-step guide. Ideal for developers, this tutorial covers everything from downloading MinGW to setting up environment variables, enabling seamless C/C++ programming on your PC»
By CodeWithHarry
Updated: 5 April 2025
If you’re a developer aiming to compile C/C++ programs using the command prompt, this blog post can guide you through the process of installing the gcc and g++ compilers on your Windows PC.
Without these compilers installed, attempting to compile or run C/C++ programs may result in an error message stating:
gcc : The term 'gcc' is not recognized as the name of a cmdlet, function, script file, or operable program. Check
the spelling of the name, or if a path was included, verify that the path is correct and try again.
At line:1 char:1
+ gcc
+ ~~~~
    + CategoryInfo          : ObjectNotFound: (gcc:String) [], CommandNotFoundException
    + FullyQualifiedErrorId : CommandNotFoundException
In Windows 10 and older, this error looks like this: «gcc is not recognized as an internal or external command.»
A little Background
Before we proceed with the installation steps, we need to know about these tools:
- MinGW: This is a development environment to run C/C++ programs for Windows.
- gcc: This is the compiler that we will be using to compile C programs.
- g++: This is the compiler for compiling C++ programs.
MinGW includes both the gcc and g++ compilers in one package, eliminating the need for separate installations.
By downloading and installing MinGW, you can seamlessly continue your journey in C/C++ programming without the hassle of installing each compiler individually.
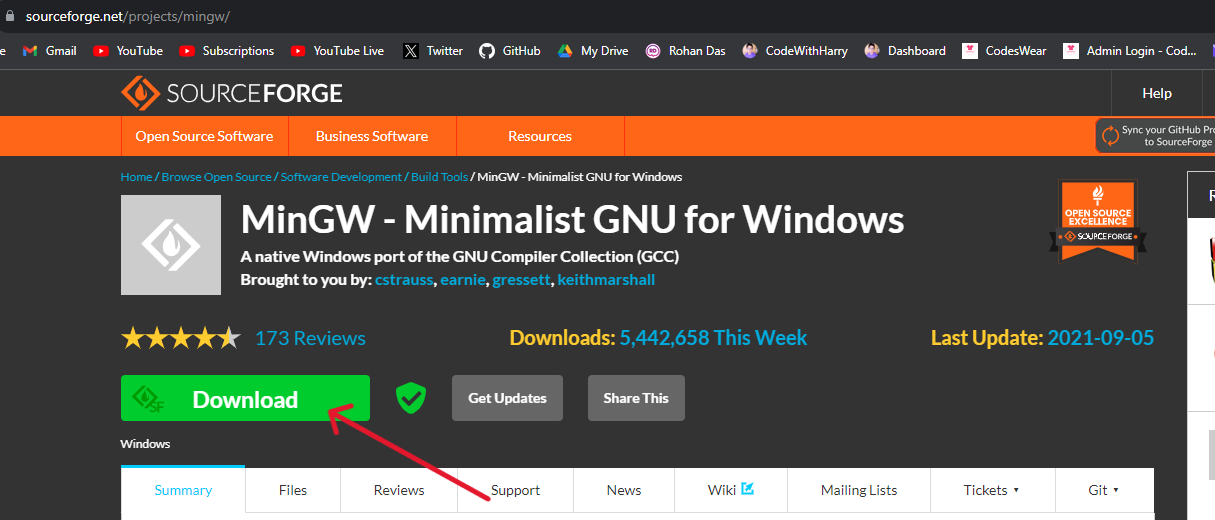
Step 1: Download MinGW Tool
Let’s start by downloading the MinGW installer from MinGW’s Sourceforge Page.
On this Sourceforge download page, click on the download button, and download the installer.
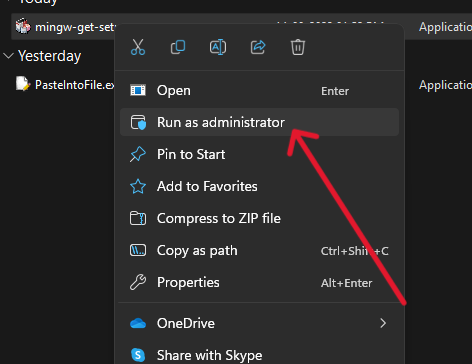
Step 2: Install MinGW
-
Right-click on the downloaded
mingw-get-setup.exefile and run as administrator.
-
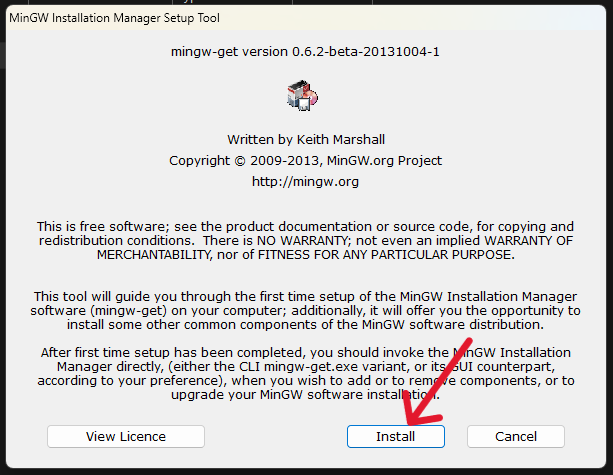
In the MinGW Installation Manager Setup Tool window, click on Install.
-
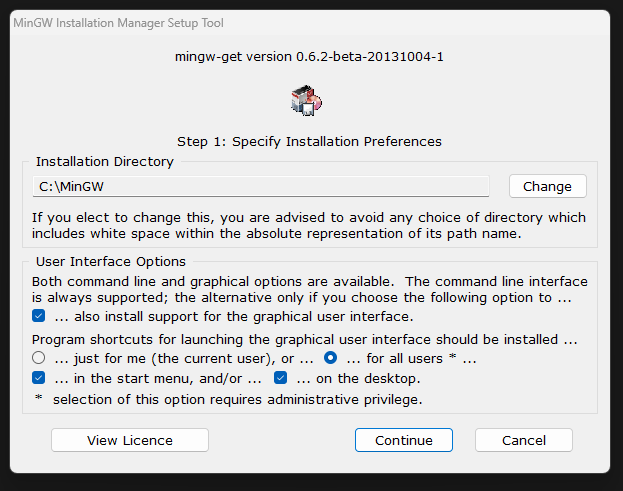
By default, the installation directory is set as
C:\MinGW. You can change the installation directory by clicking on the Change button and selecting a different folder (I don’t recommend changing the installation directory).
-
Click on the Continue button to start the installation. Here it might take some time to download. Once it’s complete, click on continue to start the installation.
-
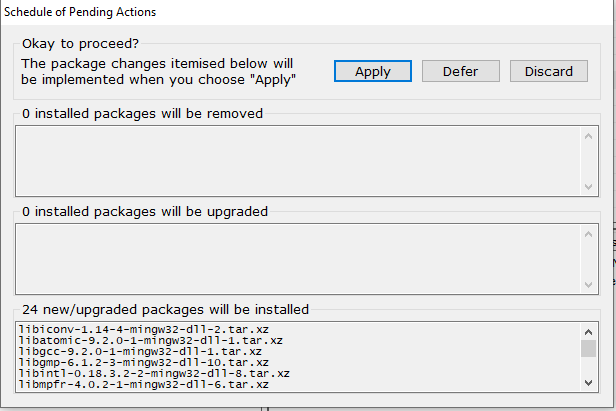
Now, you will be presented with this window. Here, we will right-click on the following items and select the mark for installation:
(a) mingw32-gcc-g++
(b) mingw32-gcc-objc
Once we have selected the items, we will click on «Installation» at the top and hit apply changes. It will start downloading and installing the packages. The video below clearly shows these steps: -
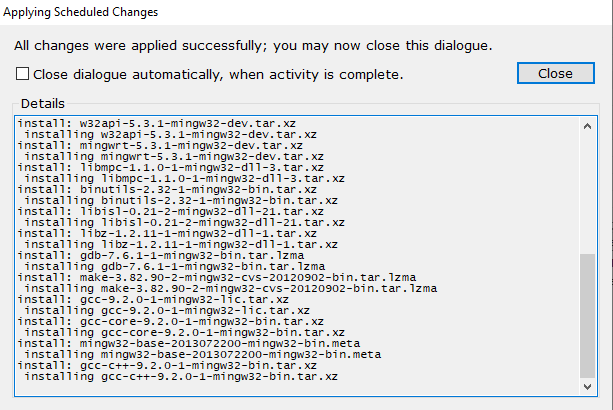
Once the installation is done, You will be presented with this window. Click on ‘close’ to close the window.
Step 3: Set up the environment variable for MinGW:
-
Once the MinGW setup is complete and the gcc and g++ compiler packages are installed, we need to set the PATH variable for our computer.
Click on your search icon beside the windows icon and type «Environment Variables»
-
Click on the first option «Edit the system Environment Variables». A System Properties window will open. Click on «Environment Variables»
-
Select Path and click on «Edit»
-
Click «New» and add the location of MinGW installation.
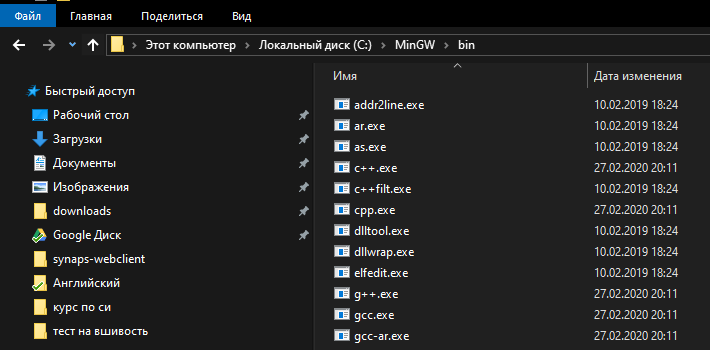
By Default, the MinGW installer installs all the files to
C:\MinGW\binfolder. If you have changed the installation directory while installing it you need to give the location of that folder. This is how it will look:
Step 4: Test gcc and g++ compiler:
To test if the gcc compiler or the g++ compiler is installed correctly, open a command prompt and type the following command.
For gcc compiler:
gcc –vFor g++ compiler:
g++ -v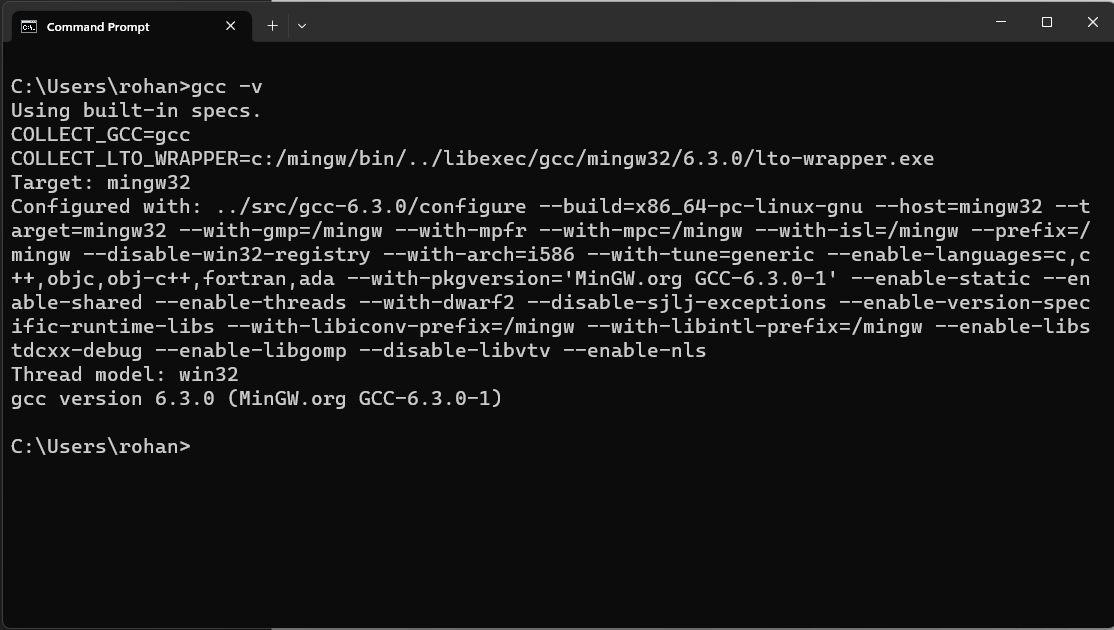
Conclusion:
You’ve now successfully set up gcc on Windows 11, enabling you to create C/C++ applications seamlessly. These steps cover the entire process, from installing the gcc and g++ compilers to executing your programs in the command prompt. Should you encounter any inquiries or difficulties, feel free to reach out via the comments section. Happy coding!
Tags
howtoinstallgnugcccompileronwindows
How To Set Environment Variables for GCC On Windows, Hey There!, Welcome Back to Think & Free. In the previous lesson, I showed you, how to get download and install the GNU GCC Compiler on your Windows System using MinGW. This is part two of How to Install GCC On Windows. In this lesson, I will show you how to Configure Correctly MinGW in Windows System.
Part 1 – How To Install GCC On Windows
Once you correctly installed the GNU GCC Compiler using MinGW on your Windows system. Then you need to Create a Path variable for, getting Access to GCC. Now I’m going to show you how to Create a Path Variable and how to Configure MinGW Correctly. Let’s see how it works.
What are Path Variables?
C:\WINDOWS\system32 is a first path variable in Windows systems. path variable contains executable file locations of programs where it has been located or where it has been installed path in the Windows System. If some program is configured in the PATH Variable it can access anywhere in Windows Systems. That is about PATH Variables. Now we need to create a new path variable for our MinGW installation path before starting working with MinGW.
Create Path Variable & Configure MinGW
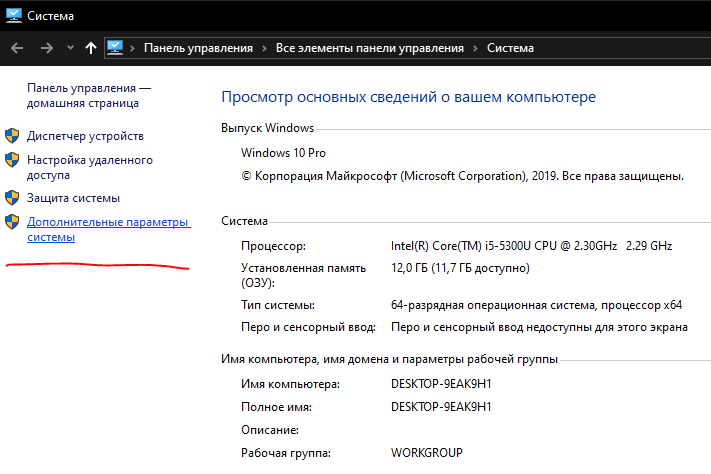
First Open up the Control panel window by Start and Search “Control Panel”. And go to System and Security. Now we can see all of the System and Security settings here. Now we need to select System.
Another way is you Open up the System Configuration Window by simply Going to This PC and Right-click the Icon. Now select Properties. The left side pane on the System Configuration window will provide some Administrator options. Now we need to go to the Advanced system settings in there.
Once you tap the Advanced system settings option. You can see another little window will prompt. That is a “System Properties” window. In this window, go to the Environment Variables Under the Advanced Options.
It will prompt another window, Called “Environment Variables“. Now we are going to create a Path Environment Variable for our MinGW Installation Directory. In the Top of the “Environment variables” Window, you can see the User variable for <USERNAME>, That means these variables are only allowed to the Current user. If you install MinGW Only for you, you can create a PATH Variable here.
I’m using only for user environment variable option for this time, If you prefer to set environment variables systemwide choose the Edit option in the Path variable under the System variables option.
Creating PATH Variable
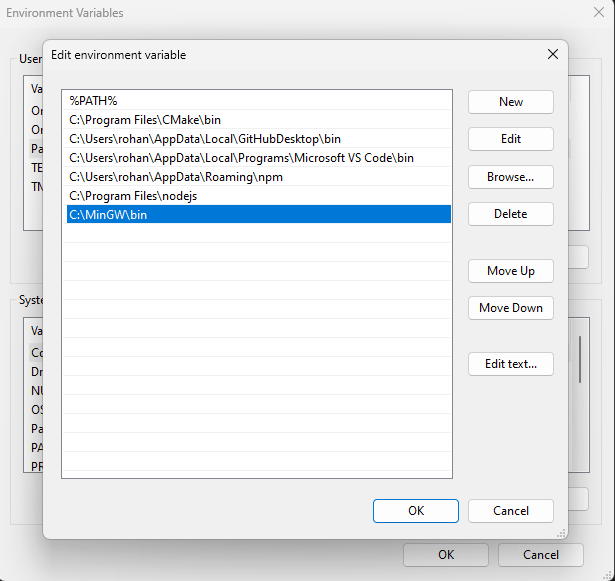
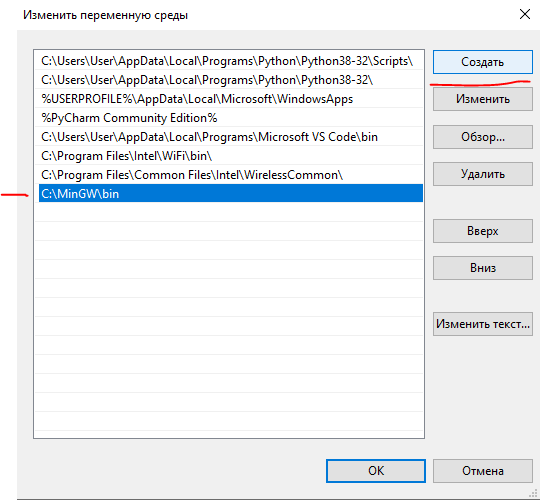
Let’s create a path variable under the current user. First Go to PATH under the User Variables, and Hit the Edit button at the bottom. Now You can see the “Edit Environment Variable” window will appear.
First, copy the full path of the MinGW installation directory. In that location, we can see a directory called “bin“. All binaries will be located in this directory. OK, now select the “New” Option on the Left side top on the “Edit Environment Variable” window.
It will allow us to add a new PATH Variable. Now Paste, That you copied, The full path of, the bin directory. It is located in the MinGW installation directory.
In my System, C:\MinGW\bin. I’m using the default MinGW installation path. if you change it in the Installation location you must provide it correctly here.
Now hit the OK button. Our Path Variable setup process has been completed! Now Hit the OK button in all windows and Close them. Let’s check if our Path variable is working correctly.
Open up a new command prompt window and type gcc –version. it will prompt GCC version information. if you got some message like this. That means The MinGW Configuration setup was successful. If not, check again and create a correct path for the bin directory located in the MinGW installation directory.
I hope you guys enjoy this. if you have questions with this leave a comment.
Post Views: 888
Данный текст будет полезен тем, кто давно хотел слезть с иглы тяжеленных IDE, но настройка компилятора под себя – казалось делом неблагодарным и запутанным.
VS Code – это лишь редактор кода. Это не среда разработки – здесь нет встроенного компилятора или дебаггера. Здесь есть только их поддержка. Чем более инструмент универсален – тем сложнее вначале разобраться в его особенностях. Однако, здесь нет ничего невозможного! Если правильно один раз настроить VS Code, то вы получите замечательную среду с помощью которой можно поддерживать различные проекты на совершенно разных языках.

VS Code является легковесным, кроссплатформенным редактором кода. Одной из его главных особенностей является поддержка кучи плагинов. Плагины позволяют расширять технологию IntelliSense (автодополнение кода) на разные языки программирования, добавлять поддержку специфического оборудования, отладчиков и прочее. Очень приятная и гибкая цветовая схема не раздражает даже после многочасового просиживания в процессе работы.
В общем-то поэтому решил написать как подготовить себе приятную среду разработки. В данном случае – под C и C++
Картинки кликабельны. И их максимально много. Если считаете, что что-то слишком очевидно, то пропустите этот момент
Чаще всего используется компилятор gcc. Данный компилятор обычно идет совместно с Unix-осью. Для того, чтобы работать с этим компилятором на Windows, нужно установить некоторые инструменты разработки. Есть два больших и известных проекта, созданных с данной целью:
- MinGW
- Cygwin
Главное их отличие в том, что MinGW сосредоточен в основном на компиляторе с некой поддержкой системных команд, в то время как Cygwin старается эмулировать полноценную UNIX-среду.
Обсуждение на Stack Overflow на эту тему
https://stackoverflow.com/questions/771756/what-is-the-difference-between-cygwin-and-mingw
Установка MinGW
Первым делом нужно убедится, что на компьютере уже не установлен компилятор gcc. Нажмем Win+R и вызовем командную строку.
C:\Users\User> gcc -version
Если компилятор не установлен – выведется сообщение, что программа не найдена. Иначе, можно опустить установку и настройку MinGW и переходить прямо к разделу с настройкой VS Code.
Закрываем консоль (“cmd“) и переходим на официальный сайт проекта MinGW http://www.mingw.org/.
Ищем ссылку “Download” и переходим. Должно открыться что-то подобное, как на рисунке снизу.
Выбираем необходимые нам пакеты. Нам нужен базовый пакет mingw32-base и mingw32-gcc-g++. Отмечаем их
Внимание – приписка 32 в названии не означает работу приложения только и/или нацеленно на 32-битной платформе

После чего применяем внесенные изменения
Видим, что будет установлено/обновлено 24 пакета
Новое окно сообщает об успешном применении изменений
Теперь можем перейти в папку установки и убедиться в том, что все необходимое установлено (g++.exe и gcc.exe)
Выполним проверку установки переменной PATH. Проведем такую же проверку, как и в начале. Нажмем Win+R и вызовем командную строку.
Попросим компилятор вывести его версию следующей командой:
C:\Users\User> gcc -version

Если все сработало как нужно, то переходим к разделу с настройкой VS Code.
Если в консоли появилась ошибка, то нужно настроить переменную PATH. Это глобальная системная переменная и содержит в себе каталог исполняемых программ. То есть её настройка позволяет запустить программу по имени, не указывая полный путь до исполняемого файла. Их есть два вида – отдельная для каждого пользователя и одна общесистемная, которая доступна каждому пользователю.
Как настроить переменную PATH
Переходим в “Этот компьютер” и нажимаем правую кнопку -> свойства.
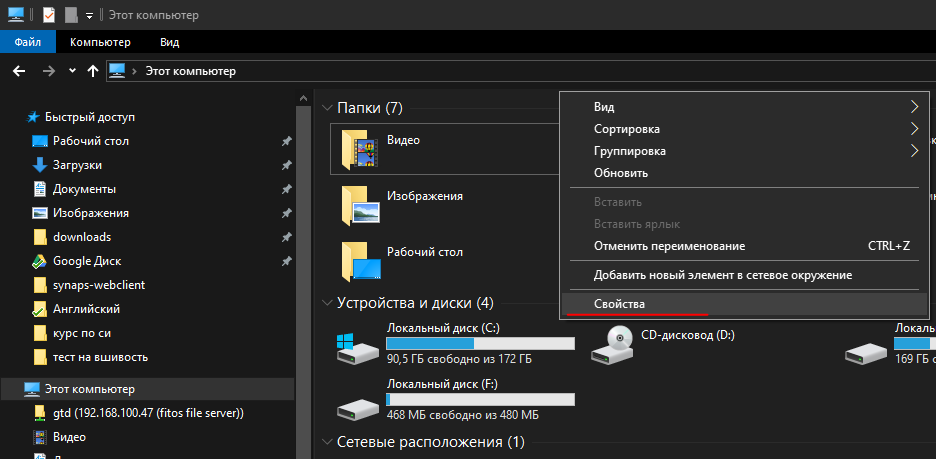
Далее в левой колонке жмем “Дополнительные параметры среды“
Далее в “Переменные среды“
Выбираем в списке переменных сред для пользователя выбираем переменную PATH и жмем “Изменить“.

Жмем “Создать” и вписываем полный путь до папки MinGW\bin
Нажимаем “Ок” и снова вызываем командную строку – Win+R – cmd.
Внимание – чтобы изменения переменной PATH вступили в силу, командную строку нужно перезапустить, если она осталась открытой.
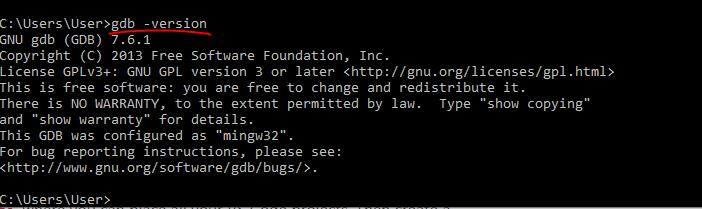
Выводим для проверки версию компилятора:
C:\Users\User> gcc -version
Заодно проверим дебаггер:
C:\Users\User> gdb -version
VS Code – Hellow World
Скачиваем с официального сайта абсолютно бесплатный VS Code.
https://code.visualstudio.com/
Процесс установки опустим – подсказок установщика достаточно
Для корректного автодополнения, дебага и подсказок по документации стоит установить расширение C/C++.
Расширения устанавливаются прямо из VS Code во вкладке “Extensions” или Ctrl+Shift+X. На нижней картинке эта вкладка подчеркнута в левом столбце.
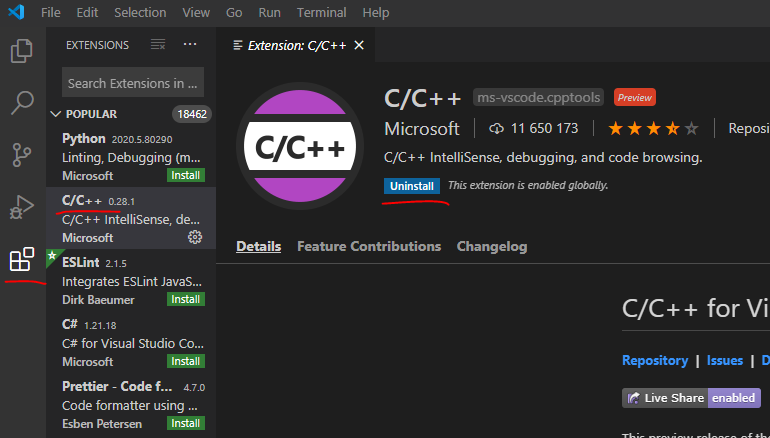
Найдем через строку поиска C/C++ и установим.
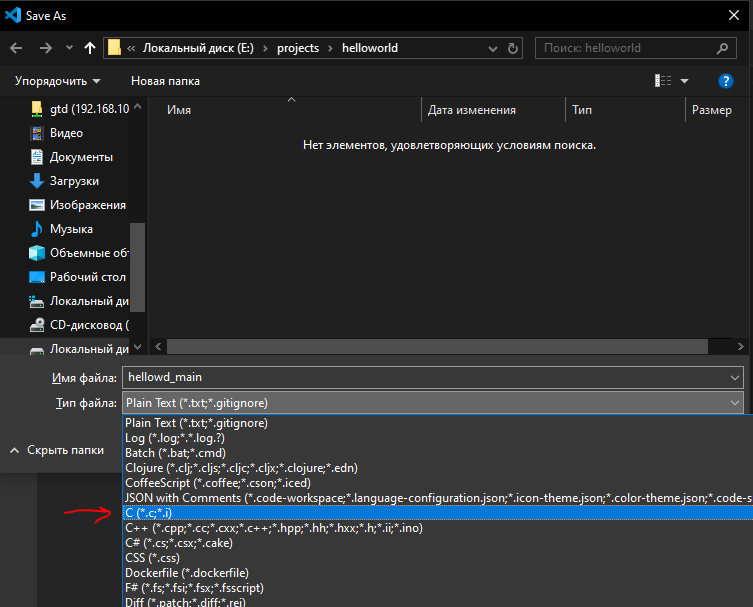
Далее создаем папку будущего проекта в произвольном месте на компьютере. Свою назвал “helloworld“. Она будет папкой всего проекта, который вы будете разрабатывать. В VS Code открываем папку используя File > Open Folder…
Откроется проект. Пока он пустой. Создадим первый файл в проекте через File > New File
Чтобы VS Code начал предлагать подсказки по вводу и подсвечивать синтаксис, следует сразу после создания файла сохранить его в необходимом расширении. По сути сейчас вы определяете язык будущего проекта. Нажимаете File > Save… и в открывшемся окне выбираете тип файла. Т.к. наш тестовый проект пишется на Си, выбираем его в выпадающем списке Тип файла.
Теперь при вводе текста будут появляться подсказки с автодополнением. Для подстановки предложенного автодополнения можно нажать Tab. В VS Code достаточно много удобных хоткеев. Посмотреть все быстрые клавиши можно тут File > Preferences > Keyboard Shortcuts
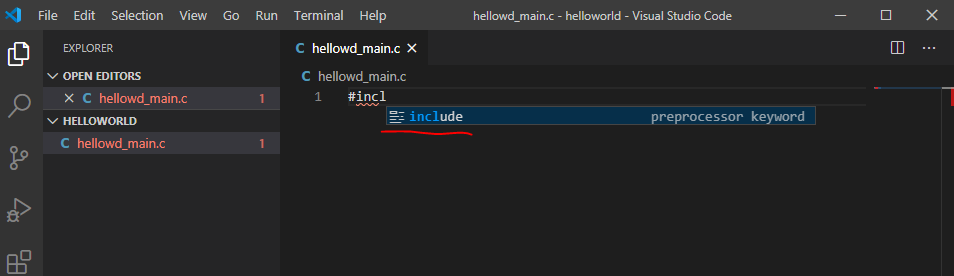
Запишем наш код HelloWorld в файл. В принципе, можно писать любой код – главное, чтобы был вывод в консоль для отладки.
#include <stdio.h>

int main(void)
{
    char * msg = "Hello World";
    printf("%s", msg);
    return 0;
}
Настройка компилятора
Время перейти к настройке компилятора и дебаггера.
Компилятор позволит из написанного кода собрать рабочее приложение.
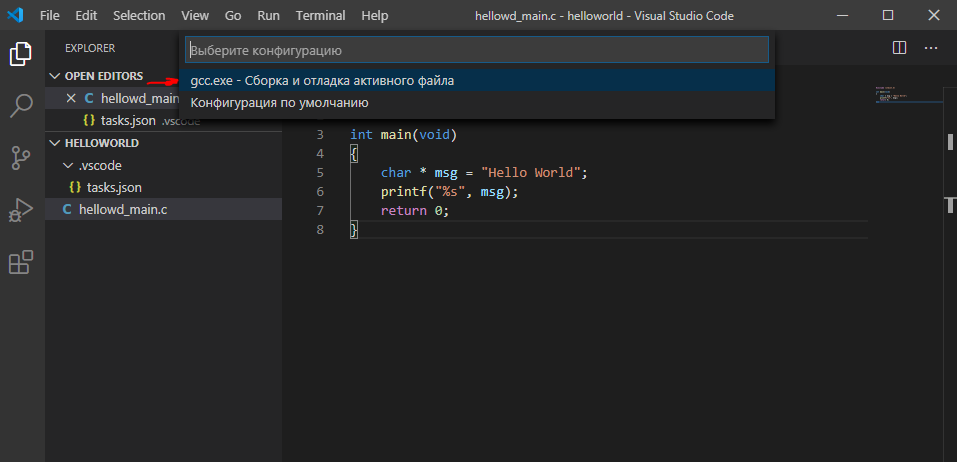
Переходим Terminal > Configure Default Build Task…
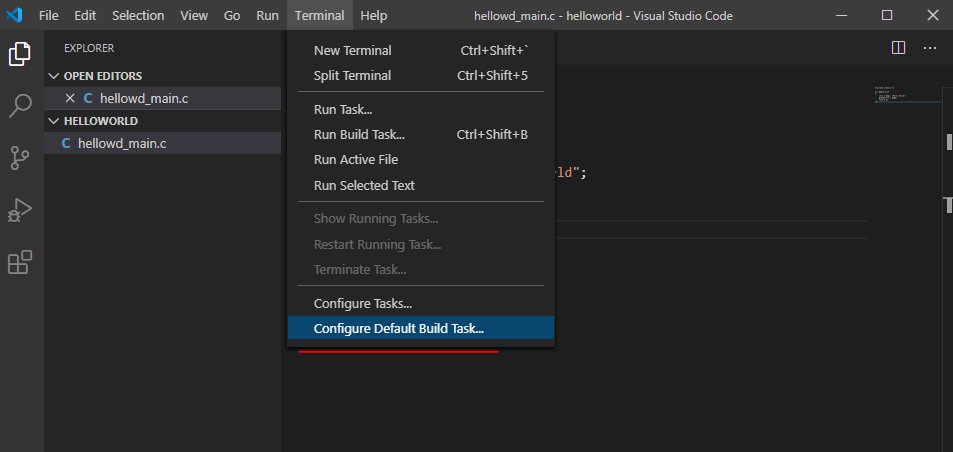
Мы изначально определили язык программирования (во время сохранения) и VS Code самостоятельно нашел компилятор – нам предложено задать сценарий работы с ним.
Если самостоятельно VS Code не нашла компилятор, то нужно редактировать файл c_cpp_properties.json, который идет вместе с расширением. Именно в данном файле настраивается путь к includePath
Подробнее по ссылке на официальном сайте. Ссылка актуальна на 2020 год.
https://code.visualstudio.com/docs/cpp/configure-intellisense-crosscompilation
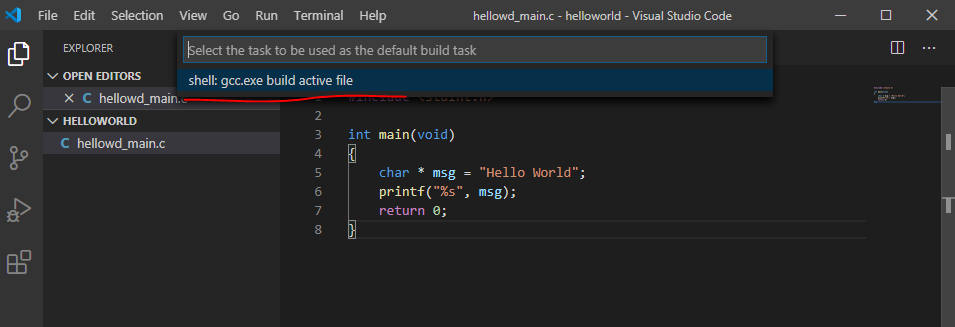
Кликаем по предложенной подсказке.
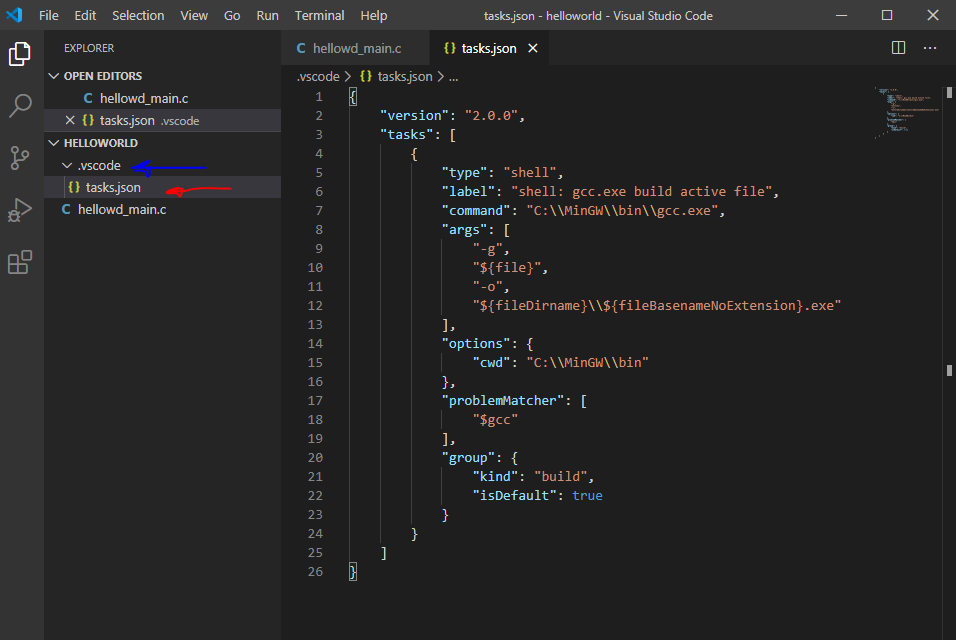
Текст файла примерно такой:
{
    "version": "2.0.0",
    "tasks": [
        {
            "type": "shell",
            "label": "shell: gcc.exe build active file",
            "command": "C:\\MinGW\\bin\\gcc.exe",
            "args": [
                "-g",
                "${file}",
                "-o",
                "${fileDirname}\\${fileBasenameNoExtension}.exe"
            ],
            "options": {
                "cwd": "C:\\MinGW\\bin"
            },
            "problemMatcher": [
                "$gcc"
            ],
            "group": {
                "kind": "build",
                "isDefault": true
            }
        }
     }
   ]
}
Выглядит страшно, как и любой развернутый JSON
Гайд на официальном сайте vscode говорит о том, что этого достаточно, а если что-то идет не так, то отсылают почитать про функционал task.json. К сожалению, если оставить в таком виде, то собирать многофайловые проекты будет невозможно.
Если в вашем проекте будет НЕ больше одного файла, можете пропустить дальнейший текст и перейти к настройке дебаггера. Если планируется работать с несколькими файлами – рекомендую проделать дальнейшие манипуляции.
JSON – это текстовое представление данных/объектов (в основном в JS).
Обычно используется для передачи данных в парах Клиент-Сервер.
Массивы обозначаются квадратными скобками []
Ячейки обозначаются фигурными скобками {}
Обычная запись представляет собой пару ключ-значение через двоеточие:
{ “Ключ” : “Значение” }
Значение может быть массивом, ячейкой, массивом ячеек и т.д. – ограничений нет.Коротко про JSON
Поле tasks содержит массив ( [массив] ), который состоит из ячеек отделенных фигурными скобками и запятыми ( [ {ячейка 1}, {ячейка 2}, {ячейка 3} ] ). В нашем случае этот массив содержит одну ячейку.
Создадим еще один элемент в массиве задач (task). Нужно скопировать все что есть в квадратных скобках (task[ вот это ]) и вставить через запятую в конце первой ячейки массива.
{
    "version": "2.0.0",
    "tasks": [
        {
            "type": "shell",
            "label": "shell: gcc.exe build active file",
            "command": "C:\\MinGW\\bin\\gcc.exe",
            "args": [
                "-g",
                "${file}",
                "-o",
                "${fileDirname}\\${fileBasenameNoExtension}.exe"
            ],
            "options": {
                "cwd": "C:\\MinGW\\bin"
            },
            "problemMatcher": [
                "$gcc"
            ],
            "group": {
                "kind": "build",
                "isDefault": true
            }
        },
        {
            "type": "shell",
            "label": "shell: gcc.exe build active file",
            "command": "C:\\MinGW\\bin\\gcc.exe",
           "args": [
                "-g",
                "${file}",
                "-o",
                "${fileDirname}\\${fileBasenameNoExtension}.exe"
            ],
            "options": {
                "cwd": "C:\\MinGW\\bin"
            },
            "problemMatcher": [
                "$gcc"
            ],
            "group": {
                "kind": "build",
                "isDefault": true
            }
        }
    ]
}
Файл должен выглядеть примерно как указано выше. Следите за скобками и запятыми – если где-то будет ошибка VS Code сообщит. Удаляем ячейку “group” на строках 20-23. Этот параметр отвечает за выбор компилятора, который будет запущен по-умолчанию.
Нас сейчас больше всего интересуют строки с 27 по 31.
Изменим значение ячейки “label” на 27 строке на любое название. Пусть будет build c project. Именно по этому имени мы сможем понять какой именно компилятор сейчас выбран.
Ячейка “command” – это команда, которая будет передана в терминал/консоль для старта компиляции. Как мы видим, все правильно, это путь к gcc.exe.
Ячейка “args” – это список аргументов, который будет передан после команды. Не пугайтесь, мы уже это делали. Чуть ранее мы узнавали версию gcc путем передачи аргумента -version.
- “-g” указывает компилятору на необходимость вставлять в готовое приложение отладочную информацию – номера строк, имена переменных и т.д. Необходимо для корректной работы дебаггера (отладчика) GDB;
- Следующим аргументом идёт файл или список файлов. “${file}” означает текущий файл. То есть компилятору будет передан только один файл. Мы хотим, чтобы сюда входили все файлы из определенной директории. Да, одним из решений будет вписывать сюда каждый созданный .c файл, но разве это удобно? Значит записываем сюда конструкцию: Из этой директории, взять все .c-файлы. Получится следующее: “${fileDirname}/**.c“
- Аргумент вывода файла
- Путь вывода скомпилированного приложения.
В итоге, добавленная нами часть будет выглядеть следующим образом:
         {
            "type": "shell",
            "label": "build c project",
            "command": "C:\\MinGW\\bin\\gcc.exe",
            "args": [
                "-g",
                "${fileDirname}/**.c",
                "-o",
                "${fileDirname}\\${fileBasenameNoExtension}.exe"
            ],
            "options": {
                "cwd": "C:\\MinGW\\bin"
            },
            "problemMatcher": [
                "$gcc"
            ],
            "group": {
                "kind": "build",
                "isDefault": true
            }
        }
    ]
}
Подробнее про task.json
https://code.visualstudio.com/docs/editor/tasks
Настройка отладчика
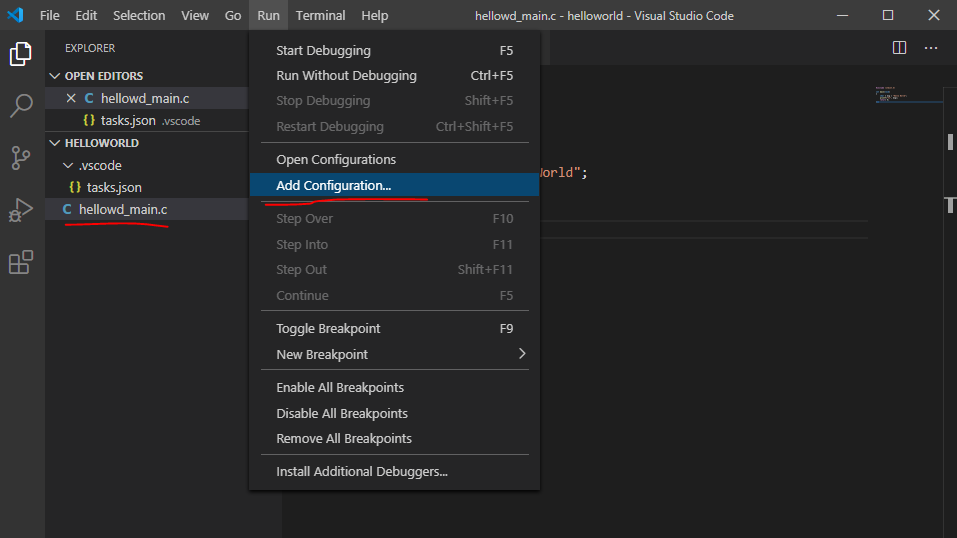
Теперь настроим дебаггер или отладчик. Переходим в наш файл с кодом, далее Run > Add Configuration…
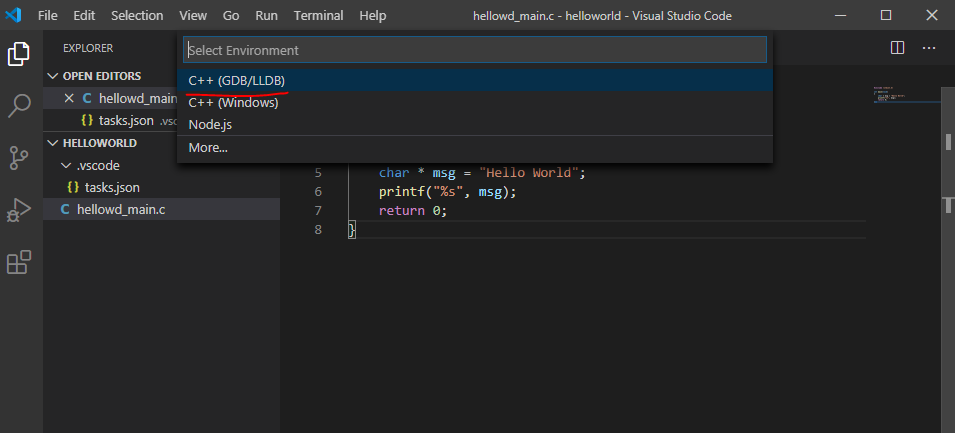
Выбираем окружение GDB
Выбираем Сборка и отладка активного файла
Если возникла ошибка и открылось окно, нажмите на нем Abort. Это лишь значит, что не удалось собрать приложение – может быть синтаксическая ошибка.
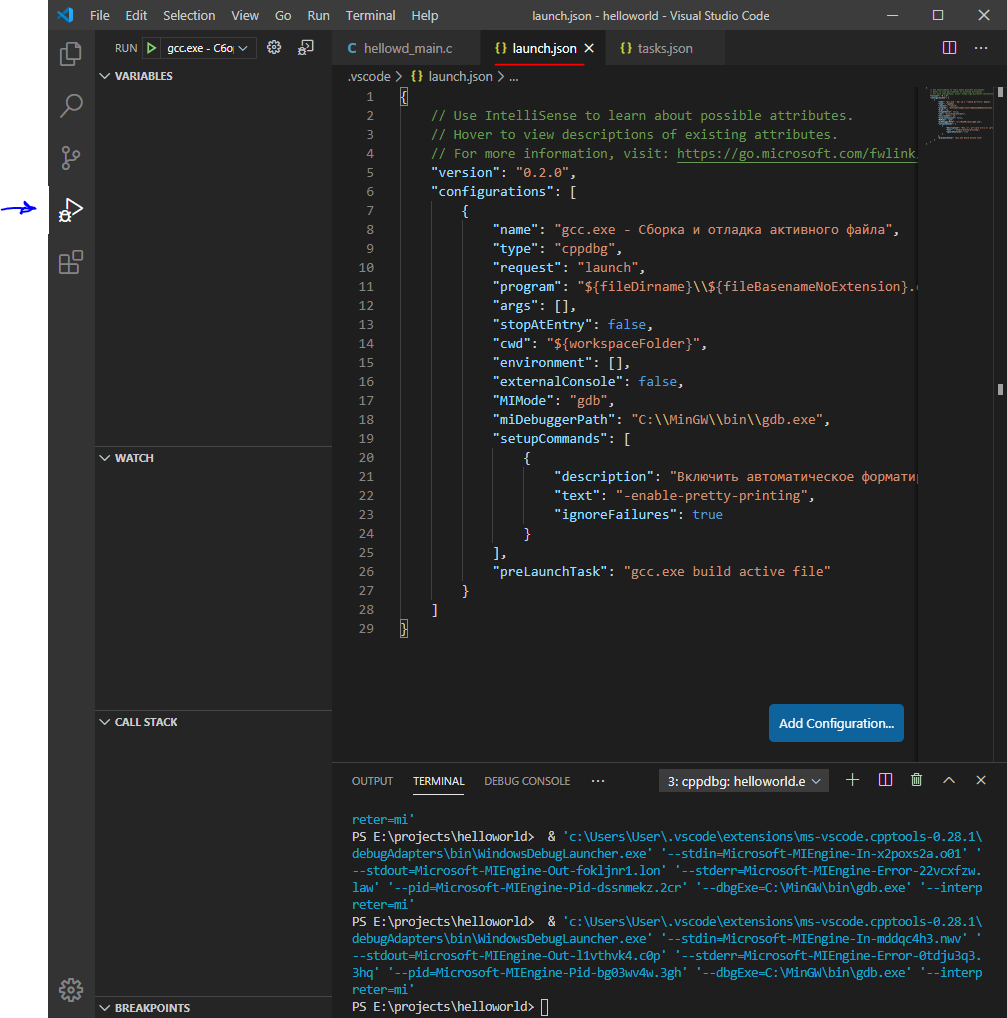
Далее откроется файл launch.json
Для тех, кто добавлял свой task: Изменим значение preLaunchTask на то название, которое придумали для своего компилятора. В моем случае – это “build c project“. Чтобы не было путаница стоить изменить и поле “name“. Можете как и прошлом примере добавить еще одну конфигурацию запуска в массив конфигураций, оставив первоначальную без изменений.
Запускаем приложение
Снова переходим в созданный файл с кодом и выбираем Terminal > Run Build Task…
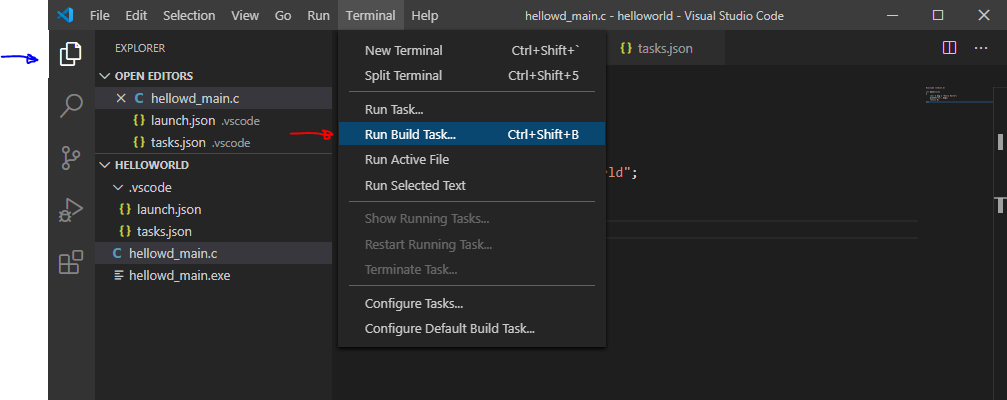
Эта команда проведет все шаги компиляции приложения и создаст в целевой папке исполняемый файл с расширением .exe
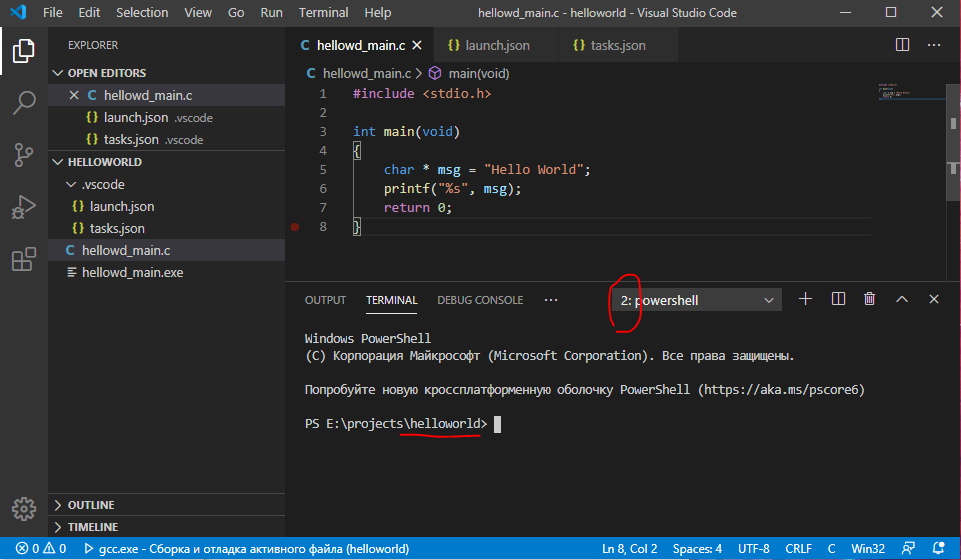
На картинке выше красным подчеркнут выпадающий список открытых терминалов (без паники – это как несколько cmd-консолей или терминалов в линуксе). Синим (правее красной линии, видно плохо) подчеркнуты элементы управления списком терминалов – их можно добавить, удалить или поставить парочку рядом.
Как мы видим, процесс компиляции завершился без ошибок и в списке файлов проекта появился .exe.
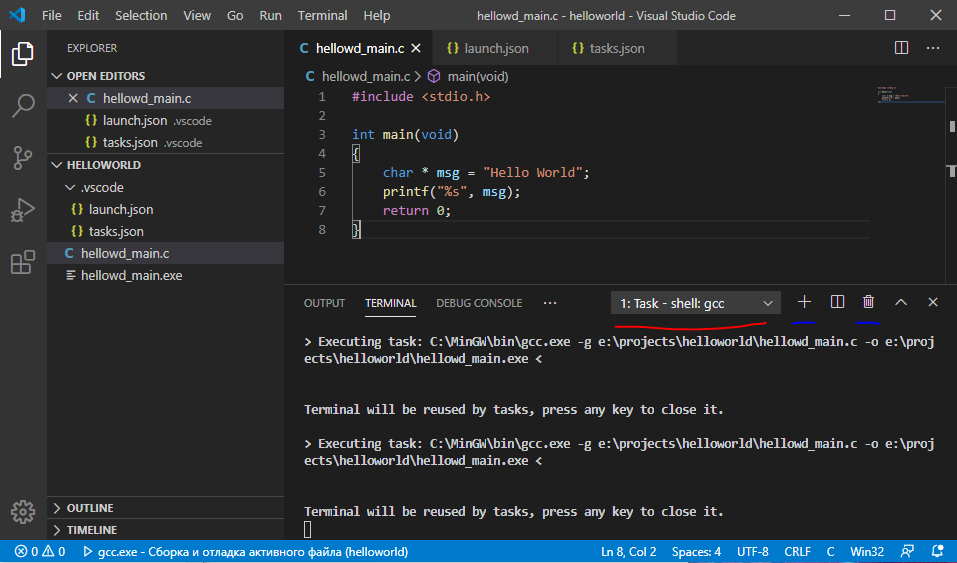
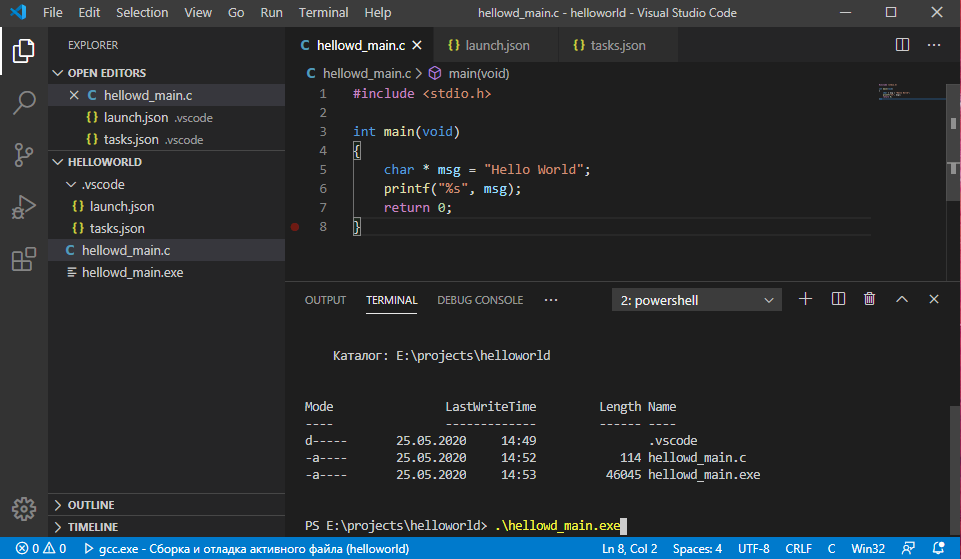
Создадим новый терминал.
Как мы видим, изменился порядковый номер нового терминала. Также видно, что мы находимся в папке с проектом. Отсюда можно вызвать наше скомпилированное приложение. Можно начать набирать его имя и нажать Tab и сработает автодополнение. На каждое следующее нажатие терминал предложит различные подходящие варианты под то, что имелось ввиду. Если предложить нечего – ничего не произойдет.
Вызовем наше приложение. В моем случае:
> .\hellowd_main.exe
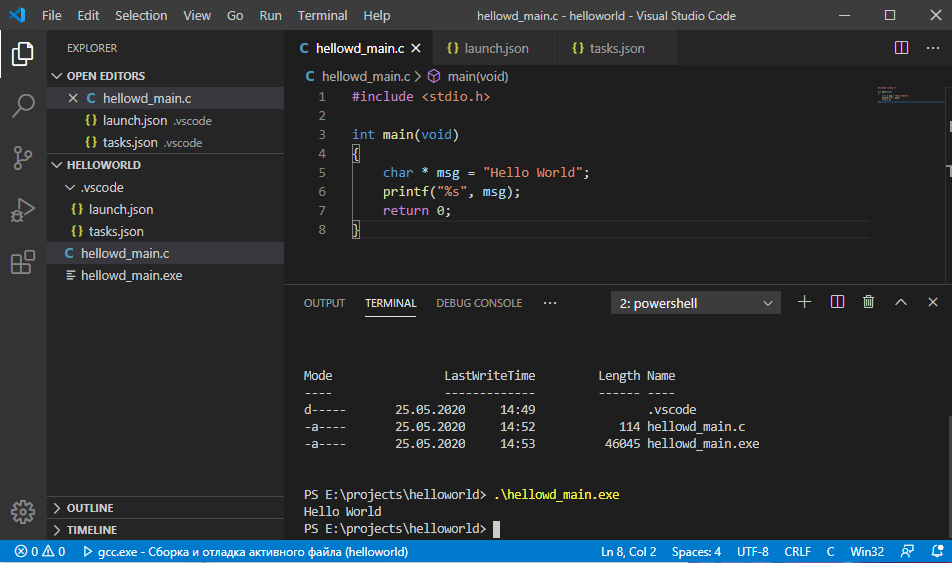
Замечательно, вывод сработал как надо.
Теперь инициируем отладку/дебаггинг этого приложения, чтобы посмотреть как это работает.
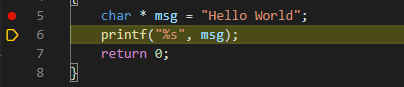
Установим “Breakpoint” или точку останова. Все как в классических IDE.
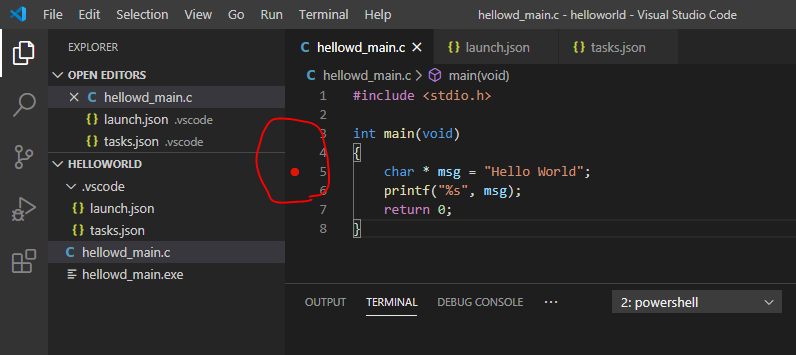
Запускаем отладку Run > Start Debugging или f5
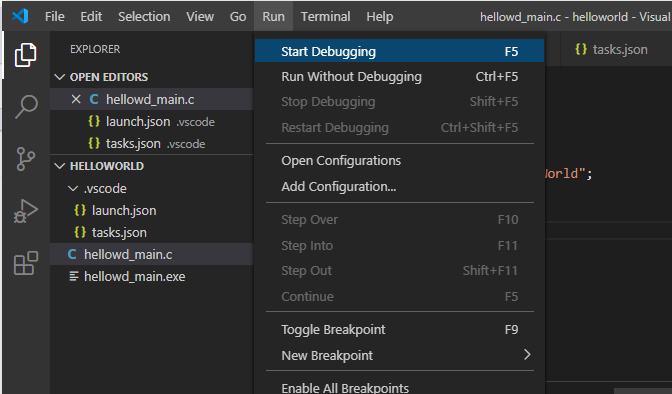
Выполнение программы было приостановлено в том месте, которое мы пометили точкой останова.
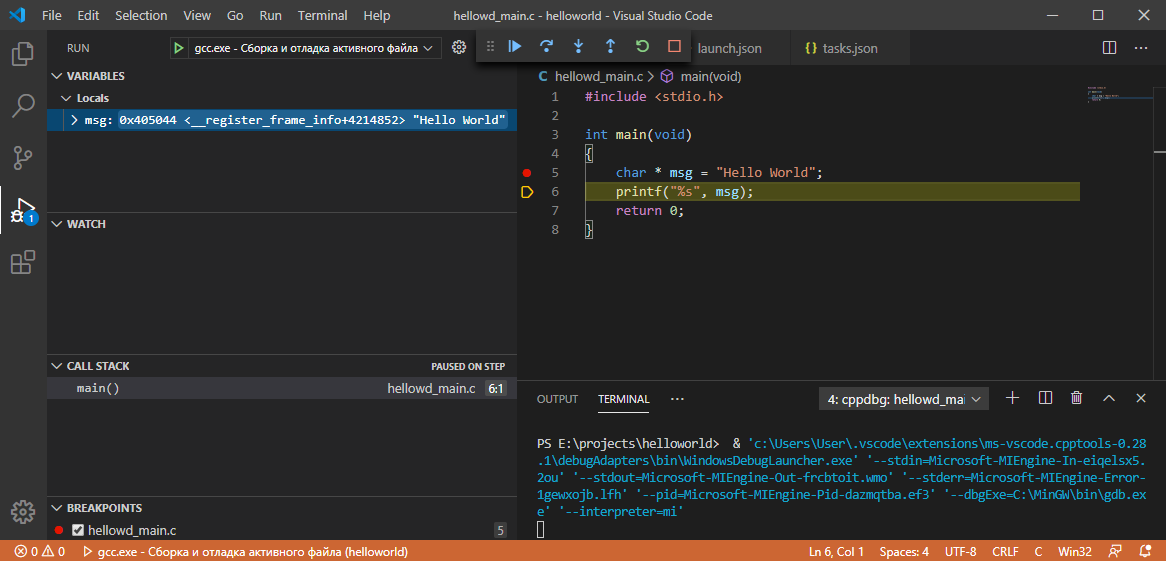
Открылось другое окно редактора, которое специально подготовлено для работы в режиме отладки. В левой части окна появилось четыре секции:
- VARIABLES все переменные
- WATCH сюда, через знак плюса можно добавлять переменные, функции и т.д. по имени
- CALL STACK стек вызовов функции. В общих чертах – функции часто вызываются в теле других функций.
- BREAKPOINTS все точки останова
Текущая выполняемая строка подсвечивается и имеет желтый указатель строки
Управление ходом отладки программы тоже удобное и классическое.
- Продолжить
- Сделать шаг
- Пройти “внутрь” текущей строки
- Выйти на уровень выше
- Перезапуск отладки
- Остановка отладки
Удачного освоения инструмента