
In this walk-through, you will learn how to create a graph using the Windows Form App (WinForm) step by step.
By default, chart control is not available in the toolbox. You have to install first the chart option, then proceed towards CHART preparation.
Create Project using template “Windows Forms App”
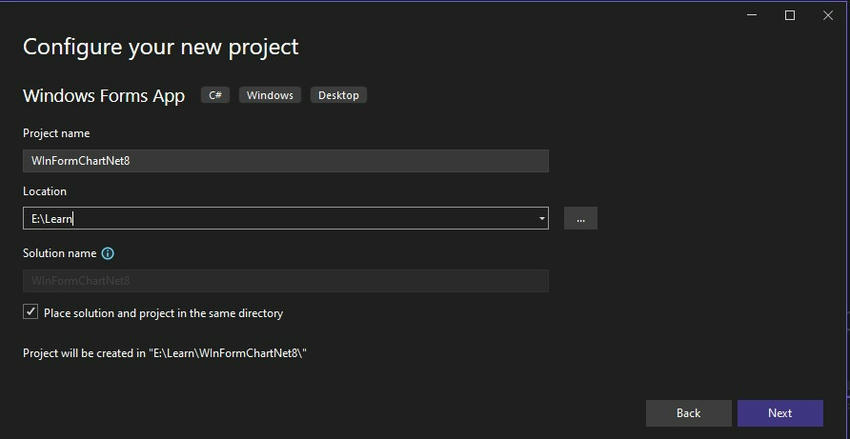
Set your project name and Location, which means the path of the project.

Select Your Framework .Net Version and create the project.
Search the Chart in the toolbox, you will come to know that there is no CHART control.
Install NugGet: System.Windows.Forms.DataVisualization
Right-click on Project and select Manage NuGet packages.
After installation, you can seethe Chart option is visible. Now, drag and drop the chart control on the Form1 canvas.
Double-click on the Form1 canvas area or press F7 on Form1 and enter the following code using the Inside Form1_Laod method.
private void Form1_Load(object sender, EventArgs e)
{
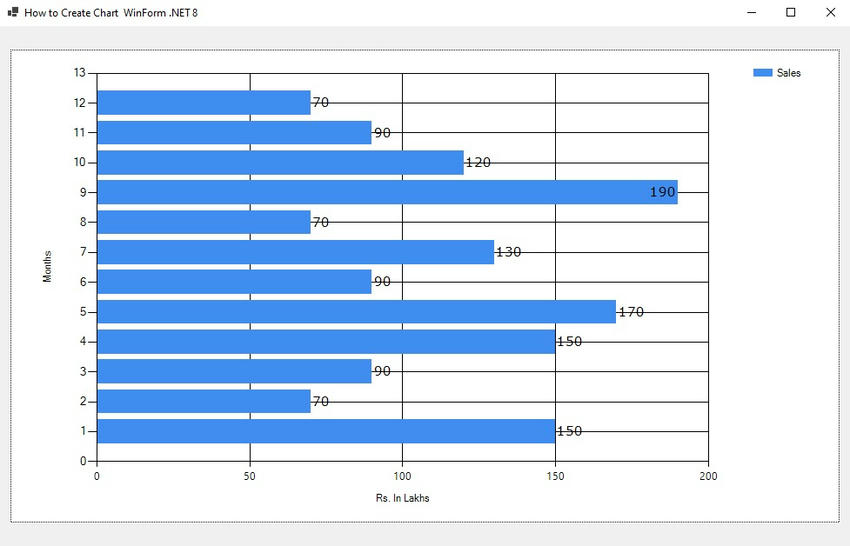
this.Text = "How to Create Chart WinForm .NET 8";
// Clear ChartAreas, Series
chart1.ChartAreas.Clear();
chart1.Series.Clear();
// Create Chart Area
ChartArea chartArea = new ChartArea("GraphArea");
chartArea.AxisX.Title = "Months";
chartArea.AxisY.Title = "Rs. In Lakhs";
// Add Chart Area
chart1.ChartAreas.Add(chartArea);
// Create a Series and set type to Bar
Series series = new Series("Sales")
{
ChartType = SeriesChartType.Bar,
IsValueShownAsLabel = true
};
// Add Data Points
series.Points.AddXY(1, 150);
series.Points.AddXY(2, 70);
series.Points.AddXY(3, 90);
series.Points.AddXY(4, 150);
series.Points.AddXY(5, 170);
series.Points.AddXY(6, 90);
series.Points.AddXY(7, 130);
series.Points.AddXY(8, 70);
series.Points.AddXY(9, 190);
series.Points.AddXY(10, 120);
series.Points.AddXY(11, 90);
series.Points.AddXY(12, 70);
// Add Series to Chart
chart1.Series.Add(series);
// Set Fonts
series.Font = new Font("Verdana", 11);
chart1.ChartAreas[0].AxisY.LabelStyle.Font = new Font("Segoe UI", 9);
}Output
To change the Chart Type, set the following property.
// Create a Series and set type to Bar
Series series = new Series("Sales")
{
    ChartType = SeriesChartType.Line,
    IsValueShownAsLabel = true
};

Happy Coding!
The following example demonstrates how to add the ChartControl to a form. Note that the Chart Control can be added to your charting application at both design time and runtime.
Design Time
By default, the ChartControl item is added to the DX.24.2: Data & Analytics toolbox tab of the VS IDE. So, to add the Chart Control to your project, simply drag the corresponding toolbox item, and drop it onto the form.
Note
While adding the ChartControl, the Chart Wizard window may be invoked (in case its “Show wizard every time a new chart is added” option is enabled). Click Cancel if you don’t want to use it, or go through its steps to customize the initial look of your chart.
Runtime
To add a Chart Control to a form at runtime, don’t forget to include all necessary assemblies to the References list of your project.
- C#
- VB.NET
using System.Drawing;
using System.Windows.Forms;
using DevExpress.XtraCharts;
// ...

private void OnButtonClick(object sender, System.EventArgs e) {
    // Create a new Chart control.
    ChartControl chart = new ChartControl();

    // Set the chart's location.
    chart.Location = new Point(10, 10);

    // Perform any other initialization here.
    // ...
    // ...

    // Add the chart to the Form.
    this.Controls.AddRange(new Control[] {chart});
}
Доброго времени суток! В данной статье мы рассмотрим, как можно создавать графики в WinForms C#.
В качестве платформы примера нужно взять .Net Framework 4.8. Далее в ссылки проекта необходимо добавить
ссылку на сборку System.Windows.Forms.DataVisualization.
Для этого нужно в обозревателе решений нажать правой мыши на элемент меню Ссылки и далее Добавить ссылку.
В открывшемся окне необходимо найти сборку и выделить ее галочкой. В панели элементов должен появиться новый элемент — Chart.
Обратите внимание, что проект должен быть для версии .Net Framework 4.*.
Теперь рассмотрим пример кода:
using System.Windows.Forms;

using System.Windows.Forms.DataVisualization.Charting;
namespace ChartsWinForms
{
public partial class MainForm : Form
{
public MainForm()
{
InitializeComponent();
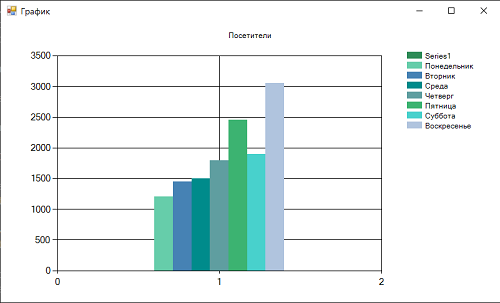
string[] daysOfWeek = { "Понедельник", "Вторник", "Среда", "Четверг", "Пятница", "Суббота", "Воскресенье" };
int[] numberOfVisitors = { 1200, 1450, 1504, 1790, 2450, 1900, 3050 };
// Установим палитру
chart.Palette = ChartColorPalette.SeaGreen;
// Заголовок графика
chart.Titles.Add("Посетители");
// Добавляем последовательность
for (int i = 0; i < daysOfWeek.Length; i++)
{
Series series = chart.Series.Add(daysOfWeek[i]);
// Добавляем точку
series.Points.Add(numberOfVisitors[i]);
}
}
}
}
Таким образом, вот так просто можно создавать графики в WinForms C#.
-
Создано 16.03.2023 13:36:01
-
Михаил Русаков
Копирование материалов разрешается только с указанием автора (Михаил Русаков) и индексируемой прямой ссылкой на сайт (http://myrusakov.ru)!
Добавляйтесь ко мне в друзья ВКонтакте: http://vk.com/myrusakov.
Если Вы хотите дать оценку мне и моей работе, то напишите её в моей группе: http://vk.com/rusakovmy.
Если Вы не хотите пропустить новые материалы на сайте,
то Вы можете подписаться на обновления: Подписаться на обновления
Если у Вас остались какие-либо вопросы, либо у Вас есть желание высказаться по поводу этой статьи, то Вы можете оставить свой комментарий внизу страницы.
Если Вам понравился сайт, то разместите ссылку на него (у себя на сайте, на форуме, в контакте):
-
Кнопка:
Она выглядит вот так:
-
Текстовая ссылка:
Она выглядит вот так: Как создать свой сайт
- BB-код ссылки для форумов (например, можете поставить её в подписи):
VS2022 — VS2019 .NET CHARTING COMPONENT Winforms 4.8 Framework C# Walk Through
ProEssentials WinForms interfaces are used when creating stand-alone Desktop or Embedded EXEs to be distributed royalty-free and ran on an end-users machine. This VS2022 — VS2019 C# Charting Walk-through includes instructions for Net4.8 Framework VS2022 and VS2019. If you prefer Net80 Nuget: Click here for Net80 Nuget Charting or if you prefer Visual Basic: Click here for VB.NET Charting or for C# in an earlier VS: Click here for VS2015-VS2012
See the demo…
- If you haven’t seen the v10 demo?
- Download our Winforms C# Chart Demo + WPF Demo + 100% native MFC Demo.
- Only Experience equals Knowledge: Size, Shape, Right Click, Export, Zoom (especially date and log scales), Pan, and Rotate.


Hello World — Walk Through — Tutorial
The WinForm interfaces support adapting to changes in the parent form’s font and background color. They are designed so that the grid number text size (grid numbers are the grid line labels such as 70, 80, 90 along y axis) matches that of the other standard controls such as TextBox, Radio Button, and Labels. As long as you don’t explicitly change the font and background color for the chart, you will be able to change the form’s font size and backcolor and all other controls on the form will adapt to match. Note that the default form text size of 8 points is fairly small. You may want to increase it to 9 or 10 points depending on your needs. This feature results in a clean looking user interface where the charting control appears to be a true sibling of the other standard controls.
You will have to write a little code (see below) to develop your graphing solutions. In the end, you’ll prefer our .NET (property, method, event) interface. 99% of your code will set simple properties.
Creating a new project…
1) Start Visual Studio.NET and create a new project targeting [C#] [Windows] [Desktop] and [WinForms .Net Framework]. Accept the default name of [WindowsFormsApp1]. Note, Do not select Windows Forms .NET (without the Framework) as the Framework is required and we recommend .Net 4.8 for this tutorial. We optionally have assemblies for Net80 (Windows) but these are installed via Nuget package via Package Manager and adjusting Package Source to [ Gigasoft10 (Local) ] or searching for «Gigasoft» if installing from Nuget.org.

2) When the new project opens, you will be presented the design view of «Form1.cs».
Adding designer controls to your Toolbox…
3) Installing WinForms interfaces into Visual Studio.NET
Pro Tip: To add an assembly to a modern VS2022 project, we recommend opening and editing the project file directly to add or adjust the Reference and HintPath manually. This approach simplifies the process and eliminates the tedious task of installing tools into the IDE. Once you start adding assemblies manually, you’ll likely find it avoids much of the confusion often associated with installing tools into the IDE.
VS2022 Instructions
- 1. With the Designer window having focus, Click the [Toolbox] vertical tab,
- 2. Right Click the area below the [General] tab,
- 3. Select [Add Tab],
- 4. Enter [Gigasoft] for the tab’s name,
- 5. Right Click the area below new [Gigasoft] tab,
- 6. Select [Choose Items…],
- 7. If not selected, left click the [.NET Framework Components] tab,
- 8. Left click the [Browse…] button and find the file «Gigasoft.ProEssentials.dll» found in our \DotNet48\x64 subfolder where you installed ProEssentials. By default, this should be located at «C:\ProEssentials10\DotNet48\x64»,
- 9. Select the file «Gigasoft.ProEssentials.dll» and close the [Open File] dialog,
- 10. The [Choose Toolbox Items] dialog should now show 5 highlighted controls: Pe3do, Pego, Pepco, Pepso, and Pesgo.
- 11. Close dialog and 5 ProEssentials components will show within the Gigasoft tab as shown in the bottom right image.
- Note 1. Attemping to add our x86 assembly to the VS2022 toolbox will result in an error as the VS2022 designer is 64 bit.
- Note 2. When deploying your finished project and prefer to support AnyCpu or pure x86, close the Designer window, in Solution Explorer remove Reference and replace with any of our other References. The project will now support compiling as AnyCpu, x64, or x86 that matches the Reference added. To again add our charts to a form via the Designer, change Reference to our x64 assembly.
VS2019 Instructions
- 1. With the Designer window having focus, Click the [Toolbox] vertical tab,
- 2. Right Click the area below the [General] tab,
- 3. Select [Add Tab],
- 4. Enter [Gigasoft] for the tab’s name,
- 5. Right Click the area below new [Gigasoft] tab,
- 6. Select [Choose Items…],
- 7. If not selected, left click the [.NET Framework Components] tab,
- 8. Left click the [Browse…] button and find the file «Gigasoft.ProEssentials.dll» found in our \DotNet48\AnyCpu subfolder where you installed ProEssentials. By default, this should be located at «C:\ProEssentials10\DotNet48\AnyCpu»,
- 9. Select the file «Gigasoft.ProEssentials.dll» and close the [Open File] dialog,
- 10. The [Choose Toolbox Items] dialog should now show 5 highlighted controls: Pe3do, Pego, Pepco, Pepso, and Pesgo.
- 11. Close dialog and 5 ProEssentials components will show within the Gigasoft tab as shown in the bottom right image.
- Note 1. Attemping to add our x64 assembly located to VS2019 and earlier toolbox will result in an error as the VS2019 designer is 32 bit.
- Note 2. When deploying your finished project and prefer to change the target to pure x64 or pure x86, close the Designer window, in Solution Explorer remove our Reference and replace with any of our other References. The project will now support compiling as x64, x86, or AnyCpu that matches the Reference added. To again add our charts to a form via the Designer, change Reference to our AnyCpu assembly.
Adding ProEssentials to the Form…
4) Double click the [Pego] tool within the toolbox. This places an instance of the Pego component within «Form1.cs».
Left click bottom-right corner of control and drag down-right to fill up client area of Form1. The adjacent image shows what you see.

This represents the default state of a ProEssentials Graph. The default state has one subset with four data points. In the course of constructing your own charts, you’ll set the properties PeData.Subsets and PeData.Points which define the quantity of data your chart will hold. You’ll then pass data via the PeData.Y[subset, point] two dimensional property array.
ProEssentials uses the terms Subsets and Points but you can think of these as Rows and Columns. Passing data is as simple as filling each Subset with Points worth of data.
To enable the chart to match the size of it’s container, let us change the chart’s Dock setting.
Left click the pego control within Form1 to give it the focus.
From the main menu select [View] and [Properties Window]
Within the [Properties Window], scroll and locate the Layout section and then the Dock item.
Modify the Dock setting by clicking the center section or ‘Fill’ mode.
Adjusting design time settings…
5) We recommend setting the parent Form’s versions of back color, font, etc properties as ProEssentials will use the parent form’s settings to help facilitate a uniform look among sibling controls.
We also recommend coding your property settings as this creates a record for you and others as to what settings are being used. And you might be able to re-use this code in other areas for other charts.
If new to C#, the (Name) property is probably the most fundamental property as its name is reflected in all code. For example: pego1.PeData.Subsets = 1; is a line of code, and it shows how the (Name) property (pego1) starts the line.
Form1.cs [Code]…
6) Double click Form1’s Title/Caption Bar to open the code view for «Form1.cs» with default Form1_Load event initialized.
The cursor will be within the Form1_Load code section, enter the following code into this section.
You can copy and paste, but hand-typing a few lines of this code will help familiarize yourself with the Gigasoft.ProEssentials namespace.
Note: adding the following using declaration at the top of «Form1.cs» will shorten enumeration syntax.
using Gigasoft.ProEssentials.Enums;
// Simple to code = simple to implement and maintain //
pego1.PeString.MainTitle = «Hello World»;
pego1.PeString.SubTitle = «»;
pego1.PeData.Subsets = 2; // Subsets = Rows //
pego1.PeData.Points = 6; // Points = Columns //
pego1.PeData.Y[0, 0] = 10; pego1.PeData.Y[0, 1] = 30;
pego1.PeData.Y[0, 2] = 20; pego1.PeData.Y[0, 3] = 40;
pego1.PeData.Y[0, 4] = 30; pego1.PeData.Y[0, 5] = 50;
pego1.PeData.Y[1, 0] = 15; pego1.PeData.Y[1, 1] = 63;
pego1.PeData.Y[1, 2] = 74; pego1.PeData.Y[1, 3] = 54;
pego1.PeData.Y[1, 4] = 25; pego1.PeData.Y[1, 5] = 34;
pego1.PeString.PointLabels[0] = «Jan»;
pego1.PeString.PointLabels[1] = «Feb»;
pego1.PeString.PointLabels[2] = «Mar»;
pego1.PeString.PointLabels[3] = «Apr»;
pego1.PeString.PointLabels[4] = «May»;
pego1.PeString.PointLabels[5] = «June»;
pego1.PeString.SubsetLabels[0] = «For .Net Framework»;
pego1.PeString.SubsetLabels[1] = «or MFC, ActiveX, VCL»;
pego1.PeString.YAxisLabel = «Simple Quality Rendering»;
pego1.PeColor.SubsetColors[0] = Color.FromArgb(60, 0, 180, 0);
pego1.PeColor.SubsetColors[1] = Color.FromArgb(180, 0, 0, 130);
pego1.PeColor.BitmapGradientMode = false;
pego1.PeColor.QuickStyle = Gigasoft.ProEssentials.Enums.QuickStyle.LightShadow;
pego1.PeTable.Show = Gigasoft.ProEssentials.Enums.GraphPlusTable.Both;
pego1.PeData.Precision = Gigasoft.ProEssentials.Enums.DataPrecision.NoDecimals;
pego1.PeFont.Label.Bold = true;
pego1.PePlot.Method = Gigasoft.ProEssentials.Enums.GraphPlottingMethod.Bar;
pego1.PePlot.Option.GradientBars = 8;
pego1.PePlot.Option.BarGlassEffect = true;
pego1.PeLegend.Location = Gigasoft.ProEssentials.Enums.LegendLocation.Left;
pego1.PePlot.DataShadows = Gigasoft.ProEssentials.Enums.DataShadows.ThreeDimensional;
pego1.PeFont.FontSize = Gigasoft.ProEssentials.Enums.FontSize.Large;
pego1.PePlot.SubsetLineTypes[0] = Gigasoft.ProEssentials.Enums.LineType.MediumSolid;
pego1.PePlot.SubsetLineTypes[1] = Gigasoft.ProEssentials.Enums.LineType.MediumDash;
// This enables data hot spots, But we need to define code in the HotSpot event //
pego1.PeUserInterface.HotSpot.Data = true;
// These settings will be used for all charts //
pego1.PeConfigure.RenderEngine = Gigasoft.ProEssentials.Enums.RenderEngine.Direct2D;
pego1.PeConfigure.PrepareImages = true;
pego1.PeConfigure.CacheBmp = true;
pego1.PeConfigure.AntiAliasGraphics = true;
pego1.PeConfigure.AntiAliasText = true;
// Call this at end of setting properties //
pego1.PeFunction.ReinitializeResetImage();
pego1.Refresh(); // call standard .NET Refresh method to force paint
Your project code should look similar to…

Adding a DataHotSpot event…
7) The code above enabled the DataHotSpot event, so we should place some appropriate code in the DataHotSpot event.
Left click the pego control within Form1 to give it the focus.
From the main menu select [View] and [Properties Window]
Within the [Properties Window], click the event icon.
Within the available events, double-click PeDataHotSpot
This opens the code view of «Form1.cs» with cursor within the pego1.PeDataHotSpot event handler.

Add the following code to the pego1.PeDataHotSpot event.
System.Windows.Forms.MessageBox.Show(«Subset » + e.SubsetIndex.ToString() +
«, Point » + e.PointIndex.ToString() + » with a value of » +
pego1.PeData.Y[e.SubsetIndex, e.PointIndex].ToString());
Success!!!
 Save and run the project. Your project will show an image as follows. Move the mouse over a bar and click to trigger the DataHotSpot event.
This completes this walkthrough.
Please read the remaining sections within Chapter 2 and review the demo code and documentation that’s installed with the eval/product.
Once installed, the demo program can be accessed via shortcut…
Start / ProEssentials v10 / PeDemo
Note that our main charting demo is replicated in WPF and Winform C#.NET, VB.NET, VC++ MFC, Delphi, Builder all accessible from where you installed ProEssentials. These are great for modifying an existing demo to test potential modifications before implementing within your applications.

Example. Now we can use the Chart. In the next step, we will use the Form1_Load event handler to initialize the Chart we just added. To add Form1_Load, double-click on the Form window in Visual Studio.
Array: In Form1_Load, we assign an array of strings (Series) and an array of integers (Points).
For: In the for-loop, we add the strings to the Series collection and add the integers to the Points collections on those Series.
For
Tip: The loop results in two Series: a Cats series with a Point of 1, and a Dogs series with a Point of 2.
Info: These are reflected in a bar graph, which is shown in this page’s screenshot.
Example that sets Chart control up: C#
using System;
using System.Windows.Forms;
using System.Windows.Forms.DataVisualization.Charting;
namespace WindowsFormsApplication1
{
public partial class Form1 : Form
{
public Form1()
{
InitializeComponent();
}
private void Form1_Load(object sender, EventArgs e)
{
// Data arrays.
string[] seriesArray = { «Cats», «Dogs» };
int[] pointsArray = { 1, 2 };
// Set palette.
this.chart1.Palette = ChartColorPalette.SeaGreen;
// Set title.
this.chart1.Titles.Add(«Pets»);
// Add series.
for
(int i = 0; i < seriesArray.Length; i++)
{
// Add series.
Series series = this.chart1.Series.Add(seriesArray[i]);
// Add point.
series.Points.Add(pointsArray[i]);
}
}
}
}